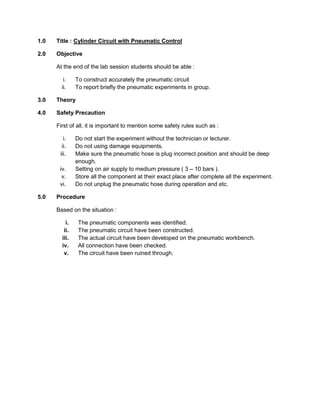
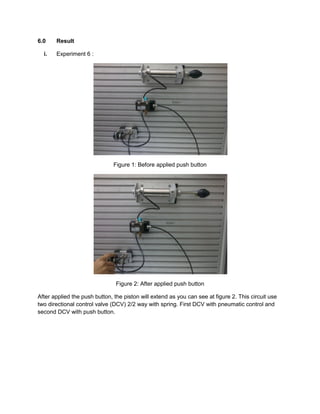
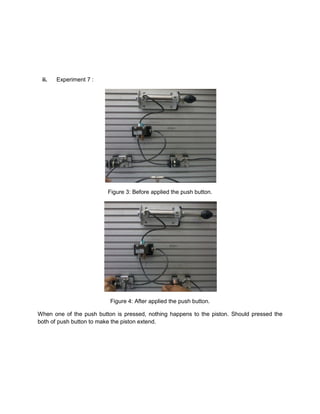
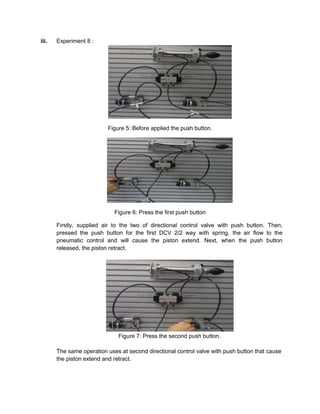
1.0   Title : Cylinder Circuit with Pneumatic Control

2.0   Objective

      At the end of the lab session students should be able :

         i.    To construct accurately the pneumatic circuit
        ii.    To report briefly the pneumatic experiments in group.

3.0   Theory

4.0   Safety Precaution

      First of all, it is important to mention some safety rules such as :

         i.    Do not start the experiment without the technician or lecturer.
        ii.    Do not using damage equipments.
       iii.    Make sure the pneumatic hose is plug incorrect position and should be deep
               enough.
       iv.     Setting on air supply to medium pressure ( 3 – 10 bars ).
        v.     Store all the component at their exact place after complete all the experiment.
       vi.     Do not unplug the pneumatic hose during operation and etc.

5.0   Procedure

      Based on the situation :

          i.    The pneumatic components was identified.
         ii.    The pneumatic circuit have been constructed.
        iii.    The actual circuit have been developed on the pneumatic workbench.
        iv.     All connection have been checked.
         v.     The circuit have been ruined through.
6.0    Result

  i.   Experiment 6 :


                               Figure 1: Before applied push button


                                Figure 2: After applied push button

After applied the push button, the piston will extend as you can see at figure 2. This circuit use
two directional control valve (DCV) 2/2 way with spring. First DCV with pneumatic control and
second DCV with push button.
ii.   Experiment 7 :


                         Figure 3: Before applied the push button.


                          Figure 4: After applied the push button.

When one of the push button is pressed, nothing happens to the piston. Should pressed the
both of push button to make the piston extend.
iii.   Experiment 8 :


                          Figure 5: Before applied the push button.


                             Figure 6: Press the first push button

       Firstly, supplied air to the two of directional control valve with push button. Then,
       pressed the push button for the first DCV 2/2 way with spring, the air flow to the
       pneumatic control and will cause the piston extend. Next, when the push button
       released, the piston retract.


                              Figure 7: Press the second push button.

       The same operation uses at second directional control valve with push button that cause
       the piston extend and retract.
iv.   Experiment 9 :


                          Figure 8: Before applied push button


                         Figure 9: :Press the first push button


                       Figure 10: Press the second push button
7.0    Discussion


                                  Experiment drawing circuit.


                                         Actual circuit.

We compared the experiment circuit with actual circuit. We found that type of DCV not same.
experiment circuit use DCV 5/2 way with spring, but in actual circuit we use DCV 4/2 way with
spring. It can operate in complete circuit because the function of both DCV are same.
8.0   Conclusion and Recommendation

      Our conclusion is we can know how to construct accurately and can arrange the
      component of pneumatic circuit systematically. Then we can know how to report and
      explain briefly the operation of pneumatic experiment in group. Next we can learn to find
      out the correct component and equipment. For our recommendation ,there are
      components that have been damaged mixed with the component that can work.
      Components should be separated so that students do not use these components to build
      the circuit. Components need to be replaced with new components so that students can
      use enough components to build the circuit mainly used by many groups.


9.0   Reference

      Sources: Websites

      http://www.clippard.com/downloads/general/PDF_Documents/Intro_to_Pneumatics.pdf

      (4 October 2012 22:07 pm)

      http://www.digitalcircuitry.com/DOC/ELECTRONICS/Manuals/Pneumatics/Course%20Books/Tex
      t-Pneumatics%20Basic.pdf

      (4 October 2012 01:15 pm)

Lab pneumatic

  • 1.
    1.0 Title : Cylinder Circuit with Pneumatic Control 2.0 Objective At the end of the lab session students should be able : i. To construct accurately the pneumatic circuit ii. To report briefly the pneumatic experiments in group. 3.0 Theory 4.0 Safety Precaution First of all, it is important to mention some safety rules such as : i. Do not start the experiment without the technician or lecturer. ii. Do not using damage equipments. iii. Make sure the pneumatic hose is plug incorrect position and should be deep enough. iv. Setting on air supply to medium pressure ( 3 – 10 bars ). v. Store all the component at their exact place after complete all the experiment. vi. Do not unplug the pneumatic hose during operation and etc. 5.0 Procedure Based on the situation : i. The pneumatic components was identified. ii. The pneumatic circuit have been constructed. iii. The actual circuit have been developed on the pneumatic workbench. iv. All connection have been checked. v. The circuit have been ruined through.
  • 2.
    6.0 Result i. Experiment 6 : Figure 1: Before applied push button Figure 2: After applied push button After applied the push button, the piston will extend as you can see at figure 2. This circuit use two directional control valve (DCV) 2/2 way with spring. First DCV with pneumatic control and second DCV with push button.
  • 3.
    ii. Experiment 7 : Figure 3: Before applied the push button. Figure 4: After applied the push button. When one of the push button is pressed, nothing happens to the piston. Should pressed the both of push button to make the piston extend.
  • 4.
    iii. Experiment 8 : Figure 5: Before applied the push button. Figure 6: Press the first push button Firstly, supplied air to the two of directional control valve with push button. Then, pressed the push button for the first DCV 2/2 way with spring, the air flow to the pneumatic control and will cause the piston extend. Next, when the push button released, the piston retract. Figure 7: Press the second push button. The same operation uses at second directional control valve with push button that cause the piston extend and retract.
  • 5.
    iv. Experiment 9 : Figure 8: Before applied push button Figure 9: :Press the first push button Figure 10: Press the second push button
  • 6.
    7.0 Discussion Experiment drawing circuit. Actual circuit. We compared the experiment circuit with actual circuit. We found that type of DCV not same. experiment circuit use DCV 5/2 way with spring, but in actual circuit we use DCV 4/2 way with spring. It can operate in complete circuit because the function of both DCV are same.
  • 7.
    8.0 Conclusion and Recommendation Our conclusion is we can know how to construct accurately and can arrange the component of pneumatic circuit systematically. Then we can know how to report and explain briefly the operation of pneumatic experiment in group. Next we can learn to find out the correct component and equipment. For our recommendation ,there are components that have been damaged mixed with the component that can work. Components should be separated so that students do not use these components to build the circuit. Components need to be replaced with new components so that students can use enough components to build the circuit mainly used by many groups. 9.0 Reference Sources: Websites http://www.clippard.com/downloads/general/PDF_Documents/Intro_to_Pneumatics.pdf (4 October 2012 22:07 pm) http://www.digitalcircuitry.com/DOC/ELECTRONICS/Manuals/Pneumatics/Course%20Books/Tex t-Pneumatics%20Basic.pdf (4 October 2012 01:15 pm)