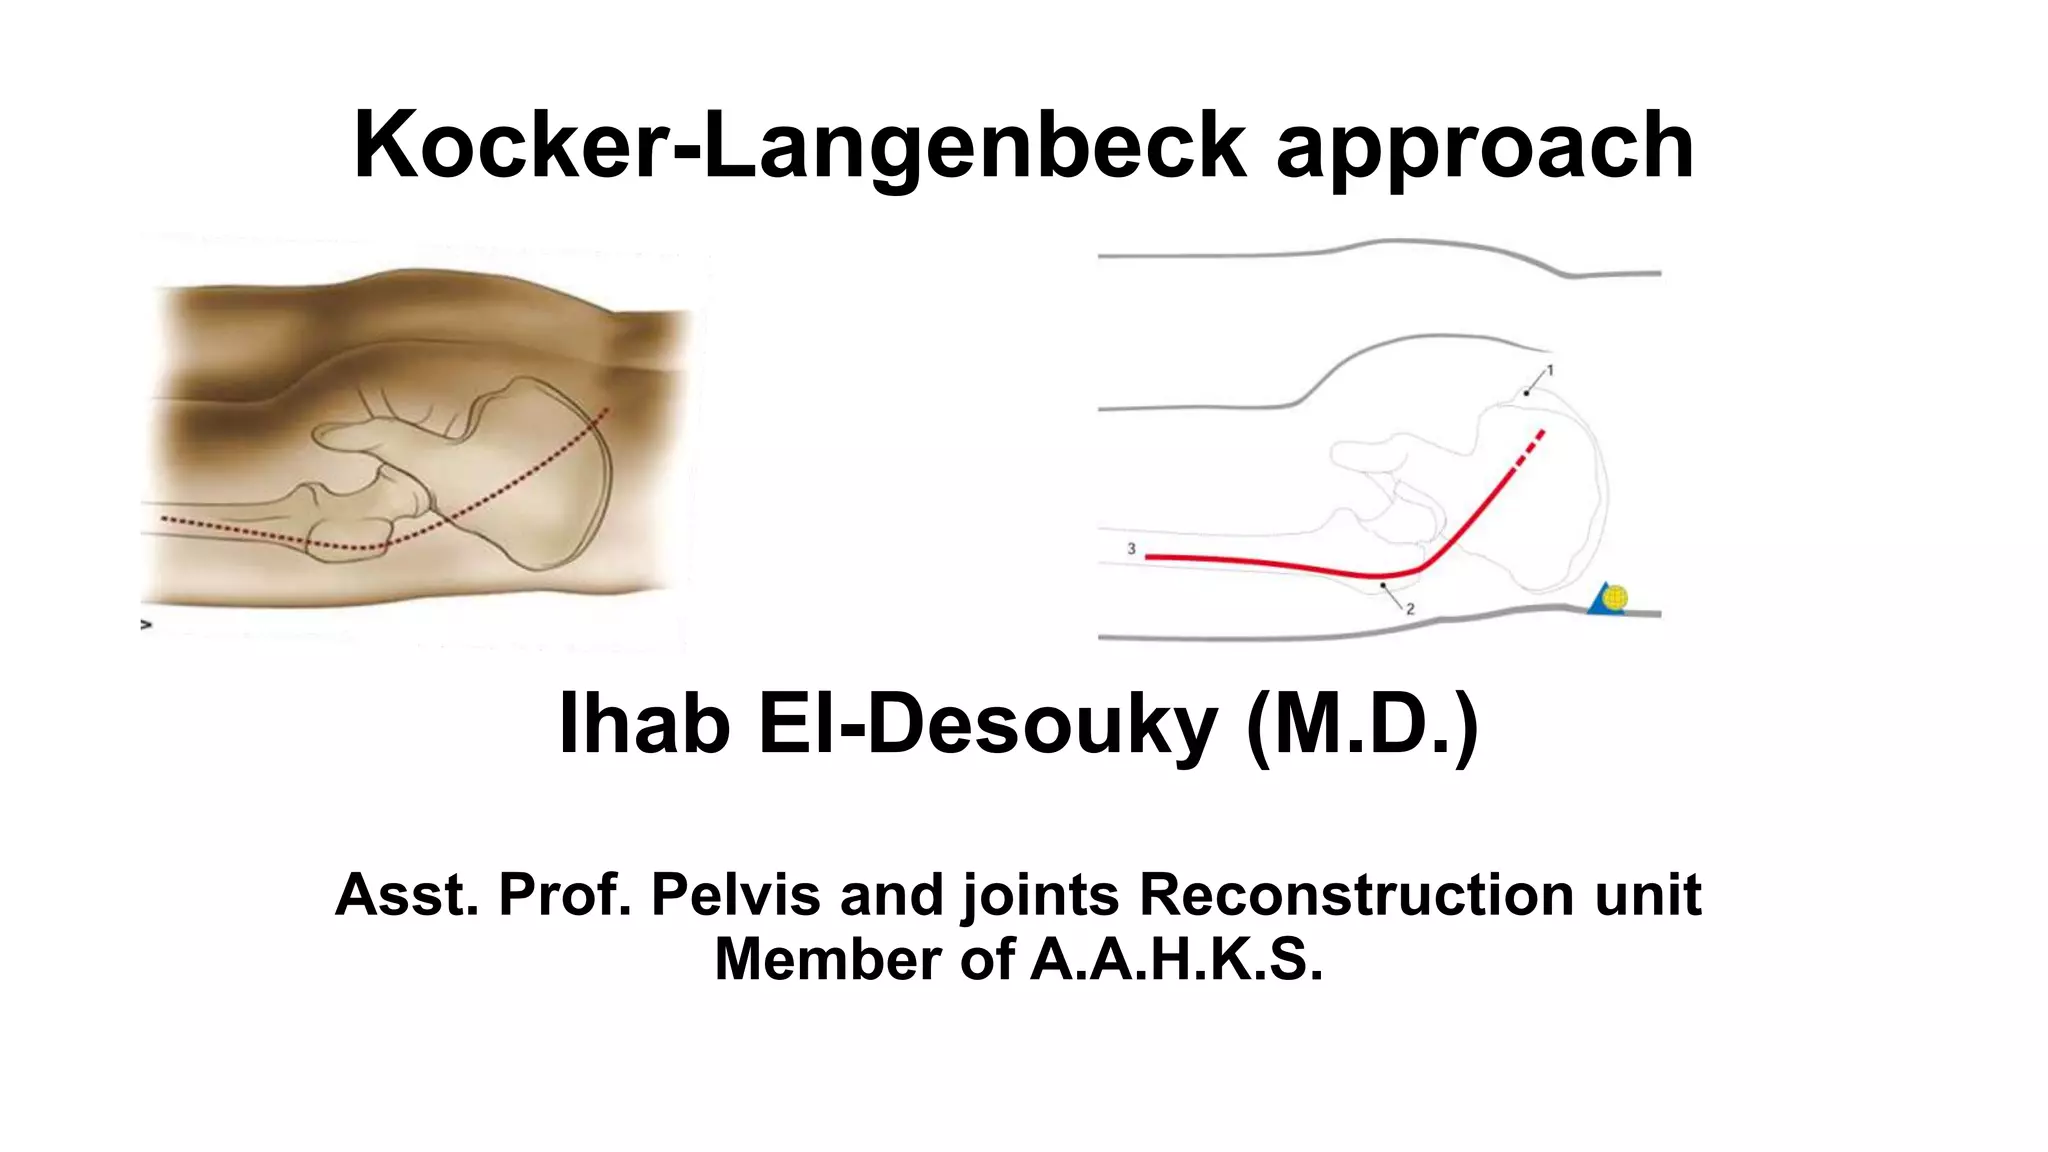
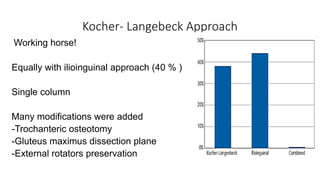
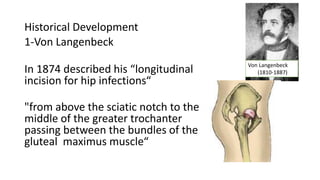
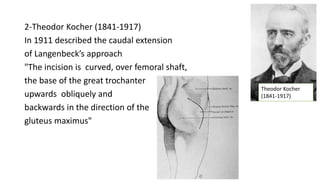
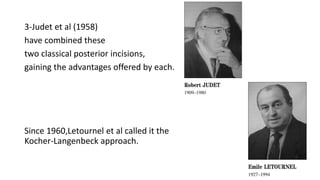
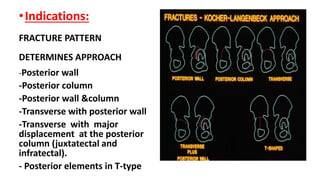
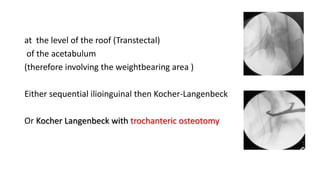
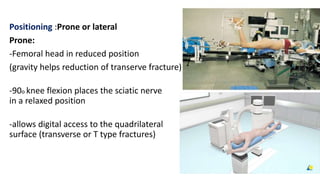
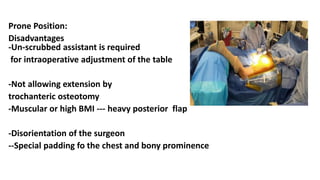
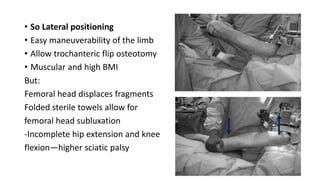
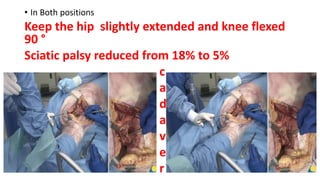
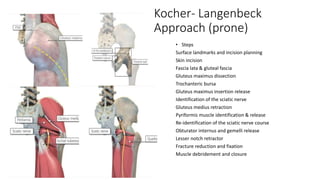
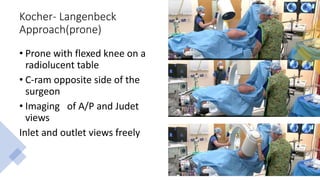
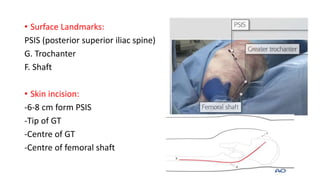
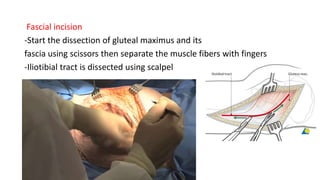
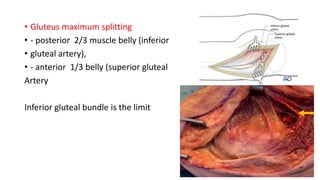
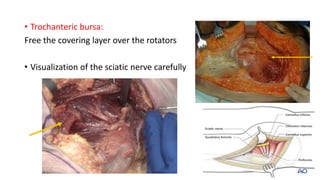
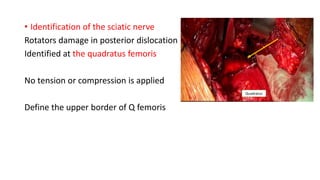
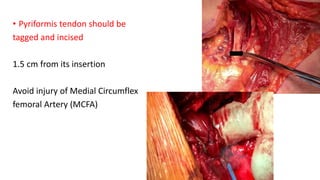
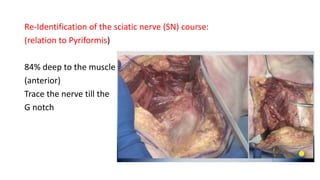
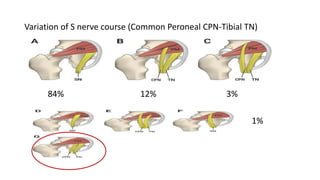
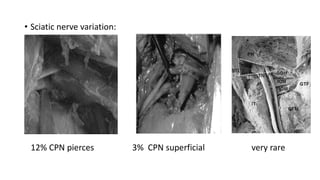
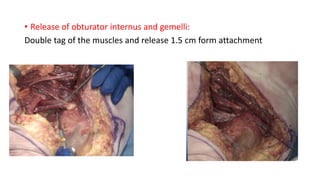
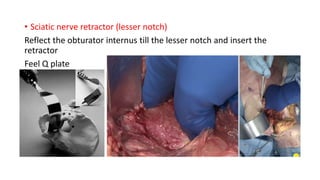
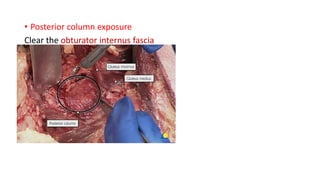
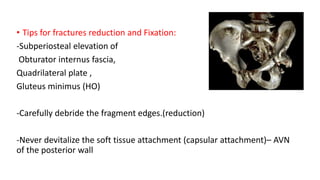
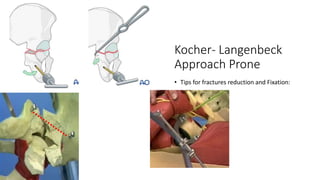
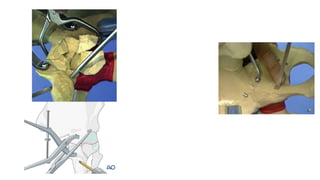
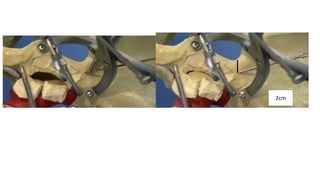
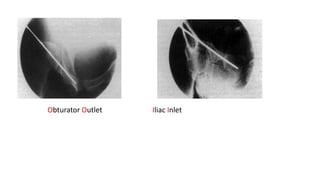
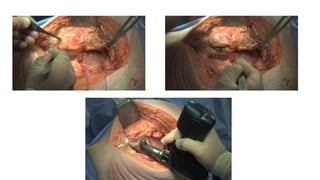
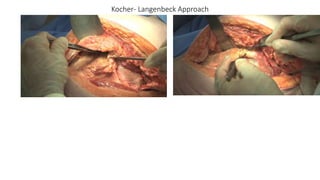
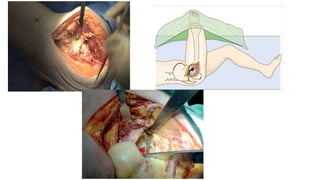
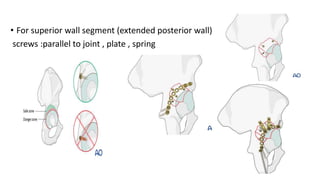
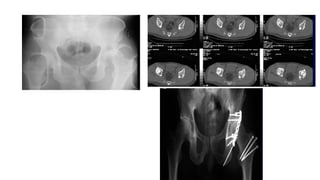
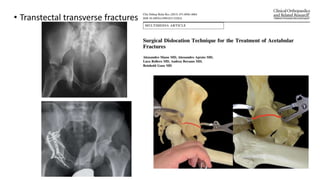
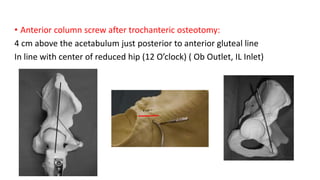
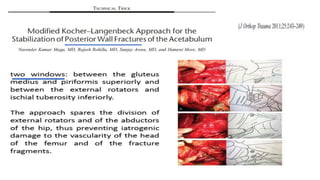
Kocker-Langenbeck approach
Ihab El-Desouky (M.D.)
Asst. Prof. Pelvis and joints Reconstruction unit
Member of A.A.H.K.S.
Kocker-Langenbeck approach
• Learning outcomes:
Historical Development of the approach
Indications:
Preoperative precautions
Surgical Anatomy
Classic steps
Modifications:
Complications
Kocher- Langebeck Approach
Working horse!
Equally with ilioinguinal approach (40 % )
Single column
Many modifications were added
-Trochanteric osteotomy
-Gluteus maximus dissection plane
-External rotators preservation
Historical Development
1-Von Langenbeck
In 1874 described his “longitudinal
incision for hip infections“
"from above the sciatic notch to the
middle of the greater trochanter
passing between the bundles of the
gluteal maximus muscle“
Von Langenbeck
(1810-1887)
2-Theodor Kocher (1841-1917)
In 1911 described the caudal extension
of Langenbeck’s approach
"The incision is curved, over femoral shaft,
the base of the great trochanter
upwards obliquely and
backwards in the direction of the
gluteus maximus"
Theodor Kocher
(1841-1917)
3-Judet et al (1958)
have combined these
two classical posterior incisions,
gaining the advantages offered by each.
Since 1960,Letournel et al called it the
Kocher-Langenbeck approach.
•Indications:
FRACTURE PATTERN
DETERMINES APPROACH
-Posterior wall
-Posterior column
-Posterior wall &column
-Transverse with posterior wall
-Transverse with major
displacement at the posterior
column (juxtatectal and
infratectal).
- Posterior elements in T-type
at the level of the roof (Transtectal)
of the acetabulum
(therefore involving the weightbearing area )
Either sequential ilioinguinal then Kocher-Langenbeck
Or Kocher Langenbeck with trochanteric osteotomy
• Access:
Visible (including released Q femoris
Palpable
After Trochanteric osteotomy
360 ° acetabulum (Ganz)
•Preoperative preparation:
• Surgery 3 to 5 days after injury.
• Review the patient’s general condition, limb N/V status
• blood transfusion.
• Review the imaging studies (anteroposterior pelvic and Judet
views and CT.
• Operating table, instruments, and implants.
• Retractors, Clamps , Forceps, Pusher.
• 3.5-mm screws and 3.5-mm reconstruction plates
• 1/3 tubular , mini-screws (2mm
• Soft tissue Retractors
Hohmann
Sciatic nerve (or Deever)
Cobra
Taylor (gluteal muscles)
Schanz pins
Sciatic n. retractor in the lesser notch
• Reduction tools:
• Jaw clamps of Matta (ball tipped- pointed)
(standard & offset)
• Schanz pins
• Weber pointed clamp .
• Jungbluth reduction clamp.
• Large King Tong forceps ball-tipped;
• Ball-spiked pusher; spiked disc
• Farabeuf reduction forceps; and
• Serrated reduction forceps
• Jungbluth clamp with 2 screws technique
Ball spike pusher with spiked disc for
comminuted bone
Positioning :Prone or lateral
Prone:
-Femoral head in reduced position
(gravity helps reduction of transerve fracture)
-90o knee flexion places the sciatic nerve
in a relaxed position
-allows digital access to the quadrilateral
surface (transverse or T type fractures)
Prone Position:
Disadvantages
-Un-scrubbed assistant is required
for intraoperative adjustment of the table
-Not allowing extension by
trochanteric osteotomy
-Muscular or high BMI --- heavy posterior flap
-Disorientation of the surgeon
--Special padding fo the chest and bony prominence
• So Lateral positioning
• Easy maneuverability of the limb
• Allow trochanteric flip osteotomy
• Muscular and high BMI
But:
Femoral head displaces fragments
Folded sterile towels allow for
femoral head subluxation
-Incomplete hip extension and knee
flexion—higher sciatic palsy
• In Both positions
Keep the hip slightly extended and knee flexed
90 °
Sciatic palsy reduced from 18% to 5%
c
a
d
a
v
e
r
No advantage to either position for the posterior
approach could be found
With equivalent radiologic outcomes between both
groups, a significantly higher rate of infection (p 0.017) were found in
the prone group
Residual fracture displacement with transverse
fractures reduced and stabilized in the lateral position
compared with those positioned prone.
Transverse with posterior wall fracture
Kocher- Langenbeck
Approach (prone)
• Steps
Surface landmarks and incision planning
Skin incision
Fascia lata & gluteal fascia
Gluteus maximus dissection
Trochanteric bursa
Gluteus maximus insertion release
Identification of the sciatic nerve
Gluteus medius retraction
Pyriformis muscle identification & release
Re-identification of the sciatic nerve course
Obturator internus and gemelli release
Lesser notch retractor
Fracture reduction and fixation
Muscle debridement and closure
Kocher- Langenbeck
Approach(prone)
• Prone with flexed knee on a
radiolucent table
• C-ram opposite side of the
surgeon
• Imaging of A/P and Judet
views
Inlet and outlet views freely
• Surface Landmarks:
PSIS (posterior superior iliac spine)
G. Trochanter
F. Shaft
• Skin incision:
-6-8 cm form PSIS
-Tip of GT
-Centre of GT
-Centre of femoral shaft
Fascial incision
-Start the dissection of gluteal maximus and its
fascia using scissors then separate the muscle fibers with fingers
-Iliotibial tract is dissected using scalpel
• Gluteus maximum splitting
• - posterior 2/3 muscle belly (inferior
• gluteal artery),
• - anterior 1/3 belly (superior gluteal
Artery
Inferior gluteal bundle is the limit
• Trochanteric bursa:
Free the covering layer over the rotators
• Visualization of the sciatic nerve carefully
• Gluteus maximus insertion release
• Detach the gluteus maximus 1.5 cm
from its insertion into the
gluteal tuberosity of the femur.
• less tension and easier mobilization
• A constant perforator
should be cauterized
• Identification of the sciatic nerve
Rotators damage in posterior dislocation
Identified at the quadratus femoris
No tension or compression is applied
Define the upper border of Q femoris
Quadratus
• Identification of the pyriformis muscle
Retract the gluteus Medius tendon
at the G trochanter limited by
Superior gluteal bundle
Beneath it lie both the G minimus (HO)
, and rounded pyriformis tendon.
G Medius
G
minimus
Pyriformis
• Pyriformis tendon should be
tagged and incised
1.5 cm from its insertion
Avoid injury of Medial Circumflex
femoral Artery (MCFA)
• Blood supply of the femoral head
Deep branch of MCFA
• Can be injured :
-Detachment of the Q femoris
(femoral side)
-Detachment of pyriformis or
Obturator Int less than 1.5 cm
Re-Identification of the sciatic nerve (SN) course:
(relation to Pyriformis)
84% deep to the muscle
(anterior)
Trace the nerve till the
G notch
Variation of S nerve course (Common Peroneal CPN-Tibial TN)
84% 12% 3%
1%
• Sciatic nerve variation:
12% CPN pierces 3% CPN superficial very rare
• Release of obturator internus and gemelli:
Double tag of the muscles and release 1.5 cm form attachment
• Sciatic nerve retractor (lesser notch)
Reflect the obturator internus till the lesser notch and insert the
retractor
Feel Q plate
• Posterior column exposure
Clear the obturator internus fascia
• Tips for fractures reduction and Fixation:
-Subperiosteal elevation of
Obturator internus fascia,
Quadrilateral plate ,
Gluteus minimus (HO)
-Carefully debride the fragment edges.(reduction)
-Never devitalize the soft tissue attachment (capsular attachment)– AVN
of the posterior wall
Kocher- Langenbeck
Approach Prone
• Tips for fractures reduction and Fixation:
2cm
Obturator Outlet Iliac Inlet
• Apply interfragmentary wall screws
• Double plates for the column
• Check intra-articular position in all views
Wound closure
• Meticulous debridement Remove necrotic tissue (G minimus) and
irrigate the entire wound
• suction drains
• Reinsert all tendons and approximate the split parts of the gluteus
maximus
• closure of the iliotibial tract
• Modifications:
1-Trochanteric flip osteotomy:
-Supraacetabular region with superior wall fragment
-Femoral head fracture with surgical dislocation
-Anterior column screw –transtectal transverse
Lateral approach
Single sheath including
V lateralis, G Medius
1.5 cm
Kocher- Langenbeck Approach
• For superior wall segment (extended posterior wall)
screws :parallel to joint , plate , spring
• Transtectal transverse fractures
• Anterior column screw after trochanteric osteotomy:
4 cm above the acetabulum just posterior to anterior gluteal line
In line with center of reduced hip (12 O’clock) ( Ob Outlet, IL Inlet)
Complications:
1-Sciatic Nerve Palsy; 3-5%
-Always flex knee 90 °
-Proper identification
-Expect variations
-Intermittent retraction
-Never two retractors in both notches
2- Infection 2-5%
3-Heterotopic ossification: necrotic G minimus 10%
4-Superior gluteal artery bleeding:
4- Post-traumatic OA : 17%
5-AVN: 7.5%
Take Home Message
Kocher –Langenbeck
-Non extensile (use trochanteric osteotomy)
-Posterior fractures
-Prone is better except in some situations
-Special instruments
-Meticulous exposure and identification
-Tips for reduction and fixation
FURTHER READING

Kocher-Langenbeck acetabular approach

  • 1.
    Kocker-Langenbeck approach Ihab El-Desouky(M.D.) Asst. Prof. Pelvis and joints Reconstruction unit Member of A.A.H.K.S.
  • 2.
    Kocker-Langenbeck approach • Learningoutcomes: Historical Development of the approach Indications: Preoperative precautions Surgical Anatomy Classic steps Modifications: Complications
  • 3.
    Kocher- Langebeck Approach Workinghorse! Equally with ilioinguinal approach (40 % ) Single column Many modifications were added -Trochanteric osteotomy -Gluteus maximus dissection plane -External rotators preservation
  • 4.
    Historical Development 1-Von Langenbeck In1874 described his “longitudinal incision for hip infections“ "from above the sciatic notch to the middle of the greater trochanter passing between the bundles of the gluteal maximus muscle“ Von Langenbeck (1810-1887)
  • 5.
    2-Theodor Kocher (1841-1917) In1911 described the caudal extension of Langenbeck’s approach "The incision is curved, over femoral shaft, the base of the great trochanter upwards obliquely and backwards in the direction of the gluteus maximus" Theodor Kocher (1841-1917)
  • 6.
    3-Judet et al(1958) have combined these two classical posterior incisions, gaining the advantages offered by each. Since 1960,Letournel et al called it the Kocher-Langenbeck approach.
  • 7.
    •Indications: FRACTURE PATTERN DETERMINES APPROACH -Posteriorwall -Posterior column -Posterior wall &column -Transverse with posterior wall -Transverse with major displacement at the posterior column (juxtatectal and infratectal). - Posterior elements in T-type
  • 8.
    at the levelof the roof (Transtectal) of the acetabulum (therefore involving the weightbearing area ) Either sequential ilioinguinal then Kocher-Langenbeck Or Kocher Langenbeck with trochanteric osteotomy
  • 9.
    • Access: Visible (includingreleased Q femoris Palpable After Trochanteric osteotomy 360 ° acetabulum (Ganz)
  • 10.
    •Preoperative preparation: • Surgery3 to 5 days after injury. • Review the patient’s general condition, limb N/V status • blood transfusion. • Review the imaging studies (anteroposterior pelvic and Judet views and CT. • Operating table, instruments, and implants. • Retractors, Clamps , Forceps, Pusher. • 3.5-mm screws and 3.5-mm reconstruction plates • 1/3 tubular , mini-screws (2mm
  • 11.
    • Soft tissueRetractors Hohmann Sciatic nerve (or Deever) Cobra Taylor (gluteal muscles) Schanz pins Sciatic n. retractor in the lesser notch
  • 12.
    • Reduction tools: •Jaw clamps of Matta (ball tipped- pointed) (standard & offset) • Schanz pins • Weber pointed clamp . • Jungbluth reduction clamp. • Large King Tong forceps ball-tipped; • Ball-spiked pusher; spiked disc • Farabeuf reduction forceps; and • Serrated reduction forceps
  • 13.
    • Jungbluth clampwith 2 screws technique Ball spike pusher with spiked disc for comminuted bone
  • 14.
    Positioning :Prone orlateral Prone: -Femoral head in reduced position (gravity helps reduction of transerve fracture) -90o knee flexion places the sciatic nerve in a relaxed position -allows digital access to the quadrilateral surface (transverse or T type fractures)
  • 15.
    Prone Position: Disadvantages -Un-scrubbed assistantis required for intraoperative adjustment of the table -Not allowing extension by trochanteric osteotomy -Muscular or high BMI --- heavy posterior flap -Disorientation of the surgeon --Special padding fo the chest and bony prominence
  • 16.
    • So Lateralpositioning • Easy maneuverability of the limb • Allow trochanteric flip osteotomy • Muscular and high BMI But: Femoral head displaces fragments Folded sterile towels allow for femoral head subluxation -Incomplete hip extension and knee flexion—higher sciatic palsy
  • 17.
    • In Bothpositions Keep the hip slightly extended and knee flexed 90 ° Sciatic palsy reduced from 18% to 5% c a d a v e r
  • 18.
    No advantage toeither position for the posterior approach could be found With equivalent radiologic outcomes between both groups, a significantly higher rate of infection (p 0.017) were found in the prone group
  • 19.
    Residual fracture displacementwith transverse fractures reduced and stabilized in the lateral position compared with those positioned prone.
  • 20.
  • 21.
    Kocher- Langenbeck Approach (prone) •Steps Surface landmarks and incision planning Skin incision Fascia lata & gluteal fascia Gluteus maximus dissection Trochanteric bursa Gluteus maximus insertion release Identification of the sciatic nerve Gluteus medius retraction Pyriformis muscle identification & release Re-identification of the sciatic nerve course Obturator internus and gemelli release Lesser notch retractor Fracture reduction and fixation Muscle debridement and closure
  • 22.
    Kocher- Langenbeck Approach(prone) • Pronewith flexed knee on a radiolucent table • C-ram opposite side of the surgeon • Imaging of A/P and Judet views Inlet and outlet views freely
  • 23.
    • Surface Landmarks: PSIS(posterior superior iliac spine) G. Trochanter F. Shaft • Skin incision: -6-8 cm form PSIS -Tip of GT -Centre of GT -Centre of femoral shaft
  • 24.
    Fascial incision -Start thedissection of gluteal maximus and its fascia using scissors then separate the muscle fibers with fingers -Iliotibial tract is dissected using scalpel
  • 25.
    • Gluteus maximumsplitting • - posterior 2/3 muscle belly (inferior • gluteal artery), • - anterior 1/3 belly (superior gluteal Artery Inferior gluteal bundle is the limit
  • 26.
    • Trochanteric bursa: Freethe covering layer over the rotators • Visualization of the sciatic nerve carefully
  • 27.
    • Gluteus maximusinsertion release • Detach the gluteus maximus 1.5 cm from its insertion into the gluteal tuberosity of the femur. • less tension and easier mobilization • A constant perforator should be cauterized
  • 28.
    • Identification ofthe sciatic nerve Rotators damage in posterior dislocation Identified at the quadratus femoris No tension or compression is applied Define the upper border of Q femoris Quadratus
  • 29.
    • Identification ofthe pyriformis muscle Retract the gluteus Medius tendon at the G trochanter limited by Superior gluteal bundle Beneath it lie both the G minimus (HO) , and rounded pyriformis tendon. G Medius G minimus Pyriformis
  • 30.
    • Pyriformis tendonshould be tagged and incised 1.5 cm from its insertion Avoid injury of Medial Circumflex femoral Artery (MCFA)
  • 31.
    • Blood supplyof the femoral head Deep branch of MCFA • Can be injured : -Detachment of the Q femoris (femoral side) -Detachment of pyriformis or Obturator Int less than 1.5 cm
  • 32.
    Re-Identification of thesciatic nerve (SN) course: (relation to Pyriformis) 84% deep to the muscle (anterior) Trace the nerve till the G notch
  • 33.
    Variation of Snerve course (Common Peroneal CPN-Tibial TN) 84% 12% 3% 1%
  • 34.
    • Sciatic nervevariation: 12% CPN pierces 3% CPN superficial very rare
  • 35.
    • Release ofobturator internus and gemelli: Double tag of the muscles and release 1.5 cm form attachment
  • 36.
    • Sciatic nerveretractor (lesser notch) Reflect the obturator internus till the lesser notch and insert the retractor Feel Q plate
  • 37.
    • Posterior columnexposure Clear the obturator internus fascia
  • 38.
    • Tips forfractures reduction and Fixation: -Subperiosteal elevation of Obturator internus fascia, Quadrilateral plate , Gluteus minimus (HO) -Carefully debride the fragment edges.(reduction) -Never devitalize the soft tissue attachment (capsular attachment)– AVN of the posterior wall
  • 39.
    Kocher- Langenbeck Approach Prone •Tips for fractures reduction and Fixation:
  • 41.
  • 42.
  • 43.
    • Apply interfragmentarywall screws • Double plates for the column • Check intra-articular position in all views
  • 44.
    Wound closure • Meticulousdebridement Remove necrotic tissue (G minimus) and irrigate the entire wound • suction drains • Reinsert all tendons and approximate the split parts of the gluteus maximus • closure of the iliotibial tract
  • 45.
    • Modifications: 1-Trochanteric fliposteotomy: -Supraacetabular region with superior wall fragment -Femoral head fracture with surgical dislocation -Anterior column screw –transtectal transverse Lateral approach Single sheath including V lateralis, G Medius 1.5 cm
  • 47.
  • 49.
    • For superiorwall segment (extended posterior wall) screws :parallel to joint , plate , spring
  • 51.
  • 52.
    • Anterior columnscrew after trochanteric osteotomy: 4 cm above the acetabulum just posterior to anterior gluteal line In line with center of reduced hip (12 O’clock) ( Ob Outlet, IL Inlet)
  • 54.
    Complications: 1-Sciatic Nerve Palsy;3-5% -Always flex knee 90 ° -Proper identification -Expect variations -Intermittent retraction -Never two retractors in both notches
  • 55.
    2- Infection 2-5% 3-Heterotopicossification: necrotic G minimus 10% 4-Superior gluteal artery bleeding: 4- Post-traumatic OA : 17% 5-AVN: 7.5%
  • 56.
    Take Home Message Kocher–Langenbeck -Non extensile (use trochanteric osteotomy) -Posterior fractures -Prone is better except in some situations -Special instruments -Meticulous exposure and identification -Tips for reduction and fixation
  • 57.

Editor's Notes

  • #4 Was The working horse for displaced acetabular fractures accounting more than 52 % But it is now equally used with ilioinguinal approach accounting for about 40 % So it is still one of the working horses for management of displaced acetabular fractures. A single column non-extensile approach for the posterior acetabular structures, but can fix some parts of the anterior column Many modifications are present to allow for better exposure and preserve the hip joint function and viability of the femoral head that included –osteotomy
  • #8 Fixation of posterior acetabular structures
  • #10 The classical Kocher-Langenbeck approach allows direct visualization of the entire posterior column and wall and part of the supraacetabular region. part of the inner surface of the true pelvis (quadrilateral surface) can be palpated through the greater sciatic foramen Additional surgical hip dislocation with a bigastric trochanteric osteotomy allows a near total exposure of the acetabular roof and near total direct visualization of the articular surface
  • #11  For acetabular fracture reduction, specialized reduction tools, such as pelvic reduction clamps and forceps, ball spike pushers, and bone hooks, are used. For fracture fixation, 3.5-mm cortical screws and 3.5-mm reconstruction plates are commonly used. Other implants that might be necessary, depending on the fracture type, are the one-third tubular plates (used as spring plates) and the 2.0-mm miniscrews (used for the 2-level reconstruction of marginal impaction of the posterior wall)
  • #12 Offset clamps for anterior column reduction
  • #13 The angle of the jaw clamp avoid pressing the sciatic nerve during inserion through the Greater notch
  • #14 two-screw technique with a Jungbluth clampand an angled pelvic reduction clamp through the greater sciatic notch, placed on the quadrilateral surface.  This spiked disc can be applied for any ball –tipped instrument
  • #15 Prone position either with or without traction table and fixed distal femoral traction
  • #16 If the surgeon is routinely using the lateral position only
  • #17 The patient in the lateral position with no fixed traction. A stack of towels tucked under the thigh acts as a fulcrum to assist with hip subluxation. Longitudinal traction is provided manually via the Schanz pin placed into the femur at the level of the trochanters. The extremity and hip are free for repositioning as needed.
  • #18 Reduction of the sciatic palsy by this maneuvers as extension increase nerve tension and reduces movability (examination in a cadaver)
  • #24 Dotted line allows for A more proximal extension may improve exposure in obese or muscular patients. This extension will be through the skin but not the gluteus maximus muscle (as it will be stopped by the 1st bundle inferior epigastric )
  • #25 Use your finger splitting the muscle to avoid injury of the inferior gluteal bundle
  • #26 As shown by the yellow arrow
  • #27 Free the layer of fat covering the short external rotators, exposing the insertion of the piriformis tendon, the gemelli, and the internal obturator muscle. Constant bleeding needs to be auterized The sciatic nerve (see illustration) lies posterior to the gemelli and internal obturator muscles, and anterior to the piriformis muscle, between the greater trochanter and the ischial tuberosity. Carefully visualize the sciatic nerve. Ensure at all times that no direct pressure or stretching is exerted on the nerve.
  • #28 1st first perforating branch of the profunda femoris
  • #29 The identification of the sciatic nerve more proximally is unsafe because of the potentially distorted anatomy due to the fracture and/or trauma and should consequently be avoided. Handle the sciatic nerve gently, avoiding excessive release of the surrounding fat tissue, and follow it up to the greater sciatic notch. Awareness of the nerve position and tension or compression applied to it at any given time throughout the procedure is of paramount importance
  • #30 Retraction of these muscles can be maintained by inserting two smooth Steinmann pins into the ilium above the greater sciatic notch. Identify and protect the superior gluteal nerve and vessels as they exit the greater sciatic notch
  • #31 Use Bovie and protect by your finger
  • #32 Black lines indicate the variable distances through the course of the artery with a closer position to the bone in the pyriformis and ob internus but nof the Q FEMORIS (so never detach the quadratus femoris from the femoral side but from the ischial side
  • #33 Type A variation where the SN exits the pelvis as a single entity anterior (deep) the PM B Peroneal division pierces the muscle Type C peroneal division posterior to muscle (superficial ) and tibial diviosn anterior (deep) We met this variation one time before (2 sciatic nerves)
  • #34 Type A variation where the SN exits the pelvis as a single entity anterior (deep) the PM B Peroneal division pierces the muscle Type C peroneal division posterior to muscle (superficial ) and tibial diviosn anterior (deep) We met this variation one time before (2 sciatic nerves)
  • #39 Fragement edges for reduction
  • #40 Schantz screw for manipulation of the ischiopubic fragment Direction of Jungbluth clamp is away from the notch to prevent compression of the sciatic nerve
  • #42 Assess the anterior wall direction by index finger through the quadrilateral plate and The starting point of drilling is about 2 cm from the apex of G notch direct the dill and scres aided by fluoroscopy
  • #43 Screw direction is verified in Obturator outlet and Iliac outlet views then apply your plates
  • #44 If screw is extraarticular in one view it is extraarticular
  • #51 CT dome cuts Spring plates