
Recommended
More Related Content
What's hot
What's hot (20)
Similar to Unit 5 Task 4 Create an Ad
Similar to Unit 5 Task 4 Create an Ad (20)
More from ilyaboj
Recently uploaded
Recently uploaded (20)
Unit 5 Task 4 Create an Ad
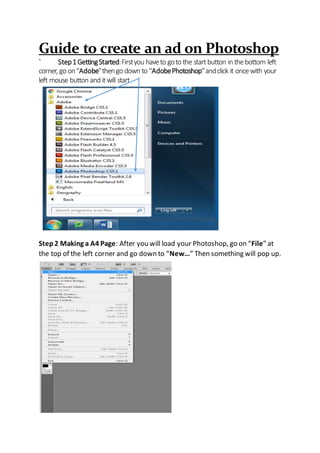
- 1. Guide to create an ad on Photoshop ` Step1GettingStarted:Firstyou haveto goto the startbutton in thebottom left corner, go on“Adobe”thengo down to “AdobePhotoshop”andclick it oncewith your left mouse button and itwill start. Step2 Making a A4 Page: After you will load your Photoshop, go on “File” at the top of the left corner and go down to “New…” Then something will pop up.
- 2. Step3 Size for the A4 page: After you will have a measurement of the pages, you will need to put in the little table so it will generate a page of that size which is A4. Put this exact measurementin the table. Width is “21 cm” and Height is “29.7 cm”, also the resolution would be “300 pixels/inch” Step4 How tomake a title/textbox: When you put all the measurements in, press “OK” and it should generate an A4 page that you will make an adverton. Go down to the “Horizontal Type Tool” so you can make the title on your page. This is also a picture of other tools.
- 3. Step5 Changing Font/Colour: You will need to insert a title, for my example I’mgoing to call it “Harley Official News”.When your making your title you can change the “Font”, colour and the writing style above it. You have to make your heading stand out so when people flick through pages of a magazine the title will catch their eye so they could take a second look at your advert. Drag the text box whereyou want it to be, and write in it. EXAMPLE
- 4. Step6 Making a New Layer: I will make a new layer for the backround colour, to do that go to the top, go to “Layer” then “New” then a box should pop up called “New Layer” name it backround colour so you can colour your backround.
- 5. Step7 Changing colour of backround/Theme: You can change the backround colour but don’tmake it to dull becausethis is an advert. To do that you can make it like a shade or put a full colour on it. You will need to use the “Gradient Tool” or the “Paint Bucket Tool” I would say justuse the paint bucket tool since it would be a lot better and easier. To change the colour go to the right top corner whereyoo can see the two colour boxes and lick the one on top of eachother so you can choose a colour for your backround. When you chosen your colour press “Ok” To use the “Gradient Tool “select it instead of the “Bucket Tool” The two coloured squares will be your two colours, you drag it out and it makes it a Fade of two colours.
- 6. Step8 Capacity and getting a new backround: You can change the opacity which means how transparentyour colour will be. For an advertuse a solid colour or a whole pictures as a backround for your advert. How rich is the red. Open up google and search backround or a picture of your choice to use as backround on google. Press enter and click images, choosean image and right click it and press “Save image as…” find a folder and saveit. Then open up photoshop and go to the top left, click file and then click open and find whereyou saved your background picture.
- 7. You should go on the image and press “copy image” and go back to photoshop and press “Ctrl +V” on your keyboard and it will pastethe picture in Select it, and hold “Ctrl + T” to resizeit, make as big as your page where your making your advert on. Hold shift whiloe doing it so you don’t mess up the resolution. Step9 Making your ad look nice: You would need to setup the advert. Make some text box’s. Makea eye catching of something that you will advertise. I will change my title Mustang 2017 whereI’llbe advertising the new mustang and showing whatit’s good at and it’s price. Firstyou need to get a picture search for what you will advertise, find a picture, copy it make a new page and paste it. Paste the picture on your new slide so you can edit it.
- 8. You will use the magnetic lasso tool to go around the picture so you can select the car from the background. After you went around the picture go to the bottom left and click the camera icon.
- 9. Use the paint brush for deleting the background and the rubber to delete the red. Oncedone After press the camera icon again and it will select the car. After press “CtrlC” and paste it onto your main page. The Icon.
- 10. Now press “Ctrl + C” and now you will havethe selected car copied. Now you can paste it on your main page. When you want to make the image a different sizeyou haveto go to “Edit then Transformand Scale. Hold shift when rezising the image so it doesn’tgo blurry.
- 11. Step10 Setting uptext boxes and finishing up: Press the Horizantaltype icon so you can make a text box to write in. This is whereyou change the font, and the sizeof the writing, and after u found the font you write in your basically finished, justput in the information in the boxes you need to provide.
- 12. You can change the colour of the writing here. This is my finished product. Makesure to make it look eye catching and colourful so people would be interested. This is an example you can do better.