SlideShare a Scribd company logo
1 of 15
Download to read offline
This tutorial will show you the steps to create this simple Bridal Pageant Boutique Flyer using
          the Business Application – Microsoft Word.
          Steps
          01: Document Setup
          02: Margins
          03: Page Orientation
          04: Insert Oval
          05: Shape Fill
          06: Fill Effects Window
          07: Fill Effects - Two Colors
          08: Shape Outline
          09: Royalty Free Image
          10: The Text Group
          11: Insert Text Box
          12: Insert Picture
          13: Flip Picture
          14: Transparency and Line
          15: Insert WordArt
          16: Format WordArt
          17: Change WordArt Shape
          18: Fix Truncated Text
          19: Fill Effects Window
          20: Gradient Filled Text
          21: Text Box Line
          22: Shadow Effects
          23: Shadow Color
          24: Change WordArt Shape
          25: Add and Format Text
          26: Save File


                                         Bridal Pageant Boutique Flyer

                                         For Printing Flyers we Recommend iTezen Printers
                                         iTezen Phaser Printer & Repair
                                         Their high volume low cost per page printers
                                         are perfect for producing flyers at low cost!


                         If there is anything that is unclear to you, or you spot any mistakes,
                 please send email to feedback@flyertutor.com Suggestions are always welcome.


                                                     Page 1 of 15
Microsoft Word 2007 Tutorial – Bridal Pageant Boutique Flyer                               www.flyertutor.com
Step 01: Document Setup


           To begin, go to the Ribbon and select the Page Layout Tab.

           Click on Size and select Letter from the drop down menu.


                                                 Step 02: Margins
                                                 Click on Margins and select Narrow from the drop
                                                 down menu.


                                                  Page 2 of 15
Microsoft Word 2007 Tutorial – Bridal Pageant Boutique Flyer                          www.flyertutor.com
Step 03: Page Orientation
           Go to the Page Setup Group and click on
           Orientation. Select Portrait from the drop
           down menu.


                                                  Step 04: Insert Oval
                                                  We will draw an Oval Shaped Background.

                                                  Go back to the Ribbon and select the Insert Tab.

                                                  Go to the Illustrations Group. Select Shapes to
                                                  open up the Shapes Window.

                                                                                      Select the Oval
                                                                                      under Recently
                                                                                      Used Shapes.


                                                  Hold down the Left mouse button and draw the Oval
                                                  on the Page. You will notice that the Ribbon has
                                                  changed to the Format Tab which showcases the
                                                  Drawing Tools.

                                                                           The Oval should take up
                                                                           most of the page.

                                                                           8 Blue Shapes appear
                                                                           around the Oval. You can
                                                                           use any of these to resize
                                                                           the Oval if needed.


                                                  Page 3 of 15
Microsoft Word 2007 Tutorial – Bridal Pageant Boutique Flyer                             www.flyertutor.com
Step 05: Shape Fill
                                                                               While the Oval is still
                                                                               selected, go to the
                                                                               Format Tab > Shape
                                                                               Styles Group.

           Click on the Down Arrow on the right side of the Shape Fill Icon.


                                             A drop down Color Menu will
                                             appear. Select Gradients, which
                                             will open a Gradients Presets
                                             Window.

                                             From here select More Gradients
                                             which will open up the Fill
                                             Effects Window.


           Step 06: Fill Effects Window
           You should automatically be in the
           Gradient Tab, which is the first tab of
           this window.

           In the Color Section select Two
           Colors.

           This will change the Color Section of
           the Fill Effects Window to include 2
           Drop Down Color Menus.


                                                     Page 4 of 15
Microsoft Word 2007 Tutorial – Bridal Pageant Boutique Flyer                                 www.flyertutor.com
Step 07: Fill Effects - Two Colors
                                                                   Select the Down Arrow for
                                                                   Color1 and select "White" from
                                                                   Theme Colors, and select the
                                                                   Down Arrow for Color2 and
                                                                   select "Yellow" from Standard
                                                                   Colors.

                                                                   In the Transparency Section, set
                                                                   From to "100%" and To to
                                                                   "0%".

                                                                   In the Shading Styles Section,
                                                                   select Diagonal Down. Then select
                                                                   the Check Box for "Rotate fill
                                                                   effect with shape". Click OK.

                                                                   The Gradient Filled Oval should
                                                                   look like this:


           Step 08: Shape Outline
           Now to remove the Shape Outline, select the Oval and go back
           to the Format Tab > Shape Styles Group and select the Down
           Arrow to the right side of the Shape Outline Icon.

           This will open the Color Menu. Select No Outline.

                               There you have it, a Gradient Filled Oval
                               Background.


                                                   Page 5 of 15
Microsoft Word 2007 Tutorial – Bridal Pageant Boutique Flyer                            www.flyertutor.com
Step 09: Royalty Free Image
                           Next add an Image to the document.

                           Here I downloaded the Image of a Bride from www.Clker.com, which is a
                           site where you can download Royalty Free Clipart.

                           You can also check out www.Public-Domain-Image.com,
                           OpenClipArt.org, and www.PublicDomainPictures.net.


           Step 10: The Text Group
           In Adobe Illustrator, Adobe Photoshop, OpenOffice Draw, Inkscape, Corel Draw and
           Microsoft Publisher, you are able to freely move an Image anywhere on the canvas. This is
           also possible in Microsoft Word as long as you first place the Image within a Text Box.

           To Insert a Text Box, go back to the Ribbon
           and select the Insert Tab. Then go to the Text
           Group and select Text Box.


           Step 11: Insert Text Box
                                                                  The Built-In Text Box Window
                                                                  appears.

                                                                  To the bottom of this window, you will
                                                                  see Draw Text Box.

                                                                  Select it, then hold down the Left Mouse
                                                                  Button and draw the Text Box on the
                                                                  screen.


                                                   Page 6 of 15
Microsoft Word 2007 Tutorial – Bridal Pageant Boutique Flyer                                 www.flyertutor.com
Step 12: Insert Picture
           The Ribbon will change to the Format Tab. Go back to
           the Insert Tab and click on the Picture Icon in the
           Illustrations Group.

           This allows you to insert a Picture from File. It opens up the Insert Picture Window, where
           you can select your file and then click Insert.

                                      Be certain that your images are in a format that will be
                                      recognized by Microsoft Word. These images are saved in PNG
                                      (Portable Network Graphics) Format.

                                      Once the Image has been inserted, Resize it by selecting one of
                                      the Circles and holding down the "Ctrl" and "Shift" Keys
                                      together, so that you don't get a disproportionate Image.

                                      You will notice that the image is facing the wrong direction. To
                                      correct this we need to Flip it.


           Step 13: Flip Picture
           With the Image selected, go to the Format Tab >
           Arrange Group.

           Click on the Rotate Icon to open a drop down menu.
           Select Flip Horizontal.


                                         The Flipped Image will look
                                         like this:


                                                   Page 7 of 15
Microsoft Word 2007 Tutorial – Bridal Pageant Boutique Flyer                               www.flyertutor.com
Step 14: Transparency and Line
                                       Select the Text Box, then Right click over it to reveal another
                                       menu. Select Format Text Box. This will open the Format Text
                                       Box Window.


           In the Colors and Lines Tab, go
           to the Fill Section and set
           Transparency to "100%".

           In the Line Section, click on the
           Down Arrow for Color and
           select No Color from the Color
           Window. Click OK.

           The Image now has a
           Transparent Background.


                              Selecting the Image for moving may be a little tricky, since you can only
                              move it when its Text Box container is selected, which should look like
                              this.


           Step 15: Insert WordArt
           Go back to the Insert Tab, to insert another Text Box. Once this is done, remember the
           Ribbon will change to the Format Tab.

           Go back to the Insert Tab again, look for the
           Text Group and select the Word Art Icon,
           which will open up a Word Art Style Menu.


                                                   Select Word Art Style 1.


                                                    Page 8 of 15
Microsoft Word 2007 Tutorial – Bridal Pageant Boutique Flyer                                www.flyertutor.com
Step 16: Format WordArt
                                                                              This will open up the Edit
                                                                              Word Art Text Window.

                                                                              Start typing the text
                                                                              "Bridal Pageant
                                                                              Boutique".

                                                                              Click the 1st Down
                                                                              Arrow to choose a Font.

                                                                              In this case the Font is
                                                                              "Advert" which is a Free
                                                                              Font that was downloaded
                                                                              at www.FontFreak.com.

                                                                              Click on the 2nd Down
                                                                              Arrow to change the
                                                                              Font Size. Set it to "48".
                                                                              Click Ok.

           The Word Art Text should look like this:

           To make the Text Box appear invisible, repeat Step 14 for Transparency and Line.


           Step 17: Change WordArt Shape
           Select the Text, click the Change Shape Icon from the Word Art Styles Group.


                                          This will open up a drop down menu.

                                          Select the Arch Up (Curve), which is the second shape
                                          under Follow Path.

                                          Some of the Text will appear to be cut off.

                                          Don't be alarmed, we will take care of it in the next step.


                                                  Page 9 of 15
Microsoft Word 2007 Tutorial – Bridal Pageant Boutique Flyer                                www.flyertutor.com
Step 18: Fix Truncated Text
           The Text will be surrounded by a Rectangle
           that has 4 Squares and 4 Rectangles on it.

           Move your cursor above the Rectangle until
           you see a 4 Pointed Arrow.


                                                            Click again and the Rectangle around the
                                                            Text will change to just 4 Squares and 4
                                                            Circles.

                                                            Move the cursor over the Square to the
                                                            Right.

           When you see a 2 Sided Arrow, hold down the mouse button and drag outward to widen the
           Rectangle.

           The Text will now be all visible. This step will have
           to be repeated whenever any change is made to this
           Text.


                                          Step 19: Fill Effects Window
                                          To add the Gradient, right click over the WordArt Text and
                                          select Format WordArt from the menu that appears.


                                          This will open the Format WordArt Window.


           In the Colors and Lines
           Tab, in the Fill Section,
           click on Fill Effects, which
           will open the Fill Effects
           Window.


                                                    Page 10 of 15
Microsoft Word 2007 Tutorial – Bridal Pageant Boutique Flyer                               www.flyertutor.com
Step 20: Gradient Filled Text
                                                                        In the Colors Section, select
                                                                        Two Colors.

                                                                        Click on the Down Arrow
                                                                        under Color 1 and select Red
                                                                        from the Color Menu that
                                                                        appears.


                                                                        Then go to Color 2 and select
                                                                        Yellow.

                                                                        In the Shading Styles Section
                                                                        select Vertical and then check
                                                                        the "Rotate Fill Effect with
                                                                        Shape" Box.

           Click OK.


           Step 21: Text Box Line
           You will then be back at the Format WordArt Window.

           In the Line Section, click the Down Arrow on the Right side of
           Color and select No Color from the Color Menu that appears.

           Click OK.

                                           Remember some of the Text
                                           will appear to be cut off.

                                           Leave it alone for now.


                                                  Page 11 of 15
Microsoft Word 2007 Tutorial – Bridal Pageant Boutique Flyer                              www.flyertutor.com
Step 22: Shadow Effects
           Double click on the Gradient Title. Notice that the Ribbon has changed to the Format Tab.
           Click on the Shadow Effects Button in the Shadow Effects Group.

                                                                        Select Shadow Style 5 from the
                                                                        Drop Shadow Section.

                                                                        If you hold your mouse over
                                                                        each Style for 2 seconds, it will
                                                                        tell you the Style's Name.

                                                                        Once you select the Drop
                                                                        Shadow, the menu will close.


           Step 23: Shadow Color
           Go back to the Shadow Effects Button.

           Then go all the way down to Shadow Color and select Black
           from the Shadow Menu that appears.

           Now repeat the Previous Step (Step 18) to adjust the Text.

           The finished Gradient Filled Drop Shadow Text should look
           like this:


                                                   Page 12 of 15
Microsoft Word 2007 Tutorial – Bridal Pageant Boutique Flyer                                www.flyertutor.com
Step 24: Change WordArt Shape
           Repeat Steps 15 through 17 this time using the Text "Create The Perfect Day". Set the
           Font to "Advert" and the Font Size to "24".

           When choosing the Word Art Shape, select Arch Down (Curve). Then Repeat Step 21 and
           finally Step 18.
                                                    Even though the Curve was applied to the Text,
                                                    it does require some more adjustments.

           With the Text still selected, move the cursor over the Upper Right Corner Square and drag
           slightly upward to increase the curvature of the Text.

           While dragging you will notice a dashed curved line appear.

           Once finished, you will notice the Text will appear to move downward. Simply select the
           Text Box around the Text and move upward with the Arrow Key on your keyboard.

           The Text should look like this:


           Step 25: Add and Format Text
           All that remains is to add regular Text to the Flyer.

                                                       Insert a Text Box. Type the "Flower Girl" Text.
                                                       After typing the entire block of Text, select all the
                                                       Text by holding down your Left mouse button and
                                                       dragging.

           Go to the Home Tab and in the Font Group select the Down Arrow next to
           "Calibri". In this case the Font is set to "Segoe Print", which is a free Font that
           was downloaded at FontFreak.com.

           You can also pick a Font of your own choosing. Set the Font Size to 30 by typing
           in a number in the Font Size box, or you could click the down arrow to the right of
           the Font Size box and select a suitable number from the drop down menu that
           appears.

                                              Set the Text to Bold by clicking on the Bold
                                              Icon in the Font Group.

                                              To the right of the Font Group is the Paragraph
                                              Group. With the Text still selected, choose the
                                              Center Icon.

           All the other Blocks of Text are of a smaller Font Size and are set to both Bold and
           Italic. Select each Text Box and move into place by using the Arrow Keys on your
           keyboard.

                                                     Page 13 of 15
Microsoft Word 2007 Tutorial – Bridal Pageant Boutique Flyer                                   www.flyertutor.com
Step 26: Save File
           Repeate Step 14 to set the Transparency and Line
           Color for each Text Box.

           All that's left to do is Save the document.

           Click on the Office Button         (located in the top
           left corner of the screen), which will open up a drop
           down menu.


                                                                     Go to Save As > Word Document.

                                                                     In the Save As Window name your
                                                                     document and click the Save button.


                                                     Page 14 of 15
Microsoft Word 2007 Tutorial – Bridal Pageant Boutique Flyer                                   www.flyertutor.com
Page 15 of 15
Microsoft Word 2007 Tutorial – Bridal Pageant Boutique Flyer     www.flyertutor.com

More Related Content

What's hot

Inkscape Tutorials: Digital Photography Flyer
Inkscape Tutorials: Digital Photography FlyerInkscape Tutorials: Digital Photography Flyer
Inkscape Tutorials: Digital Photography FlyerFlyer Tutor
 
Microsoft Word Tutorial: Easter Egg Hunt Flyer
Microsoft Word Tutorial: Easter Egg Hunt FlyerMicrosoft Word Tutorial: Easter Egg Hunt Flyer
Microsoft Word Tutorial: Easter Egg Hunt FlyerFlyer Tutor
 
Visio Tutorial
Visio TutorialVisio Tutorial
Visio Tutorialmacleodc
 
Business power point templates 3d circular missing puzzle piece illustrate pr...
Business power point templates 3d circular missing puzzle piece illustrate pr...Business power point templates 3d circular missing puzzle piece illustrate pr...
Business power point templates 3d circular missing puzzle piece illustrate pr...SlideTeam.net
 
Microsoft visio 2013
Microsoft visio 2013Microsoft visio 2013
Microsoft visio 2013Raghu nath
 
Microsoft Publisher 2007 Tutorial: Easter Egg Hunt Flyer
Microsoft Publisher 2007 Tutorial: Easter Egg Hunt FlyerMicrosoft Publisher 2007 Tutorial: Easter Egg Hunt Flyer
Microsoft Publisher 2007 Tutorial: Easter Egg Hunt FlyerFlyer Tutor
 
Business power point templates 3d circular missing puzzle piece illustrate co...
Business power point templates 3d circular missing puzzle piece illustrate co...Business power point templates 3d circular missing puzzle piece illustrate co...
Business power point templates 3d circular missing puzzle piece illustrate co...SlideTeam.net
 
Inkscape Tutorials: Easter Egg Hunt Flyer
Inkscape Tutorials: Easter Egg Hunt FlyerInkscape Tutorials: Easter Egg Hunt Flyer
Inkscape Tutorials: Easter Egg Hunt FlyerFlyer Tutor
 

What's hot (9)

Inkscape Tutorials: Digital Photography Flyer
Inkscape Tutorials: Digital Photography FlyerInkscape Tutorials: Digital Photography Flyer
Inkscape Tutorials: Digital Photography Flyer
 
08 graphics
08 graphics08 graphics
08 graphics
 
Microsoft Word Tutorial: Easter Egg Hunt Flyer
Microsoft Word Tutorial: Easter Egg Hunt FlyerMicrosoft Word Tutorial: Easter Egg Hunt Flyer
Microsoft Word Tutorial: Easter Egg Hunt Flyer
 
Visio Tutorial
Visio TutorialVisio Tutorial
Visio Tutorial
 
Business power point templates 3d circular missing puzzle piece illustrate pr...
Business power point templates 3d circular missing puzzle piece illustrate pr...Business power point templates 3d circular missing puzzle piece illustrate pr...
Business power point templates 3d circular missing puzzle piece illustrate pr...
 
Microsoft visio 2013
Microsoft visio 2013Microsoft visio 2013
Microsoft visio 2013
 
Microsoft Publisher 2007 Tutorial: Easter Egg Hunt Flyer
Microsoft Publisher 2007 Tutorial: Easter Egg Hunt FlyerMicrosoft Publisher 2007 Tutorial: Easter Egg Hunt Flyer
Microsoft Publisher 2007 Tutorial: Easter Egg Hunt Flyer
 
Business power point templates 3d circular missing puzzle piece illustrate co...
Business power point templates 3d circular missing puzzle piece illustrate co...Business power point templates 3d circular missing puzzle piece illustrate co...
Business power point templates 3d circular missing puzzle piece illustrate co...
 
Inkscape Tutorials: Easter Egg Hunt Flyer
Inkscape Tutorials: Easter Egg Hunt FlyerInkscape Tutorials: Easter Egg Hunt Flyer
Inkscape Tutorials: Easter Egg Hunt Flyer
 

Similar to Microsoft Word Tutorial: Bridal Pageant Boutique Flyer

OpenOffice Draw Tutorials: Florist Flyer
OpenOffice Draw Tutorials: Florist FlyerOpenOffice Draw Tutorials: Florist Flyer
OpenOffice Draw Tutorials: Florist FlyerFlyer Tutor
 
Corel Draw Tutorial: Florist Flyer
Corel Draw Tutorial: Florist FlyerCorel Draw Tutorial: Florist Flyer
Corel Draw Tutorial: Florist FlyerFlyer Tutor
 
OpenOffice Draw Tutorial: Digital Photography Flyer
OpenOffice Draw Tutorial: Digital Photography FlyerOpenOffice Draw Tutorial: Digital Photography Flyer
OpenOffice Draw Tutorial: Digital Photography FlyerFlyer Tutor
 
Adobe Illustrator Tutorials: Digital Photography Flyer
Adobe Illustrator Tutorials: Digital Photography FlyerAdobe Illustrator Tutorials: Digital Photography Flyer
Adobe Illustrator Tutorials: Digital Photography FlyerFlyer Tutor
 
Inkscape Fall Fest Flyer Tutorial
Inkscape Fall Fest Flyer TutorialInkscape Fall Fest Flyer Tutorial
Inkscape Fall Fest Flyer TutorialFlyer Tutor
 
Customizing Your Document in PerfectForms
Customizing Your Document in PerfectFormsCustomizing Your Document in PerfectForms
Customizing Your Document in PerfectFormsKaren Hunter-Sliger
 
Corel Draw Tutorials: Easter Egg Hunt Flyer
Corel Draw Tutorials: Easter Egg Hunt FlyerCorel Draw Tutorials: Easter Egg Hunt Flyer
Corel Draw Tutorials: Easter Egg Hunt FlyerFlyer Tutor
 
Inkscape Beginner Tutorial: How to Make a Yoga Class Flyer
Inkscape Beginner Tutorial: How to Make a Yoga Class FlyerInkscape Beginner Tutorial: How to Make a Yoga Class Flyer
Inkscape Beginner Tutorial: How to Make a Yoga Class FlyerFlyer Tutor
 
MEMBUAT LOGO THE COFFEE SHOP
MEMBUAT LOGO THE COFFEE SHOPMEMBUAT LOGO THE COFFEE SHOP
MEMBUAT LOGO THE COFFEE SHOPDIANTO IRAWAN
 
OpenOffice Draw Tutorials: Easter Egg Hunt Flyer
OpenOffice Draw Tutorials: Easter Egg Hunt FlyerOpenOffice Draw Tutorials: Easter Egg Hunt Flyer
OpenOffice Draw Tutorials: Easter Egg Hunt FlyerFlyer Tutor
 
advanced%20corel%20draw
advanced%20corel%20drawadvanced%20corel%20draw
advanced%20corel%20drawtutorialsruby
 
advanced%20corel%20draw
advanced%20corel%20drawadvanced%20corel%20draw
advanced%20corel%20drawtutorialsruby
 
Adobe Illustrator Tutorials: Easter Egg Hunt Flyer
Adobe Illustrator Tutorials: Easter Egg Hunt FlyerAdobe Illustrator Tutorials: Easter Egg Hunt Flyer
Adobe Illustrator Tutorials: Easter Egg Hunt FlyerFlyer Tutor
 
Microsoft Publisher 2013 Quickstart
Microsoft Publisher 2013 QuickstartMicrosoft Publisher 2013 Quickstart
Microsoft Publisher 2013 Quickstartcomatsg
 
How to add a drop shadow to your product images in Adobe Photoshop
How to add a drop shadow to your product images in Adobe PhotoshopHow to add a drop shadow to your product images in Adobe Photoshop
How to add a drop shadow to your product images in Adobe PhotoshopPixc
 
Lab 1 create a basic flow chart using ms visio
Lab 1 create a basic flow chart using ms visioLab 1 create a basic flow chart using ms visio
Lab 1 create a basic flow chart using ms visioFarah Ahmed
 
Morgan Campbell Advanced Dtp Notes
Morgan Campbell Advanced Dtp NotesMorgan Campbell Advanced Dtp Notes
Morgan Campbell Advanced Dtp NotesIBAT College
 
Image editing basics using PIXLR Editor
Image editing basics using PIXLR EditorImage editing basics using PIXLR Editor
Image editing basics using PIXLR EditorJohn Allan
 

Similar to Microsoft Word Tutorial: Bridal Pageant Boutique Flyer (20)

OpenOffice Draw Tutorials: Florist Flyer
OpenOffice Draw Tutorials: Florist FlyerOpenOffice Draw Tutorials: Florist Flyer
OpenOffice Draw Tutorials: Florist Flyer
 
Corel Draw Tutorial: Florist Flyer
Corel Draw Tutorial: Florist FlyerCorel Draw Tutorial: Florist Flyer
Corel Draw Tutorial: Florist Flyer
 
OpenOffice Draw Tutorial: Digital Photography Flyer
OpenOffice Draw Tutorial: Digital Photography FlyerOpenOffice Draw Tutorial: Digital Photography Flyer
OpenOffice Draw Tutorial: Digital Photography Flyer
 
Adobe Illustrator Tutorials: Digital Photography Flyer
Adobe Illustrator Tutorials: Digital Photography FlyerAdobe Illustrator Tutorials: Digital Photography Flyer
Adobe Illustrator Tutorials: Digital Photography Flyer
 
Inkscape Fall Fest Flyer Tutorial
Inkscape Fall Fest Flyer TutorialInkscape Fall Fest Flyer Tutorial
Inkscape Fall Fest Flyer Tutorial
 
Customizing Your Document in PerfectForms
Customizing Your Document in PerfectFormsCustomizing Your Document in PerfectForms
Customizing Your Document in PerfectForms
 
Corel Draw Tutorials: Easter Egg Hunt Flyer
Corel Draw Tutorials: Easter Egg Hunt FlyerCorel Draw Tutorials: Easter Egg Hunt Flyer
Corel Draw Tutorials: Easter Egg Hunt Flyer
 
Inkscape Beginner Tutorial: How to Make a Yoga Class Flyer
Inkscape Beginner Tutorial: How to Make a Yoga Class FlyerInkscape Beginner Tutorial: How to Make a Yoga Class Flyer
Inkscape Beginner Tutorial: How to Make a Yoga Class Flyer
 
MEMBUAT LOGO THE COFFEE SHOP
MEMBUAT LOGO THE COFFEE SHOPMEMBUAT LOGO THE COFFEE SHOP
MEMBUAT LOGO THE COFFEE SHOP
 
OpenOffice Draw Tutorials: Easter Egg Hunt Flyer
OpenOffice Draw Tutorials: Easter Egg Hunt FlyerOpenOffice Draw Tutorials: Easter Egg Hunt Flyer
OpenOffice Draw Tutorials: Easter Egg Hunt Flyer
 
Dr 2
Dr 2Dr 2
Dr 2
 
advanced%20corel%20draw
advanced%20corel%20drawadvanced%20corel%20draw
advanced%20corel%20draw
 
advanced%20corel%20draw
advanced%20corel%20drawadvanced%20corel%20draw
advanced%20corel%20draw
 
Adobe Illustrator Tutorials: Easter Egg Hunt Flyer
Adobe Illustrator Tutorials: Easter Egg Hunt FlyerAdobe Illustrator Tutorials: Easter Egg Hunt Flyer
Adobe Illustrator Tutorials: Easter Egg Hunt Flyer
 
Ed online guide_book_web
Ed online guide_book_webEd online guide_book_web
Ed online guide_book_web
 
Microsoft Publisher 2013 Quickstart
Microsoft Publisher 2013 QuickstartMicrosoft Publisher 2013 Quickstart
Microsoft Publisher 2013 Quickstart
 
How to add a drop shadow to your product images in Adobe Photoshop
How to add a drop shadow to your product images in Adobe PhotoshopHow to add a drop shadow to your product images in Adobe Photoshop
How to add a drop shadow to your product images in Adobe Photoshop
 
Lab 1 create a basic flow chart using ms visio
Lab 1 create a basic flow chart using ms visioLab 1 create a basic flow chart using ms visio
Lab 1 create a basic flow chart using ms visio
 
Morgan Campbell Advanced Dtp Notes
Morgan Campbell Advanced Dtp NotesMorgan Campbell Advanced Dtp Notes
Morgan Campbell Advanced Dtp Notes
 
Image editing basics using PIXLR Editor
Image editing basics using PIXLR EditorImage editing basics using PIXLR Editor
Image editing basics using PIXLR Editor
 

Recently uploaded

Postal Ballot procedure for employees to utilise
Postal Ballot procedure for employees to utilisePostal Ballot procedure for employees to utilise
Postal Ballot procedure for employees to utiliseccsubcollector
 
办理西悉尼大学毕业证成绩单、制作假文凭
办理西悉尼大学毕业证成绩单、制作假文凭办理西悉尼大学毕业证成绩单、制作假文凭
办理西悉尼大学毕业证成绩单、制作假文凭o8wvnojp
 
Call Girls in Kalyan Vihar Delhi 💯 Call Us 🔝8264348440🔝
Call Girls in Kalyan Vihar Delhi 💯 Call Us 🔝8264348440🔝Call Girls in Kalyan Vihar Delhi 💯 Call Us 🔝8264348440🔝
Call Girls in Kalyan Vihar Delhi 💯 Call Us 🔝8264348440🔝soniya singh
 
办理国外毕业证学位证《原版美国montana文凭》蒙大拿州立大学毕业证制作成绩单修改
办理国外毕业证学位证《原版美国montana文凭》蒙大拿州立大学毕业证制作成绩单修改办理国外毕业证学位证《原版美国montana文凭》蒙大拿州立大学毕业证制作成绩单修改
办理国外毕业证学位证《原版美国montana文凭》蒙大拿州立大学毕业证制作成绩单修改atducpo
 
Dhule Call Girls #9907093804 Contact Number Escorts Service Dhule
Dhule Call Girls #9907093804 Contact Number Escorts Service DhuleDhule Call Girls #9907093804 Contact Number Escorts Service Dhule
Dhule Call Girls #9907093804 Contact Number Escorts Service Dhulesrsj9000
 
《塔夫斯大学毕业证成绩单购买》做Tufts文凭毕业证成绩单/伪造美国假文凭假毕业证书图片Q微信741003700《塔夫斯大学毕业证购买》《Tufts毕业文...
《塔夫斯大学毕业证成绩单购买》做Tufts文凭毕业证成绩单/伪造美国假文凭假毕业证书图片Q微信741003700《塔夫斯大学毕业证购买》《Tufts毕业文...《塔夫斯大学毕业证成绩单购买》做Tufts文凭毕业证成绩单/伪造美国假文凭假毕业证书图片Q微信741003700《塔夫斯大学毕业证购买》《Tufts毕业文...
《塔夫斯大学毕业证成绩单购买》做Tufts文凭毕业证成绩单/伪造美国假文凭假毕业证书图片Q微信741003700《塔夫斯大学毕业证购买》《Tufts毕业文...ur8mqw8e
 
Powerpoint on Writing a Newspaper Report.pptx
Powerpoint on Writing a Newspaper Report.pptxPowerpoint on Writing a Newspaper Report.pptx
Powerpoint on Writing a Newspaper Report.pptxNeelamMulchandani1
 
Call Girls In Karkardooma 83770 87607 Just-Dial Escorts Service 24X7 Avilable
Call Girls In Karkardooma 83770 87607 Just-Dial Escorts Service 24X7 AvilableCall Girls In Karkardooma 83770 87607 Just-Dial Escorts Service 24X7 Avilable
Call Girls In Karkardooma 83770 87607 Just-Dial Escorts Service 24X7 Avilabledollysharma2066
 
Authentic No 1 Amil Baba In Pakistan Amil Baba In Faisalabad Amil Baba In Kar...
Authentic No 1 Amil Baba In Pakistan Amil Baba In Faisalabad Amil Baba In Kar...Authentic No 1 Amil Baba In Pakistan Amil Baba In Faisalabad Amil Baba In Kar...
Authentic No 1 Amil Baba In Pakistan Amil Baba In Faisalabad Amil Baba In Kar...Authentic No 1 Amil Baba In Pakistan
 
西伦敦大学毕业证学位证成绩单-怎么样做
西伦敦大学毕业证学位证成绩单-怎么样做西伦敦大学毕业证学位证成绩单-怎么样做
西伦敦大学毕业证学位证成绩单-怎么样做j5bzwet6
 
REFLECTIONS Newsletter Jan-Jul 2024.pdf.pdf
REFLECTIONS Newsletter Jan-Jul 2024.pdf.pdfREFLECTIONS Newsletter Jan-Jul 2024.pdf.pdf
REFLECTIONS Newsletter Jan-Jul 2024.pdf.pdfssusere8ea60
 
(No.1)↠Young Call Girls in Sikanderpur (Gurgaon) ꧁❤ 9711911712 ❤꧂ Escorts
(No.1)↠Young Call Girls in Sikanderpur (Gurgaon) ꧁❤ 9711911712 ❤꧂ Escorts(No.1)↠Young Call Girls in Sikanderpur (Gurgaon) ꧁❤ 9711911712 ❤꧂ Escorts
(No.1)↠Young Call Girls in Sikanderpur (Gurgaon) ꧁❤ 9711911712 ❤꧂ EscortsDelhi Escorts Service
 
南新罕布什尔大学毕业证学位证成绩单-学历认证
南新罕布什尔大学毕业证学位证成绩单-学历认证南新罕布什尔大学毕业证学位证成绩单-学历认证
南新罕布什尔大学毕业证学位证成绩单-学历认证kbdhl05e
 
Ahmedabad Escorts Girl Services For Male Tourists 9537192988
Ahmedabad Escorts Girl Services For Male Tourists 9537192988Ahmedabad Escorts Girl Services For Male Tourists 9537192988
Ahmedabad Escorts Girl Services For Male Tourists 9537192988oolala9823
 
Call Girls in Govindpuri Delhi 💯Call Us 🔝8264348440🔝
Call Girls in Govindpuri Delhi 💯Call Us 🔝8264348440🔝Call Girls in Govindpuri Delhi 💯Call Us 🔝8264348440🔝
Call Girls in Govindpuri Delhi 💯Call Us 🔝8264348440🔝soniya singh
 

Recently uploaded (20)

Postal Ballot procedure for employees to utilise
Postal Ballot procedure for employees to utilisePostal Ballot procedure for employees to utilise
Postal Ballot procedure for employees to utilise
 
办理西悉尼大学毕业证成绩单、制作假文凭
办理西悉尼大学毕业证成绩单、制作假文凭办理西悉尼大学毕业证成绩单、制作假文凭
办理西悉尼大学毕业证成绩单、制作假文凭
 
Call Girls in Kalyan Vihar Delhi 💯 Call Us 🔝8264348440🔝
Call Girls in Kalyan Vihar Delhi 💯 Call Us 🔝8264348440🔝Call Girls in Kalyan Vihar Delhi 💯 Call Us 🔝8264348440🔝
Call Girls in Kalyan Vihar Delhi 💯 Call Us 🔝8264348440🔝
 
办理国外毕业证学位证《原版美国montana文凭》蒙大拿州立大学毕业证制作成绩单修改
办理国外毕业证学位证《原版美国montana文凭》蒙大拿州立大学毕业证制作成绩单修改办理国外毕业证学位证《原版美国montana文凭》蒙大拿州立大学毕业证制作成绩单修改
办理国外毕业证学位证《原版美国montana文凭》蒙大拿州立大学毕业证制作成绩单修改
 
Cheap Rate ➥8448380779 ▻Call Girls In Mg Road Gurgaon
Cheap Rate ➥8448380779 ▻Call Girls In Mg Road GurgaonCheap Rate ➥8448380779 ▻Call Girls In Mg Road Gurgaon
Cheap Rate ➥8448380779 ▻Call Girls In Mg Road Gurgaon
 
Dhule Call Girls #9907093804 Contact Number Escorts Service Dhule
Dhule Call Girls #9907093804 Contact Number Escorts Service DhuleDhule Call Girls #9907093804 Contact Number Escorts Service Dhule
Dhule Call Girls #9907093804 Contact Number Escorts Service Dhule
 
《塔夫斯大学毕业证成绩单购买》做Tufts文凭毕业证成绩单/伪造美国假文凭假毕业证书图片Q微信741003700《塔夫斯大学毕业证购买》《Tufts毕业文...
《塔夫斯大学毕业证成绩单购买》做Tufts文凭毕业证成绩单/伪造美国假文凭假毕业证书图片Q微信741003700《塔夫斯大学毕业证购买》《Tufts毕业文...《塔夫斯大学毕业证成绩单购买》做Tufts文凭毕业证成绩单/伪造美国假文凭假毕业证书图片Q微信741003700《塔夫斯大学毕业证购买》《Tufts毕业文...
《塔夫斯大学毕业证成绩单购买》做Tufts文凭毕业证成绩单/伪造美国假文凭假毕业证书图片Q微信741003700《塔夫斯大学毕业证购买》《Tufts毕业文...
 
Powerpoint on Writing a Newspaper Report.pptx
Powerpoint on Writing a Newspaper Report.pptxPowerpoint on Writing a Newspaper Report.pptx
Powerpoint on Writing a Newspaper Report.pptx
 
Call Girls In Karkardooma 83770 87607 Just-Dial Escorts Service 24X7 Avilable
Call Girls In Karkardooma 83770 87607 Just-Dial Escorts Service 24X7 AvilableCall Girls In Karkardooma 83770 87607 Just-Dial Escorts Service 24X7 Avilable
Call Girls In Karkardooma 83770 87607 Just-Dial Escorts Service 24X7 Avilable
 
Authentic No 1 Amil Baba In Pakistan Amil Baba In Faisalabad Amil Baba In Kar...
Authentic No 1 Amil Baba In Pakistan Amil Baba In Faisalabad Amil Baba In Kar...Authentic No 1 Amil Baba In Pakistan Amil Baba In Faisalabad Amil Baba In Kar...
Authentic No 1 Amil Baba In Pakistan Amil Baba In Faisalabad Amil Baba In Kar...
 
西伦敦大学毕业证学位证成绩单-怎么样做
西伦敦大学毕业证学位证成绩单-怎么样做西伦敦大学毕业证学位证成绩单-怎么样做
西伦敦大学毕业证学位证成绩单-怎么样做
 
escort service sasti (*~Call Girls in Paschim Vihar Metro❤️9953056974
escort service  sasti (*~Call Girls in Paschim Vihar Metro❤️9953056974escort service  sasti (*~Call Girls in Paschim Vihar Metro❤️9953056974
escort service sasti (*~Call Girls in Paschim Vihar Metro❤️9953056974
 
REFLECTIONS Newsletter Jan-Jul 2024.pdf.pdf
REFLECTIONS Newsletter Jan-Jul 2024.pdf.pdfREFLECTIONS Newsletter Jan-Jul 2024.pdf.pdf
REFLECTIONS Newsletter Jan-Jul 2024.pdf.pdf
 
(No.1)↠Young Call Girls in Sikanderpur (Gurgaon) ꧁❤ 9711911712 ❤꧂ Escorts
(No.1)↠Young Call Girls in Sikanderpur (Gurgaon) ꧁❤ 9711911712 ❤꧂ Escorts(No.1)↠Young Call Girls in Sikanderpur (Gurgaon) ꧁❤ 9711911712 ❤꧂ Escorts
(No.1)↠Young Call Girls in Sikanderpur (Gurgaon) ꧁❤ 9711911712 ❤꧂ Escorts
 
Model Call Girl in Lado Sarai Delhi reach out to us at 🔝9953056974🔝
Model Call Girl in Lado Sarai Delhi reach out to us at 🔝9953056974🔝Model Call Girl in Lado Sarai Delhi reach out to us at 🔝9953056974🔝
Model Call Girl in Lado Sarai Delhi reach out to us at 🔝9953056974🔝
 
南新罕布什尔大学毕业证学位证成绩单-学历认证
南新罕布什尔大学毕业证学位证成绩单-学历认证南新罕布什尔大学毕业证学位证成绩单-学历认证
南新罕布什尔大学毕业证学位证成绩单-学历认证
 
young Call girls in Neb Sarai 🔝 9953056974 🔝 Delhi escort Service
young Call girls in Neb Sarai 🔝 9953056974 🔝 Delhi escort Serviceyoung Call girls in Neb Sarai 🔝 9953056974 🔝 Delhi escort Service
young Call girls in Neb Sarai 🔝 9953056974 🔝 Delhi escort Service
 
🔝9953056974🔝!!-YOUNG BOOK model Call Girls In Aerocity Delhi Escort service
🔝9953056974🔝!!-YOUNG BOOK model Call Girls In Aerocity Delhi Escort service🔝9953056974🔝!!-YOUNG BOOK model Call Girls In Aerocity Delhi Escort service
🔝9953056974🔝!!-YOUNG BOOK model Call Girls In Aerocity Delhi Escort service
 
Ahmedabad Escorts Girl Services For Male Tourists 9537192988
Ahmedabad Escorts Girl Services For Male Tourists 9537192988Ahmedabad Escorts Girl Services For Male Tourists 9537192988
Ahmedabad Escorts Girl Services For Male Tourists 9537192988
 
Call Girls in Govindpuri Delhi 💯Call Us 🔝8264348440🔝
Call Girls in Govindpuri Delhi 💯Call Us 🔝8264348440🔝Call Girls in Govindpuri Delhi 💯Call Us 🔝8264348440🔝
Call Girls in Govindpuri Delhi 💯Call Us 🔝8264348440🔝
 

Microsoft Word Tutorial: Bridal Pageant Boutique Flyer

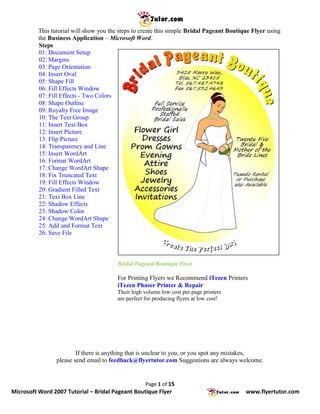
  • 1. This tutorial will show you the steps to create this simple Bridal Pageant Boutique Flyer using the Business Application – Microsoft Word. Steps 01: Document Setup 02: Margins 03: Page Orientation 04: Insert Oval 05: Shape Fill 06: Fill Effects Window 07: Fill Effects - Two Colors 08: Shape Outline 09: Royalty Free Image 10: The Text Group 11: Insert Text Box 12: Insert Picture 13: Flip Picture 14: Transparency and Line 15: Insert WordArt 16: Format WordArt 17: Change WordArt Shape 18: Fix Truncated Text 19: Fill Effects Window 20: Gradient Filled Text 21: Text Box Line 22: Shadow Effects 23: Shadow Color 24: Change WordArt Shape 25: Add and Format Text 26: Save File Bridal Pageant Boutique Flyer For Printing Flyers we Recommend iTezen Printers iTezen Phaser Printer & Repair Their high volume low cost per page printers are perfect for producing flyers at low cost! If there is anything that is unclear to you, or you spot any mistakes, please send email to feedback@flyertutor.com Suggestions are always welcome. Page 1 of 15 Microsoft Word 2007 Tutorial – Bridal Pageant Boutique Flyer www.flyertutor.com
  • 2. Step 01: Document Setup To begin, go to the Ribbon and select the Page Layout Tab. Click on Size and select Letter from the drop down menu. Step 02: Margins Click on Margins and select Narrow from the drop down menu. Page 2 of 15 Microsoft Word 2007 Tutorial – Bridal Pageant Boutique Flyer www.flyertutor.com
  • 3. Step 03: Page Orientation Go to the Page Setup Group and click on Orientation. Select Portrait from the drop down menu. Step 04: Insert Oval We will draw an Oval Shaped Background. Go back to the Ribbon and select the Insert Tab. Go to the Illustrations Group. Select Shapes to open up the Shapes Window. Select the Oval under Recently Used Shapes. Hold down the Left mouse button and draw the Oval on the Page. You will notice that the Ribbon has changed to the Format Tab which showcases the Drawing Tools. The Oval should take up most of the page. 8 Blue Shapes appear around the Oval. You can use any of these to resize the Oval if needed. Page 3 of 15 Microsoft Word 2007 Tutorial – Bridal Pageant Boutique Flyer www.flyertutor.com
  • 4. Step 05: Shape Fill While the Oval is still selected, go to the Format Tab > Shape Styles Group. Click on the Down Arrow on the right side of the Shape Fill Icon. A drop down Color Menu will appear. Select Gradients, which will open a Gradients Presets Window. From here select More Gradients which will open up the Fill Effects Window. Step 06: Fill Effects Window You should automatically be in the Gradient Tab, which is the first tab of this window. In the Color Section select Two Colors. This will change the Color Section of the Fill Effects Window to include 2 Drop Down Color Menus. Page 4 of 15 Microsoft Word 2007 Tutorial – Bridal Pageant Boutique Flyer www.flyertutor.com
  • 5. Step 07: Fill Effects - Two Colors Select the Down Arrow for Color1 and select "White" from Theme Colors, and select the Down Arrow for Color2 and select "Yellow" from Standard Colors. In the Transparency Section, set From to "100%" and To to "0%". In the Shading Styles Section, select Diagonal Down. Then select the Check Box for "Rotate fill effect with shape". Click OK. The Gradient Filled Oval should look like this: Step 08: Shape Outline Now to remove the Shape Outline, select the Oval and go back to the Format Tab > Shape Styles Group and select the Down Arrow to the right side of the Shape Outline Icon. This will open the Color Menu. Select No Outline. There you have it, a Gradient Filled Oval Background. Page 5 of 15 Microsoft Word 2007 Tutorial – Bridal Pageant Boutique Flyer www.flyertutor.com
  • 6. Step 09: Royalty Free Image Next add an Image to the document. Here I downloaded the Image of a Bride from www.Clker.com, which is a site where you can download Royalty Free Clipart. You can also check out www.Public-Domain-Image.com, OpenClipArt.org, and www.PublicDomainPictures.net. Step 10: The Text Group In Adobe Illustrator, Adobe Photoshop, OpenOffice Draw, Inkscape, Corel Draw and Microsoft Publisher, you are able to freely move an Image anywhere on the canvas. This is also possible in Microsoft Word as long as you first place the Image within a Text Box. To Insert a Text Box, go back to the Ribbon and select the Insert Tab. Then go to the Text Group and select Text Box. Step 11: Insert Text Box The Built-In Text Box Window appears. To the bottom of this window, you will see Draw Text Box. Select it, then hold down the Left Mouse Button and draw the Text Box on the screen. Page 6 of 15 Microsoft Word 2007 Tutorial – Bridal Pageant Boutique Flyer www.flyertutor.com
  • 7. Step 12: Insert Picture The Ribbon will change to the Format Tab. Go back to the Insert Tab and click on the Picture Icon in the Illustrations Group. This allows you to insert a Picture from File. It opens up the Insert Picture Window, where you can select your file and then click Insert. Be certain that your images are in a format that will be recognized by Microsoft Word. These images are saved in PNG (Portable Network Graphics) Format. Once the Image has been inserted, Resize it by selecting one of the Circles and holding down the "Ctrl" and "Shift" Keys together, so that you don't get a disproportionate Image. You will notice that the image is facing the wrong direction. To correct this we need to Flip it. Step 13: Flip Picture With the Image selected, go to the Format Tab > Arrange Group. Click on the Rotate Icon to open a drop down menu. Select Flip Horizontal. The Flipped Image will look like this: Page 7 of 15 Microsoft Word 2007 Tutorial – Bridal Pageant Boutique Flyer www.flyertutor.com
  • 8. Step 14: Transparency and Line Select the Text Box, then Right click over it to reveal another menu. Select Format Text Box. This will open the Format Text Box Window. In the Colors and Lines Tab, go to the Fill Section and set Transparency to "100%". In the Line Section, click on the Down Arrow for Color and select No Color from the Color Window. Click OK. The Image now has a Transparent Background. Selecting the Image for moving may be a little tricky, since you can only move it when its Text Box container is selected, which should look like this. Step 15: Insert WordArt Go back to the Insert Tab, to insert another Text Box. Once this is done, remember the Ribbon will change to the Format Tab. Go back to the Insert Tab again, look for the Text Group and select the Word Art Icon, which will open up a Word Art Style Menu. Select Word Art Style 1. Page 8 of 15 Microsoft Word 2007 Tutorial – Bridal Pageant Boutique Flyer www.flyertutor.com
  • 9. Step 16: Format WordArt This will open up the Edit Word Art Text Window. Start typing the text "Bridal Pageant Boutique". Click the 1st Down Arrow to choose a Font. In this case the Font is "Advert" which is a Free Font that was downloaded at www.FontFreak.com. Click on the 2nd Down Arrow to change the Font Size. Set it to "48". Click Ok. The Word Art Text should look like this: To make the Text Box appear invisible, repeat Step 14 for Transparency and Line. Step 17: Change WordArt Shape Select the Text, click the Change Shape Icon from the Word Art Styles Group. This will open up a drop down menu. Select the Arch Up (Curve), which is the second shape under Follow Path. Some of the Text will appear to be cut off. Don't be alarmed, we will take care of it in the next step. Page 9 of 15 Microsoft Word 2007 Tutorial – Bridal Pageant Boutique Flyer www.flyertutor.com
  • 10. Step 18: Fix Truncated Text The Text will be surrounded by a Rectangle that has 4 Squares and 4 Rectangles on it. Move your cursor above the Rectangle until you see a 4 Pointed Arrow. Click again and the Rectangle around the Text will change to just 4 Squares and 4 Circles. Move the cursor over the Square to the Right. When you see a 2 Sided Arrow, hold down the mouse button and drag outward to widen the Rectangle. The Text will now be all visible. This step will have to be repeated whenever any change is made to this Text. Step 19: Fill Effects Window To add the Gradient, right click over the WordArt Text and select Format WordArt from the menu that appears. This will open the Format WordArt Window. In the Colors and Lines Tab, in the Fill Section, click on Fill Effects, which will open the Fill Effects Window. Page 10 of 15 Microsoft Word 2007 Tutorial – Bridal Pageant Boutique Flyer www.flyertutor.com
  • 11. Step 20: Gradient Filled Text In the Colors Section, select Two Colors. Click on the Down Arrow under Color 1 and select Red from the Color Menu that appears. Then go to Color 2 and select Yellow. In the Shading Styles Section select Vertical and then check the "Rotate Fill Effect with Shape" Box. Click OK. Step 21: Text Box Line You will then be back at the Format WordArt Window. In the Line Section, click the Down Arrow on the Right side of Color and select No Color from the Color Menu that appears. Click OK. Remember some of the Text will appear to be cut off. Leave it alone for now. Page 11 of 15 Microsoft Word 2007 Tutorial – Bridal Pageant Boutique Flyer www.flyertutor.com
  • 12. Step 22: Shadow Effects Double click on the Gradient Title. Notice that the Ribbon has changed to the Format Tab. Click on the Shadow Effects Button in the Shadow Effects Group. Select Shadow Style 5 from the Drop Shadow Section. If you hold your mouse over each Style for 2 seconds, it will tell you the Style's Name. Once you select the Drop Shadow, the menu will close. Step 23: Shadow Color Go back to the Shadow Effects Button. Then go all the way down to Shadow Color and select Black from the Shadow Menu that appears. Now repeat the Previous Step (Step 18) to adjust the Text. The finished Gradient Filled Drop Shadow Text should look like this: Page 12 of 15 Microsoft Word 2007 Tutorial – Bridal Pageant Boutique Flyer www.flyertutor.com
  • 13. Step 24: Change WordArt Shape Repeat Steps 15 through 17 this time using the Text "Create The Perfect Day". Set the Font to "Advert" and the Font Size to "24". When choosing the Word Art Shape, select Arch Down (Curve). Then Repeat Step 21 and finally Step 18. Even though the Curve was applied to the Text, it does require some more adjustments. With the Text still selected, move the cursor over the Upper Right Corner Square and drag slightly upward to increase the curvature of the Text. While dragging you will notice a dashed curved line appear. Once finished, you will notice the Text will appear to move downward. Simply select the Text Box around the Text and move upward with the Arrow Key on your keyboard. The Text should look like this: Step 25: Add and Format Text All that remains is to add regular Text to the Flyer. Insert a Text Box. Type the "Flower Girl" Text. After typing the entire block of Text, select all the Text by holding down your Left mouse button and dragging. Go to the Home Tab and in the Font Group select the Down Arrow next to "Calibri". In this case the Font is set to "Segoe Print", which is a free Font that was downloaded at FontFreak.com. You can also pick a Font of your own choosing. Set the Font Size to 30 by typing in a number in the Font Size box, or you could click the down arrow to the right of the Font Size box and select a suitable number from the drop down menu that appears. Set the Text to Bold by clicking on the Bold Icon in the Font Group. To the right of the Font Group is the Paragraph Group. With the Text still selected, choose the Center Icon. All the other Blocks of Text are of a smaller Font Size and are set to both Bold and Italic. Select each Text Box and move into place by using the Arrow Keys on your keyboard. Page 13 of 15 Microsoft Word 2007 Tutorial – Bridal Pageant Boutique Flyer www.flyertutor.com
  • 14. Step 26: Save File Repeate Step 14 to set the Transparency and Line Color for each Text Box. All that's left to do is Save the document. Click on the Office Button (located in the top left corner of the screen), which will open up a drop down menu. Go to Save As > Word Document. In the Save As Window name your document and click the Save button. Page 14 of 15 Microsoft Word 2007 Tutorial – Bridal Pageant Boutique Flyer www.flyertutor.com
  • 15. Page 15 of 15 Microsoft Word 2007 Tutorial – Bridal Pageant Boutique Flyer www.flyertutor.com