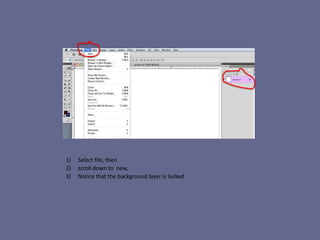
1. 1) Select file, then
2) scroll down to new,
3) Notice that the background layer is locked
2.
3. 1) In the new window, search for your picture and
2) click to open
4. 1) unlocked the background layer,
2) A new layer message box will appear, you may give this a name
5. 1) Using the selection tool, select the space around your head,
2) then copy – use the command key - and then hold down the C key,
3) Now select the first tab that you opened
6. 1) Use the magic wand to remove the background around your head,
2) You can also use the eraser tool.
3) Make sure that all of the background around your head has been removed.
4) Check to make sure that the layer was unlocked.
8. 1) Now you want to search for the picture of the place that you want to
visit
2) Select file, scroll down to open
9. 1) A new window will open showing your desktop
2) Select the .jpg [or .png] of the place you will travel to, e.g., Zurich
10. 1) A third tab will open
2) Your picture is not visible on this layer
3) Notice that the layer is locked, unlock it [slick 4 will show how to do it]
11. 1) The city / county layer is now unlocked
2) Select all, command A,
3) Then copy, command C.
12. 1) Paste [command V] the city/county images on the first tab,
2) Notice that that city image is on top of your face
3) Layer 2 is highlighted, and layer 1 is not.
4) Layer 1 is your face; layer 2 is the city/country
5) Notice that each layer has an eye icon in front of the layer. That means that you can SEE the LAYER.
13. 1) Click on the eye icon on layer 1,
2) Now you will not be able to see layer 1 [your face]
3) Select Layer 2, it will be highlighted
4) you can see the city/county picture, and nothing else on ht layer
14. 1) Select edit
2) Scroll down to transform
3) Carefully move directly over to scale
4) Hold down the shift AND command keys
15. Checkered area = background
1) While holding down the shift AND command keys
2) Grab hold of any or the selected corners to stretch the picture
3) Fill the entire background with your picture
16. 1) Notice you no longer can see the checkered background area.
2) Notice that you can no longer use any tools, … because …
17. 1) You must APPLY the new size of your picture.
2) Select the Apply button
18. 1) Turn the eye icon on
2) Your picture will not be visible
3) Select layer 1 and move it above layer 2
4) Now you can see you face in front of the city/country image
19. 1) Turn off the eye icon for layer 2 [city/county] layer
2) Notice that the city/country image is not longer visible
3) Select layer 1 and it will be highlighted
4) Now, select the paintbrush
20. 1 choose the paint brush type that you like, using the slide bar,
2) Choose the size of the brush diameter.
21. 1) Using your paint brush, make your body; stick figure is fine.
2) The color swatch will allow you to choose a specific color of paint.
22. 1) Select the eye icon for layer 2 [the city/county image],
2) The photo of the place you want to travel to will be visible behind
‘your image’.
23. 1) Select the eye icon for layer 1 [you will not longer be able to see ‘your image’
2) Select layer 2 [city / country image]
3) Select filter, and scroll down to Filter Gallery.
4) The city / county image will open up in a new view.
24. 1) Select many of the different filters to see which TEXTURE you like the best.
2) Note paper was chosen for this view.
3) The side bars on the right create more changes in the texture.
4) Once you get the view that you like, save, by clicking on
OK
25. 1) Now the city/country has a new texture
2) You can see that layer 2 is highlighted
26. 1) Select the eye icon for layer 1
2) ‘Your image’ appears in front of the city/country that you want to
visit.
27. 1) Save this image,
2) Select file,
3) Scroll down to Save As [shift – command – S keys]
28. 1) A new message box will appear,
2) Type your NamePlace in the Save As: box
3) Select Desktop
4) Then scroll down to JPEG for the file format.