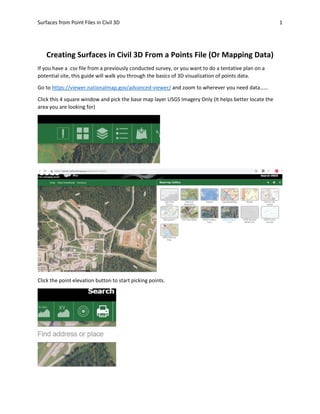
Coefficient of Thermal Expansion and their Importance.pptx
Civil 3d surface import
1. Surfaces from Point Files in Civil 3D 1
Creating Surfaces in Civil 3D From a Points File (Or Mapping Data)
If you have a .csv file from a previously conducted survey, or you want to do a tentative plan on a
potential site, this guide will walk you through the basics of 3D visualization of points data.
Go to https://viewer.nationalmap.gov/advanced-viewer/ and zoom to wherever you need data……
Click this 4 square window and pick the base map layer USGS Imagery Only (It helps better locate the
area you are looking for)
Click the point elevation button to start picking points.
2. Surfaces from Point Files in Civil 3D 2
Click activate and then start picking points on the map that you want data for……
Notice the points come in with both meters and feet. Highlight all the point data when complete, and
ctr-C (copy)….
Open Excel and a new sheet……..
3. Surfaces from Point Files in Civil 3D 3
Ctr-V (paste) the data into the new spreadsheet
Delete either the meter or feet column (I deleted meter because I am using survey feet in my civil 3D
coordinate system (future step)).
NOTE: I added a point description in the 5th
column so when I import my file, it comes in with a point
description (future step).
Save file as a .CSV (comma delimited)
4. Surfaces from Point Files in Civil 3D 4
Now Startup Civil 3D
Open Civil 3d…. Start a new project…
Change Tool Layout to Planning and analysis
Click map setup tab
Click assign coordinate system
x
5. Surfaces from Point Files in Civil 3D 5
Search for the state you are in initials and pick XX83 for survey foot (I’m using CF for central Missouri
survey feet)
Change back to civil 3d tool space
6. Surfaces from Point Files in Civil 3D 6
Click the Insert tab and select points from file…..
This box will pop up. You need to click the manage formats button in the center right before ever
selecting a file.
Click New…
7. Surfaces from Point Files in Civil 3D 7
Select user point file and click OK….
Name your new format whatever you want. Change defuaklt file extension to .csv. Under format
options click delimited by: and put a comma in the box. Put a check in the coordinate zone transform
box and select the globe button…….
8. Surfaces from Point Files in Civil 3D 8
In the selected coordinate zone system code: type ll84 which autofills the rest to be Lat Long WGS84
Now you have to specify the column info for your custom import format. Click the first untiled column
heading and change it to point number.
9. Surfaces from Point Files in Civil 3D 9
Change the second one to DECDEG Latitude and set the precision to 7……. This will help delineate
between points that really close
Do the same for the third column and select DECDEG Longitude
10. Surfaces from Point Files in Civil 3D 10
For the 4th
column select point elevation
If you added a 5th
column for a full description of the point, select full description. When complete with
all columns, it should look like this… Click OK…. Then click close on the previous dialog box
11. Surfaces from Point Files in Civil 3D 11
Now click the plus to add your points file
Make sure the file type is set to .csv, and then find your points file you created in the beginning. MAKE
SURE THE EXCEL FILE IS CLOSED IN THE BACKGROUND BEFORE OPENING!!!
Once the file is loaded in the dialog box, lect your custom-made import format and you can see a
preview at the bottom that shows how it is interpreting your points.
12. Surfaces from Point Files in Civil 3D 12
Type Z hit enter then E hit enter to zoom to extents….. you should see your points now……..
In the prospector window on the left, right click surface and then create surface.
13. Surfaces from Point Files in Civil 3D 13
Name your surface and hit ok.
Hit your plus key next to surface and expand out your surface, then definition
14. Surfaces from Point Files in Civil 3D 14
Right click points group and select add….. Then click all points group…. (many ways to do this if you
previously made different points groups…. This is the fastest for instruction purposes)
WHALAH!!! You now have a surface from a points file….Now lets work some magic…….
15. Surfaces from Point Files in Civil 3D 15
Right click surface in the prospector box and edit surface properties
Click contours tab and change Use color scheme to true. I like to make smaller contour intervals as
well…
16. Surfaces from Point Files in Civil 3D 16
I also changed the depressions to show and turned on contour smoothing.
Now you have a cleaner surface, and can 3D orbit around and see your elevations……
17. Surfaces from Point Files in Civil 3D 17
Also you can click the display tab and turn on the slope arrows
18. Surfaces from Point Files in Civil 3D 18
With slope arrows……….
Now lets drape an image……. Go to Google earth pro (or anywhere you want) and get a good image to
drape……. Go to insert…..Click attach….Pick your image and click Open
19. Surfaces from Point Files in Civil 3D 19
Click OK on the following dialog box…. You can play around with the options or trust the defaults and
work the image on the screen………
Click a point in you drawing and scale the image……. If you use an image with a scale reference, it makes
it easier to ensure your image is the correct size compared to your surface. This may take a while……
20. Surfaces from Point Files in Civil 3D 20
Type DrapeImage and make sure your pic and surface are the two in the dialog box..
Now you have a draped material on your surface that should look very accurate….If you 3d orbit, you
should be able to see some legit contour changes………
21. Surfaces from Point Files in Civil 3D 21
Now all of this allowed you do visualize and model a surface without ever leaving your office, and now
you can do some preliminary civil planning work or start designing.