Hybridoma Technology ( Production , Purification , and Application )
Introduction to portraiture
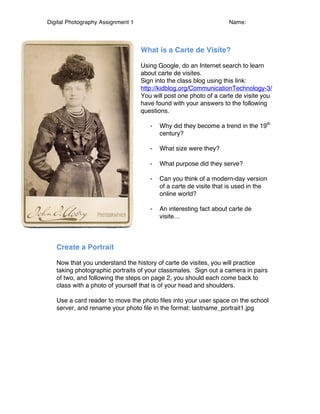
1. Digital Photography Assignment 1
Name:
What is a Carte de Visite?
Using Google, do an Internet search to learn
about carte de visites.
Sign into the class blog using this link:
http://kidblog.org/CommunicationTechnology-3/
You will post one photo of a carte de visite you
have found with your answers to the following
questions.
-
Why did they become a trend in the 19th
century?
-
What size were they?
-
What purpose did they serve?
-
Can you think of a modern-day version
of a carte de visite that is used in the
online world?
-
An interesting fact about carte de
visite…
Create a Portrait
Now that you understand the history of carte de visites, you will practice
taking photographic portraits of your classmates. Sign out a camera in pairs
of two, and following the steps on page 2, you should each come back to
class with a photo of yourself that is of your head and shoulders.
Use a card reader to move the photo files into your user space on the school
server, and rename your photo file in the format: lastname_portrait1.jpg
2. Digital Photography Assignment 1
Name:
Introduction to Portraiture: Tips for taking good portraits
1. Natural light is best! The person being photographed should stand by a
window. He or she should stand slightly turned toward the window while still
looking straight at the camera. (See the diagram below)
2. Make sure the flash is turned off. Ask Miss B. for help if you arenʼt sure. (It
is best to take photos using the ʻmanualʼ mode in your digital camera so that you
can control the amount of light and shadow.)
3. Make sure you are standing a good distance from your subject and zoom
in with the lens. Standing too close to your subject will distort their face!
4. Before taking the picture, look at what is in the background! Are there
things in the background that will be distracting from the portrait?
5. If your photos are coming out blurry, sign out a tripod!
6. Make sure your lens is zoomed in so that the photo only shows the head
and shoulders of your partner.
3. Digital Photography Assignment 1
Name:
Editing Your Portrait in Photoshop
Once you have downloaded your portrait onto your user space, open the file in
Photoshop Elements. You will edit this photo to become a split portrait, showing
one half of your identity that is rooted in the physical world, and the other half of
your identity that is influenced by the online world.
1. Open your file. Your photo is the background layer in your layer palette.
Double click the background layer to make it into Layer 0. Make a new
layer (Layer 1).
2. With Layer 0 selected go to ʻSelectʼ > ʻSelect Allʼ then go to ʻEditʼ> ʻCopyʼ
>ʼPasteʼ into Layer 1
4. Digital Photography Assignment 1
Name:
3. You now have two versions of your portrait. You will make changes to
Layer 1 and leave Layer 0 as a backup in case you need to go back to
your original image at any point.
Using the ʻRectangular Marqueeʼ tool select
half of your face.
Go to ʻEditʼ > ʻCutʼ, make a new layer (Layer 2), and go to ʻEditʼ > ʻPasteʼ
Your layer palette should look like this:
4. One half of your face will stay untouched. The other half will be edited to show
your digital identity.
Select Layer 1. Select the ʻMagnetic Lassoʼ tool.
Use this tool to trace around the half of your face that is on Layer 1.
Tip: Double-click to complete the selection path before releasing
your hand from the mouse.
Make a new layer (Layer 3). Go to ʻEditʼ > ʻPasteʼ into Layer 3.
5. Digital Photography Assignment 1
Name:
(Hint: to make it less confusing to match up the images, Click on the little ʻEyeʼ
button at the left-hand side of each layer to hide it from view. When you want all
layers visible just click on the eye again.)
5. Now you will edit Layer 3. Go to ʻFilterʼ. You can select any of the filter options
to adjust your appearance. I am using ʻAdd Noiseʼ to create the look of digital
noise on my face.
6. Digital Photography Assignment 1
Name:
6. I am also going to tint my face to be a different colour. I usually think of the
colour blue when I think of the internet.
To do this, hold down the ʻControlʼ key on your keyboard as you click on Layer 3
in your layer palette. This selects only this layer. Without deselecting this area,
make a new layer (Layer 4) in your palette. Go to the ʻPaint Canʼ tool and choose
a colour, and click the Paint Can tool inside the selected area of your photo.
7. Digital Photography Assignment 1
Name:
7. Make sure you still have Layer 4 selected. Go to the layer blending options in
your layer palette.
8. Now find images of the website logos that you use frequently on the internet
and ʻCopyʼ and ʻPasteʼ them into new layers in your file. Use the layer blending
options (shown in step 7) to change the way these images are integrated into
your photo. Add at least 3 logos into your photo.
8. Digital Photography Assignment 1
Name:
9. To make sure that the ʻsplitʼ between the photos remains distinct, drag Layer 2
to the top of your layer palette.
10. You may choose to add words to the ʻdigitalʼ side of your portrait. Use the
ʻTextʼ tool
9. Digital Photography Assignment 1
Name:
11. Go to ʻFileʼ > ʻSave Asʼ . Make sure you use this file name format: Lastname
Firstinitial_digital CDV.psd
MAKE SURE YOU CLICK ʻSaveʼ ʻAs a Copyʼ and save to your Media Arts folder
in your user space on the school server.
Marks will be deducted if you do not save your file properly and if your folder is
not well organized.