SlideShare a Scribd company logo
1 of 22
Download to read offline
Adobe Photoshop CS4: Advanced
Part 2: Special Effects and Graphic Design
Version 1.0

INFORMATION TECHNOLOGY SERVICES
CALIFORNIA STATE UNIVERSITY, LOS ANGELES

Winter 2010

Table of Contents
Introduction ....................................................................................................................................2
Downloading the Data Files ..........................................................................................................2
Creating Special Effects with Photographic Images and Text ..................................................2
Making Graffiti Art .....................................................................................................................2
Imitating Andy Warhol ...............................................................................................................7
Creating Neon Text ...................................................................................................................10
Animating in Photoshop ..............................................................................................................13
Compositing ..................................................................................................................................17
Watermarking ..............................................................................................................................20

For additional handouts, visit http://www.calstatela.edu/handouts.
Introduction
Adobe Photoshop CS4, an industry standard, pushes the boundaries of digital imaging and
editing. While widely used by professional photographers as well as web and graphic designers,
Photoshop can also provide a creative outlet for amateurs, enthusiasts, and artists alike.
The kinds of special effects a person can create using Photoshop is limitless. This handout will
introduce users to just a few ideas to get their creative juices flowing. Furthermore, lessons will
comprise of designing posters and flyers. This handout will also cover how to add copyright
information to an image’s metadata as well as the image itself through watermarking.

Downloading the Data Files
This handout includes sample data files that can be used for hands-on practice. The data files are
stored in a self-extracting archive. The archive must be downloaded and executed in order to
extract the data files.
 The data files used with this handout are available for download at
http://www.calstatela.edu/its/training/datafiles/photoshopcs4advp2.exe.
 Instructions on how to download and extract the data files are available at
http://www.calstatela.edu/its/docs/download.php.

Creating Special Effects with Photographic Images and Text
Special effect is a term used to describe a visual or sound effect that seems realistic, but was
actually created post shoot. The following two lessons tap into some of Photoshop’s special
effects abilities.

Making Graffiti Art

Graffiti is a controversial form of visual expression; however, no one can deny its commercial
appeal. The following lesson shows users how to convert a photographic image into graffiti art.
To turn the photograph into a graphic element:
1. Start Adobe Photoshop CS4.
2. Locate and open the graffiti.psd file.
3. In the Layers panel, select the graffiti 1 layer.
4. Click the Layer menu, point to New Adjustment Layer, and select Threshold to turn
the photographic image to black and white. The New Layer dialog box opens.
5. Select the Use Previous Layer to Create Clipping Mask check box, and then click the
OK button (see Figure 1).

Figure 1 – New Layer Dialog Box

NOTE: To apply the adjustment layer to all layers, do not select the Use Previous Layer to
Create Clipping Mask check box.
Adobe Photoshop CS4: Advanced, Part 2

2
6. In the Adjustments panel, type 111 in the Threshold Level box. Or, drag the Threshold
slider to the left or right until the desired level is reached (see Figure 2).

Figure 2 – Threshold Level in the Adjustments Panel

7. In the Tools panel, select the Burn tool
Figure 3).

hidden under the Dodge tool

(see

Figure 3 – Burn and Dodge Tools

8. With the graffiti 1 layer selected in the Layers panel, click on the areas of the image that
need to be darkened (e.g., the white tank top area).
9. Select the Dodge tool
and click on the areas of the image that need to be lightened
(e.g., face and pants area).
10. Click the Filter menu, point to Noise, and select Median to get rid of the jagged edges.
The Median dialog box opens.
11. Set the Radius to 3 pixels, and then click the OK button to return to the canvas (see
Figure 4).

Figure 4 – Median Dialog Box
Adobe Photoshop CS4: Advanced, Part 2

3
Figure 5 – Before and After Applying Median Noise Filter

12. In the Layers panel, right-click the Threshold 1 adjustment layer and select Merge
Down (see Figure 6).

Figure 6 – Merging Down a Layer

To create a spattering effect around the edges of the image:
1. In the Tools panel, select the Polygonal Lasso tool
(see Figure 7).

hidden under the Lasso tool

Figure 7 – Polygonal Lasso Tool

2. Click around the image to make a polygonal selection (see Figure 8).

Figure 8 – Polygonal Selection

3. Click the Select menu and select Inverse.
4. In the Tools panel, select the Brush tool
Adobe Photoshop CS4: Advanced, Part 2

.
4
5. On the Options bar, open the Brush Preset picker and set the Hardness to 0% and the
Master Diameter to 150 px (see Figure 9).

Figure 9 – Brush Preset Picker

6. On the Options bar, click the Mode arrow and select Dissolve from the list (see Figure
9).
7. On the canvas, drag the brush along the edges of the selection to create a spattering effect
(see Figure 10).

Figure 10 – Spattering Effect

8. Click the Select menu and select Deselect.
To colorize the graffiti and blend it with the background:
1. With the graffiti 1 layer selected, click the Image menu, point to Adjustments, and
select Hue/Saturation. The Hue/Saturation dialog box opens (see Figure 11).
2. Select the Colorize check box.
Adobe Photoshop CS4: Advanced, Part 2

5
Figure 11 – Hue/Saturation Dialog Box

3. Drag the Lightness slider to the right to brighten the black areas (see Figure 11).
4. Drag the Saturation and Hue sliders to the left or right to change the color (see Figure
11).
5. When finished, click the OK button.
6. To soften all the edges, click the Filter menu, point to Blur, and select Gaussian Blur.
The Gaussian Blur dialog box opens.
7. Set the Radius to 1.0 pixels, and then click the OK button (see Figure 12).

Figure 12 – Gaussian Blur Dialog Box

8. In the Layers panel, turn on the layer visibility on the Brick Wall layer (see Figure 13).

Adobe Photoshop CS4: Advanced, Part 2

6
Figure 13 – Layer Visibility and Multiply Blending Mode

9. To blend the image with the background, select the graffiti 1 layer, click the Blending
Mode arrow, and select Multiply from the list (see Figure 13).

Figure 14 – Final Image

Imitating Andy Warhol

Andy Warhol is famous for his silk screens of famous actresses Marilyn Monroe and Elizabeth
Taylor. The following exercise shows users how to imitate this visual effect using Photoshop
layers, blending modes, the Brush tool, and colors.
To set up the black and white photograph for painting:
1. Locate and open the warhol.psd file.
2. In the Layers panel, select the face layer and change its Blending Mode to Hard Light
to create a more stylized look (see Figure 15).

Adobe Photoshop CS4: Advanced, Part 2

7
Figure 15 – Hard Light Blending Mode

3. Hold down the Ctrl key and click the face layer’s layer thumbnail to load it as a selection
(see Figure 15).
4. Click the Layer menu, point to New, and select Layer. The New Layer dialog box
opens.
5. Type color in the Name box to rename the layer (see Figure 16).

Figure 16 – New Layer Dialog Box

6. Click the OK button.
7. In the Layers panel, set the color layer’s Blending Mode to Multiply (see Figure 17).

Figure 17 – Multiply Blending Mode

8. Click the Edit menu and select Fill. The Fill dialog box opens.
9. Under Contents, click the Use arrow and select Color from the list (see Figure 18).

Adobe Photoshop CS4: Advanced, Part 2

8
Figure 18 – Fill Dialog Box

10. In the Color Picker dialog box, select a flesh toned color, and then click the OK button
(see Figure 19).

Figure 19 – Color Picker Dialog Box

11. In the Fill dialog box, click the OK button to return to the canvas.
12. Click the Select menu and select Deselect.
To color the rest of the face:
1. In the Layers panel, click the Lock Transparent Pixels icon
of the color layer (see Figure 20).

to lock the transparency

Figure 20 – Lock Transparent Pixels
Adobe Photoshop CS4: Advanced, Part 2

9
2. To color the rest of the face, select the Brush tool
in the Tools panel.
3. Click the Foreground color box (see Figure 21). The Color Picker dialog box opens.
4. Change the color to red, and then click the OK button.

Figure 21 – Foreground Color Box

5. Paint the lips red using the Brush tool.
NOTE: Change the brush size and hardness as needed.

6. Repeat steps 3 through 5 to paint the eyes, eyelids, and hair with the desired colors (see
Figure 22).

Figure 22 – Final Image

Creating Neon Text

Typographic manipulation and effects can be done using Photoshop. In the following exercise,
users will take ordinary text and turn it into a neon sign. In real life, neon lettering is made of
glass tubes heated up and bent into shapes. In Photoshop, the neon light effect is done using
selection techniques and layer styles.
To prepare the text:
1. Locate and open the neon.psd file.
2. Hold down the Ctrl key and click the Layer 1 layer thumbnail to load the word on the
canvas as a selection (see Figure 23).

Adobe Photoshop CS4: Advanced, Part 2

10
Figure 23 – Neon Layer Thumbnail

3. Click the Select menu, point to Modify, and select Expand. The Expand Selection
dialog box opens.
4. Type 8 in the Expand By box, and then click the OK button (see Figure 24).

Figure 24 – Expand Selection Dialog Box

Figure 25 – Expanding a Selection

5. With the Layer 1 layer selected, click the Layer menu, point to New, and select Layer.
The New Layer dialog box opens.
6. Click the OK button.
7. Click the Edit menu and select Fill. The Fill dialog box opens.
8. Click the Use arrow and select Color from the list (see Figure 26). The Color Picker
dialog box opens.

Figure 26 – Fill Dialog Box
Adobe Photoshop CS4: Advanced, Part 2

11
9. Select a color that will enhance the neon effect, and then click the OK button.
10. In the Fill dialog box, click the OK button to return to the canvas.
11. With the Layer 2 layer selected, hold down the Ctrl key and click the Layer 1 layer
thumbnail to load it as a selection (see Figure 27).

Figure 27 – Loading Layer 1 as a Selection with Layer 2 Selected

12. Click the eye icon
next to the Layer 1 layer to hide its content (see Figure 27).
13. Press the Delete key to delete the selected area (see Figure 28).

Figure 28 – Delete the Selection

14. Click the Select menu and select Deselect.
To add the neon effect:
1. Locate and open the neon_step2.psd file.
2. In the Tools panel, select the Eraser tool
.
3. With the Layer 2 layer selected, use the Eraser tool to insert breaks to give a sense of
the tubes joining (see Figure 29).
NOTE: Resize the brush size as needed and use a hard-edged brush.
NOTE: Use the Zoom tool to magnify the image in order to erase with accuracy.

Figure 29 – Using the Eraser Tool to Insert Breaks

Adobe Photoshop CS4: Advanced, Part 2

12
4. With the Layer 2 layer selected, click the Layer menu, point to Layer Style, and select
Blending Options. The Layer Style dialog box opens.
5. Select Outer Glow in the left column (see Figure 30).
6. Drag the Size slider to the right or type 15 in the Size box (see Figure 30).

Figure 30 – Outer Glow Layer Style

7. Click the color box to change the color of the outer glow (see Figure 30). The Color
Picker dialog box opens.
8. Click on a letter on the canvas to sample its color (see Figure 31).

Figure 31 – Sampling Color

9. Click the OK button to close the Color Picker dialog box.
10. In the Layer Style dialog box, select Bevel and Emboss in the left column, and then
click the OK button.

Animating in Photoshop
Animation is a sequence of images, or frames, displayed over time creating an illusion of
movement when viewed in quick succession. Users can now create frame-based animation
directly in Photoshop using the Animation panel. Animated images can be saved as a .psd file or
rendered as an Adobe Flash Video, a QuickTime Movie, or an MPEG-4 file.
To animate:
1. Locate and open the animate.psd file.
2. Change the workspace to Video by clicking the Window menu, pointing to Workspace,
and selecting Video (see Figure 32). Or, click the Workspace menu on the Application
bar and select Video (see Figure 32).

Adobe Photoshop CS4: Advanced, Part 2

13
Figure 32 – Video Workspace

3. If the Lens and Mask layers are not already selected, hold down the Ctrl key and click
on both layers (see Figure 33).

Figure 33 – Lens and Mask Layers Selected in the Layers Panel

4. By default, a frame already appears in the Animation panel. Create another frame by
clicking the Duplicate Selected Frames icon
at the bottom of the Animation panel
(see Figure 34). Or, click the Animation panel menu located in the upper right corner of
the panel and select New Frame (see Figure 34).

Figure 34 – Duplicate Selected Frames Icon and Panel Menu

Adobe Photoshop CS4: Advanced, Part 2

14
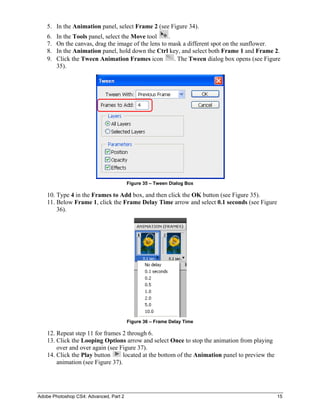
5. In the Animation panel, select Frame 2 (see Figure 34).
6.
7.
8.
9.

In the Tools panel, select the Move tool
.
On the canvas, drag the image of the lens to mask a different spot on the sunflower.
In the Animation panel, hold down the Ctrl key, and select both Frame 1 and Frame 2.
Click the Tween Animation Frames icon
. The Tween dialog box opens (see Figure
35).

Figure 35 – Tween Dialog Box

10. Type 4 in the Frames to Add box, and then click the OK button (see Figure 35).
11. Below Frame 1, click the Frame Delay Time arrow and select 0.1 seconds (see Figure
36).

Figure 36 – Frame Delay Time

12. Repeat step 11 for frames 2 through 6.
13. Click the Looping Options arrow and select Once to stop the animation from playing
over and over again (see Figure 37).
14. Click the Play button
located at the bottom of the Animation panel to preview the
animation (see Figure 37).

Adobe Photoshop CS4: Advanced, Part 2

15
Figure 37 – Animation Play Button and Looping Options

To save the animation:
1. Click the File menu and select Save to save the animation as a .psd file. Or, click the File
menu, point to Export, and select Render Video. The Render Video dialog box opens
(see Figure 38).
2. Under the Location section, click the Select Folder button and select Desktop in the
Browse for Folder dialog box, and then click the OK button (see Figure 38).

Figure 38 – Render Video Dialog Box

3. Under the File Options section, select the QuickTime Export option and select
QuickTime Movie from the list box next to it (see Figure 38).
NOTE: To edit video quality and filter settings, click the Settings button.

4. When finished, click the Render button (see Figure 38).
5. Double-click the animate.mov file on the desktop to preview it in QuickTime Player
(see Figure 39).

Adobe Photoshop CS4: Advanced, Part 2

16
Figure 39 – Previewing in QuickTime Player

Compositing
Digital compositing refers to the process in which multiple images are assembled to create one
final image. The following exercise takes seven images and composites them to create one
image.
To combine multiple images into one file:
1. Locate and simultaneously open the composite_1.psd, composite_2.psd,
composite_3.psd, composite_4.psd, composite_5.psd, composite_6.psd, and
composite_7.psd files (see Figure 40).

Figure 40 – Opening Multiple Images in Photoshop

2. Click the Window menu, point to Arrange, and select Tile.
Adobe Photoshop CS4: Advanced, Part 2

17
3. In the Tools panel, select the Move tool
.
4. Click on the image in composite_2.psd and while holding down the Shift key, drag that
image into composite_1.psd (see Figure 41).
NOTE: Holding down the Shift key while dragging will ensure that each image drops directly on
top of the others.

5. Repeat step 4 for composite_3.psd, composite_4.psd, composite_5.psd,
composite_6.psd, and composite_7.psd (see Figure 41).

Figure 41 – Dragging Multiple Images into One File

6. Select composite_1.psd and verify that there are seven total layers in the Layers panel.
7. Close all the image files except for composite_1.psd.
To composite:
1. Locate and open the compositing.psd file.
2. In the Layers panel, select the Layer 6 layer.
3. In the Tools panel, select the Lasso tool

(see Figure 42).

Figure 42 – Lasso Tool

4. On the Options bar, type 12 px in the Feather box to soften the edges of the selection
(see Figure 43).
Adobe Photoshop CS4: Advanced, Part 2

18
Figure 43 – Feather Box

5. Drag to trace a selection around the figure and its shadow (see Figure 44).
NOTE: If necessary, zoom in using the Zoom tool.

Figure 44 – Tracing Around the Figure Using the Lasso Tool

6. Click the Add Layer Mask icon at the bottom of the Layers panel to hide everything
except the selected area (see Figure 45).

Figure 45 – Adding Layer Masks

7. Repeat steps 5 and 6 for all layers except the Background layer (see Figure 45).

Figure 46 – Final Composite Image

Adobe Photoshop CS4: Advanced, Part 2

19
Watermarking
While there are many ways to protect an image, watermarking is probably the most effective
way. Watermarking is the process of embedding information directly onto an image for
copyright protection. The following lesson shows users how to create a unique watermark and
add it to any image.
To create a watermark:
1. Locate and open the watermarking.psd file.
2. In the Tools panel, select the Custom Shape tool
(see Figure 47).

hidden under the Rectangle tool

Figure 47 – Custom Shape Tool

3. On the Options bar, click the Shape arrow to open the Custom Shape panel and select
the copyright symbol (see Figure 48).

Figure 48 – Custom Shape Panel

4. On the canvas, drag the mouse pointer to draw the copyright symbol.
5. In the Layers panel, rename the Shape 1 layer to Copyright (see Figure 49).

Figure 49 – Copyright Layer
Adobe Photoshop CS4: Advanced, Part 2

20
6. Double-click the Copyright layer thumbnail to open the Color Picker dialog box and
change the color of the shape to grey (see Figure 49).
7. Click the Add a Layer Style icon
located at the bottom of the Layers panel and
select Bevel and Emboss (see Figure 49). The Layer Style dialog box opens (see Figure
50).
8. Click the OK button.

Figure 50 – Layer Style Dialog Box

9. In the Tools panel, select the Type tool
and type Copyright 2009 below the
copyright symbol.
10. Highlight the text and change the Font Size to 48 pt on the Options bar.
11. Select the Move tool
and drag the text to the desired location on the canvas.
12. In the Layers panel, right-click the Copyright layer and select Copy Layer Style, and
then right-click the Copyright 2009 layer and select Paste Layer Style.
13. Select the Copyright 2009 layer and change its Blending Mode to Hard Light (see
Figure 51).

Figure 51 – Blending Mode and Opacity

14. Lower the opacity of the Copyright 2009 layer to around 30% by dragging the Opacity
slider to the left or typing 30% in the Opacity box (see Figure 51).
15. Repeat steps 13 and 14 for the Copyright layer.
16. Click the Layer menu and select Flatten Image to flatten all layers onto a single layer.

Adobe Photoshop CS4: Advanced, Part 2

21
Figure 52 – Final Watermarked Image

To add the copyright symbol in front of an image title:
1. Click the File menu and select File Info. A dialog box opens.
2. Make sure the Description tab is selected (see Figure 53).

Figure 53 – Description Tab

3. Change the image’s copyright status by clicking the Copyright Status arrow and
selecting Copyrighted from the list (see Figure 54).

Figure 54 – File Copyright Status

4. In the Copyright Notice box, type a name and any pertinent information that should be
included with the copyright (see Figure 54).
5. When finished, click the OK button. The copyright information is displayed in the Title
tab (see Figure 55).
Figure 55 – Title Tab with Copyright Information

Adobe Photoshop CS4: Advanced, Part 2

22

More Related Content

What's hot

ENVI Pocket Guide: Volume 2 | Intermediate
ENVI Pocket Guide: Volume 2 | IntermediateENVI Pocket Guide: Volume 2 | Intermediate
ENVI Pocket Guide: Volume 2 | IntermediateAugustus Wright
 
Adobe InDesign Primer
Adobe InDesign PrimerAdobe InDesign Primer
Adobe InDesign PrimerNYCCTfab
 
Microsoft Word 2007 Tutorials: Florist Flyer
Microsoft Word 2007 Tutorials: Florist FlyerMicrosoft Word 2007 Tutorials: Florist Flyer
Microsoft Word 2007 Tutorials: Florist FlyerFlyer Tutor
 
Adobe Connect 9.3 Whats New
Adobe Connect 9.3 Whats NewAdobe Connect 9.3 Whats New
Adobe Connect 9.3 Whats NewTom Behan
 
Dwm l ab_manual_final
Dwm l ab_manual_finalDwm l ab_manual_final
Dwm l ab_manual_finalVarsha Patil
 
ENVI basic function overview
ENVI basic function overviewENVI basic function overview
ENVI basic function overviewspherix
 
Autodesk 3ds max design 2010 tutorial
Autodesk 3ds max design 2010 tutorialAutodesk 3ds max design 2010 tutorial
Autodesk 3ds max design 2010 tutorialGeorge Livanos
 
Adobe Illustrator CS5 Part 3 : Real World Illustrator
Adobe Illustrator CS5 Part 3 : Real World IllustratorAdobe Illustrator CS5 Part 3 : Real World Illustrator
Adobe Illustrator CS5 Part 3 : Real World Illustratorcsula its training
 
How to Make a Great Screenshot
How to Make a Great ScreenshotHow to Make a Great Screenshot
How to Make a Great ScreenshotEsri
 
Csphtp1 02
Csphtp1 02Csphtp1 02
Csphtp1 02HUST
 
Mapİnfo Kullanım Kılavuzu
Mapİnfo Kullanım KılavuzuMapİnfo Kullanım Kılavuzu
Mapİnfo Kullanım KılavuzuTolga GÖZÜTOK
 
Chapter 02
Chapter 02Chapter 02
Chapter 02llmeade
 

What's hot (15)

ENVI Pocket Guide: Volume 2 | Intermediate
ENVI Pocket Guide: Volume 2 | IntermediateENVI Pocket Guide: Volume 2 | Intermediate
ENVI Pocket Guide: Volume 2 | Intermediate
 
Ig proe-wf-5.0
Ig proe-wf-5.0Ig proe-wf-5.0
Ig proe-wf-5.0
 
Introduction to AutoCad 2011
Introduction to AutoCad 2011Introduction to AutoCad 2011
Introduction to AutoCad 2011
 
Adobe InDesign Primer
Adobe InDesign PrimerAdobe InDesign Primer
Adobe InDesign Primer
 
Microsoft Word 2007 Tutorials: Florist Flyer
Microsoft Word 2007 Tutorials: Florist FlyerMicrosoft Word 2007 Tutorials: Florist Flyer
Microsoft Word 2007 Tutorials: Florist Flyer
 
Adobe Connect 9.3 Whats New
Adobe Connect 9.3 Whats NewAdobe Connect 9.3 Whats New
Adobe Connect 9.3 Whats New
 
Dwm l ab_manual_final
Dwm l ab_manual_finalDwm l ab_manual_final
Dwm l ab_manual_final
 
ENVI basic function overview
ENVI basic function overviewENVI basic function overview
ENVI basic function overview
 
Autodesk 3ds max design 2010 tutorial
Autodesk 3ds max design 2010 tutorialAutodesk 3ds max design 2010 tutorial
Autodesk 3ds max design 2010 tutorial
 
Adobe Illustrator CS5 Part 3 : Real World Illustrator
Adobe Illustrator CS5 Part 3 : Real World IllustratorAdobe Illustrator CS5 Part 3 : Real World Illustrator
Adobe Illustrator CS5 Part 3 : Real World Illustrator
 
How to Make a Great Screenshot
How to Make a Great ScreenshotHow to Make a Great Screenshot
How to Make a Great Screenshot
 
Csphtp1 02
Csphtp1 02Csphtp1 02
Csphtp1 02
 
Mapİnfo Kullanım Kılavuzu
Mapİnfo Kullanım KılavuzuMapİnfo Kullanım Kılavuzu
Mapİnfo Kullanım Kılavuzu
 
InDesign Crash Course
InDesign Crash CourseInDesign Crash Course
InDesign Crash Course
 
Chapter 02
Chapter 02Chapter 02
Chapter 02
 

Viewers also liked

Analisa ecotects
Analisa ecotectsAnalisa ecotects
Analisa ecotectsfrans2014
 
μυστράς στοιχεία αρχιτεκτονικής
μυστράς στοιχεία αρχιτεκτονικήςμυστράς στοιχεία αρχιτεκτονικής
μυστράς στοιχεία αρχιτεκτονικήςTheod13
 
Emcdevteam com topbostoncriminallawyer_practice_theft-crimes
Emcdevteam com topbostoncriminallawyer_practice_theft-crimesEmcdevteam com topbostoncriminallawyer_practice_theft-crimes
Emcdevteam com topbostoncriminallawyer_practice_theft-crimesLaurena Campos
 
Piano Marketing strategico per l'Associazione Gran Prato - IED Firenze
Piano Marketing strategico per l'Associazione Gran Prato - IED FirenzePiano Marketing strategico per l'Associazione Gran Prato - IED Firenze
Piano Marketing strategico per l'Associazione Gran Prato - IED FirenzeEmanuele Ciaponi
 
P.o.m project report
P.o.m project reportP.o.m project report
P.o.m project reportmounikapadiri
 
2016 IoT Business Forum
2016 IoT Business Forum2016 IoT Business Forum
2016 IoT Business ForumMarlos Bosso
 
Virtualization session3 vm installation
Virtualization session3 vm installationVirtualization session3 vm installation
Virtualization session3 vm installationAswin Krishnamoorthy
 
Perencanaan sambungan-profil-baja
Perencanaan sambungan-profil-bajaPerencanaan sambungan-profil-baja
Perencanaan sambungan-profil-bajafrans2014
 
Pp65tahun2005
Pp65tahun2005Pp65tahun2005
Pp65tahun2005frans2014
 
πετρινα γεφυρια (4)
πετρινα γεφυρια (4)πετρινα γεφυρια (4)
πετρινα γεφυρια (4)Theod13
 
An RGB Laser And Its Applications
An RGB Laser And Its ApplicationsAn RGB Laser And Its Applications
An RGB Laser And Its Applicationsznsaja
 
μυστράς (2)
μυστράς (2)μυστράς (2)
μυστράς (2)Theod13
 
გარემოს დაცვის კლუბების მნიშვნელობა
გარემოს დაცვის კლუბების მნიშვნელობაგარემოს დაცვის კლუბების მნიშვნელობა
გარემოს დაცვის კლუბების მნიშვნელობაNato Khuroshvili
 

Viewers also liked (17)

Analisa ecotects
Analisa ecotectsAnalisa ecotects
Analisa ecotects
 
μυστράς στοιχεία αρχιτεκτονικής
μυστράς στοιχεία αρχιτεκτονικήςμυστράς στοιχεία αρχιτεκτονικής
μυστράς στοιχεία αρχιτεκτονικής
 
patient monitor veterinary use
patient monitor veterinary usepatient monitor veterinary use
patient monitor veterinary use
 
Emcdevteam com topbostoncriminallawyer_practice_theft-crimes
Emcdevteam com topbostoncriminallawyer_practice_theft-crimesEmcdevteam com topbostoncriminallawyer_practice_theft-crimes
Emcdevteam com topbostoncriminallawyer_practice_theft-crimes
 
Piano Marketing strategico per l'Associazione Gran Prato - IED Firenze
Piano Marketing strategico per l'Associazione Gran Prato - IED FirenzePiano Marketing strategico per l'Associazione Gran Prato - IED Firenze
Piano Marketing strategico per l'Associazione Gran Prato - IED Firenze
 
P.o.m project report
P.o.m project reportP.o.m project report
P.o.m project report
 
2016 IoT Business Forum
2016 IoT Business Forum2016 IoT Business Forum
2016 IoT Business Forum
 
Html
HtmlHtml
Html
 
Python slide.1
Python slide.1Python slide.1
Python slide.1
 
Virtualization session3 vm installation
Virtualization session3 vm installationVirtualization session3 vm installation
Virtualization session3 vm installation
 
Perencanaan sambungan-profil-baja
Perencanaan sambungan-profil-bajaPerencanaan sambungan-profil-baja
Perencanaan sambungan-profil-baja
 
Pp65tahun2005
Pp65tahun2005Pp65tahun2005
Pp65tahun2005
 
πετρινα γεφυρια (4)
πετρινα γεφυρια (4)πετρινα γεφυρια (4)
πετρινα γεφυρια (4)
 
An RGB Laser And Its Applications
An RGB Laser And Its ApplicationsAn RGB Laser And Its Applications
An RGB Laser And Its Applications
 
μυστράς (2)
μυστράς (2)μυστράς (2)
μυστράς (2)
 
Windows 2012
Windows 2012Windows 2012
Windows 2012
 
გარემოს დაცვის კლუბების მნიშვნელობა
გარემოს დაცვის კლუბების მნიშვნელობაგარემოს დაცვის კლუბების მნიშვნელობა
გარემოს დაცვის კლუბების მნიშვნელობა
 

Similar to Photoshop Tutorial Clipping path service, Photoshop clipping path. photo clipping path, image clipping path, clipping path mask, hair clipping path, mask clipping path, clipping path company , clipping mask, clipping path, Clipping path India

adobephotoshop_frerking
adobephotoshop_frerking adobephotoshop_frerking
adobephotoshop_frerking Agung Yuwono
 
Adobe photoshop cs6
Adobe photoshop cs6Adobe photoshop cs6
Adobe photoshop cs6Ila Azmil
 
Adobe photoshop cs6
Adobe photoshop cs6Adobe photoshop cs6
Adobe photoshop cs6ilaazmil2
 
Adobe photoshop cs6 tutorial
Adobe photoshop cs6 tutorialAdobe photoshop cs6 tutorial
Adobe photoshop cs6 tutorialAgung Yuwono
 
Lighting with Photoshop
Lighting with PhotoshopLighting with Photoshop
Lighting with PhotoshopNYCCTfab
 
217 quick guide to photoshop cs6
217 quick guide to photoshop cs6217 quick guide to photoshop cs6
217 quick guide to photoshop cs6Rodel Morales
 
Photoshop pdf
Photoshop pdfPhotoshop pdf
Photoshop pdfKim B
 
Photoshop notes cs-4
Photoshop notes  cs-4Photoshop notes  cs-4
Photoshop notes cs-4SirajRock
 
Image editing basics using PIXLR Editor
Image editing basics using PIXLR EditorImage editing basics using PIXLR Editor
Image editing basics using PIXLR EditorJohn Allan
 
Create a Photo Collage in Photoshop.pdf
Create a Photo Collage in Photoshop.pdfCreate a Photo Collage in Photoshop.pdf
Create a Photo Collage in Photoshop.pdfPinkverge
 
Paths, Masks And Blend Modes
Paths, Masks And Blend ModesPaths, Masks And Blend Modes
Paths, Masks And Blend ModesShan
 
Photoshop cs4 tutorial
Photoshop cs4 tutorialPhotoshop cs4 tutorial
Photoshop cs4 tutorialAgung Yuwono
 

Similar to Photoshop Tutorial Clipping path service, Photoshop clipping path. photo clipping path, image clipping path, clipping path mask, hair clipping path, mask clipping path, clipping path company , clipping mask, clipping path, Clipping path India (20)

Cours photoshop
Cours photoshopCours photoshop
Cours photoshop
 
adobephotoshop_frerking
adobephotoshop_frerking adobephotoshop_frerking
adobephotoshop_frerking
 
Tools
ToolsTools
Tools
 
Basic tutorials
Basic tutorialsBasic tutorials
Basic tutorials
 
Basic tutorials
Basic tutorialsBasic tutorials
Basic tutorials
 
Adobe photoshop cs6
Adobe photoshop cs6Adobe photoshop cs6
Adobe photoshop cs6
 
Adobe photoshop cs6
Adobe photoshop cs6Adobe photoshop cs6
Adobe photoshop cs6
 
Adobe photoshop cs6 tutorial
Adobe photoshop cs6 tutorialAdobe photoshop cs6 tutorial
Adobe photoshop cs6 tutorial
 
Lighting with Photoshop
Lighting with PhotoshopLighting with Photoshop
Lighting with Photoshop
 
217 quick guide to photoshop cs6
217 quick guide to photoshop cs6217 quick guide to photoshop cs6
217 quick guide to photoshop cs6
 
Photoshop pdf
Photoshop pdfPhotoshop pdf
Photoshop pdf
 
Computer Science.pptx
Computer Science.pptxComputer Science.pptx
Computer Science.pptx
 
Photoshop notes cs-4
Photoshop notes  cs-4Photoshop notes  cs-4
Photoshop notes cs-4
 
Image editing basics using PIXLR Editor
Image editing basics using PIXLR EditorImage editing basics using PIXLR Editor
Image editing basics using PIXLR Editor
 
Photoshop basics
Photoshop basicsPhotoshop basics
Photoshop basics
 
Test
TestTest
Test
 
Create a Photo Collage in Photoshop.pdf
Create a Photo Collage in Photoshop.pdfCreate a Photo Collage in Photoshop.pdf
Create a Photo Collage in Photoshop.pdf
 
Paths, Masks And Blend Modes
Paths, Masks And Blend ModesPaths, Masks And Blend Modes
Paths, Masks And Blend Modes
 
Photoshop cs4 tutorial
Photoshop cs4 tutorialPhotoshop cs4 tutorial
Photoshop cs4 tutorial
 
Photoshop - Module 6
Photoshop - Module 6Photoshop - Module 6
Photoshop - Module 6
 

Recently uploaded

Call Girls in Ashok Nagar Delhi ✡️9711147426✡️ Escorts Service
Call Girls in Ashok Nagar Delhi ✡️9711147426✡️ Escorts ServiceCall Girls in Ashok Nagar Delhi ✡️9711147426✡️ Escorts Service
Call Girls in Ashok Nagar Delhi ✡️9711147426✡️ Escorts Servicejennyeacort
 
Call Girls Aslali 7397865700 Ridhima Hire Me Full Night
Call Girls Aslali 7397865700 Ridhima Hire Me Full NightCall Girls Aslali 7397865700 Ridhima Hire Me Full Night
Call Girls Aslali 7397865700 Ridhima Hire Me Full Nightssuser7cb4ff
 
Call Girls in Okhla Delhi 💯Call Us 🔝8264348440🔝
Call Girls in Okhla Delhi 💯Call Us 🔝8264348440🔝Call Girls in Okhla Delhi 💯Call Us 🔝8264348440🔝
Call Girls in Okhla Delhi 💯Call Us 🔝8264348440🔝soniya singh
 
1比1办理美国北卡罗莱纳州立大学毕业证成绩单pdf电子版制作修改
1比1办理美国北卡罗莱纳州立大学毕业证成绩单pdf电子版制作修改1比1办理美国北卡罗莱纳州立大学毕业证成绩单pdf电子版制作修改
1比1办理美国北卡罗莱纳州立大学毕业证成绩单pdf电子版制作修改yuu sss
 
Introduction-to-Canva-and-Graphic-Design-Basics.pptx
Introduction-to-Canva-and-Graphic-Design-Basics.pptxIntroduction-to-Canva-and-Graphic-Design-Basics.pptx
Introduction-to-Canva-and-Graphic-Design-Basics.pptxnewslab143
 
在线办理ohio毕业证俄亥俄大学毕业证成绩单留信学历认证
在线办理ohio毕业证俄亥俄大学毕业证成绩单留信学历认证在线办理ohio毕业证俄亥俄大学毕业证成绩单留信学历认证
在线办理ohio毕业证俄亥俄大学毕业证成绩单留信学历认证nhjeo1gg
 
办理学位证(NUS证书)新加坡国立大学毕业证成绩单原版一比一
办理学位证(NUS证书)新加坡国立大学毕业证成绩单原版一比一办理学位证(NUS证书)新加坡国立大学毕业证成绩单原版一比一
办理学位证(NUS证书)新加坡国立大学毕业证成绩单原版一比一Fi L
 
Call Us ✡️97111⇛47426⇛Call In girls Vasant Vihar༒(Delhi)
Call Us ✡️97111⇛47426⇛Call In girls Vasant Vihar༒(Delhi)Call Us ✡️97111⇛47426⇛Call In girls Vasant Vihar༒(Delhi)
Call Us ✡️97111⇛47426⇛Call In girls Vasant Vihar༒(Delhi)jennyeacort
 
Call Girls Meghani Nagar 7397865700 Independent Call Girls
Call Girls Meghani Nagar 7397865700  Independent Call GirlsCall Girls Meghani Nagar 7397865700  Independent Call Girls
Call Girls Meghani Nagar 7397865700 Independent Call Girlsssuser7cb4ff
 
2024新版美国旧金山州立大学毕业证成绩单pdf电子版制作修改#毕业文凭制作#回国入职#diploma#degree
2024新版美国旧金山州立大学毕业证成绩单pdf电子版制作修改#毕业文凭制作#回国入职#diploma#degree2024新版美国旧金山州立大学毕业证成绩单pdf电子版制作修改#毕业文凭制作#回国入职#diploma#degree
2024新版美国旧金山州立大学毕业证成绩单pdf电子版制作修改#毕业文凭制作#回国入职#diploma#degreeyuu sss
 
PORTAFOLIO 2024_ ANASTASIYA KUDINOVA
PORTAFOLIO   2024_  ANASTASIYA  KUDINOVAPORTAFOLIO   2024_  ANASTASIYA  KUDINOVA
PORTAFOLIO 2024_ ANASTASIYA KUDINOVAAnastasiya Kudinova
 
MT. Marseille an Archipelago. Strategies for Integrating Residential Communit...
MT. Marseille an Archipelago. Strategies for Integrating Residential Communit...MT. Marseille an Archipelago. Strategies for Integrating Residential Communit...
MT. Marseille an Archipelago. Strategies for Integrating Residential Communit...katerynaivanenko1
 
(办理学位证)埃迪斯科文大学毕业证成绩单原版一比一
(办理学位证)埃迪斯科文大学毕业证成绩单原版一比一(办理学位证)埃迪斯科文大学毕业证成绩单原版一比一
(办理学位证)埃迪斯科文大学毕业证成绩单原版一比一Fi sss
 
How to Be Famous in your Field just visit our Site
How to Be Famous in your Field just visit our SiteHow to Be Famous in your Field just visit our Site
How to Be Famous in your Field just visit our Sitegalleryaagency
 
办理(UC毕业证书)查尔斯顿大学毕业证成绩单原版一比一
办理(UC毕业证书)查尔斯顿大学毕业证成绩单原版一比一办理(UC毕业证书)查尔斯顿大学毕业证成绩单原版一比一
办理(UC毕业证书)查尔斯顿大学毕业证成绩单原版一比一z xss
 
3D Printing And Designing Final Report.pdf
3D Printing And Designing Final Report.pdf3D Printing And Designing Final Report.pdf
3D Printing And Designing Final Report.pdfSwaraliBorhade
 
Top 10 Modern Web Design Trends for 2025
Top 10 Modern Web Design Trends for 2025Top 10 Modern Web Design Trends for 2025
Top 10 Modern Web Design Trends for 2025Rndexperts
 
PORTFOLIO DE ARQUITECTURA CRISTOBAL HERAUD 2024
PORTFOLIO DE ARQUITECTURA CRISTOBAL HERAUD 2024PORTFOLIO DE ARQUITECTURA CRISTOBAL HERAUD 2024
PORTFOLIO DE ARQUITECTURA CRISTOBAL HERAUD 2024CristobalHeraud
 
ARt app | UX Case Study
ARt app | UX Case StudyARt app | UX Case Study
ARt app | UX Case StudySophia Viganò
 
办理(USYD毕业证书)澳洲悉尼大学毕业证成绩单原版一比一
办理(USYD毕业证书)澳洲悉尼大学毕业证成绩单原版一比一办理(USYD毕业证书)澳洲悉尼大学毕业证成绩单原版一比一
办理(USYD毕业证书)澳洲悉尼大学毕业证成绩单原版一比一diploma 1
 

Recently uploaded (20)

Call Girls in Ashok Nagar Delhi ✡️9711147426✡️ Escorts Service
Call Girls in Ashok Nagar Delhi ✡️9711147426✡️ Escorts ServiceCall Girls in Ashok Nagar Delhi ✡️9711147426✡️ Escorts Service
Call Girls in Ashok Nagar Delhi ✡️9711147426✡️ Escorts Service
 
Call Girls Aslali 7397865700 Ridhima Hire Me Full Night
Call Girls Aslali 7397865700 Ridhima Hire Me Full NightCall Girls Aslali 7397865700 Ridhima Hire Me Full Night
Call Girls Aslali 7397865700 Ridhima Hire Me Full Night
 
Call Girls in Okhla Delhi 💯Call Us 🔝8264348440🔝
Call Girls in Okhla Delhi 💯Call Us 🔝8264348440🔝Call Girls in Okhla Delhi 💯Call Us 🔝8264348440🔝
Call Girls in Okhla Delhi 💯Call Us 🔝8264348440🔝
 
1比1办理美国北卡罗莱纳州立大学毕业证成绩单pdf电子版制作修改
1比1办理美国北卡罗莱纳州立大学毕业证成绩单pdf电子版制作修改1比1办理美国北卡罗莱纳州立大学毕业证成绩单pdf电子版制作修改
1比1办理美国北卡罗莱纳州立大学毕业证成绩单pdf电子版制作修改
 
Introduction-to-Canva-and-Graphic-Design-Basics.pptx
Introduction-to-Canva-and-Graphic-Design-Basics.pptxIntroduction-to-Canva-and-Graphic-Design-Basics.pptx
Introduction-to-Canva-and-Graphic-Design-Basics.pptx
 
在线办理ohio毕业证俄亥俄大学毕业证成绩单留信学历认证
在线办理ohio毕业证俄亥俄大学毕业证成绩单留信学历认证在线办理ohio毕业证俄亥俄大学毕业证成绩单留信学历认证
在线办理ohio毕业证俄亥俄大学毕业证成绩单留信学历认证
 
办理学位证(NUS证书)新加坡国立大学毕业证成绩单原版一比一
办理学位证(NUS证书)新加坡国立大学毕业证成绩单原版一比一办理学位证(NUS证书)新加坡国立大学毕业证成绩单原版一比一
办理学位证(NUS证书)新加坡国立大学毕业证成绩单原版一比一
 
Call Us ✡️97111⇛47426⇛Call In girls Vasant Vihar༒(Delhi)
Call Us ✡️97111⇛47426⇛Call In girls Vasant Vihar༒(Delhi)Call Us ✡️97111⇛47426⇛Call In girls Vasant Vihar༒(Delhi)
Call Us ✡️97111⇛47426⇛Call In girls Vasant Vihar༒(Delhi)
 
Call Girls Meghani Nagar 7397865700 Independent Call Girls
Call Girls Meghani Nagar 7397865700  Independent Call GirlsCall Girls Meghani Nagar 7397865700  Independent Call Girls
Call Girls Meghani Nagar 7397865700 Independent Call Girls
 
2024新版美国旧金山州立大学毕业证成绩单pdf电子版制作修改#毕业文凭制作#回国入职#diploma#degree
2024新版美国旧金山州立大学毕业证成绩单pdf电子版制作修改#毕业文凭制作#回国入职#diploma#degree2024新版美国旧金山州立大学毕业证成绩单pdf电子版制作修改#毕业文凭制作#回国入职#diploma#degree
2024新版美国旧金山州立大学毕业证成绩单pdf电子版制作修改#毕业文凭制作#回国入职#diploma#degree
 
PORTAFOLIO 2024_ ANASTASIYA KUDINOVA
PORTAFOLIO   2024_  ANASTASIYA  KUDINOVAPORTAFOLIO   2024_  ANASTASIYA  KUDINOVA
PORTAFOLIO 2024_ ANASTASIYA KUDINOVA
 
MT. Marseille an Archipelago. Strategies for Integrating Residential Communit...
MT. Marseille an Archipelago. Strategies for Integrating Residential Communit...MT. Marseille an Archipelago. Strategies for Integrating Residential Communit...
MT. Marseille an Archipelago. Strategies for Integrating Residential Communit...
 
(办理学位证)埃迪斯科文大学毕业证成绩单原版一比一
(办理学位证)埃迪斯科文大学毕业证成绩单原版一比一(办理学位证)埃迪斯科文大学毕业证成绩单原版一比一
(办理学位证)埃迪斯科文大学毕业证成绩单原版一比一
 
How to Be Famous in your Field just visit our Site
How to Be Famous in your Field just visit our SiteHow to Be Famous in your Field just visit our Site
How to Be Famous in your Field just visit our Site
 
办理(UC毕业证书)查尔斯顿大学毕业证成绩单原版一比一
办理(UC毕业证书)查尔斯顿大学毕业证成绩单原版一比一办理(UC毕业证书)查尔斯顿大学毕业证成绩单原版一比一
办理(UC毕业证书)查尔斯顿大学毕业证成绩单原版一比一
 
3D Printing And Designing Final Report.pdf
3D Printing And Designing Final Report.pdf3D Printing And Designing Final Report.pdf
3D Printing And Designing Final Report.pdf
 
Top 10 Modern Web Design Trends for 2025
Top 10 Modern Web Design Trends for 2025Top 10 Modern Web Design Trends for 2025
Top 10 Modern Web Design Trends for 2025
 
PORTFOLIO DE ARQUITECTURA CRISTOBAL HERAUD 2024
PORTFOLIO DE ARQUITECTURA CRISTOBAL HERAUD 2024PORTFOLIO DE ARQUITECTURA CRISTOBAL HERAUD 2024
PORTFOLIO DE ARQUITECTURA CRISTOBAL HERAUD 2024
 
ARt app | UX Case Study
ARt app | UX Case StudyARt app | UX Case Study
ARt app | UX Case Study
 
办理(USYD毕业证书)澳洲悉尼大学毕业证成绩单原版一比一
办理(USYD毕业证书)澳洲悉尼大学毕业证成绩单原版一比一办理(USYD毕业证书)澳洲悉尼大学毕业证成绩单原版一比一
办理(USYD毕业证书)澳洲悉尼大学毕业证成绩单原版一比一
 

Photoshop Tutorial Clipping path service, Photoshop clipping path. photo clipping path, image clipping path, clipping path mask, hair clipping path, mask clipping path, clipping path company , clipping mask, clipping path, Clipping path India

  • 1. Adobe Photoshop CS4: Advanced Part 2: Special Effects and Graphic Design Version 1.0 INFORMATION TECHNOLOGY SERVICES CALIFORNIA STATE UNIVERSITY, LOS ANGELES Winter 2010 Table of Contents Introduction ....................................................................................................................................2 Downloading the Data Files ..........................................................................................................2 Creating Special Effects with Photographic Images and Text ..................................................2 Making Graffiti Art .....................................................................................................................2 Imitating Andy Warhol ...............................................................................................................7 Creating Neon Text ...................................................................................................................10 Animating in Photoshop ..............................................................................................................13 Compositing ..................................................................................................................................17 Watermarking ..............................................................................................................................20 For additional handouts, visit http://www.calstatela.edu/handouts.
  • 2. Introduction Adobe Photoshop CS4, an industry standard, pushes the boundaries of digital imaging and editing. While widely used by professional photographers as well as web and graphic designers, Photoshop can also provide a creative outlet for amateurs, enthusiasts, and artists alike. The kinds of special effects a person can create using Photoshop is limitless. This handout will introduce users to just a few ideas to get their creative juices flowing. Furthermore, lessons will comprise of designing posters and flyers. This handout will also cover how to add copyright information to an image’s metadata as well as the image itself through watermarking. Downloading the Data Files This handout includes sample data files that can be used for hands-on practice. The data files are stored in a self-extracting archive. The archive must be downloaded and executed in order to extract the data files.  The data files used with this handout are available for download at http://www.calstatela.edu/its/training/datafiles/photoshopcs4advp2.exe.  Instructions on how to download and extract the data files are available at http://www.calstatela.edu/its/docs/download.php. Creating Special Effects with Photographic Images and Text Special effect is a term used to describe a visual or sound effect that seems realistic, but was actually created post shoot. The following two lessons tap into some of Photoshop’s special effects abilities. Making Graffiti Art Graffiti is a controversial form of visual expression; however, no one can deny its commercial appeal. The following lesson shows users how to convert a photographic image into graffiti art. To turn the photograph into a graphic element: 1. Start Adobe Photoshop CS4. 2. Locate and open the graffiti.psd file. 3. In the Layers panel, select the graffiti 1 layer. 4. Click the Layer menu, point to New Adjustment Layer, and select Threshold to turn the photographic image to black and white. The New Layer dialog box opens. 5. Select the Use Previous Layer to Create Clipping Mask check box, and then click the OK button (see Figure 1). Figure 1 – New Layer Dialog Box NOTE: To apply the adjustment layer to all layers, do not select the Use Previous Layer to Create Clipping Mask check box. Adobe Photoshop CS4: Advanced, Part 2 2
  • 3. 6. In the Adjustments panel, type 111 in the Threshold Level box. Or, drag the Threshold slider to the left or right until the desired level is reached (see Figure 2). Figure 2 – Threshold Level in the Adjustments Panel 7. In the Tools panel, select the Burn tool Figure 3). hidden under the Dodge tool (see Figure 3 – Burn and Dodge Tools 8. With the graffiti 1 layer selected in the Layers panel, click on the areas of the image that need to be darkened (e.g., the white tank top area). 9. Select the Dodge tool and click on the areas of the image that need to be lightened (e.g., face and pants area). 10. Click the Filter menu, point to Noise, and select Median to get rid of the jagged edges. The Median dialog box opens. 11. Set the Radius to 3 pixels, and then click the OK button to return to the canvas (see Figure 4). Figure 4 – Median Dialog Box Adobe Photoshop CS4: Advanced, Part 2 3
  • 4. Figure 5 – Before and After Applying Median Noise Filter 12. In the Layers panel, right-click the Threshold 1 adjustment layer and select Merge Down (see Figure 6). Figure 6 – Merging Down a Layer To create a spattering effect around the edges of the image: 1. In the Tools panel, select the Polygonal Lasso tool (see Figure 7). hidden under the Lasso tool Figure 7 – Polygonal Lasso Tool 2. Click around the image to make a polygonal selection (see Figure 8). Figure 8 – Polygonal Selection 3. Click the Select menu and select Inverse. 4. In the Tools panel, select the Brush tool Adobe Photoshop CS4: Advanced, Part 2 . 4
  • 5. 5. On the Options bar, open the Brush Preset picker and set the Hardness to 0% and the Master Diameter to 150 px (see Figure 9). Figure 9 – Brush Preset Picker 6. On the Options bar, click the Mode arrow and select Dissolve from the list (see Figure 9). 7. On the canvas, drag the brush along the edges of the selection to create a spattering effect (see Figure 10). Figure 10 – Spattering Effect 8. Click the Select menu and select Deselect. To colorize the graffiti and blend it with the background: 1. With the graffiti 1 layer selected, click the Image menu, point to Adjustments, and select Hue/Saturation. The Hue/Saturation dialog box opens (see Figure 11). 2. Select the Colorize check box. Adobe Photoshop CS4: Advanced, Part 2 5
  • 6. Figure 11 – Hue/Saturation Dialog Box 3. Drag the Lightness slider to the right to brighten the black areas (see Figure 11). 4. Drag the Saturation and Hue sliders to the left or right to change the color (see Figure 11). 5. When finished, click the OK button. 6. To soften all the edges, click the Filter menu, point to Blur, and select Gaussian Blur. The Gaussian Blur dialog box opens. 7. Set the Radius to 1.0 pixels, and then click the OK button (see Figure 12). Figure 12 – Gaussian Blur Dialog Box 8. In the Layers panel, turn on the layer visibility on the Brick Wall layer (see Figure 13). Adobe Photoshop CS4: Advanced, Part 2 6
  • 7. Figure 13 – Layer Visibility and Multiply Blending Mode 9. To blend the image with the background, select the graffiti 1 layer, click the Blending Mode arrow, and select Multiply from the list (see Figure 13). Figure 14 – Final Image Imitating Andy Warhol Andy Warhol is famous for his silk screens of famous actresses Marilyn Monroe and Elizabeth Taylor. The following exercise shows users how to imitate this visual effect using Photoshop layers, blending modes, the Brush tool, and colors. To set up the black and white photograph for painting: 1. Locate and open the warhol.psd file. 2. In the Layers panel, select the face layer and change its Blending Mode to Hard Light to create a more stylized look (see Figure 15). Adobe Photoshop CS4: Advanced, Part 2 7
  • 8. Figure 15 – Hard Light Blending Mode 3. Hold down the Ctrl key and click the face layer’s layer thumbnail to load it as a selection (see Figure 15). 4. Click the Layer menu, point to New, and select Layer. The New Layer dialog box opens. 5. Type color in the Name box to rename the layer (see Figure 16). Figure 16 – New Layer Dialog Box 6. Click the OK button. 7. In the Layers panel, set the color layer’s Blending Mode to Multiply (see Figure 17). Figure 17 – Multiply Blending Mode 8. Click the Edit menu and select Fill. The Fill dialog box opens. 9. Under Contents, click the Use arrow and select Color from the list (see Figure 18). Adobe Photoshop CS4: Advanced, Part 2 8
  • 9. Figure 18 – Fill Dialog Box 10. In the Color Picker dialog box, select a flesh toned color, and then click the OK button (see Figure 19). Figure 19 – Color Picker Dialog Box 11. In the Fill dialog box, click the OK button to return to the canvas. 12. Click the Select menu and select Deselect. To color the rest of the face: 1. In the Layers panel, click the Lock Transparent Pixels icon of the color layer (see Figure 20). to lock the transparency Figure 20 – Lock Transparent Pixels Adobe Photoshop CS4: Advanced, Part 2 9
  • 10. 2. To color the rest of the face, select the Brush tool in the Tools panel. 3. Click the Foreground color box (see Figure 21). The Color Picker dialog box opens. 4. Change the color to red, and then click the OK button. Figure 21 – Foreground Color Box 5. Paint the lips red using the Brush tool. NOTE: Change the brush size and hardness as needed. 6. Repeat steps 3 through 5 to paint the eyes, eyelids, and hair with the desired colors (see Figure 22). Figure 22 – Final Image Creating Neon Text Typographic manipulation and effects can be done using Photoshop. In the following exercise, users will take ordinary text and turn it into a neon sign. In real life, neon lettering is made of glass tubes heated up and bent into shapes. In Photoshop, the neon light effect is done using selection techniques and layer styles. To prepare the text: 1. Locate and open the neon.psd file. 2. Hold down the Ctrl key and click the Layer 1 layer thumbnail to load the word on the canvas as a selection (see Figure 23). Adobe Photoshop CS4: Advanced, Part 2 10
  • 11. Figure 23 – Neon Layer Thumbnail 3. Click the Select menu, point to Modify, and select Expand. The Expand Selection dialog box opens. 4. Type 8 in the Expand By box, and then click the OK button (see Figure 24). Figure 24 – Expand Selection Dialog Box Figure 25 – Expanding a Selection 5. With the Layer 1 layer selected, click the Layer menu, point to New, and select Layer. The New Layer dialog box opens. 6. Click the OK button. 7. Click the Edit menu and select Fill. The Fill dialog box opens. 8. Click the Use arrow and select Color from the list (see Figure 26). The Color Picker dialog box opens. Figure 26 – Fill Dialog Box Adobe Photoshop CS4: Advanced, Part 2 11
  • 12. 9. Select a color that will enhance the neon effect, and then click the OK button. 10. In the Fill dialog box, click the OK button to return to the canvas. 11. With the Layer 2 layer selected, hold down the Ctrl key and click the Layer 1 layer thumbnail to load it as a selection (see Figure 27). Figure 27 – Loading Layer 1 as a Selection with Layer 2 Selected 12. Click the eye icon next to the Layer 1 layer to hide its content (see Figure 27). 13. Press the Delete key to delete the selected area (see Figure 28). Figure 28 – Delete the Selection 14. Click the Select menu and select Deselect. To add the neon effect: 1. Locate and open the neon_step2.psd file. 2. In the Tools panel, select the Eraser tool . 3. With the Layer 2 layer selected, use the Eraser tool to insert breaks to give a sense of the tubes joining (see Figure 29). NOTE: Resize the brush size as needed and use a hard-edged brush. NOTE: Use the Zoom tool to magnify the image in order to erase with accuracy. Figure 29 – Using the Eraser Tool to Insert Breaks Adobe Photoshop CS4: Advanced, Part 2 12
  • 13. 4. With the Layer 2 layer selected, click the Layer menu, point to Layer Style, and select Blending Options. The Layer Style dialog box opens. 5. Select Outer Glow in the left column (see Figure 30). 6. Drag the Size slider to the right or type 15 in the Size box (see Figure 30). Figure 30 – Outer Glow Layer Style 7. Click the color box to change the color of the outer glow (see Figure 30). The Color Picker dialog box opens. 8. Click on a letter on the canvas to sample its color (see Figure 31). Figure 31 – Sampling Color 9. Click the OK button to close the Color Picker dialog box. 10. In the Layer Style dialog box, select Bevel and Emboss in the left column, and then click the OK button. Animating in Photoshop Animation is a sequence of images, or frames, displayed over time creating an illusion of movement when viewed in quick succession. Users can now create frame-based animation directly in Photoshop using the Animation panel. Animated images can be saved as a .psd file or rendered as an Adobe Flash Video, a QuickTime Movie, or an MPEG-4 file. To animate: 1. Locate and open the animate.psd file. 2. Change the workspace to Video by clicking the Window menu, pointing to Workspace, and selecting Video (see Figure 32). Or, click the Workspace menu on the Application bar and select Video (see Figure 32). Adobe Photoshop CS4: Advanced, Part 2 13
  • 14. Figure 32 – Video Workspace 3. If the Lens and Mask layers are not already selected, hold down the Ctrl key and click on both layers (see Figure 33). Figure 33 – Lens and Mask Layers Selected in the Layers Panel 4. By default, a frame already appears in the Animation panel. Create another frame by clicking the Duplicate Selected Frames icon at the bottom of the Animation panel (see Figure 34). Or, click the Animation panel menu located in the upper right corner of the panel and select New Frame (see Figure 34). Figure 34 – Duplicate Selected Frames Icon and Panel Menu Adobe Photoshop CS4: Advanced, Part 2 14
  • 15. 5. In the Animation panel, select Frame 2 (see Figure 34). 6. 7. 8. 9. In the Tools panel, select the Move tool . On the canvas, drag the image of the lens to mask a different spot on the sunflower. In the Animation panel, hold down the Ctrl key, and select both Frame 1 and Frame 2. Click the Tween Animation Frames icon . The Tween dialog box opens (see Figure 35). Figure 35 – Tween Dialog Box 10. Type 4 in the Frames to Add box, and then click the OK button (see Figure 35). 11. Below Frame 1, click the Frame Delay Time arrow and select 0.1 seconds (see Figure 36). Figure 36 – Frame Delay Time 12. Repeat step 11 for frames 2 through 6. 13. Click the Looping Options arrow and select Once to stop the animation from playing over and over again (see Figure 37). 14. Click the Play button located at the bottom of the Animation panel to preview the animation (see Figure 37). Adobe Photoshop CS4: Advanced, Part 2 15
  • 16. Figure 37 – Animation Play Button and Looping Options To save the animation: 1. Click the File menu and select Save to save the animation as a .psd file. Or, click the File menu, point to Export, and select Render Video. The Render Video dialog box opens (see Figure 38). 2. Under the Location section, click the Select Folder button and select Desktop in the Browse for Folder dialog box, and then click the OK button (see Figure 38). Figure 38 – Render Video Dialog Box 3. Under the File Options section, select the QuickTime Export option and select QuickTime Movie from the list box next to it (see Figure 38). NOTE: To edit video quality and filter settings, click the Settings button. 4. When finished, click the Render button (see Figure 38). 5. Double-click the animate.mov file on the desktop to preview it in QuickTime Player (see Figure 39). Adobe Photoshop CS4: Advanced, Part 2 16
  • 17. Figure 39 – Previewing in QuickTime Player Compositing Digital compositing refers to the process in which multiple images are assembled to create one final image. The following exercise takes seven images and composites them to create one image. To combine multiple images into one file: 1. Locate and simultaneously open the composite_1.psd, composite_2.psd, composite_3.psd, composite_4.psd, composite_5.psd, composite_6.psd, and composite_7.psd files (see Figure 40). Figure 40 – Opening Multiple Images in Photoshop 2. Click the Window menu, point to Arrange, and select Tile. Adobe Photoshop CS4: Advanced, Part 2 17
  • 18. 3. In the Tools panel, select the Move tool . 4. Click on the image in composite_2.psd and while holding down the Shift key, drag that image into composite_1.psd (see Figure 41). NOTE: Holding down the Shift key while dragging will ensure that each image drops directly on top of the others. 5. Repeat step 4 for composite_3.psd, composite_4.psd, composite_5.psd, composite_6.psd, and composite_7.psd (see Figure 41). Figure 41 – Dragging Multiple Images into One File 6. Select composite_1.psd and verify that there are seven total layers in the Layers panel. 7. Close all the image files except for composite_1.psd. To composite: 1. Locate and open the compositing.psd file. 2. In the Layers panel, select the Layer 6 layer. 3. In the Tools panel, select the Lasso tool (see Figure 42). Figure 42 – Lasso Tool 4. On the Options bar, type 12 px in the Feather box to soften the edges of the selection (see Figure 43). Adobe Photoshop CS4: Advanced, Part 2 18
  • 19. Figure 43 – Feather Box 5. Drag to trace a selection around the figure and its shadow (see Figure 44). NOTE: If necessary, zoom in using the Zoom tool. Figure 44 – Tracing Around the Figure Using the Lasso Tool 6. Click the Add Layer Mask icon at the bottom of the Layers panel to hide everything except the selected area (see Figure 45). Figure 45 – Adding Layer Masks 7. Repeat steps 5 and 6 for all layers except the Background layer (see Figure 45). Figure 46 – Final Composite Image Adobe Photoshop CS4: Advanced, Part 2 19
  • 20. Watermarking While there are many ways to protect an image, watermarking is probably the most effective way. Watermarking is the process of embedding information directly onto an image for copyright protection. The following lesson shows users how to create a unique watermark and add it to any image. To create a watermark: 1. Locate and open the watermarking.psd file. 2. In the Tools panel, select the Custom Shape tool (see Figure 47). hidden under the Rectangle tool Figure 47 – Custom Shape Tool 3. On the Options bar, click the Shape arrow to open the Custom Shape panel and select the copyright symbol (see Figure 48). Figure 48 – Custom Shape Panel 4. On the canvas, drag the mouse pointer to draw the copyright symbol. 5. In the Layers panel, rename the Shape 1 layer to Copyright (see Figure 49). Figure 49 – Copyright Layer Adobe Photoshop CS4: Advanced, Part 2 20
  • 21. 6. Double-click the Copyright layer thumbnail to open the Color Picker dialog box and change the color of the shape to grey (see Figure 49). 7. Click the Add a Layer Style icon located at the bottom of the Layers panel and select Bevel and Emboss (see Figure 49). The Layer Style dialog box opens (see Figure 50). 8. Click the OK button. Figure 50 – Layer Style Dialog Box 9. In the Tools panel, select the Type tool and type Copyright 2009 below the copyright symbol. 10. Highlight the text and change the Font Size to 48 pt on the Options bar. 11. Select the Move tool and drag the text to the desired location on the canvas. 12. In the Layers panel, right-click the Copyright layer and select Copy Layer Style, and then right-click the Copyright 2009 layer and select Paste Layer Style. 13. Select the Copyright 2009 layer and change its Blending Mode to Hard Light (see Figure 51). Figure 51 – Blending Mode and Opacity 14. Lower the opacity of the Copyright 2009 layer to around 30% by dragging the Opacity slider to the left or typing 30% in the Opacity box (see Figure 51). 15. Repeat steps 13 and 14 for the Copyright layer. 16. Click the Layer menu and select Flatten Image to flatten all layers onto a single layer. Adobe Photoshop CS4: Advanced, Part 2 21
  • 22. Figure 52 – Final Watermarked Image To add the copyright symbol in front of an image title: 1. Click the File menu and select File Info. A dialog box opens. 2. Make sure the Description tab is selected (see Figure 53). Figure 53 – Description Tab 3. Change the image’s copyright status by clicking the Copyright Status arrow and selecting Copyrighted from the list (see Figure 54). Figure 54 – File Copyright Status 4. In the Copyright Notice box, type a name and any pertinent information that should be included with the copyright (see Figure 54). 5. When finished, click the OK button. The copyright information is displayed in the Title tab (see Figure 55). Figure 55 – Title Tab with Copyright Information Adobe Photoshop CS4: Advanced, Part 2 22