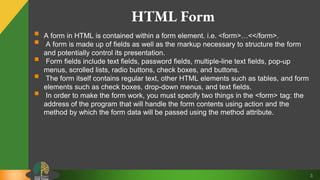
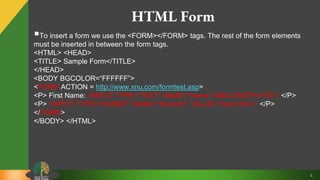
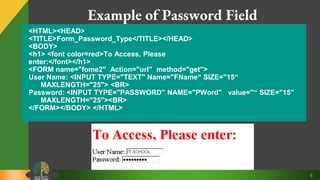
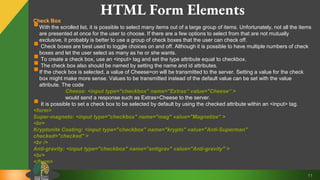
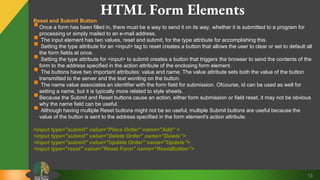
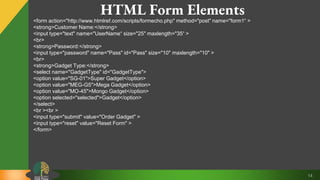
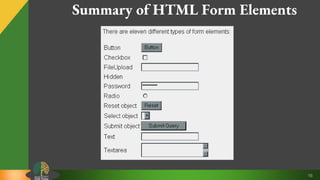
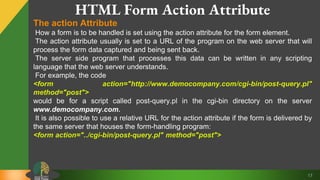
The document discusses HTML forms and form elements. It provides objectives and descriptions of how to create forms using HTML tags like <form> and <input>. It explains various form elements including text fields, password fields, text areas, drop-down menus, checkboxes, radio buttons, and their attributes. The document provides examples of code for each form element.
The document discusses HTML forms and how they are used to collect user input on web pages. It provides examples of common form elements like text fields, buttons, checkboxes, radio buttons, and drop-down menus. It also explains how forms work with tags like <form> and <input> and attributes that define behaviors and properties of the elements. JavaScript can be used to add interactivity and validate user input in forms.
This document provides an overview of creating and submitting forms in ProdigyView. It discusses the required understanding of HTML form elements and PVHtml. It then demonstrates creating a basic form using various form elements like text inputs, textareas, buttons, selects, radios, checkboxes and more. It also discusses options that can be passed to form elements to define attributes. The document encourages reviewing the PVForms API reference and checking additional tutorials for more details.
Forms are used in HTML to collect user input on web pages. The <form> tag defines a form area that contains form elements like text fields, checkboxes, radio buttons, and dropdown menus. When the user submits the form, the data from these elements is sent to the server. Common form elements include <input>, <textarea>, and <select>. The <input> tag defines different element types like text, checkbox, radio, submit, and hidden using the "type" attribute. Forms allow collecting user data to send to a server for processing.
This document provides an overview of HTML forms, including the various form elements like <input>, <select>, <textarea>, and <button>. It explains how to structure a form using the <form> tag and how attributes like action, method, and name are used. Specific <input> types are covered like text, radio buttons, checkboxes, passwords, files, and submit buttons. It also discusses <select> dropdowns, <textarea> multi-line inputs, and form submission and processing.
The document discusses various HTML form elements and attributes. It describes common form controls like text fields, checkboxes, radio buttons, select boxes, buttons and file uploads. It explains how to create forms using the <form> tag and how to structure inputs using tags like <input>, <select>, <textarea> and <button>. The document also provides details on attributes for each form control that specify properties like name, value, type and more.
This document discusses HTML forms, including:
- HTML forms allow users to enter and submit data through text boxes, buttons, checkboxes, radio buttons, and other controls.
- Forms are defined using <form> tags which specify an action and method for submitting data.
- Common form controls include text fields, passwords, checkboxes, radio buttons, buttons, textareas, and select menus.
- Accessible forms should use <label> tags, <fieldset> and <legend> elements to organize groups of controls.
- CSS can style forms and individual controls using properties like :focus and outline.
- Form layout can be controlled through <br>, tables, or CSS float and clear properties.
This document discusses HTML forms and the various input elements used to create forms. It covers the basic structure of a form using the <form> tag and describes many different input types such as text, password, checkbox, radio button, submit button, and file upload. It provides examples of how to code each input type using the <input> tag and its attributes. The document is intended as a reference for how to build interactive forms in HTML.
HTML5 includes many new features for forms that make them easier to create and more powerful. It introduces new form controls like number, range, date, time, color pickers as well as new attributes for validation and user experience improvements. While support is still limited, as browsers implement these new standards forms will work more consistently across devices and enable more semantic data collection.
This document discusses HTML forms and form elements. It begins by explaining that forms allow websites to collect information from users rather than just display static content. It then covers the main HTML form tags like <form> and various form field elements like <input>, <textarea>, and <select>. It details the different attributes associated with these elements, such as name, type, value, and how they determine what data is collected and how it is passed to the server. Finally, it discusses concepts like GET vs POST methods, and how submitted form data is handled by server-side variables like $_GET, $_POST, and $_REQUEST in PHP.
Static Websites
This document discusses HTML5 forms and how to code them. It provides examples of different form field types like text, email, number and describes how to declare forms in HTML5 using tags. It also covers styling forms with CSS.
More than 90 questions we have solved. This is an exam preparation guide for fiverr.com. Solution links are provided there so that you can check every answer. We uploaded scripts to sololearn.com as well. My students getting 9 and above with the help of this guide. If you find any error on my document please let me know. Hope for the best.
In this slide I described all control which is used by the Html Form Controls such as checkbox , radio , text , drop down list / select , file upload and html output controls.
HTML5 includes many new form features to improve the consistency and capabilities of web forms. Some key additions include new form controls like number, range, date, and color pickers. It also adds new attributes to improve the user experience, such as placeholder text, autofocus, restricting input values with min/max, and step controls. Browsers can now perform native form validation using features like required fields, input type validation, and custom patterns. However, support varies across browsers and older browsers may not support all new features.
Forms are used to collect data from users on a website. Form elements include text fields, textareas, drop-downs, radio buttons, and checkboxes. The name, action, and method attributes are commonly used form attributes. Name identifies the form, action specifies the script that receives submitted data, and method specifies how data is uploaded (GET or POST). HTML5 introduces new input types like email, url, number and date/time. It also includes new form attributes for improved user experience and control over input behavior like placeholder, autofocus, maxlength and pattern.
HTML5 introduced new form elements, attributes, and input types to improve the user experience of web forms. Key additions included the <datalist> element for autocomplete suggestions, <keygen> for digital signatures, and <output> to display calculation results. HTML5 also defined new input types like email, url, tel, and color to provide native form validation for specific data types. While browser support for HTML5 forms has increased, some features remain incompatible with older browsers, so backward compatibility must still be considered.
HTML forms allow users to enter data into a website. There are various form elements like text fields, textareas, dropdowns, radio buttons, checkboxes, and file uploads that collect different types of user input. The <form> tag is used to create a form, which includes form elements and a submit button. Forms submit data to a backend application using GET or POST methods.
The document discusses HTML frames and forms. HTML frames enable displaying multiple HTML documents in the same browser window using the <frameset> tag to define columns and <frame> tags to specify the source documents. HTML forms allow users to enter information using input fields like text, text areas, menus, radio buttons, checkboxes defined using <input> tags with attributes like type and name. Common input field types include text, password, radio and checkbox.
The document discusses creating and working with web forms in HTML, including adding different form elements like input boxes, radio buttons, drop-down lists, checkboxes, and text areas. It also covers setting attributes of forms and form elements, organizing fields using fieldsets, linking labels to fields, and submitting forms using buttons. The last few sections discuss hidden fields, specifying actions and methods for forms, and designing custom buttons.
The document discusses various HTML form elements and their attributes. It describes the <form> element which defines an HTML form, and common form elements like <input>, <select>, <textarea> and <button>. It provides examples and explanations of different input types such as text, password, checkbox, radio and submit. It also covers attributes like name, value, readonly and disabled.
This document discusses forms in web development. It covers creating forms using tags like <form>, <input>, <textarea>, and <select>. It describes how forms accept user input and provide interactivity. The document also discusses server-side processing using CGI to handle form data, and lists some free CGI resources. Key concepts covered include different types of forms, the two components of using forms, and how to invoke server-side processing to handle submitted form data.
Forms allow users to enter data into a website. They contain form elements like text fields, drop-down menus, and buttons. The <form> element defines a form, while <input>, <textarea>, <select>, and <button> elements create specific form controls. Forms submit data via GET or POST requests, and attributes like action, method, and target control submission. Common elements include single-line text, passwords, textareas, checkboxes, radio buttons, drop-downs, file uploads, hidden fields, and submit/reset buttons.
The document discusses HTML form tags. It covers the <form>, <fieldset>, <legend>, <label>, <input>, <select>, <option>, and <textarea> tags. It provides examples of how to use each tag properly, including how to associate <label> tags to <input> fields using "for" and "id" attributes. It also describes the different input types like text, email, radio buttons, checkboxes, and buttons. The document is intended to teach the basics of HTML forms.
Forms are used to create graphical user interfaces on web pages to collect user input. A form contains elements like text fields, checkboxes, radio buttons, and dropdown menus. When the user submits the form, the data from these elements is sent to the server. JavaScript can be used to add interactivity to forms, like validating user input before submitting.
HTML is a markup language used to structure and present content on the web. It uses tags placed within angle brackets to define elements like headings, paragraphs, links, images, and form controls. CSS is used to style and lay out HTML elements, separating document structure and presentation. Common HTML elements include headings, paragraphs, links, images, forms, tables and lists. Forms allow users to enter data using controls like text fields, buttons, checkboxes and dropdowns. CSS rules define styles for elements using selectors and declarations with properties and values. Styles can be defined inline, in internal style sheets within HTML, or in external style sheets linked to HTML pages.
Forms are used to create graphical user interfaces on web pages to collect user input. A form contains elements like text fields, checkboxes, radio buttons and dropdown menus. JavaScript can be used to add interactivity to forms, such as validating user input before submitting. The <form> tag defines a form region and the action and method attributes specify where and how user input data is sent. Common form elements include text <input>, buttons, checkboxes, radio buttons and dropdown <select> menus. Hidden <input> fields allow including extra data without displaying it to the user.
This document provides an overview of HTML forms and their various elements. It discusses the <form> tag and its attributes like action and method. It then describes different form elements like text fields, password fields, radio buttons, checkboxes, textareas, select boxes, and button controls. It provides examples of how to create each of these elements in HTML and explains their purpose in collecting user input for processing on the server-side.
The document discusses HTML forms, input elements, and drop-down menus. It describes how forms are used to collect user input and pass data to servers. Common input elements include text fields, checkboxes, radio buttons, and submit buttons. Drop-down menus provide a compact way for users to select single or multiple options from a list, though not all options are visible at once without customization.
This document provides information about CSS forms including:
- Forms allow users to enter information and perform actions online like searching, registering on websites, shopping online, and signing up for newsletters.
- The <form> element defines a form and includes attributes like action and method. Action specifies the URL that receives the submitted form data and method can be get or post.
- Common form controls include text fields, checkboxes, radio buttons, submit buttons, textareas, password fields, and select boxes. Each has an <input> or <select> element that defines its type.
- When a user submits a form, the data is sent to the server specified in the action attribute.
HTML forms allow users to enter data into a website. Form elements like text fields, checkboxes, and dropdown menus are used to collect user input. A <form> element defines a form and includes attributes like action and method. The action attribute specifies where the form data will be sent, and method defines how it will be sent (GET or POST). Common form controls include text inputs, buttons, checkboxes/radio buttons, dropdowns, file uploads, and hidden fields. Forms make use of various input field types like text, password, textarea, submit, reset, checkbox, radio, and file to collect different types of user data.
The document discusses various HTML form controls that can be used to collect user input data on a web page. It describes text input controls like single-line text, password, and multi-line text boxes. It also covers other controls like checkboxes, radio buttons, select boxes, file uploads, buttons, and hidden inputs. For each control, it provides the HTML tag used to create it (like <input>, <textarea>, <select>) along with attributes and examples.
HTML forms are used to collect user input on web pages. The <form> element defines an HTML form, which contains various form elements like text fields, checkboxes, radio buttons, and submit buttons to collect input from the user. Forms submit data using the GET or POST methods, with POST being more secure as it does not display submitted data in the URL. Common form elements include <input>, <select>, <textarea> to collect different types of user input like text, selections, and multi-line text. Forms are an essential part of creating interactive web pages that collect and process user data.
This document provides an overview of HTML forms. It defines HTML forms as a way to create graphical user interfaces on web pages to collect user input. The <form> tag is used to define a form and includes attributes like action and method. Common form elements include text fields, checkboxes, radio buttons, dropdown menus, and buttons, which are typically defined using the <input> tag along with attributes like type, name and value. The document provides examples of how to code different types of form elements in HTML.
HTML forms are used to collect data from users on websites. A form contains input elements like text fields, checkboxes, radio buttons, and dropdown menus to collect information. When submitted, the form sends the user data as a POST request to a backend application which then processes the data using server-side scripts like PHP, ASP, or CGI scripts. Common form elements include single-line and multi-line text inputs, checkboxes for multiple selections, radio buttons to select a single option among groups, and dropdown menus to choose from a list.
The document provides information about designing and developing websites and web applications. It discusses topics like HTML tags for text formatting, lists, tables, images, forms, and multimedia. It also covers CSS for styling websites and the differences between HTML4 and HTML5. The speaker is Md. Zakir Hossain, a software engineer who will teach participants how to design professional websites, develop web-based software, and publish online content in a series of classes.
The document provides an overview of HTML elements and tags. It discusses key concepts like the structure of an HTML document with the <html>, <head>, and <body> tags. It also covers common page elements like headings, paragraphs, links, images, lists, tables, forms, and semantic elements. The document provides examples and explanations of many individual HTML tags.
The document provides an overview of HTML forms, including:
- Forms allow users to enter information into a webpage which is then sent to a server.
- Forms contain elements like text fields, checkboxes, radio buttons, and dropdown menus to collect user input.
- JavaScript can be used to add interactivity to forms, like validating user input before submitting.
- The <form> tag defines a form and attributes like "action" and "method" control where submitted data is sent.
- Common form elements like text, buttons, checkboxes are defined using <input> tags while dropdowns use <select>.
This document provides an overview of how to create forms in HTML. It discusses the main components of forms, including common form controls like text fields, checkboxes, radio buttons, selection menus, file uploads, and buttons. It explains how to set attributes like name, value, size for each form control. The document also covers how form data is passed via the GET and POST methods, and how hidden fields can be used to pass additional data without the user seeing it. The overall purpose is to teach the fundamentals of creating HTML forms for collecting user input.
This document provides instructions on creating HTML forms. It discusses the common elements of forms, including input boxes, radio buttons, selection lists, checkboxes, and text areas. It explains that a CGI script is used to process form data submitted by the user. The document provides syntax and examples for implementing each of the different form elements and attributes like default values, size, and text wrapping. It also covers how to write CGI scripts in various programming languages to handle submitted form data.
This document discusses HTML forms and the various form elements used to gather user input. It identifies the <form> tag which defines a form section and includes attributes like action and method. The <input> tag is used to create form controls like text boxes, checkboxes, radio buttons, etc. Other tags covered are <textarea> for multi-line text, <select> and <option> for drop-down menus, and <submit> for submitting the form. The document provides examples of how to use these tags to build interactive forms.
HTML5 includes many new features for web forms to make them easier to create and more powerful across browsers. It introduces new form controls like number, range, date, time, color pickers as well as attributes for validation and expected values. While support is still limited, these new features provide standardized ways to build complex forms without JavaScript.
The document provides information about HTML forms and form elements. It defines a form as an area that can contain input elements like text fields, checkboxes, radio buttons, and select lists. The <form> tag is used to enclose these elements and submit the user-entered data to a server using either GET or POST methods. Common form input elements are described, including text, checkbox, radio, submit, reset, hidden, and select elements. Their attributes and usage are explained.
This document discusses HTML forms, which allow users to enter and submit information through a web page. It describes the <form>, <input>, <textarea>, and <select> tags used to build forms. <form> defines a form section and includes attributes like action and method. <input> creates different form controls like text boxes, checkboxes, and buttons. <textarea> makes multi-line text fields. <select> produces drop-down menus, with <option> creating the menu items. The document explains how to use these tags to build basic forms that gather and submit user input.
HTML frames allow dividing the browser window into multiple sections to display separate HTML documents or URLs. Key elements for creating frames include <frameset>, <frame>, and <iframe>. <frameset> defines the layout of frames using rows and cols attributes. <frame> specifies the source of each frame's content. Nested framesets create complex layouts. iframes display inline frames for a web page within another page. HTML forms are used to collect user input using elements like text fields, checkboxes, radio buttons, and select boxes. Form data is submitted to a backend application for processing.
In this chapter we will see the various element of Android SDK, we will see more about their usage in User Interface Design. One of the most basic user interface elements, or controls, in the Android SDK is the TextView control. You use it, quite simply, to draw text on the screen. You primarily use it to display fixed text strings or labels.
HTML from A to Z
HTML Basics : Basics-Semantic Elements-Attributes-Block and Inline Elements-Forms-Responsive Web Design-XHTML…..
HTML for Text Formatting : Text formatting-Links-Tables-Lists-Symbols-Space…
HTML Visuals and Media : Layout-Classes-Colors-Images-Multimedia…
This document provides an introduction to Python programming. It outlines the key learning objectives of understanding basic programming concepts, decision making statements, and GUI applications using Python code. It then covers various topics related to Python programming including the history and versions of Python, why it is a good language to learn, its characteristics and applications. It also discusses Python environments including interactive and script modes.
This document discusses object-oriented programming concepts in VB.NET, including:
- Classes define templates for objects with data and behaviors, while objects are instances of classes.
- Features like abstraction, encapsulation, and polymorphism are supported.
- Properties and methods represent object data and behaviors. Constructors and destructors manage object instantiation and cleanup.
- An example class defines properties and a constructor to initialize objects.
Inheritance allows classes to inherit and reuse attributes and behaviors of other classes. It reduces duplicate code and improves efficiency. There are two main types of classes - base/parent classes that are inherited from, and derived/child classes that inherit from base classes. Inheritance is implemented using the "Inherits" keyword in VB.NET and allows passing functionality from base to derived classes. Constructors and destructors are also inherited by default. Abstract classes cannot be instantiated while final classes cannot be inherited from.
Overloading allows methods within a class to have the same name but different signatures. The signature includes the name, number, and type of arguments but not the return type. Functions, procedures, constructors, and properties can be overloaded in VB.NET. Constructor overloading is a special case where constructors with the same name but different parameters are declared. Examples show overloading procedures to handle integer and string inputs differently and overloading constructors to accept integer and string parameters.
This document discusses various decision statements in VB.NET including If-Then, If-Then Else, If-Then ElseIf, and Select Case statements. It provides examples of each statement type and discusses how to nest statements and use short-circuited logic. Key features covered include using multiple conditions in If-Then ElseIf, matching expressions in Select Case, and nesting Select Case statements within other control structures.
This document discusses loop control statements in VB.NET, including exit, continue, and goto statements. The exit statement terminates the loop and transfers control to the statement after the loop. The continue statement skips the rest of the current loop iteration and continues to the next one. The goto statement unconditionally transfers control to a labeled statement. Examples are provided for each type of statement.
The document discusses different types of looping statements in VB.NET, including While, Do, For, and For Each loops. It provides examples and syntax for each type of loop. The key types of loops are:
- While loops repeat statements as long as a condition is true.
- Do loops execute statements first, then check a condition to repeat.
- For loops repeat a set number of times, specified by a start and end value.
- For Each loops iterate through each element of a collection, such as an array.
This document discusses operators in VB.NET. It defines operators as symbols that perform operations on variables or values. It describes different types of operators such as arithmetic, comparison, logical, bitwise, and assignment operators. It provides examples of common operators like addition, subtraction, equality checks and AND/OR logic. The document also covers operator precedence and how it determines the order of operations.
1) Variables are used in programming to store and manipulate data values. They must be declared with a name and data type.
2) Variables can be initialized during or after declaration by assigning them a value. User input can be obtained and assigned to variables using functions like Console.ReadLine().
3) Constants are variables whose values cannot change once declared, while the scope of a variable determines where it can be accessed within a program.
This document provides an introduction and overview of VB.NET (Visual Basic .NET). It discusses what VB.NET is, its features, why it is used as a professional language, advantages and disadvantages. It also describes the structure of a VB.NET program, including namespaces, classes, modules, procedures, variables, and the main procedure. It explains the compilation and execution process of a VB.NET program in Visual Studio. An example VB.NET "Hello World" program is provided to demonstrate the core components.
The .NET Framework Class Library (FCL) provides core functionality for the .NET Framework. It includes thousands of reusable classes organized into namespaces that support tasks like data access, input/output, GUI development, and web services. The FCL is integrated with the Common Language Runtime and provides consistent base types used across all .NET languages.
The document provides an introduction to the .NET framework, including its evolution, versions, components, characteristics, and pros and cons. It discusses the Common Language Runtime (CLR), Common Type System (CTS), Base Class Library (BCL), Common Language Specification (CLS), Framework Class Library (FCL), .NET assemblies, and other components like Windows Forms and ASP.NET. It also covers when .NET is well-suited, such as for scalable products, cross-platform needs, and enterprise-scale infrastructures.
The document provides an introduction to Java Server Pages (JSP) which is a server-side technology used to create dynamic web pages. It discusses static vs dynamic web pages, the JSP lifecycle including compilation, initialization, execution and cleanup. It also covers JSP elements like scriptlets, declarations, expressions, comments and directives. Key components like the JSP directory structure and JSP architecture models are summarized.
SGML is a standard for specifying markup languages. It describes how to define document structure separately from presentation. XML is a simplified version of SGML used to store and transport data. Key differences between XML and HTML include XML focusing on data rather than presentation, being case sensitive, requiring closing tags, and preserving whitespace.
5th LF Energy Power Grid Model Meet-up SlidesDanBrown980551
5th Power Grid Model Meet-up
It is with great pleasure that we extend to you an invitation to the 5th Power Grid Model Meet-up, scheduled for 6th June 2024. This event will adopt a hybrid format, allowing participants to join us either through an online Mircosoft Teams session or in person at TU/e located at Den Dolech 2, Eindhoven, Netherlands. The meet-up will be hosted by Eindhoven University of Technology (TU/e), a research university specializing in engineering science & technology.
Power Grid Model
The global energy transition is placing new and unprecedented demands on Distribution System Operators (DSOs). Alongside upgrades to grid capacity, processes such as digitization, capacity optimization, and congestion management are becoming vital for delivering reliable services.
Power Grid Model is an open source project from Linux Foundation Energy and provides a calculation engine that is increasingly essential for DSOs. It offers a standards-based foundation enabling real-time power systems analysis, simulations of electrical power grids, and sophisticated what-if analysis. In addition, it enables in-depth studies and analysis of the electrical power grid’s behavior and performance. This comprehensive model incorporates essential factors such as power generation capacity, electrical losses, voltage levels, power flows, and system stability.
Power Grid Model is currently being applied in a wide variety of use cases, including grid planning, expansion, reliability, and congestion studies. It can also help in analyzing the impact of renewable energy integration, assessing the effects of disturbances or faults, and developing strategies for grid control and optimization.
What to expect
For the upcoming meetup we are organizing, we have an exciting lineup of activities planned:
-Insightful presentations covering two practical applications of the Power Grid Model.
-An update on the latest advancements in Power Grid -Model technology during the first and second quarters of 2024.
-An interactive brainstorming session to discuss and propose new feature requests.
-An opportunity to connect with fellow Power Grid Model enthusiasts and users.
Salesforce Integration for Bonterra Impact Management (fka Social Solutions A...Jeffrey Haguewood
Sidekick Solutions uses Bonterra Impact Management (fka Social Solutions Apricot) and automation solutions to integrate data for business workflows.
We believe integration and automation are essential to user experience and the promise of efficient work through technology. Automation is the critical ingredient to realizing that full vision. We develop integration products and services for Bonterra Case Management software to support the deployment of automations for a variety of use cases.
This video focuses on integration of Salesforce with Bonterra Impact Management.
Interested in deploying an integration with Salesforce for Bonterra Impact Management? Contact us at sales@sidekicksolutionsllc.com to discuss next steps.
OpenID AuthZEN Interop Read Out - AuthorizationDavid Brossard
During Identiverse 2024 and EIC 2024, members of the OpenID AuthZEN WG got together and demoed their authorization endpoints conforming to the AuthZEN API
Ivanti’s Patch Tuesday breakdown goes beyond patching your applications and brings you the intelligence and guidance needed to prioritize where to focus your attention first. Catch early analysis on our Ivanti blog, then join industry expert Chris Goettl for the Patch Tuesday Webinar Event. There we’ll do a deep dive into each of the bulletins and give guidance on the risks associated with the newly-identified vulnerabilities.
HCL Notes und Domino Lizenzkostenreduzierung in der Welt von DLAUpanagenda
Webinar Recording: https://www.panagenda.com/webinars/hcl-notes-und-domino-lizenzkostenreduzierung-in-der-welt-von-dlau/
DLAU und die Lizenzen nach dem CCB- und CCX-Modell sind für viele in der HCL-Community seit letztem Jahr ein heißes Thema. Als Notes- oder Domino-Kunde haben Sie vielleicht mit unerwartet hohen Benutzerzahlen und Lizenzgebühren zu kämpfen. Sie fragen sich vielleicht, wie diese neue Art der Lizenzierung funktioniert und welchen Nutzen sie Ihnen bringt. Vor allem wollen Sie sicherlich Ihr Budget einhalten und Kosten sparen, wo immer möglich. Das verstehen wir und wir möchten Ihnen dabei helfen!
Wir erklären Ihnen, wie Sie häufige Konfigurationsprobleme lösen können, die dazu führen können, dass mehr Benutzer gezählt werden als nötig, und wie Sie überflüssige oder ungenutzte Konten identifizieren und entfernen können, um Geld zu sparen. Es gibt auch einige Ansätze, die zu unnötigen Ausgaben führen können, z. B. wenn ein Personendokument anstelle eines Mail-Ins für geteilte Mailboxen verwendet wird. Wir zeigen Ihnen solche Fälle und deren Lösungen. Und natürlich erklären wir Ihnen das neue Lizenzmodell.
Nehmen Sie an diesem Webinar teil, bei dem HCL-Ambassador Marc Thomas und Gastredner Franz Walder Ihnen diese neue Welt näherbringen. Es vermittelt Ihnen die Tools und das Know-how, um den Überblick zu bewahren. Sie werden in der Lage sein, Ihre Kosten durch eine optimierte Domino-Konfiguration zu reduzieren und auch in Zukunft gering zu halten.
Diese Themen werden behandelt
- Reduzierung der Lizenzkosten durch Auffinden und Beheben von Fehlkonfigurationen und überflüssigen Konten
- Wie funktionieren CCB- und CCX-Lizenzen wirklich?
- Verstehen des DLAU-Tools und wie man es am besten nutzt
- Tipps für häufige Problembereiche, wie z. B. Team-Postfächer, Funktions-/Testbenutzer usw.
- Praxisbeispiele und Best Practices zum sofortigen Umsetzen
Best 20 SEO Techniques To Improve Website Visibility In SERPPixlogix Infotech
Boost your website's visibility with proven SEO techniques! Our latest blog dives into essential strategies to enhance your online presence, increase traffic, and rank higher on search engines. From keyword optimization to quality content creation, learn how to make your site stand out in the crowded digital landscape. Discover actionable tips and expert insights to elevate your SEO game.
Taking AI to the Next Level in Manufacturing.pdfssuserfac0301
Read Taking AI to the Next Level in Manufacturing to gain insights on AI adoption in the manufacturing industry, such as:
1. How quickly AI is being implemented in manufacturing.
2. Which barriers stand in the way of AI adoption.
3. How data quality and governance form the backbone of AI.
4. Organizational processes and structures that may inhibit effective AI adoption.
6. Ideas and approaches to help build your organization's AI strategy.
Unlock the Future of Search with MongoDB Atlas_ Vector Search Unleashed.pdfMalak Abu Hammad
Discover how MongoDB Atlas and vector search technology can revolutionize your application's search capabilities. This comprehensive presentation covers:
* What is Vector Search?
* Importance and benefits of vector search
* Practical use cases across various industries
* Step-by-step implementation guide
* Live demos with code snippets
* Enhancing LLM capabilities with vector search
* Best practices and optimization strategies
Perfect for developers, AI enthusiasts, and tech leaders. Learn how to leverage MongoDB Atlas to deliver highly relevant, context-aware search results, transforming your data retrieval process. Stay ahead in tech innovation and maximize the potential of your applications.
#MongoDB #VectorSearch #AI #SemanticSearch #TechInnovation #DataScience #LLM #MachineLearning #SearchTechnology
Introduction of Cybersecurity with OSS at Code Europe 2024Hiroshi SHIBATA
I develop the Ruby programming language, RubyGems, and Bundler, which are package managers for Ruby. Today, I will introduce how to enhance the security of your application using open-source software (OSS) examples from Ruby and RubyGems.
The first topic is CVE (Common Vulnerabilities and Exposures). I have published CVEs many times. But what exactly is a CVE? I'll provide a basic understanding of CVEs and explain how to detect and handle vulnerabilities in OSS.
Next, let's discuss package managers. Package managers play a critical role in the OSS ecosystem. I'll explain how to manage library dependencies in your application.
I'll share insights into how the Ruby and RubyGems core team works to keep our ecosystem safe. By the end of this talk, you'll have a better understanding of how to safeguard your code.
Let's Integrate MuleSoft RPA, COMPOSER, APM with AWS IDP along with Slackshyamraj55
Discover the seamless integration of RPA (Robotic Process Automation), COMPOSER, and APM with AWS IDP enhanced with Slack notifications. Explore how these technologies converge to streamline workflows, optimize performance, and ensure secure access, all while leveraging the power of AWS IDP and real-time communication via Slack notifications.
In the rapidly evolving landscape of technologies, XML continues to play a vital role in structuring, storing, and transporting data across diverse systems. The recent advancements in artificial intelligence (AI) present new methodologies for enhancing XML development workflows, introducing efficiency, automation, and intelligent capabilities. This presentation will outline the scope and perspective of utilizing AI in XML development. The potential benefits and the possible pitfalls will be highlighted, providing a balanced view of the subject.
We will explore the capabilities of AI in understanding XML markup languages and autonomously creating structured XML content. Additionally, we will examine the capacity of AI to enrich plain text with appropriate XML markup. Practical examples and methodological guidelines will be provided to elucidate how AI can be effectively prompted to interpret and generate accurate XML markup.
Further emphasis will be placed on the role of AI in developing XSLT, or schemas such as XSD and Schematron. We will address the techniques and strategies adopted to create prompts for generating code, explaining code, or refactoring the code, and the results achieved.
The discussion will extend to how AI can be used to transform XML content. In particular, the focus will be on the use of AI XPath extension functions in XSLT, Schematron, Schematron Quick Fixes, or for XML content refactoring.
The presentation aims to deliver a comprehensive overview of AI usage in XML development, providing attendees with the necessary knowledge to make informed decisions. Whether you’re at the early stages of adopting AI or considering integrating it in advanced XML development, this presentation will cover all levels of expertise.
By highlighting the potential advantages and challenges of integrating AI with XML development tools and languages, the presentation seeks to inspire thoughtful conversation around the future of XML development. We’ll not only delve into the technical aspects of AI-powered XML development but also discuss practical implications and possible future directions.
2. 2
HTML Form
Forms add the ability to web pages to not only provide the person
viewing the document with dynamic information but also to obtain
information from the person viewing it, and process the information.
Objectives:
Upon completing this section, you should be able to
1. Create a FORM.
2. Add elements to a FORM.
3. Define CGI (Common Gateway Interface).
4. Describe the purpose of a CGI Application.
5. Specify an action for the FORM.
Forms work in all browsers.
Forms are Platform Independent
3. 3
HTML Form
A form in HTML is contained within a form element. i.e. <form>…<</form>.
A form is made up of fields as well as the markup necessary to structure the form
and potentially control its presentation.
Form fields include text fields, password fields, multiple-line text fields, pop-up
menus, scrolled lists, radio buttons, check boxes, and buttons.
The form itself contains regular text, other HTML elements such as tables, and form
elements such as check boxes, drop-down menus, and text fields.
In order to make the form work, you must specify two things in the <form> tag: the
address of the program that will handle the form contents using action and the
method by which the form data will be passed using the method attribute.
4. 4
HTML Form
To insert a form we use the <FORM></FORM> tags. The rest of the form elements
must be inserted in between the form tags.
<HTML> <HEAD>
<TITLE> Sample Form</TITLE>
</HEAD>
<BODY BGCOLOR=“FFFFFF”>
<FORM ACTION = http://www.xnu.com/formtest.asp>
<P> First Name: <INPUT TYPE=“TEXT” NAME=“fname” MAXLENGTH=“50”> </P>
<P> <INPUT TYPE=“SUBMIT” NAME=“fsubmit1” VALUE=“Send Info”> </P>
</FORM>
</BODY> </HTML>
5. 5
HTML Form Attributes
ACTION: is the URL of the CGI (Common Gateway Interface) program that is going to
accept the data from the form, process it, and send a response back to the browser.
METHOD: GET (default) or POST specifies which HTTP method will be used to send
the form’s contents to the web server. The CGI application should be written to accept
the data from either method.
NAME: is a form name used by VBScript or JavaScripts.
TARGET: is the target frame where the response page will show up.
6. 6
HTML Form ElementsText Fields
Single-line text entry fields are specified using the input element and are useful for collecting small
bits of data such as a user's name, address, e-mail address, and so on. It is possible to specify a
multiple-line text field using the textarea element. To set a text entry control, <input> tag is used.
<input type="text" name="UserName" id="UserName" size="30" maxlength="60“ value="Enter your
name here”>
Attributes
Name /Id: All form elements should be named by setting the name attribute to some unique value.
Size: By default, unless specified this field generally will be a width of 20 characters. The value of
the size field for an <input> tag is the number of characters to be displayed. It is possible for the user
to type more characters than this value. The text will just scroll by.
Maxlength: If you want to limit the size of the field, you need to set the value of the maxlength
attribute to the maximum number of characters allowed in the field.
Value: The final attribute that is useful to set with a text entry field is the value attribute. With this
attribute, you can specify the default text you want to appear in the field when the form is first loaded.
7. 7
HTML Form Elements
Password Fields
The password form field is the same as the simple text entry field, except that the input to the field
is not echoed when typed. To set a password form control, use the <input> tag again but this
time set the type attribute equal to password.
As with the text field, it is possible to specify the size of the field in characters with size and the
maximum entry in characters with maxlength.
Setting a default value for the password field with the value attribute doesn't make much sense
because the user can see it by viewing the HTML source of the document.
Of course, the name and id attributes should also be used on this form field.
<input type="password" name="Pass" id="Pass" size="10" maxlength="10“ >
8. 8
Example of Password Field
<HTML><HEAD>
<TITLE>Form_Password_Type</TITLE></HEAD>
<BODY>
<h1> <font color=red>To Access, Please
enter:</font></h1>
<FORM name="fome2" Action="url" method="get">
User Name: <INPUT TYPE="TEXT" Name="FName“ SIZE="15“
MAXLENGTH="25"> <BR>
Password: <INPUT TYPE="PASSWORD" NAME="PWord" value="“ SIZE="15”
MAXLENGTH="25"><BR>
</FORM></BODY> </HTML>
9. 9
HTML Form Elements
Multiple-Line Text Input
When it is necessary to enter more than one line of text in a form field, the input element must be
abandoned in favor of the textarea element. Like the text input field, there are similar attributes to
control the display size of the data entry area as well as the default value and the name of the control.
Attributes
Rows: To set the number of rows in the text entry area, set the rows attribute equal to the
number of rows desired.
Cols: To set the number of characters per line, set the cols attribute.
<textarea rows="5" cols="80" name="CommentBox" id="CommentBox"> </textarea>
Because there can be many lines of text within a <textarea> tag, it is not possible to set the default
text for the area using the value attribute. Instead, place the default text between the <textarea> and
</textarea> tags:
<textarea rows="5" cols="80" name="CommentBox" id="CommentBox">
Please fill in your comments here.
</textarea>
The information enclosed within a <textarea> tag must be plain text and should not include any
HTML markup. In fact, the default text in a <textarea> tag preserves all the spaces, returns, and
other special characters. Markup included within the form control will not be interpreted.
10. 10
HTML Form Elements
Drop-Down Menus
A drop-down menu enables the user to select one choice out of many possible choices. One nice aspect of drop-
down menus is that all choices do not have to be seen on the screen and are generally are hidden. To create a
drop-down menu <select> tag is used.
The tag should contain one or more occurrences of the option element. Each <option> tag specifies a menu
choice.
Like all form fields the select element has name and id attributes used to set a unique name for the field. It is also
possible to set the size attribute on a <select> tag, but generally this is not set unless the menu is a scrolled list.
The option element has a few attributes as well. An occurrence of the attribute selected in an <option> tag sets the
form control to select this item by default. Otherwise, a browser will choose the first <option> within the select
element as the default. If multiple selected attributes are specified, the result is generally to select the final
<option> tag with a selected attribute. Generally, the value submitted when the form is sent is the value enclosed
by the option element. However, it is possible to set the value attribute for the element that will be returned instead.
<form >
<select name="GadgetType" id="GadgetType">
<option>Super Gadget</option>
<option value="MEG-G5">Mega Gadget</option>
<option value="MO-45" selected="selected">Mongo Gadget</option>
<option>Plain Gadget</option>
</select>
</form>
11. 11
HTML Form Elements
Check Box
With the scrolled list, it is possible to select many items out of a large group of items. Unfortunately, not all the items
are presented at once for the user to choose. If there are a few options to select from that are not mutually
exclusive, it probably is better to use a group of check boxes that the user can check off.
Check boxes are best used to toggle choices on and off. Although it is possible to have multiple numbers of check
boxes and let the user select as many as he or she wants.
To create a check box, use an <input> tag and set the type attribute equal to checkbox.
The check box also should be named by setting the name and id attributes.
If the check box is selected, a value of Cheese=on will be transmitted to the server. Setting a value for the check
box might make more sense. Values to be transmitted instead of the default value can be set with the value
attribute. The code
Cheese: <input type="checkbox" name="Extras“ value="Cheese“ >
would send a response such as Extras=Cheese to the server.
It is possible to set a check box to be selected by default by using the checked attribute within an <input> tag.
<form>
Super-magneto: <input type="checkbox" name="mag" value="Magnetize" >
<br>
Kryptonite Coating: <input type="checkbox" name="krypto" value="Anti-Superman"
checked="checked" >
<br />
Anti-gravity: <input type="checkbox" name="antigrav" value="Anti-gravity" >
<br>
</form>
12. 12
HTML Form Elements
Radio Button :
Radio buttons use a similar notation to check boxes, but only one option may be chosen among many.
This is an especially good option for choices that don't make sense when selected together.
In this sense, radio buttons are like pull-down menus that allow only one choice.
The main difference is that all options are shown at once with radio buttons.
Like check boxes, this form field uses the standard <input type=""> format. In this case, set type equal to radio.
Setting the name attribute is very important in the case of radio buttons because it groups together controls that
share the radio functionality.
The radio functionality says that when an item is selected, it deselects the previously pressed item. If the names
are not the same, the radio group will not work.
Be careful when naming radio fields.
When working with radio buttons, the value attribute must also be carefully considered. It is important to set each
individual radio button to a different value entry. Otherwise, it will be impossible to decipher which button was
selected.
Like check boxes, the occurrence of the selected attribute in an <input> tag will preselect the item. Only one item
may be selected as a default out of a radio group.
If the selected attribute does not occur, the browser typically will not display any items as selected.
<form>
Groovy Green: <input type="radio" name="Color" value="Green">
Rocket Red: <input type="radio" name="Color" value="Red" checked="checked">
Yipee! Yellow: <input type="radio" name="Color" value="Yellow">
</form>
13. 13
HTML Form Elements
Reset and Submit Button
Once a form has been filled in, there must be a way to send it on its way, whether it is submitted to a program for
processing or simply mailed to an e-mail address.
The input element has two values, reset and submit, for the type attribute for accomplishing this.
Setting the type attribute for an <input> tag to reset creates a button that allows the user to clear or set to default all
the form fields at once.
Setting the type attribute for <input> to submit creates a button that triggers the browser to send the contents of the
form to the address specified in the action attribute of the enclosing form element.
The buttons have two important attributes: value and name. The value attribute sets both the value of the button
transmitted to the server and the text wording on the button.
The name value associates an identifier with the form field for submission. Ofcourse, id can be used as well for
setting a name, but it is typically more related to style sheets.
Because the Submit and Reset buttons cause an action, either form submission or field reset, it may not be obvious
why the name field can be useful.
Although having multiple Reset buttons might not be so useful, multiple Submit buttons are useful because the
value of the button is sent to the address specified in the form element's action attribute.
<input type="submit" value="Place Order" name="Add“ >
<input type="submit" value="Delete Order" name="Delete”>
<input type="submit" value="Update Order" name="Update”>
<input type="reset" value="Reset Form" name="ResetButton”>
15. 15
HTML Form Elements
File Upload: You can use a file upload to allow surfers to upload files to your web server.
<INPUT TYPE=“FILE”>
Browser will display
File Upload has the following attributes:
TYPE: file.
SIZE: is the size of the text box in characters.
NAME: is the name of the variable to be sent to the CGI application.
MAXLENGHT: is the maximum size of the input in the textbox in characters.
<BODY bgcolor=lightblue>
<form>
<H3><font color=forestgreen>
Please attach your file here to for uploading to
My <font color =red>SERVER...<BR>
<INPUT TYPE="File" name="myFile" size="30">
<INPUT TYPE="Submit" value="SubmitFile">
</form>
</BODY>
17. 17
HTML Form Action Attribute
The action Attribute
How a form is to be handled is set using the action attribute for the form element.
The action attribute usually is set to a URL of the program on the web server that will
process the form data captured and being sent back.
The server side program that processes this data can be written in any scripting
language that the web server understands.
For example, the code
<form action="http://www.democompany.com/cgi-bin/post-query.pl"
method="post">
would be for a script called post-query.pl in the cgi-bin directory on the server
www.democompany.com.
It is also possible to use a relative URL for the action attribute if the form is delivered by
the same server that houses the form-handling program:
<form action="../cgi-bin/post-query.pl" method="post">
18. 18
HTML Form Method Attribute
It is also necessary to specify how the form will be submitted to the
address specified by the action attribute.
How data will be submitted is handled by the method attribute.
There are two acceptable values for the method attribute:
1) get
2) post
These are the HTTP methods that a browser uses to "talk" to a
server.
If the method attribute remains unspecified, it defaults to the get
method.
19. 19
HTML Form get() Method
• The HTTP get method generally is the default method for browsers to submit
information.
• In fact, HTML documents generally are retrieved by requesting a single URL from a
Web server using the get method, which is part of the HTTP protocol. When you type
a URL such as http://www.democompany.com/staff/thomas.html into your Web
browser, it is translated into a valid HTTP get request like this: GET
/staff/thomas.html HTTP/1.1
• This request is then sent to the server www.democompany.com. What this request
says, essentially, is "Get me the file thomas.html in the staff directory. I am speaking
the 1.1 dialect of HTTP."
• We need to pass the form data along with the name of the program to run. To do
this, all the information from the form is appended onto the end of the URL being
requested. This produces a very long URL with the actual data in it, as shown here:
http://www.democompany.com/cgi-
bin/comments.exe?Name=Matthew+Foley&Age=32&Sex=male
20. 20
HTML Form get() Method
Disadvantages:
The get method isn't very secure because the data input appears in the URL.
Furthermore, there is a limitation to just how much data can be passed with the get
method (1024 bytes).
Advantage:
• First, get is easy to deal with. An example URL like the previous one should make it
obvious that the Name field is set to Matthew Foley, the Age is 32, and the Sex is
male. The individual form field values are separated by ampersands. Other reason
to use get is that it comes in the form of a URL, so it can be bookmarked or set as a
link.
• The get method is used properly in search engines. When a user submits a query to
a search engine, the engine runs the query and then returns page upon page of
results. It is possible to bookmark the query results and rerun the query later.
21. 21
HTML Form post() Method
In situations where a large amount of information must be passed back, the post method is more
appropriate than get.
The post method transmits all form input information as a data stream immediately after the
requested URL.
In other words, once the server has received a request from a form using post, it knows to
continue "listening" for the rest of the information.
The get method comes with the data to use right in the URL request. The encoding of the form
data is handled in the same general way as the get method by default; spaces become plus signs
and other characters are encoded in the URL fashion. A sample form might send data that would
look like the following:
Name=Jane+Smith&Age=30&Sex=female
The benefit of using the post method is that a large amount of data can be submitted this way
because the form contents are not in the URL.
In the post example, the encoding of the form data is the same as get, although it is possible to
change the encoding method using the enctype attribute.
One potential downside of the post method is that pages generated by data submitted via post
cannot be bookmarked.