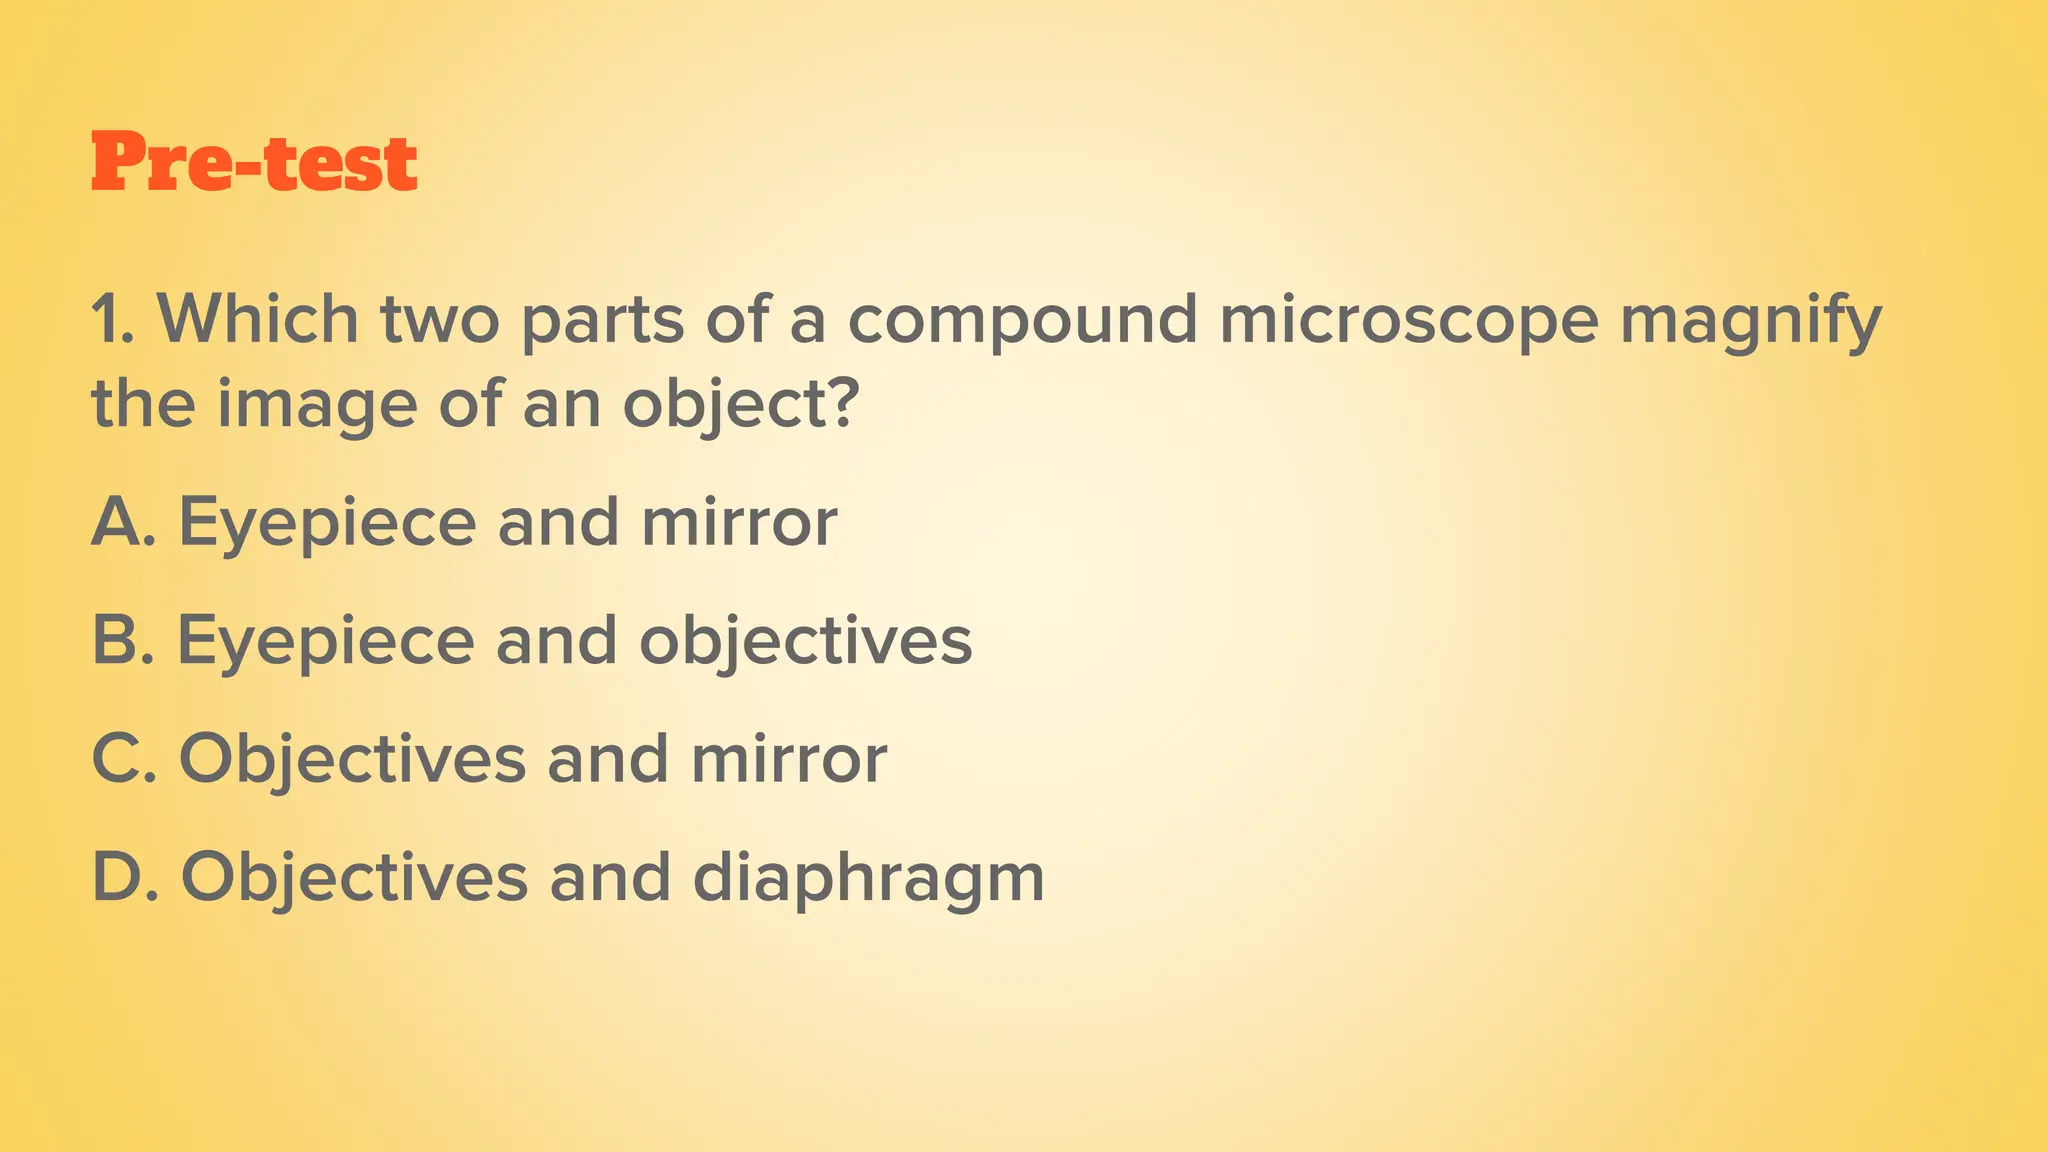
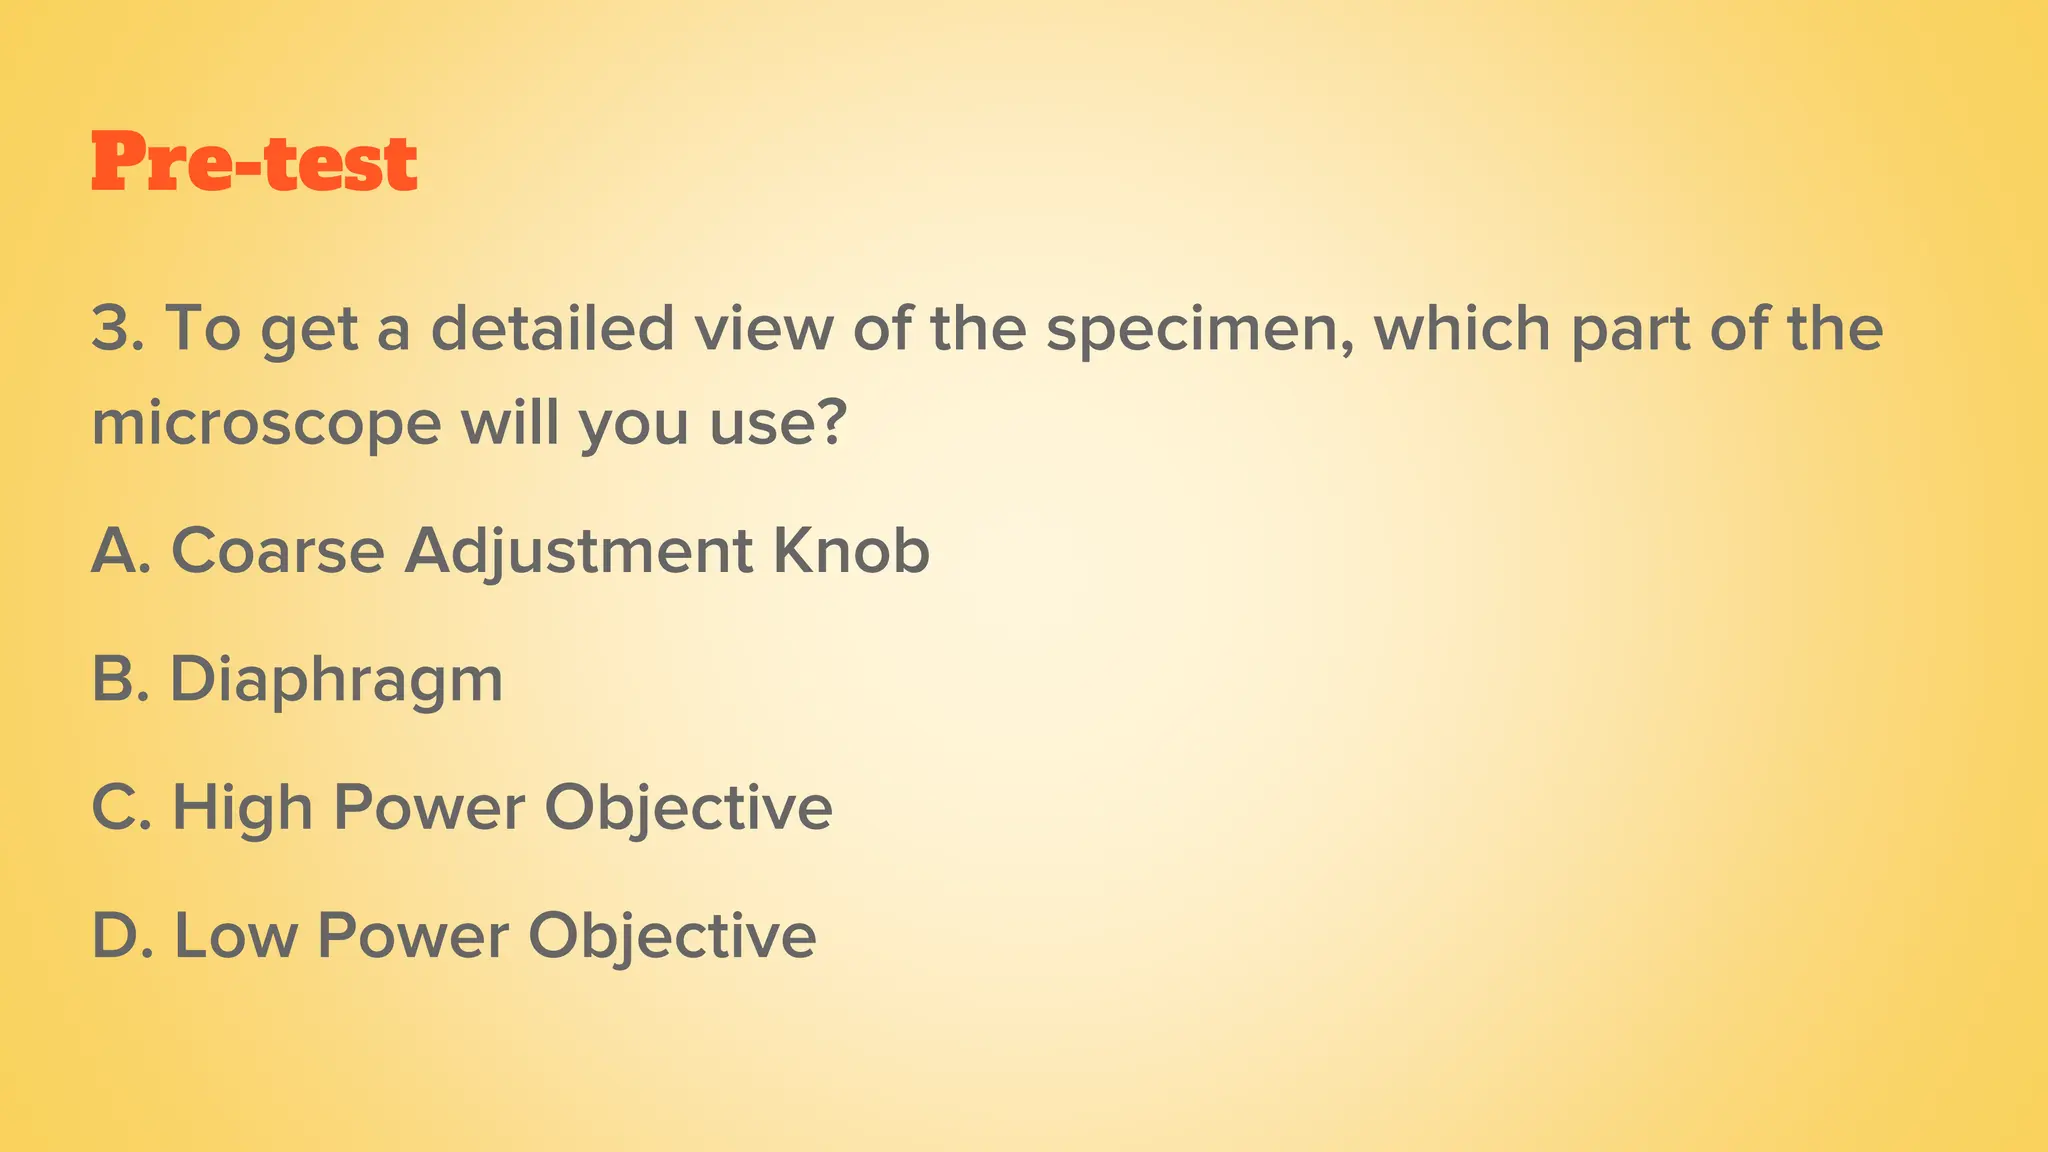
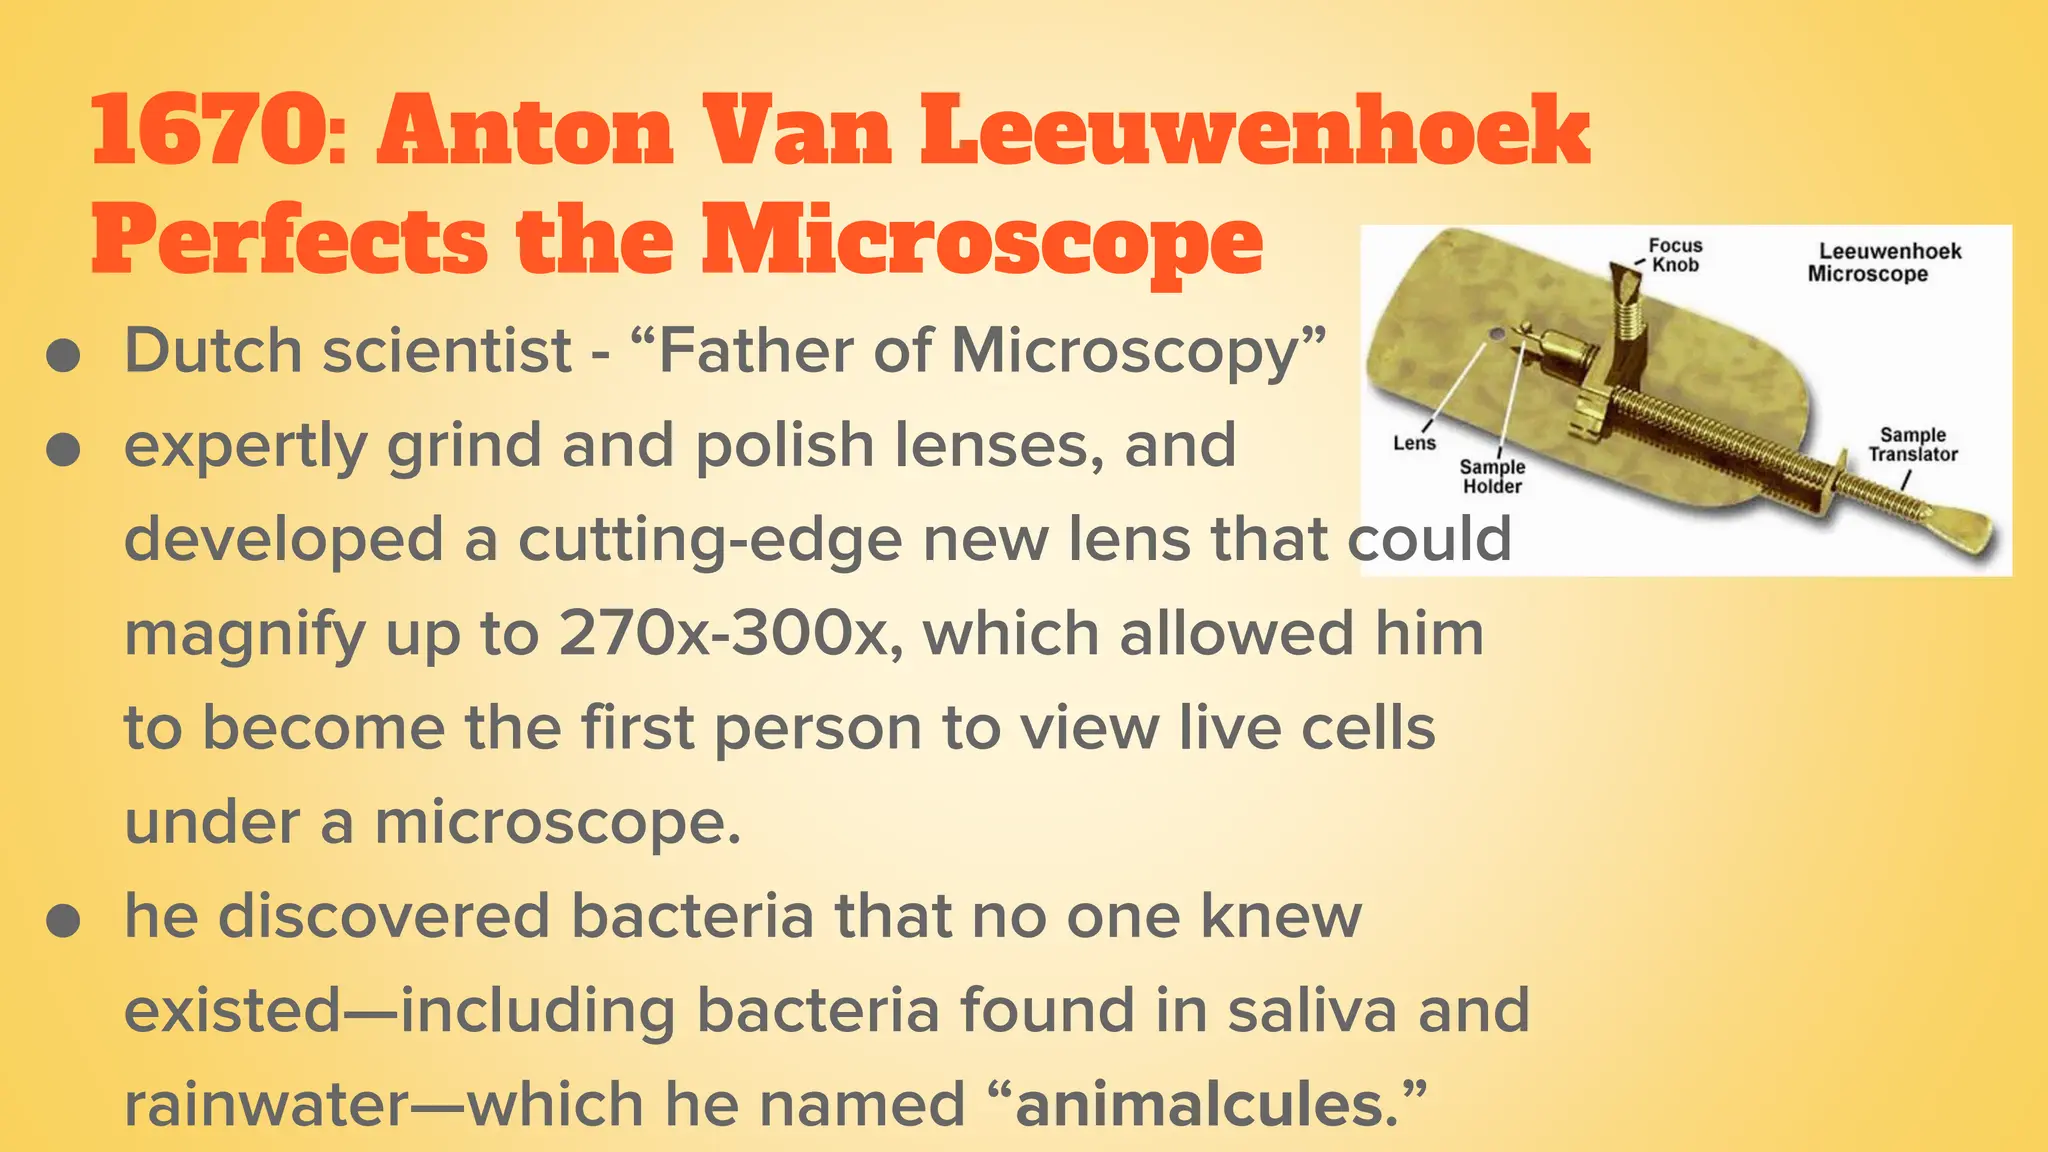
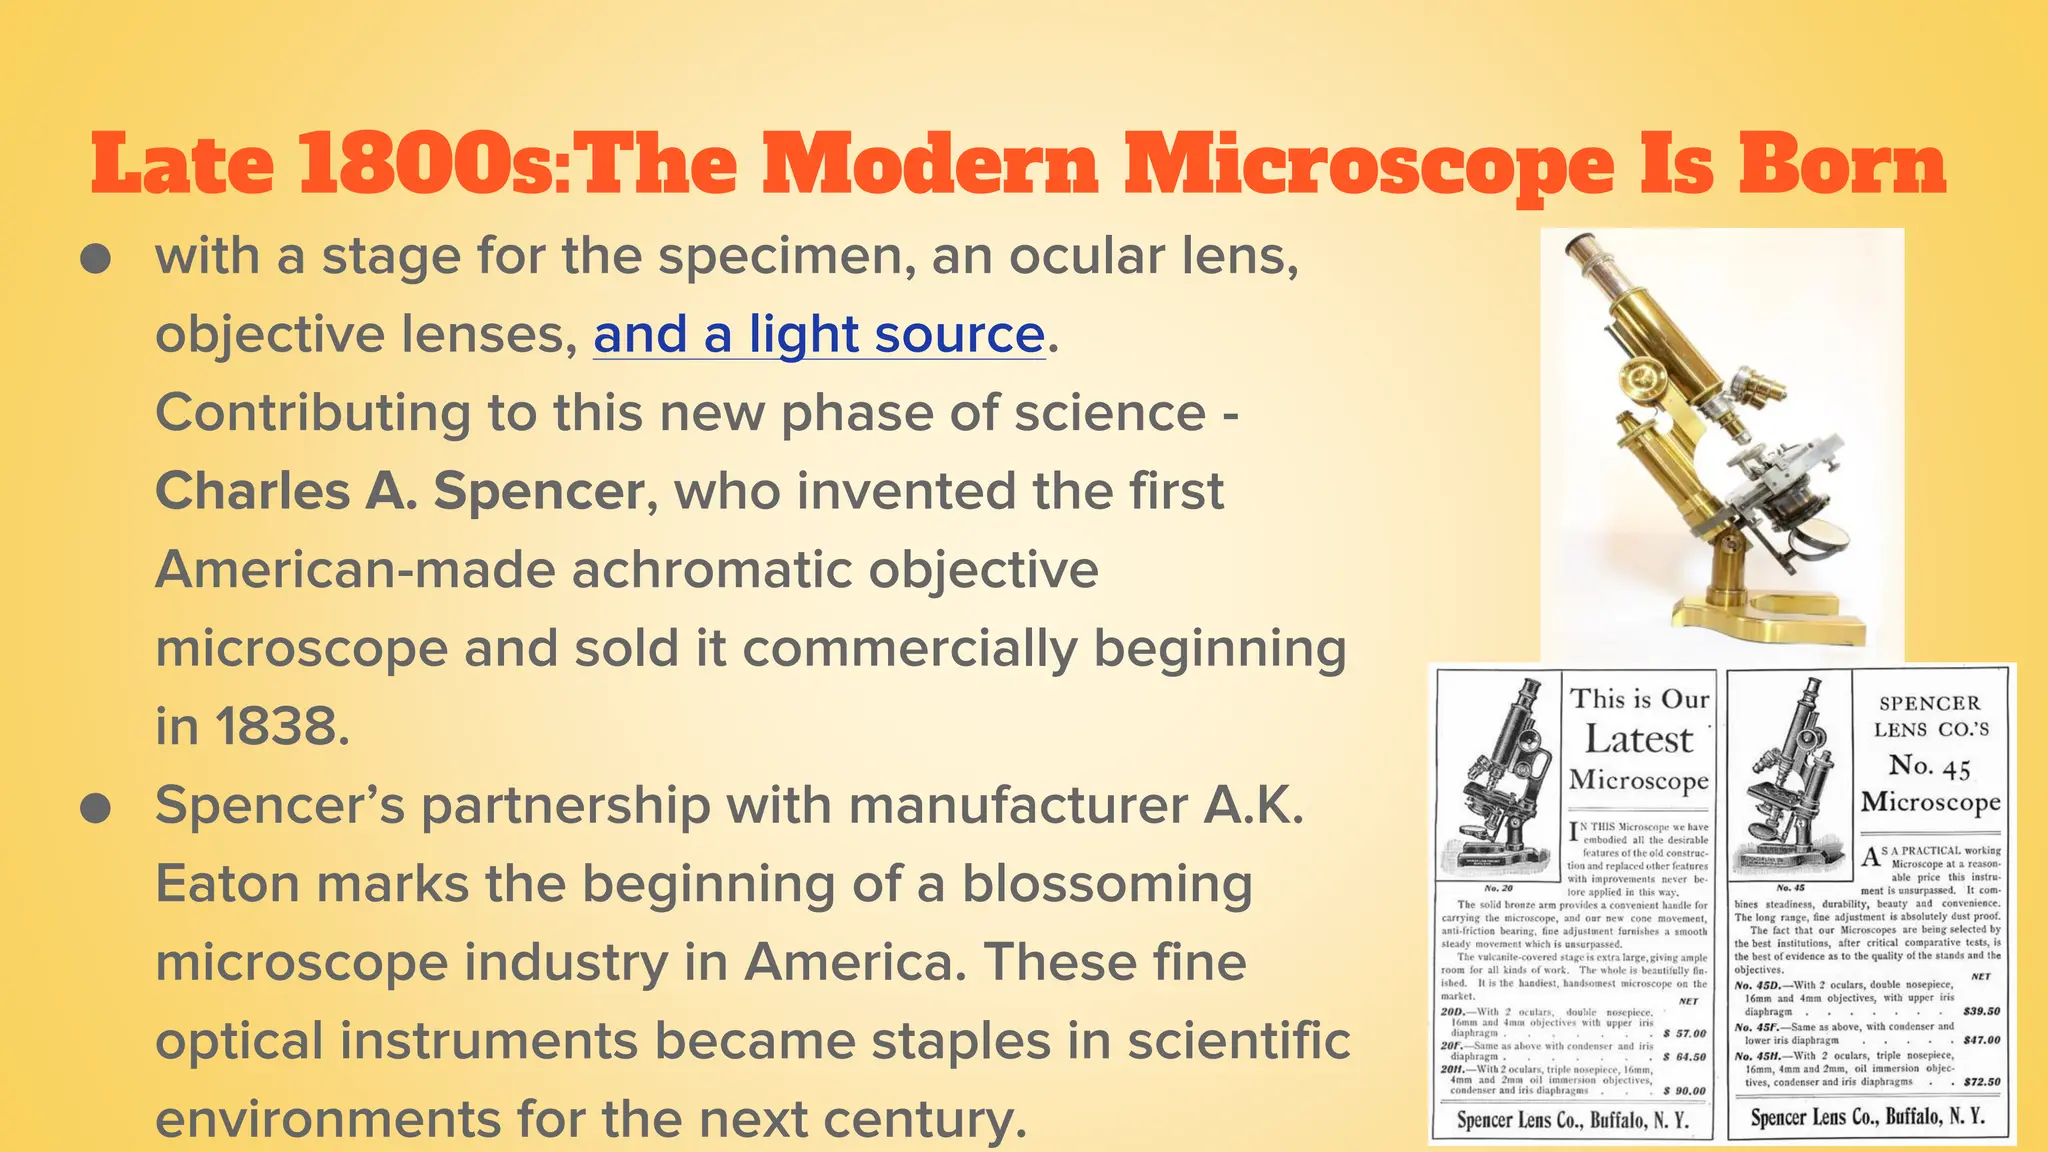
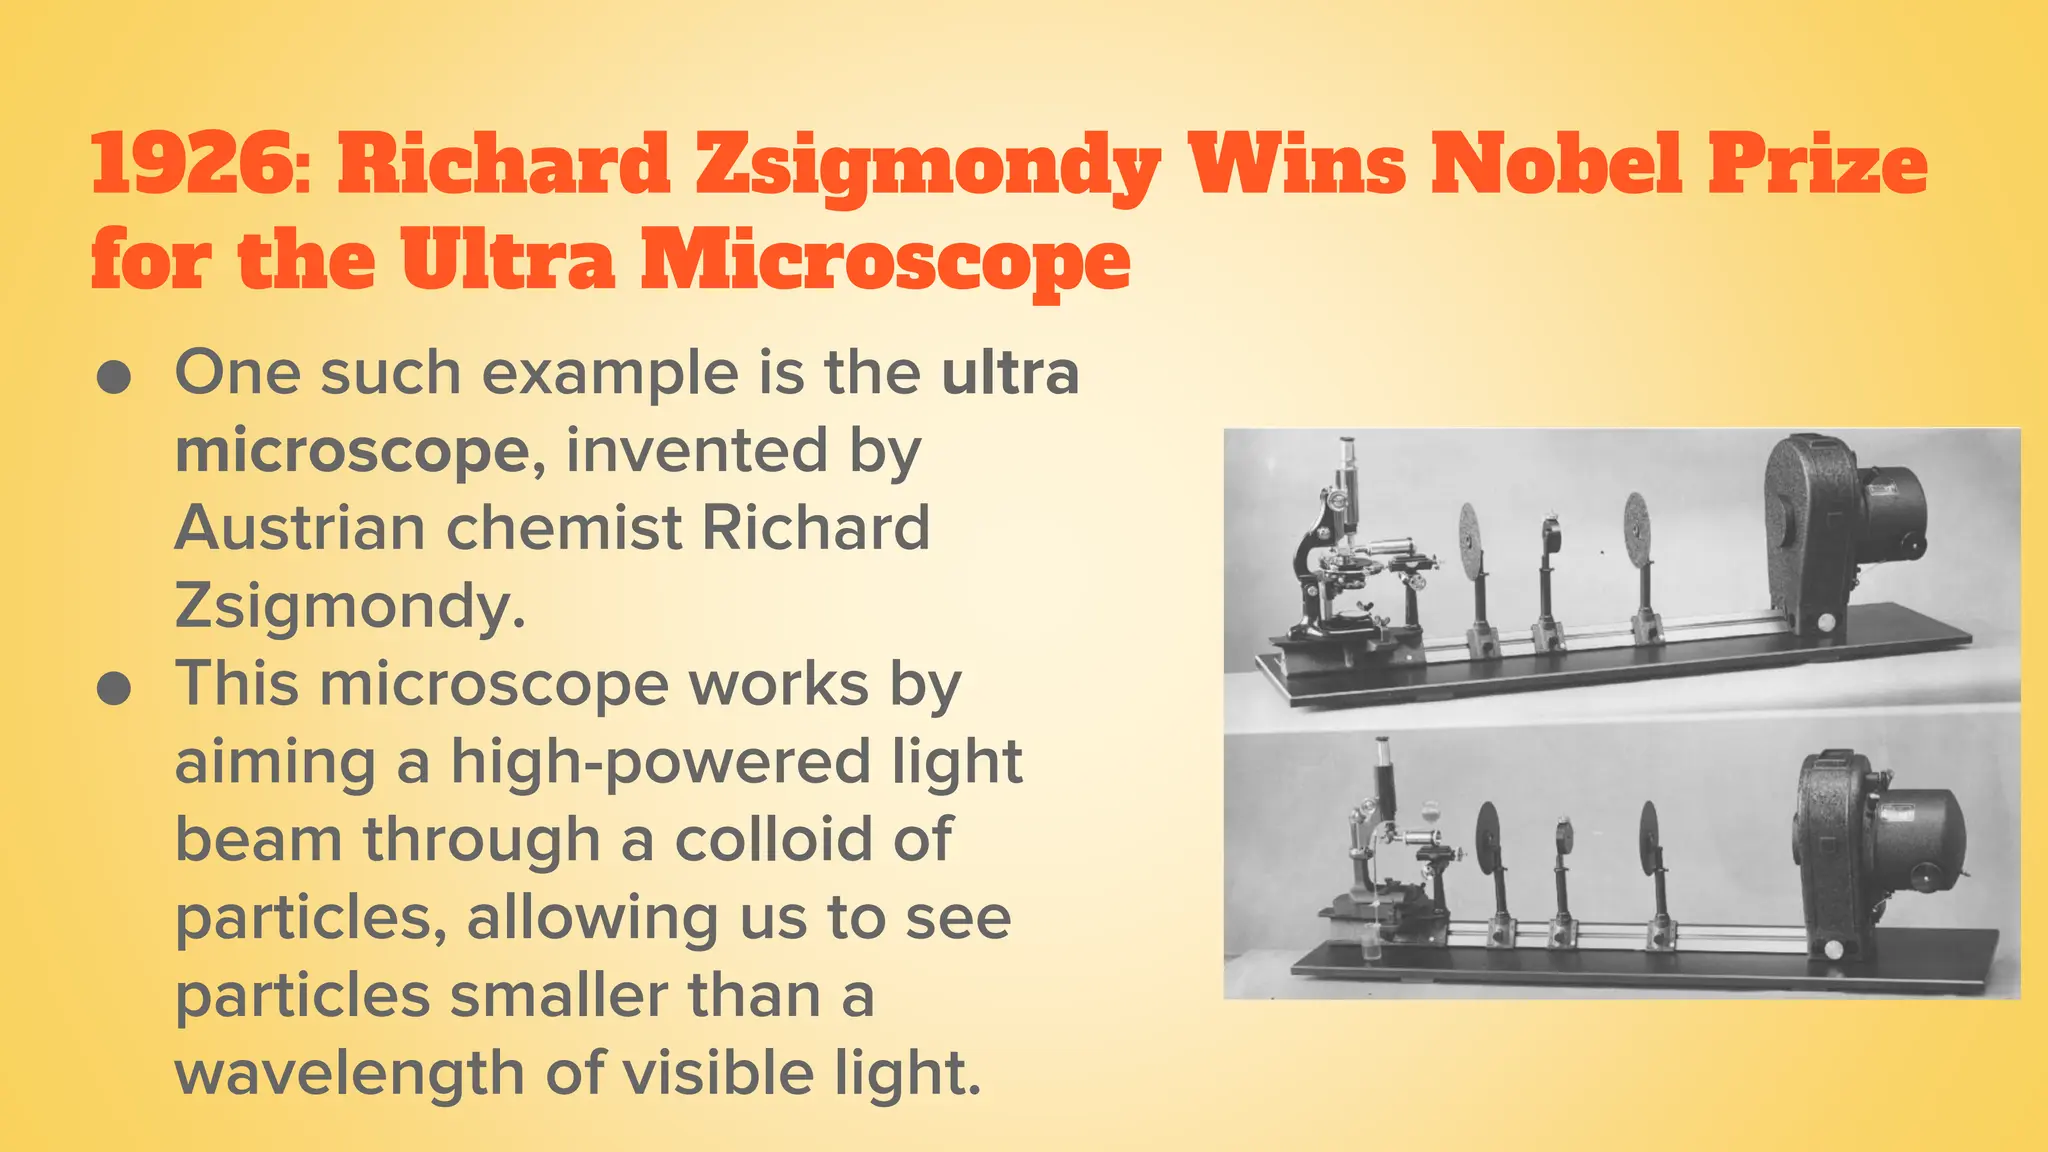
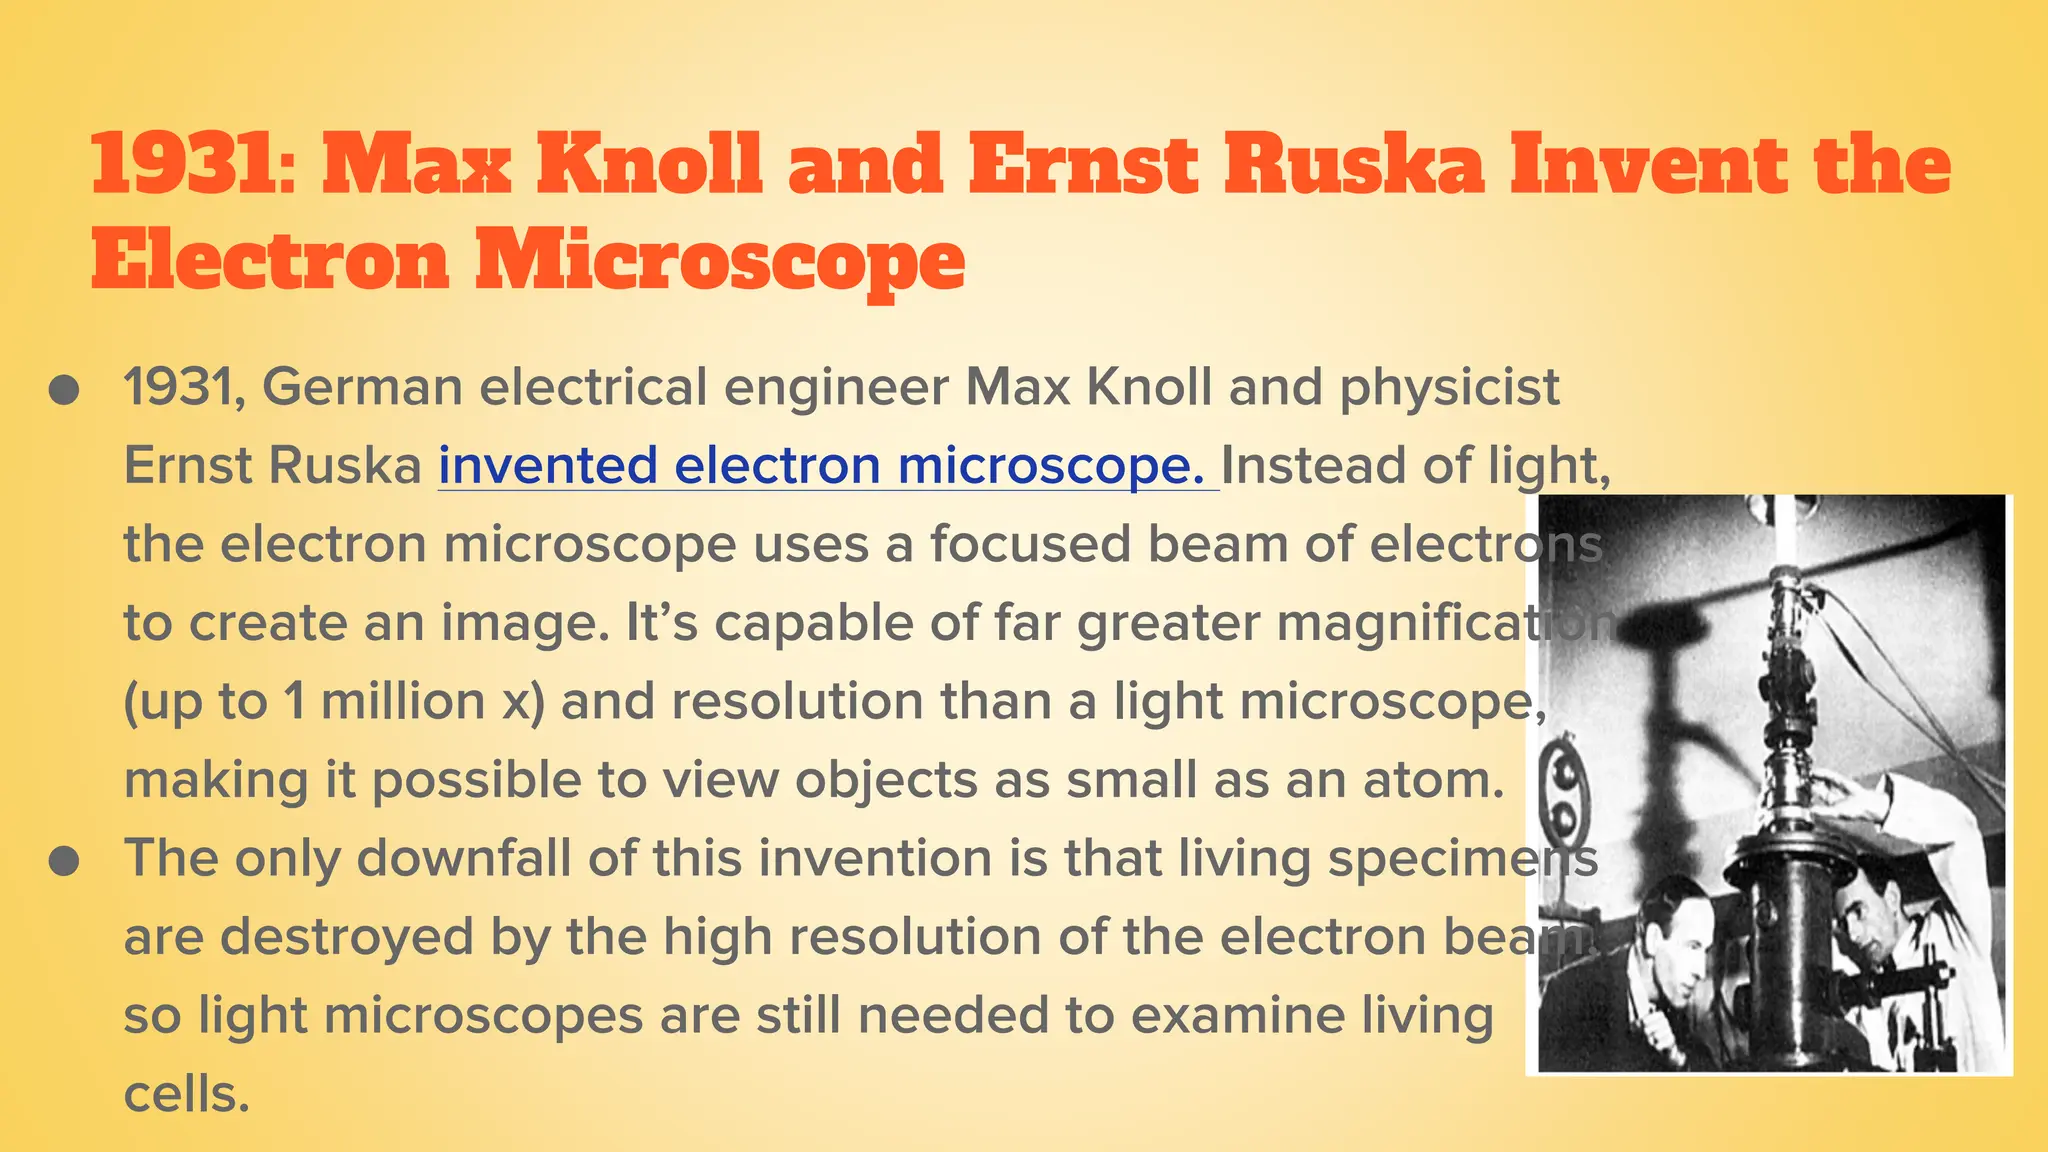
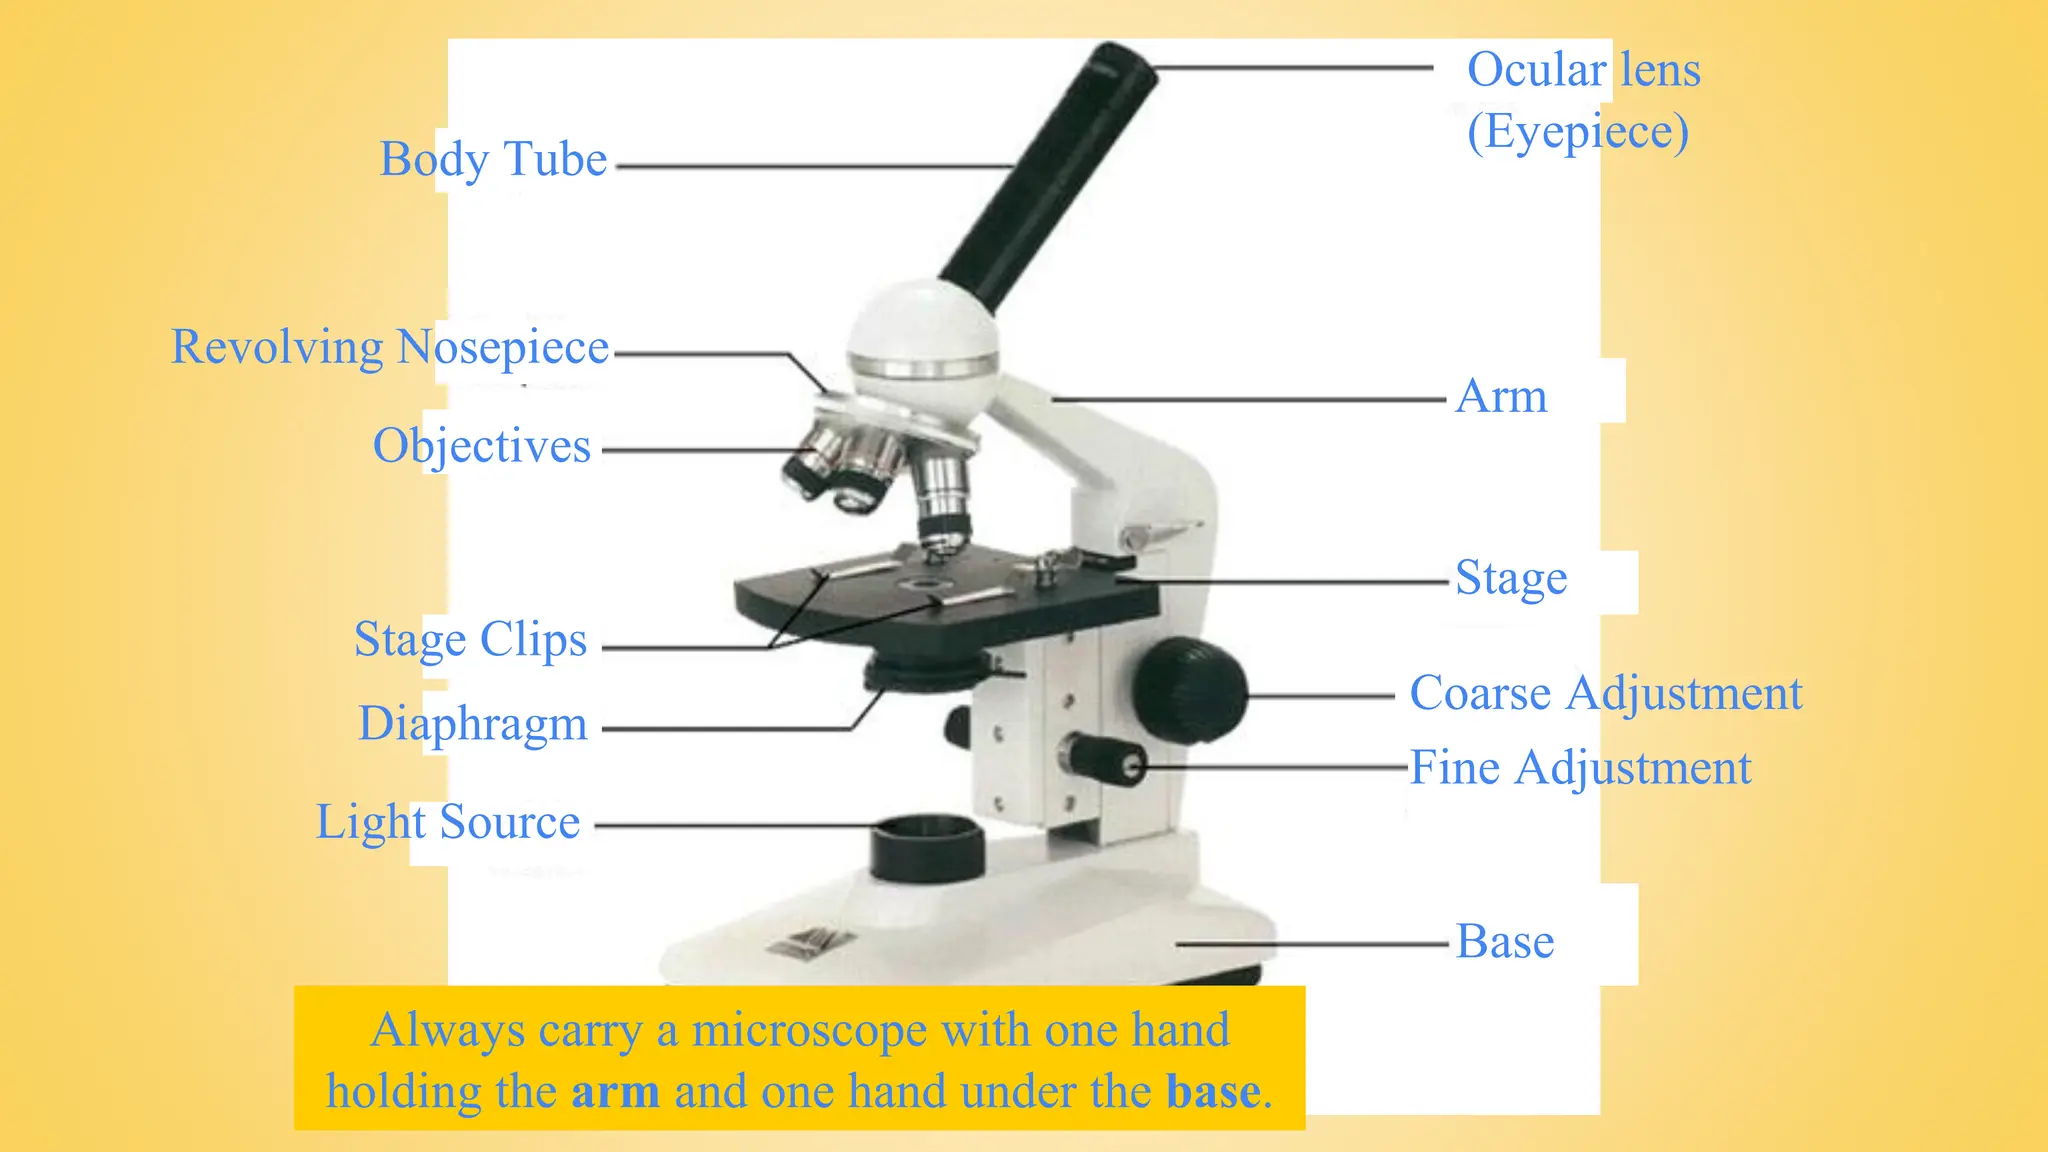
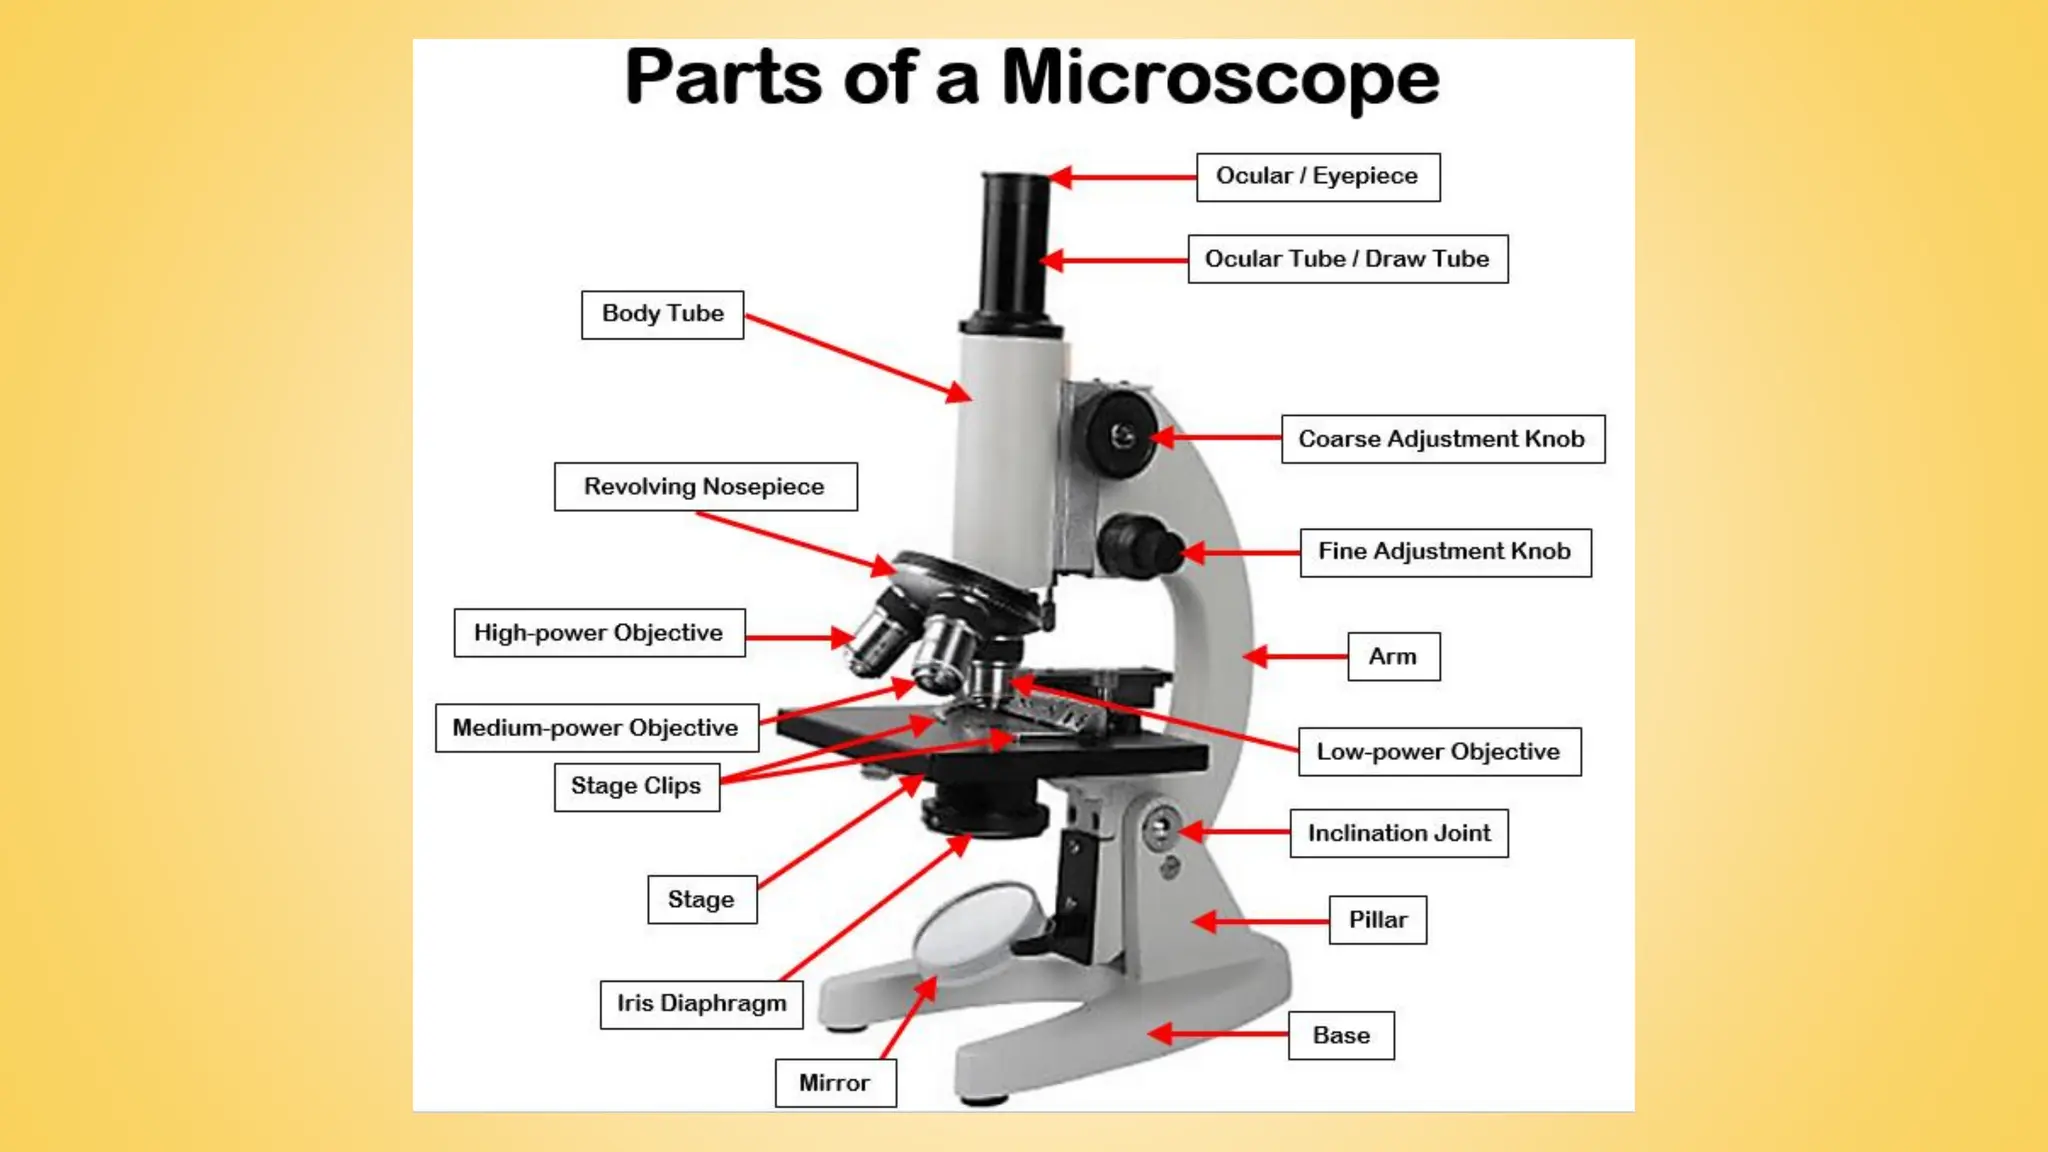
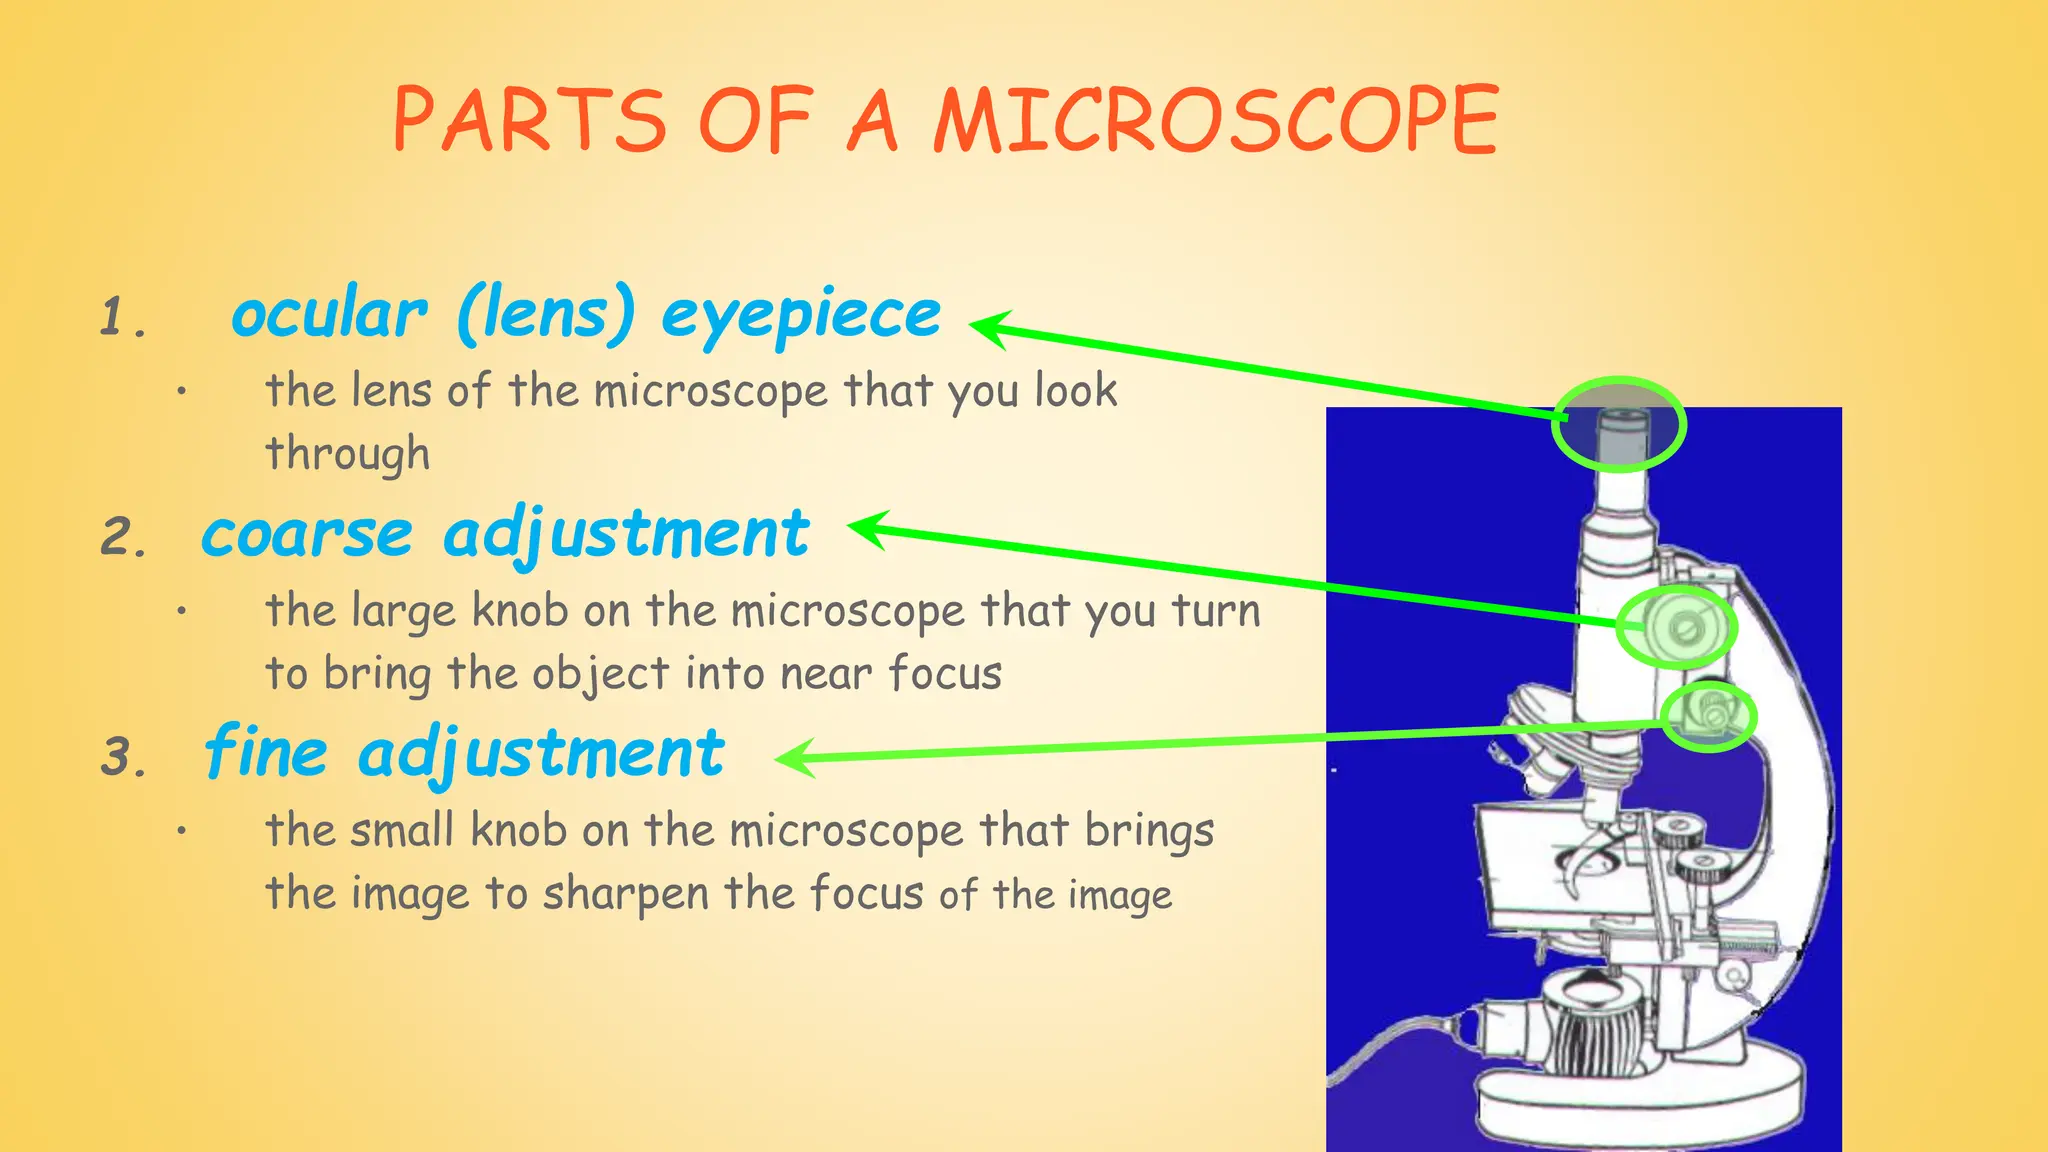
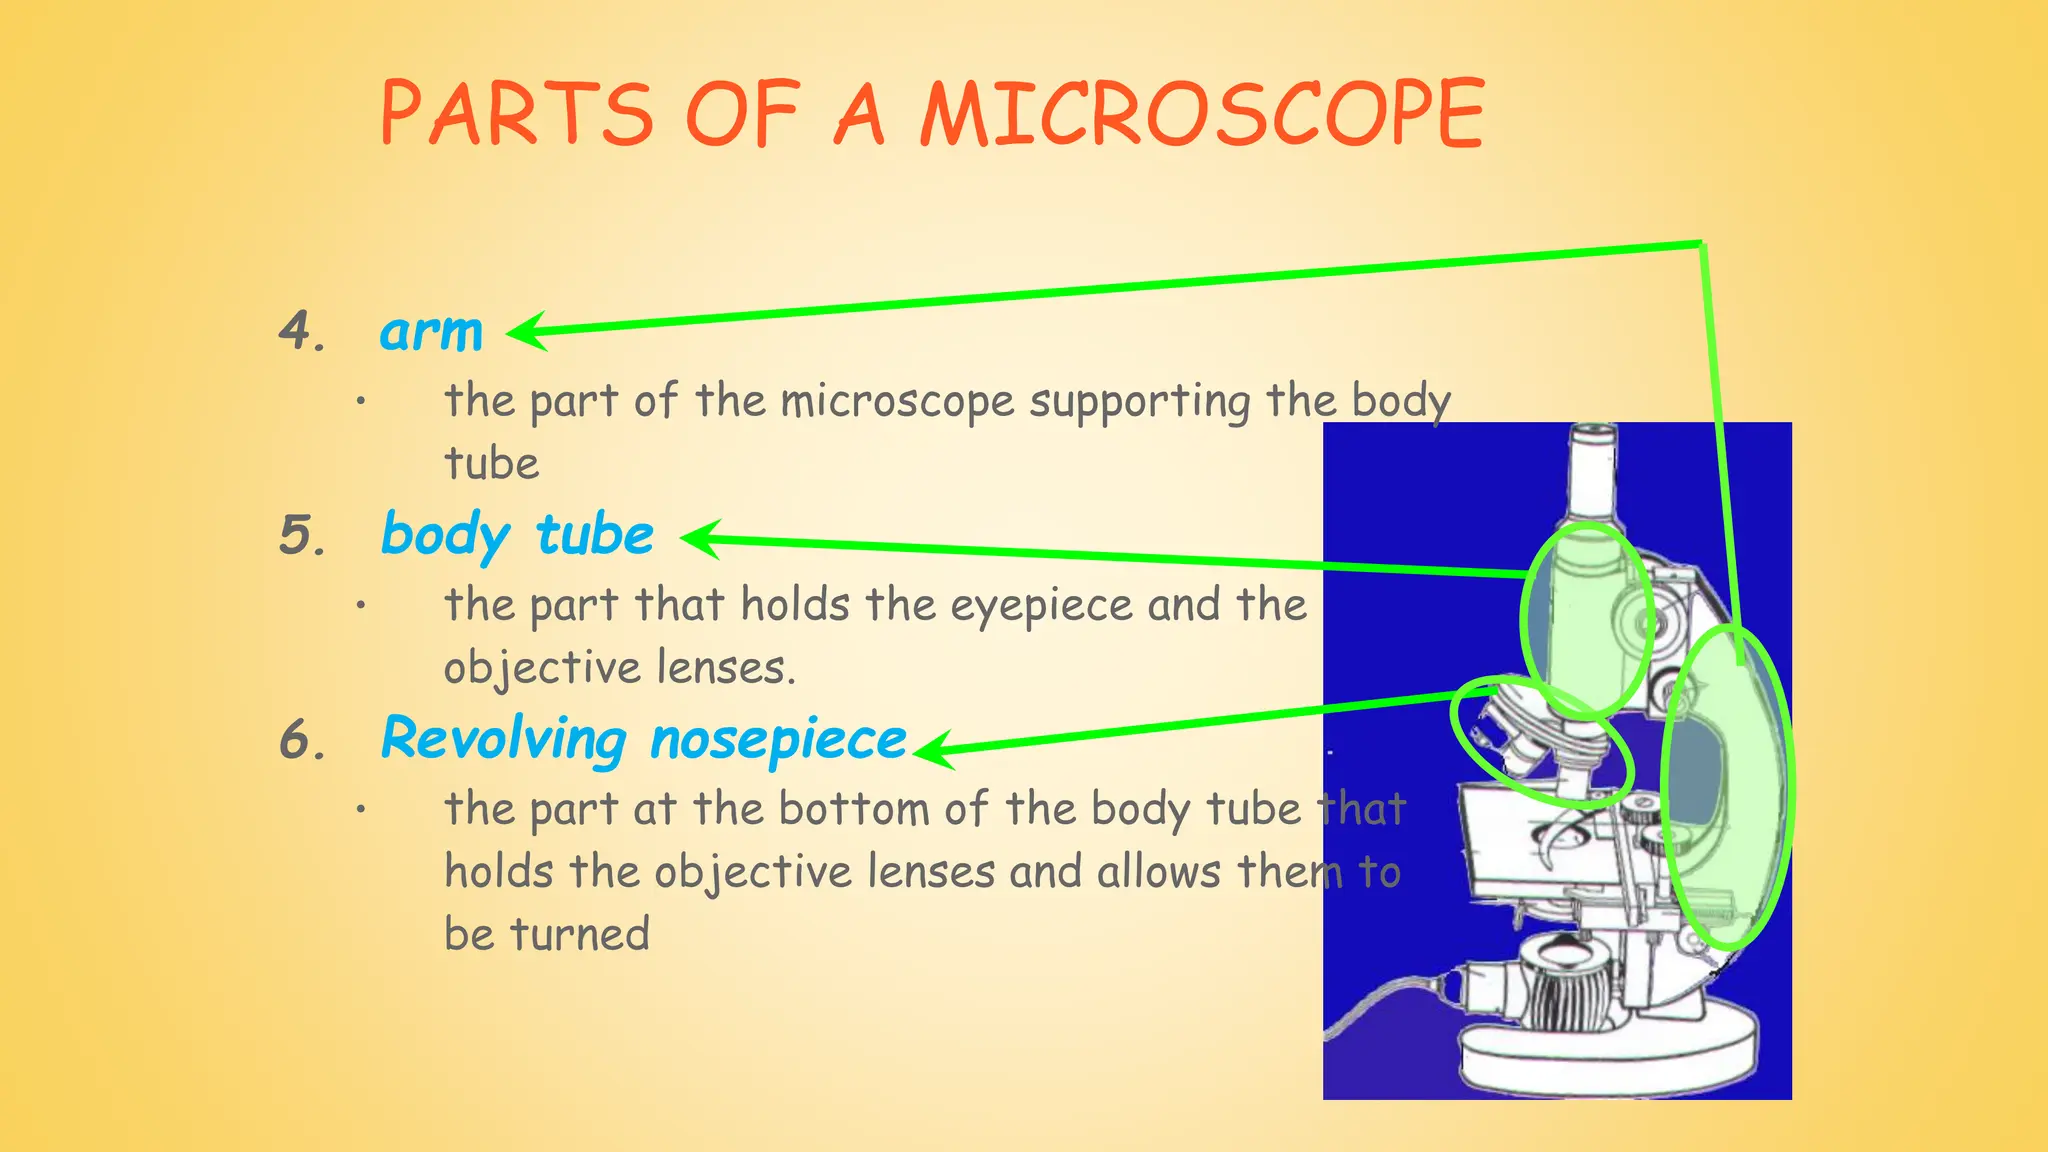
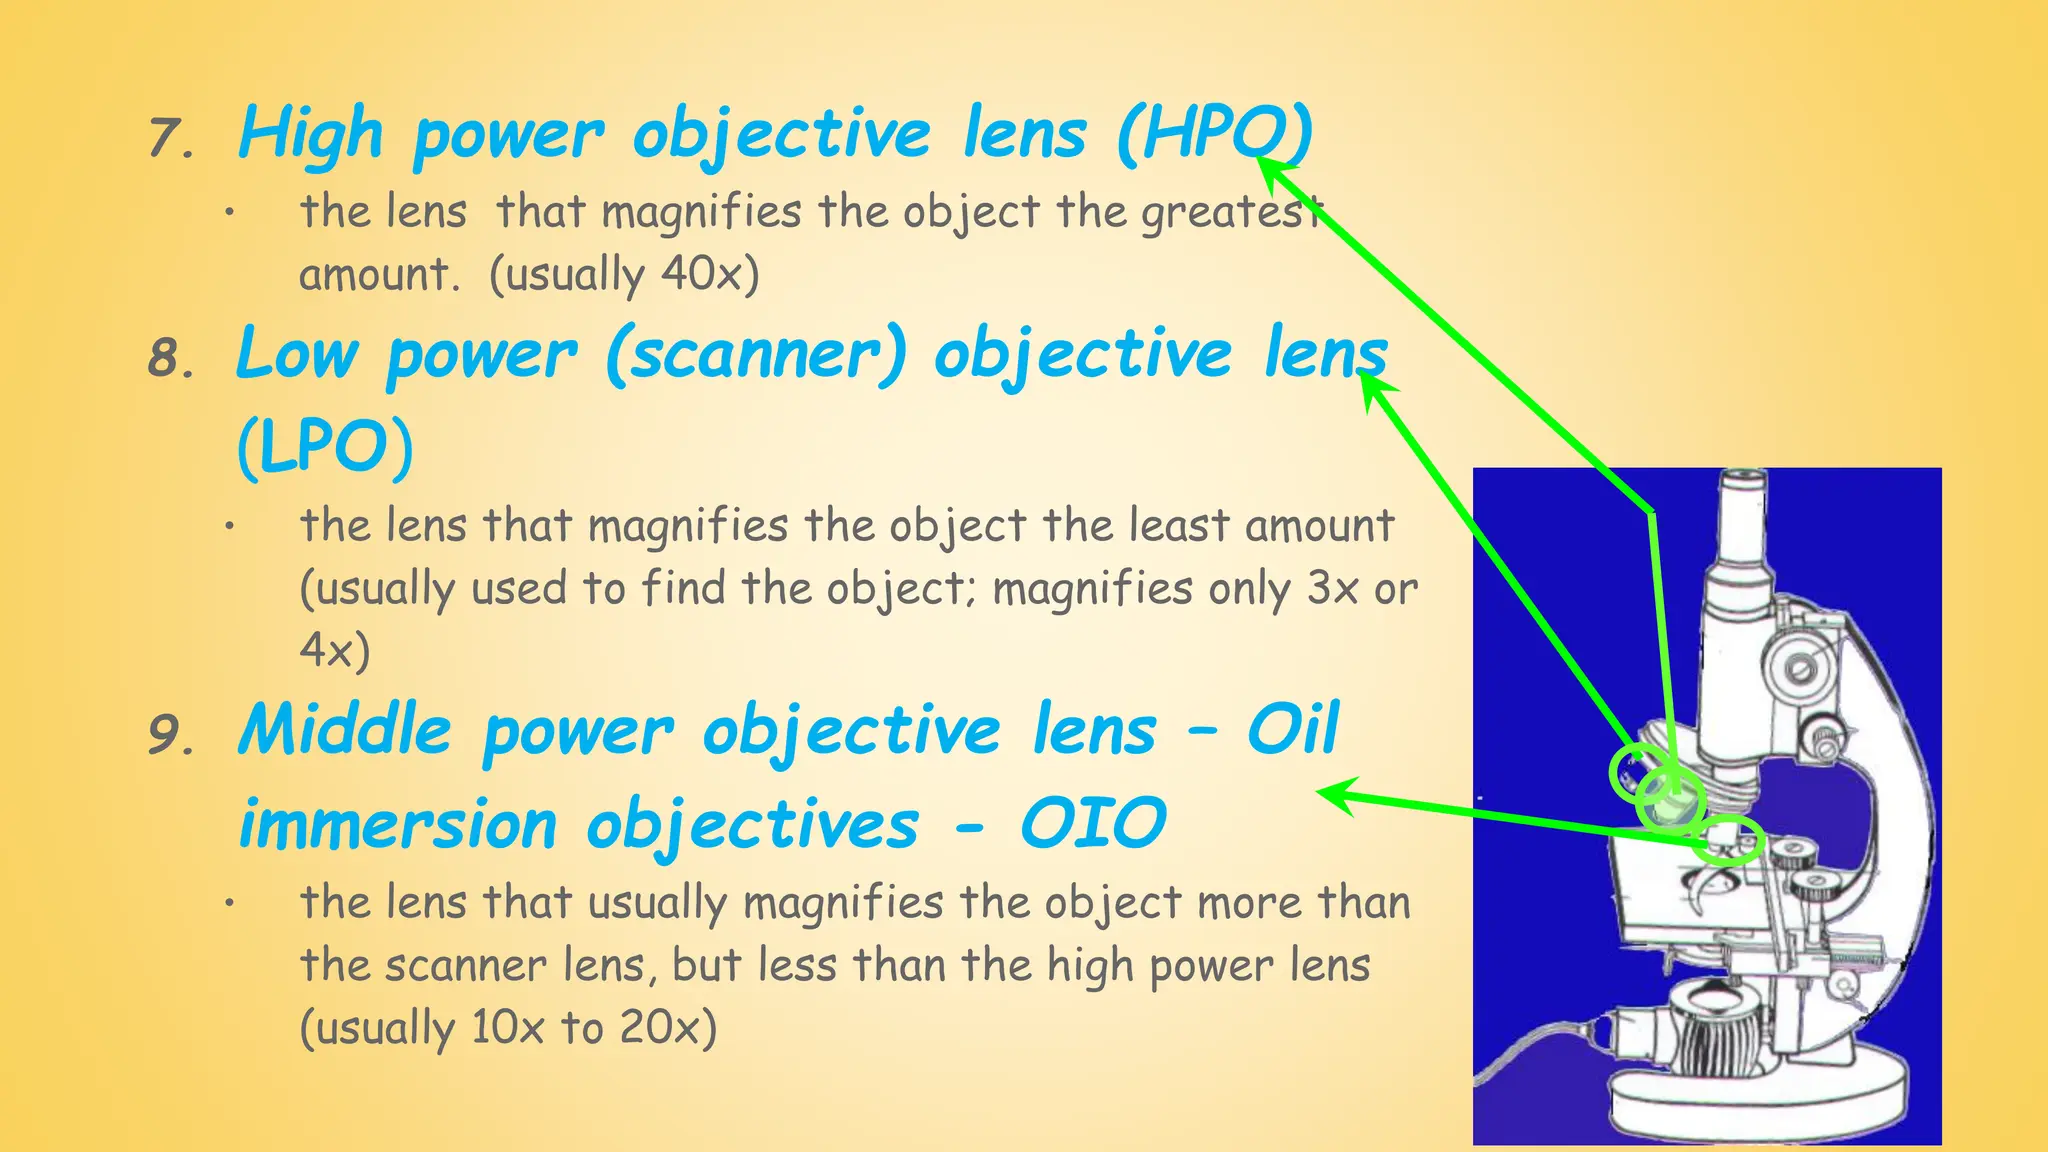
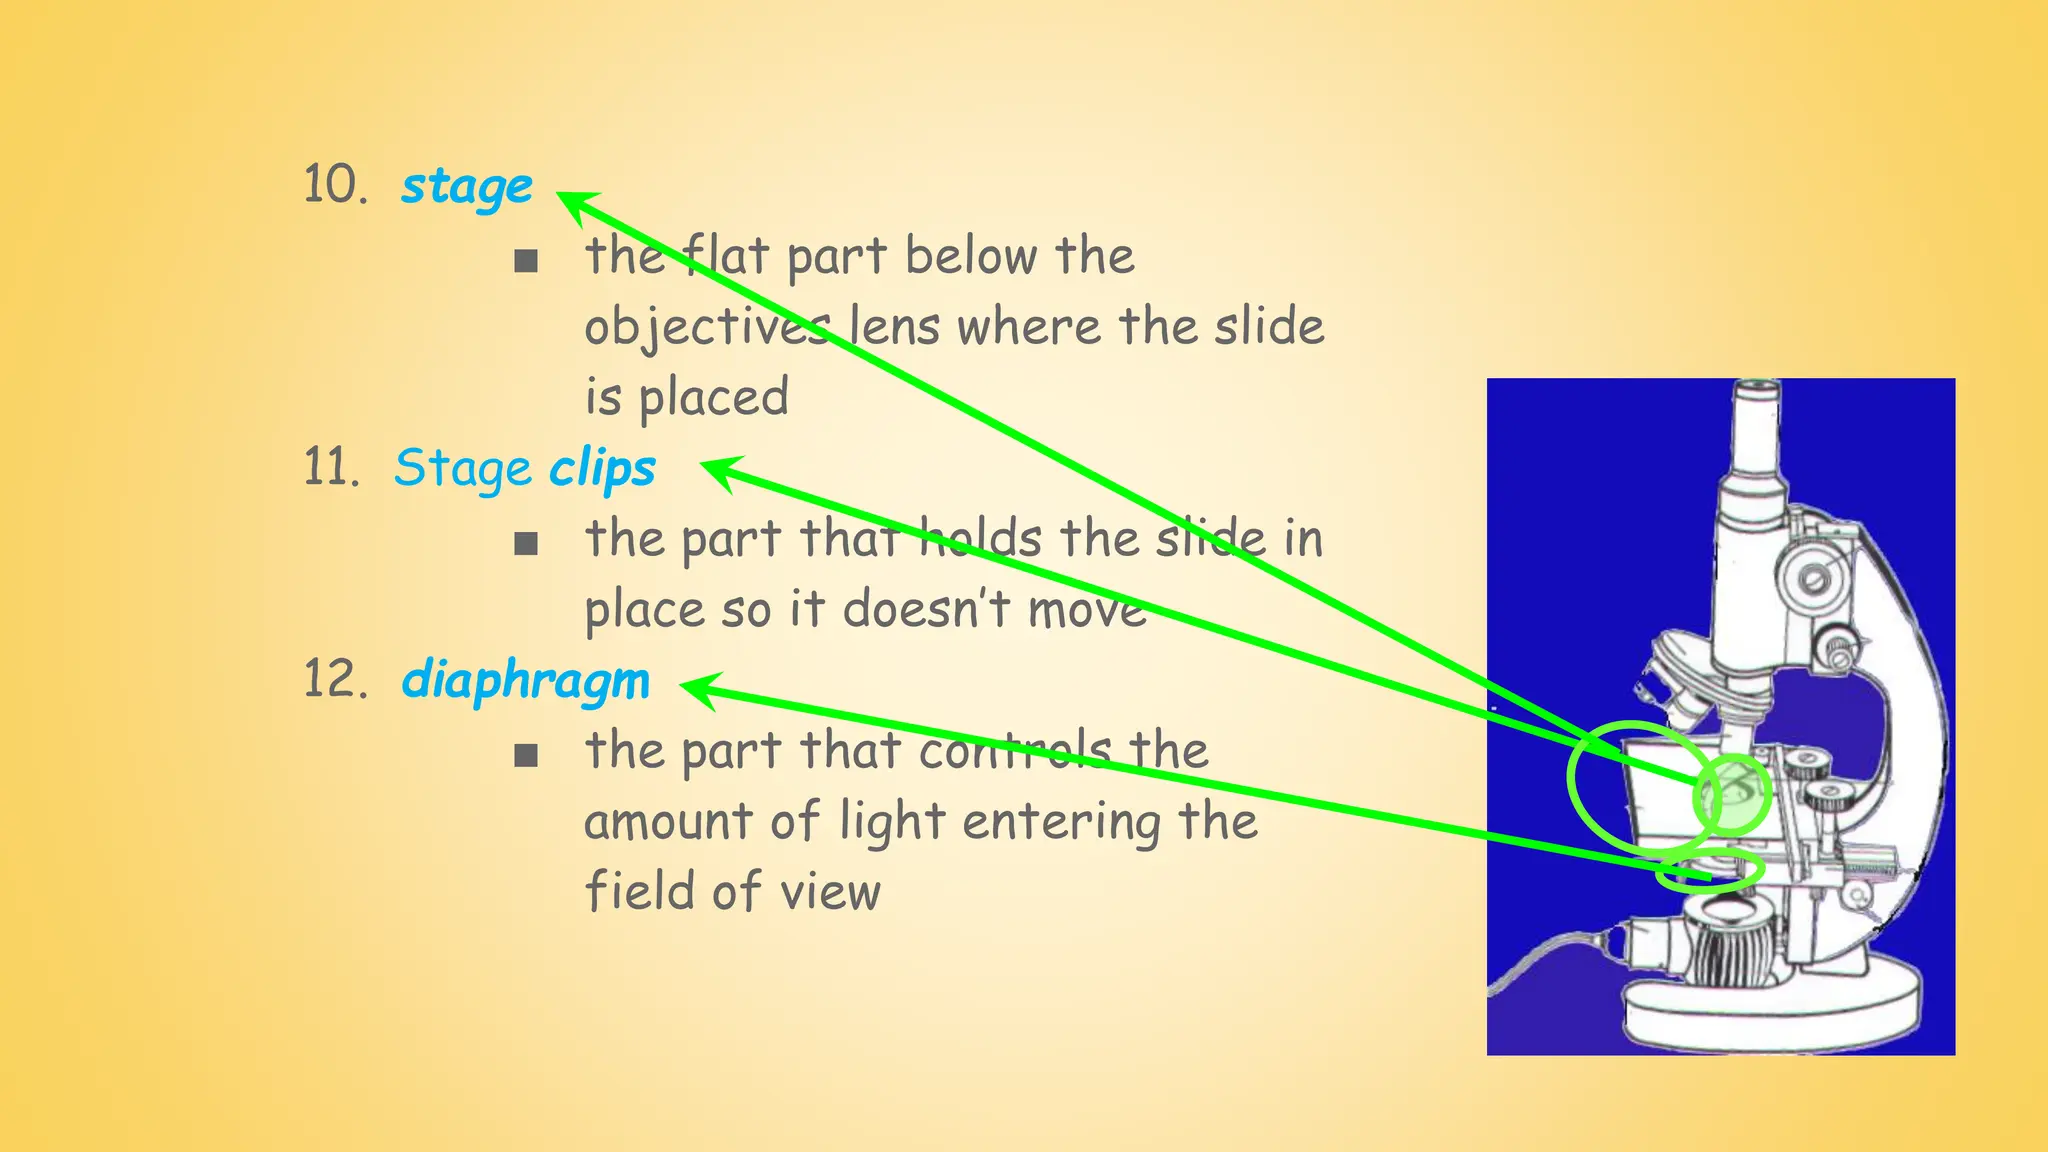
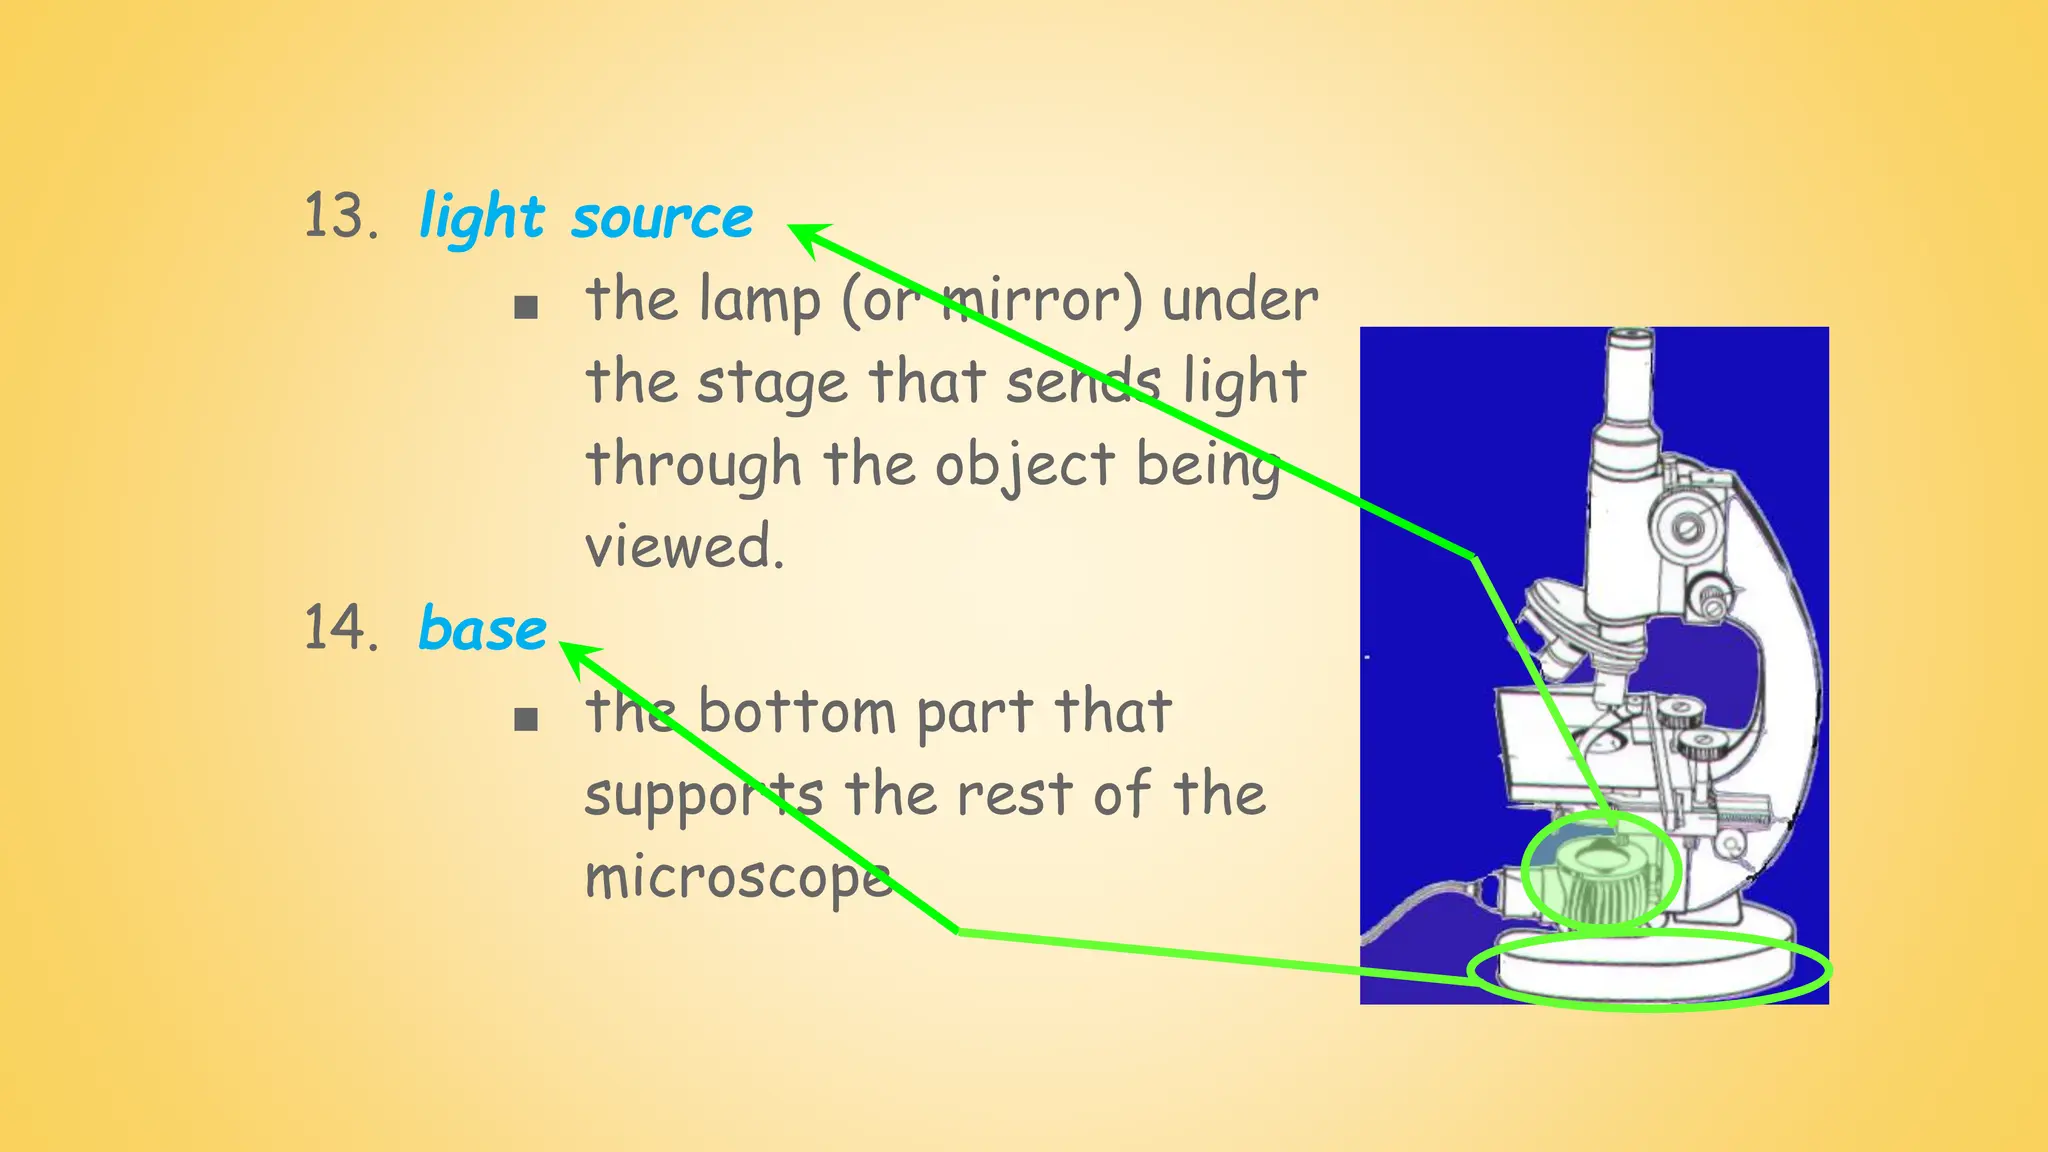
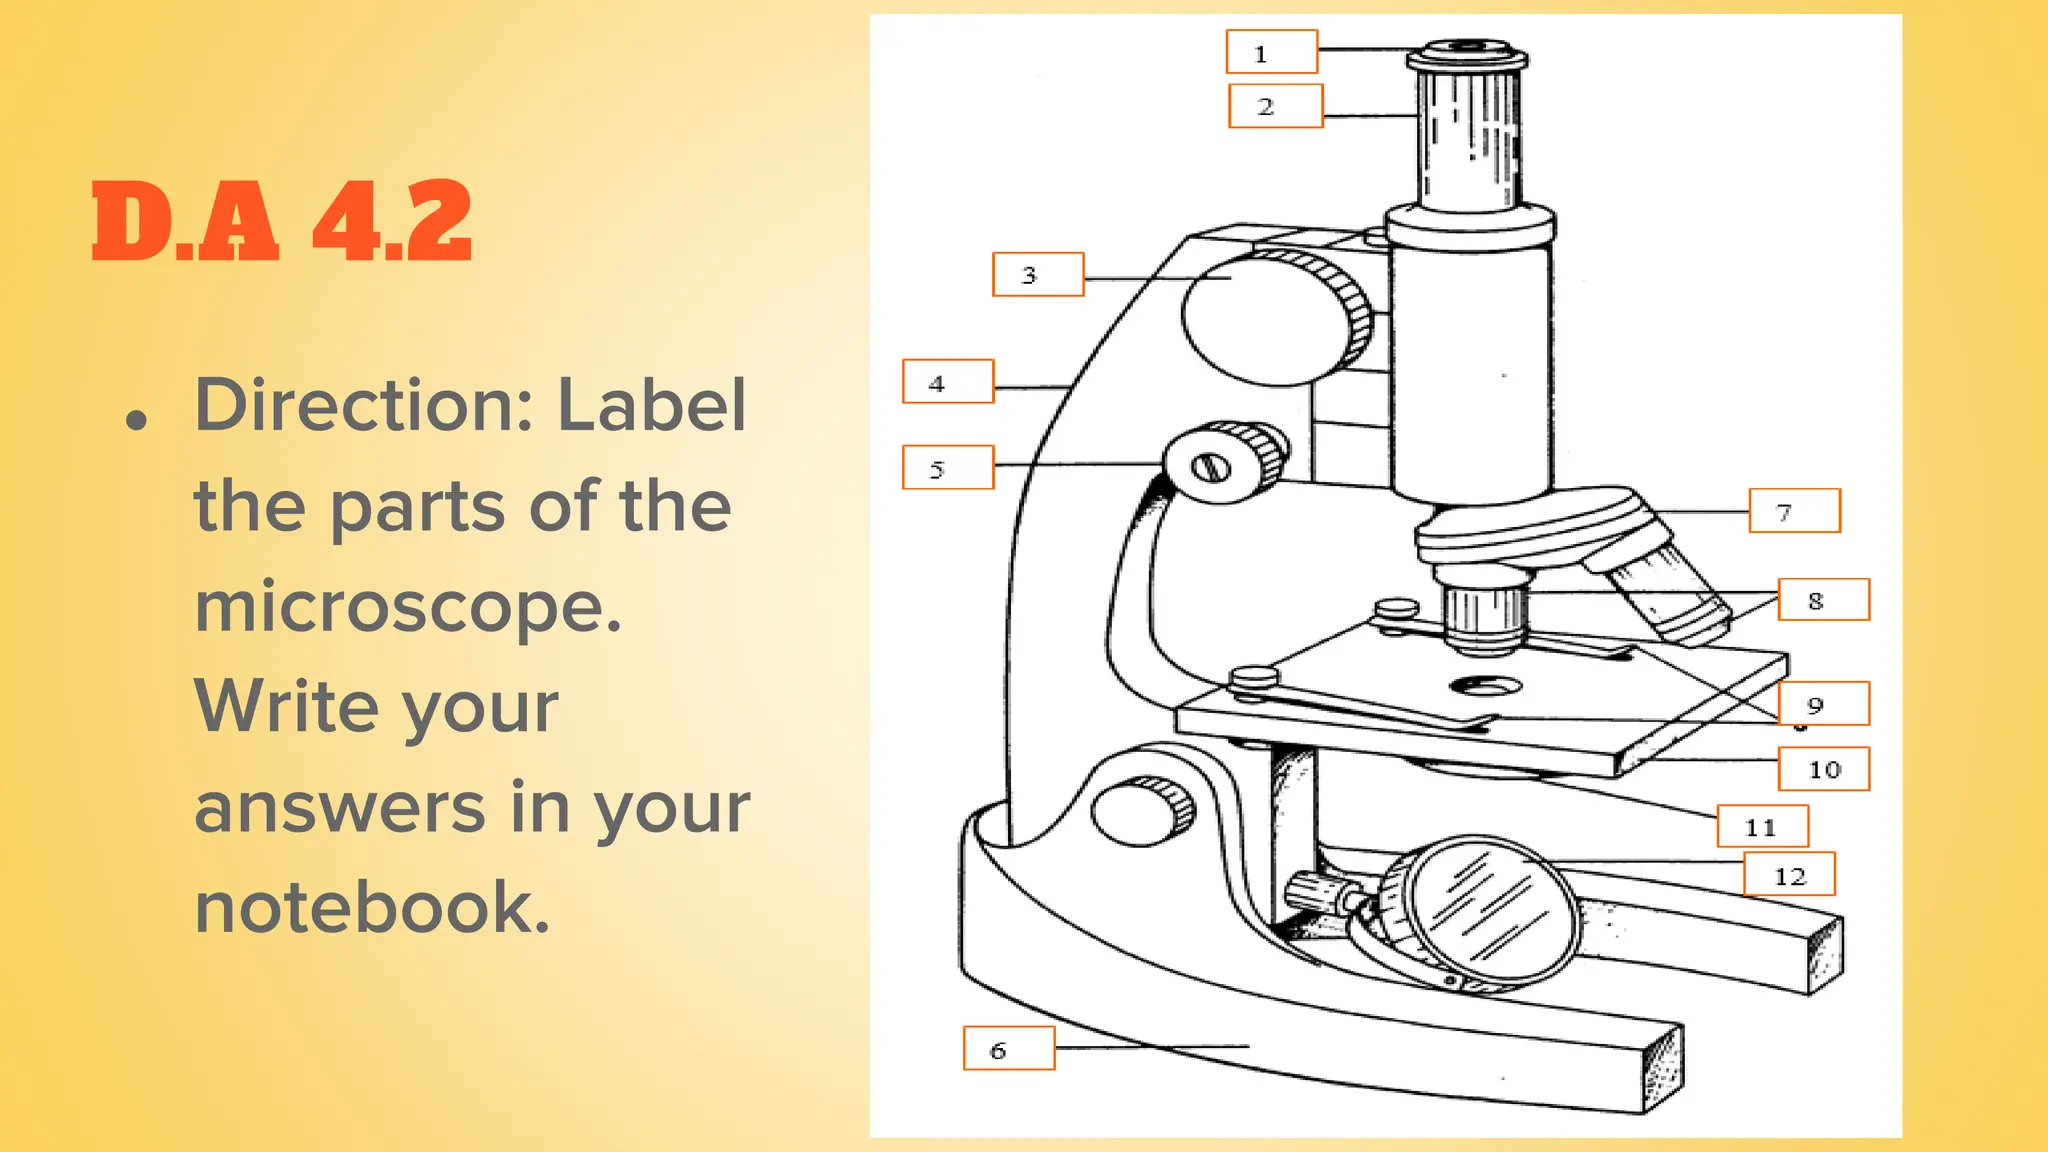
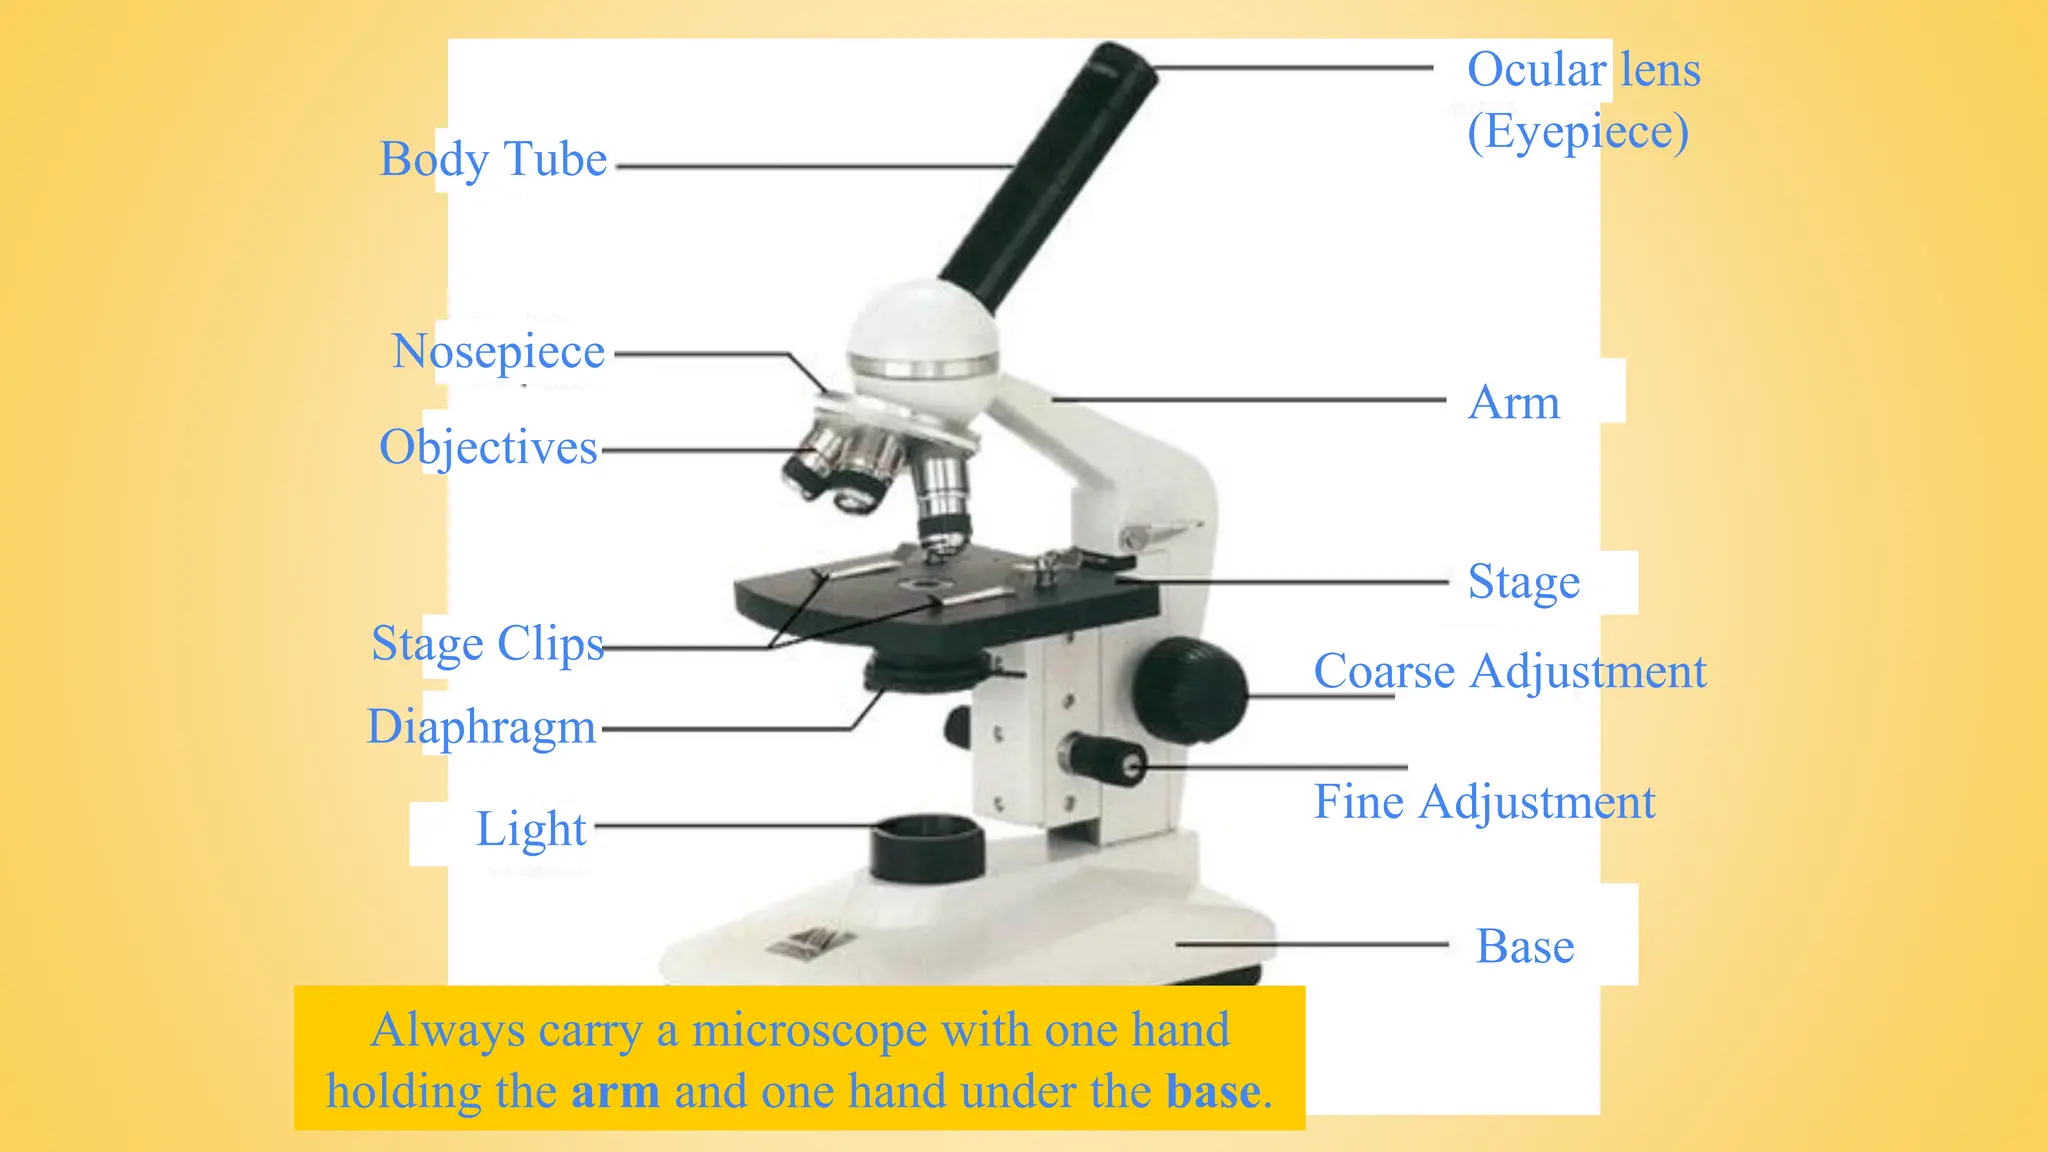
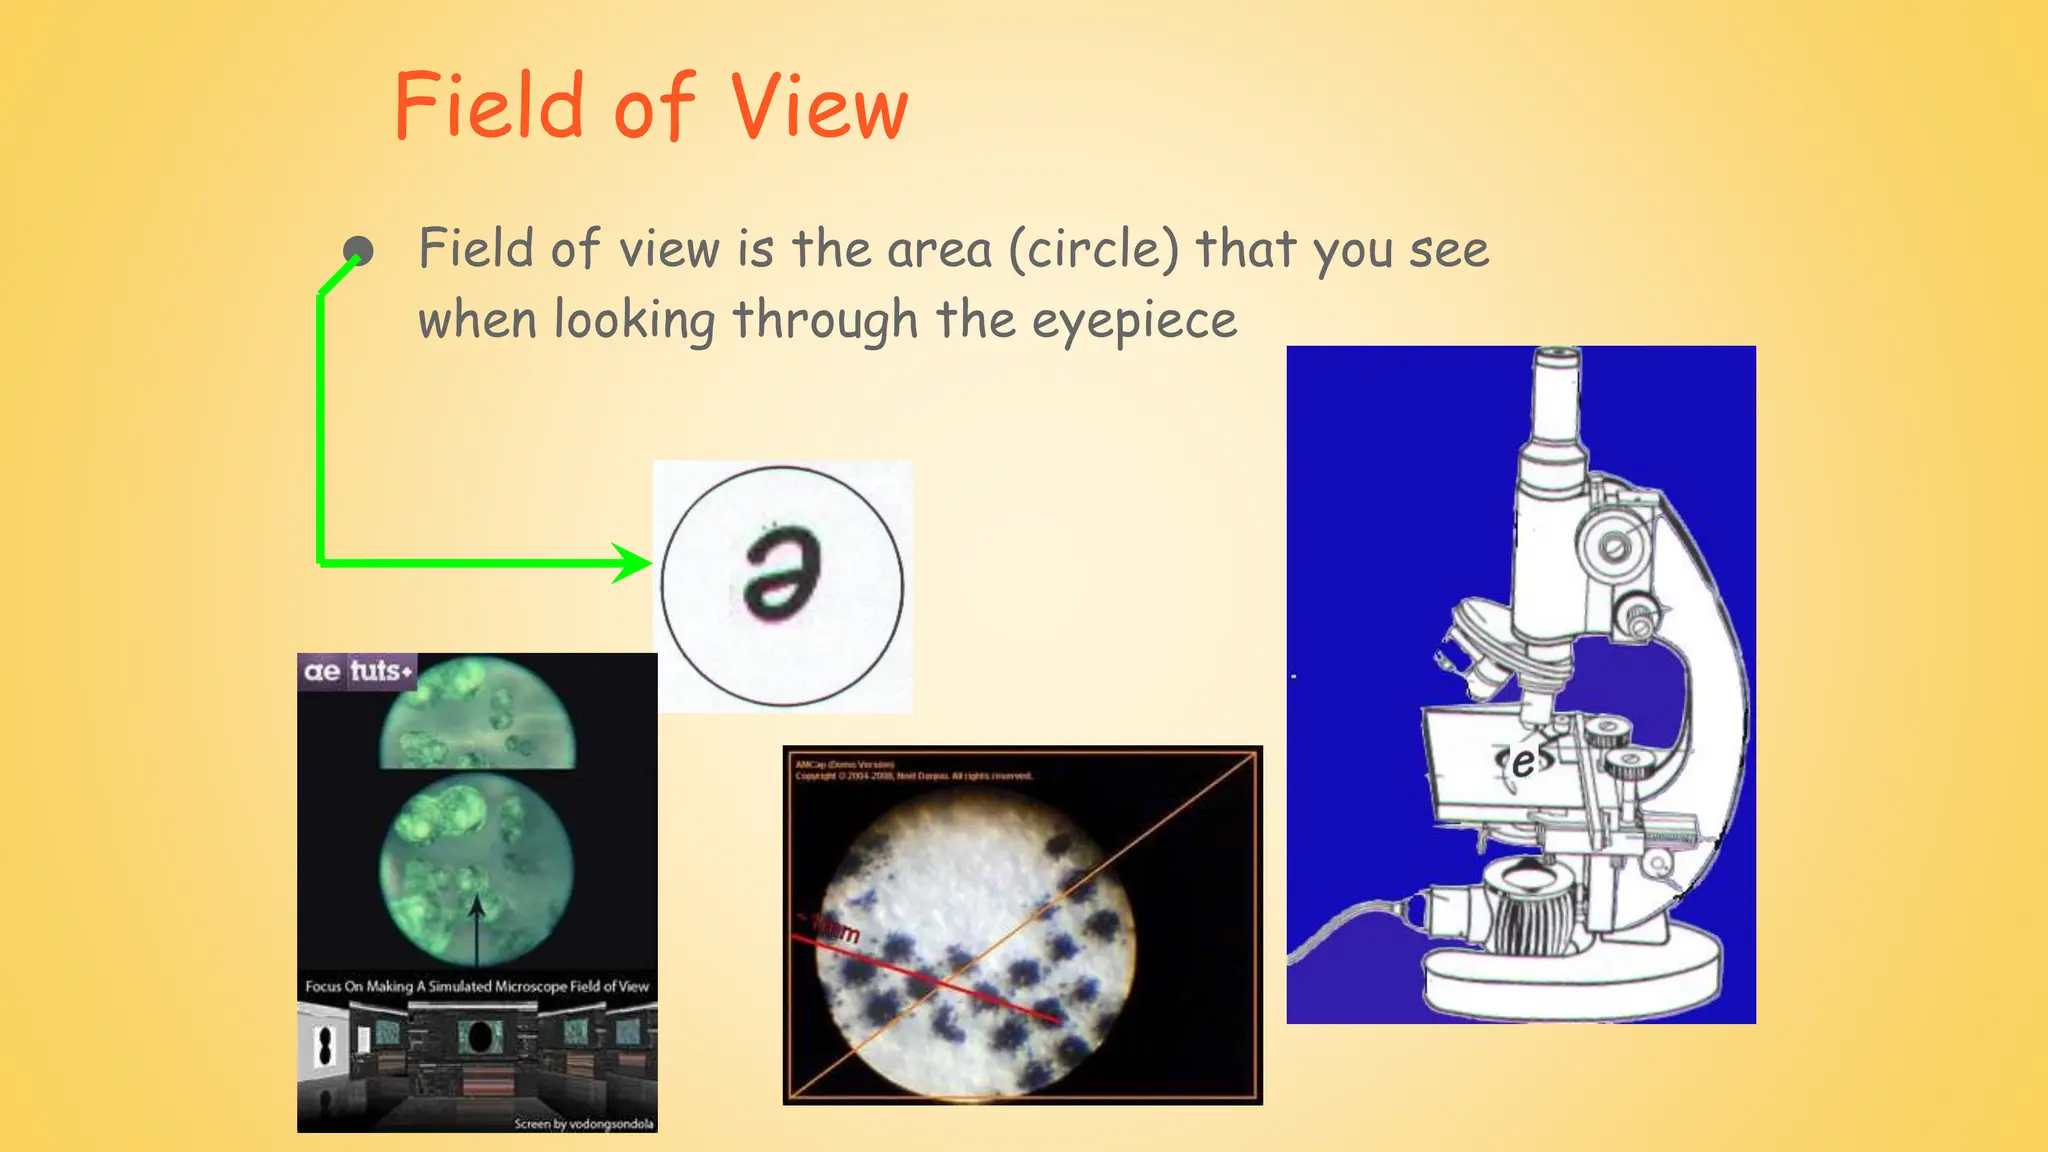
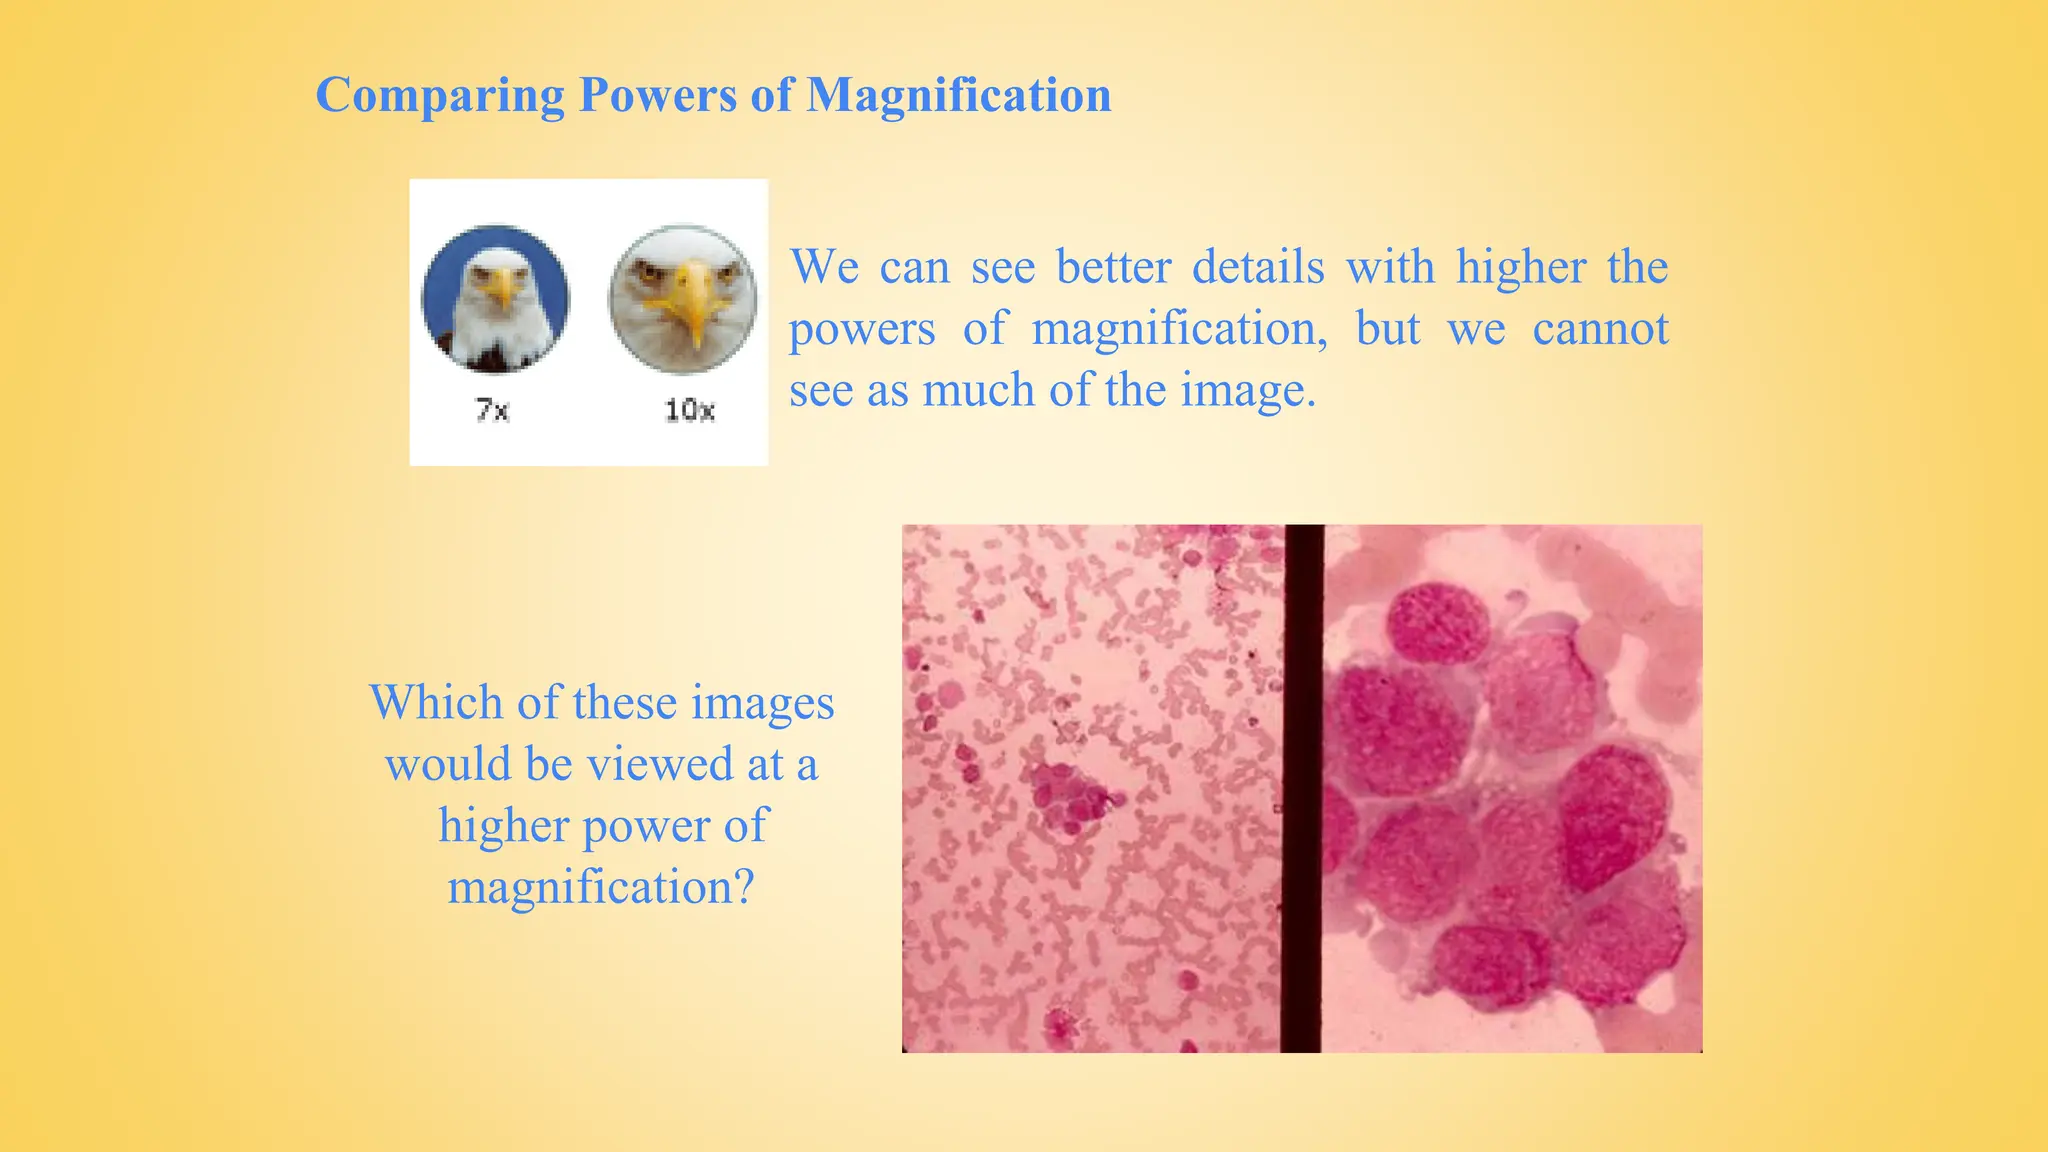
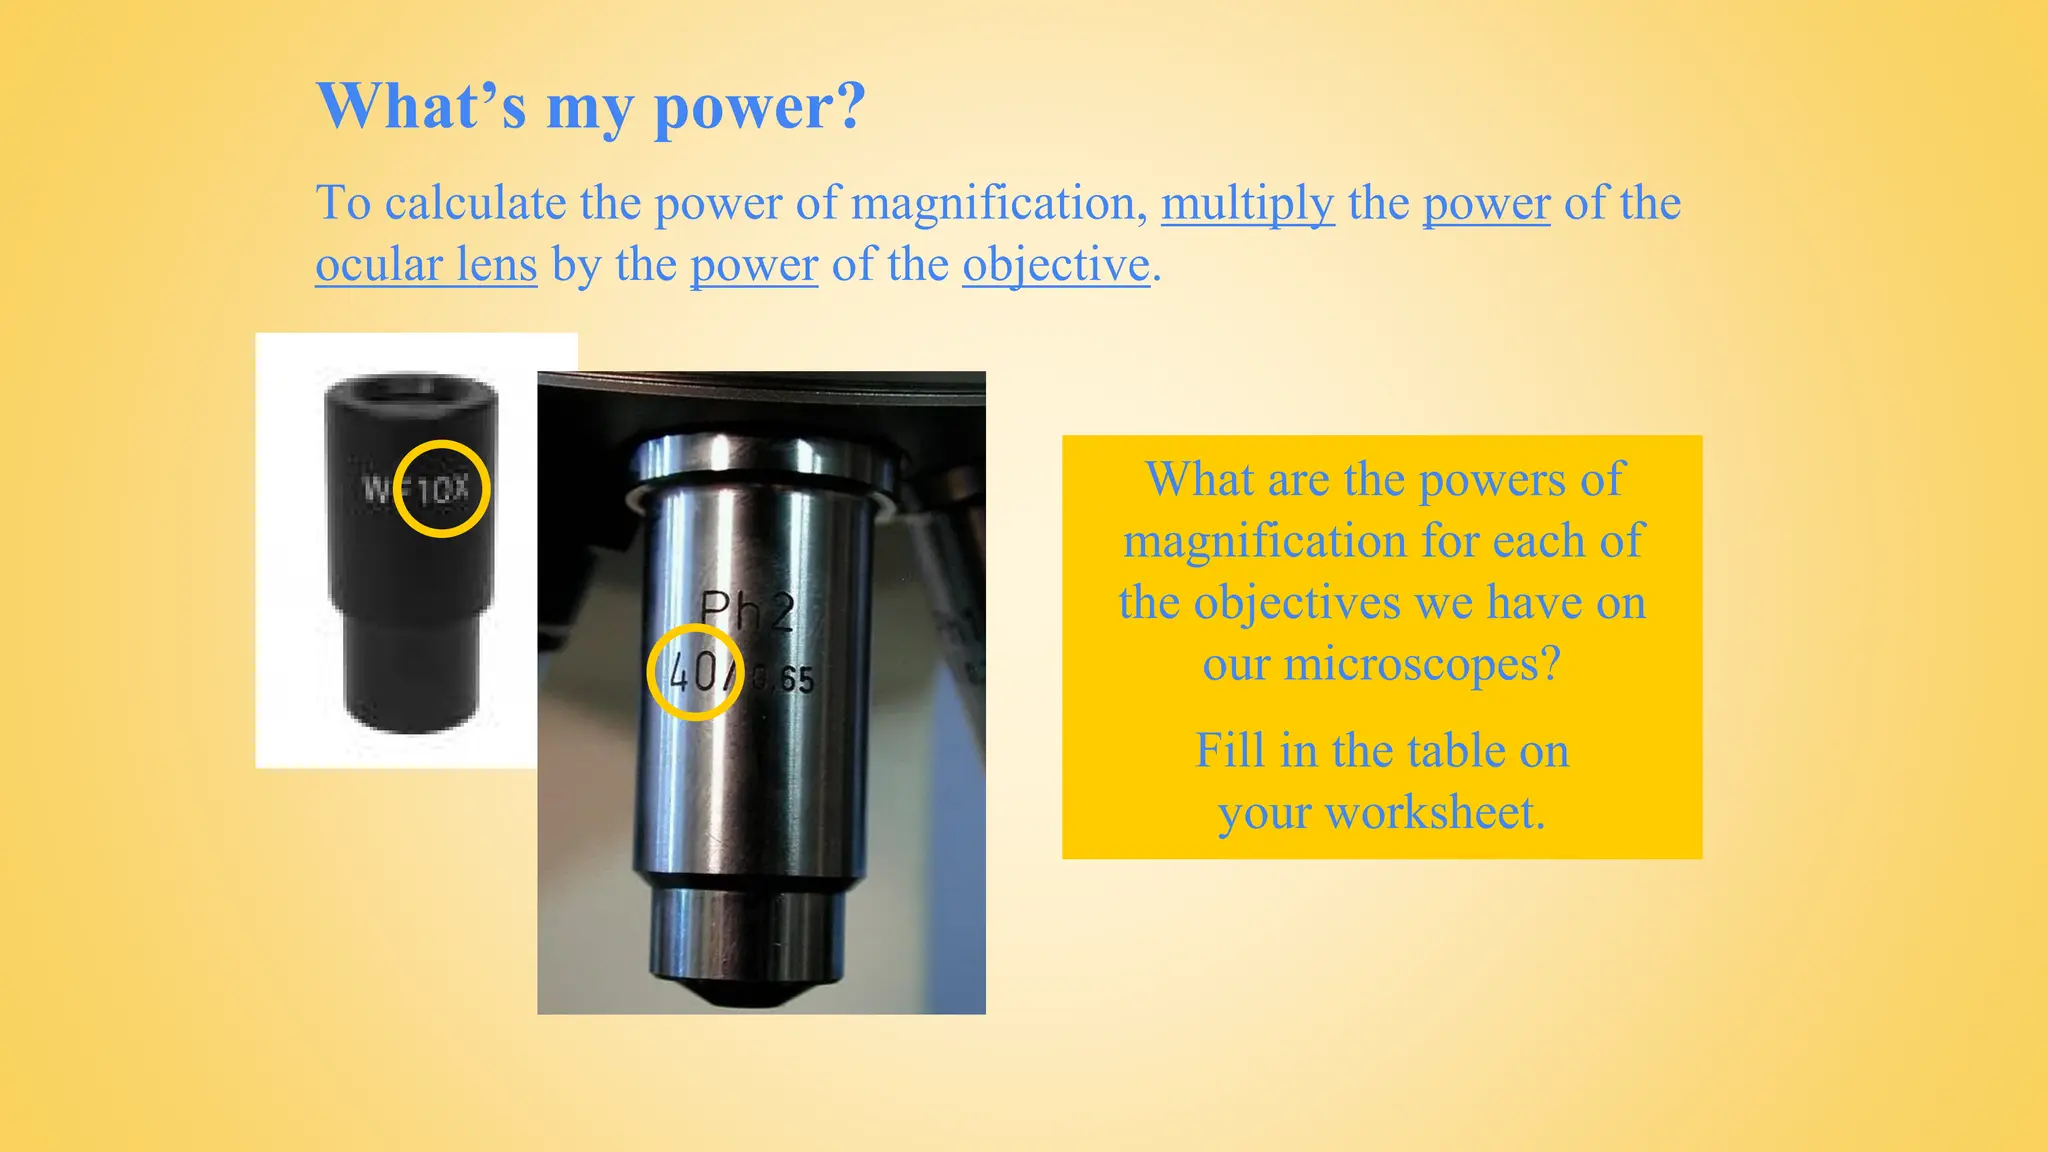
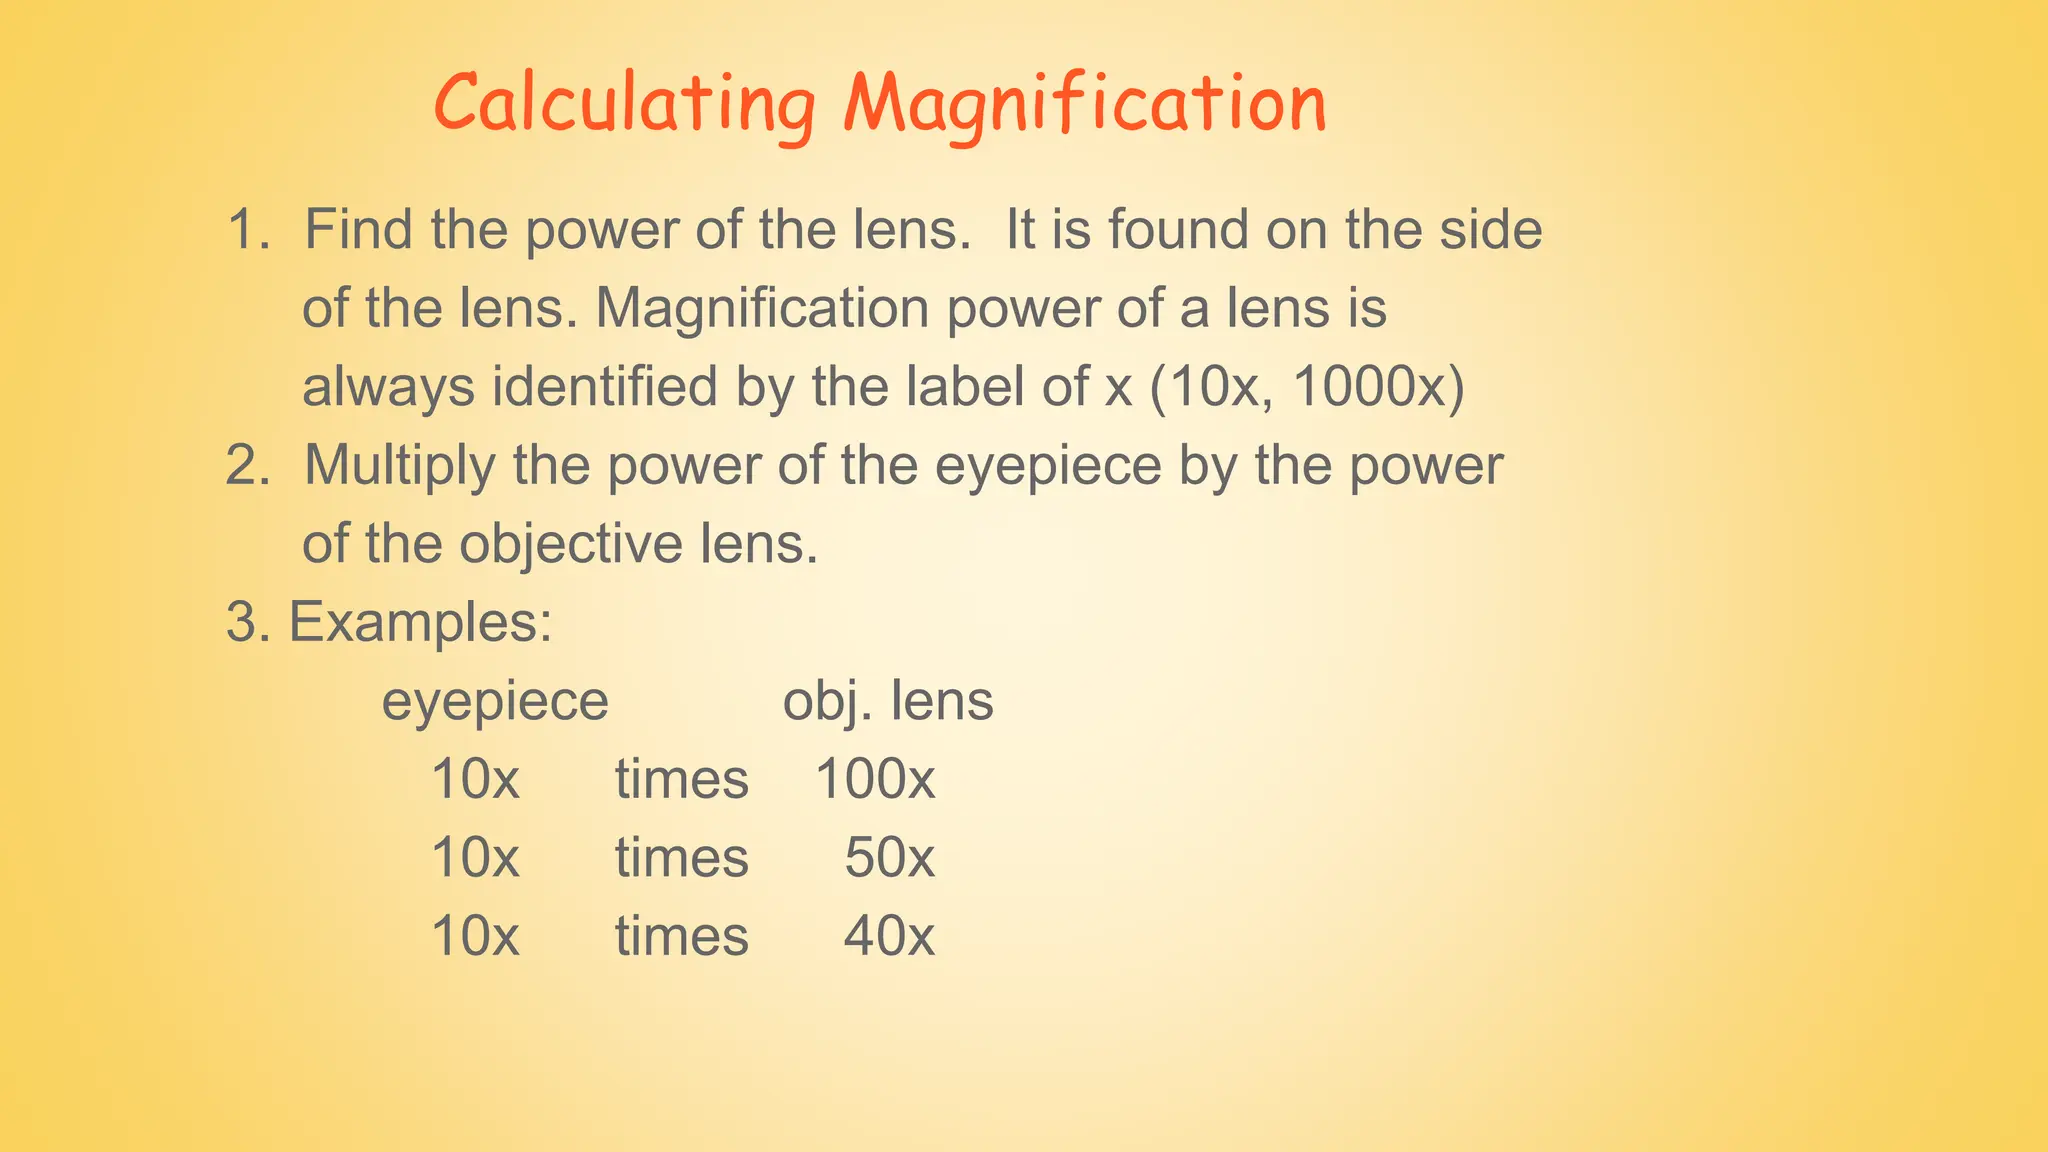
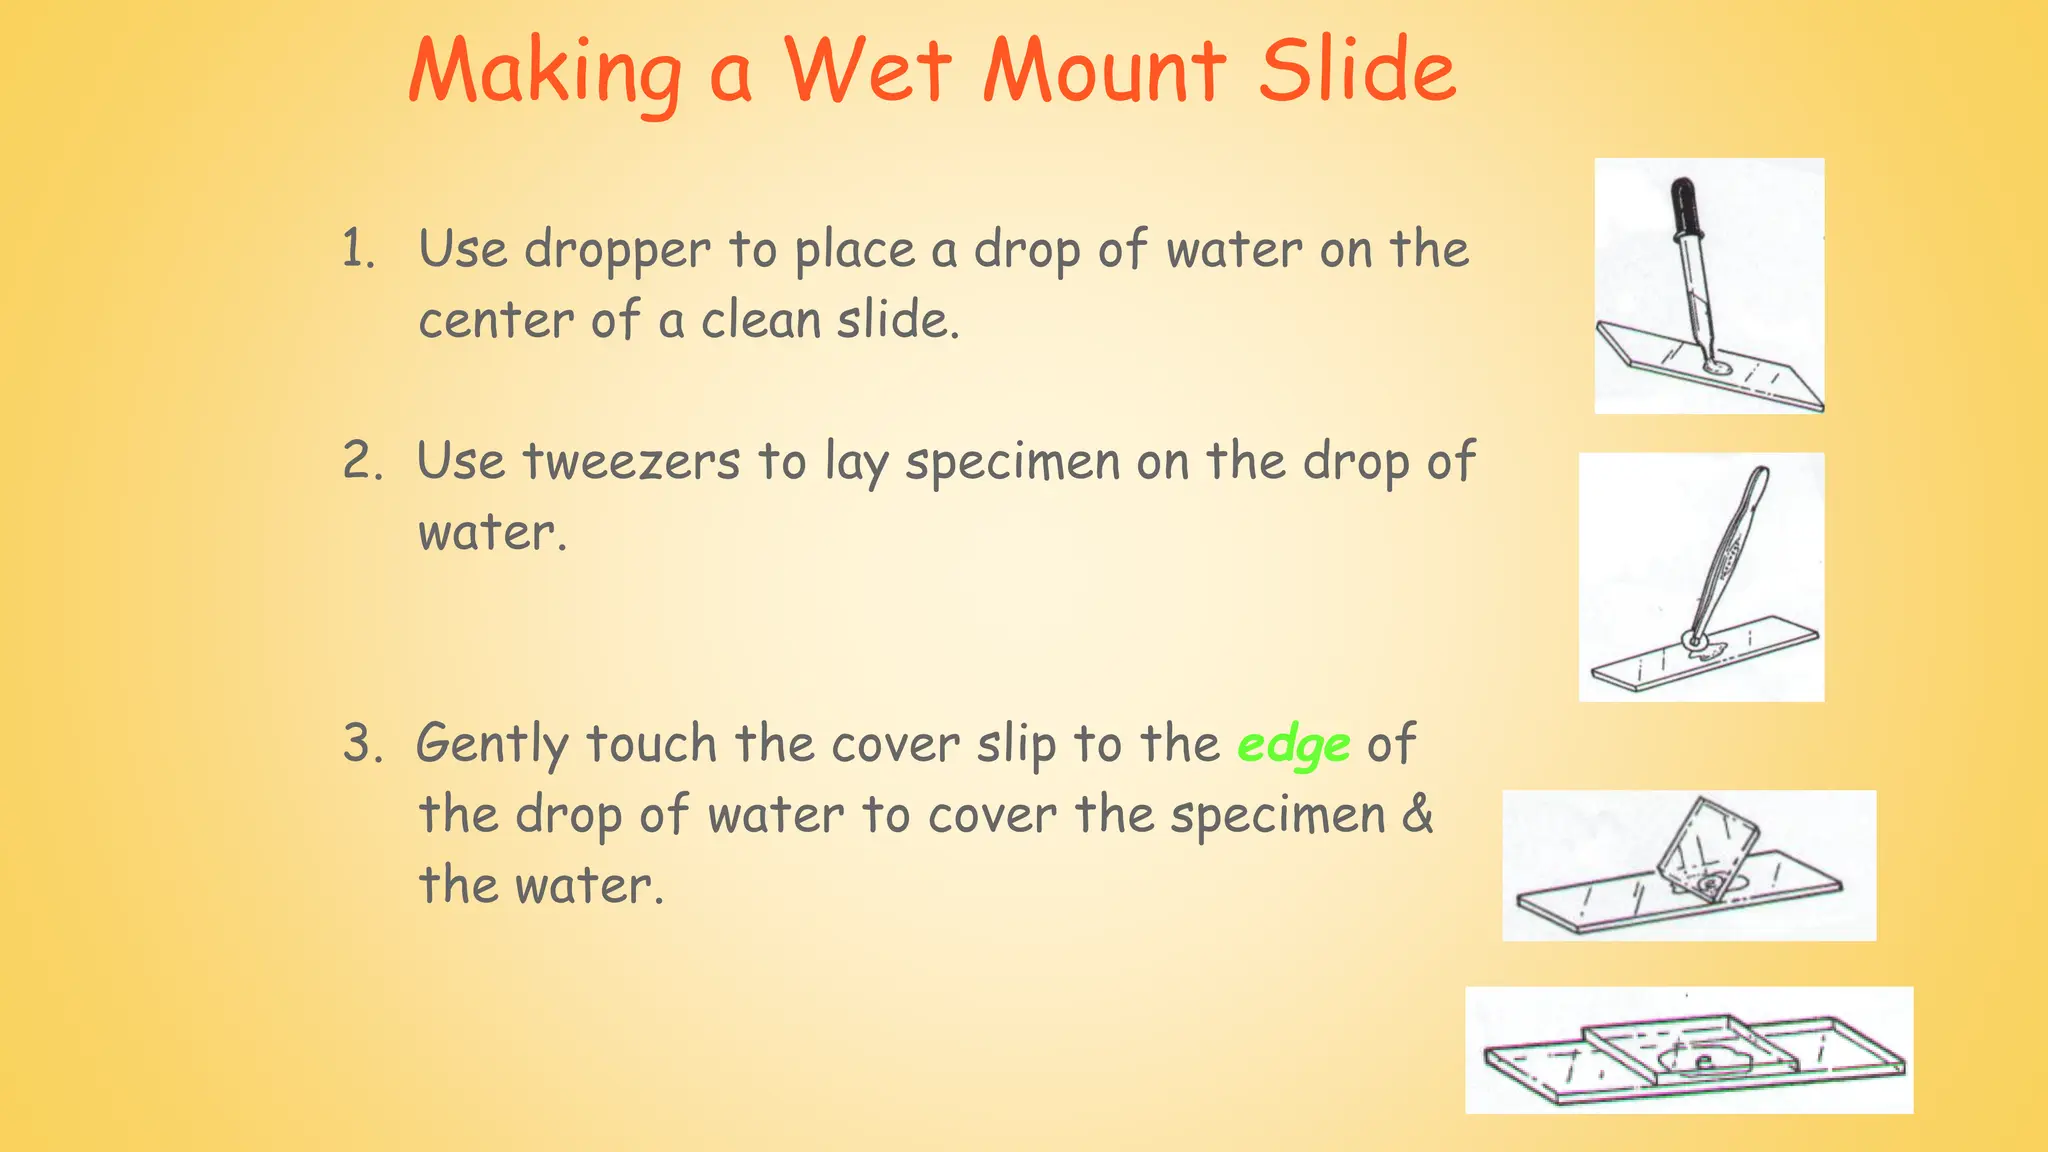
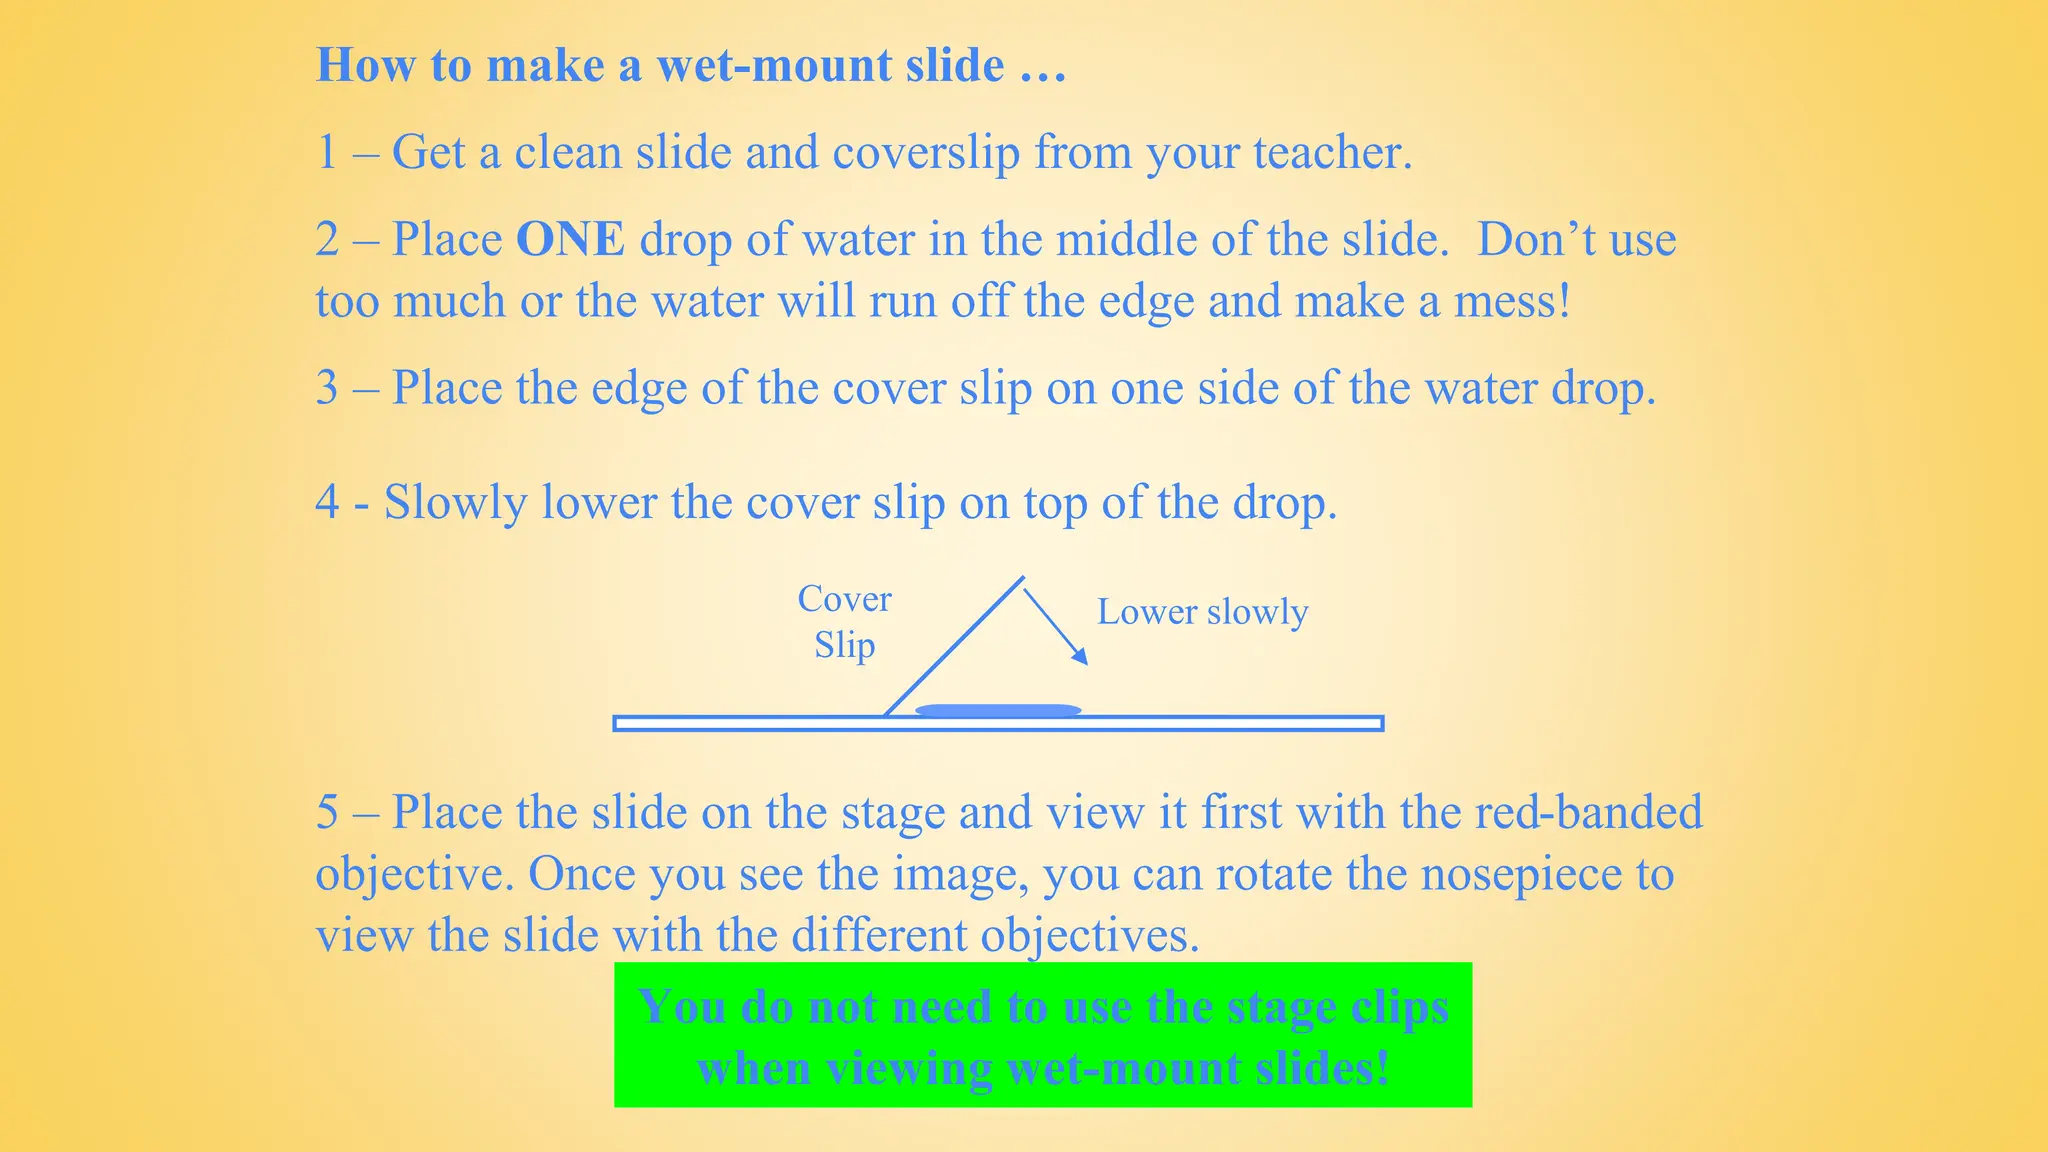
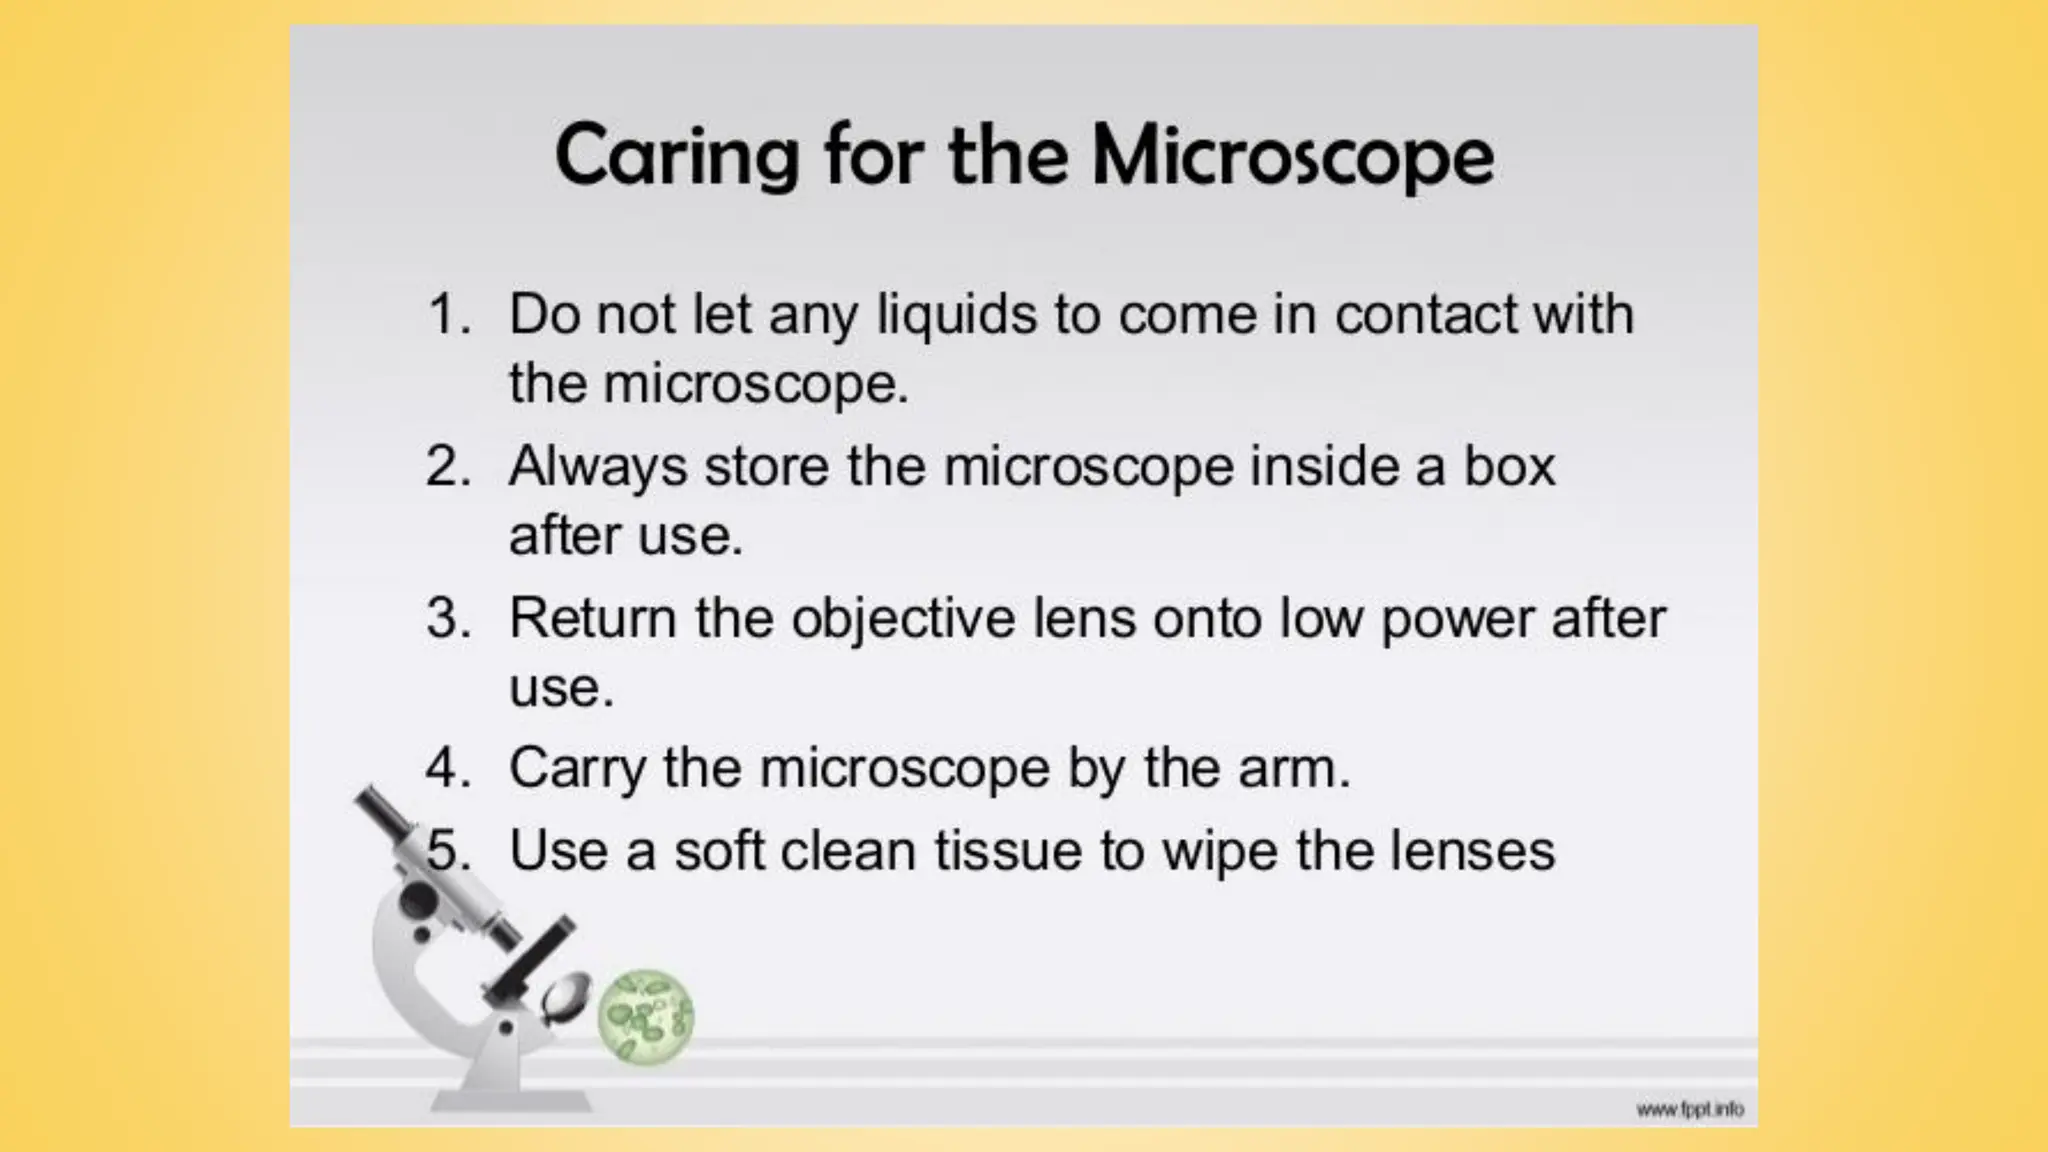
SlideShare a Scribd company logo
1 of 58
Download to read offline
microscope
4th Quarter - Lesson 1
Objectives
1. Identify parts of the microscope and their
functions.
2. Become familiar with the parts of the
microscope.
3. Differentiate types of microscopes
according to their ability to magnify.
Pre-test
Directions. Read each questions carefully. Choose the letter
of the correct answer on your notebook.
Pre-test
1. Which two parts of a compound microscope magnify
the image of an object?
A. Eyepiece and mirror
B. Eyepiece and objectives
C. Objectives and mirror
D. Objectives and diaphragm
Pre-test
2. Which part will you adjust if you want to change from low
power objective to high power objective?
A. Eye piece
B. Mirror
C. Revolving nosepiece
D. Stage
Pre-test
3. To get a detailed view of the specimen, which part of the
microscope will you use?
A. Coarse Adjustment Knob
B. Diaphragm
C. High Power Objective
D. Low Power Objective
Pre-test
4. You have mounted a specimen on a slide. On which part of
the microscope are you going to place it if you want to see
the image of the specimen?
A. Arm
B. Body Tube
C. Diaphragm
D. Stage
Pre-test
5. Which part of the microscope illuminates the specimen?
A. Eyepiece
B. Objectives
C. Mirror
D. Revolving nosepiece
Pre-test
6. Which part provides support and serves as a stand?
A. Arm
B. Base
C. Body Tube
D. Objective
Pre-test
7. Which part is use to hold the slide in place?
A. Diaphragm
B. Objective
C. Revolving Nosepiece
D. Stage Clip
Pre-test
8. What part of a compound microscope controls or regulates
the amount of light that reaches the specimen?
A. Eyepiece
B. Diaphragm
C. Objective
D. Stage
Pre-test
9. Which part allows the viewer to look through and see the
magnified image of the specimen?
A. Arm
B. Body Tube
C. Eyepiece
D. Mirror
Pre-test
10. Which part is use when you hold and carry the
microscope?
A. Arm
B. Body Tube
C. Coarse Adjustment Knob
D. Diaphragm
How useful are
microscopes in
appreciating the minute
forms of life invisible to
the naked eye?
D.A 4.1
Direction: List down five parts of the microscope and write
their corresponding functions on your notebook.
Parts of the Microscope Functions
1. _______________ _______________
2. _______________ _______________
3. _______________ _______________
4. _______________ _______________
5. _______________ _______________
Microscope
● instrument that produces
enlarged images of small
objects, allowing the
observer an exceedingly
close view of minute
structures at a scale
convenient for examination
and analysis.
(https://www.britannica.com/t
echnology/microscope)
● technical field of using
microscopes to view
samples & objects that
cannot be seen with the
unaided eye (objects that
are not within the
resolution range of the
normal eye).
(https://www.ed.ac.uk/clinical-sciences/edinburgh-
imaging/for-patients-study-participants/tell-me-more-
Microscopy
1285: Glasses Are Invented
● the earliest form of microscopy comes from the
art of eyeglass making
● first pair of eyeglasses is thought to have been
invented in Italy in the 13th century.
● Germans invented the concave lens in 1451, while
the Venetians debuted the convex lens not long
after.
1590s: Hans and Zacharias Janssen
Make a 9X Magnifier
● both eyeglass lens grinders, were plugging
away honing some of the most cutting-edge
new-vision technologies during the late 1500s.
● they crafted a pair of small, spherical convex
lenses in a tube — the precursor to the
compound microscope—which could magnify up
to 9x.
● the first compound microscope
1609: Galileo Perfects the Microscope
● created an almost similar model of the
compound microscope - to see distant objects
(heavenly bodies)
● could be modified by lenses with a shorter focal
length to look at tiny objects. He developed a
set of mini telescopes with two lenses: a bi-
convex objective and a bi-concave eyepiece. He
later invented the occhiolino, with three bi-
convex lenses.
● He was able to create the telescope - “spyglass”
1625: Giovanni Faber Coins the Word
“Microscope”
German botanist coined the word from the
Greek words for micron (small) and skopein (to
look at).
1665: Robert Hooke Discovered Cells
● English natural philosopher and credited with
discovering the basis of all life on earth: the
cell.
● Father of Cytology
● Crafted his crude microscope, Hooke was
able to observe thin slices of cork (which are
really just dead plant cells) at a microscopic
level. With their tiny honeycomb-like building
blocks like little boxes, the tissues Hooke
observed reminded him of monks’ chambers,
so he named them “cells.”
● He published his findings in a book called
Micrographia.
1670: Anton Van Leeuwenhoek
Perfects the Microscope
● Dutch scientist - “Father of Microscopy”
● expertly grind and polish lenses, and
developed a cutting-edge new lens that could
magnify up to 270x-300x, which allowed him
to become the first person to view live cells
under a microscope.
● he discovered bacteria that no one knew
existed—including bacteria found in saliva and
rainwater—which he named “animalcules.”
Late 1800s:The Modern Microscope Is Born
● with a stage for the specimen, an ocular lens,
objective lenses, and a light source.
Contributing to this new phase of science -
Charles A. Spencer, who invented the first
American-made achromatic objective
microscope and sold it commercially beginning
in 1838.
● Spencer’s partnership with manufacturer A.K.
Eaton marks the beginning of a blossoming
microscope industry in America. These fine
optical instruments became staples in scientific
environments for the next century.
1926: Richard Zsigmondy Wins Nobel Prize
for the Ultra Microscope
● One such example is the ultra
microscope, invented by
Austrian chemist Richard
Zsigmondy.
● This microscope works by
aiming a high-powered light
beam through a colloid of
particles, allowing us to see
particles smaller than a
wavelength of visible light.
1931: Max Knoll and Ernst Ruska Invent the
Electron Microscope
● 1931, German electrical engineer Max Knoll and physicist
Ernst Ruska invented electron microscope. Instead of light,
the electron microscope uses a focused beam of electrons
to create an image. It’s capable of far greater magnification
(up to 1 million x) and resolution than a light microscope,
making it possible to view objects as small as an atom.
● The only downfall of this invention is that living specimens
are destroyed by the high resolution of the electron beam,
so light microscopes are still needed to examine living
cells.
1953: Frits Zernike Wins Nobel for Phase
Contrast Method
● In 1953, Dutch physicist Frits Zernike won the Nobel
Prize for Physics for his invention of the phase contrast
microscope, which allows us to see colorless and
transparent materials at a microscopic level.
● This brand-new frontier of microscopy allowed
scientists to view cells without staining them (which
would kill them), in order to view internal cell structure.
The contrast-enhancing technique is ideal for viewing
living cells, including cultures, tissues, and
microorganisms, and is still widely employed in
scientific research today.
1986: Gerd Binnig and Heinrich Rohrer win
Nobel for the Scanning Tunneling
Microscope
● physicists Gerd Binnig and Heinrich
Rohrer developed the scanning tunneling
microscope (STM), which is used to image
surfaces at the atomic level. It uses
neither a light nor an electron beam, but
instead an ultrafine tip that’s able to
reveal the molecular and atomic details of
an object.
2008: the world’s most powerful
transmission electron microscope (TEM)
In 2008, the Department of Energy installed the
world’s most powerful transmission electron
microscope (TEM)—dubbed TEAM 0.5—at the
National Center for Electron Microscopy
Lawrence Berkeley National Laboratory. The
ultra-bright electron beam emitted from TEAM
0.5 will help researchers capture three-
dimensional images of individual atoms.
Common types of
Microscope
2 Types of Microscopes
● simple microscope - has only 1
lens – 5x
● compound microscope - has 2
sets of lenses. It can magnify
things 100 - 200 times larger
than they really are.
Compound Microscopes
● Compound Light Microscope (CLM) – use of visible light to illuminate
specimens and has multiple lenses that can magnify up to 1,000x and
resolves up to 0.4 nm.
● Electron Microscope - can magnify objects up to 300,000 times. They do
not use lenses, but use beam of electrons and electromagnets for focusing,
intensifying the resolution (clarity) and to enlarge the image.
Electron Microscopes
● Transmission Electron Microscope (TEM) – can magnify specimens
from 10,000x to 100,000x and resolves up to 2.5 nm, used to view
layers and details of the specimens.
● Scanning Electron Microscope (SEM) – provides a three-
dimensional view of the specimen, can magnify specimens up to
1,00x to 10,000x and resolves up to 20 nm.
Parts and functions
of the Microscope
Body Tube
Revolving Nosepiece
Objectives
Stage Clips
Light Source
Ocular lens
(Eyepiece)
Arm
Stage
Coarse Adjustment
Fine Adjustment
Always carry a microscope with one hand
holding the arm and one hand under the base.
Base
Diaphragm
PARTS OF A MICROSCOPE
1. ocular (lens) eyepiece
• the lens of the microscope that you look
through
2. coarse adjustment
• the large knob on the microscope that you turn
to bring the object into near focus
3. fine adjustment
• the small knob on the microscope that brings
the image to sharpen the focus of the image
PARTS OF A MICROSCOPE
4. arm
• the part of the microscope supporting the body
tube
5. body tube
• the part that holds the eyepiece and the
objective lenses.
6. Revolving nosepiece
• the part at the bottom of the body tube that
holds the objective lenses and allows them to
be turned
7. High power objective lens (HPO)
• the lens that magnifies the object the greatest
amount. (usually 40x)
8. Low power (scanner) objective lens
(LPO)
• the lens that magnifies the object the least amount
(usually used to find the object; magnifies only 3x or
4x)
9. Middle power objective lens – Oil
immersion objectives - OIO
• the lens that usually magnifies the object more than
the scanner lens, but less than the high power lens
(usually 10x to 20x)
10. stage
■ the flat part below the
objectives lens where the slide
is placed
11. Stage clips
■ the part that holds the slide in
place so it doesn’t move
12. diaphragm
■ the part that controls the
amount of light entering the
field of view
13. light source
■ the lamp (or mirror) under
the stage that sends light
through the object being
viewed.
14. base
■ the bottom part that
supports the rest of the
microscope
D.A 4.2
● Direction: Label
the parts of the
microscope.
Write your
answers in your
notebook.
Body Tube
Nosepiece
Objectives
Stage Clips
Light
Ocular lens
(Eyepiece)
Arm
Stage
Coarse Adjustment
Fine Adjustment
Always carry a microscope with one hand
holding the arm and one hand under the base.
Base
Diaphragm
Field of View
● Field of view is the area (circle) that you see
when looking through the eyepiece
Comparing Powers of Magnification
We can see better details with higher the
powers of magnification, but we cannot
see as much of the image.
Which of these images
would be viewed at a
higher power of
magnification?
What’s my power?
To calculate the power of magnification, multiply the power of the
ocular lens by the power of the objective.
What are the powers of
magnification for each of
the objectives we have on
our microscopes?
Fill in the table on
your worksheet.
Calculating Magnification
1. Find the power of the lens. It is found on the side
of the lens. Magnification power of a lens is
always identified by the label of x (10x, 1000x)
2. Multiply the power of the eyepiece by the power
of the objective lens.
3. Examples:
eyepiece obj. lens
10x times 100x
10x times 50x
10x times 40x
Appearance of the Specimen
● Objects appear upside-down &
backward
● Movement appears to be in opposite
direction than actual movement
Let’s give it a try ...
1 – Turn on the microscope and then rotate the nosepiece to click
the red-banded objective into place.
2 – Place a slide on the stage and secure it using the stage clips. Use
the coarse adjustment knob (large knob) to get it the image into
view and then use the fine adjustment knob (small knob) to make it
clearer.
4 – When you are done, turn off the microscope and put up the
slides you used.
3 – Once you have the image in view, rotate the nosepiece to view it
under different powers. Draw what you see on your worksheet!
Be careful with the largest objective! Sometimes there is
not enough room and you will not be able to use it!
Recording Observations
● Draw specimen large enough to fill “field of
view” circle
● Draw as many details as possible
● Drawing should be neat
● Label specimen
● Label power of magnification
● Name & date on paper
Making a Wet Mount Slide
1. Use dropper to place a drop of water on the
center of a clean slide.
2. Use tweezers to lay specimen on the drop of
water.
3. Gently touch the cover slip to the edge of
the drop of water to cover the specimen &
the water.
How to make a wet-mount slide …
1 – Get a clean slide and coverslip from your teacher.
2 – Place ONE drop of water in the middle of the slide. Don’t use
too much or the water will run off the edge and make a mess!
3 – Place the edge of the cover slip on one side of the water drop.
You do not need to use the stage clips
when viewing wet-mount slides!
5 – Place the slide on the stage and view it first with the red-banded
objective. Once you see the image, you can rotate the nosepiece to
view the slide with the different objectives.
4 - Slowly lower the cover slip on top of the drop.
Cover
Slip
Lower slowly
Grade 7 - Lesson 1 - Microscope and Its Functions

More Related Content

Similar to Grade 7 - Lesson 1 - Microscope and Its Functions

Unit 1 How to Use Microscope
Unit 1 How to Use MicroscopeUnit 1 How to Use Microscope
Unit 1 How to Use MicroscopeShally Rahmawaty
 
examination of microoranisms using microscope.ppt
examination of microoranisms using microscope.pptexamination of microoranisms using microscope.ppt
examination of microoranisms using microscope.pptRafiaRayanabtbc
 
examination of microoranisms using microscope.ppt
examination of microoranisms using microscope.pptexamination of microoranisms using microscope.ppt
examination of microoranisms using microscope.pptRafiaRayanabtbc
 
Microscope and its types
Microscope and its typesMicroscope and its types
Microscope and its typesSummeraKausar
 
اجهزة مختبرية -م2.pptx
اجهزة مختبرية -م2.pptxاجهزة مختبرية -م2.pptx
اجهزة مختبرية -م2.pptxsaraso888
 
Microscope & Microscopy.pptxvjvgbngn bjjfhbxjb
Microscope & Microscopy.pptxvjvgbngn bjjfhbxjbMicroscope & Microscopy.pptxvjvgbngn bjjfhbxjb
Microscope & Microscopy.pptxvjvgbngn bjjfhbxjbAmirAmeerAli
 
Microscope and types of microscope
Microscope and types of microscopeMicroscope and types of microscope
Microscope and types of microscopeRimsha Pahore
 
Chapter 2 section 2 (2011): Viewing Cells
Chapter 2 section 2 (2011):  Viewing CellsChapter 2 section 2 (2011):  Viewing Cells
Chapter 2 section 2 (2011): Viewing CellsMr. Motuk
 

Similar to Grade 7 - Lesson 1 - Microscope and Its Functions (20)

Unit 1 How to Use Microscope
Unit 1 How to Use MicroscopeUnit 1 How to Use Microscope
Unit 1 How to Use Microscope
 
the Microscope
 the Microscope the Microscope
the Microscope
 
Microscopy
MicroscopyMicroscopy
Microscopy
 
History of microscopy i
History of microscopy iHistory of microscopy i
History of microscopy i
 
examination of microoranisms using microscope.ppt
examination of microoranisms using microscope.pptexamination of microoranisms using microscope.ppt
examination of microoranisms using microscope.ppt
 
examination of microoranisms using microscope.ppt
examination of microoranisms using microscope.pptexamination of microoranisms using microscope.ppt
examination of microoranisms using microscope.ppt
 
Microscope and its types
Microscope and its typesMicroscope and its types
Microscope and its types
 
Microscopy - Study
Microscopy - StudyMicroscopy - Study
Microscopy - Study
 
Microscopy - Study
Microscopy - StudyMicroscopy - Study
Microscopy - Study
 
Microscope.ppt
Microscope.pptMicroscope.ppt
Microscope.ppt
 
Microscope
MicroscopeMicroscope
Microscope
 
Microscopy use this.ppt
Microscopy use this.pptMicroscopy use this.ppt
Microscopy use this.ppt
 
اجهزة مختبرية -م2.pptx
اجهزة مختبرية -م2.pptxاجهزة مختبرية -م2.pptx
اجهزة مختبرية -م2.pptx
 
Microscopy_.ppt
Microscopy_.pptMicroscopy_.ppt
Microscopy_.ppt
 
Microscope & Microscopy.pptxvjvgbngn bjjfhbxjb
Microscope & Microscopy.pptxvjvgbngn bjjfhbxjbMicroscope & Microscopy.pptxvjvgbngn bjjfhbxjb
Microscope & Microscopy.pptxvjvgbngn bjjfhbxjb
 
microscope
microscopemicroscope
microscope
 
The Microscope
The MicroscopeThe Microscope
The Microscope
 
Microscope and types of microscope
Microscope and types of microscopeMicroscope and types of microscope
Microscope and types of microscope
 
Chapter 2 section 2 (2011): Viewing Cells
Chapter 2 section 2 (2011):  Viewing CellsChapter 2 section 2 (2011):  Viewing Cells
Chapter 2 section 2 (2011): Viewing Cells
 
Microscope
MicroscopeMicroscope
Microscope
 

Recently uploaded

SaffronCrocusGenomicsThessalonikiOnlineMay2024TalkOnline.pptx
SaffronCrocusGenomicsThessalonikiOnlineMay2024TalkOnline.pptxSaffronCrocusGenomicsThessalonikiOnlineMay2024TalkOnline.pptx
SaffronCrocusGenomicsThessalonikiOnlineMay2024TalkOnline.pptxPat (JS) Heslop-Harrison
 
RACEMIzATION AND ISOMERISATION completed.pptx
RACEMIzATION AND ISOMERISATION completed.pptxRACEMIzATION AND ISOMERISATION completed.pptx
RACEMIzATION AND ISOMERISATION completed.pptxArunLakshmiMeenakshi
 
Erythropoiesis- Dr.E. Muralinath-C Kalyan
Erythropoiesis- Dr.E. Muralinath-C KalyanErythropoiesis- Dr.E. Muralinath-C Kalyan
Erythropoiesis- Dr.E. Muralinath-C Kalyanmuralinath2
 
Mining Activity and Investment Opportunity in Myanmar.pptx
Mining Activity and Investment Opportunity in Myanmar.pptxMining Activity and Investment Opportunity in Myanmar.pptx
Mining Activity and Investment Opportunity in Myanmar.pptxKyawThanTint
 
In-pond Race way systems for Aquaculture (IPRS).pptx
In-pond Race way systems for Aquaculture (IPRS).pptxIn-pond Race way systems for Aquaculture (IPRS).pptx
In-pond Race way systems for Aquaculture (IPRS).pptxMAGOTI ERNEST
 
Continuum emission from within the plunging region of black hole discs
Continuum emission from within the plunging region of black hole discsContinuum emission from within the plunging region of black hole discs
Continuum emission from within the plunging region of black hole discsSérgio Sacani
 
NuGOweek 2024 full programme - hosted by Ghent University
NuGOweek 2024 full programme - hosted by Ghent UniversityNuGOweek 2024 full programme - hosted by Ghent University
NuGOweek 2024 full programme - hosted by Ghent Universitypablovgd
 
GBSN - Microbiology (Unit 7) Microbiology in Everyday Life
GBSN - Microbiology (Unit 7) Microbiology in Everyday LifeGBSN - Microbiology (Unit 7) Microbiology in Everyday Life
GBSN - Microbiology (Unit 7) Microbiology in Everyday LifeAreesha Ahmad
 
Jet reorientation in central galaxies of clusters and groups: insights from V...
Jet reorientation in central galaxies of clusters and groups: insights from V...Jet reorientation in central galaxies of clusters and groups: insights from V...
Jet reorientation in central galaxies of clusters and groups: insights from V...Sérgio Sacani
 
EU START PROJECT. START-Newsletter_Issue_4.pdf
EU START PROJECT. START-Newsletter_Issue_4.pdfEU START PROJECT. START-Newsletter_Issue_4.pdf
EU START PROJECT. START-Newsletter_Issue_4.pdfStart Project
 
WASP-69b’s Escaping Envelope Is Confined to a Tail Extending at Least 7 Rp
WASP-69b’s Escaping Envelope Is Confined to a Tail Extending at Least 7 RpWASP-69b’s Escaping Envelope Is Confined to a Tail Extending at Least 7 Rp
WASP-69b’s Escaping Envelope Is Confined to a Tail Extending at Least 7 RpSérgio Sacani
 
Exomoons & Exorings with the Habitable Worlds Observatory I: On the Detection...
Exomoons & Exorings with the Habitable Worlds Observatory I: On the Detection...Exomoons & Exorings with the Habitable Worlds Observatory I: On the Detection...
Exomoons & Exorings with the Habitable Worlds Observatory I: On the Detection...Sérgio Sacani
 
GBSN - Microbiology Lab (Compound Microscope)
GBSN - Microbiology Lab (Compound Microscope)GBSN - Microbiology Lab (Compound Microscope)
GBSN - Microbiology Lab (Compound Microscope)Areesha Ahmad
 
B lymphocytes, Receptors, Maturation and Activation
B lymphocytes, Receptors, Maturation and ActivationB lymphocytes, Receptors, Maturation and Activation
B lymphocytes, Receptors, Maturation and ActivationBhanu Krishan
 
IISc Bangalore M.E./M.Tech. courses and fees 2024
IISc Bangalore M.E./M.Tech. courses and fees 2024IISc Bangalore M.E./M.Tech. courses and fees 2024
IISc Bangalore M.E./M.Tech. courses and fees 2024SciAstra
 
Extensive Pollution of Uranus and Neptune’s Atmospheres by Upsweep of Icy Mat...
Extensive Pollution of Uranus and Neptune’s Atmospheres by Upsweep of Icy Mat...Extensive Pollution of Uranus and Neptune’s Atmospheres by Upsweep of Icy Mat...
Extensive Pollution of Uranus and Neptune’s Atmospheres by Upsweep of Icy Mat...Sérgio Sacani
 
Film Coated Tablet and Film Coating raw materials.pdf
Film Coated Tablet and Film Coating raw materials.pdfFilm Coated Tablet and Film Coating raw materials.pdf
Film Coated Tablet and Film Coating raw materials.pdfPharmatech-rx
 
Triploidy ...............................pptx
Triploidy ...............................pptxTriploidy ...............................pptx
Triploidy ...............................pptxCherry
 
Emergent ribozyme behaviors in oxychlorine brines indicate a unique niche for...
Emergent ribozyme behaviors in oxychlorine brines indicate a unique niche for...Emergent ribozyme behaviors in oxychlorine brines indicate a unique niche for...
Emergent ribozyme behaviors in oxychlorine brines indicate a unique niche for...Sérgio Sacani
 
Soil and Water Conservation Engineering (SWCE) is a specialized field of stud...
Soil and Water Conservation Engineering (SWCE) is a specialized field of stud...Soil and Water Conservation Engineering (SWCE) is a specialized field of stud...
Soil and Water Conservation Engineering (SWCE) is a specialized field of stud...yogeshlabana357357
 

Recently uploaded (20)

SaffronCrocusGenomicsThessalonikiOnlineMay2024TalkOnline.pptx
SaffronCrocusGenomicsThessalonikiOnlineMay2024TalkOnline.pptxSaffronCrocusGenomicsThessalonikiOnlineMay2024TalkOnline.pptx
SaffronCrocusGenomicsThessalonikiOnlineMay2024TalkOnline.pptx
 
RACEMIzATION AND ISOMERISATION completed.pptx
RACEMIzATION AND ISOMERISATION completed.pptxRACEMIzATION AND ISOMERISATION completed.pptx
RACEMIzATION AND ISOMERISATION completed.pptx
 
Erythropoiesis- Dr.E. Muralinath-C Kalyan
Erythropoiesis- Dr.E. Muralinath-C KalyanErythropoiesis- Dr.E. Muralinath-C Kalyan
Erythropoiesis- Dr.E. Muralinath-C Kalyan
 
Mining Activity and Investment Opportunity in Myanmar.pptx
Mining Activity and Investment Opportunity in Myanmar.pptxMining Activity and Investment Opportunity in Myanmar.pptx
Mining Activity and Investment Opportunity in Myanmar.pptx
 
In-pond Race way systems for Aquaculture (IPRS).pptx
In-pond Race way systems for Aquaculture (IPRS).pptxIn-pond Race way systems for Aquaculture (IPRS).pptx
In-pond Race way systems for Aquaculture (IPRS).pptx
 
Continuum emission from within the plunging region of black hole discs
Continuum emission from within the plunging region of black hole discsContinuum emission from within the plunging region of black hole discs
Continuum emission from within the plunging region of black hole discs
 
NuGOweek 2024 full programme - hosted by Ghent University
NuGOweek 2024 full programme - hosted by Ghent UniversityNuGOweek 2024 full programme - hosted by Ghent University
NuGOweek 2024 full programme - hosted by Ghent University
 
GBSN - Microbiology (Unit 7) Microbiology in Everyday Life
GBSN - Microbiology (Unit 7) Microbiology in Everyday LifeGBSN - Microbiology (Unit 7) Microbiology in Everyday Life
GBSN - Microbiology (Unit 7) Microbiology in Everyday Life
 
Jet reorientation in central galaxies of clusters and groups: insights from V...
Jet reorientation in central galaxies of clusters and groups: insights from V...Jet reorientation in central galaxies of clusters and groups: insights from V...
Jet reorientation in central galaxies of clusters and groups: insights from V...
 
EU START PROJECT. START-Newsletter_Issue_4.pdf
EU START PROJECT. START-Newsletter_Issue_4.pdfEU START PROJECT. START-Newsletter_Issue_4.pdf
EU START PROJECT. START-Newsletter_Issue_4.pdf
 
WASP-69b’s Escaping Envelope Is Confined to a Tail Extending at Least 7 Rp
WASP-69b’s Escaping Envelope Is Confined to a Tail Extending at Least 7 RpWASP-69b’s Escaping Envelope Is Confined to a Tail Extending at Least 7 Rp
WASP-69b’s Escaping Envelope Is Confined to a Tail Extending at Least 7 Rp
 
Exomoons & Exorings with the Habitable Worlds Observatory I: On the Detection...
Exomoons & Exorings with the Habitable Worlds Observatory I: On the Detection...Exomoons & Exorings with the Habitable Worlds Observatory I: On the Detection...
Exomoons & Exorings with the Habitable Worlds Observatory I: On the Detection...
 
GBSN - Microbiology Lab (Compound Microscope)
GBSN - Microbiology Lab (Compound Microscope)GBSN - Microbiology Lab (Compound Microscope)
GBSN - Microbiology Lab (Compound Microscope)
 
B lymphocytes, Receptors, Maturation and Activation
B lymphocytes, Receptors, Maturation and ActivationB lymphocytes, Receptors, Maturation and Activation
B lymphocytes, Receptors, Maturation and Activation
 
IISc Bangalore M.E./M.Tech. courses and fees 2024
IISc Bangalore M.E./M.Tech. courses and fees 2024IISc Bangalore M.E./M.Tech. courses and fees 2024
IISc Bangalore M.E./M.Tech. courses and fees 2024
 
Extensive Pollution of Uranus and Neptune’s Atmospheres by Upsweep of Icy Mat...
Extensive Pollution of Uranus and Neptune’s Atmospheres by Upsweep of Icy Mat...Extensive Pollution of Uranus and Neptune’s Atmospheres by Upsweep of Icy Mat...
Extensive Pollution of Uranus and Neptune’s Atmospheres by Upsweep of Icy Mat...
 
Film Coated Tablet and Film Coating raw materials.pdf
Film Coated Tablet and Film Coating raw materials.pdfFilm Coated Tablet and Film Coating raw materials.pdf
Film Coated Tablet and Film Coating raw materials.pdf
 
Triploidy ...............................pptx
Triploidy ...............................pptxTriploidy ...............................pptx
Triploidy ...............................pptx
 
Emergent ribozyme behaviors in oxychlorine brines indicate a unique niche for...
Emergent ribozyme behaviors in oxychlorine brines indicate a unique niche for...Emergent ribozyme behaviors in oxychlorine brines indicate a unique niche for...
Emergent ribozyme behaviors in oxychlorine brines indicate a unique niche for...
 
Soil and Water Conservation Engineering (SWCE) is a specialized field of stud...
Soil and Water Conservation Engineering (SWCE) is a specialized field of stud...Soil and Water Conservation Engineering (SWCE) is a specialized field of stud...
Soil and Water Conservation Engineering (SWCE) is a specialized field of stud...
 

Grade 7 - Lesson 1 - Microscope and Its Functions

  • 2.
  • 3. Objectives 1. Identify parts of the microscope and their functions. 2. Become familiar with the parts of the microscope. 3. Differentiate types of microscopes according to their ability to magnify.
  • 4. Pre-test Directions. Read each questions carefully. Choose the letter of the correct answer on your notebook.
  • 5. Pre-test 1. Which two parts of a compound microscope magnify the image of an object? A. Eyepiece and mirror B. Eyepiece and objectives C. Objectives and mirror D. Objectives and diaphragm
  • 6. Pre-test 2. Which part will you adjust if you want to change from low power objective to high power objective? A. Eye piece B. Mirror C. Revolving nosepiece D. Stage
  • 7. Pre-test 3. To get a detailed view of the specimen, which part of the microscope will you use? A. Coarse Adjustment Knob B. Diaphragm C. High Power Objective D. Low Power Objective
  • 8. Pre-test 4. You have mounted a specimen on a slide. On which part of the microscope are you going to place it if you want to see the image of the specimen? A. Arm B. Body Tube C. Diaphragm D. Stage
  • 9. Pre-test 5. Which part of the microscope illuminates the specimen? A. Eyepiece B. Objectives C. Mirror D. Revolving nosepiece
  • 10. Pre-test 6. Which part provides support and serves as a stand? A. Arm B. Base C. Body Tube D. Objective
  • 11. Pre-test 7. Which part is use to hold the slide in place? A. Diaphragm B. Objective C. Revolving Nosepiece D. Stage Clip
  • 12. Pre-test 8. What part of a compound microscope controls or regulates the amount of light that reaches the specimen? A. Eyepiece B. Diaphragm C. Objective D. Stage
  • 13. Pre-test 9. Which part allows the viewer to look through and see the magnified image of the specimen? A. Arm B. Body Tube C. Eyepiece D. Mirror
  • 14. Pre-test 10. Which part is use when you hold and carry the microscope? A. Arm B. Body Tube C. Coarse Adjustment Knob D. Diaphragm
  • 15. How useful are microscopes in appreciating the minute forms of life invisible to the naked eye?
  • 16. D.A 4.1 Direction: List down five parts of the microscope and write their corresponding functions on your notebook. Parts of the Microscope Functions 1. _______________ _______________ 2. _______________ _______________ 3. _______________ _______________ 4. _______________ _______________ 5. _______________ _______________
  • 17. Microscope ● instrument that produces enlarged images of small objects, allowing the observer an exceedingly close view of minute structures at a scale convenient for examination and analysis. (https://www.britannica.com/t echnology/microscope) ● technical field of using microscopes to view samples & objects that cannot be seen with the unaided eye (objects that are not within the resolution range of the normal eye). (https://www.ed.ac.uk/clinical-sciences/edinburgh- imaging/for-patients-study-participants/tell-me-more- Microscopy
  • 18.
  • 19.
  • 20.
  • 21. 1285: Glasses Are Invented ● the earliest form of microscopy comes from the art of eyeglass making ● first pair of eyeglasses is thought to have been invented in Italy in the 13th century. ● Germans invented the concave lens in 1451, while the Venetians debuted the convex lens not long after.
  • 22. 1590s: Hans and Zacharias Janssen Make a 9X Magnifier ● both eyeglass lens grinders, were plugging away honing some of the most cutting-edge new-vision technologies during the late 1500s. ● they crafted a pair of small, spherical convex lenses in a tube — the precursor to the compound microscope—which could magnify up to 9x. ● the first compound microscope
  • 23. 1609: Galileo Perfects the Microscope ● created an almost similar model of the compound microscope - to see distant objects (heavenly bodies) ● could be modified by lenses with a shorter focal length to look at tiny objects. He developed a set of mini telescopes with two lenses: a bi- convex objective and a bi-concave eyepiece. He later invented the occhiolino, with three bi- convex lenses. ● He was able to create the telescope - “spyglass”
  • 24. 1625: Giovanni Faber Coins the Word “Microscope” German botanist coined the word from the Greek words for micron (small) and skopein (to look at).
  • 25. 1665: Robert Hooke Discovered Cells ● English natural philosopher and credited with discovering the basis of all life on earth: the cell. ● Father of Cytology ● Crafted his crude microscope, Hooke was able to observe thin slices of cork (which are really just dead plant cells) at a microscopic level. With their tiny honeycomb-like building blocks like little boxes, the tissues Hooke observed reminded him of monks’ chambers, so he named them “cells.” ● He published his findings in a book called Micrographia.
  • 26. 1670: Anton Van Leeuwenhoek Perfects the Microscope ● Dutch scientist - “Father of Microscopy” ● expertly grind and polish lenses, and developed a cutting-edge new lens that could magnify up to 270x-300x, which allowed him to become the first person to view live cells under a microscope. ● he discovered bacteria that no one knew existed—including bacteria found in saliva and rainwater—which he named “animalcules.”
  • 27. Late 1800s:The Modern Microscope Is Born ● with a stage for the specimen, an ocular lens, objective lenses, and a light source. Contributing to this new phase of science - Charles A. Spencer, who invented the first American-made achromatic objective microscope and sold it commercially beginning in 1838. ● Spencer’s partnership with manufacturer A.K. Eaton marks the beginning of a blossoming microscope industry in America. These fine optical instruments became staples in scientific environments for the next century.
  • 28. 1926: Richard Zsigmondy Wins Nobel Prize for the Ultra Microscope ● One such example is the ultra microscope, invented by Austrian chemist Richard Zsigmondy. ● This microscope works by aiming a high-powered light beam through a colloid of particles, allowing us to see particles smaller than a wavelength of visible light.
  • 29. 1931: Max Knoll and Ernst Ruska Invent the Electron Microscope ● 1931, German electrical engineer Max Knoll and physicist Ernst Ruska invented electron microscope. Instead of light, the electron microscope uses a focused beam of electrons to create an image. It’s capable of far greater magnification (up to 1 million x) and resolution than a light microscope, making it possible to view objects as small as an atom. ● The only downfall of this invention is that living specimens are destroyed by the high resolution of the electron beam, so light microscopes are still needed to examine living cells.
  • 30. 1953: Frits Zernike Wins Nobel for Phase Contrast Method ● In 1953, Dutch physicist Frits Zernike won the Nobel Prize for Physics for his invention of the phase contrast microscope, which allows us to see colorless and transparent materials at a microscopic level. ● This brand-new frontier of microscopy allowed scientists to view cells without staining them (which would kill them), in order to view internal cell structure. The contrast-enhancing technique is ideal for viewing living cells, including cultures, tissues, and microorganisms, and is still widely employed in scientific research today.
  • 31. 1986: Gerd Binnig and Heinrich Rohrer win Nobel for the Scanning Tunneling Microscope ● physicists Gerd Binnig and Heinrich Rohrer developed the scanning tunneling microscope (STM), which is used to image surfaces at the atomic level. It uses neither a light nor an electron beam, but instead an ultrafine tip that’s able to reveal the molecular and atomic details of an object.
  • 32. 2008: the world’s most powerful transmission electron microscope (TEM) In 2008, the Department of Energy installed the world’s most powerful transmission electron microscope (TEM)—dubbed TEAM 0.5—at the National Center for Electron Microscopy Lawrence Berkeley National Laboratory. The ultra-bright electron beam emitted from TEAM 0.5 will help researchers capture three- dimensional images of individual atoms.
  • 34. 2 Types of Microscopes ● simple microscope - has only 1 lens – 5x ● compound microscope - has 2 sets of lenses. It can magnify things 100 - 200 times larger than they really are.
  • 35. Compound Microscopes ● Compound Light Microscope (CLM) – use of visible light to illuminate specimens and has multiple lenses that can magnify up to 1,000x and resolves up to 0.4 nm. ● Electron Microscope - can magnify objects up to 300,000 times. They do not use lenses, but use beam of electrons and electromagnets for focusing, intensifying the resolution (clarity) and to enlarge the image.
  • 36. Electron Microscopes ● Transmission Electron Microscope (TEM) – can magnify specimens from 10,000x to 100,000x and resolves up to 2.5 nm, used to view layers and details of the specimens. ● Scanning Electron Microscope (SEM) – provides a three- dimensional view of the specimen, can magnify specimens up to 1,00x to 10,000x and resolves up to 20 nm.
  • 37.
  • 38.
  • 39. Parts and functions of the Microscope
  • 40. Body Tube Revolving Nosepiece Objectives Stage Clips Light Source Ocular lens (Eyepiece) Arm Stage Coarse Adjustment Fine Adjustment Always carry a microscope with one hand holding the arm and one hand under the base. Base Diaphragm
  • 41.
  • 42. PARTS OF A MICROSCOPE 1. ocular (lens) eyepiece • the lens of the microscope that you look through 2. coarse adjustment • the large knob on the microscope that you turn to bring the object into near focus 3. fine adjustment • the small knob on the microscope that brings the image to sharpen the focus of the image
  • 43. PARTS OF A MICROSCOPE 4. arm • the part of the microscope supporting the body tube 5. body tube • the part that holds the eyepiece and the objective lenses. 6. Revolving nosepiece • the part at the bottom of the body tube that holds the objective lenses and allows them to be turned
  • 44. 7. High power objective lens (HPO) • the lens that magnifies the object the greatest amount. (usually 40x) 8. Low power (scanner) objective lens (LPO) • the lens that magnifies the object the least amount (usually used to find the object; magnifies only 3x or 4x) 9. Middle power objective lens – Oil immersion objectives - OIO • the lens that usually magnifies the object more than the scanner lens, but less than the high power lens (usually 10x to 20x)
  • 45. 10. stage ■ the flat part below the objectives lens where the slide is placed 11. Stage clips ■ the part that holds the slide in place so it doesn’t move 12. diaphragm ■ the part that controls the amount of light entering the field of view
  • 46. 13. light source ■ the lamp (or mirror) under the stage that sends light through the object being viewed. 14. base ■ the bottom part that supports the rest of the microscope
  • 47. D.A 4.2 ● Direction: Label the parts of the microscope. Write your answers in your notebook.
  • 48. Body Tube Nosepiece Objectives Stage Clips Light Ocular lens (Eyepiece) Arm Stage Coarse Adjustment Fine Adjustment Always carry a microscope with one hand holding the arm and one hand under the base. Base Diaphragm
  • 49. Field of View ● Field of view is the area (circle) that you see when looking through the eyepiece
  • 50. Comparing Powers of Magnification We can see better details with higher the powers of magnification, but we cannot see as much of the image. Which of these images would be viewed at a higher power of magnification?
  • 51. What’s my power? To calculate the power of magnification, multiply the power of the ocular lens by the power of the objective. What are the powers of magnification for each of the objectives we have on our microscopes? Fill in the table on your worksheet.
  • 52. Calculating Magnification 1. Find the power of the lens. It is found on the side of the lens. Magnification power of a lens is always identified by the label of x (10x, 1000x) 2. Multiply the power of the eyepiece by the power of the objective lens. 3. Examples: eyepiece obj. lens 10x times 100x 10x times 50x 10x times 40x
  • 53. Appearance of the Specimen ● Objects appear upside-down & backward ● Movement appears to be in opposite direction than actual movement
  • 54. Let’s give it a try ... 1 – Turn on the microscope and then rotate the nosepiece to click the red-banded objective into place. 2 – Place a slide on the stage and secure it using the stage clips. Use the coarse adjustment knob (large knob) to get it the image into view and then use the fine adjustment knob (small knob) to make it clearer. 4 – When you are done, turn off the microscope and put up the slides you used. 3 – Once you have the image in view, rotate the nosepiece to view it under different powers. Draw what you see on your worksheet! Be careful with the largest objective! Sometimes there is not enough room and you will not be able to use it!
  • 55. Recording Observations ● Draw specimen large enough to fill “field of view” circle ● Draw as many details as possible ● Drawing should be neat ● Label specimen ● Label power of magnification ● Name & date on paper
  • 56. Making a Wet Mount Slide 1. Use dropper to place a drop of water on the center of a clean slide. 2. Use tweezers to lay specimen on the drop of water. 3. Gently touch the cover slip to the edge of the drop of water to cover the specimen & the water.
  • 57. How to make a wet-mount slide … 1 – Get a clean slide and coverslip from your teacher. 2 – Place ONE drop of water in the middle of the slide. Don’t use too much or the water will run off the edge and make a mess! 3 – Place the edge of the cover slip on one side of the water drop. You do not need to use the stage clips when viewing wet-mount slides! 5 – Place the slide on the stage and view it first with the red-banded objective. Once you see the image, you can rotate the nosepiece to view the slide with the different objectives. 4 - Slowly lower the cover slip on top of the drop. Cover Slip Lower slowly