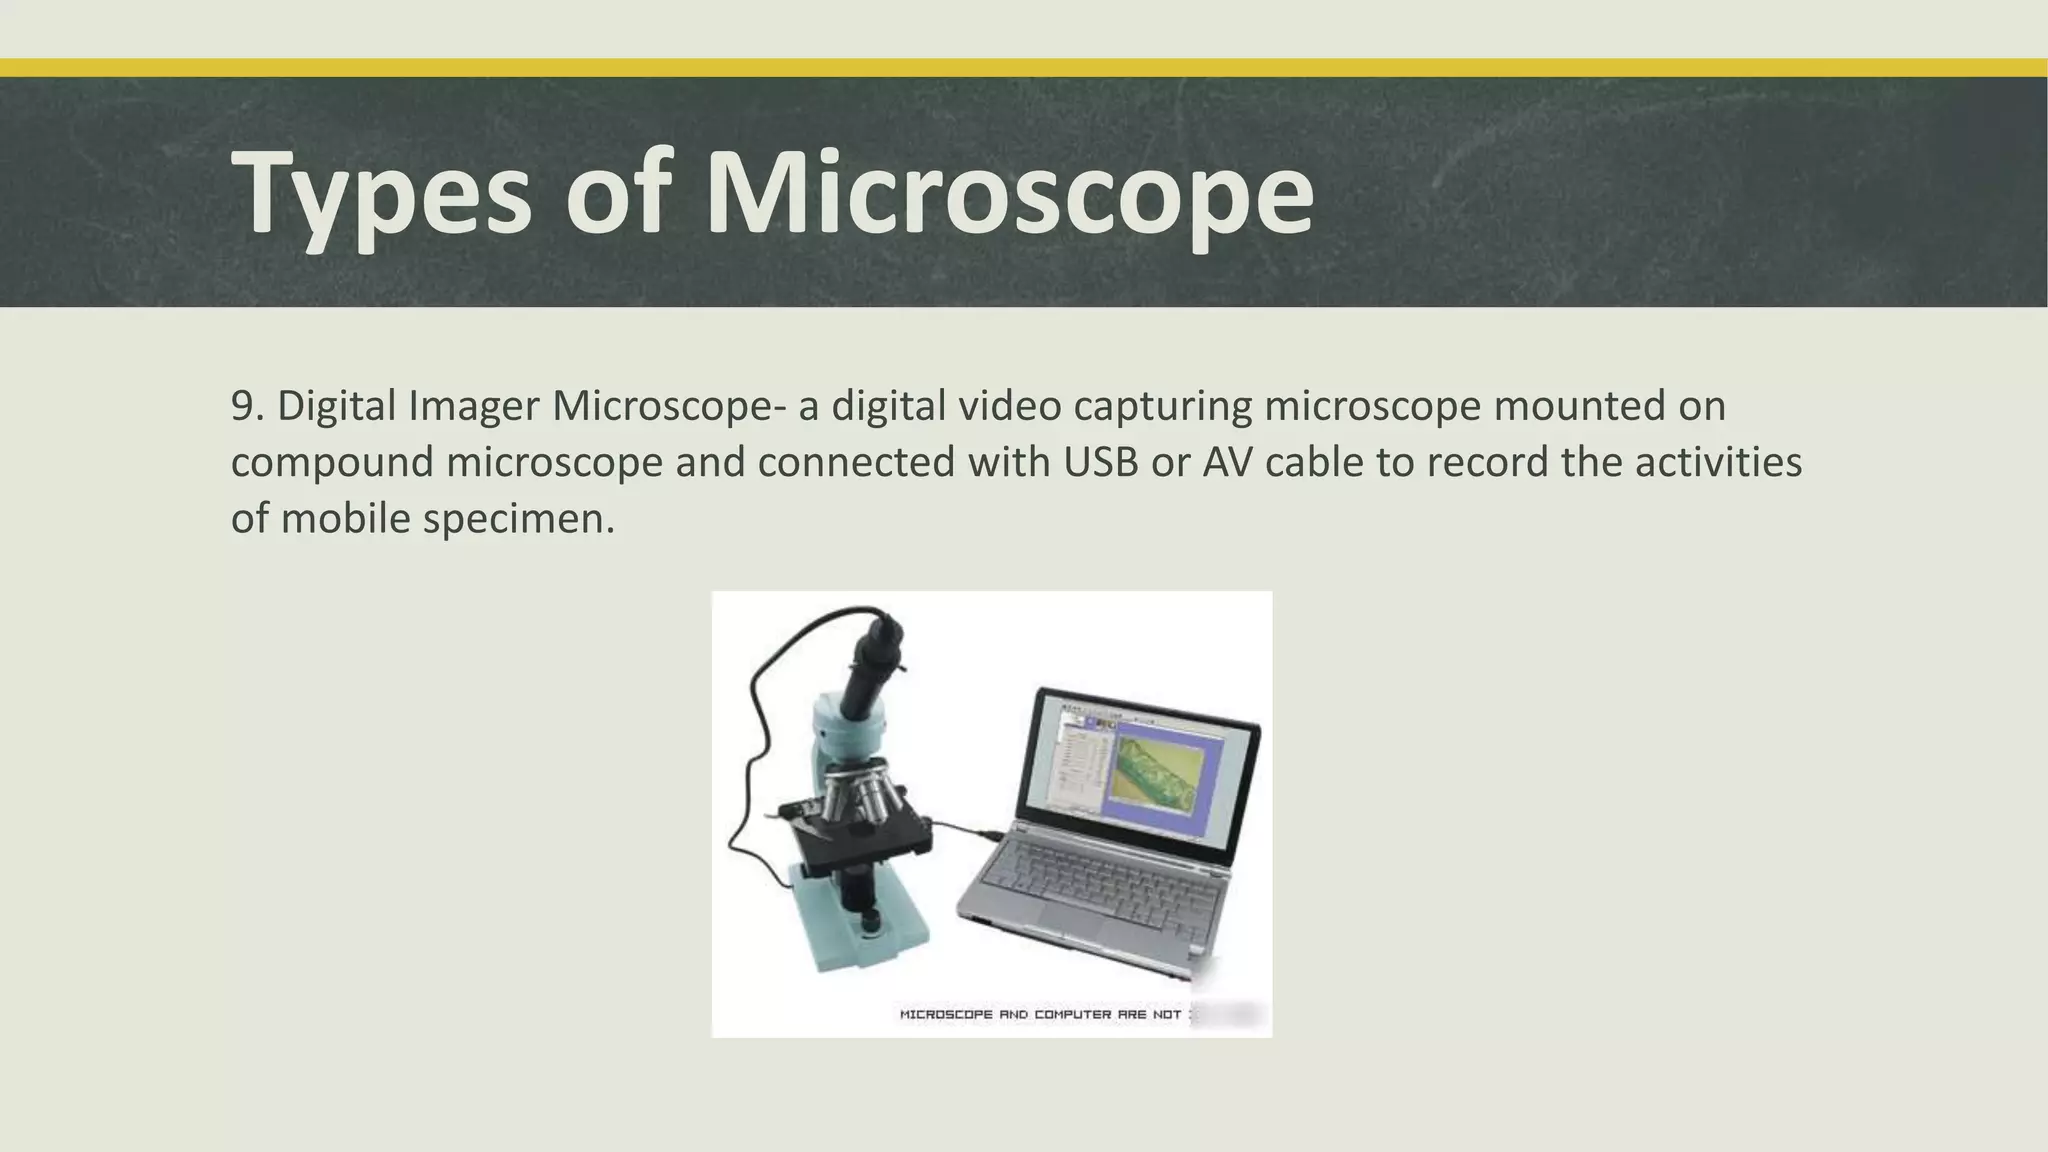
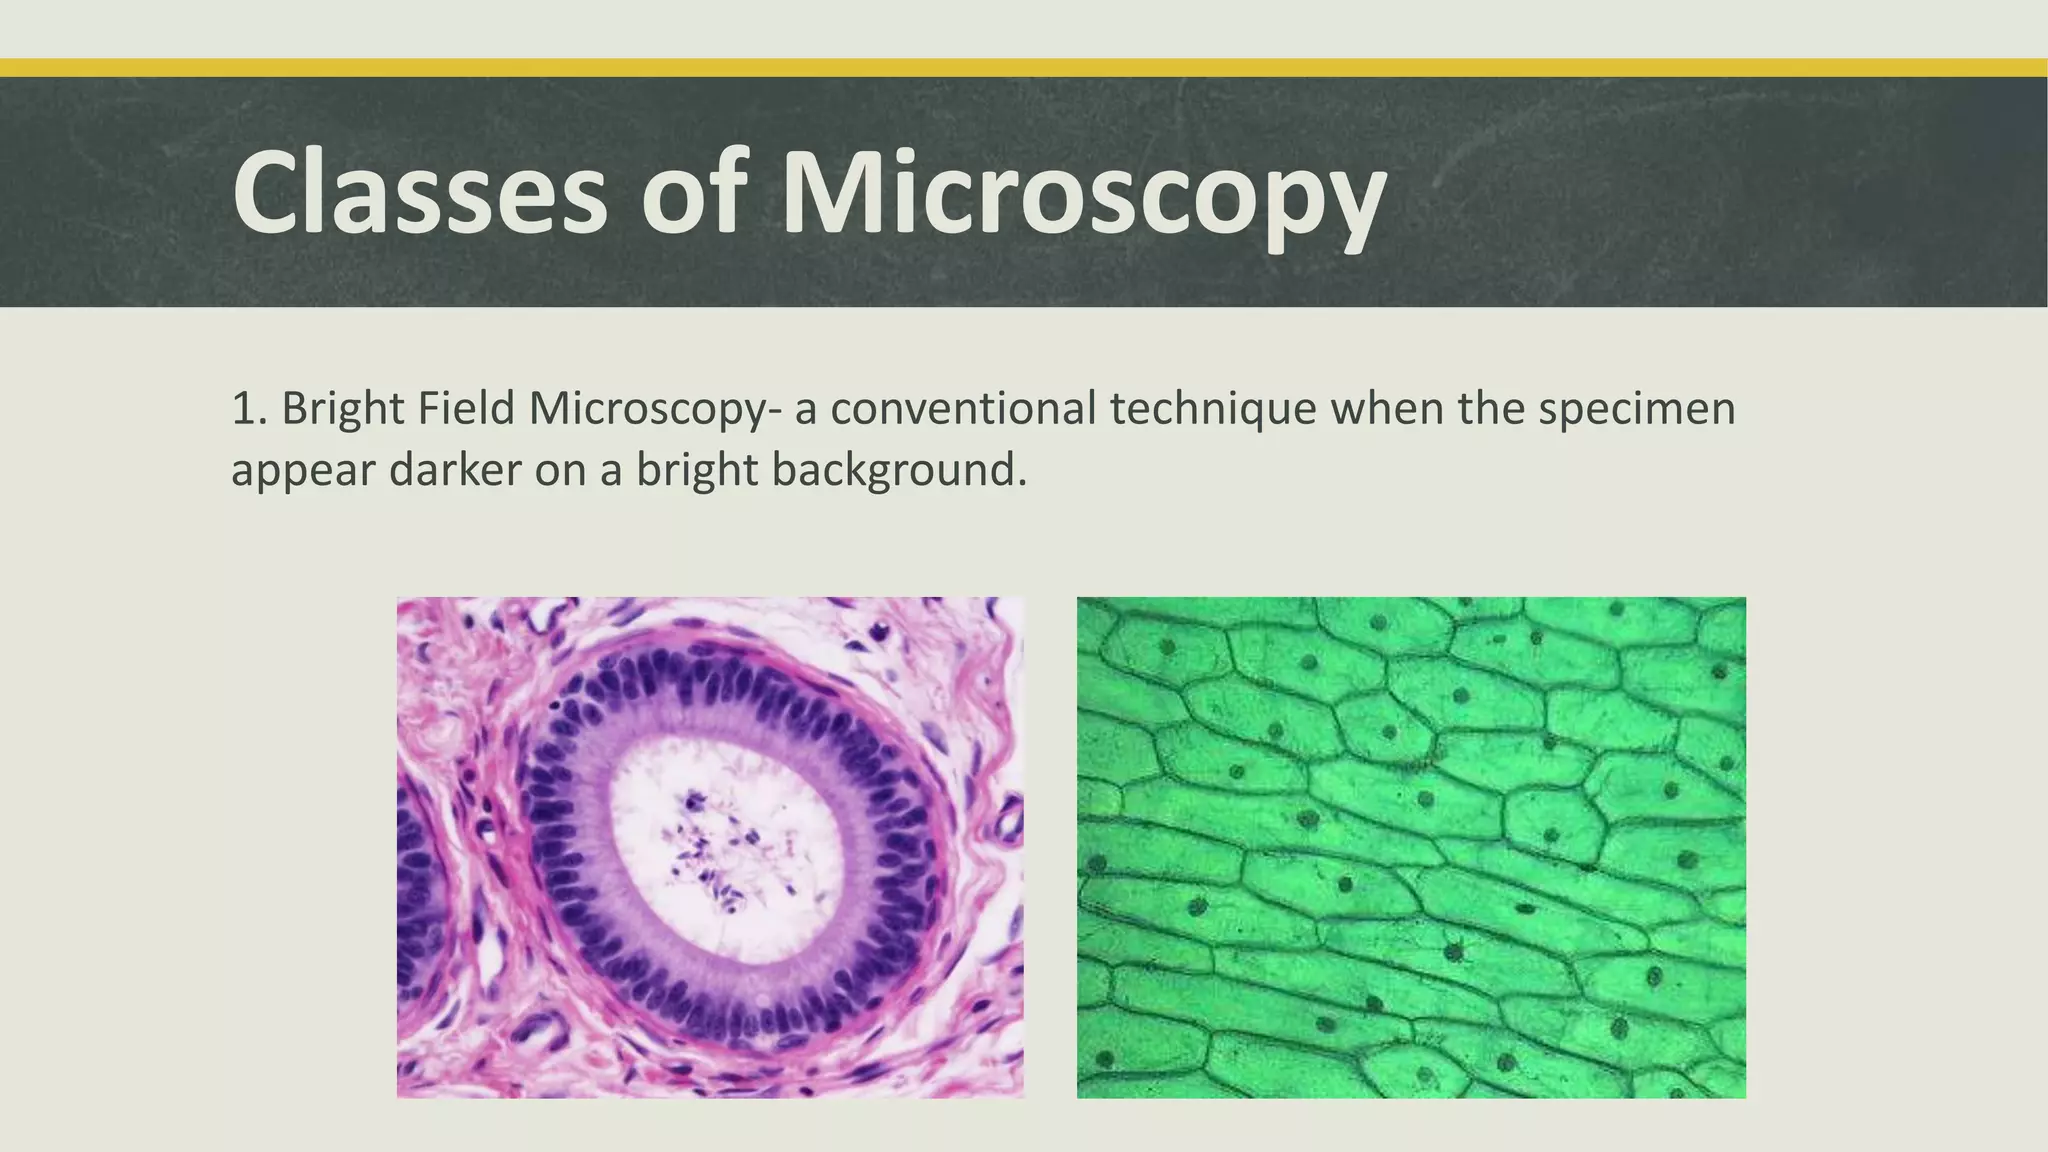
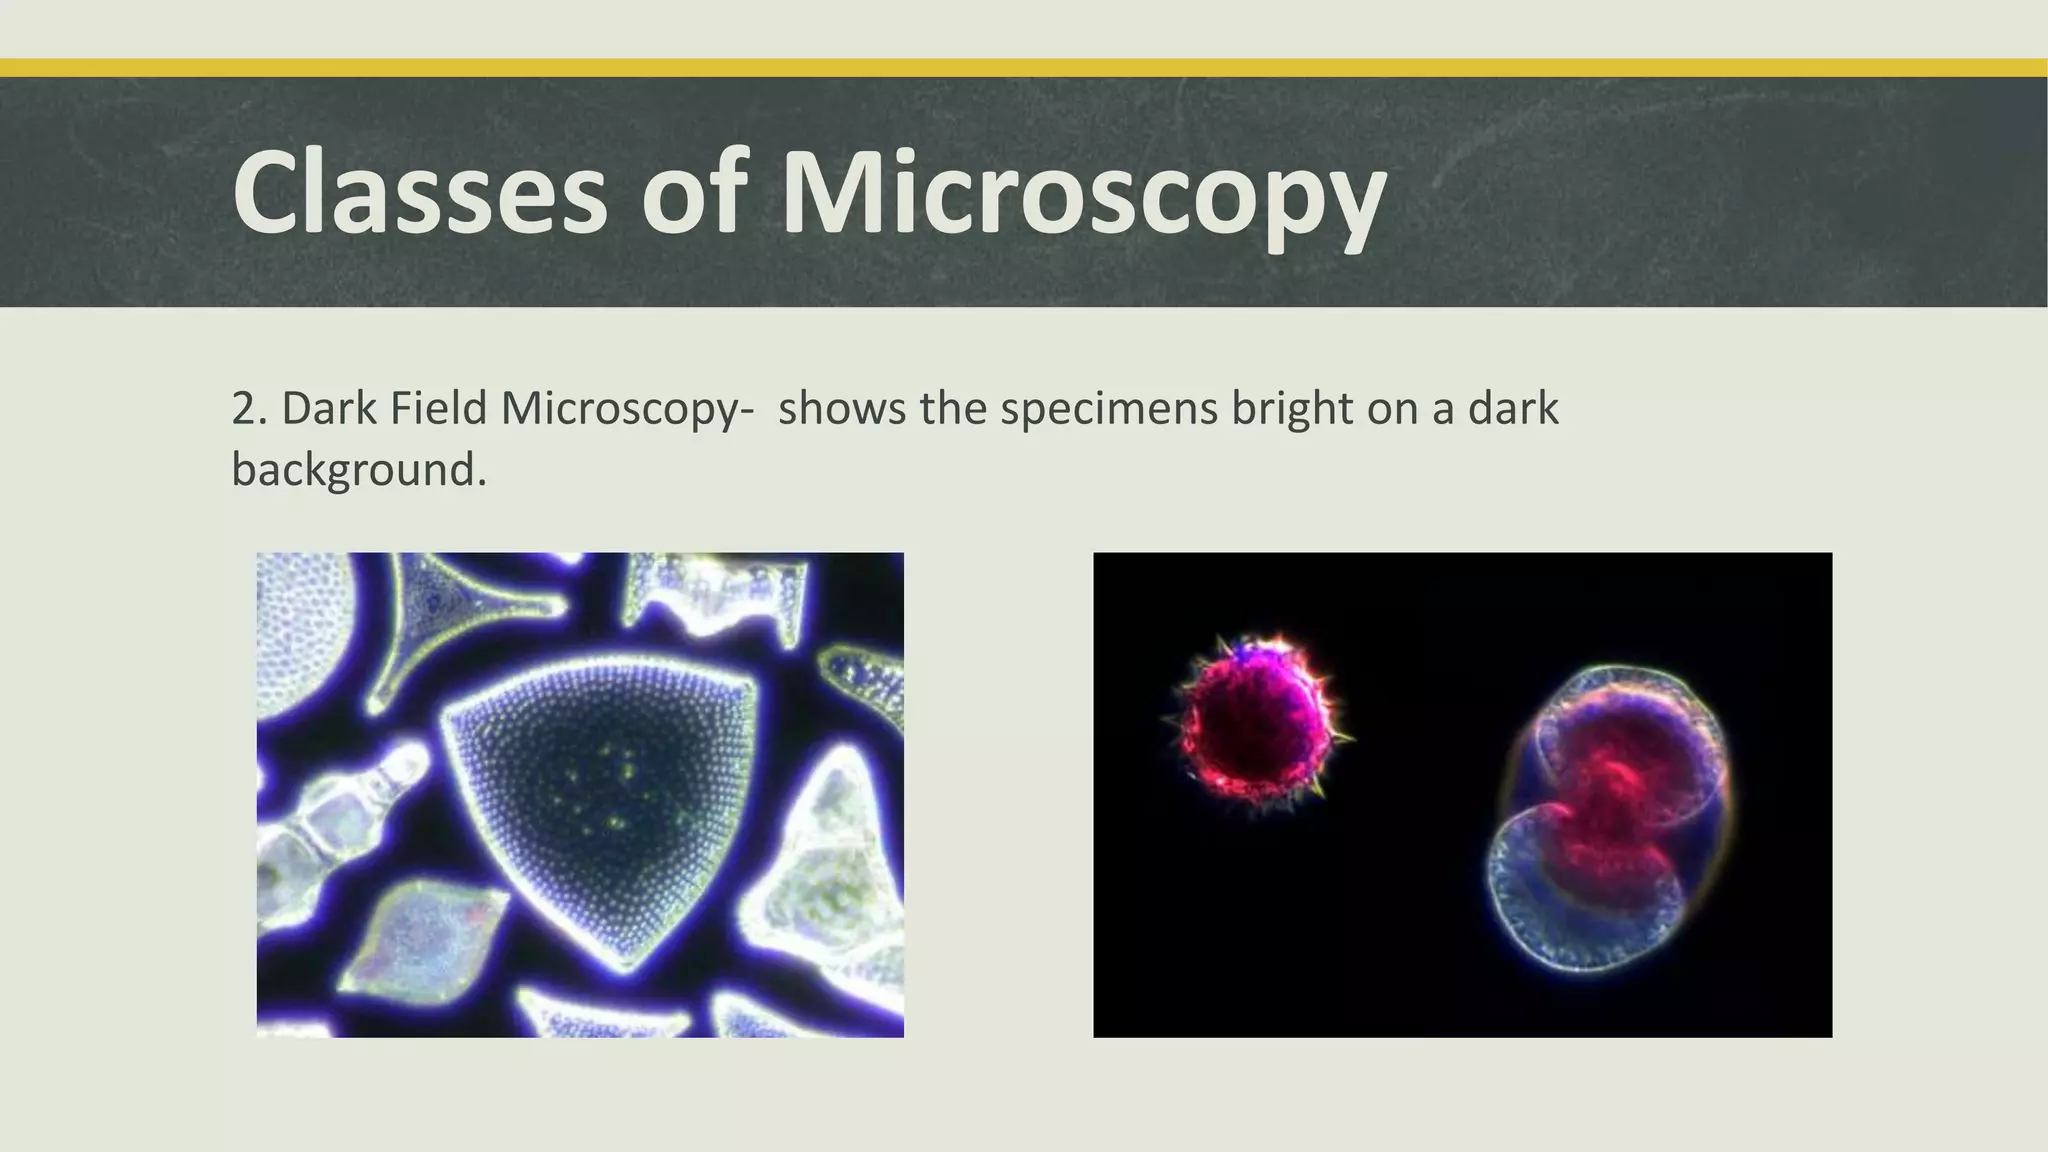
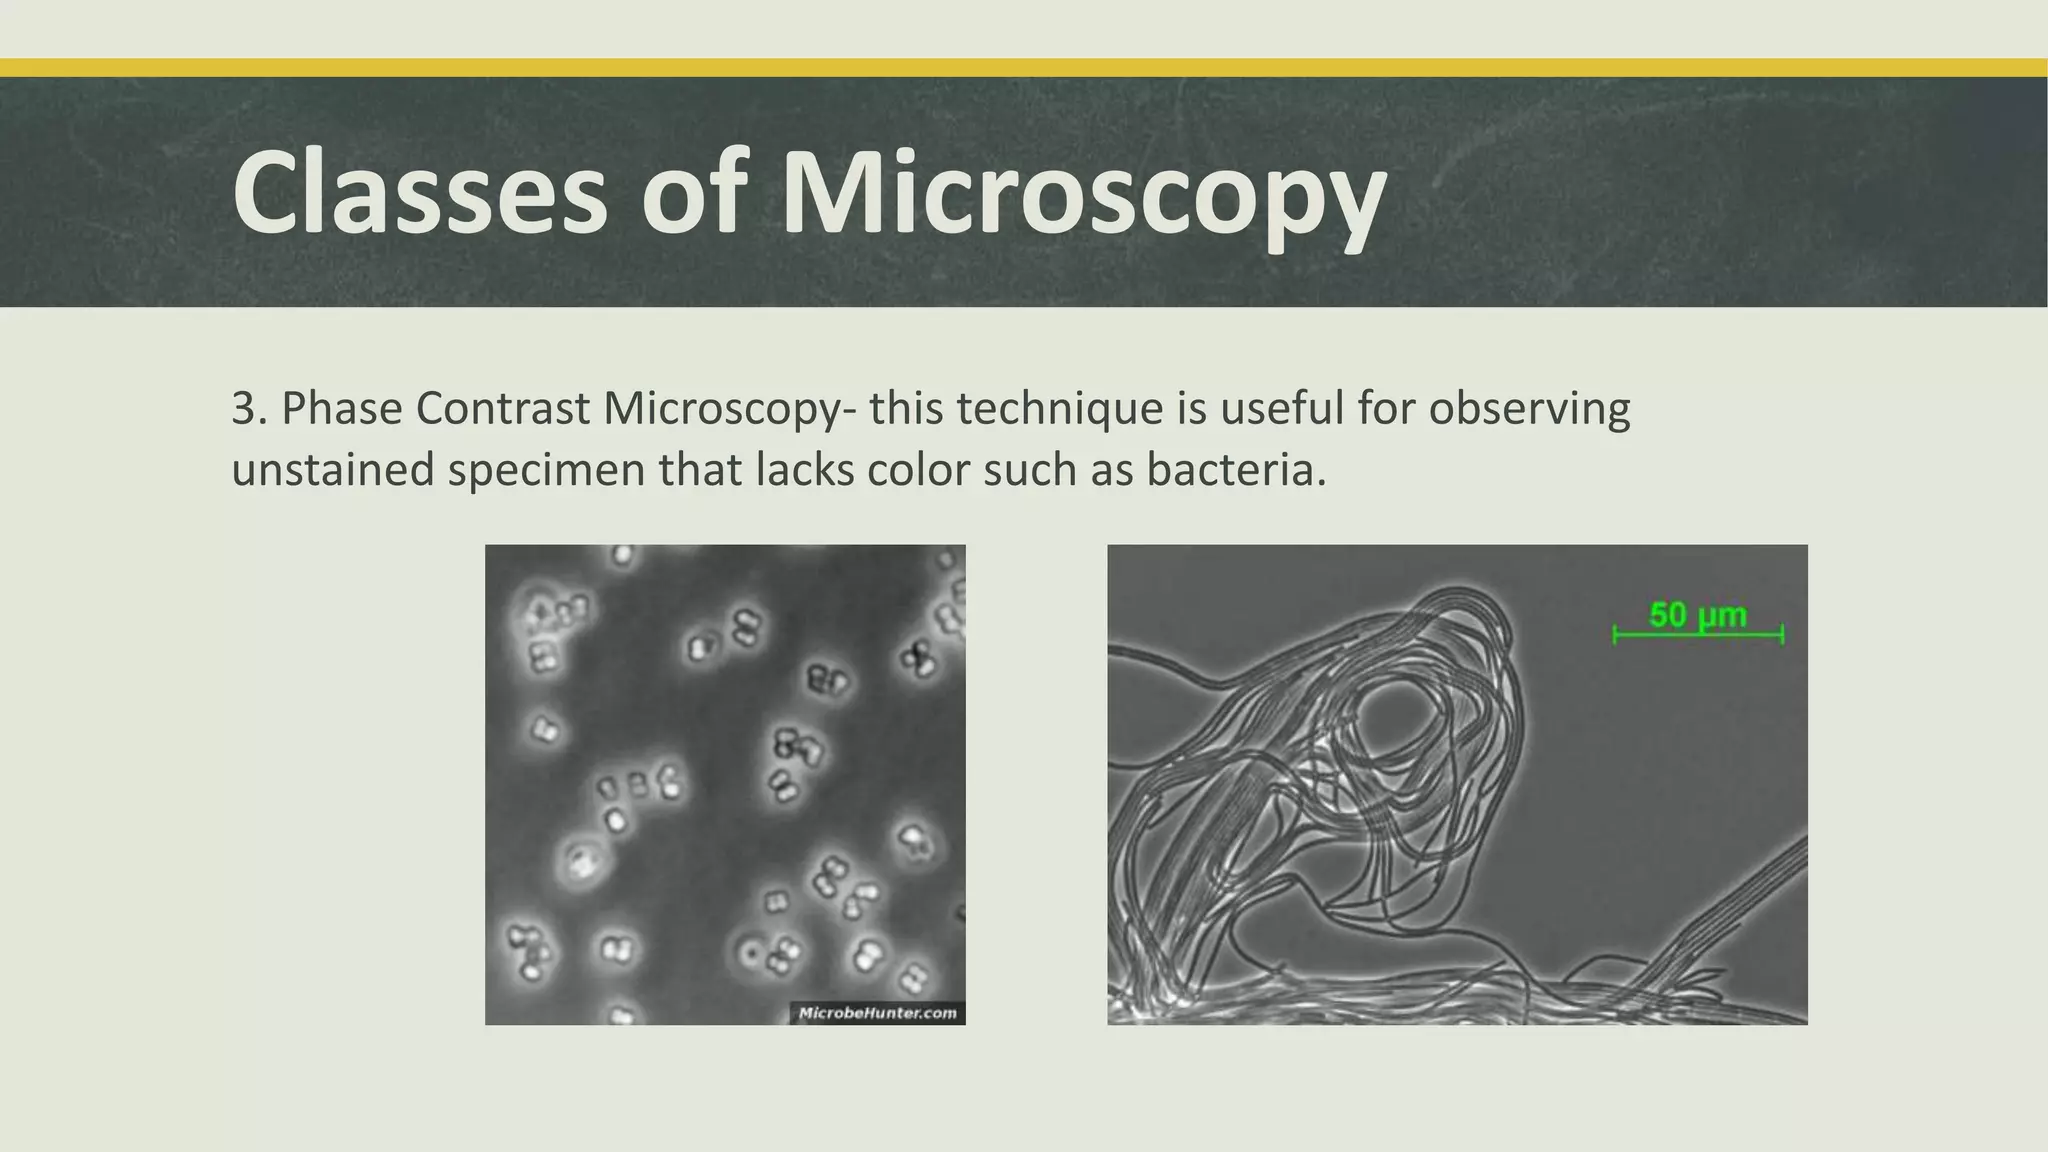
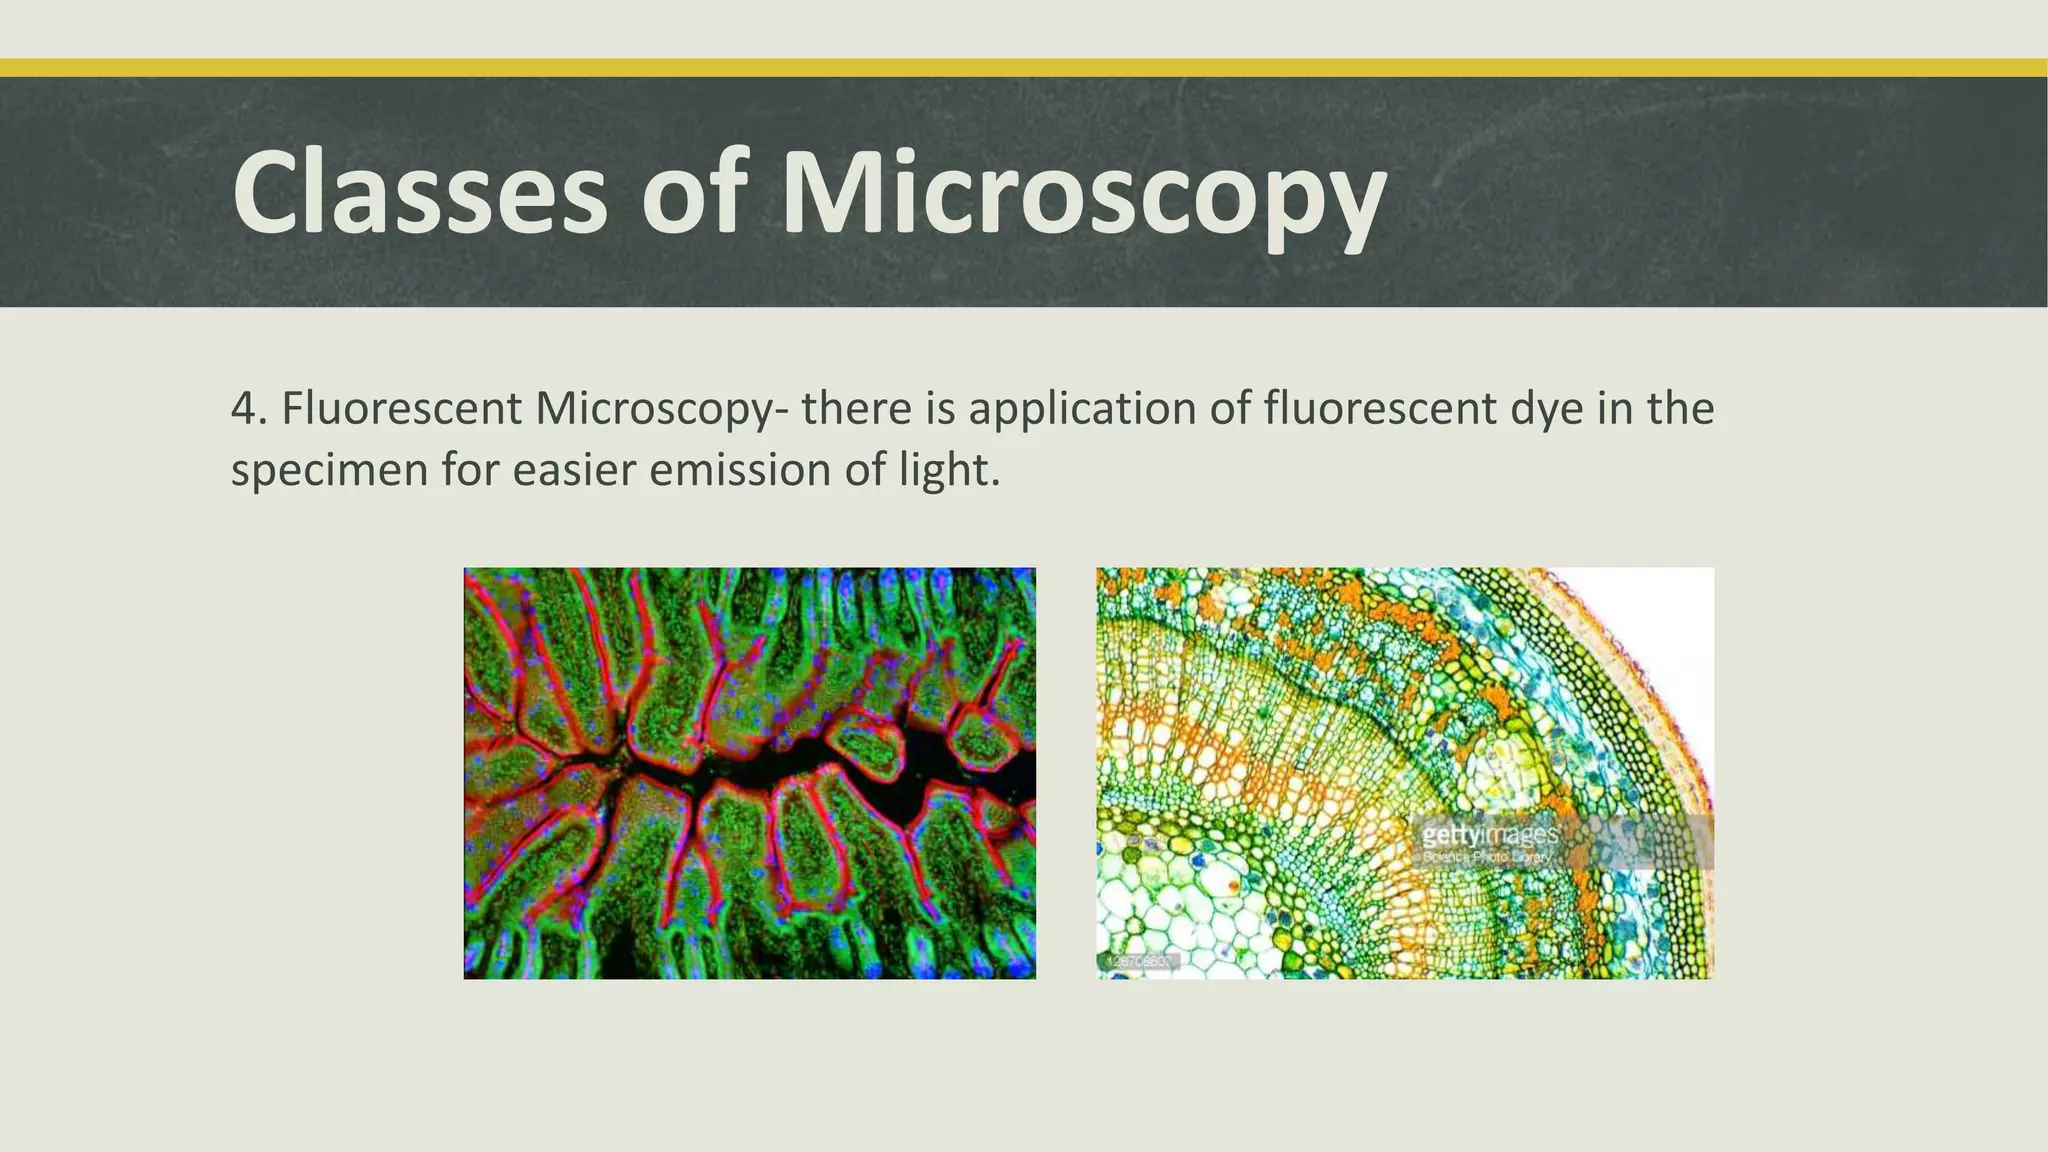
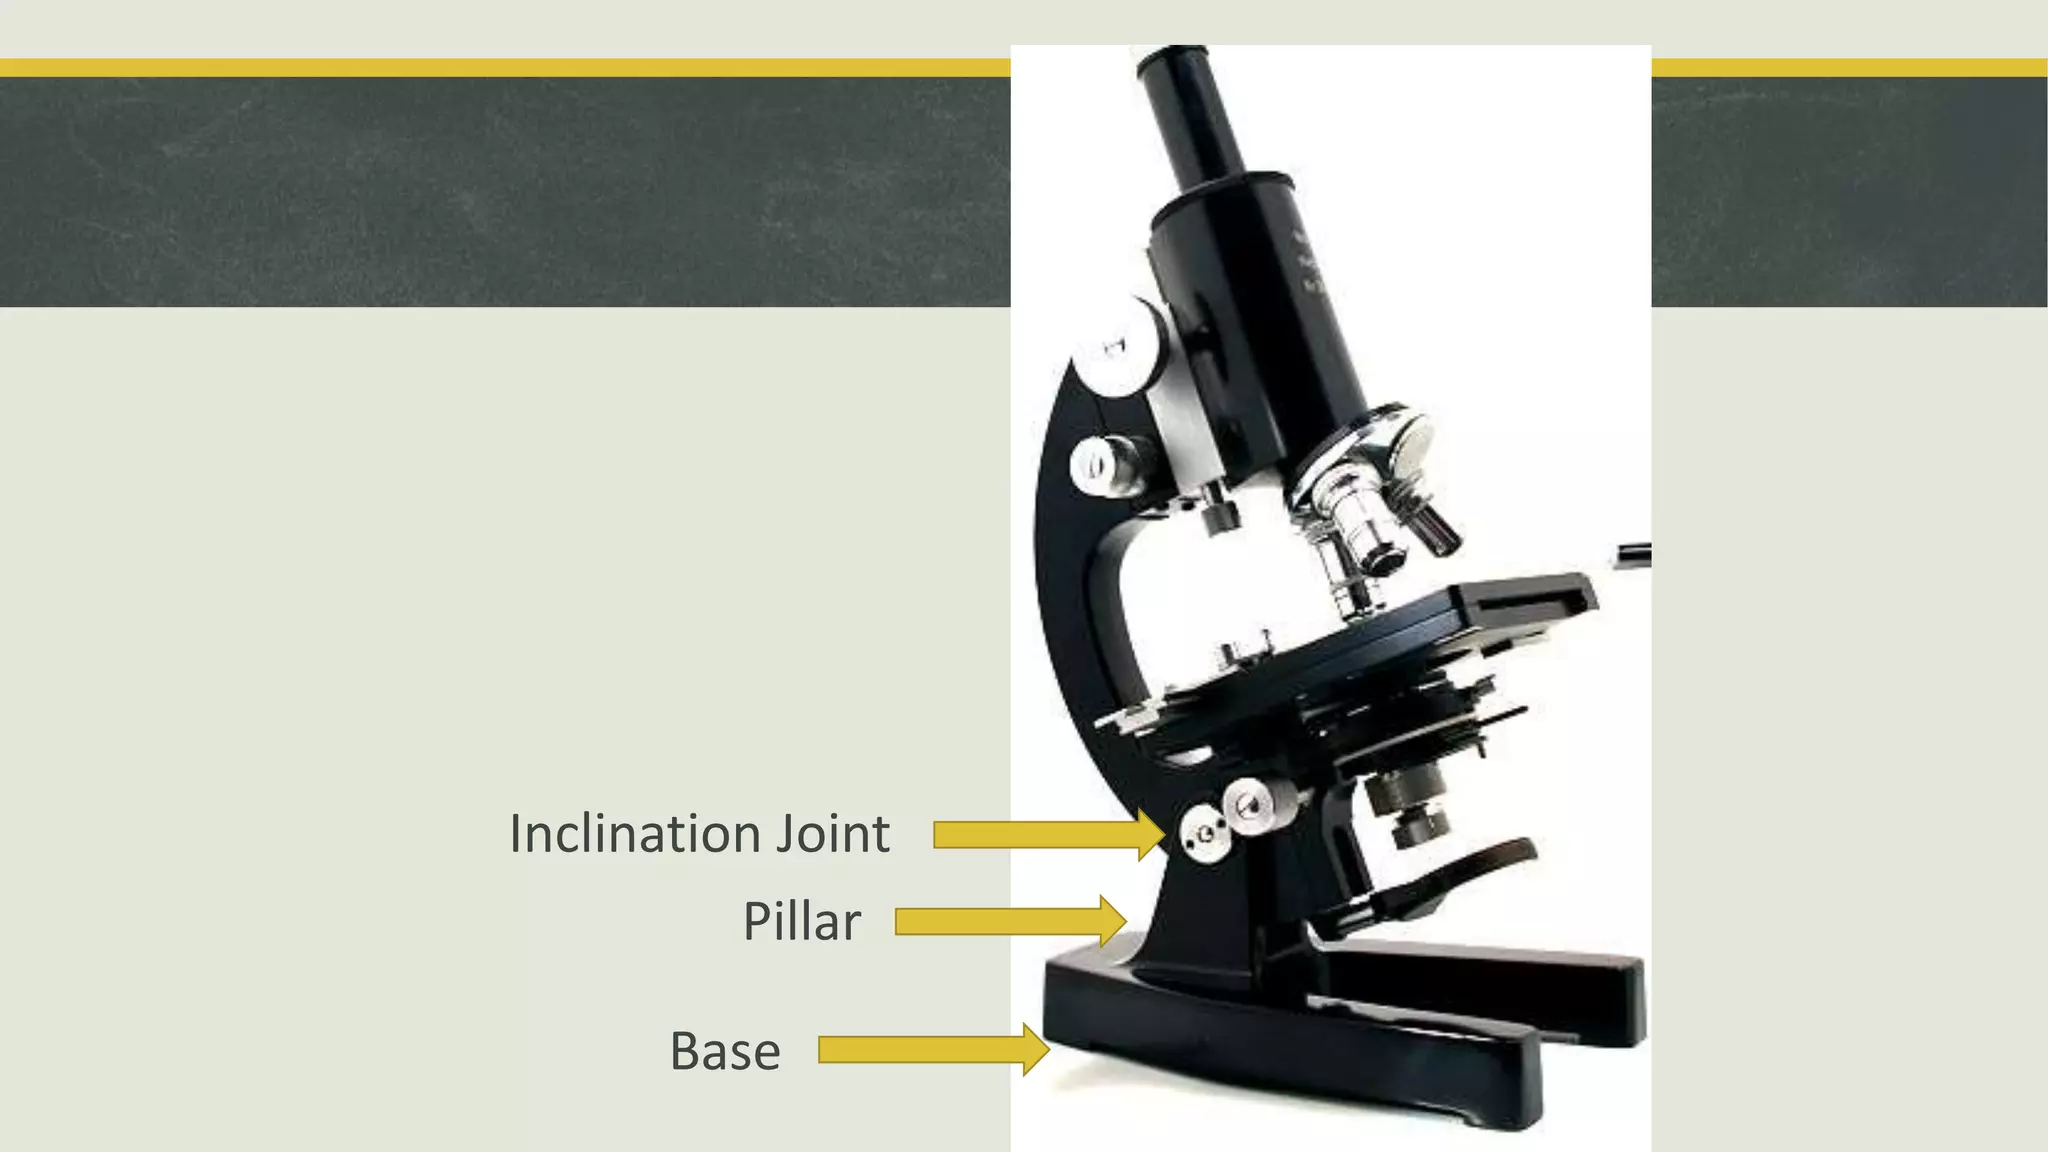
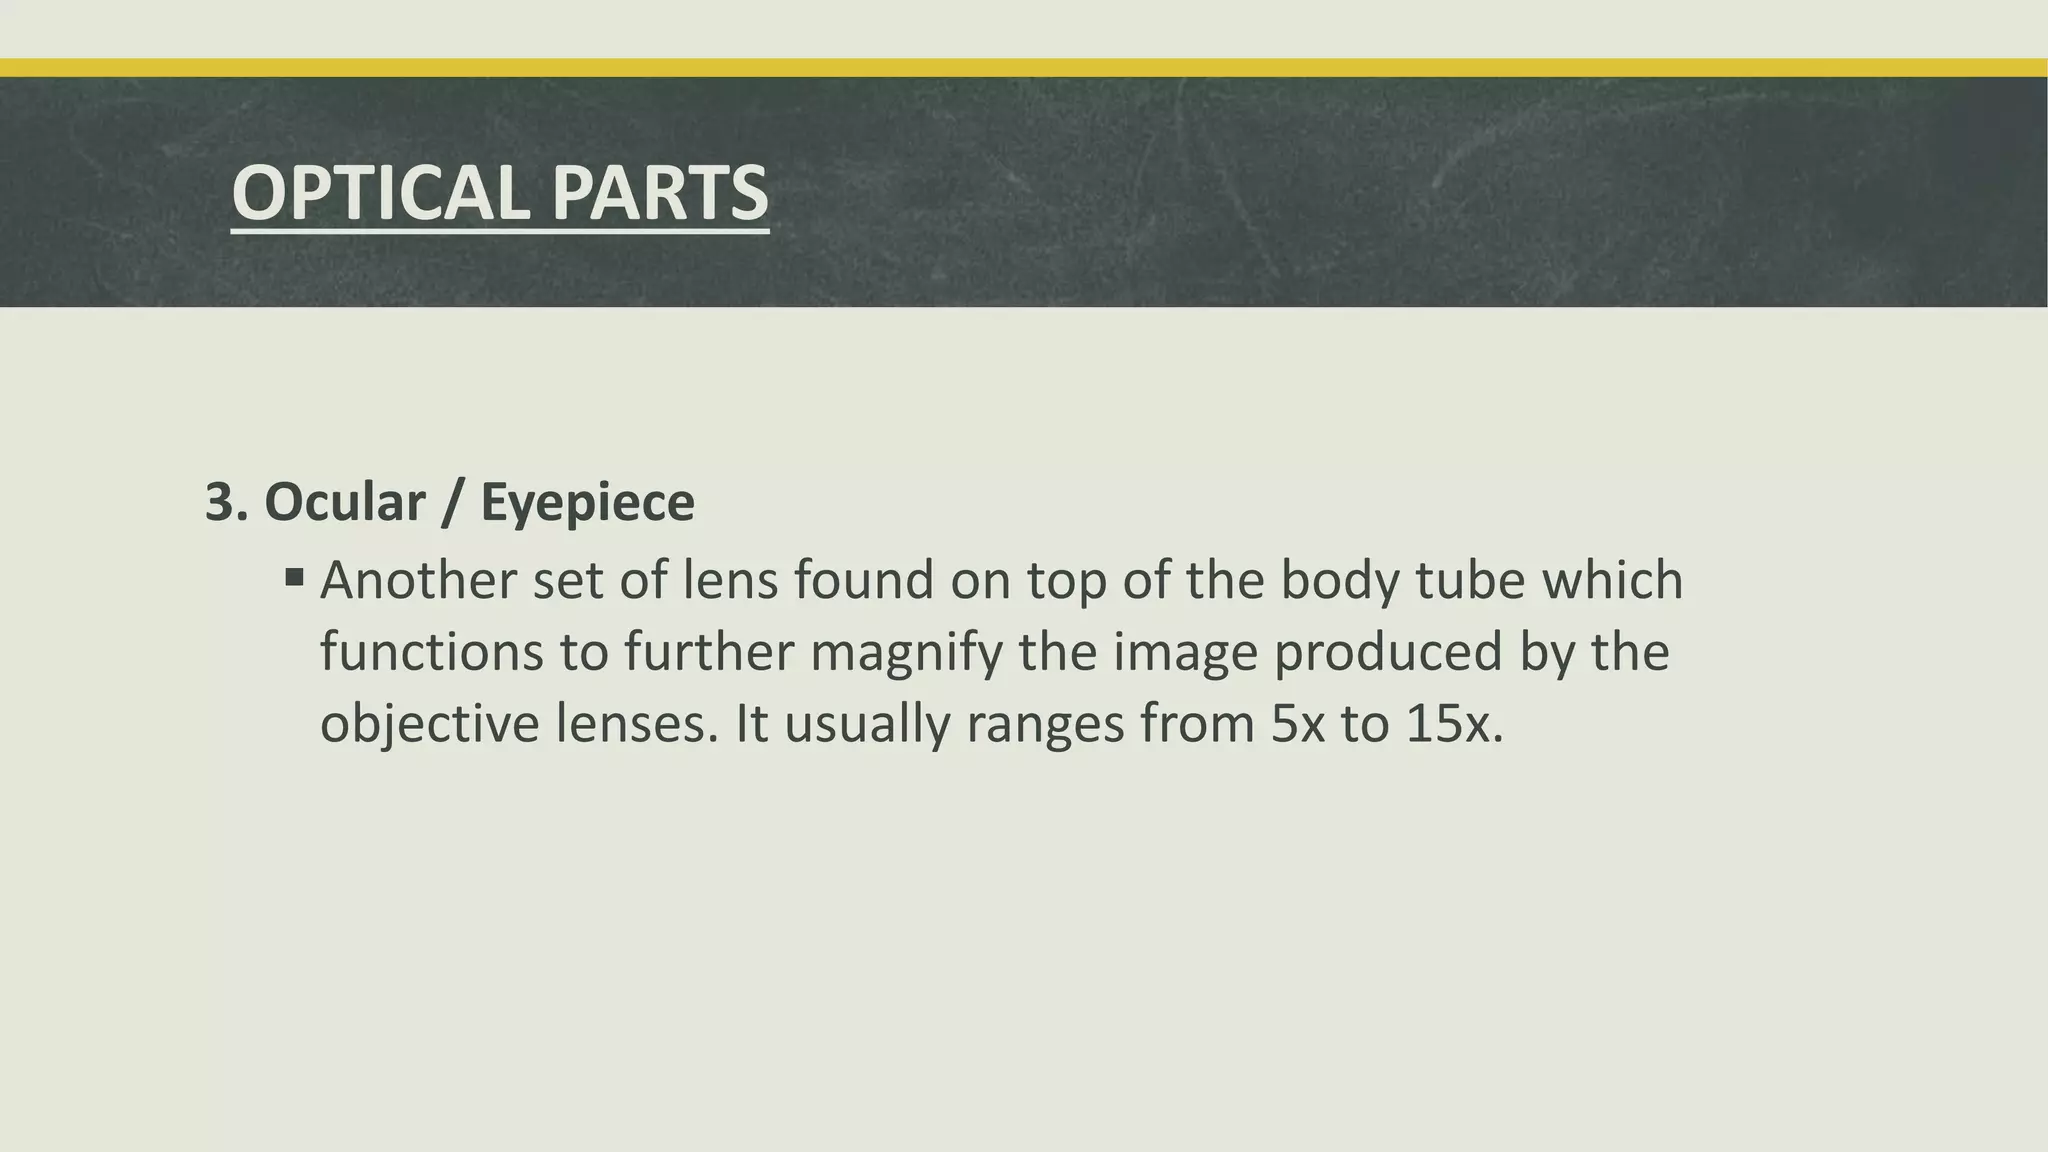
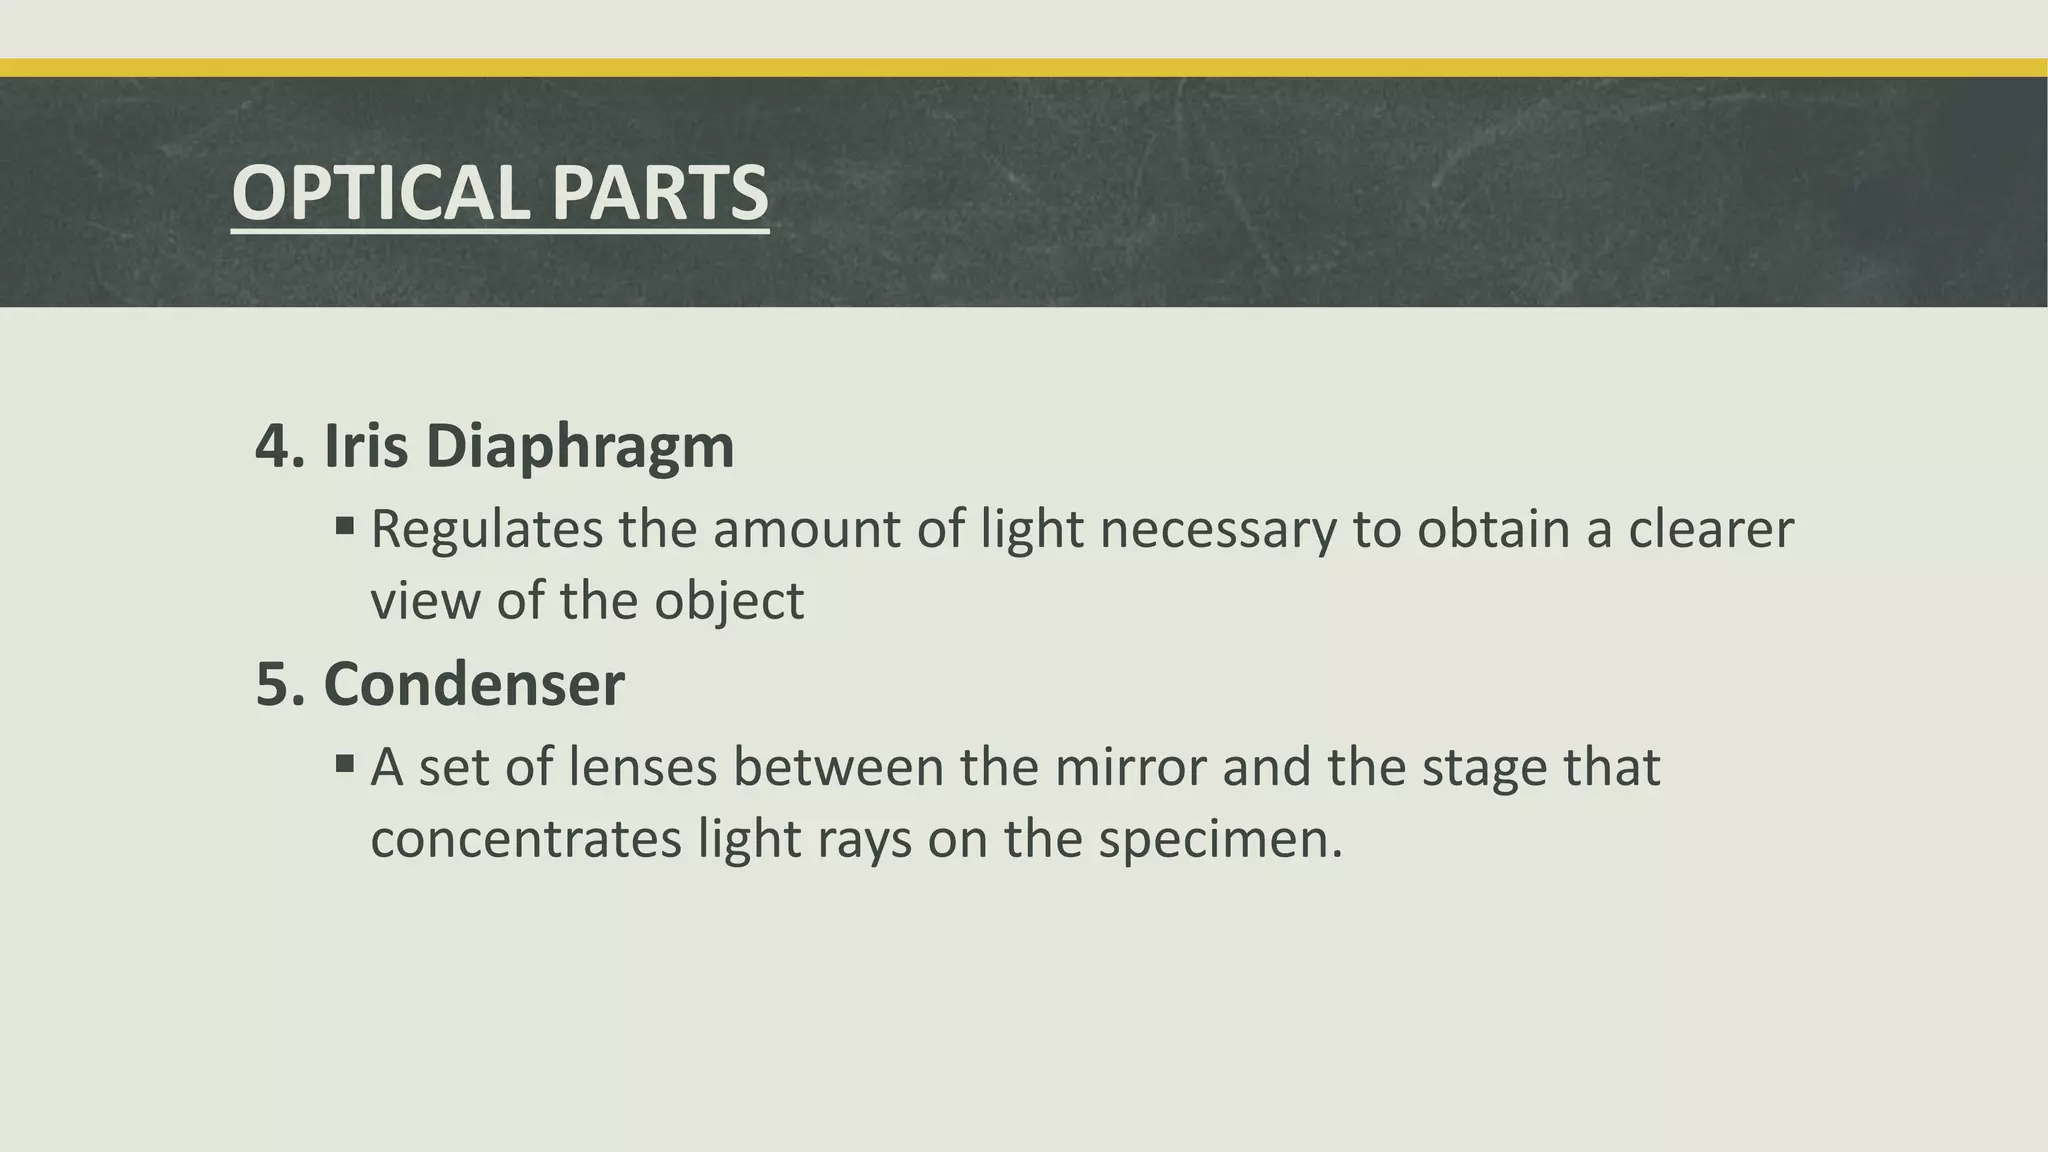
Microscopy
Biological Technique
Microscopy
 According to MW, it is the use of or investigation with a
microscope.
 A technical field of using microscopes to view objects and
objects that cannot be seen with the naked eye.
 Of all the techniques used in biology it is probably the
most important.
History of Microscope
Timeline
~1000 AD- the first vision aid, called a reading stone, is invented.
~1284- Salvino D’Armate is credited with inventing the first wearable
eye glasses.
1590- Zacharias Janssen and his son Hans place multiple lenses in a
tube. This is a forerunner of the compound microscope and the
telescope.
1609- Galileo Galilei develops a compound microscope with a convex
and concave lens.
History of Microscope
1625- Giovanni Faber coins the name “microscope” for Galileo
Galilei’s compound microscope.
1665- Robert Hooke published ‘Micrographia’ in which he coins the
term “cell” when describing tissue.
1676- Antonie van Leeuwenhoek builds a simple microscope with one
lens to examine blood, yeast and insects.
1931- Ernst Ruska design and build the first Transmission Electron
Microscope (TEM).
1935- Max Knoll builds the first Scanning Electron Microscope (SEM).
History of Microscope
1957- Marvin Minsky patented the Confocal Microscope.
1978- Thomas and Christoph Cremer developed the first practical Confocal
Laser Scanning Microscope (CLSM).
1981- Gerd Binnig and Heinrich Rohrer developed the Scanning Tunneling
Microscope (STM).
1986- Marked by the invention of Atomic Force Microscope (AFM) by Gerd
Binnig, Heinrich Rohrer and Calvin Quate.
2014- Nobel Prize in Chemistry awarded to Eric Betzig, Stefan Hell and
William Moemer for microscope to now see matter smaller than 0.2
micrometers/ nanodimentional. Sometimes called the Super-resolution
Microscope.
Kinds of Microscope
1. Simple Microscopes- magnify an object directly using single lens.
2. Compound Microscopes- magnify an object using a set of lenses or a system of
lenses, show the objects in their reverse position.
Branches of Microscopy
1. Optical/ Light Microscopy- involves passing visible light transmitted
through or reflected from the sample through a single or multiple lenses
to allow a magnified view of the sample.
2. Electron Microscopy- the use of an electron beam with a far smaller
wavelength in order to gain higher resolution.
3. Scanning Probe Microscopy- this is a sub-diffraction technique when
there is physical contact of a solid probe tip to scan the surface of an
object, which is supposed to be almost flat.
Types of Microscope
1. Simple Magnifying Lens- the simplest light microscope usually hand held and
magnify object as it is. Usually useful for field work.
2. Simple Compound Microscope- magnify object but it has no light condenser
attached beneath the stage as compared to Complex Compound Microscope.
Types of Microscope
3. Complex Compound Microscope- combines objective, eyepiece lenses and light
condenser lens to magnify the image of small objects.
4. Stereo/Dissecting Microscope- combines two objective lenses and two eyepiece
lenses to view an object resulting to three-dimensional images of the object.
Types of Microscope
5. Fluorescence Microscope- uses fluorescence and phosphorescence lights to view
samples and determine their properties.
a. Ultraviolet Microscope- UV caused microscope stains to fluoresce
Types of Microscope
6. Electron Microscope- one of the most sophisticated types of microscopes with
highest magnification (10,000x – 2,000,000x), used to illuminate the smallest
particles which passed through magnetic field onto a photographic film.
a. Transmission Electron Microscope (TEM)- has higher resolution than of SEM
which is less than 1 nm because the electrons are directly pointed toward the
sample then lot of characteristics of the specimen can be seen.
Types of Microscope
b. Scanning Electron Microscope (SEM)- has lower resolution compared to TEM
used to view images that require tens of nm at most, scattered electrons produced
the image of the specimen after the collection and counting of it.
Types of Microscope
7. Scanning-Tunnelling Microscope- an instrument for imaging surfaces at the
atomic level with good resolution of about 0.1 nm lateral resolution and 0.01 nm
depth resolution.
Types of Microscope
8. Digital Microscope- has a digital camera attached to it and connected to a
computer screen to view the object directly. Has the advantage of taking the
picture of the object.
Types of Microscope
9. Digital Imager Microscope- a digital video capturing microscope mounted on
compound microscope and connected with USB or AV cable to record the activities
of mobile specimen.
Classes of Microscopy
1. Bright Field Microscopy- a conventional technique when the specimen
appear darker on a bright background.
Classes of Microscopy
2. Dark Field Microscopy- shows the specimens bright on a dark
background.
Classes of Microscopy
3. Phase Contrast Microscopy- this technique is useful for observing
unstained specimen that lacks color such as bacteria.
Classes of Microscopy
4. Fluorescent Microscopy- there is application of fluorescent dye in the
specimen for easier emission of light.
Classes of Microscopy
5. Oil Immersion Microscopy- a technique used to increase the resolving
power of a microscope by immersing the objective lens and the specimen in
a transparent oil of high refractive index. Essential for viewing individual
bacteria and other details of fixed specimens.
Parts and Functions of a Modern Microscope
Division of Parts:
1. Mechanical Parts
 Used to support and adjust the parts
2. Magnifying/Optical Parts
 Used to enlarge the specimen
Mechanical Parts
1. Base
 Bottom most portion that supports the entire/lower
microscope. Can be Y-shaped or U-shaped foot.
2. Pillar
 Part above the base that supports the other parts
3. Inclination Joint
 Allows for tilting of the microscope for convenience of the
user
Base
Pillar
Inclination Joint
4. Arm/Neck
 Curved/slanted part which is held while carrying the microscope
5. Stage
 Platform where object to be examined is placed
6. Stage Clips
 Secures the specimen to the stage
Mechanical Parts
7. Body Tube
Attached to the arm and bears the lenses
8. Draw Tube
Cylindrical structure on top of the body tube that
holds the ocular lenses
Mechanical Parts
Draw Tube
Stage
Body Tube
Arm / Neck
9. Revolving/Rotating Nosepiece
Rotating disc where the objectives are attached
10. Dust Shield
Lies at the top of the nosepiece and keeps dust
from settling on the objectives
Mechanical Parts
Dust Shield
Revolving
Nosepiece
11. Coarse Adjustment Knob
Geared to the body tube which elevates or lowers when
rotated bringing the object into approximate focus
12. Fine Adjustment Knob
A smaller knob for delicate focusing bringing the object
into perfect focus
Mechanical Parts
Coarse Adjustment Knob
Fine Adjustment Knob
13. Condenser Adjustment Knob
Elevates and lowers the condenser to regulate the
intensity of light
14. Iris Diaphragm Lever
Lever in front of the condenser and which is moved
horizontally to open/close the diaphragm
15. Mirror Holder
Used to hold the mirror in position
Mechanical Parts
Condenser Adjustment Knob
Iris Diaphragm Lever
Mirror Holder
OPTICAL PARTS
1. Mirror
Located beneath the stage and has concave and
plane surfaces to gather and direct light in order to
illuminate the object
2. Electric Lamp
A built-in illuminator beneath the stage that may be
used if sunlight is not preferred or is not available
Mirror / Electric Lamp
3. Ocular / Eyepiece
 Another set of lens found on top of the body tube which
functions to further magnify the image produced by the
objective lenses. It usually ranges from 5x to 15x.
OPTICAL PARTS
Ocular
4. Iris Diaphragm
 Regulates the amount of light necessary to obtain a clearer
view of the object
5. Condenser
 A set of lenses between the mirror and the stage that
concentrates light rays on the specimen.
OPTICAL PARTS
Iris
Diaphragm
Condenser
6. Objectives
 Metal cylinders attached below the nosepiece and contains especially ground and
polished lenses
1. Scanning Objective
 Gives the lowest magnification, usually 4x
Getting an overview of the specimen
2. LPO / Low Power Objective
 Gives the lower magnification, usually 10x
3. HPO / High Power Objective
 Gives higher magnification, usually 40x
4. OIO / Oil Immersion Objective
 Gives the highest magnification, usually 100x, and is used wet either with
cedar wood oil or synthetic oil
 Getting into the details of the specimen
OPTICAL PARTS
MAGNIFICATION POWER
MP = Magnification of Objective x Magnification of Eyepiece
Objectives
Operating, Handling and Care of the Microscope
1. Always carry your microscope with one hand on the Arm and one hand on the Base, and close to
your body.
2. Plug the microscope in and place excess wire on the table.
3. Always start and end focusing with low power Objectives lens
4. Use only the Fine adjustment knob when using the HPO.
5. Adjust the Diaphragm as you look through the Eyepiece, and you will see that more detail is visible
when you allow in less light.
6. Always make sure the stage and lenses are clean before you put away the microscope.
7. Always use good quality lens tissue to clean before you put away the microscope.
8. Always cover your microscope with a dust jacket/put in box when not in use.
Any Question?

Chapter 1 Microscopy

  • 1.
  • 2.
    Microscopy  According toMW, it is the use of or investigation with a microscope.  A technical field of using microscopes to view objects and objects that cannot be seen with the naked eye.  Of all the techniques used in biology it is probably the most important.
  • 3.
    History of Microscope Timeline ~1000AD- the first vision aid, called a reading stone, is invented. ~1284- Salvino D’Armate is credited with inventing the first wearable eye glasses. 1590- Zacharias Janssen and his son Hans place multiple lenses in a tube. This is a forerunner of the compound microscope and the telescope. 1609- Galileo Galilei develops a compound microscope with a convex and concave lens.
  • 4.
    History of Microscope 1625-Giovanni Faber coins the name “microscope” for Galileo Galilei’s compound microscope. 1665- Robert Hooke published ‘Micrographia’ in which he coins the term “cell” when describing tissue. 1676- Antonie van Leeuwenhoek builds a simple microscope with one lens to examine blood, yeast and insects. 1931- Ernst Ruska design and build the first Transmission Electron Microscope (TEM). 1935- Max Knoll builds the first Scanning Electron Microscope (SEM).
  • 5.
    History of Microscope 1957-Marvin Minsky patented the Confocal Microscope. 1978- Thomas and Christoph Cremer developed the first practical Confocal Laser Scanning Microscope (CLSM). 1981- Gerd Binnig and Heinrich Rohrer developed the Scanning Tunneling Microscope (STM). 1986- Marked by the invention of Atomic Force Microscope (AFM) by Gerd Binnig, Heinrich Rohrer and Calvin Quate. 2014- Nobel Prize in Chemistry awarded to Eric Betzig, Stefan Hell and William Moemer for microscope to now see matter smaller than 0.2 micrometers/ nanodimentional. Sometimes called the Super-resolution Microscope.
  • 6.
    Kinds of Microscope 1.Simple Microscopes- magnify an object directly using single lens. 2. Compound Microscopes- magnify an object using a set of lenses or a system of lenses, show the objects in their reverse position.
  • 7.
    Branches of Microscopy 1.Optical/ Light Microscopy- involves passing visible light transmitted through or reflected from the sample through a single or multiple lenses to allow a magnified view of the sample. 2. Electron Microscopy- the use of an electron beam with a far smaller wavelength in order to gain higher resolution. 3. Scanning Probe Microscopy- this is a sub-diffraction technique when there is physical contact of a solid probe tip to scan the surface of an object, which is supposed to be almost flat.
  • 8.
    Types of Microscope 1.Simple Magnifying Lens- the simplest light microscope usually hand held and magnify object as it is. Usually useful for field work. 2. Simple Compound Microscope- magnify object but it has no light condenser attached beneath the stage as compared to Complex Compound Microscope.
  • 9.
    Types of Microscope 3.Complex Compound Microscope- combines objective, eyepiece lenses and light condenser lens to magnify the image of small objects. 4. Stereo/Dissecting Microscope- combines two objective lenses and two eyepiece lenses to view an object resulting to three-dimensional images of the object.
  • 10.
    Types of Microscope 5.Fluorescence Microscope- uses fluorescence and phosphorescence lights to view samples and determine their properties. a. Ultraviolet Microscope- UV caused microscope stains to fluoresce
  • 11.
    Types of Microscope 6.Electron Microscope- one of the most sophisticated types of microscopes with highest magnification (10,000x – 2,000,000x), used to illuminate the smallest particles which passed through magnetic field onto a photographic film. a. Transmission Electron Microscope (TEM)- has higher resolution than of SEM which is less than 1 nm because the electrons are directly pointed toward the sample then lot of characteristics of the specimen can be seen.
  • 12.
    Types of Microscope b.Scanning Electron Microscope (SEM)- has lower resolution compared to TEM used to view images that require tens of nm at most, scattered electrons produced the image of the specimen after the collection and counting of it.
  • 13.
    Types of Microscope 7.Scanning-Tunnelling Microscope- an instrument for imaging surfaces at the atomic level with good resolution of about 0.1 nm lateral resolution and 0.01 nm depth resolution.
  • 14.
    Types of Microscope 8.Digital Microscope- has a digital camera attached to it and connected to a computer screen to view the object directly. Has the advantage of taking the picture of the object.
  • 15.
    Types of Microscope 9.Digital Imager Microscope- a digital video capturing microscope mounted on compound microscope and connected with USB or AV cable to record the activities of mobile specimen.
  • 16.
    Classes of Microscopy 1.Bright Field Microscopy- a conventional technique when the specimen appear darker on a bright background.
  • 17.
    Classes of Microscopy 2.Dark Field Microscopy- shows the specimens bright on a dark background.
  • 18.
    Classes of Microscopy 3.Phase Contrast Microscopy- this technique is useful for observing unstained specimen that lacks color such as bacteria.
  • 19.
    Classes of Microscopy 4.Fluorescent Microscopy- there is application of fluorescent dye in the specimen for easier emission of light.
  • 20.
    Classes of Microscopy 5.Oil Immersion Microscopy- a technique used to increase the resolving power of a microscope by immersing the objective lens and the specimen in a transparent oil of high refractive index. Essential for viewing individual bacteria and other details of fixed specimens.
  • 21.
    Parts and Functionsof a Modern Microscope Division of Parts: 1. Mechanical Parts  Used to support and adjust the parts 2. Magnifying/Optical Parts  Used to enlarge the specimen
  • 22.
    Mechanical Parts 1. Base Bottom most portion that supports the entire/lower microscope. Can be Y-shaped or U-shaped foot. 2. Pillar  Part above the base that supports the other parts 3. Inclination Joint  Allows for tilting of the microscope for convenience of the user
  • 23.
  • 24.
    4. Arm/Neck  Curved/slantedpart which is held while carrying the microscope 5. Stage  Platform where object to be examined is placed 6. Stage Clips  Secures the specimen to the stage Mechanical Parts
  • 25.
    7. Body Tube Attachedto the arm and bears the lenses 8. Draw Tube Cylindrical structure on top of the body tube that holds the ocular lenses Mechanical Parts
  • 26.
  • 27.
    9. Revolving/Rotating Nosepiece Rotatingdisc where the objectives are attached 10. Dust Shield Lies at the top of the nosepiece and keeps dust from settling on the objectives Mechanical Parts
  • 28.
  • 29.
    11. Coarse AdjustmentKnob Geared to the body tube which elevates or lowers when rotated bringing the object into approximate focus 12. Fine Adjustment Knob A smaller knob for delicate focusing bringing the object into perfect focus Mechanical Parts
  • 30.
  • 31.
    13. Condenser AdjustmentKnob Elevates and lowers the condenser to regulate the intensity of light 14. Iris Diaphragm Lever Lever in front of the condenser and which is moved horizontally to open/close the diaphragm 15. Mirror Holder Used to hold the mirror in position Mechanical Parts
  • 32.
    Condenser Adjustment Knob IrisDiaphragm Lever Mirror Holder
  • 33.
    OPTICAL PARTS 1. Mirror Locatedbeneath the stage and has concave and plane surfaces to gather and direct light in order to illuminate the object 2. Electric Lamp A built-in illuminator beneath the stage that may be used if sunlight is not preferred or is not available
  • 34.
  • 35.
    3. Ocular /Eyepiece  Another set of lens found on top of the body tube which functions to further magnify the image produced by the objective lenses. It usually ranges from 5x to 15x. OPTICAL PARTS
  • 36.
  • 37.
    4. Iris Diaphragm Regulates the amount of light necessary to obtain a clearer view of the object 5. Condenser  A set of lenses between the mirror and the stage that concentrates light rays on the specimen. OPTICAL PARTS
  • 38.
  • 39.
    6. Objectives  Metalcylinders attached below the nosepiece and contains especially ground and polished lenses 1. Scanning Objective  Gives the lowest magnification, usually 4x Getting an overview of the specimen 2. LPO / Low Power Objective  Gives the lower magnification, usually 10x 3. HPO / High Power Objective  Gives higher magnification, usually 40x 4. OIO / Oil Immersion Objective  Gives the highest magnification, usually 100x, and is used wet either with cedar wood oil or synthetic oil  Getting into the details of the specimen OPTICAL PARTS
  • 40.
    MAGNIFICATION POWER MP =Magnification of Objective x Magnification of Eyepiece
  • 41.
  • 42.
    Operating, Handling andCare of the Microscope 1. Always carry your microscope with one hand on the Arm and one hand on the Base, and close to your body. 2. Plug the microscope in and place excess wire on the table. 3. Always start and end focusing with low power Objectives lens 4. Use only the Fine adjustment knob when using the HPO. 5. Adjust the Diaphragm as you look through the Eyepiece, and you will see that more detail is visible when you allow in less light. 6. Always make sure the stage and lenses are clean before you put away the microscope. 7. Always use good quality lens tissue to clean before you put away the microscope. 8. Always cover your microscope with a dust jacket/put in box when not in use.
  • 43.