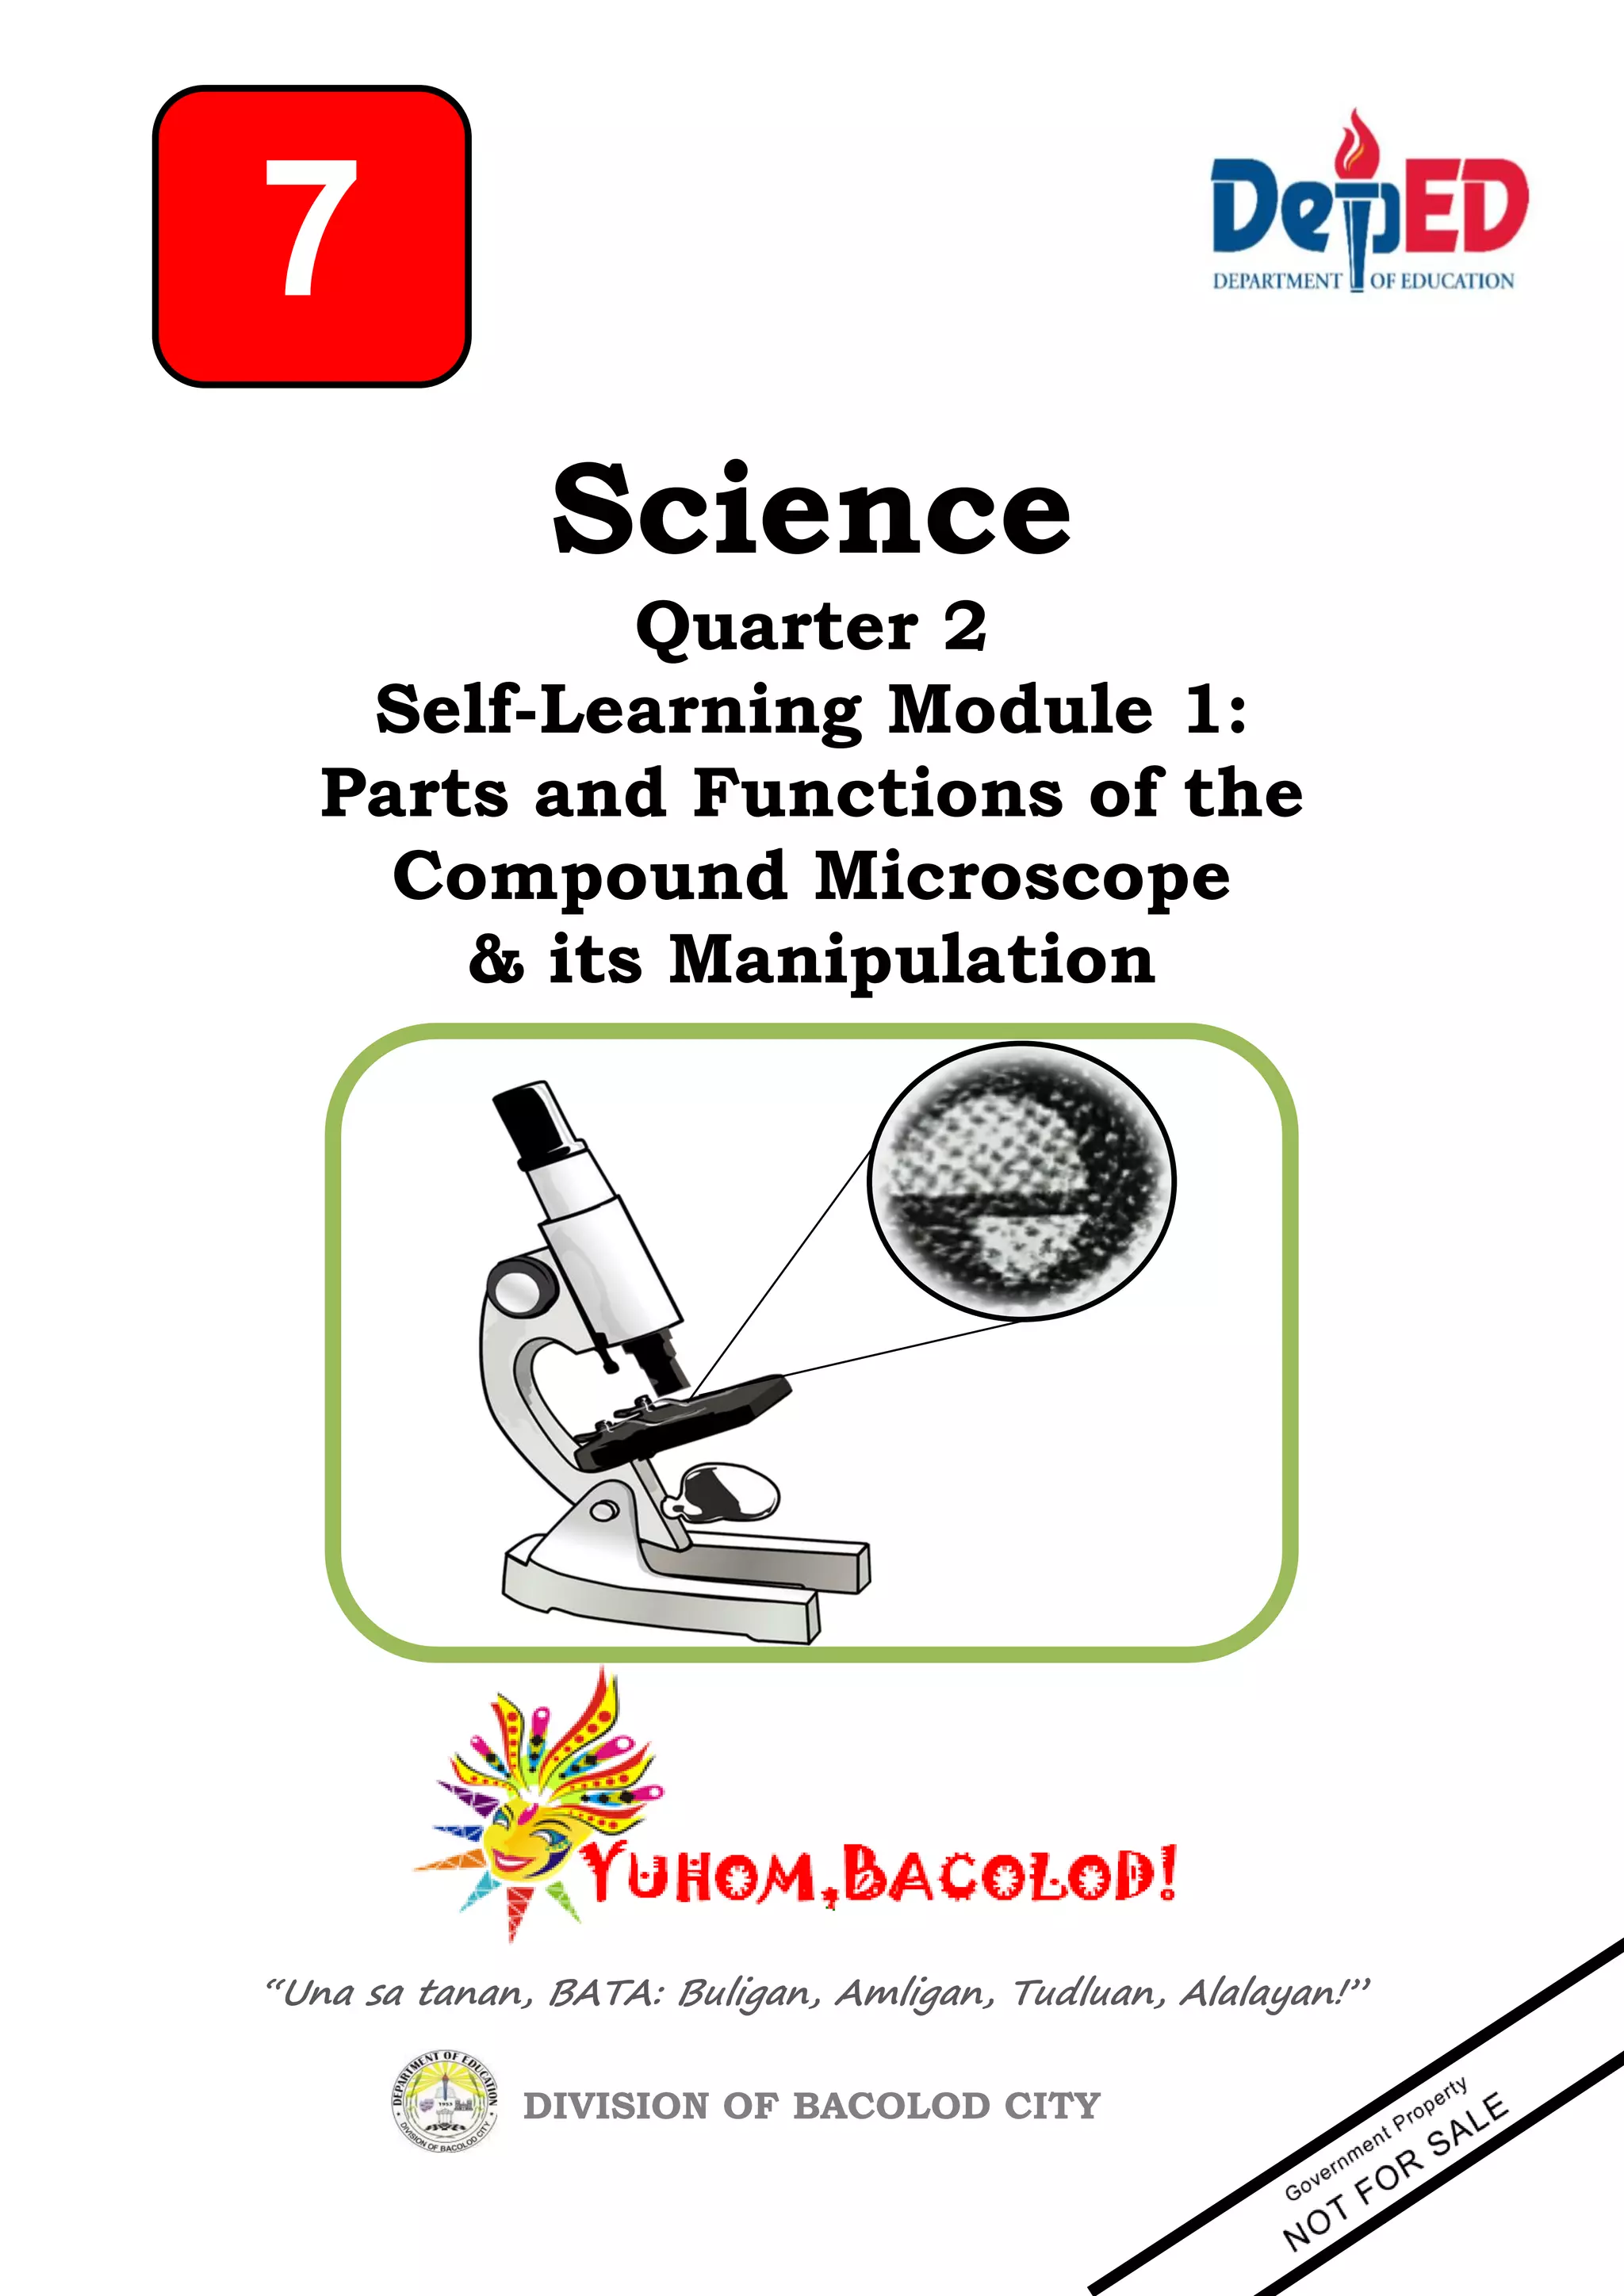
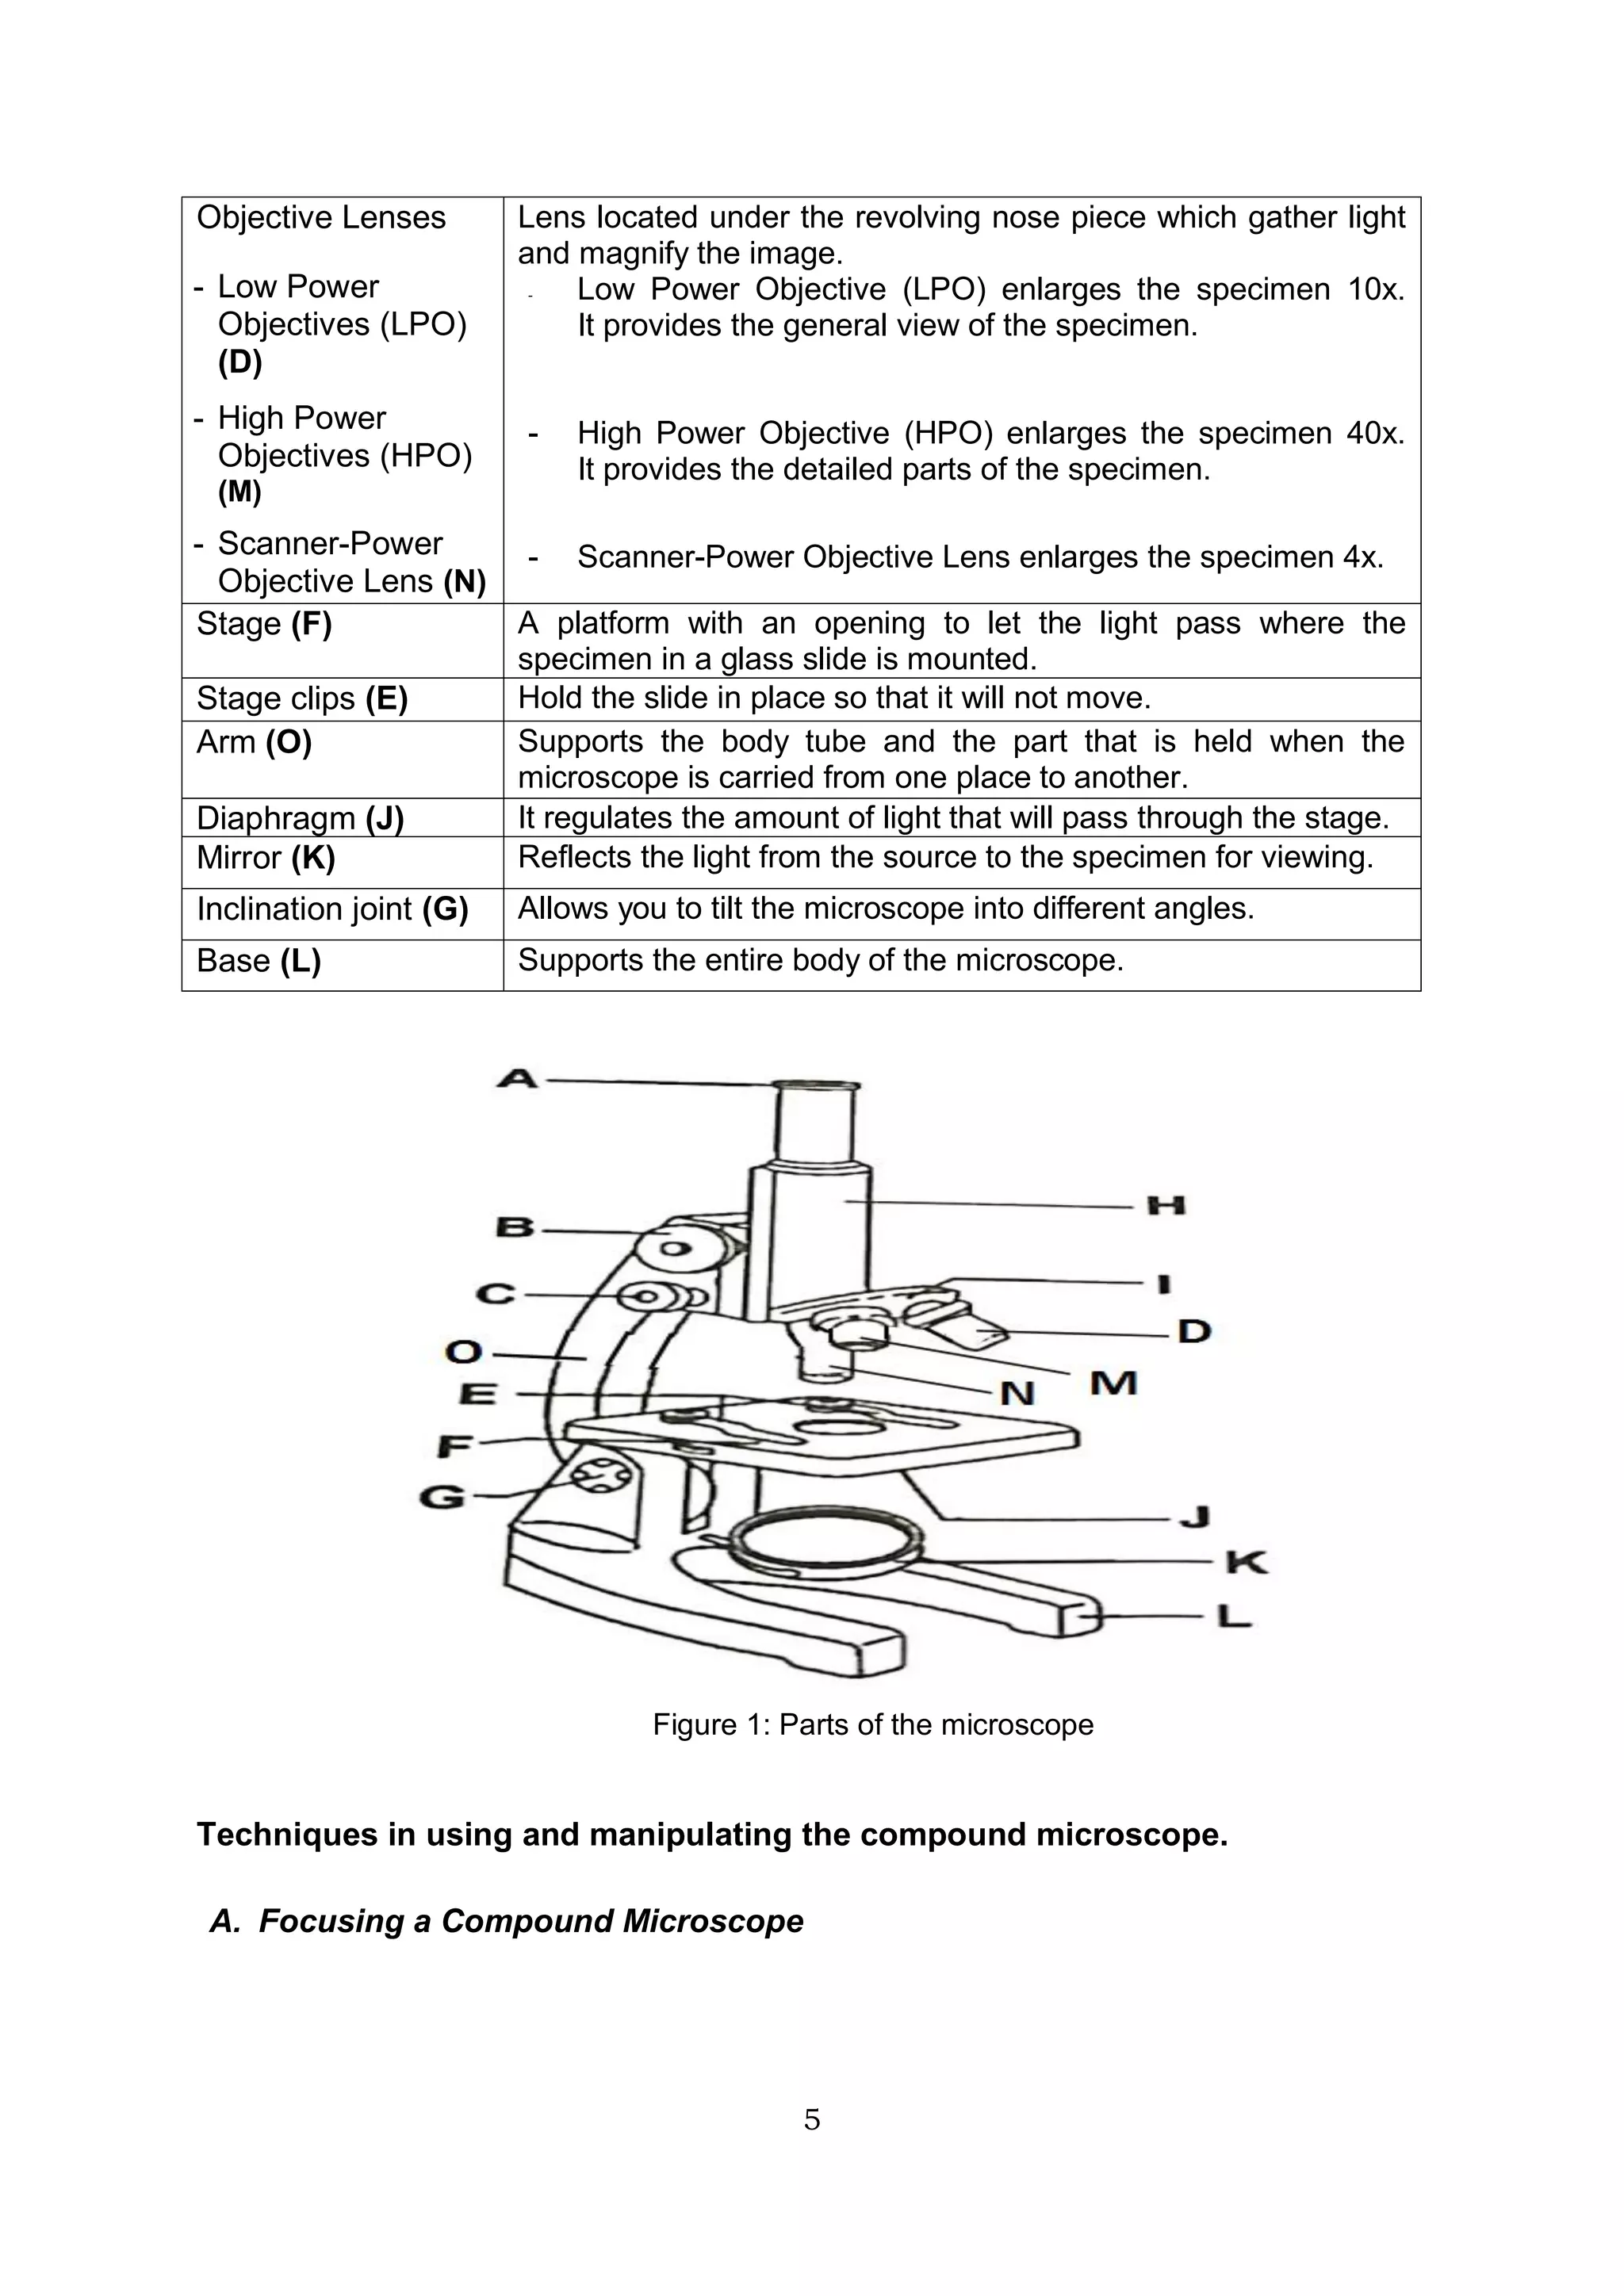
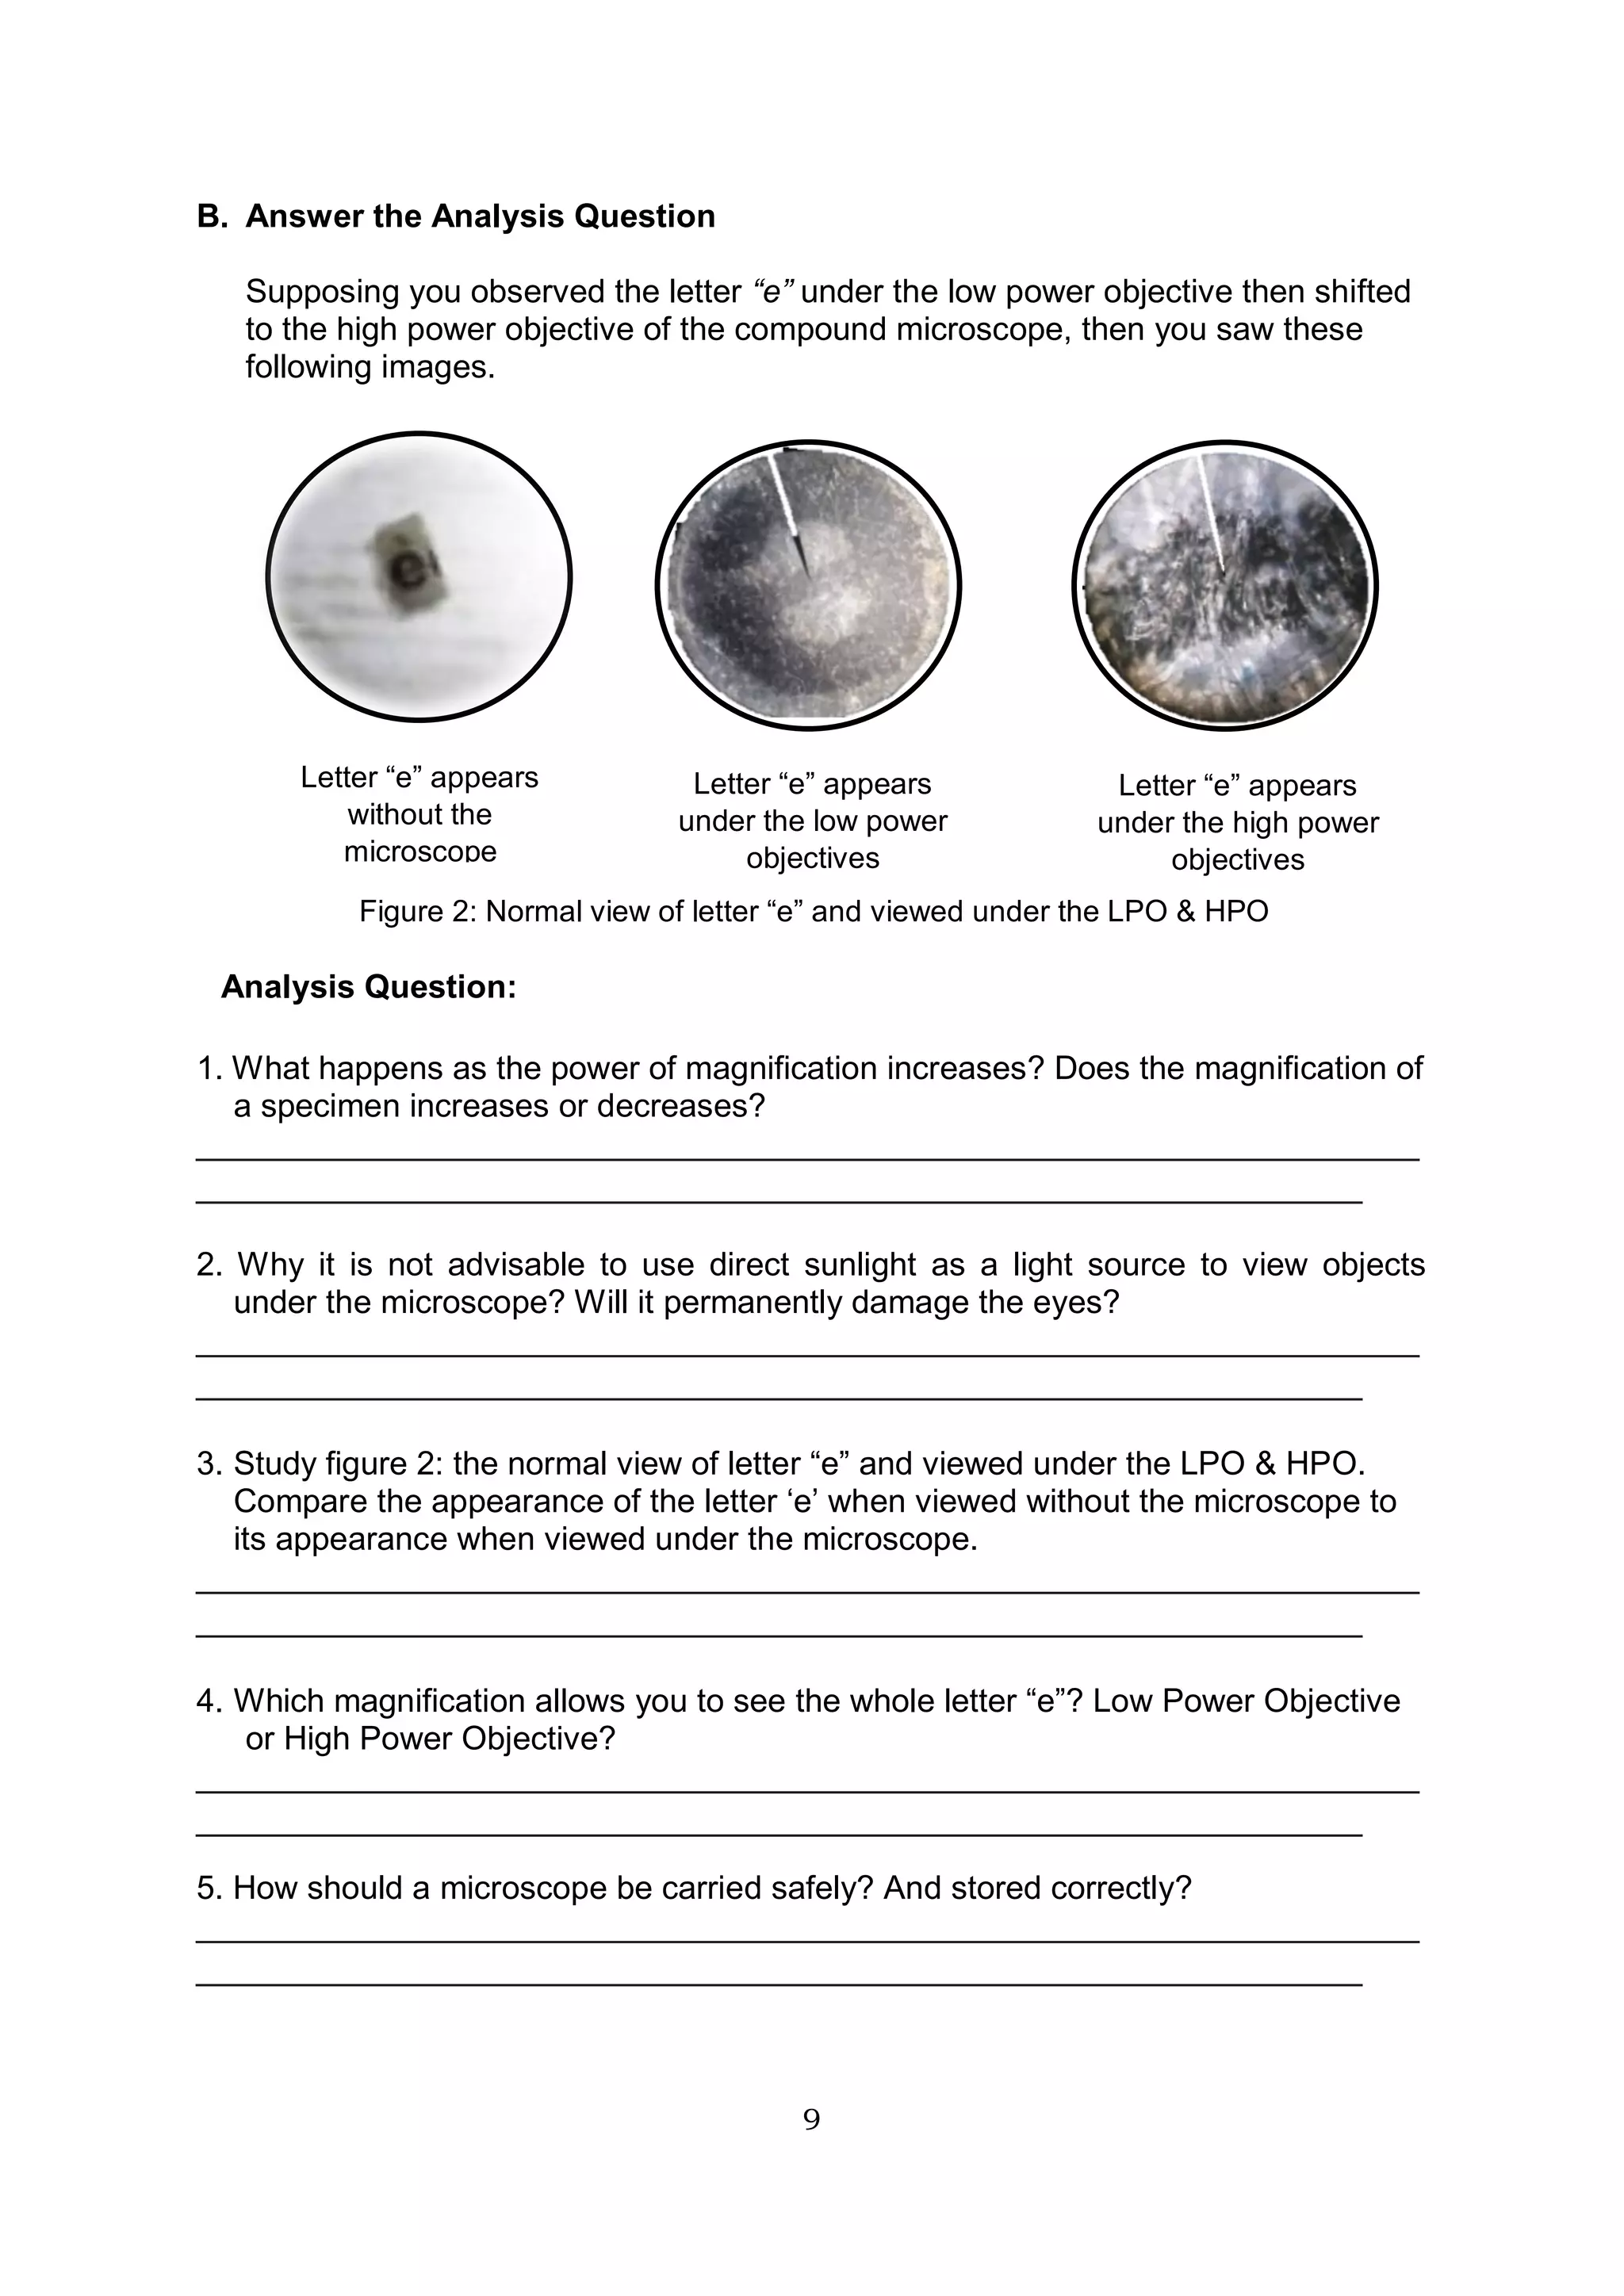
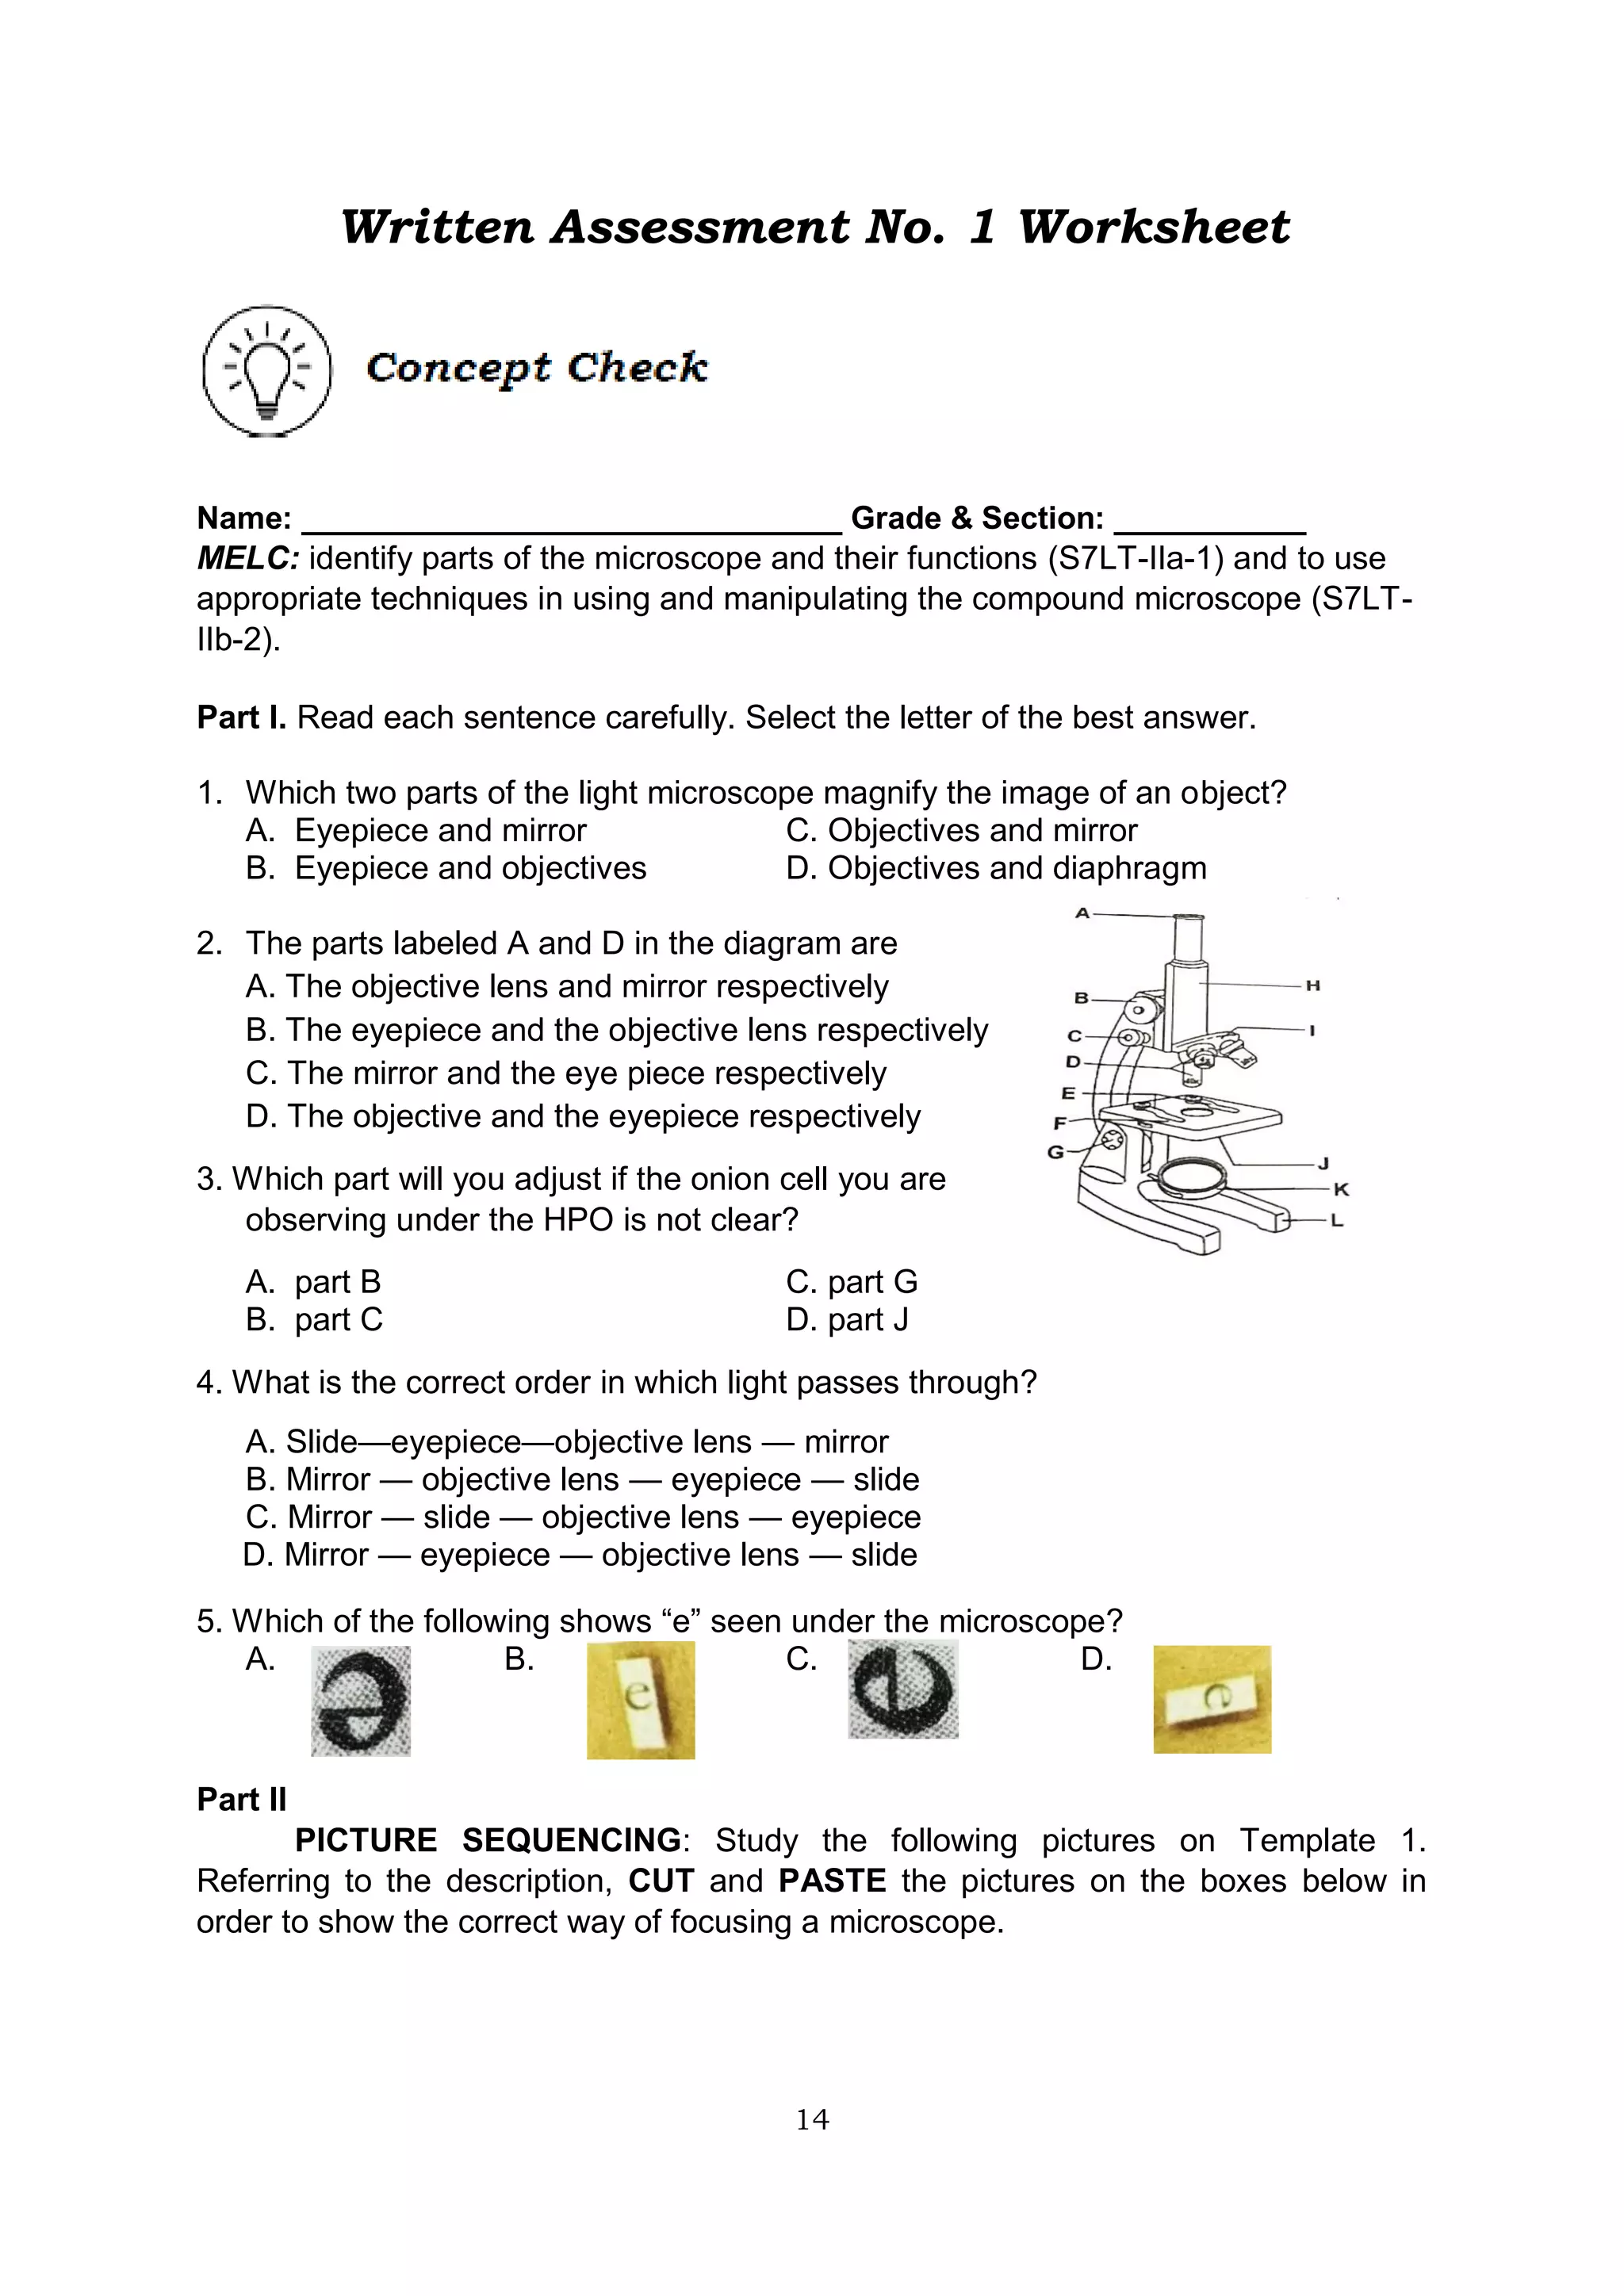
The document provides instructions for using a compound microscope, including:
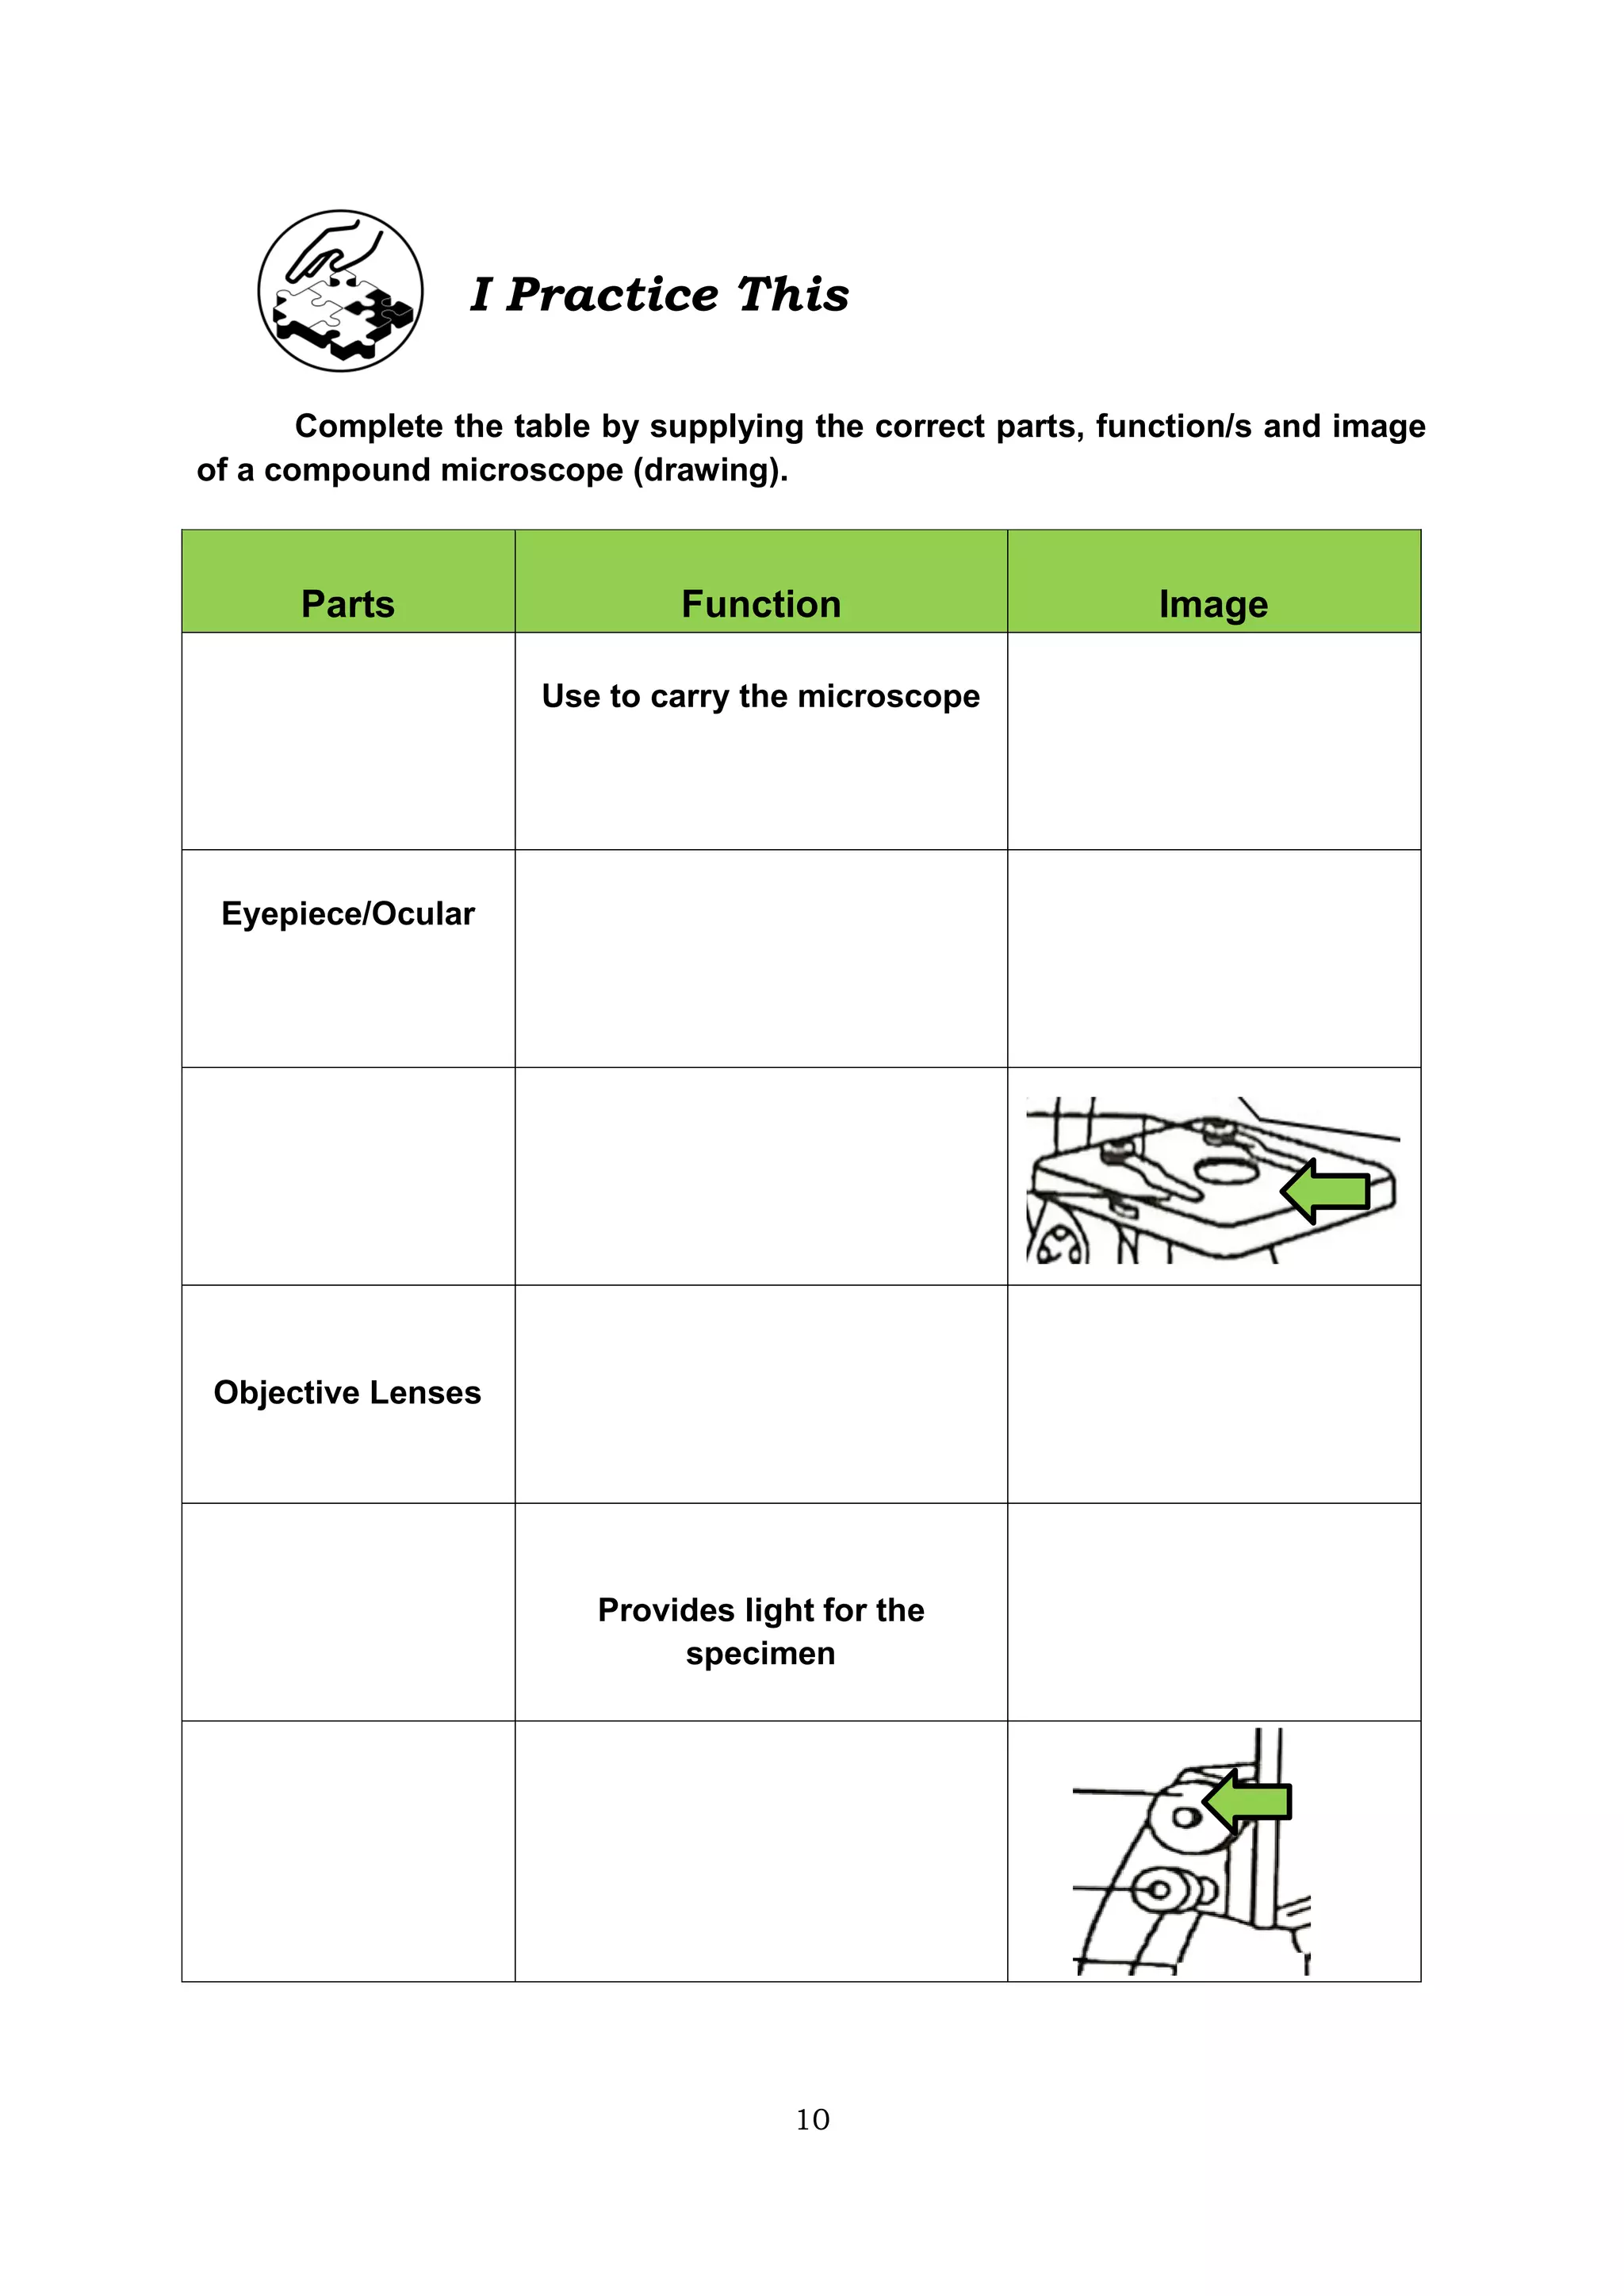
1) Identifying the main parts of the microscope and their functions, such as the eyepiece for magnification and the objectives for further magnification.
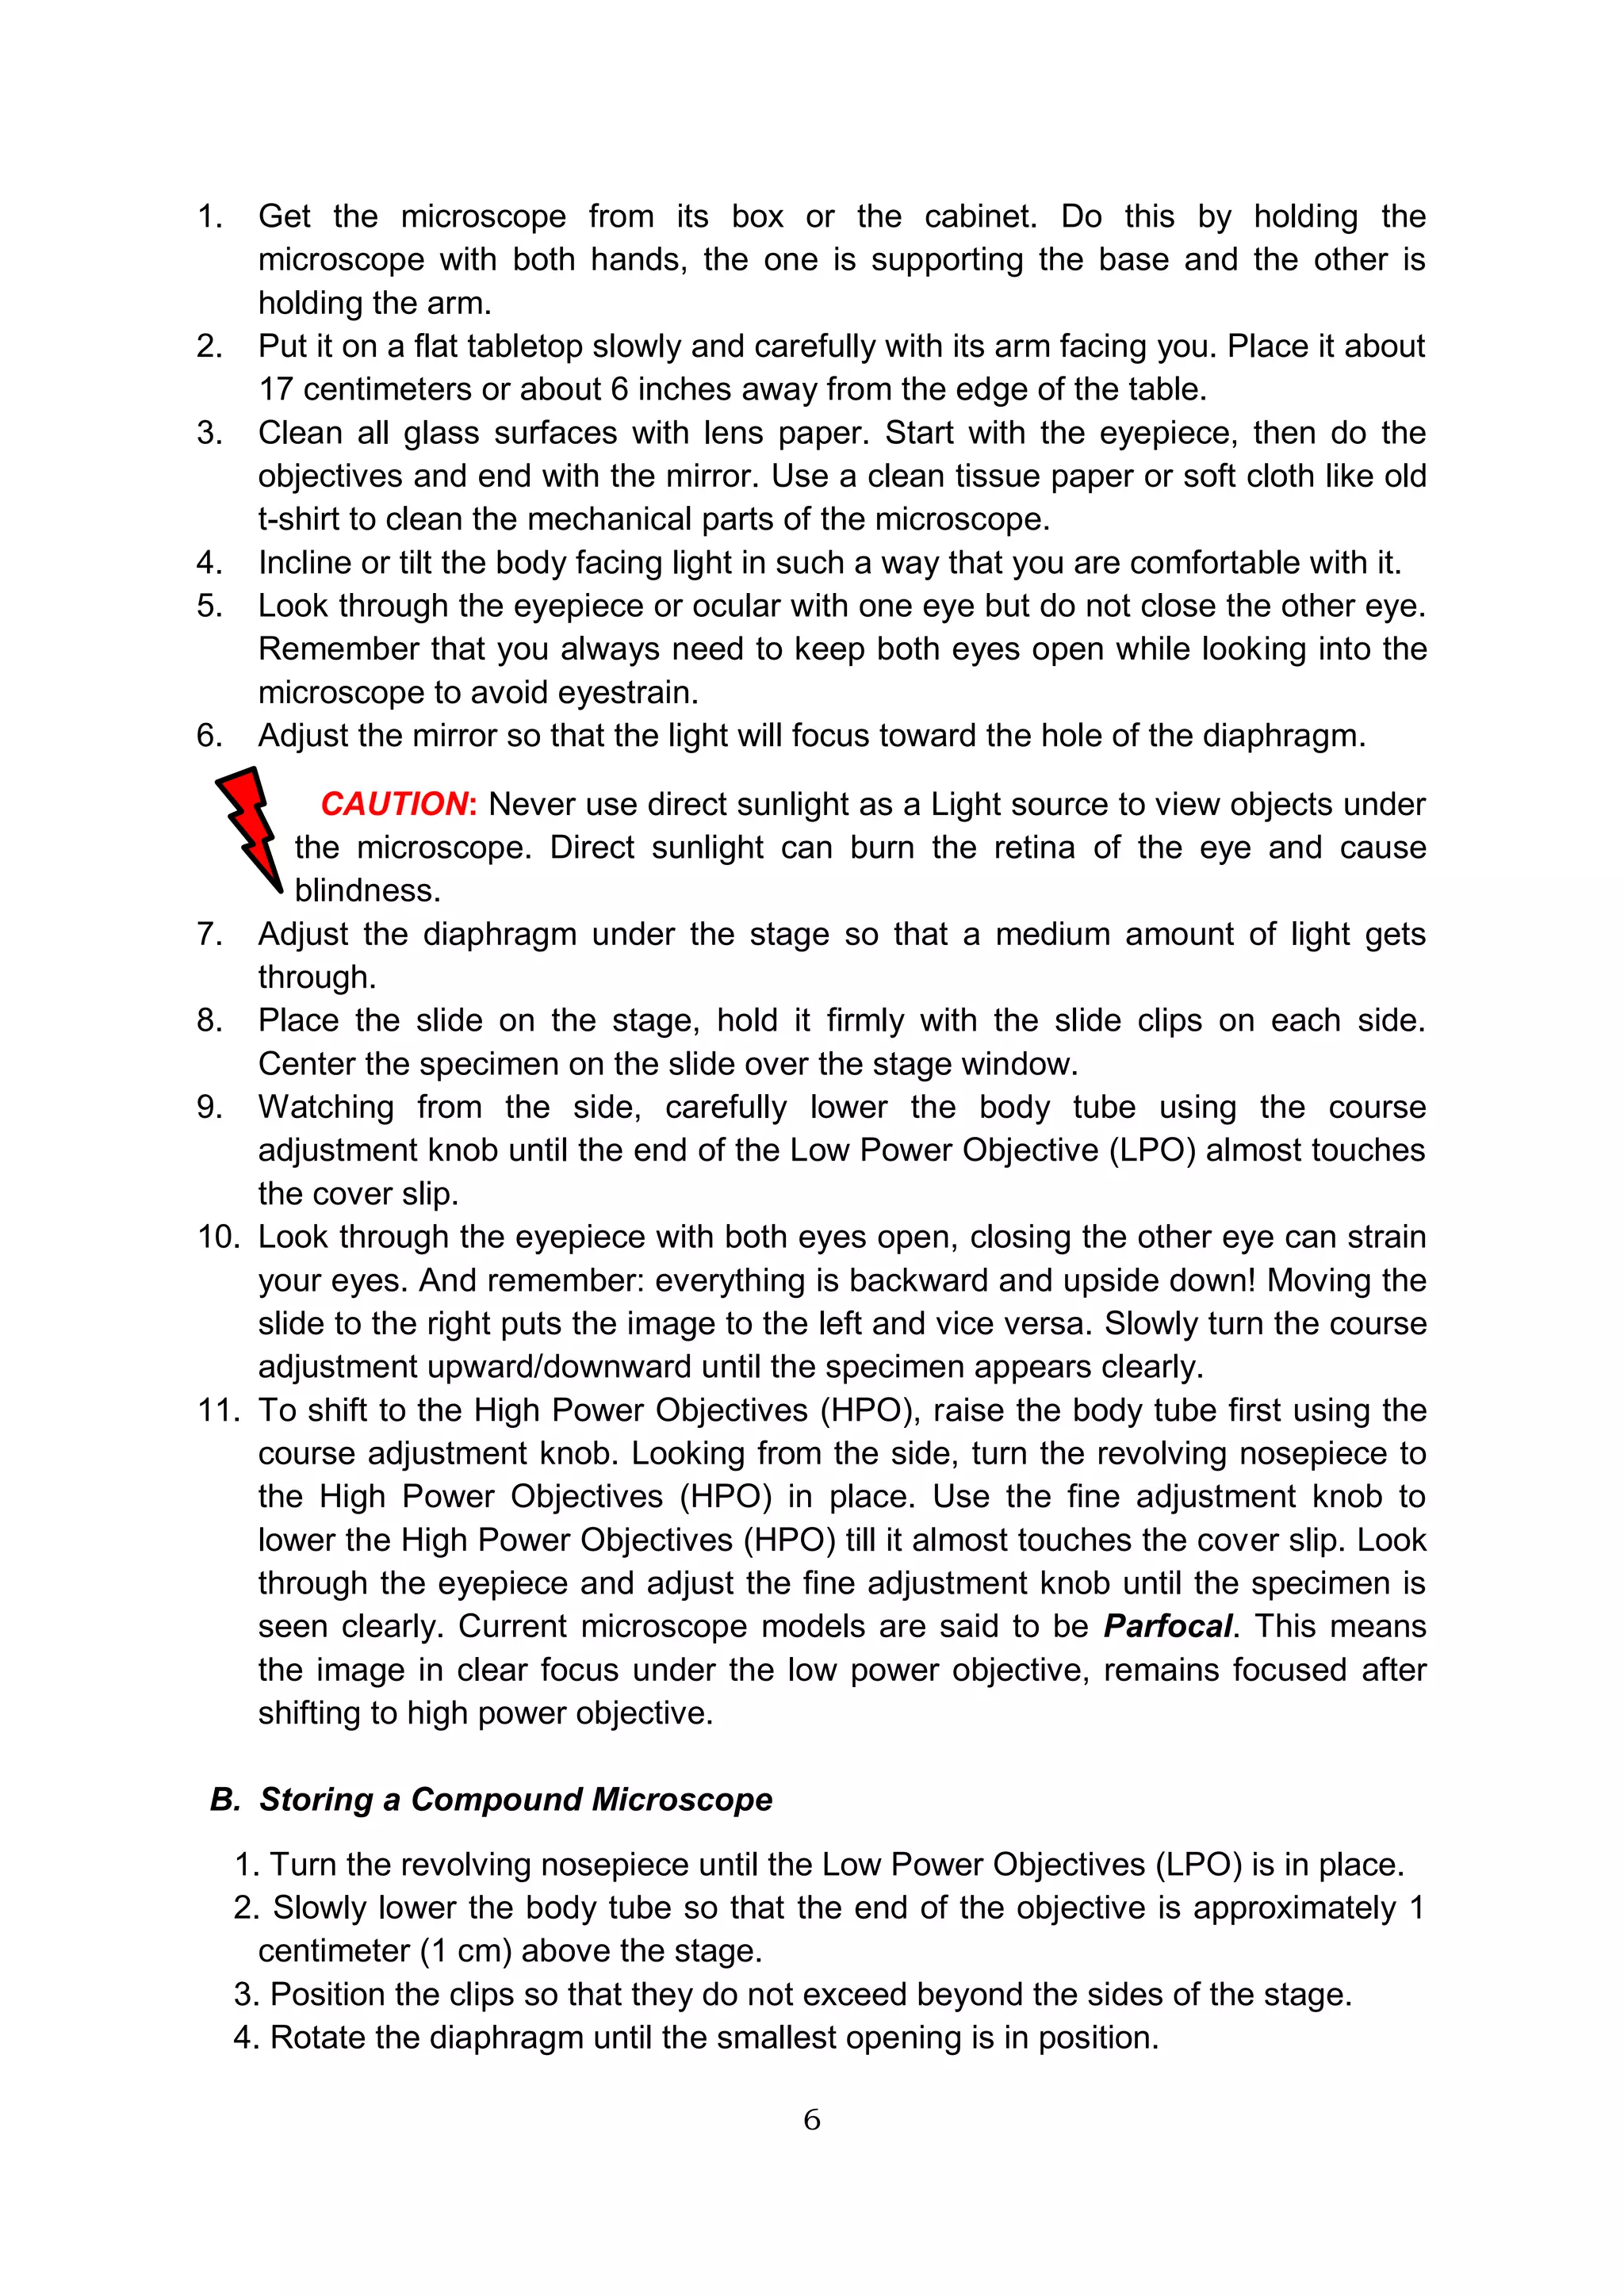
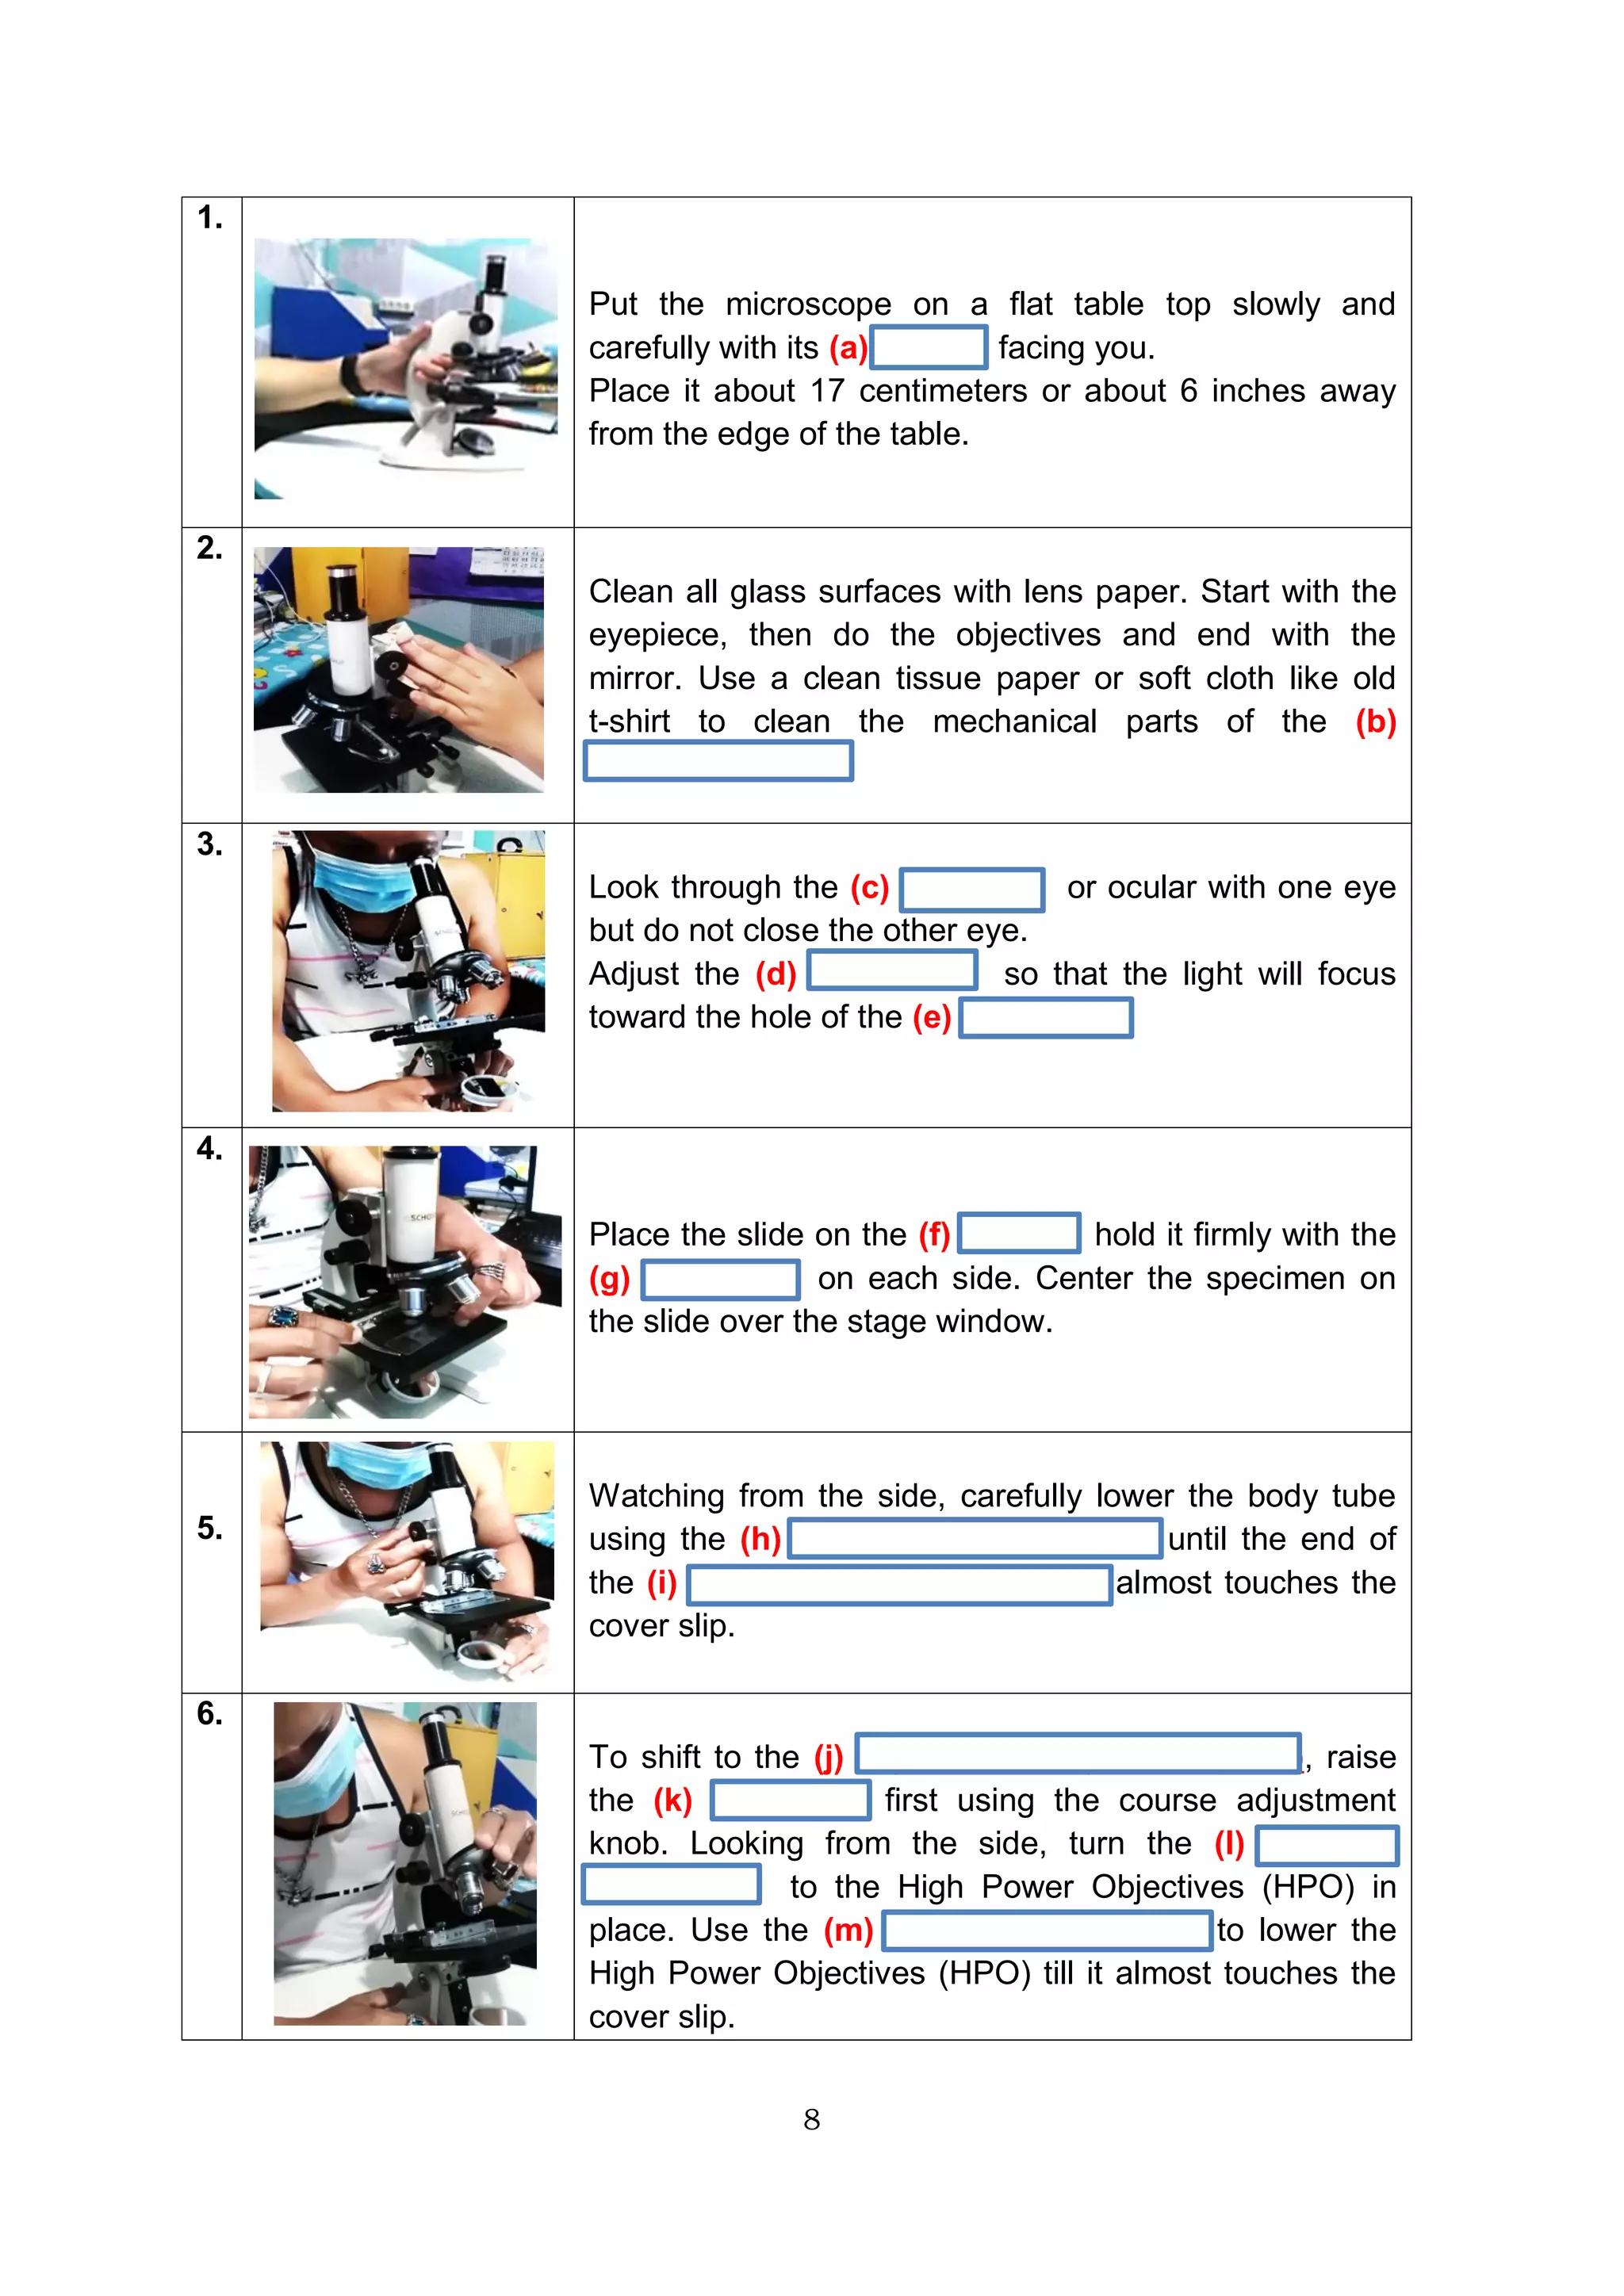
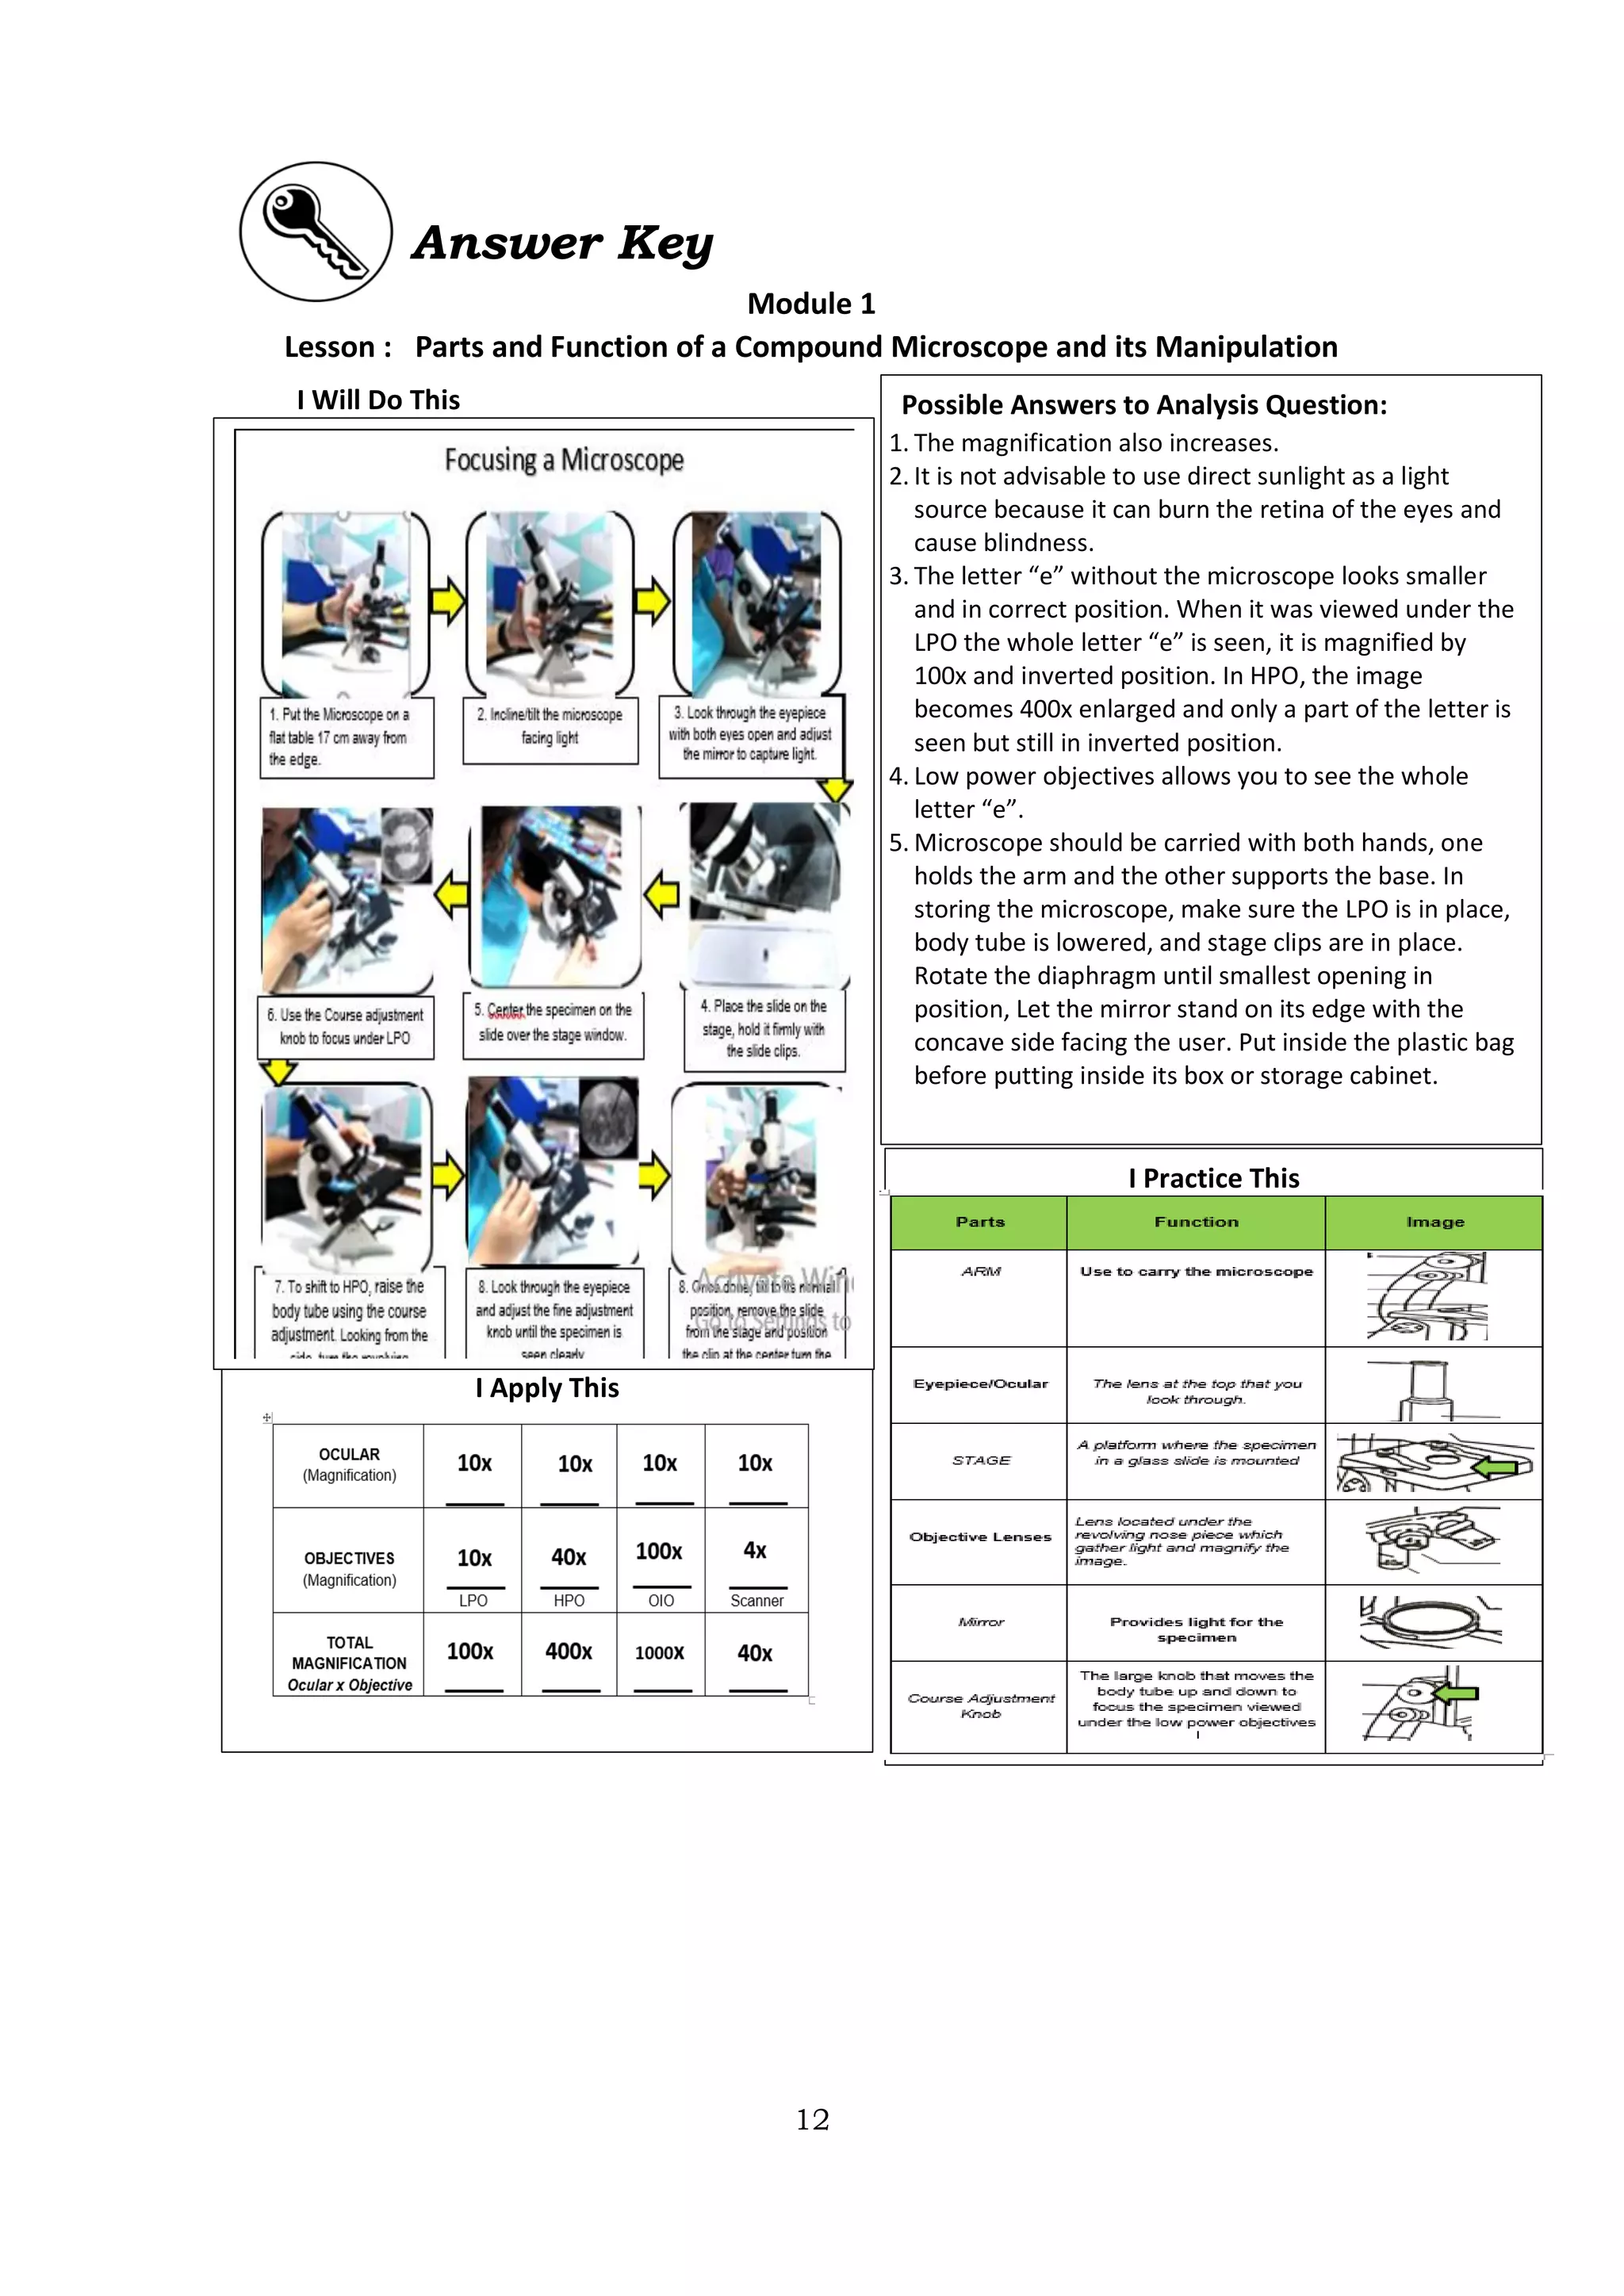
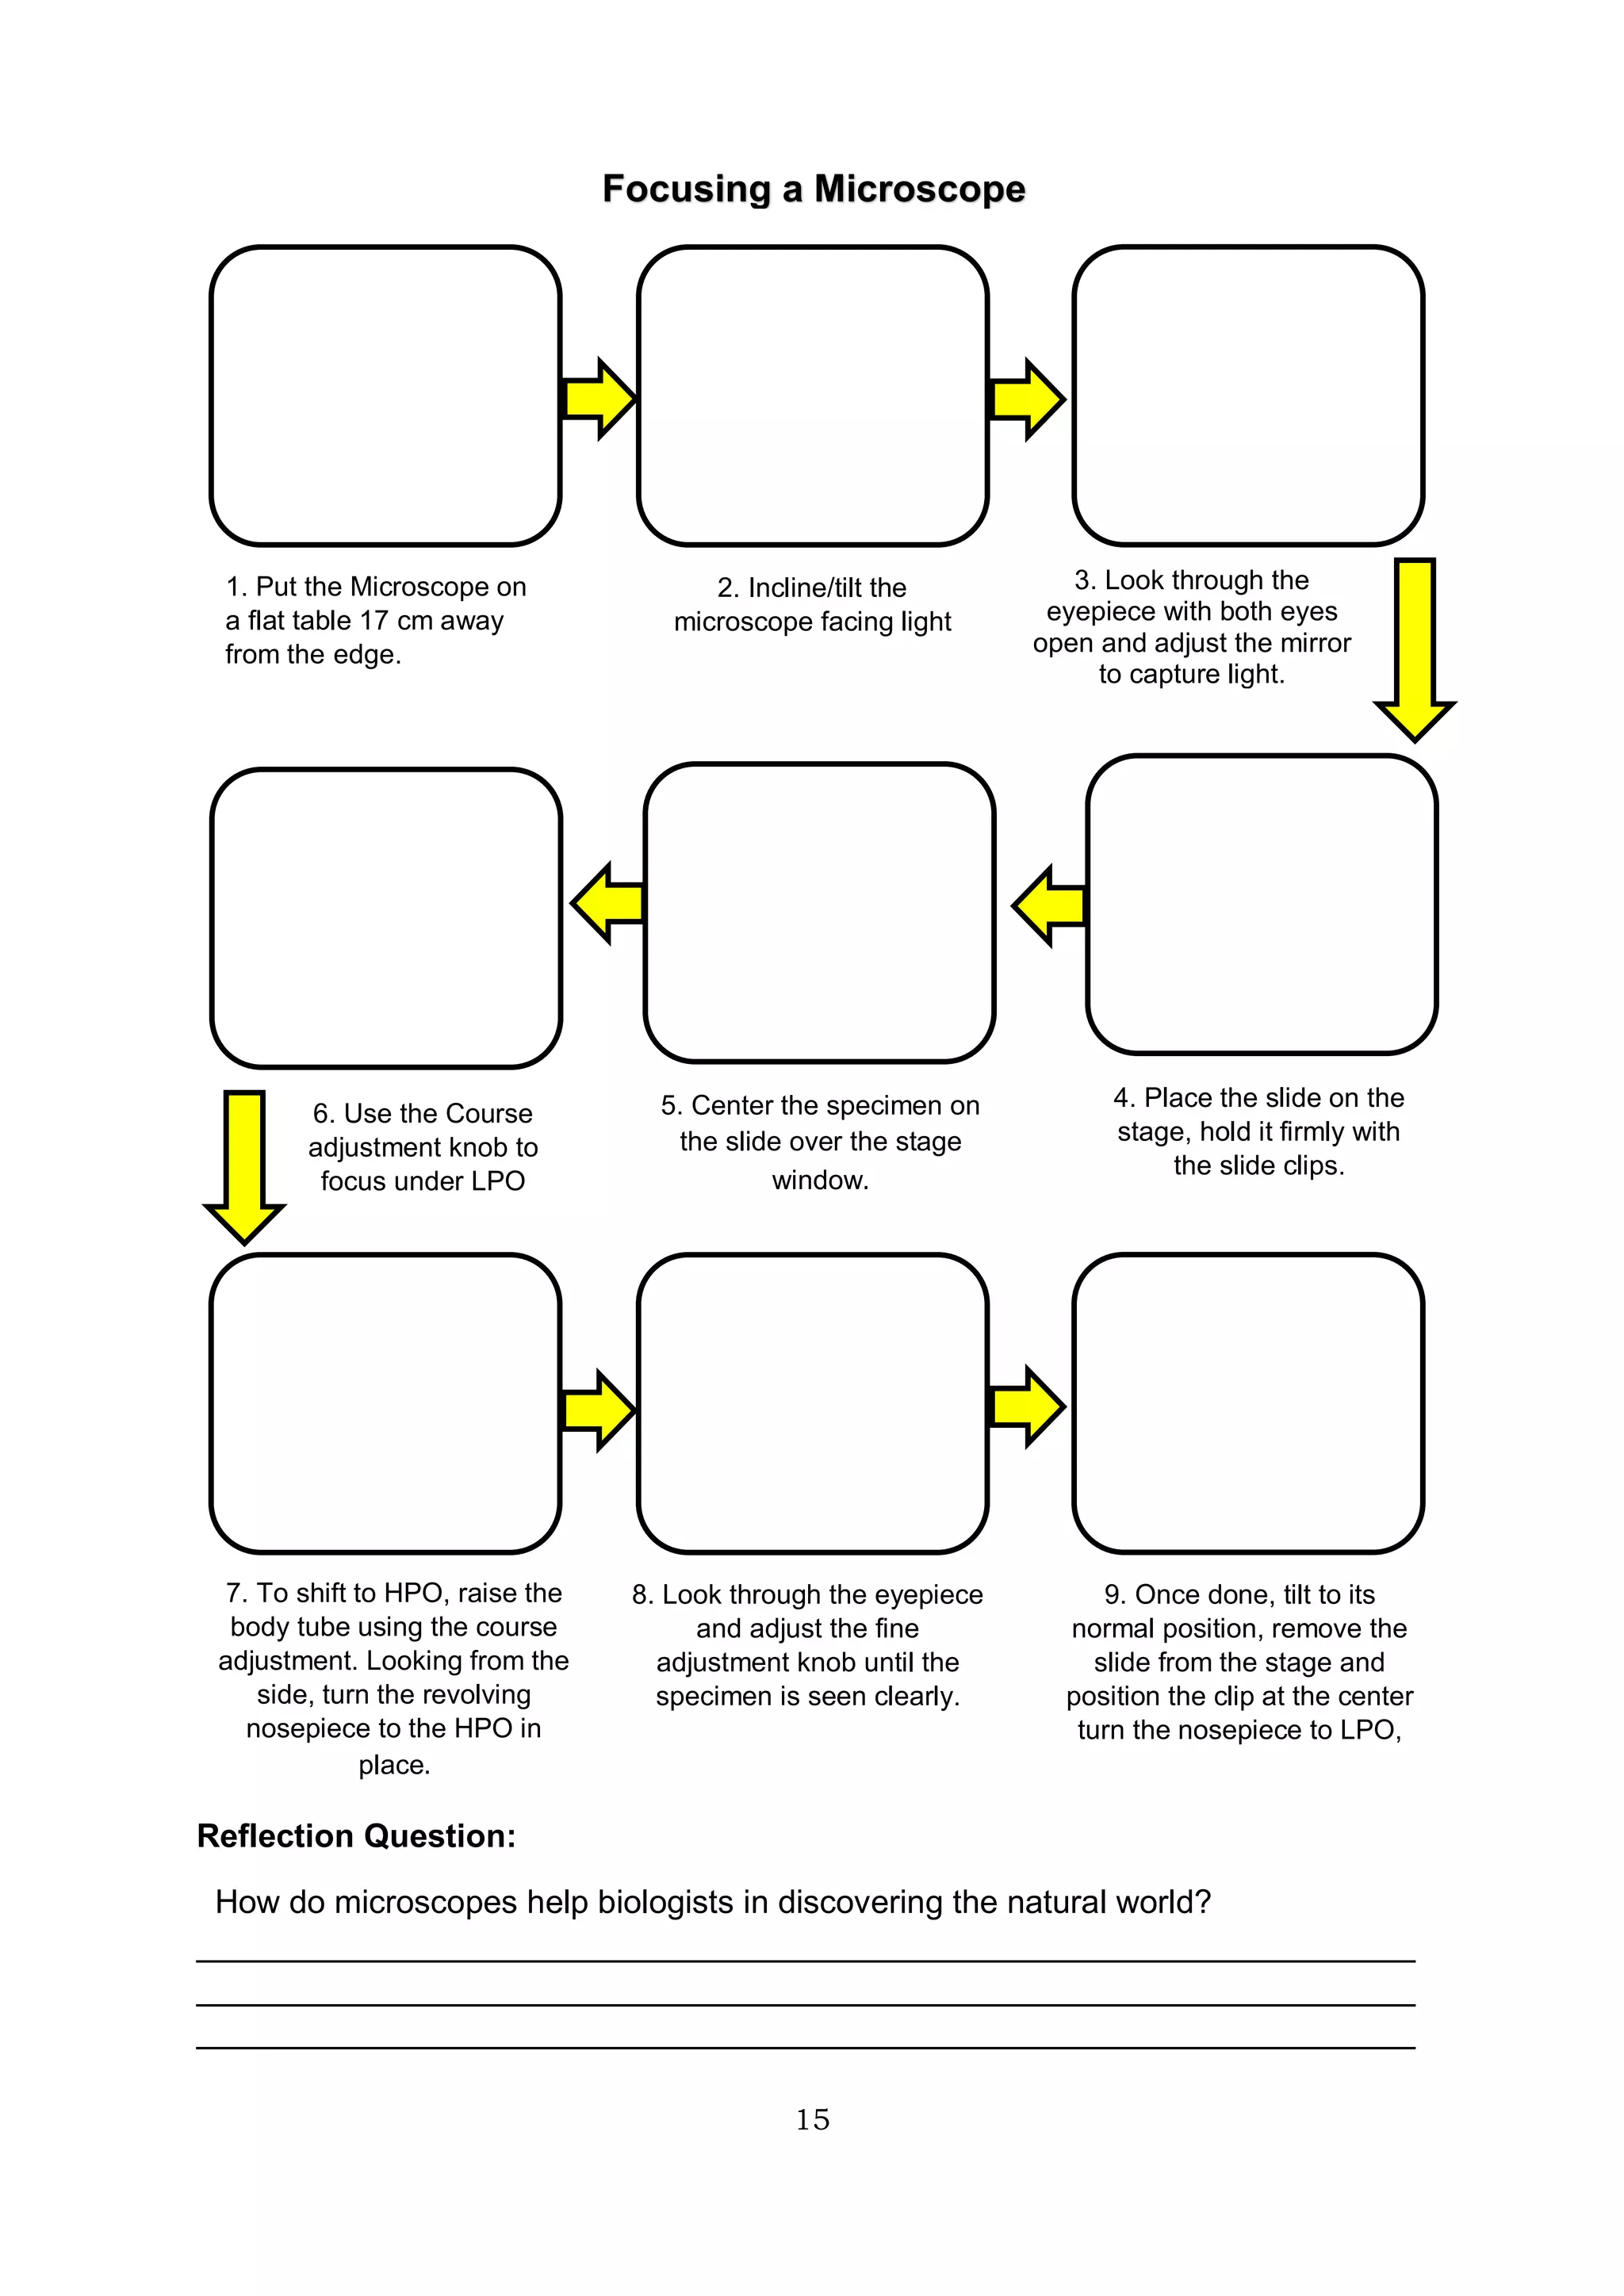
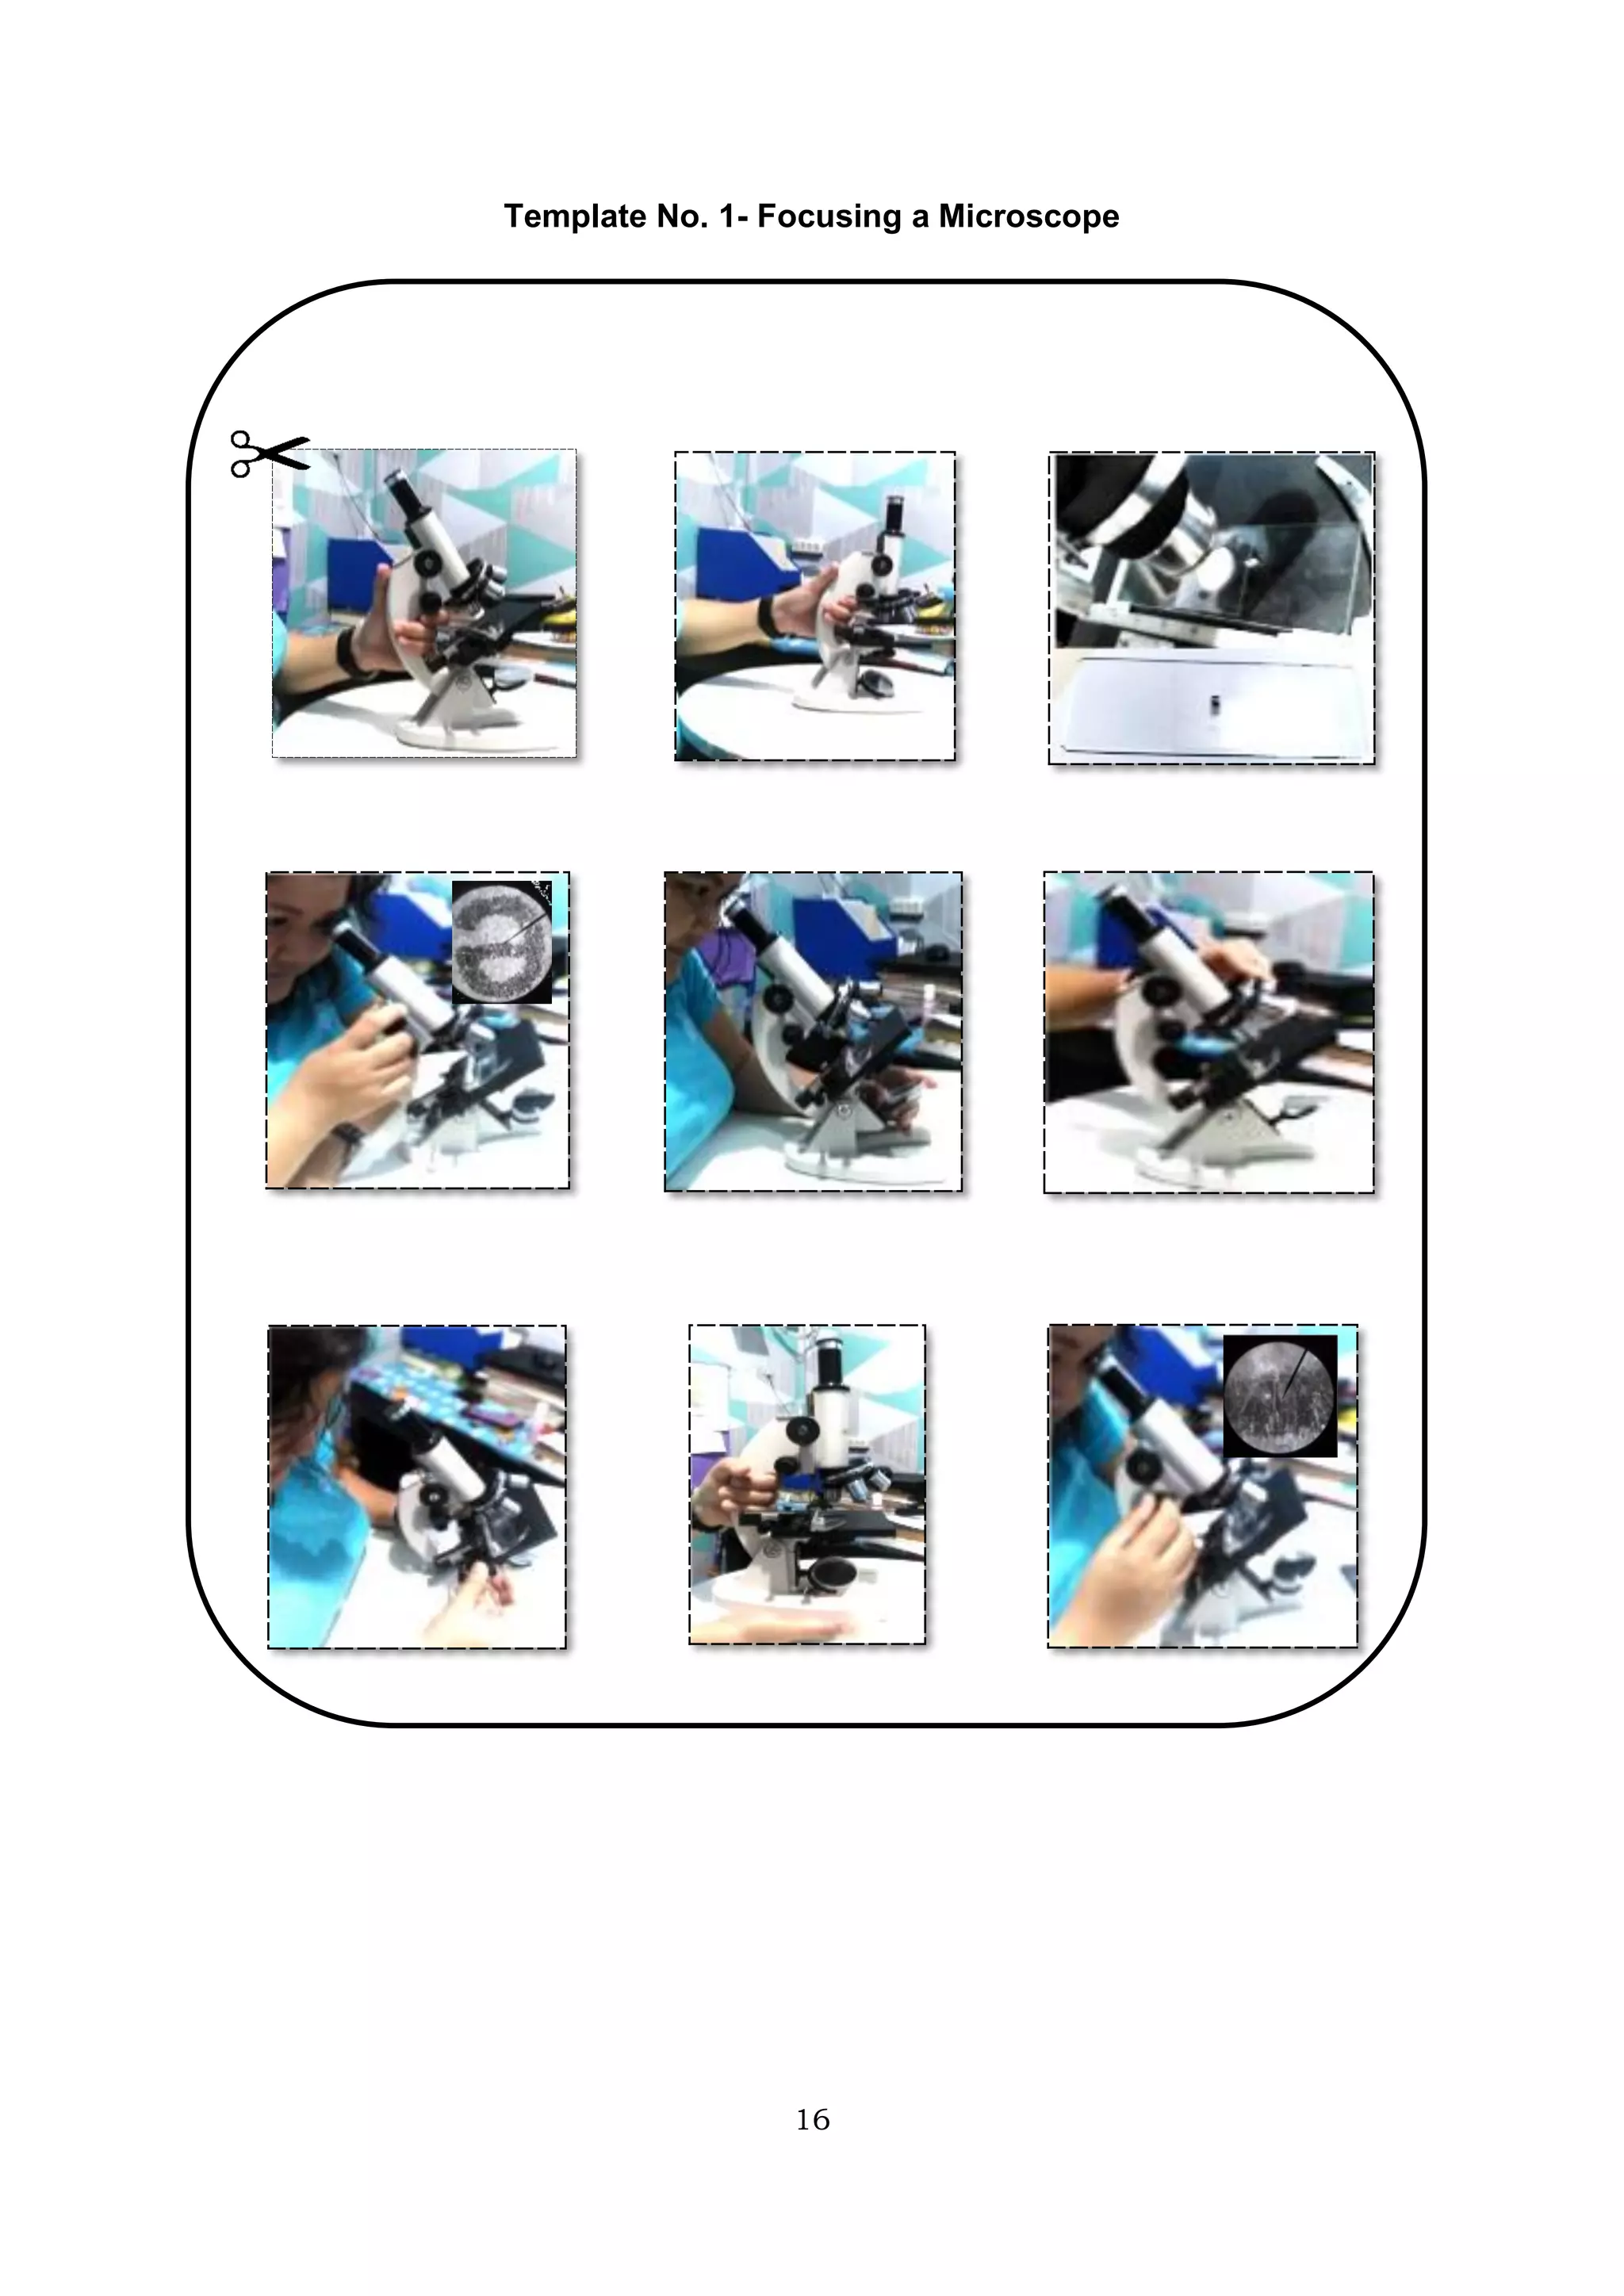
2) Describing techniques for focusing a microscope, such as using the coarse adjustment knob to move the body tube and fine adjustment knob for finer focus.
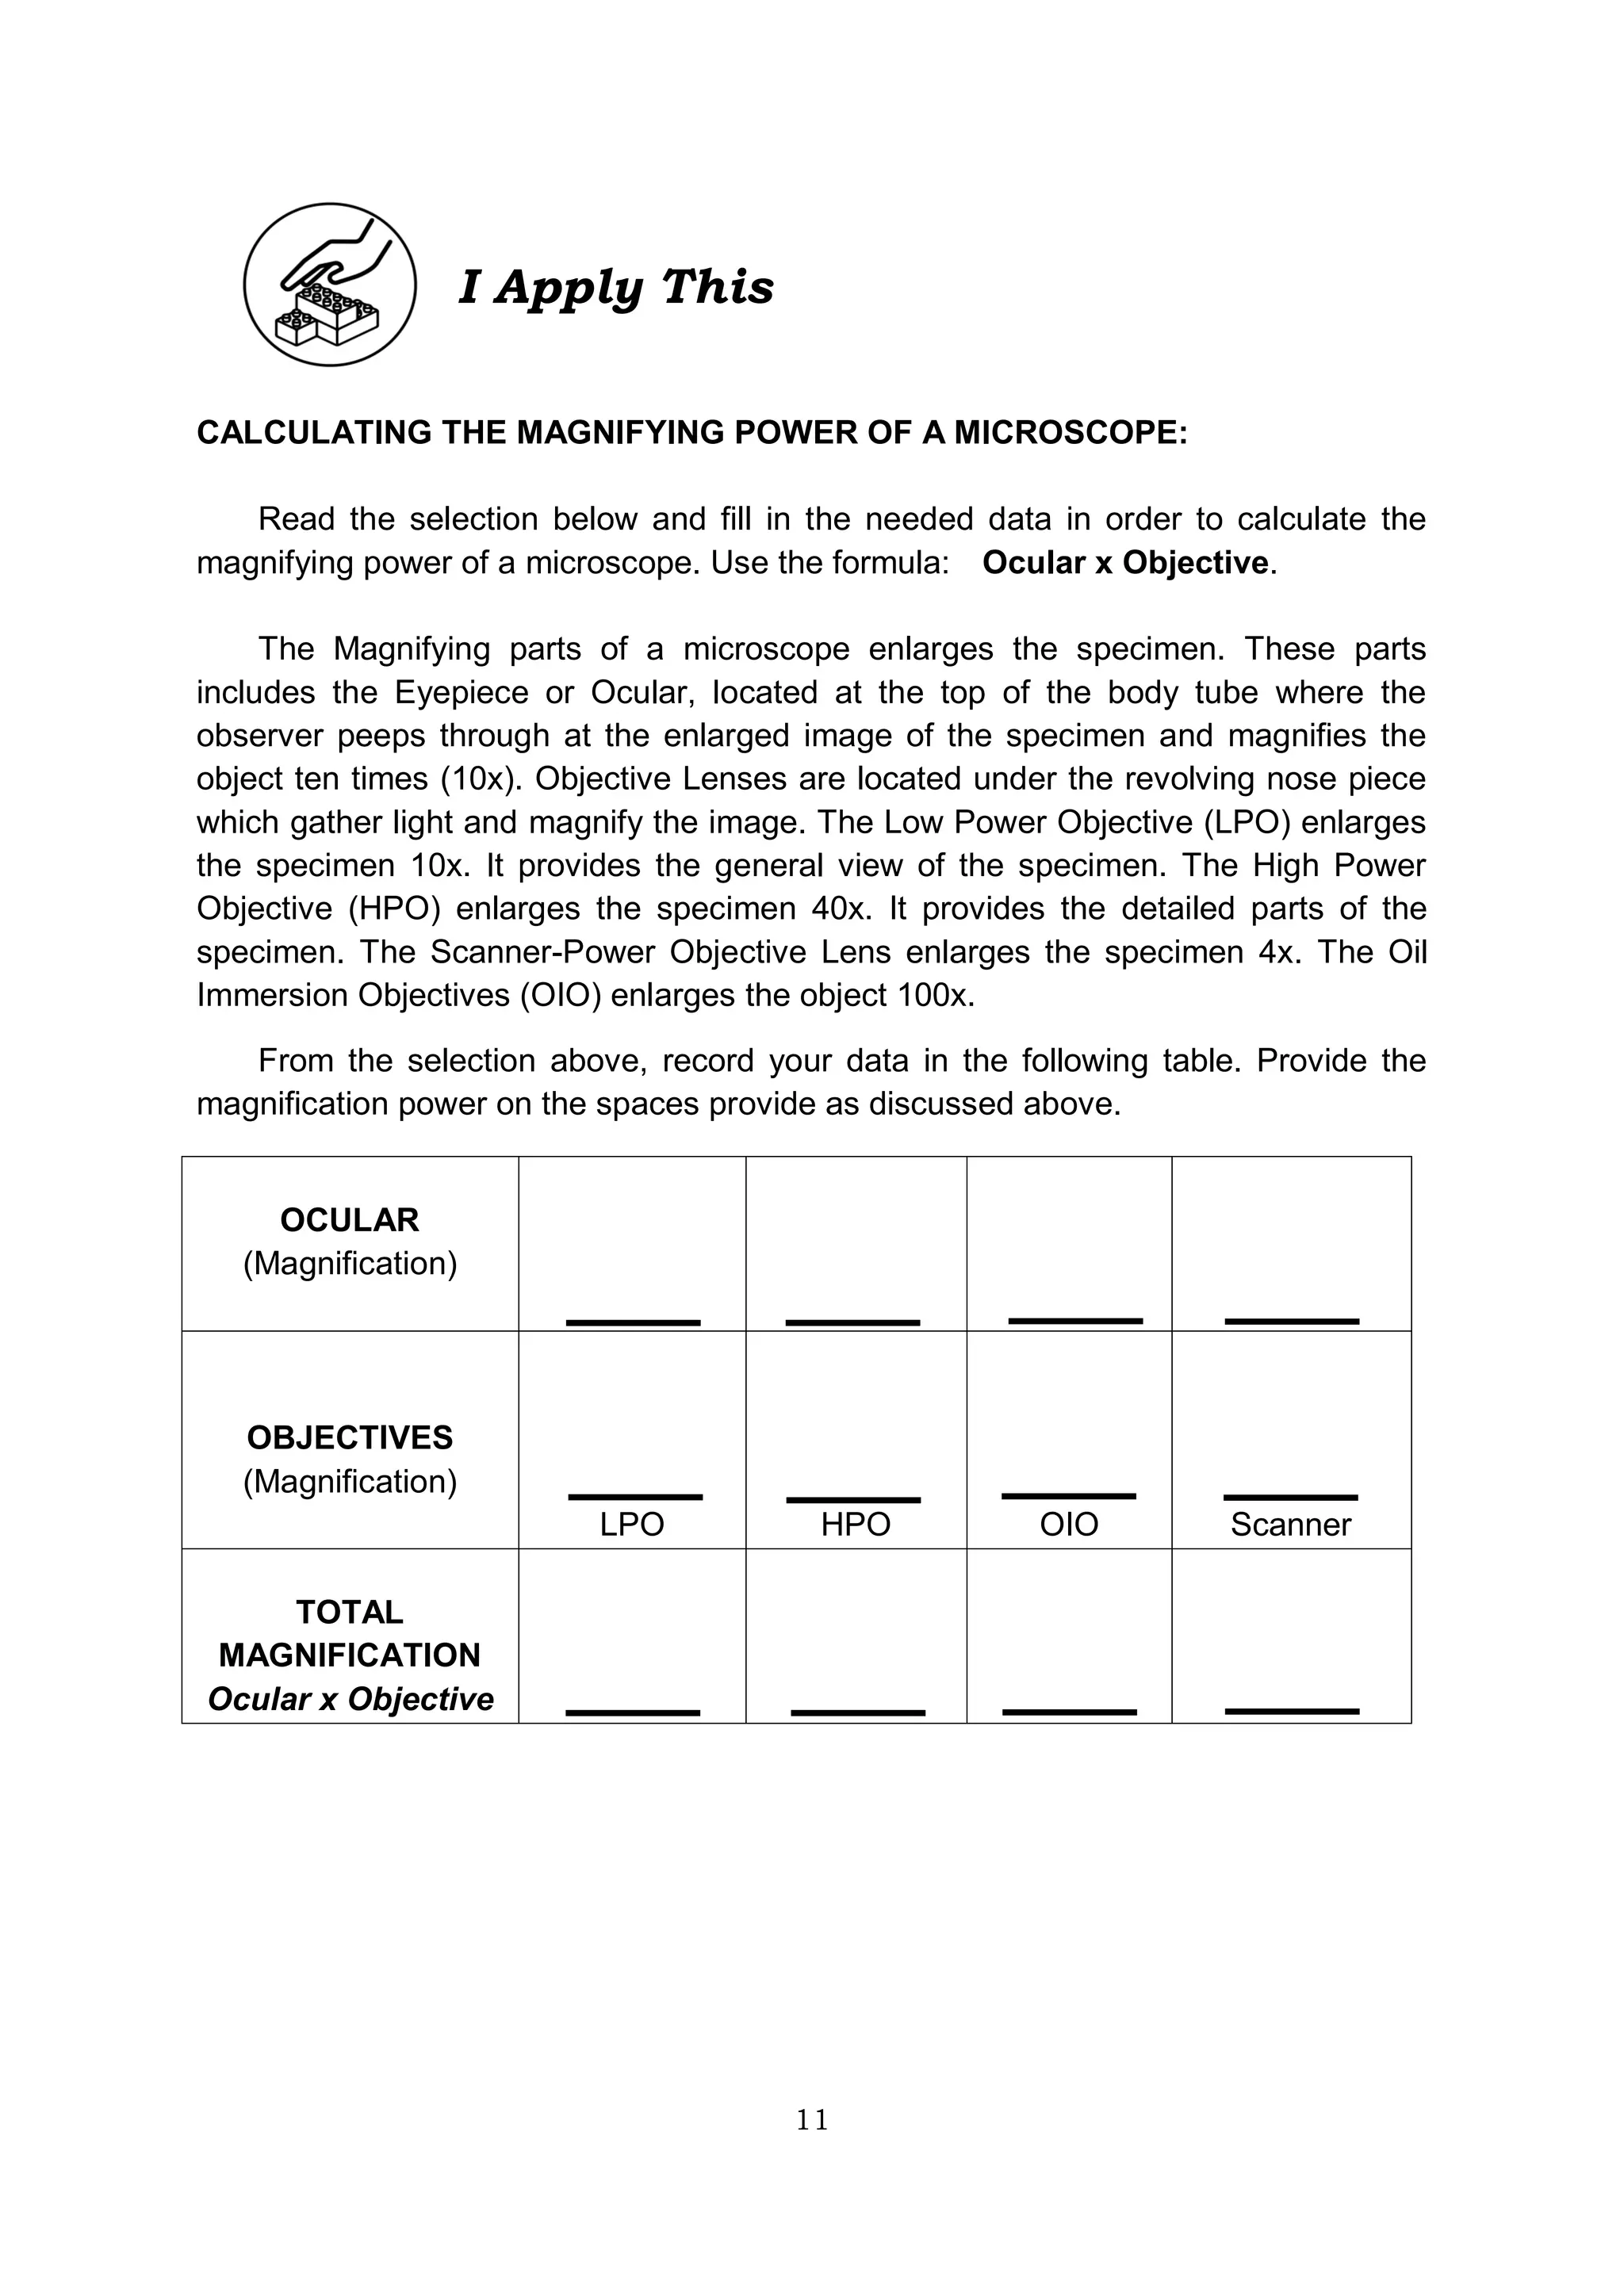
3) Explaining how to calculate magnification by multiplying the eyepiece magnification by the objective magnification, such as getting 100x magnification using a 10x eyepiece and 10x objective.
1. “Una sa tanan, BATA: Buligan, Amligan, Tudluan, Alalayan!”
DIVISION OF BACOLOD CITY
Science
Quarter 2
Self-Learning Module 1:
Parts and Functions of the
Compound Microscope
& its Manipulation
7
2. 2
Science – Grade 7
Quarter 2
Self-Learning Module 1 – Parts and Functions of the Compound Microscope
& its Manipulation
Second Edition, 2021
Republic Act 8293, section 176 states that: “No copyright shall subsist in
any work of the Government of the Philippines. However, prior approval of the
government agency or office wherein the work is created shall be necessary for
exploitation of such work for profit. Such agency or office may, among other things,
impose as a condition the payment of royalties”.
Borrowed materials (i.e., songs, stories, poems, pictures, photos, brand
names, trademarks, etc.) included in this module are owned by their respective
copyright holders. Every effort has been exerted to locate and seek permission to
use these materials from their respective copyright owners. The publisher and
authors do not represent nor claim ownership over them.
Published by the Department of Education
Schools Division Superintendent: Gladys Amylaine D. Sales, CESO VI
Assistant Schools Division Superintendent: Peter J. Galimba PhD
Printed in the Philippines by
Department of Education – Region VI – Division of Bacolod City
Office Address: Rosario-San Juan Sts., Bacolod City 6100
Telefax: (034) 704-2585
E-mail Address: bacolod.city@deped.gov.ph
Development Team of the Self Learning Module
Writer: Maria Victoria Valencia-Ponce
Editors: Aline D. Vieja, Joey Ian C. Singson
Reviewer: Edna Rose P. Gueco
Illustrators:
Layout Artist: Maria Victoria Valencia-Ponce
Management Team: Janalyn B. Navarro
Edna Rose P. Gueco
Ellen G. Dela Cruz
3. 3
This module was designed and written with you in mind. It is here to help you
identify parts of the microscope and their functions (S7LT-IIa-1) and to use
appropriate techniques in using and manipulating the compound microscope
(S7LT-IIb-2).
The scope of this module allows you to use it in many different learning situations.
The language used recognizes the diverse vocabulary level of students. The lessons
are arranged to follow the standard sequence of the course. But the order in which
you read them can be changed to correspond with the textbook you are now using.
• Lesson - Parts and functions of the microscope and Techniques in
using and manipulating the compound microscope.
After going through this module, you are expected to
1. identify the parts and functions of the microscope,
2. to focus the specimens using the compound microscope from high
objectives to low objectives, and
3. to handle microscope properly.
Lesson Parts and Function of the
Compound Microscope and
its Manipulation
For several years, humans have been exploring for tools and instruments that
will help them in discovering something that is microscopic or cannot be seen by the
naked eye. The invention of the lens has led to the discovery of the microscope, it is
an important tool which helps people see tiny objects and living organisms. The
microscope allows you to see things due to its properties, such as magnification
and resolution.
Lesson Overview
I Need to Know
4. 4
Magnifying power or Magnification is the ability of the microscope to make
images or specimen bigger. The magnification of a specimen can be calculated by
multiplying the number found in the eyepiece with the number found on the objective
being used. So, if a specimen is viewed using a 10x objective and a 10x eyepiece. It
will be magnified 100times/100x.
Resolving power or Resolution is the capacity of the microscope to
distinguish small gaps between two separate points which humans cannot
distinguish.
Two types of microscope:
Simple microscopes are composed of one lens and provide relatively low
magnifying power (5x). A magnifying glass is a good example of a simple
microscope.
Compound microscope, also called a light microscope, are composed of two
or more lenses that provide powerful magnification. It uses diffused light, a light
which is not harsh and direct from the sun or artificial light to illuminate the object or
specimen to be observed.
The parts of a Compound Microscope are categorized into three:
1. Illuminating parts are parts that provide light. The light may come from two
sources: natural source, reflected sunlight and artificial source, light bulb.
2. Magnifying parts are the parts that enlarge the object or specimen
3. Mechanical parts are the parts of the microscope that supports, adjust, connect
and move other parts.
A. Table 1: PARTS AND FUNCTIONS OF THE COMPOUND MICROSCOPE.
Parts Function
Eyepiece or Ocular
(A)
Located at the top of the body tube where the observer peeps
through at the enlarged image of the specimen. Magnifies the
object ten times (10x).
Body tube (H) Cylindrical part which connects the lenses of the objectives and
the ocular.
Course adjustment
knob (B)
The large knob that moves the body tube up and down to focus
the specimen viewed under the low power objectives (LPO).
Fine adjustment
knob (C)
Is the smaller knob that is used to get sharp focus of the
specimen viewed under the high power objectives (HPO)
Revolving
nosepiece (I)
Is a rotating disc located at the bottom of the body tube that
holds the different objectives and allows the shifting of the
objectives from the low-power objectives to the high-power
objectives.
5. 5
Objective Lenses
- Low Power
Objectives (LPO)
(D)
- High Power
Objectives (HPO)
(M)
- Scanner-Power
Objective Lens (N)
Lens located under the revolving nose piece which gather light
and magnify the image.
- Low Power Objective (LPO) enlarges the specimen 10x.
It provides the general view of the specimen.
- High Power Objective (HPO) enlarges the specimen 40x.
It provides the detailed parts of the specimen.
- Scanner-Power Objective Lens enlarges the specimen 4x.
Stage (F) A platform with an opening to let the light pass where the
specimen in a glass slide is mounted.
Stage clips (E) Hold the slide in place so that it will not move.
Arm (O) Supports the body tube and the part that is held when the
microscope is carried from one place to another.
Diaphragm (J) It regulates the amount of light that will pass through the stage.
Mirror (K) Reflects the light from the source to the specimen for viewing.
Inclination joint (G) Allows you to tilt the microscope into different angles.
Base (L) Supports the entire body of the microscope.
Figure 1: Parts of the microscope
Techniques in using and manipulating the compound microscope.
A. Focusing a Compound Microscope
6. 6
1. Get the microscope from its box or the cabinet. Do this by holding the
microscope with both hands, the one is supporting the base and the other is
holding the arm.
2. Put it on a flat tabletop slowly and carefully with its arm facing you. Place it about
17 centimeters or about 6 inches away from the edge of the table.
3. Clean all glass surfaces with lens paper. Start with the eyepiece, then do the
objectives and end with the mirror. Use a clean tissue paper or soft cloth like old
t-shirt to clean the mechanical parts of the microscope.
4. Incline or tilt the body facing light in such a way that you are comfortable with it.
5. Look through the eyepiece or ocular with one eye but do not close the other eye.
Remember that you always need to keep both eyes open while looking into the
microscope to avoid eyestrain.
6. Adjust the mirror so that the light will focus toward the hole of the diaphragm.
CAUTION: Never use direct sunlight as a Light source to view objects under
the microscope. Direct sunlight can burn the retina of the eye and cause
blindness.
7. Adjust the diaphragm under the stage so that a medium amount of light gets
through.
8. Place the slide on the stage, hold it firmly with the slide clips on each side.
Center the specimen on the slide over the stage window.
9. Watching from the side, carefully lower the body tube using the course
adjustment knob until the end of the Low Power Objective (LPO) almost touches
the cover slip.
10. Look through the eyepiece with both eyes open, closing the other eye can strain
your eyes. And remember: everything is backward and upside down! Moving the
slide to the right puts the image to the left and vice versa. Slowly turn the course
adjustment upward/downward until the specimen appears clearly.
11. To shift to the High Power Objectives (HPO), raise the body tube first using the
course adjustment knob. Looking from the side, turn the revolving nosepiece to
the High Power Objectives (HPO) in place. Use the fine adjustment knob to
lower the High Power Objectives (HPO) till it almost touches the cover slip. Look
through the eyepiece and adjust the fine adjustment knob until the specimen is
seen clearly. Current microscope models are said to be Parfocal. This means
the image in clear focus under the low power objective, remains focused after
shifting to high power objective.
B. Storing a Compound Microscope
1. Turn the revolving nosepiece until the Low Power Objectives (LPO) is in place.
2. Slowly lower the body tube so that the end of the objective is approximately 1
centimeter (1 cm) above the stage.
3. Position the clips so that they do not exceed beyond the sides of the stage.
4. Rotate the diaphragm until the smallest opening is in position.
7. 7
5. Let the mirror stand on its edge with the concave side facing the user to protect
it from dust.
6. Some microscope boxes have a socket for the eyepiece. In this case, remove
the eyepiece from the body tube and place it in the socket.
7. Put back the microscope’s plastic cover. If the original plastic cover has been
lost or destroyed, use any clean plastic bag big enough to cover the microscope.
8. Carry the microscope with both hands, supporting the bottom and holding the
arm. Put it back in its box or storage cabinet.
C. Caring for a Compound Microscope
1. Check the microscope before and after use. Report any missing or damaged
part to your teacher.
2. Use a clean tissue paper or soft cloth like old t-shirt to clean the mechanical
parts of the microscope.
3. Prevent liquids, especially acids and alcohol from spilling on any part of the
microscope. Always use a cover slip in observing wet mounts.
4. Check for moisture in the eyepiece. This may happen due to prolonged
observation of specimens. Wipe with lens paper.
5. Avoid tilting the microscope while observing wet mounts. Water might flow into
the mechanical parts of the microscope causing them to rust. Select a chair with
suitable height so that both forearms can be rested on the table during
observation.
6. Never store the microscopes in a chemical laboratory or any place where there
are corrosive fumes. Make sure there are silica get packs inside microscope
boxes or storage cabinet to absorb moisture.
Activity 1: USING A MICROSCOPE
A. Review the techniques in focusing a microscope and complete the following by
providing the answers from the box below.
Coarse
adjustment
knob
Fine
adjustment
knob
High power
objective
(HPO)
Low power
objective
(LPO)
Body
tube
Stage
Clips
Revolving
Nose Piece
Specimen Eye piece Microscope Mirror Stage Arm Diaphragm
I Will Do This
8. 8
1.
Put the microscope on a flat table top slowly and
carefully with its (a) arm facing you.
Place it about 17 centimeters or about 6 inches away
from the edge of the table.
2.
Clean all glass surfaces with lens paper. Start with the
eyepiece, then do the objectives and end with the
mirror. Use a clean tissue paper or soft cloth like old
t-shirt to clean the mechanical parts of the (b)
microscope.
3.
Look through the (c) eyepiece or ocular with one eye
but do not close the other eye.
Adjust the (d) mirror so that the light will focus
toward the hole of the (e) diaphragm.
4.
Place the slide on the (f) stage, hold it firmly with the
(g) slide clips on each side. Center the specimen on
the slide over the stage window.
5.
Watching from the side, carefully lower the body tube
using the (h) course adjustment knob until the end of
the (i) Low Power Objective (LPO) almost touches the
cover slip.
6.
To shift to the (j) High Power Objectives (HPO), raise
the (k) body tube first using the course adjustment
knob. Looking from the side, turn the (l) revolving
nosepiece to the High Power Objectives (HPO) in
place. Use the (m) fine adjustment knob to lower the
High Power Objectives (HPO) till it almost touches the
cover slip.
9. 9
B. Answer the Analysis Question
Supposing you observed the letter “e” under the low power objective then shifted
to the high power objective of the compound microscope, then you saw these
following images.
Analysis Question:
1. What happens as the power of magnification increases? Does the magnification of
a specimen increases or decreases?
________________________________________________________________
_____________________________________________________________
2. Why it is not advisable to use direct sunlight as a light source to view objects
under the microscope? Will it permanently damage the eyes?
________________________________________________________________
_____________________________________________________________
3. Study figure 2: the normal view of letter “e” and viewed under the LPO & HPO.
Compare the appearance of the letter ‘e’ when viewed without the microscope to
its appearance when viewed under the microscope.
________________________________________________________________
_____________________________________________________________
4. Which magnification allows you to see the whole letter “e”? Low Power Objective
or High Power Objective?
________________________________________________________________
_____________________________________________________________
5. How should a microscope be carried safely? And stored correctly?
________________________________________________________________
_____________________________________________________________
Letter “e” appears
without the
microscope
Letter “e” appears
under the low power
objectives
Letter “e” appears
under the high power
objectives
Figure 2: Normal view of letter “e” and viewed under the LPO & HPO
10. 10
Complete the table by supplying the correct parts, function/s and image
of a compound microscope (drawing).
Parts Function Image
Use to carry the microscope
Eyepiece/Ocular
Objective Lenses
Provides light for the
specimen
I Practice This
11. 11
CALCULATING THE MAGNIFYING POWER OF A MICROSCOPE:
Read the selection below and fill in the needed data in order to calculate the
magnifying power of a microscope. Use the formula: Ocular x Objective.
The Magnifying parts of a microscope enlarges the specimen. These parts
includes the Eyepiece or Ocular, located at the top of the body tube where the
observer peeps through at the enlarged image of the specimen and magnifies the
object ten times (10x). Objective Lenses are located under the revolving nose piece
which gather light and magnify the image. The Low Power Objective (LPO) enlarges
the specimen 10x. It provides the general view of the specimen. The High Power
Objective (HPO) enlarges the specimen 40x. It provides the detailed parts of the
specimen. The Scanner-Power Objective Lens enlarges the specimen 4x. The Oil
Immersion Objectives (OIO) enlarges the object 100x.
From the selection above, record your data in the following table. Provide the
magnification power on the spaces provide as discussed above.
OCULAR
(Magnification)
OBJECTIVES
(Magnification)
LPO HPO OIO Scanner
TOTAL
MAGNIFICATION
Ocular x Objective
I Apply This
12. 12
I Practice This
Module 1
Lesson : Parts and Function of a Compound Microscope and its Manipulation
I Will Do This
I Apply This
Possible Answers to Analysis Question:
1. The magnification also increases.
2. It is not advisable to use direct sunlight as a light
source because it can burn the retina of the eyes and
cause blindness.
3. The letter “e” without the microscope looks smaller
and in correct position. When it was viewed under the
LPO the whole letter “e” is seen, it is magnified by
100x and inverted position. In HPO, the image
becomes 400x enlarged and only a part of the letter is
seen but still in inverted position.
4. Low power objectives allows you to see the whole
letter “e”.
5. Microscope should be carried with both hands, one
holds the arm and the other supports the base. In
storing the microscope, make sure the LPO is in place,
body tube is lowered, and stage clips are in place.
Rotate the diaphragm until smallest opening in
position, Let the mirror stand on its edge with the
concave side facing the user. Put inside the plastic bag
before putting inside its box or storage cabinet.
Answer Key
13. 13
References
Books:
Bernas, V. et al. 2015. Exploring Realms of Science 7. Valenzuela City: JO-ES
Eduard C. et al. 2018. Practical Science 7. Makati City: Diwa
Madriaga. E et al. 2015. Science Links 7
Science Learner’s Module 7
TAGLAS 7 Microscope: Know My Parts and How I Work
TAGLAS 7 LET’S MAP: A Microscope
TAGLAS 7 Focus the Microscope
Internet:
http://staff.concord.org/using_compoundmicroscope
https://reviewgamezone.com/mc/candidate/test/?test_id=5133
http://www.sciencequiz.net/newjcscience/jcbiology/cell/mcq/microscope.htm
https://mrsancheta.weebly.com/uploads/1/6/1/6/16166098/microscope_worksheet_1.pdf
http://www.nobraintoosmall.co.nz/students/juniorscience/Y9/pdfs/Yr9_cellclass_microscope.
pdf
https://www.pexels.com/photo/focused-biologist-studying-plant-leaf-with-microscope-
3825541/
https://pixabay.com/vectors/microscopy-science-boy-student-148139/
https://www.edb.gov.hk/attachment/en/edu-system/primary-secondary/applicable-to-
secondary/moi/support-and-resources/science-education-secondary
For inquiries or feedback, please write or call:
Department of Education – SDO Bacolod City
(Office Address): Rosario-San Juan Sts., Brgy. 14, 6100, Bacolod City
Telefax: (034) 704 – 2585
E-mail address: bacolod.city@deped.gov.ph
14. 14
Written Assessment No. 1 Worksheet
Name: _______________________________ Grade & Section: ___________
MELC: identify parts of the microscope and their functions (S7LT-IIa-1) and to use
appropriate techniques in using and manipulating the compound microscope (S7LT-
IIb-2).
Part I. Read each sentence carefully. Select the letter of the best answer.
1. Which two parts of the light microscope magnify the image of an object?
A. Eyepiece and mirror C. Objectives and mirror
B. Eyepiece and objectives D. Objectives and diaphragm
2. The parts labeled A and D in the diagram are
A. The objective lens and mirror respectively
B. The eyepiece and the objective lens respectively
C. The mirror and the eye piece respectively
D. The objective and the eyepiece respectively
3. Which part will you adjust if the onion cell you are
observing under the HPO is not clear?
A. part B C. part G
B. part C D. part J
4. What is the correct order in which light passes through?
A. Slide—eyepiece—objective lens — mirror
B. Mirror — objective lens — eyepiece — slide
C. Mirror — slide — objective lens — eyepiece
D. Mirror — eyepiece — objective lens — slide
5. Which of the following shows “e” seen under the microscope?
A. B. C. D.
Part II
PICTURE SEQUENCING: Study the following pictures on Template 1.
Referring to the description, CUT and PASTE the pictures on the boxes below in
order to show the correct way of focusing a microscope.
15. 15
Focusing a Microscope
Reflection Question:
How do microscopes help biologists in discovering the natural world?
___________________________________________________________________
___________________________________________________________________
___________________________________________________________________
3. Look through the
eyepiece with both eyes
open and adjust the mirror
to capture light.
6. Use the Course
adjustment knob to
focus under LPO
4. Place the slide on the
stage, hold it firmly with
the slide clips.
1. Put the Microscope on
a flat table 17 cm away
from the edge.
2. Incline/tilt the
microscope facing light
5. Center the specimen on
the slide over the stage
window.
7. To shift to HPO, raise the
body tube using the course
adjustment. Looking from the
side, turn the revolving
nosepiece to the HPO in
place.
8. Look through the eyepiece
and adjust the fine
adjustment knob until the
specimen is seen clearly.
.
9. Once done, tilt to its
normal position, remove the
slide from the stage and
position the clip at the center
turn the nosepiece to LPO,