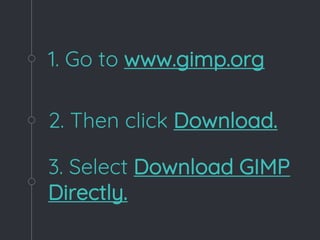
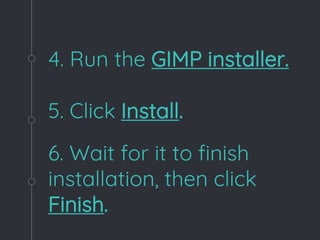
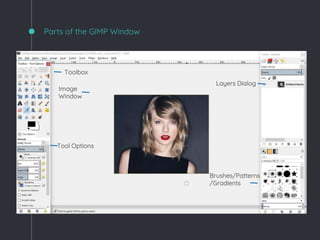
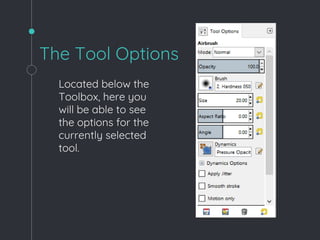
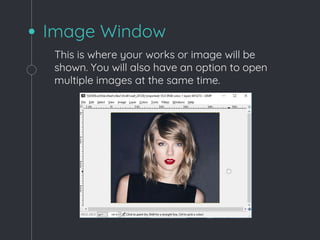
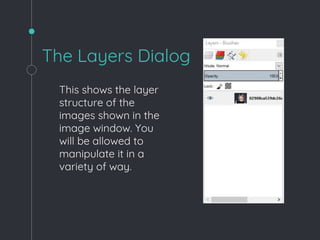
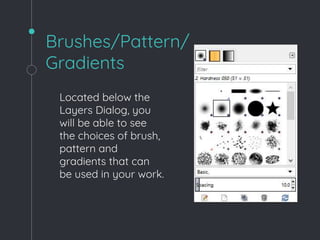
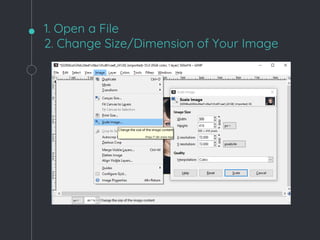
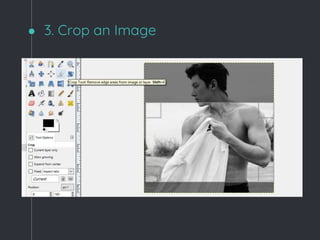
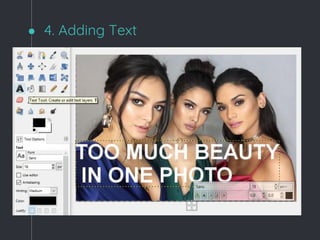
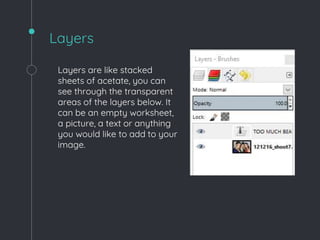
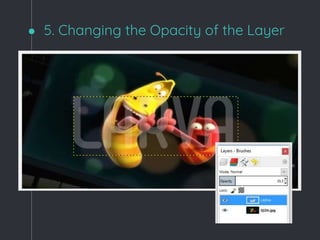
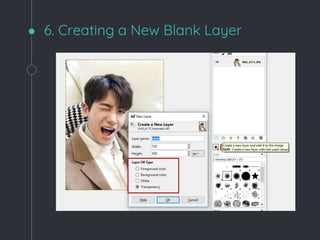
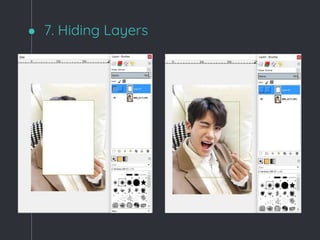
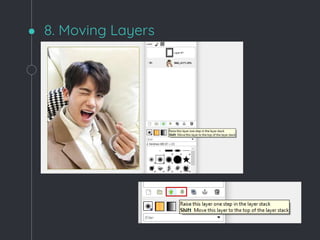
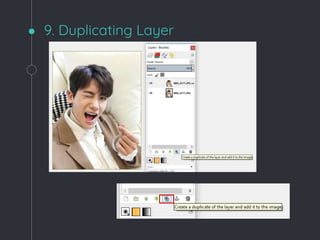
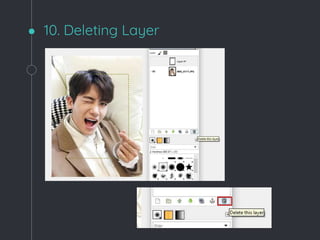
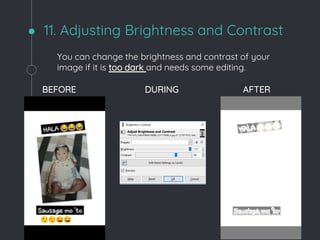
BASIC IMAGE
MANIPULATION
USING OFFLINE OR OPEN-SOURCE
SOFTWARE
Photo editing and designing
tools allow you to manipulate
or edit images, apply effects,
filters, add frames, crop, add
text, change background
color, make photo collage,
and photo album that you
would like to do in an image.
“
”
Here are various
platforms and
applications you can
use for image editing:
Is Google’s free photo manager to edit
and organize your photos.
1
Is a Windows-based
alternative to the MS
Paint editor.
2
Is a free, 3D-modelling program with
tools to allow you to create 3D models of
houses, home renovation, woodworking
projects, and others with dimensional
accuracy.
3
Is a free photo editing tool that is similar
to Photoshop and has more 600 effects,
overlays, and borders that you can use.
4
Adobe Photoshop
Is a tool to create, modify, combine and
optimize digital photos and images.
5
GIMP
GNU Image Manipulation Program is a
free, open-source image/graphics
editing program used for image
retouching and editing, free-form
drawing/painting, etc.
6
HANDS-ON!
Using GIMP for Image
Manipulation
1. Go to www.gimp.org
3. Select Download GIMP
Directly.
2. Then click Download.
4. Run the GIMP installer.
6. Wait for it to finish
installation, then click
Finish.
5. Click Install.
GIMP Basics
Let’s do the basics!
Parts of the GIMP Window
Toolbox
Image
Window
Tool Options
Layers Dialog
Brushes/Patterns
/Gradients
The Toolbox
This is the part
where the main tools
are located such as
the tools used to
crop, select, erase
and more.
The Tool Options
Located below the
Toolbox, here you
will be able to see
the options for the
currently selected
tool.
Image Window
This is where your works or image will be
shown. You will also have an option to open
multiple images at the same time.
The Layers Dialog
This shows the layer
structure of the
images shown in the
image window. You
will be allowed to
manipulate it in a
variety of way.
Brushes/Pattern/
Gradients
Located below the
Layers Dialog, you
will be able to see
the choices of brush,
pattern and
gradients that can
be used in your work.
Today we’ll learn how to…
◦ Open a File in GIMP
◦ Change the Dimension of Your
Image
◦ Crop an Image
◦ Add Texts
◦ Change Opacity of Layers
◦ Create, Hide, Move, Duplicate and
Delete Layers
◦ Change Brightness and Contrast
1. Open a File
2. Change Size/Dimension of Your Image
3. Crop an Image
4. Adding Text
Layers
Layers are like stacked
sheets of acetate, you can
see through the transparent
areas of the layers below. It
can be an empty worksheet,
a picture, a text or anything
you would like to add to your
image.
5. Changing the Opacity of the Layer
6. Creating a New Blank Layer
We have four choices.
a. Foreground Color – the layer will
appear on what the foreground
color is.
b. Background Color – located
beside the foreground color.
c. White – just as the name states,
the new layer will be white.
d. Transparency – the new layer will
be transparent.
7. Hiding Layers
8. Moving Layers
9. Duplicating Layer
10. Deleting Layer
11. Adjusting Brightness and Contrast
You can change the brightness and contrast of your
image if it is too dark and needs some editing.
BEFORE DURING AFTER
Now, do you know how to…
◦ Open a File in GIMP
◦ Change the Dimension of Your
Image
◦ Crop an Image
◦ Add Texts
◦ Change Opacity of Layers
◦ Create, Hide, Move, Duplicate and
Delete Layers
◦ Change Brightness and Contrast
Now, let us proceed to
the great Adobe
Photoshop!
Yeey!

GNU Image Manipulation Program

  • 1.
  • 2.
    Photo editing anddesigning tools allow you to manipulate or edit images, apply effects, filters, add frames, crop, add text, change background color, make photo collage, and photo album that you would like to do in an image. “ ”
  • 3.
    Here are various platformsand applications you can use for image editing:
  • 4.
    Is Google’s freephoto manager to edit and organize your photos. 1
  • 6.
    Is a Windows-based alternativeto the MS Paint editor. 2
  • 8.
    Is a free,3D-modelling program with tools to allow you to create 3D models of houses, home renovation, woodworking projects, and others with dimensional accuracy. 3
  • 10.
    Is a freephoto editing tool that is similar to Photoshop and has more 600 effects, overlays, and borders that you can use. 4
  • 12.
    Adobe Photoshop Is atool to create, modify, combine and optimize digital photos and images. 5
  • 14.
    GIMP GNU Image ManipulationProgram is a free, open-source image/graphics editing program used for image retouching and editing, free-form drawing/painting, etc. 6
  • 15.
    HANDS-ON! Using GIMP forImage Manipulation
  • 16.
    1. Go towww.gimp.org 3. Select Download GIMP Directly. 2. Then click Download.
  • 17.
    4. Run theGIMP installer. 6. Wait for it to finish installation, then click Finish. 5. Click Install.
  • 18.
  • 19.
    Parts of theGIMP Window Toolbox Image Window Tool Options Layers Dialog Brushes/Patterns /Gradients
  • 20.
    The Toolbox This isthe part where the main tools are located such as the tools used to crop, select, erase and more.
  • 21.
    The Tool Options Locatedbelow the Toolbox, here you will be able to see the options for the currently selected tool.
  • 22.
    Image Window This iswhere your works or image will be shown. You will also have an option to open multiple images at the same time.
  • 23.
    The Layers Dialog Thisshows the layer structure of the images shown in the image window. You will be allowed to manipulate it in a variety of way.
  • 24.
    Brushes/Pattern/ Gradients Located below the LayersDialog, you will be able to see the choices of brush, pattern and gradients that can be used in your work.
  • 25.
    Today we’ll learnhow to… ◦ Open a File in GIMP ◦ Change the Dimension of Your Image ◦ Crop an Image ◦ Add Texts ◦ Change Opacity of Layers ◦ Create, Hide, Move, Duplicate and Delete Layers ◦ Change Brightness and Contrast
  • 26.
    1. Open aFile 2. Change Size/Dimension of Your Image
  • 27.
  • 28.
  • 29.
    Layers Layers are likestacked sheets of acetate, you can see through the transparent areas of the layers below. It can be an empty worksheet, a picture, a text or anything you would like to add to your image.
  • 30.
    5. Changing theOpacity of the Layer
  • 31.
    6. Creating aNew Blank Layer
  • 32.
    We have fourchoices. a. Foreground Color – the layer will appear on what the foreground color is. b. Background Color – located beside the foreground color. c. White – just as the name states, the new layer will be white. d. Transparency – the new layer will be transparent.
  • 33.
  • 34.
  • 35.
  • 36.
  • 37.
    11. Adjusting Brightnessand Contrast You can change the brightness and contrast of your image if it is too dark and needs some editing. BEFORE DURING AFTER
  • 38.
    Now, do youknow how to… ◦ Open a File in GIMP ◦ Change the Dimension of Your Image ◦ Crop an Image ◦ Add Texts ◦ Change Opacity of Layers ◦ Create, Hide, Move, Duplicate and Delete Layers ◦ Change Brightness and Contrast
  • 39.
    Now, let usproceed to the great Adobe Photoshop! Yeey!