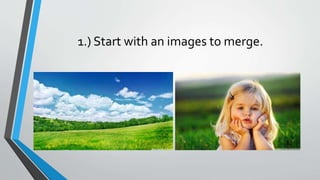
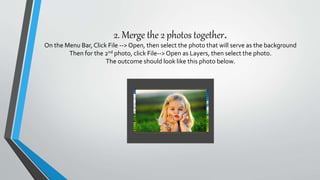
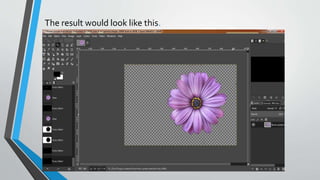
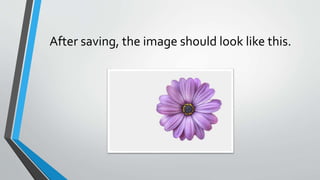
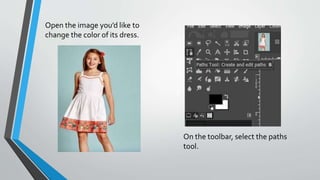
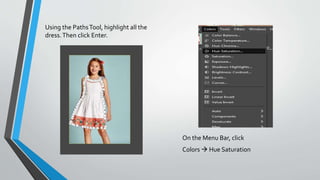
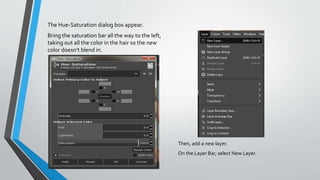
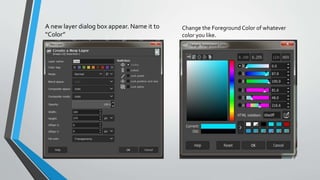
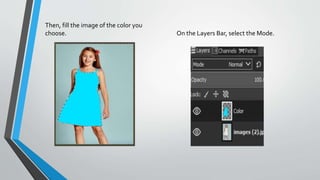
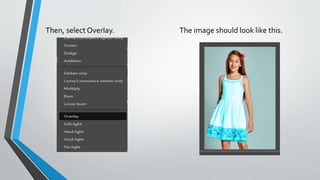
TUTORIAL IN GIMP
v.2.10.2
By: Ralph Emmanuel L. Baesa
BLENDING IMAGES IN GIMP
1.) Start with an images to merge.
2. Merge the 2 photos together.
On the Menu Bar, Click File --> Open, then select the photo that will serve as the background
Then for the 2nd photo, click File-->Open as Layers, then select the photo.
The outcome should look like this photo below.
3.) Then add layer mask.
On the Menu Bar,
click Layer---> Mask --->Add Layer Mask
Then a dialog box will appear then click
add.
4.) Take the Gradient tool
Click the GradientTool on the
Tool Bar
Make a gradient from left to right, starting
from the edge of the image and stopping in the
middle of it, to maintain a visible part.Then
click enter.
5.) Merge Down
Then, on the Menu Bar click Layer-->
Merge Down
The image should look like
this.
6.) Superimpose the two images
• Click on the image of the model, and "Select All" then
"Copy.“
• Go to the landscape image, in selection mode, and click
"Paste."
• Move the image to fit as you want.
• Save.
Removing the background of the image
Open an image in which you want to remove the
background. (In this case, I choose this image
below)
This would be the result after you open an image.
Add transparency to the image by using Layer >
Transparency >AddAlpha Channel.
On the tool bar, select the fuzzy tool.
Highlight the background of the image you
want remove.Then press delete.
The result would look like this.
After saving, the image should look like this.
Changing the color of the dress.
Open the image you’d like to
change the color of its dress.
On the toolbar, select the paths
tool.
Using the PathsTool, highlight all the
dress.Then click Enter.
On the Menu Bar, click
Colors  Hue Saturation
The Hue-Saturation dialog box appear.
Bring the saturation bar all the way to the left,
taking out all the color in the hair so the new
color doesn’t blend in.
Then, add a new layer.
On the Layer Bar, select New Layer.
A new layer dialog box appear. Name it to
“Color”
Change the Foreground Color of whatever
color you like.
Then, fill the image of the color you
choose. On the Layers Bar, select the Mode.
Then, select Overlay. The image should look like this.
Make the outline disappear, choose Select
on the menu.
Select => None
The Image should now look like
this.

Tutorial in Gimp 2.10.2

  • 1.
    TUTORIAL IN GIMP v.2.10.2 By:Ralph Emmanuel L. Baesa
  • 2.
  • 3.
    1.) Start withan images to merge.
  • 4.
    2. Merge the2 photos together. On the Menu Bar, Click File --> Open, then select the photo that will serve as the background Then for the 2nd photo, click File-->Open as Layers, then select the photo. The outcome should look like this photo below.
  • 6.
    3.) Then addlayer mask. On the Menu Bar, click Layer---> Mask --->Add Layer Mask Then a dialog box will appear then click add.
  • 7.
    4.) Take theGradient tool Click the GradientTool on the Tool Bar Make a gradient from left to right, starting from the edge of the image and stopping in the middle of it, to maintain a visible part.Then click enter.
  • 8.
    5.) Merge Down Then,on the Menu Bar click Layer--> Merge Down The image should look like this.
  • 9.
    6.) Superimpose thetwo images • Click on the image of the model, and "Select All" then "Copy.“ • Go to the landscape image, in selection mode, and click "Paste." • Move the image to fit as you want. • Save.
  • 10.
  • 11.
    Open an imagein which you want to remove the background. (In this case, I choose this image below)
  • 12.
    This would bethe result after you open an image. Add transparency to the image by using Layer > Transparency >AddAlpha Channel.
  • 13.
    On the toolbar, select the fuzzy tool. Highlight the background of the image you want remove.Then press delete.
  • 14.
    The result wouldlook like this.
  • 15.
    After saving, theimage should look like this.
  • 16.
    Changing the colorof the dress.
  • 17.
    Open the imageyou’d like to change the color of its dress. On the toolbar, select the paths tool.
  • 18.
    Using the PathsTool,highlight all the dress.Then click Enter. On the Menu Bar, click Colors  Hue Saturation
  • 19.
    The Hue-Saturation dialogbox appear. Bring the saturation bar all the way to the left, taking out all the color in the hair so the new color doesn’t blend in. Then, add a new layer. On the Layer Bar, select New Layer.
  • 20.
    A new layerdialog box appear. Name it to “Color” Change the Foreground Color of whatever color you like.
  • 21.
    Then, fill theimage of the color you choose. On the Layers Bar, select the Mode.
  • 22.
    Then, select Overlay.The image should look like this.
  • 23.
    Make the outlinedisappear, choose Select on the menu. Select => None The Image should now look like this.