The document provides step-by-step instructions for creating a fashion spread in Photoshop, including importing an image, resizing and positioning it, and adding costume information text. Key steps are opening Photoshop and creating a new document, importing an image file and copying it to the document, using the Free Transform tool to resize the image, and selecting the Horizontal Type Tool to add text with formatting.
How to Create a Book Cover with Adobe InDesignJasmine Dy
Adobe InDesign is a highly-efficient software that can be used for various kinds of print products. It’s popular for making newspaper and magazine layouts so easy to create beautifully if you have an eye for good design and aesthetics. Apart from that you can also use it for posters and book covers, which I used it for in this tutorial.
This is a step-by-step account of how to create your book’s front cover for Kindle and promotional use, and whole cover complete with the spine and back cover.
TUTorial By chad neuman in InDesign,Tutorial AT Vishal Dawdy .docxwillcoxjanay
TUTorial By chad neuman in InDesign,Tutorial AT Vishal Dawdy
Download the support files first from Mod 3 Guidelines!
Begin…
INSTRUCTIONS:
Step 1
Open InDesign and go to File>New>Document or click the Create New File icon on the welcome screen. Set the settings shown here (these are all default settings except you’ll set it to 4 pages and click “facing pages”).
Step 2
Let’s set up the master pages. That way we can add a header and page numbers automatically. Make sure your “Pages” window is open from the Window Menu. DOUBLE-Click on the A-Master icon on the top of the Pages pull-out palette to work in the master pages shown here in yellow).
Step 3
In the lower-left hand corner of the left master page, click-and-drag with the Text tool to drag out a text box for the page number.
Step 4
Go to Type>Insert Special Character> Markers>Current Page Number.
Step 5
This will insert an automated page number so you don’t have to number each page. Change the size (and style if you want) of the font to an appropriate one for your publication.
[Note: Additionally, you could also place text (like the word 'page' or '#' symbol) in front of the page number and it would be continued throughout all pages using the master page template.]
Step 6
Select the Selection tool (black arrow). Hold down Option and click-and-drag the text box that has the automatic page number in it over to the right page to create another instance of the Auto Page Number. I placed the text box on the right side page on the lower right hand corner.
Step 7
If you put the text boxes for the page numbers in the same locations as I chose to, it should look something like this.
Step 8
Page numbers are not the only objects to put onto the master pages. And all the objects don’t have to be automatically updated objects, either. You can add photos, text, or shapes and they’ll be on every page. For this tutorial, add just a simple title at the top of each page by clicking-and-dragging out a text box along the top.
Step 9
Open the Paragraph palette under Window>Type & Tables>Paragraph and click the center or justify icon to center the text after highlighting it. Up in the Control options menu, change the tracking to 600 to increase the spacing of the text to spread out the title. The Tracking setting icon is an uppercase AV with directional arrows underneath it.
Step 10
Open Adobe Illustrator, create a New Document and go to File>Place to place the japanese_flag.gif file located in the downloadable support files for this tutorial (see Module 3 on our website).
Step 11
After clicking on the placed file with a Selection tool, open the Image Trace Control palette (under Window) to view the options for live tracing. Make sure the settings are set to the ones shown here; pretty much a basic black and white trace.
Step 12 Select Trace and then Go to the OBJECT menu and Expand (object+fill) to apply the trace to the selected artwork.
Step 13 Next, Deselect the image. Then, ...
Graphics Experts Ltd is the right solution for all of your graphic design needs. We offer affordable, professional services that encompass everything from image masking, shadow creation, web image optimization, and clipping path to image manipulation, image retouching, color adjustments, photo editing, vehicle enhancement, and even illustration.
State of ICS and IoT Cyber Threat Landscape Report 2024 previewPrayukth K V
The IoT and OT threat landscape report has been prepared by the Threat Research Team at Sectrio using data from Sectrio, cyber threat intelligence farming facilities spread across over 85 cities around the world. In addition, Sectrio also runs AI-based advanced threat and payload engagement facilities that serve as sinks to attract and engage sophisticated threat actors, and newer malware including new variants and latent threats that are at an earlier stage of development.
The latest edition of the OT/ICS and IoT security Threat Landscape Report 2024 also covers:
State of global ICS asset and network exposure
Sectoral targets and attacks as well as the cost of ransom
Global APT activity, AI usage, actor and tactic profiles, and implications
Rise in volumes of AI-powered cyberattacks
Major cyber events in 2024
Malware and malicious payload trends
Cyberattack types and targets
Vulnerability exploit attempts on CVEs
Attacks on counties – USA
Expansion of bot farms – how, where, and why
In-depth analysis of the cyber threat landscape across North America, South America, Europe, APAC, and the Middle East
Why are attacks on smart factories rising?
Cyber risk predictions
Axis of attacks – Europe
Systemic attacks in the Middle East
Download the full report from here:
https://sectrio.com/resources/ot-threat-landscape-reports/sectrio-releases-ot-ics-and-iot-security-threat-landscape-report-2024/
LF Energy Webinar: Electrical Grid Modelling and Simulation Through PowSyBl -...DanBrown980551
Do you want to learn how to model and simulate an electrical network from scratch in under an hour?
Then welcome to this PowSyBl workshop, hosted by Rte, the French Transmission System Operator (TSO)!
During the webinar, you will discover the PowSyBl ecosystem as well as handle and study an electrical network through an interactive Python notebook.
PowSyBl is an open source project hosted by LF Energy, which offers a comprehensive set of features for electrical grid modelling and simulation. Among other advanced features, PowSyBl provides:
- A fully editable and extendable library for grid component modelling;
- Visualization tools to display your network;
- Grid simulation tools, such as power flows, security analyses (with or without remedial actions) and sensitivity analyses;
The framework is mostly written in Java, with a Python binding so that Python developers can access PowSyBl functionalities as well.
What you will learn during the webinar:
- For beginners: discover PowSyBl's functionalities through a quick general presentation and the notebook, without needing any expert coding skills;
- For advanced developers: master the skills to efficiently apply PowSyBl functionalities to your real-world scenarios.
Epistemic Interaction - tuning interfaces to provide information for AI supportAlan Dix
Paper presented at SYNERGY workshop at AVI 2024, Genoa, Italy. 3rd June 2024
https://alandix.com/academic/papers/synergy2024-epistemic/
As machine learning integrates deeper into human-computer interactions, the concept of epistemic interaction emerges, aiming to refine these interactions to enhance system adaptability. This approach encourages minor, intentional adjustments in user behaviour to enrich the data available for system learning. This paper introduces epistemic interaction within the context of human-system communication, illustrating how deliberate interaction design can improve system understanding and adaptation. Through concrete examples, we demonstrate the potential of epistemic interaction to significantly advance human-computer interaction by leveraging intuitive human communication strategies to inform system design and functionality, offering a novel pathway for enriching user-system engagements.
Let's dive deeper into the world of ODC! Ricardo Alves (OutSystems) will join us to tell all about the new Data Fabric. After that, Sezen de Bruijn (OutSystems) will get into the details on how to best design a sturdy architecture within ODC.
GraphRAG is All You need? LLM & Knowledge GraphGuy Korland
Guy Korland, CEO and Co-founder of FalkorDB, will review two articles on the integration of language models with knowledge graphs.
1. Unifying Large Language Models and Knowledge Graphs: A Roadmap.
https://arxiv.org/abs/2306.08302
2. Microsoft Research's GraphRAG paper and a review paper on various uses of knowledge graphs:
https://www.microsoft.com/en-us/research/blog/graphrag-unlocking-llm-discovery-on-narrative-private-data/
DevOps and Testing slides at DASA ConnectKari Kakkonen
My and Rik Marselis slides at 30.5.2024 DASA Connect conference. We discuss about what is testing, then what is agile testing and finally what is Testing in DevOps. Finally we had lovely workshop with the participants trying to find out different ways to think about quality and testing in different parts of the DevOps infinity loop.
Slack (or Teams) Automation for Bonterra Impact Management (fka Social Soluti...Jeffrey Haguewood
Sidekick Solutions uses Bonterra Impact Management (fka Social Solutions Apricot) and automation solutions to integrate data for business workflows.
We believe integration and automation are essential to user experience and the promise of efficient work through technology. Automation is the critical ingredient to realizing that full vision. We develop integration products and services for Bonterra Case Management software to support the deployment of automations for a variety of use cases.
This video focuses on the notifications, alerts, and approval requests using Slack for Bonterra Impact Management. The solutions covered in this webinar can also be deployed for Microsoft Teams.
Interested in deploying notification automations for Bonterra Impact Management? Contact us at sales@sidekicksolutionsllc.com to discuss next steps.
Essentials of Automations: Optimizing FME Workflows with ParametersSafe Software
Are you looking to streamline your workflows and boost your projects’ efficiency? Do you find yourself searching for ways to add flexibility and control over your FME workflows? If so, you’re in the right place.
Join us for an insightful dive into the world of FME parameters, a critical element in optimizing workflow efficiency. This webinar marks the beginning of our three-part “Essentials of Automation” series. This first webinar is designed to equip you with the knowledge and skills to utilize parameters effectively: enhancing the flexibility, maintainability, and user control of your FME projects.
Here’s what you’ll gain:
- Essentials of FME Parameters: Understand the pivotal role of parameters, including Reader/Writer, Transformer, User, and FME Flow categories. Discover how they are the key to unlocking automation and optimization within your workflows.
- Practical Applications in FME Form: Delve into key user parameter types including choice, connections, and file URLs. Allow users to control how a workflow runs, making your workflows more reusable. Learn to import values and deliver the best user experience for your workflows while enhancing accuracy.
- Optimization Strategies in FME Flow: Explore the creation and strategic deployment of parameters in FME Flow, including the use of deployment and geometry parameters, to maximize workflow efficiency.
- Pro Tips for Success: Gain insights on parameterizing connections and leveraging new features like Conditional Visibility for clarity and simplicity.
We’ll wrap up with a glimpse into future webinars, followed by a Q&A session to address your specific questions surrounding this topic.
Don’t miss this opportunity to elevate your FME expertise and drive your projects to new heights of efficiency.
Search and Society: Reimagining Information Access for Radical FuturesBhaskar Mitra
The field of Information retrieval (IR) is currently undergoing a transformative shift, at least partly due to the emerging applications of generative AI to information access. In this talk, we will deliberate on the sociotechnical implications of generative AI for information access. We will argue that there is both a critical necessity and an exciting opportunity for the IR community to re-center our research agendas on societal needs while dismantling the artificial separation between the work on fairness, accountability, transparency, and ethics in IR and the rest of IR research. Instead of adopting a reactionary strategy of trying to mitigate potential social harms from emerging technologies, the community should aim to proactively set the research agenda for the kinds of systems we should build inspired by diverse explicitly stated sociotechnical imaginaries. The sociotechnical imaginaries that underpin the design and development of information access technologies needs to be explicitly articulated, and we need to develop theories of change in context of these diverse perspectives. Our guiding future imaginaries must be informed by other academic fields, such as democratic theory and critical theory, and should be co-developed with social science scholars, legal scholars, civil rights and social justice activists, and artists, among others.
Search and Society: Reimagining Information Access for Radical Futures
Fashion spread 2
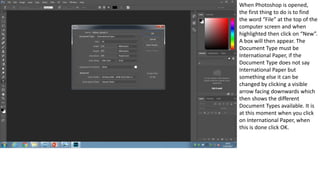
1. When Photoshop is opened,
the first thing to do is to find
the word “File” at the top of the
computer screen and when
highlighted then click on “New”.
A box will then appear. The
Document Type must be
International Paper, if the
Document Type does not say
International Paper but
something else it can be
changed by clicking a visible
arrow facing downwards which
then shows the different
Document Types available. It is
at this moment when you click
on International Paper, when
this is done click OK.
3. To get the image that is going to
be used for my second Fashion
Spread for “Teen Rulez!” go to
the top of the screen (shown in
the previous slideshow) and
find the word “File” and when
highlighted then click on
“Open”. After this find the
image and open it. It should
then should appear in a new
tab in Photoshop.
4. To get the image onto the
Fashion Spread 2 tab highlight
the whole image from
whichever corner using the
Rectangular Marquee Tool
(which can be seen highlighted)
with the left side of the mouse.
When this is done go to the top
of the page, find the word
“Edit” and when highlighted
then click on “Copy”.
5. When back on the Fashion
Spread 2 tab go to the top of
the screen, find the word “Edit”
and when highlighted click on
“Paste”. After this the image
copied should appear on the
screen.
6. To make the image smaller
without spreading it start by
going to the top of the screen
finding the word “Edit” and
when highlighted click on “Free
Transform”. After this the image
would look like this. Make sure
that the image layer (Layer 1) is
highlighted.
7. To make more room move the
image upwards and to the right
using the left side of the
mouse, this will make the
model being in the centre of
the second Fashion Spread.
8. Click the “Enter” key to make
the whole image visible and to
confirm the changes to the
image.
9. The next and final part of
creating the second Fashion
Spread for “Teen Rulez!” is
creating the Costume
Information for the second
Fashion Spread. Firstly, select
the Horizontal Type Tool and
click and drag a box where the
Costume Information will be
typed up.
10. Type the Costume Information
in your chosen colour, choice of
font and size of the font, in this
case I am using the colour
Black, the font size is 12 pt and
the chosen front is Viner Hand
ITC. The image on the left
shows the finished second
Fashion Spread for “Teen
Rulez!”
11. I made one adjustment to the
second Fashion Spread to
improve it. I moved the
Clothing Information further
down near the trousers my
model is wearing. The image on
the left shows the finished
second Fashion Spread for
“Teen Rulez!”