The document provides instructions for creating a two-sided flyer in Photoshop. It explains how to set up the document size and resolution, add margins and layers for images and text, and duplicate the file to add a second side. Tips are given to use heavier paper for printing and check printer specifications before setting up the file.
Presentacion completa en inglés sobre PowerPoint,es uno de los programas de presentación más extendidos. Es ampliamente utilizado en distintos campos de la enseñanza, los negocios.. etc.
I worked on the Microsoft IE7 Tour graphics update for her. I created the reproduction docs: technical writing and screenshots of how to update the Photoshop files with the IE7 Tour graphics. I made the updated graphics in Photoshop CS2 and wrote a simple step by step tutorial on how to do this.
How to Merge Images or Pictures in Microsoft Office WordJaff Tiger
When using Word, you may need to merge some image to one so that you can make the Word document more readable. Want to learn how to merge images in Word? just follow my words.
TUTorial By chad neuman in InDesign,Tutorial AT Vishal Dawdy .docxwillcoxjanay
TUTorial By chad neuman in InDesign,Tutorial AT Vishal Dawdy
Download the support files first from Mod 3 Guidelines!
Begin…
INSTRUCTIONS:
Step 1
Open InDesign and go to File>New>Document or click the Create New File icon on the welcome screen. Set the settings shown here (these are all default settings except you’ll set it to 4 pages and click “facing pages”).
Step 2
Let’s set up the master pages. That way we can add a header and page numbers automatically. Make sure your “Pages” window is open from the Window Menu. DOUBLE-Click on the A-Master icon on the top of the Pages pull-out palette to work in the master pages shown here in yellow).
Step 3
In the lower-left hand corner of the left master page, click-and-drag with the Text tool to drag out a text box for the page number.
Step 4
Go to Type>Insert Special Character> Markers>Current Page Number.
Step 5
This will insert an automated page number so you don’t have to number each page. Change the size (and style if you want) of the font to an appropriate one for your publication.
[Note: Additionally, you could also place text (like the word 'page' or '#' symbol) in front of the page number and it would be continued throughout all pages using the master page template.]
Step 6
Select the Selection tool (black arrow). Hold down Option and click-and-drag the text box that has the automatic page number in it over to the right page to create another instance of the Auto Page Number. I placed the text box on the right side page on the lower right hand corner.
Step 7
If you put the text boxes for the page numbers in the same locations as I chose to, it should look something like this.
Step 8
Page numbers are not the only objects to put onto the master pages. And all the objects don’t have to be automatically updated objects, either. You can add photos, text, or shapes and they’ll be on every page. For this tutorial, add just a simple title at the top of each page by clicking-and-dragging out a text box along the top.
Step 9
Open the Paragraph palette under Window>Type & Tables>Paragraph and click the center or justify icon to center the text after highlighting it. Up in the Control options menu, change the tracking to 600 to increase the spacing of the text to spread out the title. The Tracking setting icon is an uppercase AV with directional arrows underneath it.
Step 10
Open Adobe Illustrator, create a New Document and go to File>Place to place the japanese_flag.gif file located in the downloadable support files for this tutorial (see Module 3 on our website).
Step 11
After clicking on the placed file with a Selection tool, open the Image Trace Control palette (under Window) to view the options for live tracing. Make sure the settings are set to the ones shown here; pretty much a basic black and white trace.
Step 12 Select Trace and then Go to the OBJECT menu and Expand (object+fill) to apply the trace to the selected artwork.
Step 13 Next, Deselect the image. Then, ...
In this PP Presentation we explain in detail how to create watermark effect on your images using Photoshop.
Watermark effect takes your images to another level providing you the opportunity to increase brand awareness or simply to mark/protect your artistic photos.
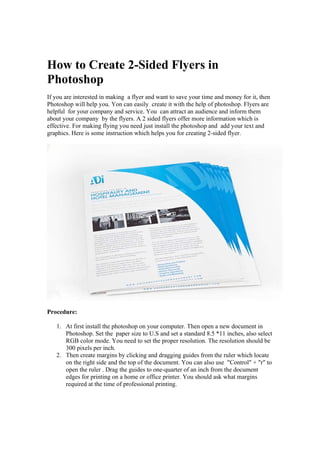
1. How to Create 2-Sided Flyers in
Photoshop
If you are interested in making a flyer and want to save your time and money for it, then
Photoshop will help you. Yon can easily create it with the help of photoshop. Flyers are
helpful for your company and service. You can attract an audience and inform them
about your company by the flyers. A 2 sided flyers offer more information which is
effective. For making flying you need just install the photoshop and add your text and
graphics. Here is some instruction which helps you for creating 2-sided flyer.
Procedure:
1. At first install the photoshop on your computer. Then open a new document in
Photoshop. Set the paper size to U.S and set a standard 8.5 *11 inches, also select
RGB color mode. You need to set the proper resolution. The resolution should be
300 pixels per inch.
2. Then create margins by clicking and dragging guides from the ruler which locate
on the right side and the top of the document. You can also use "Control" + "r" to
open the ruler . Drag the guides to one-quarter of an inch from the document
edges for printing on a home or office printer. You should ask what margins
required at the time of professional printing.
2. 3. Click the "Type" tool and select your font. You can choose a color for your text
for your design. You should careful in choosing the color.
4. Then open an image or other artwork . Drag it into your flyer document. So It will
appear on its own layer. Now you can resize your image. You can do it by the
help of "Free Transform" tool or "Control + "t". You can press the "Shift" key at
the time by resizing to maintain the aspect ratio. If you can add effects like a drop
shadow to make your image stand out then you can use layer effect option. So,
Double click on the layer effects option to open this.
5. If you want you can add more text to describe the main point of your flyer. To
place smaller text lower down on your flyer, you can use the text tools. Try to
keep your text simple and easy to read. With the "Text" tool active, open k the
"Create Warped Text" icon in the tool options towards the top of the screen. For
using this you can add an eye catching banner effect to your text.
6. You can create a second side of your flyer by opening to the "Image" pull-down
menu and picking "Duplicate." Then a dialog box will open which allows you to
name the new document. Then Click "OK" and a same copy of your first
document will open. . Make your flyer's second side with appropriate text, images
and other information which you like.
7. After finishing the design , save your document. You can print your work directly
from photoshop.
Tips:
Always try to print the flyer yourself on heavier paper. You should avoid thinner paper.
For professional printing you should sure about the right specification for your printer
before setting up your document.
Business Card Printing http://www.samedayprinting.com/business‐card‐printing.html
Flyer Printing http://www.samedayprinting.com/flyers.html
Postcard Printing http://www.samedayprinting.com/postcards.html
Poster Printing http://www.samedayprinting.com/posters.html
Banner Printing http://www.samedayprinting.com/banners.html
Brochure Printing http://www.samedayprinting.com/brochure‐printing.html
Sticker Printing http://www.samedayprinting.com/sticker‐printing.html
EDDM Printing
http://www.samedayprinting.com/direct‐mail‐printing‐
eddm.html