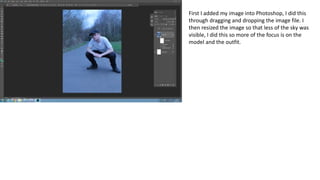
1. First I added my image into Photoshop, I did this
through dragging and dropping the image file. I
then resized the image so that less of the sky was
visible, I did this so more of the focus is on the
model and the outfit.
2. I then added in the text describing the outfit
that my model was wearing, the prices and
where the clothes can be bought from, I did
this as it is conventional of a fashion spread to
have these things listed.
3. I then adjusted the colour balance, vibrance and
the brightness/contrast. I did this in order to make
the colours of the model’s clothes stand out more,
adjusting these also helps the background of the
image stand out more, for example it makes the
grass greener and therefore more visually
intersesting.
4. I then added the outer glow to my text in order
to make it stand out more, this was especially
needed after the adjustments to the smart
filters were made as this made it harder to
make out the text, therefore the outer glow
had to be added.