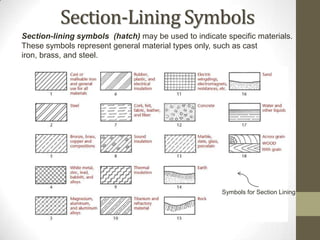
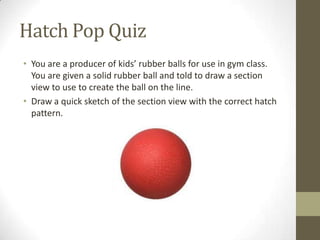
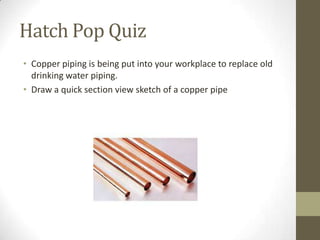
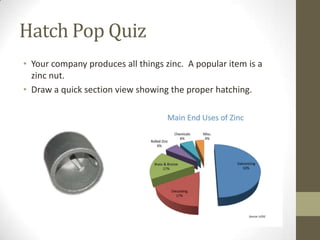
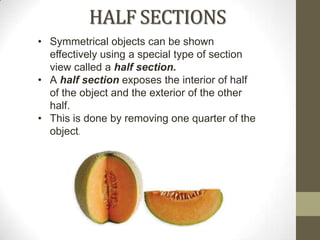
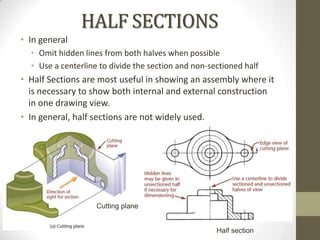
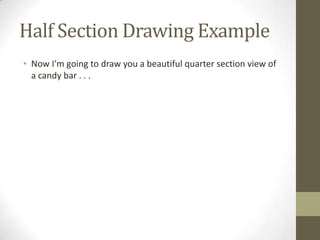
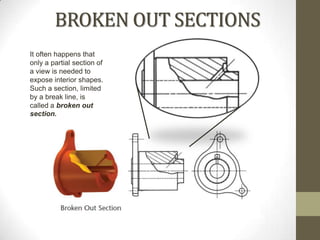
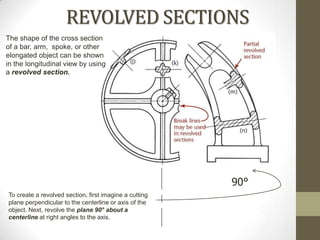
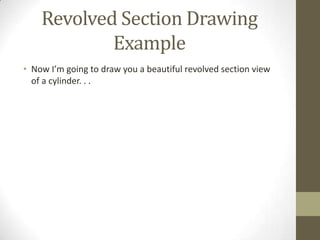
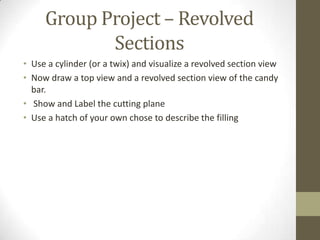
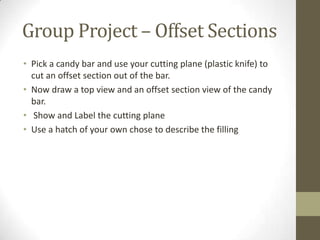
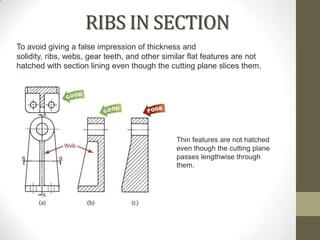
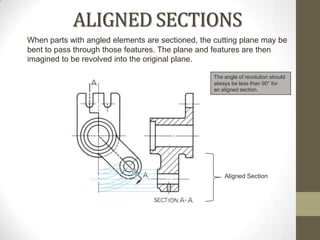
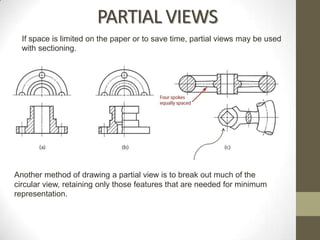
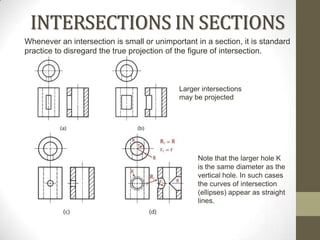
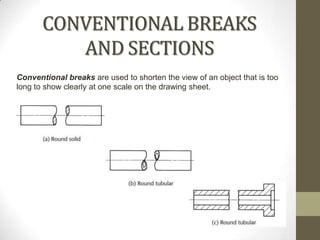
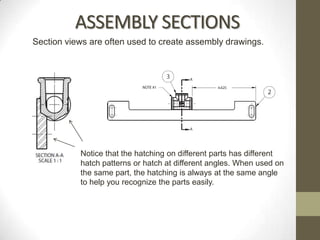
2D Essentials


Instructor: Laura Gerold, PE
Catalog #10614113
Class # 22784, 24113, 24136, & 24138
Class Start: January 18, 2012
Class End: May 16, 2012
Reminders
• Optional extra credit is due today
• Final Project is due on May 9th.
• Final Exam is May 16th.
“Mid-term” Survey
• Take out a sheet of paper and answer the following
  questions about me. You do not need to sign the paper.
  Justin and Jacob, you can email me your responses.
  1. I think it would help me if we did MORE:
  2. The thing I like doing best/is most helpful is:
  3. If there is one thing I could change about this course, it
     would be:
  4. If there is one thing I would want the instructor to know it
     would be:
  5. In this class I thought we were going to:
  6. One thing I hope we have time to cover is:
  7. In the last half, the thing I'd like MOST to concentrate on is:
  8. In the last half, the thing I'd like LEAST to concentrate on is:
  9. OTHER COMMENTS:
Project Tips
• Use a light lead and a fine point for your first drawing of the
  object. Erase construction lines and then darken in the final
  lines using a darker lead.
• Project descriptions to show all six orthographic views . . . I’m
  making the executive decision to change it to necessary views.
• Unsure of necessary views? Talk to me after class today or
  before class next week about your project.
Chapter 7 – Section
      Views
When is it appropriate to show
hidden lines in section view?
• Hidden lines should NOT be shown when they will “clutter”
  the view


• Hidden lines can be shown when they are necessary to show
  detail of the object
Can Section Views be located
off of the center?
• Yes!!
• Section Views should be shown when there is a “change” in an
  object.
• If an object is uniform, show it the section view in the center
  of the object.
• If there are changes in the object, show additional section
  views at additional locations.
• Remember – the point of section views is to be able to build
  an item by giving all the necessary information.
What is the difference between a Section
 View Line and a Removed View Line?
• A Removed view line is shown outside of the drawn
  object, while the section view line is inside the object.


     Removed View Using
     Viewing-Plane Line                    Section View Using
                                           Viewing-Plane Line
New Groups!!
• We are going to mix up the groups in class today.
• Make a new group of 2 to 3 people composed of one person
  from each row.
Group Project - Section View
         Locations
• With your new group, locate a complex item in the classroom
  or on a brief trip outside of the classroom that would take
  more than one section view to describe.
• Do a quick sketch of the item (with section views).
• Describe what you found to the group.
Line Precedence
• What take precedence? A cutting-plane line or a centerline?
Line Precedence
• What take precedence? The cutting plane line!
• When a cutting plane line would obscure important
  details, just end the line outside the view and show the arrows
• Make sure to leave a small, but visible gap.
SECTION-LINING TECHNIQUE
• Uniformly spaced by an interval of about 2.5 mm
• Not too close together
• Uniformly thin, not varying in thickness
• Distinctly thinner than visible lines
• Neither running beyond nor stopping short of visible
  outlines
Section-Lining Symbols
Section-lining symbols (hatch) may be used to indicate specific materials.
These symbols represent general material types only, such as cast
iron, brass, and steel.


                                                      Symbols for Section Lining
Hatch Pop Quiz
• You are a producer of kids’ rubber balls for use in gym class.
  You are given a solid rubber ball and told to draw a section
  view to use to create the ball on the line.
• Draw a quick sketch of the section view with the correct hatch
  pattern.
Hatch Pop Quiz
• You are putting a galvanized steel pipe into your factory. Your
  boss needs a section view of the pipe.
• Sketch a quick section view showing the proper hatch.
Hatch Pop Quiz
• Your factory makes the best cast iron skillets in America. You
  are given a cast iron skillet and told to draw a section view for
  use in production of the skillet.
• Draw a quick section view using the correct hatch.
Hatch Pop Quiz
• Copper piping is being put into your workplace to replace old
  drinking water piping.
• Draw a quick section view sketch of a copper pipe
Hatch Pop Quiz
• Your company produces all things zinc. A popular item is a
  zinc nut.
• Draw a quick section view showing the proper hatching.
Hatch Pop Quiz
• Magnesium is the third most commonly used structural metal
  after iron and aluminum. It is strong and light.
• Your company makes Magnesium die cast components.
  Sketch a quick section view using the appropriate section line
  hatch.
HALF SECTIONS
• Symmetrical objects can be shown
  effectively using a special type of section
  view called a half section.
• A half section exposes the interior of half
  of the object and the exterior of the other
  half.
• This is done by removing one quarter of the
  object.
HALF SECTIONS
• In general
  • Omit hidden lines from both halves when possible
  • Use a centerline to divide the section and non-sectioned half
• Half Sections are most useful in showing an assembly where it
  is necessary to show both internal and external construction
  in one drawing view.
• In general, half sections are not widely used.


                    Cutting plane


                                                     Half section
Half Section Drawing Example
• Now I’m going to draw you a beautiful quarter section view of
  a candy bar . . .
Group Project – Half Sections
• Pick a candy bar and use your cutting plane (plastic knife) to
  cut a quarter section out of the bar.
• Now draw a top view and a half section view of the candy bar.
• Show and Label the cutting plane
• Use a hatch of your own chose to describe the filling
BROKEN OUT SECTIONS
It often happens that
only a partial section of
a view is needed to
expose interior shapes.
Such a section, limited
by a break line, is
called a broken out
section.
Broken Out Section Drawing
          Example
• Now I’m going to draw you a beautiful broken out section
  view of a candy bar . . .
Group Project – Broken Out
           Sections
• Pick a candy bar and use your cutting plane (plastic knife) to
  cut a broken out section out of the bar.
• Now draw a top view and a broken out section view of the
  candy bar.
• Show and Label the cutting plane
• Use a hatch of your own chose to describe the filling
REVOLVED SECTIONS
The shape of the cross section
of a bar, arm, spoke, or other
elongated object can be shown
in the longitudinal view by using
a revolved section.


                                                        90°
To create a revolved section, first imagine a cutting
plane perpendicular to the centerline or axis of the
object. Next, revolve the plane 90° about a
centerline at right angles to the axis.
Revolved Section Drawing
            Example
• Now I’m going to draw you a beautiful revolved section view
  of a cylinder. . .
Group Project – Revolved
            Sections
• Use a cylinder (or a twix) and visualize a revolved section view
• Now draw a top view and a revolved section view of the candy
  bar.
• Show and Label the cutting plane
• Use a hatch of your own chose to describe the filling
REMOVED SECTIONS
           A removed section is
           one that is not in direct
           projection from the view
           containing the cutting
           plane — that is, it is not
           positioned in agreement
           with the standard
           arrangement of views.
REMOVED SECTIONS
• If you must rotate the view, use a rotation arrow to note the
  angle the view was rotated.
• Removed views should be labeled such as Section A-A or B-B
  to correspond to the cutting plane line
• Removed views should be arranged in alphabetical order from
  left to right on the sheet.
• Do not use letters, I, O, and Q for Section labeling as they can
  easily be confused with numbers 1 and 0.
REMOVED SECTIONS
• Removed views are also known as partial sections
• They are often drawn at an enlarged scale (like a detail)
• If you show the section at an enlarged scale, make sure to
  note the new scale under the detail
• Try to keep removed views on the same sheet as the regular
  views. If it needs to be on a separate sheet, make a note such
  as SECTION B-B ON SHEET 4, ZONE A3
Removed Section Drawing
           Example
• Now I’m going to draw you a beautiful removed section view
  of a candy bar . . .
Group Project – Removed
            Sections
• Pick a candy bar and use your cutting plane (plastic knife) to
  cut a full section out of the bar.
• Now draw a top view and a removed section view of the
  candy bar.
• Show and Label the cutting plane
• Use a hatch of your own chose to describe the filling
OFFSET SECTIONS
In sectioning complex objects, it is often desirable to show features that do not lie in a
straight line by “offsetting” or bending the cutting plane. These are called offset sections.

         Note the offset cutting plane line


                                        Note the hidden lines in the section view make it so
                                        Another view is not needed.
Offset Section Drawing
                Example
• Now I’m going to draw you a beautiful offset section view of a
  candy bar . . .
Group Project – Offset Sections
• Pick a candy bar and use your cutting plane (plastic knife) to
  cut an offset section out of the bar.
• Now draw a top view and an offset section view of the candy
  bar.
• Show and Label the cutting plane
• Use a hatch of your own chose to describe the filling
RIBS IN SECTION
To avoid giving a false impression of thickness and
solidity, ribs, webs, gear teeth, and other similar flat features are not
hatched with section lining even though the cutting plane slices them.


                                               Thin features are not hatched
                                               even though the cutting plane
                                               passes lengthwise through
                                               them.
ALIGNED SECTIONS
When parts with angled elements are sectioned, the cutting plane may be
bent to pass through those features. The plane and features are then
imagined to be revolved into the original plane.

                                                  The angle of revolution should
                                                  always be less than 90° for
                                                  an aligned section.


                                                      Aligned Section
Group Project – Aligned
             Sections
• Each group will be assigned a graphic: 7.37, 7.38, 7.39, 7.40.
• Talk through the illustration with you group and make sure
  you understand what the graphic is showing you
• How would you teach this to the class? Can you show an
  example or can you talk through the explanation?
• Show the graphic to the class and teach your classmates about
  it.
PARTIAL VIEWS
  If space is limited on the paper or to save time, partial views may be used
  with sectioning.


Another method of drawing a partial view is to break out much of the
circular view, retaining only those features that are needed for minimum
representation.
INTERSECTIONS IN SECTIONS
Whenever an intersection is small or unimportant in a section, it is standard
practice to disregard the true projection of the figure of intersection.


                                            Larger intersections
                                            may be projected


                                                  Note that the larger hole K
                                                  is the same diameter as the
                                                  vertical hole. In such cases
                                                  the curves of intersection
                                                  (ellipses) appear as straight
                                                  lines.
CONVENTIONAL BREAKS
          AND SECTIONS
Conventional breaks are used to shorten the view of an object that is too
long to show clearly at one scale on the drawing sheet.
ASSEMBLY SECTIONS
Section views are often used to create assembly drawings.


           Notice that the hatching on different parts has different
           hatch patterns or hatch at different angles. When used on
           the same part, the hatching is always at the same angle
           to help you recognize the parts easily.
How to draw a section view of
a coffee cup . . .
• Section View of a Coffee Cup
Section Views Visualization
           Exercise
• http://www.wisc-
  online.com/objects/ViewObject.aspx?ID=ENG19804
Group Project
• Each group take a type of section view
  •   Full Section
  •   Half Section
  •   Broken-Out Section
  •   Removed Section
  •   Revolved Section
  •   Aligned Section
  •   Offset Section
• Determine a way good way to teach this type of section view
  to the rest of the class
• Do a brief mini-lesson in front of the class
What’s Next?
• Chapter 8 – Auxiliary Views
Questions?
• On one of your sketches, answer the following
  two questions:
   • What was the most useful thing that you
     learned today?
   • What do you still have questions about?
Homework
Read Chapter 8
Chapter 7 Review Questions: 2, 3, 5, 6, 7
Chapter 7 Sectioning Exercises: 7.1

Class 11 presentation

  • 1.
    2D Essentials Instructor: LauraGerold, PE Catalog #10614113 Class # 22784, 24113, 24136, & 24138 Class Start: January 18, 2012 Class End: May 16, 2012
  • 2.
    Reminders • Optional extracredit is due today • Final Project is due on May 9th. • Final Exam is May 16th.
  • 3.
    “Mid-term” Survey • Takeout a sheet of paper and answer the following questions about me. You do not need to sign the paper. Justin and Jacob, you can email me your responses. 1. I think it would help me if we did MORE: 2. The thing I like doing best/is most helpful is: 3. If there is one thing I could change about this course, it would be: 4. If there is one thing I would want the instructor to know it would be: 5. In this class I thought we were going to: 6. One thing I hope we have time to cover is: 7. In the last half, the thing I'd like MOST to concentrate on is: 8. In the last half, the thing I'd like LEAST to concentrate on is: 9. OTHER COMMENTS:
  • 4.
    Project Tips • Usea light lead and a fine point for your first drawing of the object. Erase construction lines and then darken in the final lines using a darker lead. • Project descriptions to show all six orthographic views . . . I’m making the executive decision to change it to necessary views. • Unsure of necessary views? Talk to me after class today or before class next week about your project.
  • 5.
    Chapter 7 –Section Views
  • 6.
    When is itappropriate to show hidden lines in section view? • Hidden lines should NOT be shown when they will “clutter” the view • Hidden lines can be shown when they are necessary to show detail of the object
  • 7.
    Can Section Viewsbe located off of the center? • Yes!! • Section Views should be shown when there is a “change” in an object. • If an object is uniform, show it the section view in the center of the object. • If there are changes in the object, show additional section views at additional locations. • Remember – the point of section views is to be able to build an item by giving all the necessary information.
  • 8.
    What is thedifference between a Section View Line and a Removed View Line? • A Removed view line is shown outside of the drawn object, while the section view line is inside the object. Removed View Using Viewing-Plane Line Section View Using Viewing-Plane Line
  • 9.
    New Groups!! • Weare going to mix up the groups in class today. • Make a new group of 2 to 3 people composed of one person from each row.
  • 10.
    Group Project -Section View Locations • With your new group, locate a complex item in the classroom or on a brief trip outside of the classroom that would take more than one section view to describe. • Do a quick sketch of the item (with section views). • Describe what you found to the group.
  • 11.
    Line Precedence • Whattake precedence? A cutting-plane line or a centerline?
  • 12.
    Line Precedence • Whattake precedence? The cutting plane line! • When a cutting plane line would obscure important details, just end the line outside the view and show the arrows • Make sure to leave a small, but visible gap.
  • 13.
    SECTION-LINING TECHNIQUE • Uniformlyspaced by an interval of about 2.5 mm • Not too close together • Uniformly thin, not varying in thickness • Distinctly thinner than visible lines • Neither running beyond nor stopping short of visible outlines
  • 14.
    Section-Lining Symbols Section-lining symbols(hatch) may be used to indicate specific materials. These symbols represent general material types only, such as cast iron, brass, and steel. Symbols for Section Lining
  • 15.
    Hatch Pop Quiz •You are a producer of kids’ rubber balls for use in gym class. You are given a solid rubber ball and told to draw a section view to use to create the ball on the line. • Draw a quick sketch of the section view with the correct hatch pattern.
  • 16.
    Hatch Pop Quiz •You are putting a galvanized steel pipe into your factory. Your boss needs a section view of the pipe. • Sketch a quick section view showing the proper hatch.
  • 17.
    Hatch Pop Quiz •Your factory makes the best cast iron skillets in America. You are given a cast iron skillet and told to draw a section view for use in production of the skillet. • Draw a quick section view using the correct hatch.
  • 18.
    Hatch Pop Quiz •Copper piping is being put into your workplace to replace old drinking water piping. • Draw a quick section view sketch of a copper pipe
  • 19.
    Hatch Pop Quiz •Your company produces all things zinc. A popular item is a zinc nut. • Draw a quick section view showing the proper hatching.
  • 20.
    Hatch Pop Quiz •Magnesium is the third most commonly used structural metal after iron and aluminum. It is strong and light. • Your company makes Magnesium die cast components. Sketch a quick section view using the appropriate section line hatch.
  • 21.
    HALF SECTIONS • Symmetricalobjects can be shown effectively using a special type of section view called a half section. • A half section exposes the interior of half of the object and the exterior of the other half. • This is done by removing one quarter of the object.
  • 22.
    HALF SECTIONS • Ingeneral • Omit hidden lines from both halves when possible • Use a centerline to divide the section and non-sectioned half • Half Sections are most useful in showing an assembly where it is necessary to show both internal and external construction in one drawing view. • In general, half sections are not widely used. Cutting plane Half section
  • 23.
    Half Section DrawingExample • Now I’m going to draw you a beautiful quarter section view of a candy bar . . .
  • 24.
    Group Project –Half Sections • Pick a candy bar and use your cutting plane (plastic knife) to cut a quarter section out of the bar. • Now draw a top view and a half section view of the candy bar. • Show and Label the cutting plane • Use a hatch of your own chose to describe the filling
  • 25.
    BROKEN OUT SECTIONS Itoften happens that only a partial section of a view is needed to expose interior shapes. Such a section, limited by a break line, is called a broken out section.
  • 26.
    Broken Out SectionDrawing Example • Now I’m going to draw you a beautiful broken out section view of a candy bar . . .
  • 27.
    Group Project –Broken Out Sections • Pick a candy bar and use your cutting plane (plastic knife) to cut a broken out section out of the bar. • Now draw a top view and a broken out section view of the candy bar. • Show and Label the cutting plane • Use a hatch of your own chose to describe the filling
  • 28.
    REVOLVED SECTIONS The shapeof the cross section of a bar, arm, spoke, or other elongated object can be shown in the longitudinal view by using a revolved section. 90° To create a revolved section, first imagine a cutting plane perpendicular to the centerline or axis of the object. Next, revolve the plane 90° about a centerline at right angles to the axis.
  • 29.
    Revolved Section Drawing Example • Now I’m going to draw you a beautiful revolved section view of a cylinder. . .
  • 30.
    Group Project –Revolved Sections • Use a cylinder (or a twix) and visualize a revolved section view • Now draw a top view and a revolved section view of the candy bar. • Show and Label the cutting plane • Use a hatch of your own chose to describe the filling
  • 31.
    REMOVED SECTIONS A removed section is one that is not in direct projection from the view containing the cutting plane — that is, it is not positioned in agreement with the standard arrangement of views.
  • 32.
    REMOVED SECTIONS • Ifyou must rotate the view, use a rotation arrow to note the angle the view was rotated. • Removed views should be labeled such as Section A-A or B-B to correspond to the cutting plane line • Removed views should be arranged in alphabetical order from left to right on the sheet. • Do not use letters, I, O, and Q for Section labeling as they can easily be confused with numbers 1 and 0.
  • 33.
    REMOVED SECTIONS • Removedviews are also known as partial sections • They are often drawn at an enlarged scale (like a detail) • If you show the section at an enlarged scale, make sure to note the new scale under the detail • Try to keep removed views on the same sheet as the regular views. If it needs to be on a separate sheet, make a note such as SECTION B-B ON SHEET 4, ZONE A3
  • 34.
    Removed Section Drawing Example • Now I’m going to draw you a beautiful removed section view of a candy bar . . .
  • 35.
    Group Project –Removed Sections • Pick a candy bar and use your cutting plane (plastic knife) to cut a full section out of the bar. • Now draw a top view and a removed section view of the candy bar. • Show and Label the cutting plane • Use a hatch of your own chose to describe the filling
  • 36.
    OFFSET SECTIONS In sectioningcomplex objects, it is often desirable to show features that do not lie in a straight line by “offsetting” or bending the cutting plane. These are called offset sections. Note the offset cutting plane line Note the hidden lines in the section view make it so Another view is not needed.
  • 37.
    Offset Section Drawing Example • Now I’m going to draw you a beautiful offset section view of a candy bar . . .
  • 38.
    Group Project –Offset Sections • Pick a candy bar and use your cutting plane (plastic knife) to cut an offset section out of the bar. • Now draw a top view and an offset section view of the candy bar. • Show and Label the cutting plane • Use a hatch of your own chose to describe the filling
  • 39.
    RIBS IN SECTION Toavoid giving a false impression of thickness and solidity, ribs, webs, gear teeth, and other similar flat features are not hatched with section lining even though the cutting plane slices them. Thin features are not hatched even though the cutting plane passes lengthwise through them.
  • 40.
    ALIGNED SECTIONS When partswith angled elements are sectioned, the cutting plane may be bent to pass through those features. The plane and features are then imagined to be revolved into the original plane. The angle of revolution should always be less than 90° for an aligned section. Aligned Section
  • 41.
    Group Project –Aligned Sections • Each group will be assigned a graphic: 7.37, 7.38, 7.39, 7.40. • Talk through the illustration with you group and make sure you understand what the graphic is showing you • How would you teach this to the class? Can you show an example or can you talk through the explanation? • Show the graphic to the class and teach your classmates about it.
  • 42.
    PARTIAL VIEWS If space is limited on the paper or to save time, partial views may be used with sectioning. Another method of drawing a partial view is to break out much of the circular view, retaining only those features that are needed for minimum representation.
  • 43.
    INTERSECTIONS IN SECTIONS Wheneveran intersection is small or unimportant in a section, it is standard practice to disregard the true projection of the figure of intersection. Larger intersections may be projected Note that the larger hole K is the same diameter as the vertical hole. In such cases the curves of intersection (ellipses) appear as straight lines.
  • 44.
    CONVENTIONAL BREAKS AND SECTIONS Conventional breaks are used to shorten the view of an object that is too long to show clearly at one scale on the drawing sheet.
  • 45.
    ASSEMBLY SECTIONS Section viewsare often used to create assembly drawings. Notice that the hatching on different parts has different hatch patterns or hatch at different angles. When used on the same part, the hatching is always at the same angle to help you recognize the parts easily.
  • 46.
    How to drawa section view of a coffee cup . . . • Section View of a Coffee Cup
  • 47.
    Section Views Visualization Exercise • http://www.wisc- online.com/objects/ViewObject.aspx?ID=ENG19804
  • 48.
    Group Project • Eachgroup take a type of section view • Full Section • Half Section • Broken-Out Section • Removed Section • Revolved Section • Aligned Section • Offset Section • Determine a way good way to teach this type of section view to the rest of the class • Do a brief mini-lesson in front of the class
  • 49.
    What’s Next? • Chapter8 – Auxiliary Views
  • 50.
    Questions? • On oneof your sketches, answer the following two questions: • What was the most useful thing that you learned today? • What do you still have questions about?
  • 51.
    Homework Read Chapter 8 Chapter7 Review Questions: 2, 3, 5, 6, 7 Chapter 7 Sectioning Exercises: 7.1