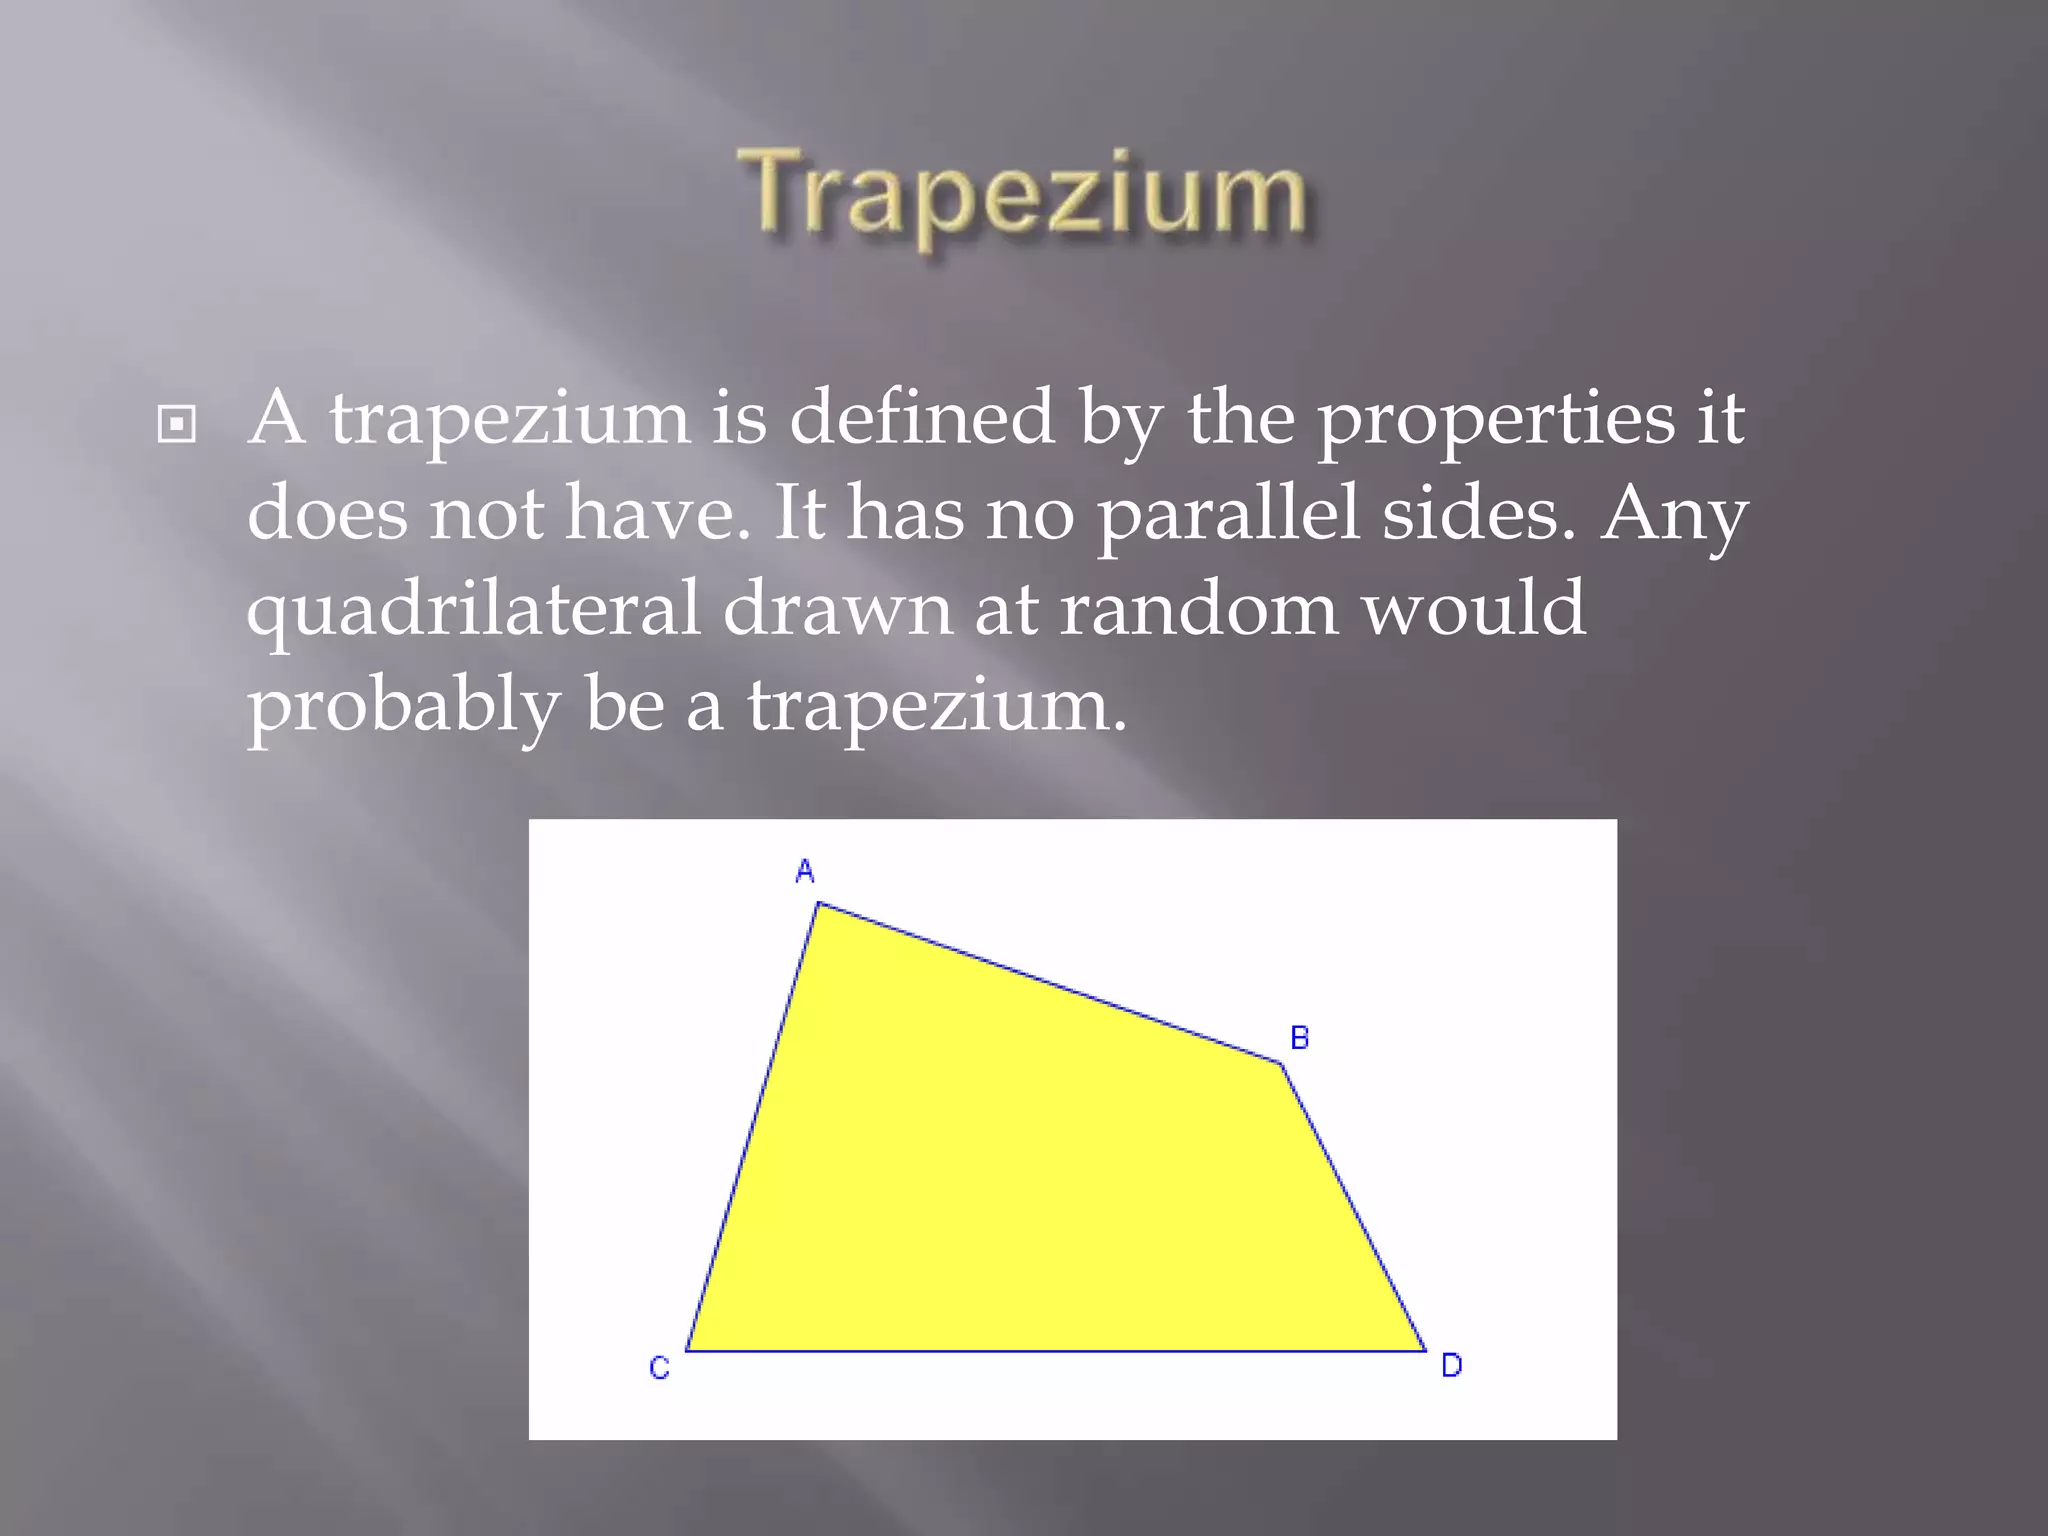
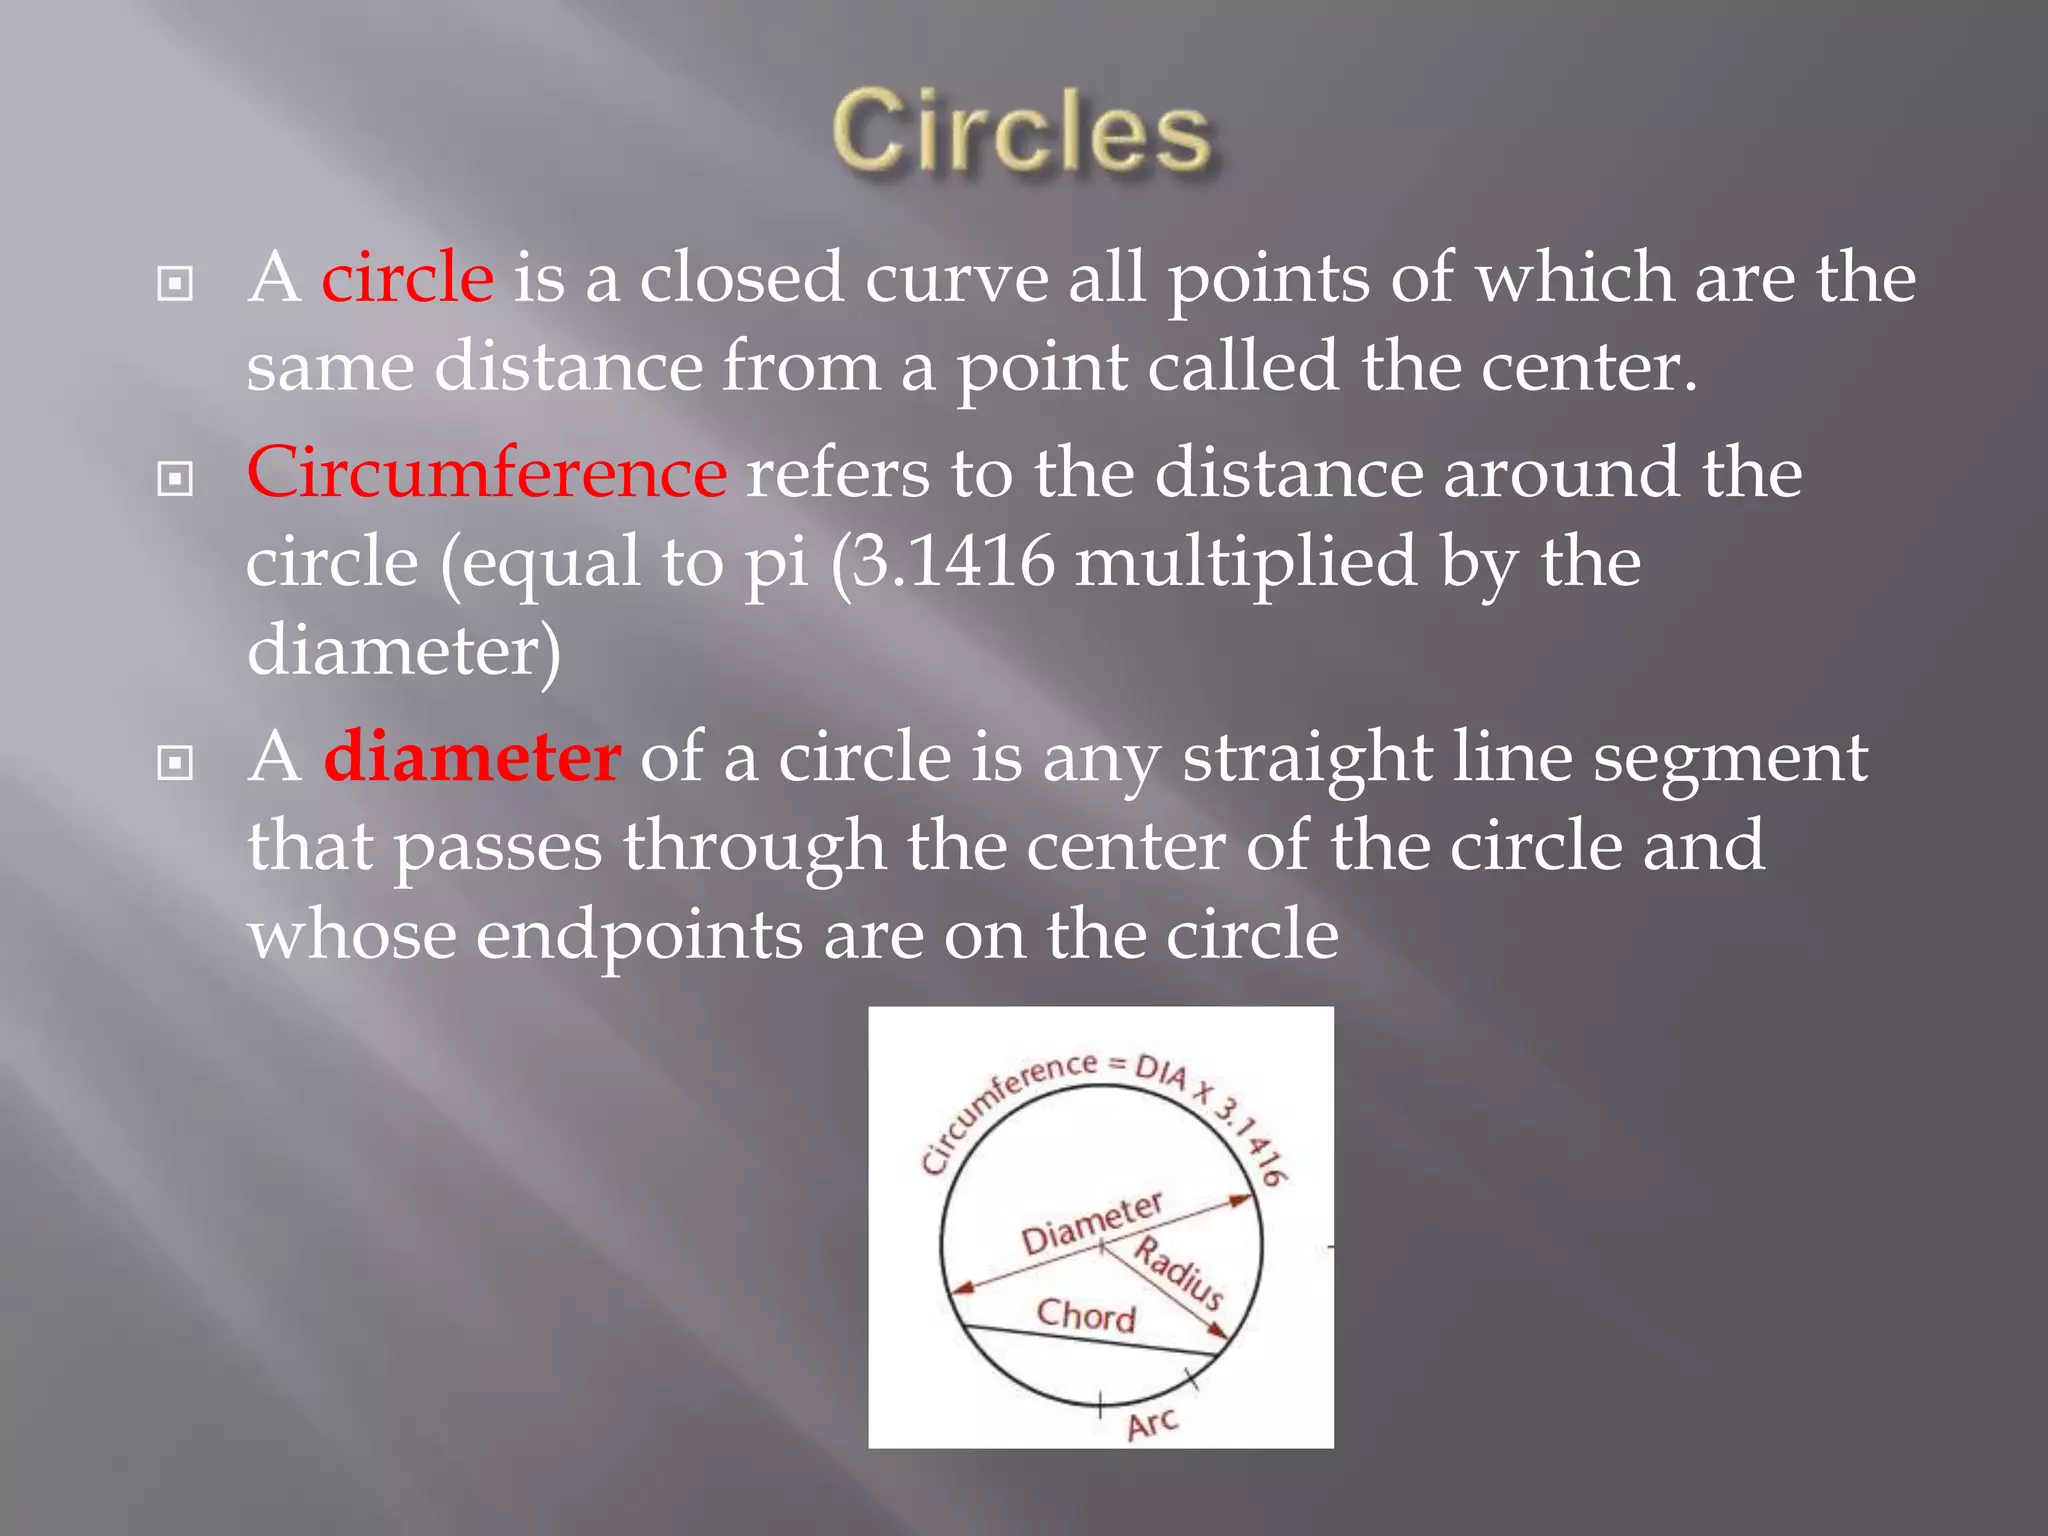
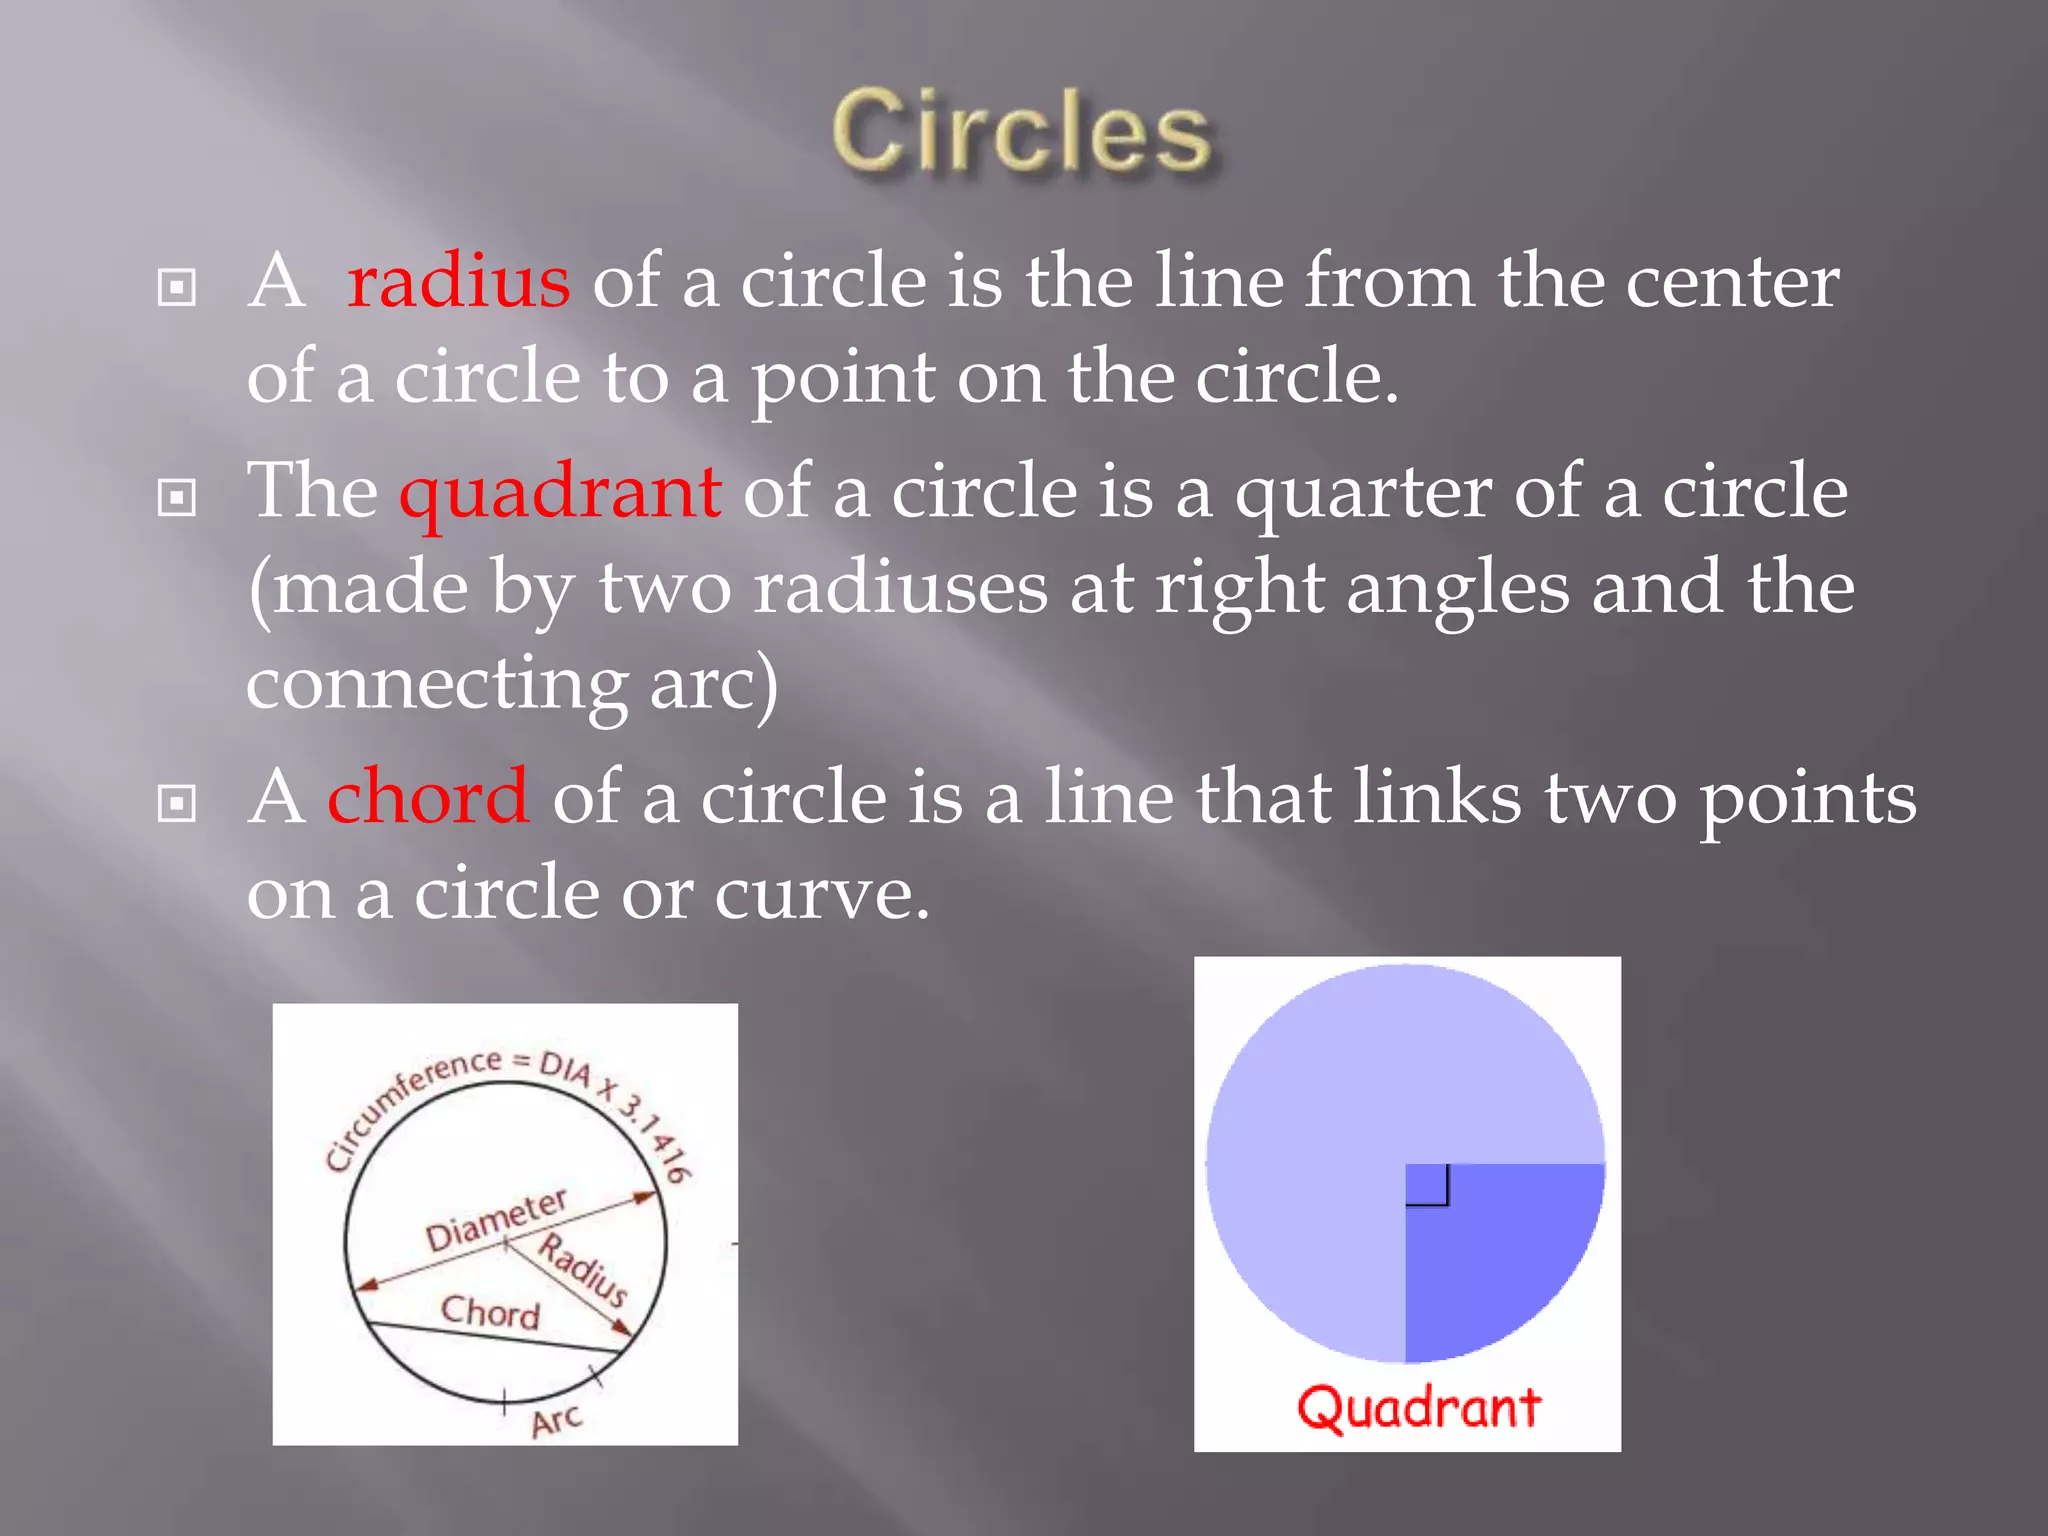
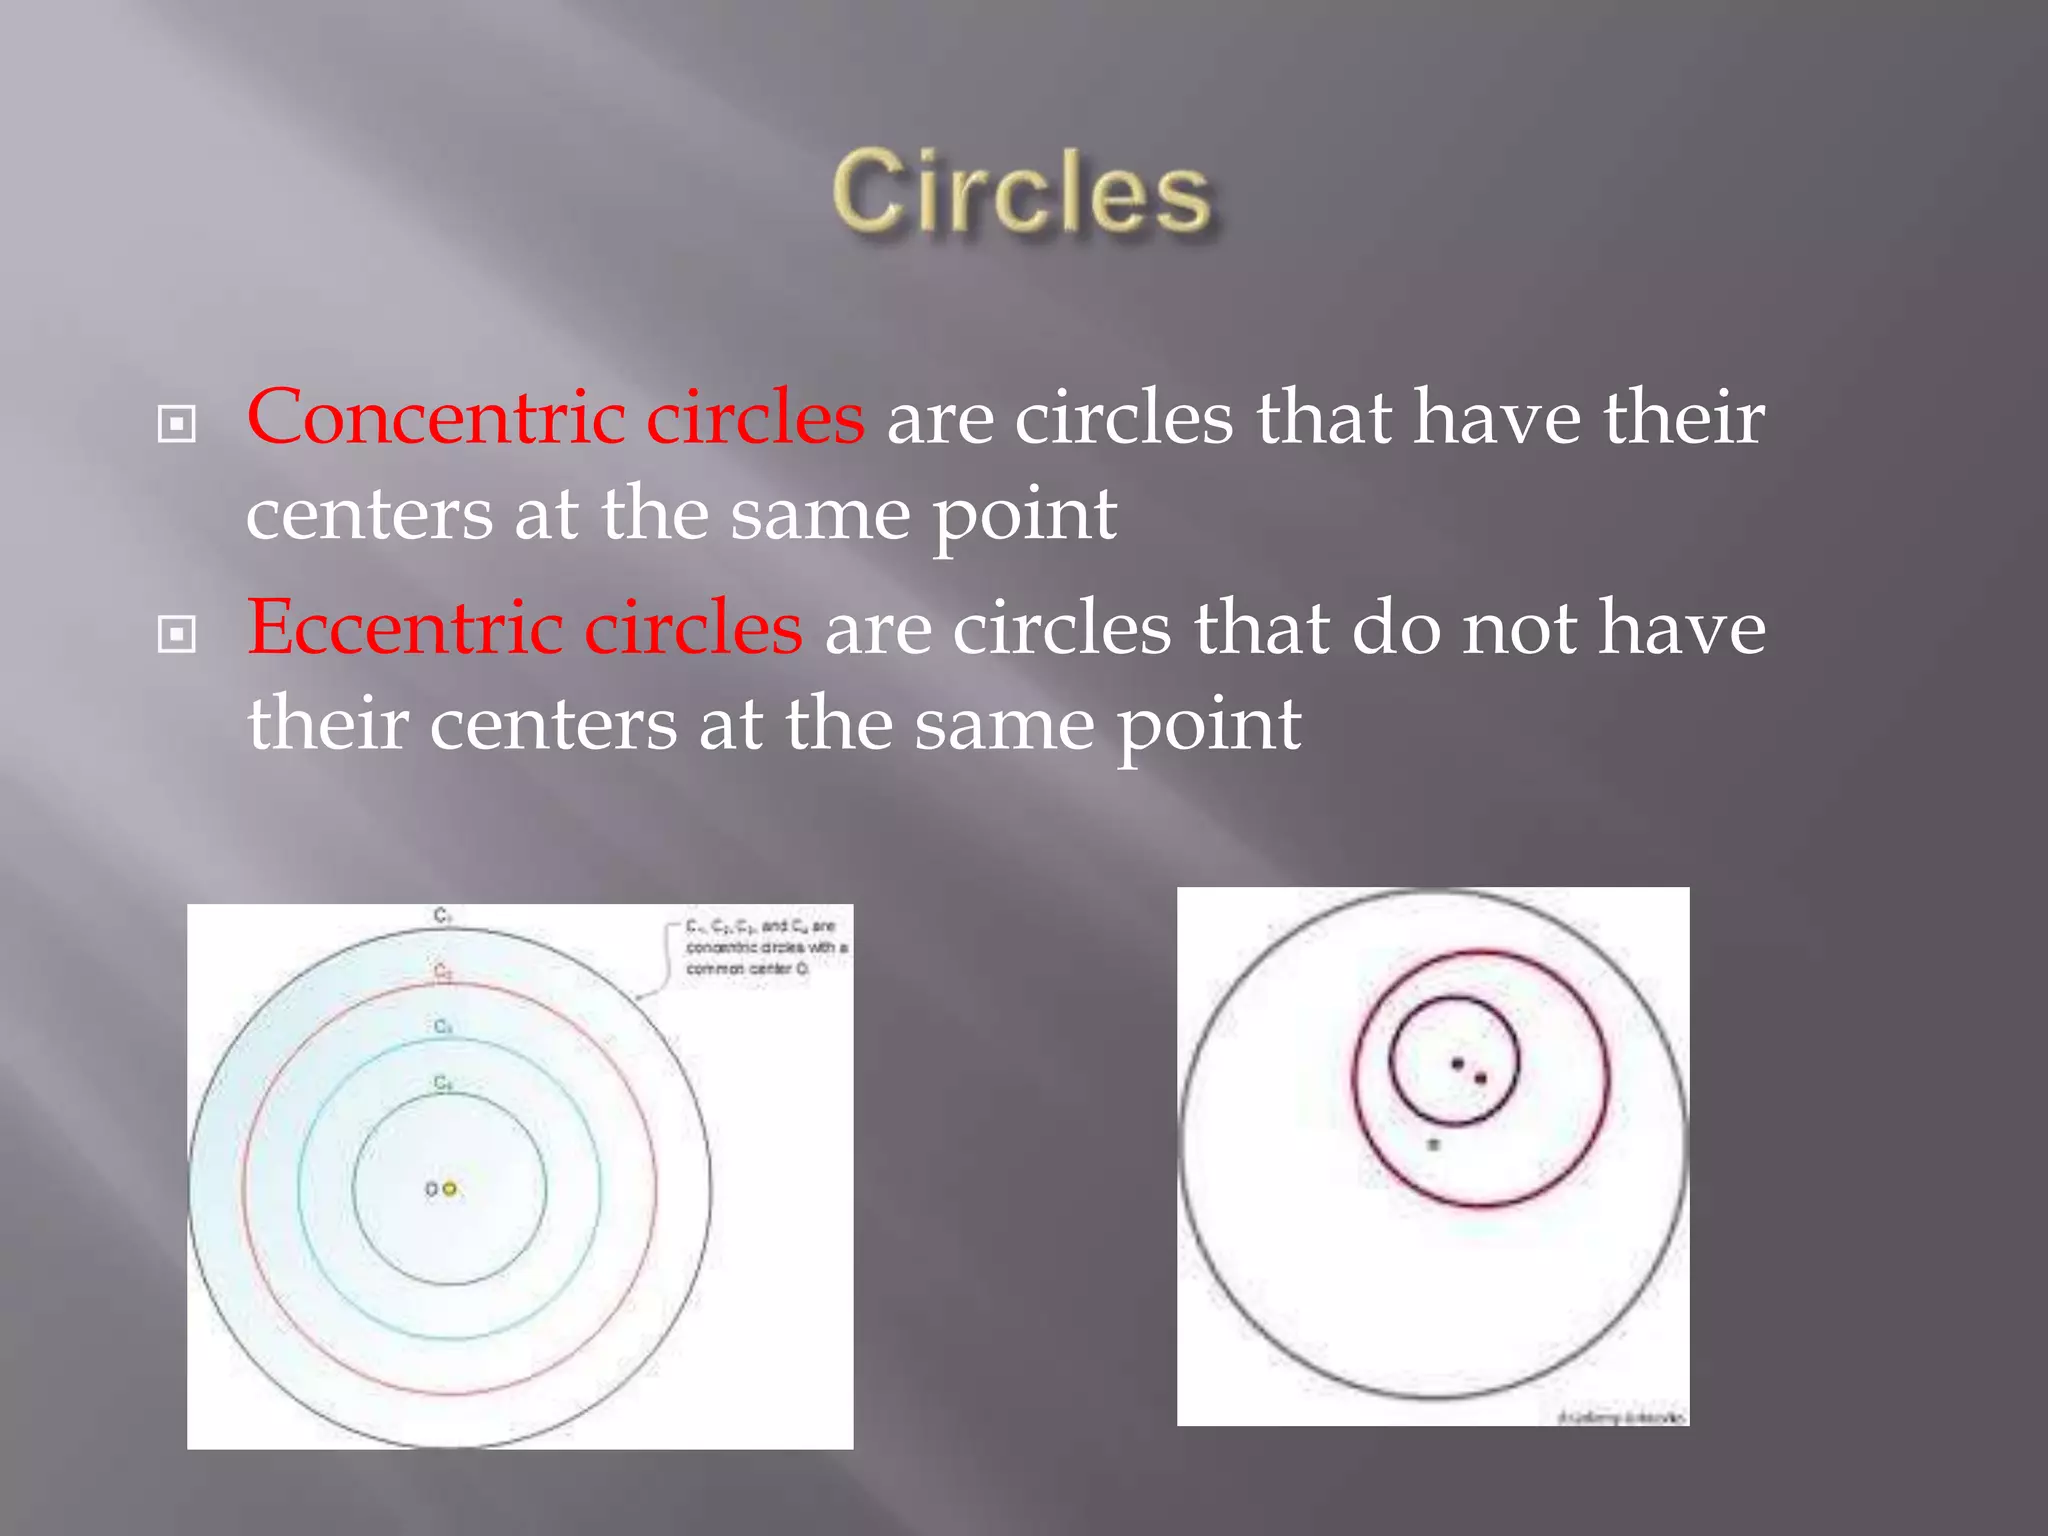
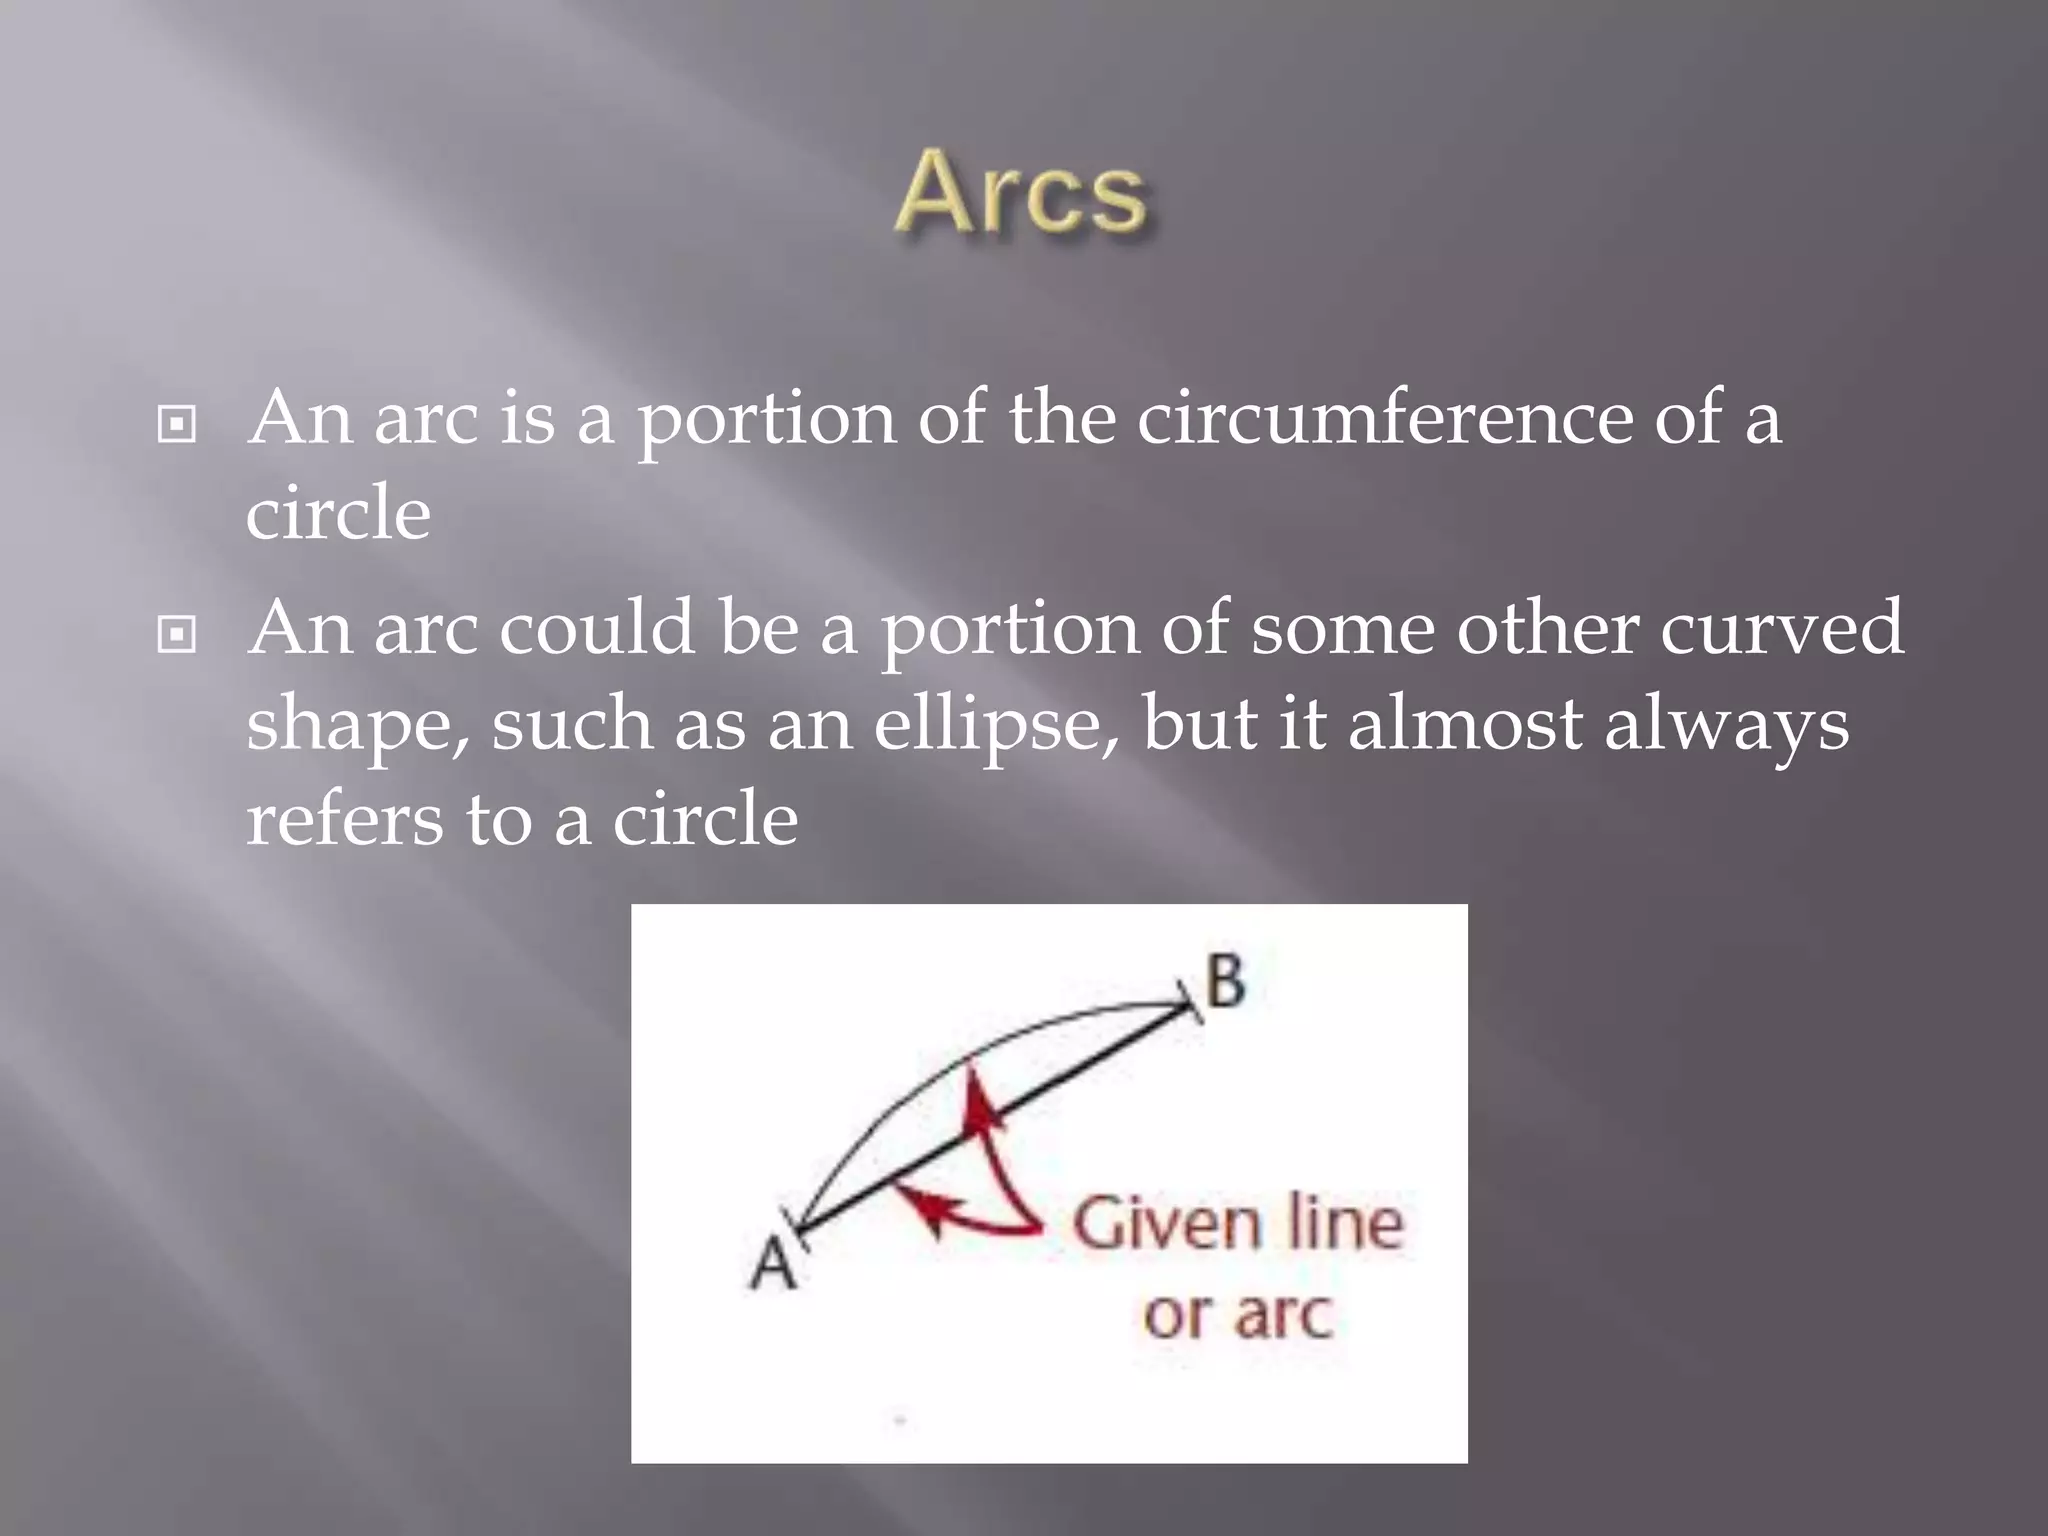
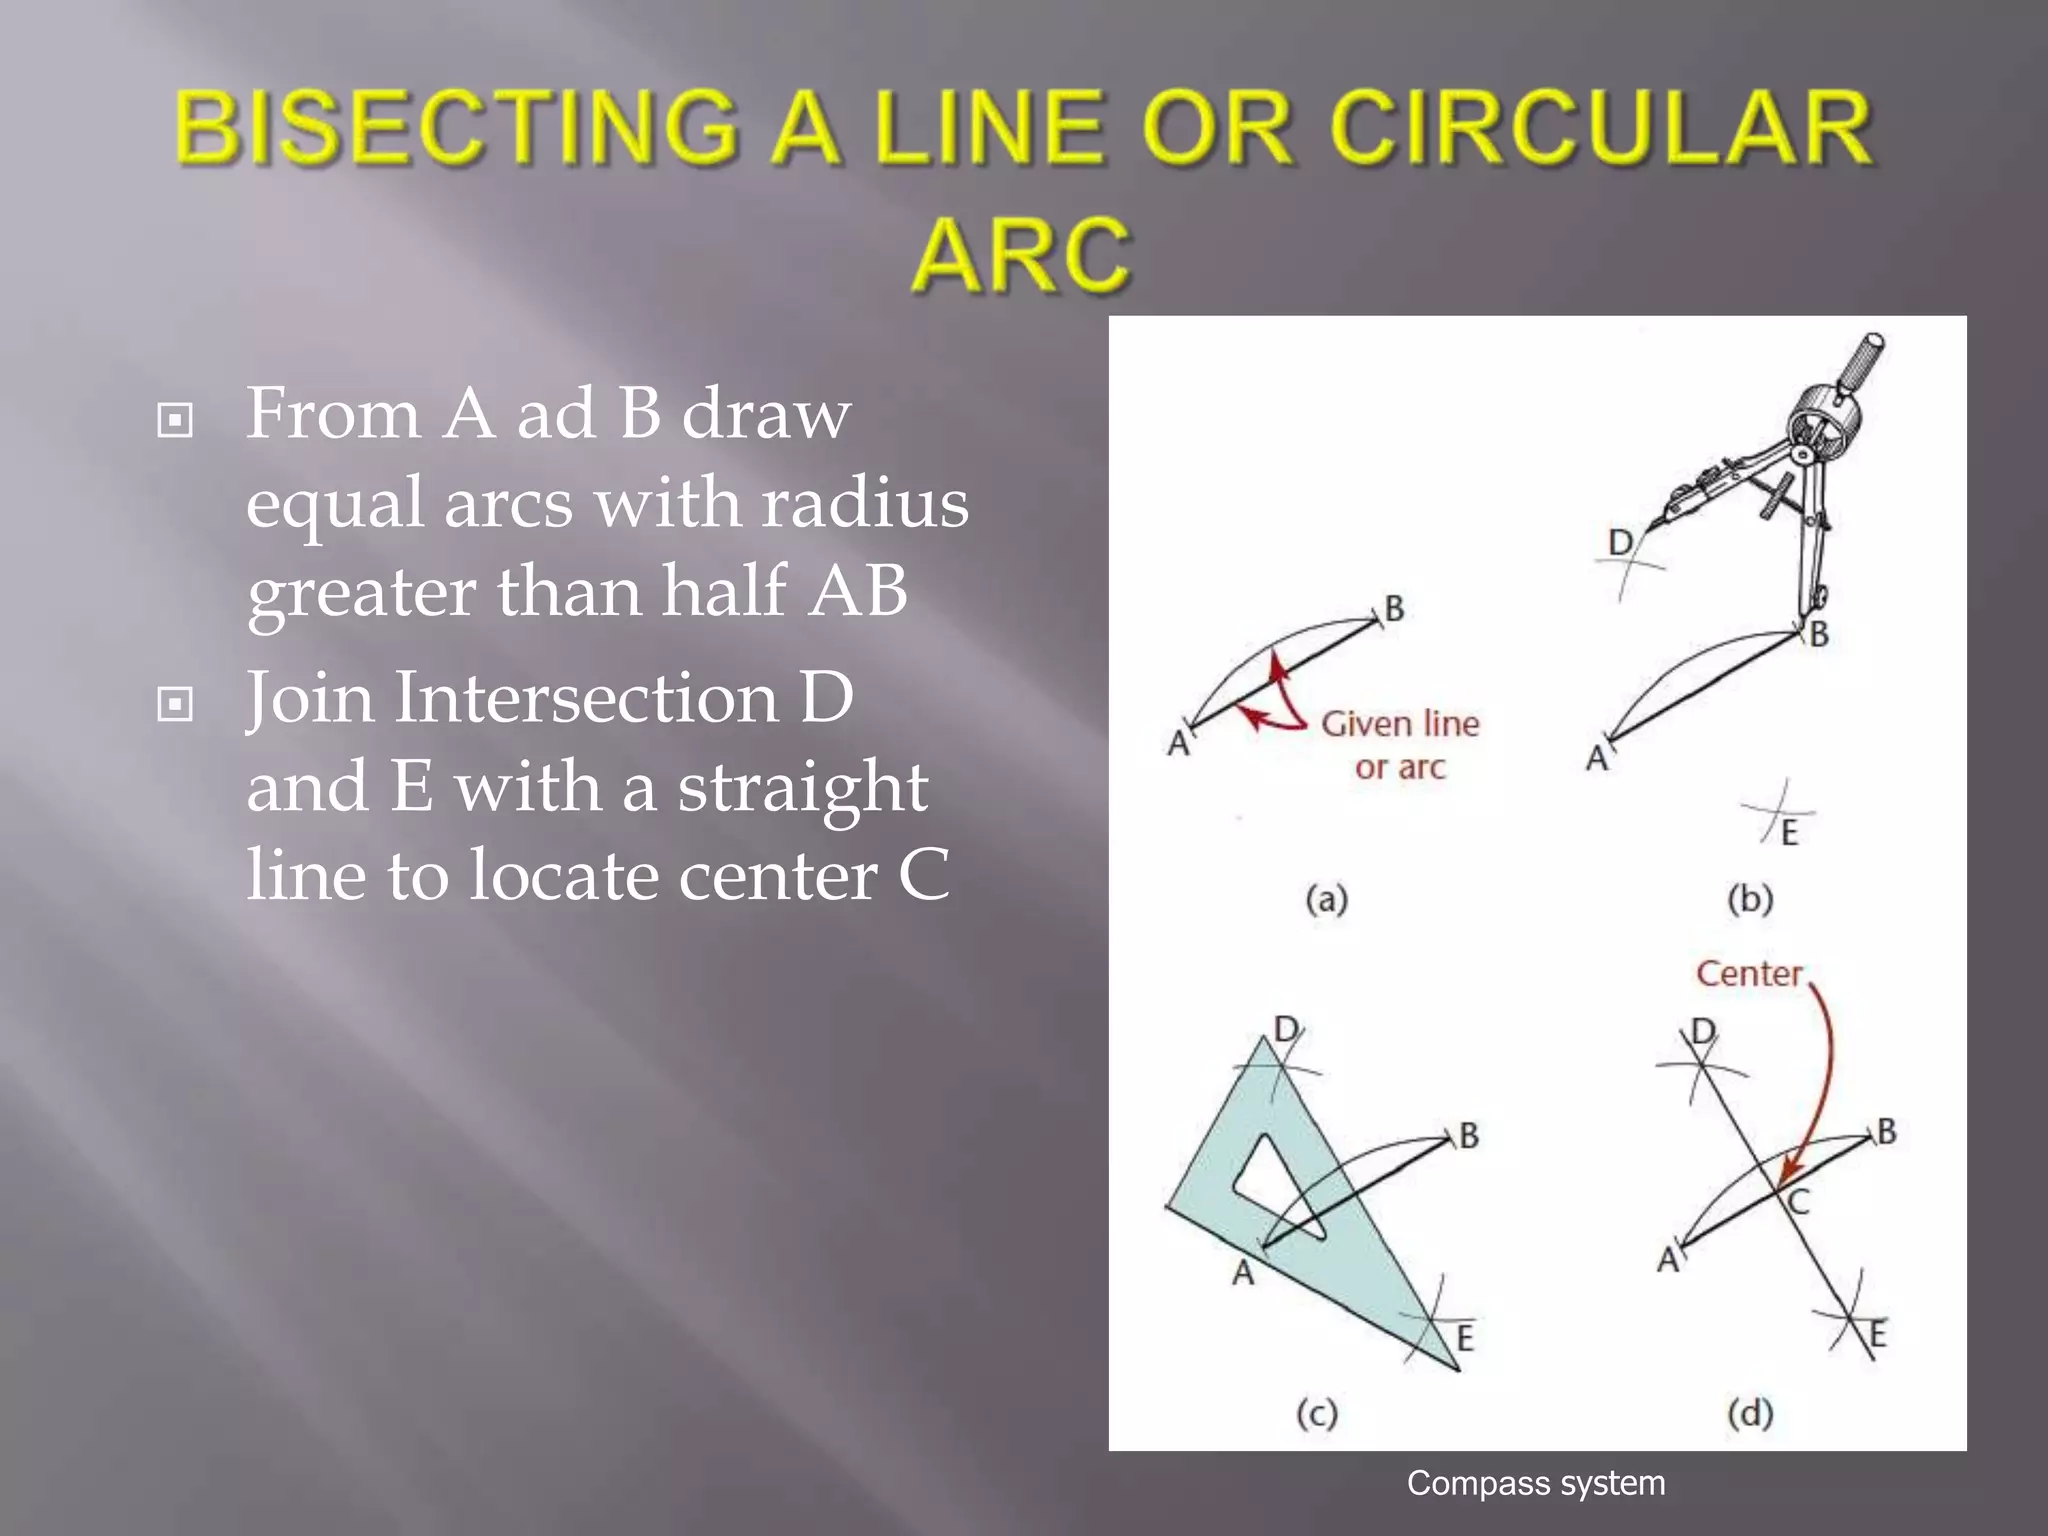
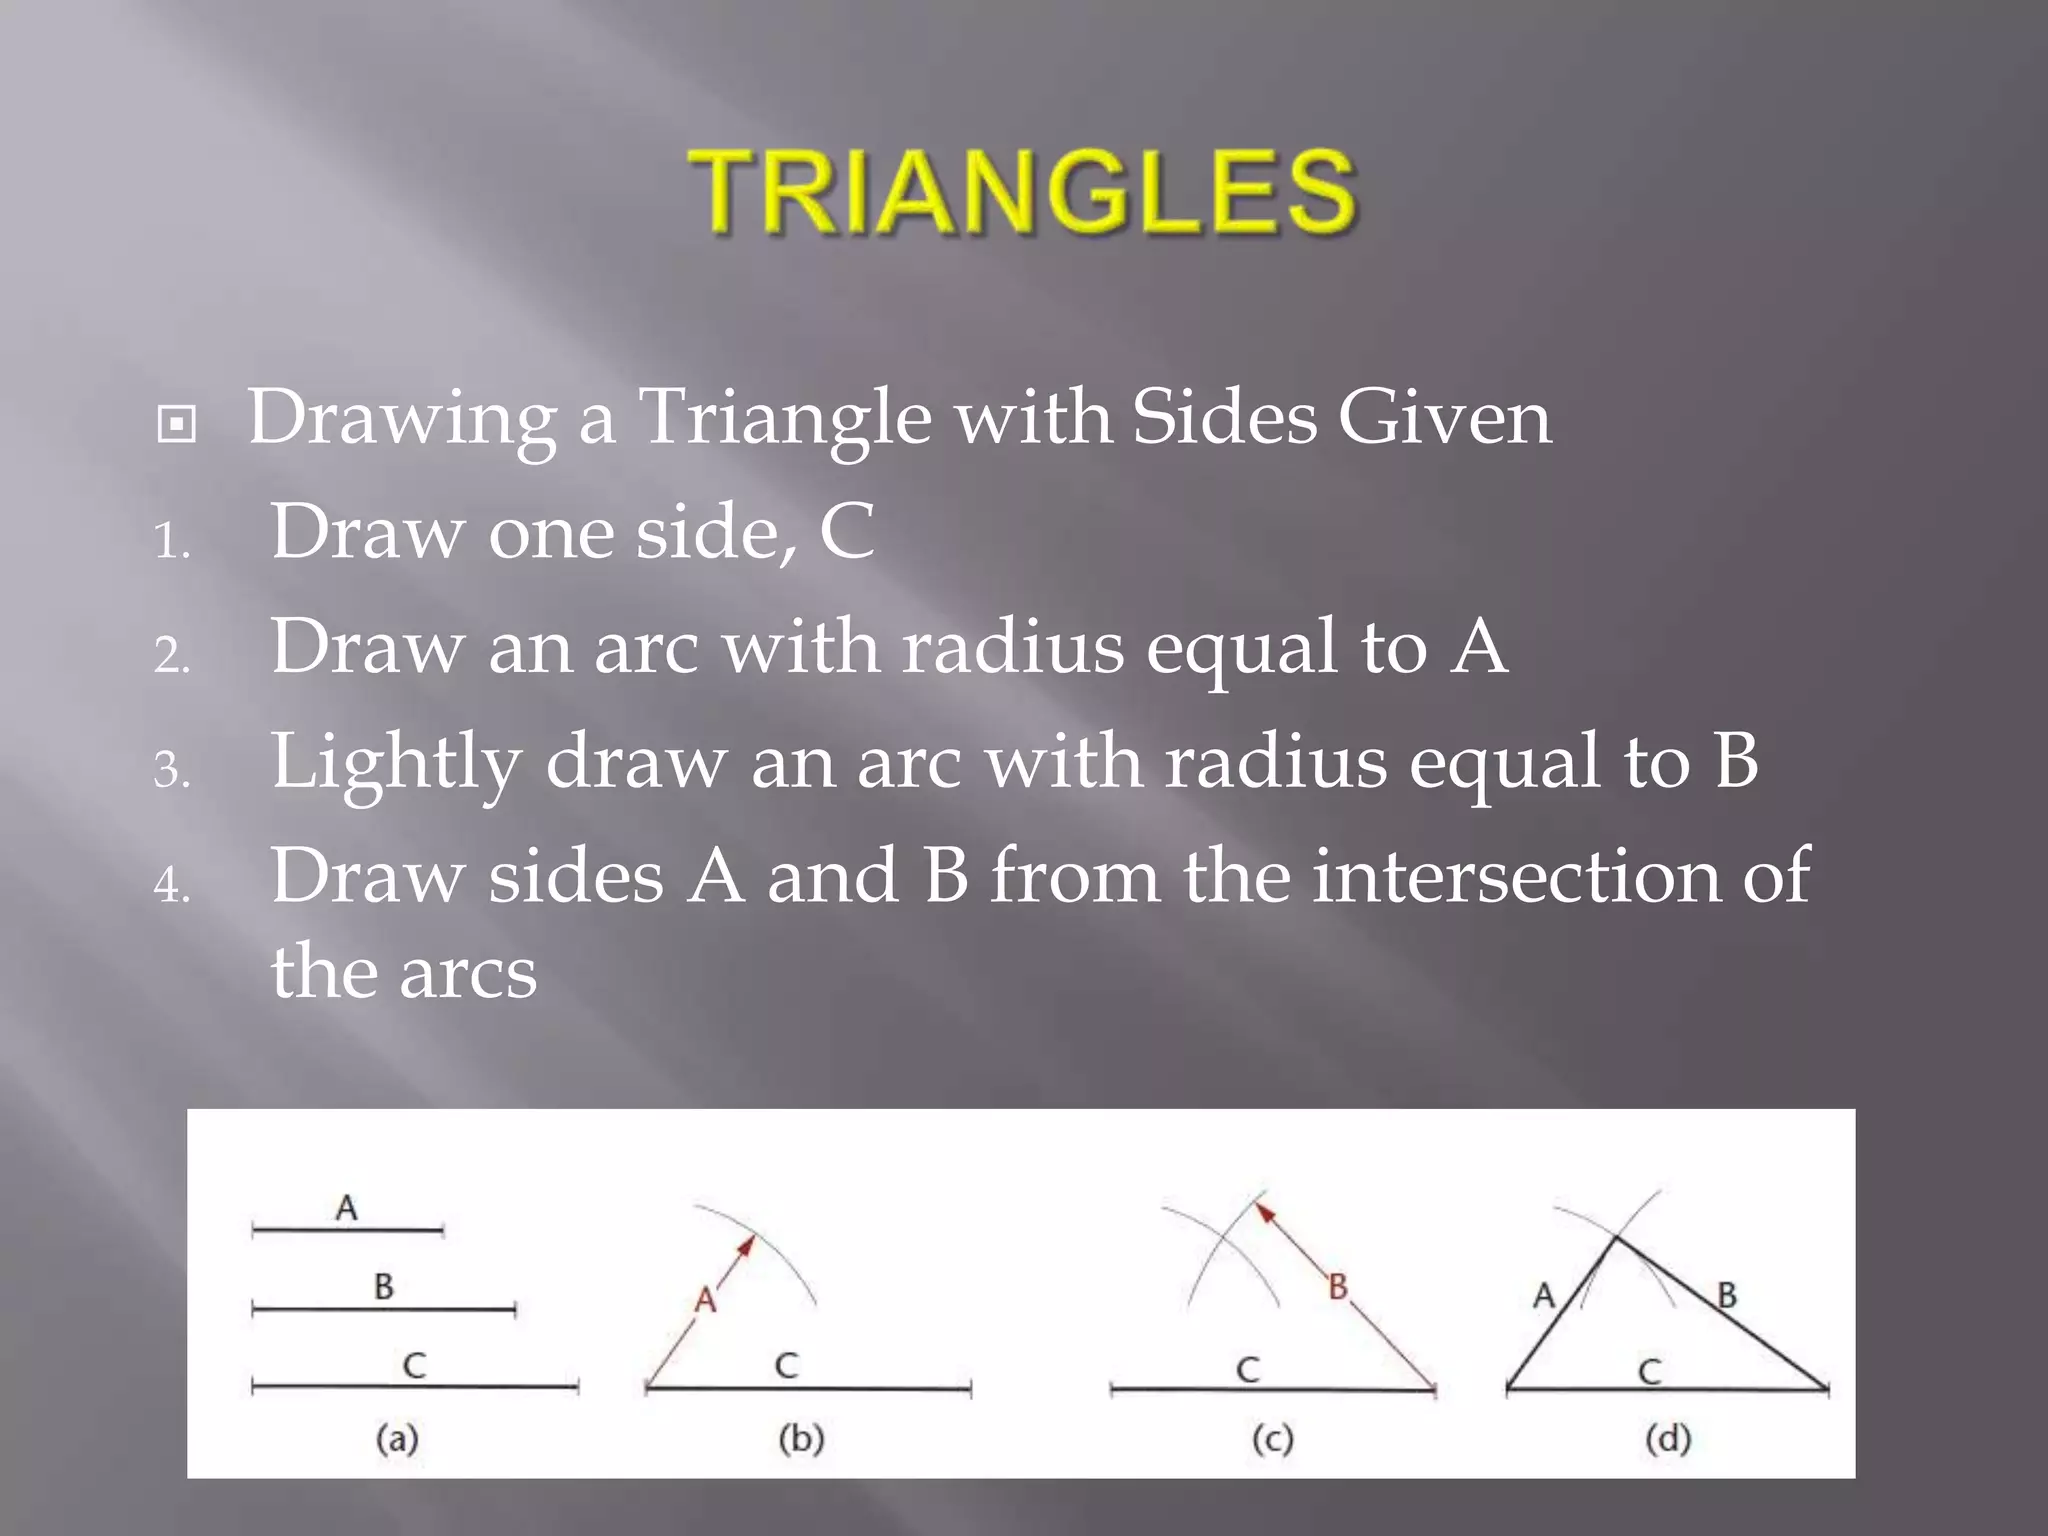
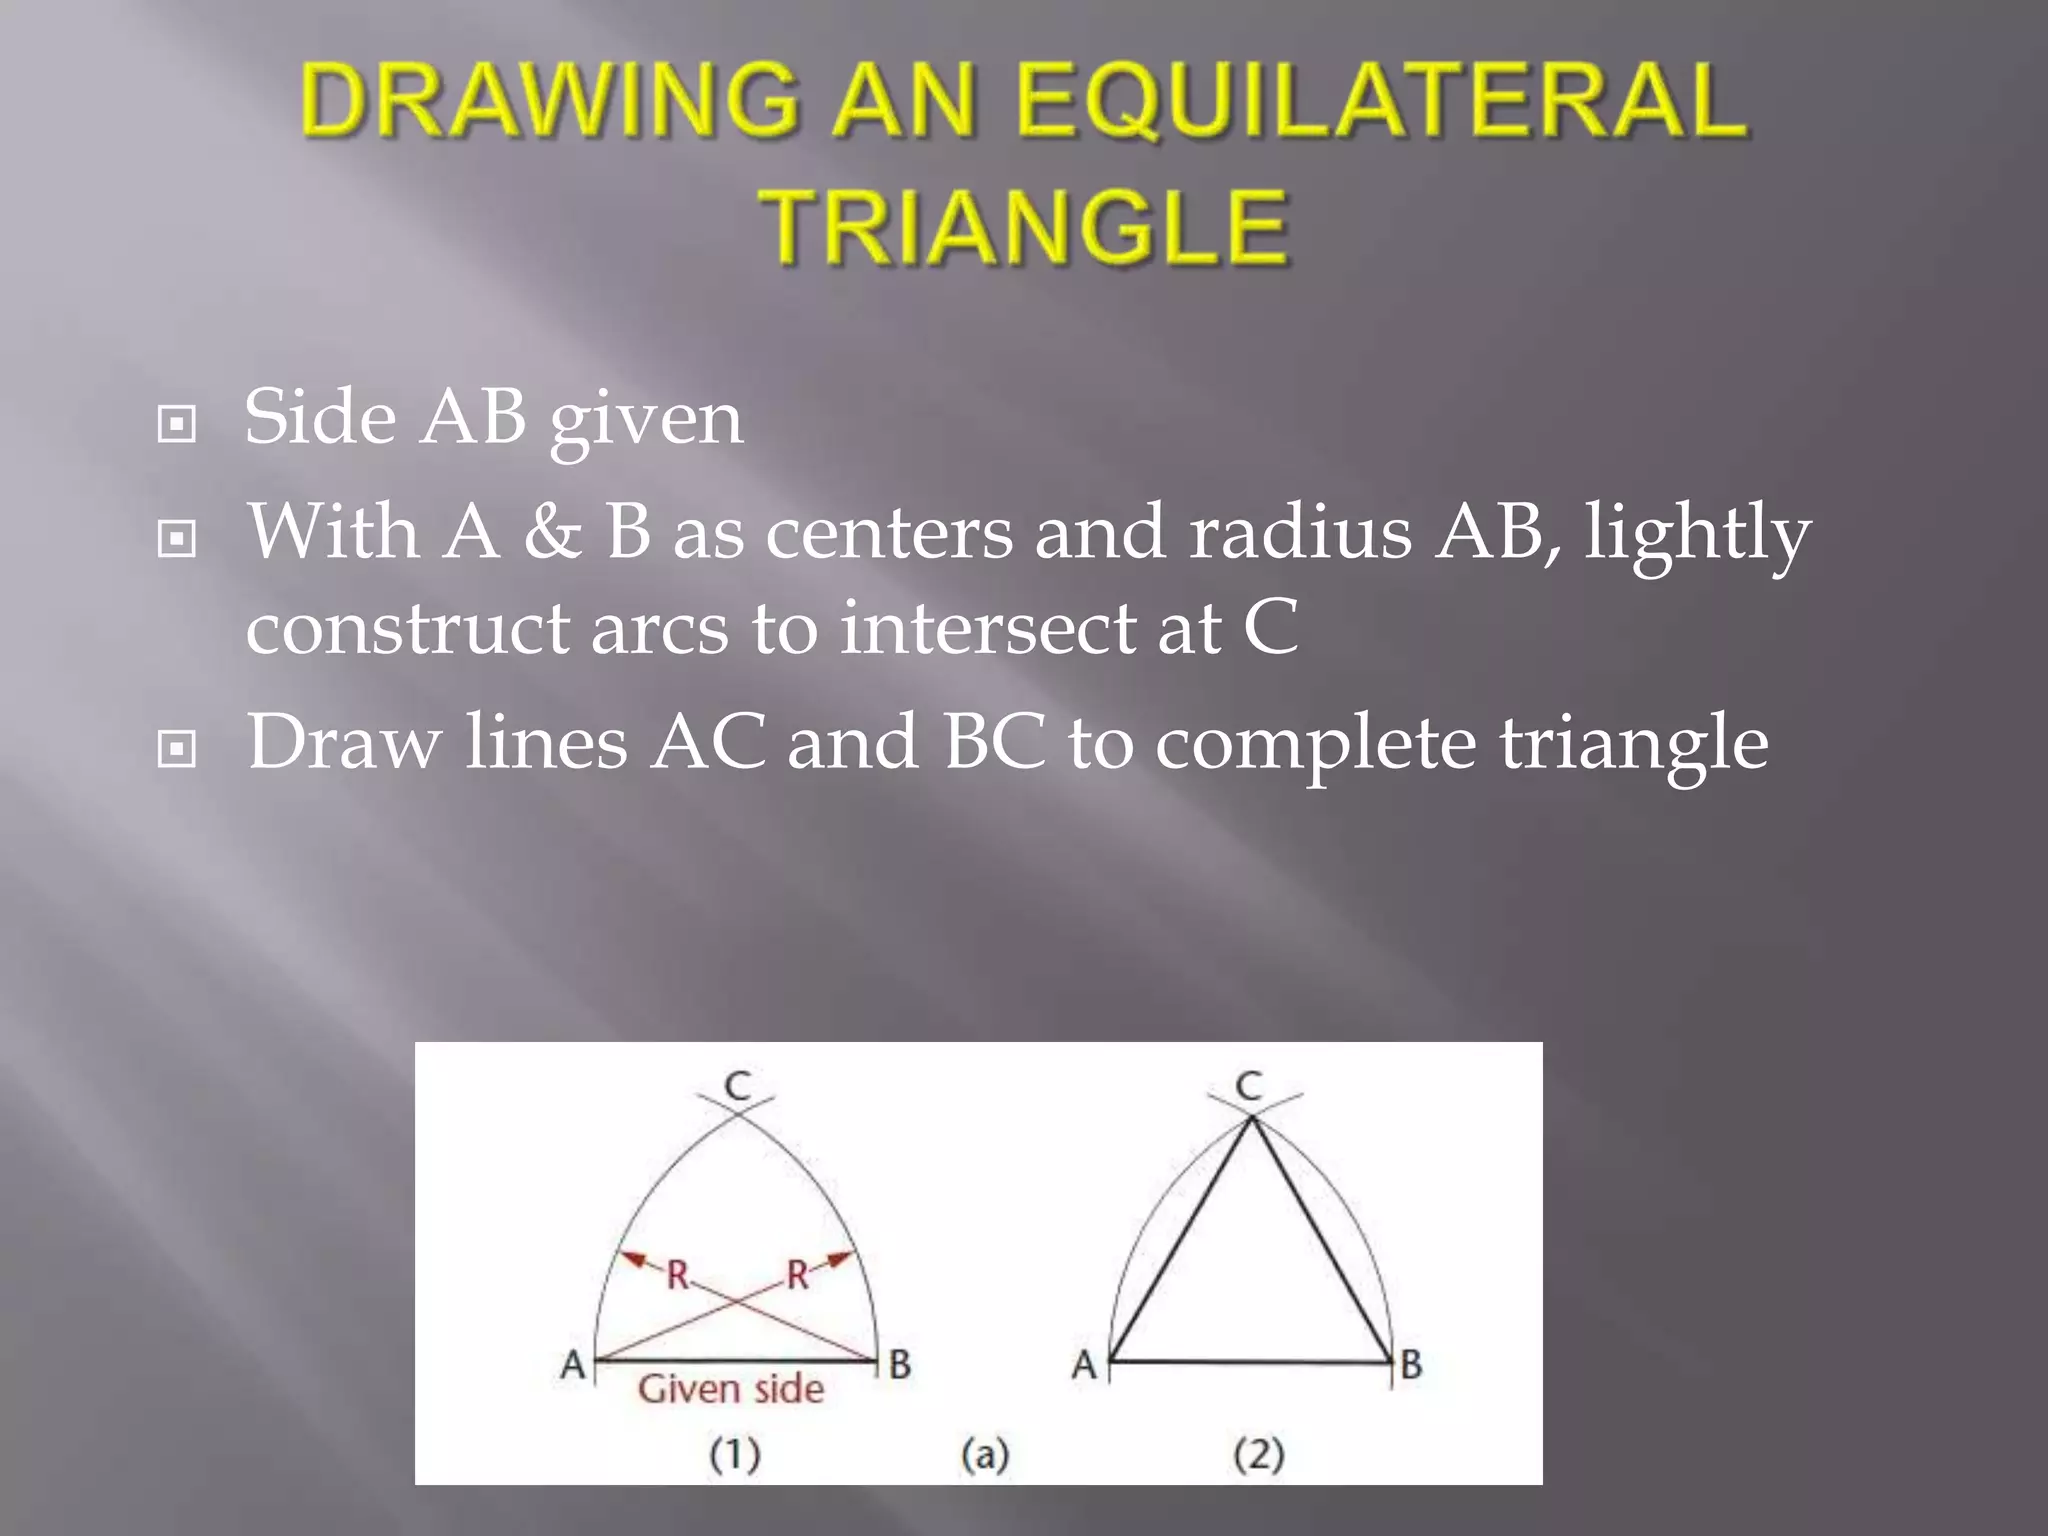
Instructor: Laura Gerold, PE
               Catalog #10614113
     Class # 22784, 24113, 24136, & 24138
Class Start: January 18, 2012 Class End: May
                    16, 2012
   Project Proposals are due in two weeks on
    February 22nd
   Laura’s office hour will be cancelled next week
    on February 15th as she will be driving back
    from a 1 PM meeting in Milwaukee.
   Please email any questions you may have
    about the homework or class!
   For ten extra points, write a question for our
    upcoming first exam (first exam is in one month on
    March 7th)
   Question can be in any of the following formats
       Question with a drawing/sketch for an answer
       Essay Question
       Fill in the blank question
       True/False
       Multiple Choice
   Question can cover any topics we covered in class
    so far. Also can include tonight and next week.
   Please include your answer
   Question & Answer are due in two weeks on
    February 22nd for extra ten points
   The wrong scale is used for measurement
   Architect Scale: 1/8 & ¼ scales are similar in
    the middle and wrong numbers can be read off
   Plans are printed out on a different size paper
    than was designed on and wrong scale used
    (check scales)
   Plans don’t fit to scale as they were printed out
    wrong (check scales)
There are ANSI/ASME standards for international and U.S. sheet
sizes. Note that drawing sheet size is given as height width. Most
standard sheets use what is called a “landscape” orientation.


          * May also be used as a vertical sheet size at 11" tall by 8.5" wide.
• Margins and Borders
• Zones
   Units are not converted correctly
   Not understanding the relationship between the
    different sides of the scale
   Not understanding on engineer’s scale that
    1”=20’ (etc.) and on Architect’s scale that ¼” =
    1’ (etc.)
   Engineer scale is divided by tens, Architect
    scale is divided by twelve
   Architect 16 Scale – Sixteen divisions per inch
   Engineer Scale
       Actual Length
        1. Measure actual length with 10 scale
        2. 1:2 is half size. Use 20 scale and measure out length
           from step 1. Draw
        3. 2:1 is double size. Double measurement from step
           1, measure on 10 scale. Draw
       Using scale lengths to double
        1. Measure length using 20 scale
        2. 1:2 is half size. Use 40 scale to measure out length
           from step 1. Draw
        3. 2:1 is double size. Use 10 scale to measure out length
           from step 1. Draw.
   Architect Scale
       Actual Length
        1. Measure actual length with 16 scale
        2. 1:2 is half size. Divide length from Step 1 in 2. Use 16
           scale and measure out length. Draw.
        3. 2:1 is double size. Double measurement from step 1,
           measure on 16 scale. Draw.
       Using scale lengths to double
        1. Measure length using 1/4 scale
        2. 1:2 is half size. Use 1/8 scale to measure out length
           from step 1. Draw.
        3. 2:1 is double size. Use ½ scale to measure out length
           from step 1. Draw.
   Do the same exercise as 2.2 over again, using
    the line lengths from 2.1.
   Maximum of ten points will be rewarded
   Some tips
     Label lines 1, 2, 3, etc.
     Explain which scale you used and label on lines
      (engineer or architect, 20, 1/2 )
     Include your measurements of the original lines
   Highly recommended for students who were
    deducted points on this exercise (and bonus for
    those scale experts who were not)
THICK! Use your 7 mm mechanical pencil.
   How to Use the Ames Lettering Guide
   Very well! It is a course competency to be able
    to “describe solids”
   You need to be able to describe the following:
     Prisms
     Cylinders
     Pyramids
     Cones
     Spheres
     Torus
     Ellipsoids
   On a test, you may be asked to do one of the
    following:
       Draw one of the solids
       Give the definition of one of the solids (essay, fill in
        the blank, true/false, or multiple choice (like
        questions 2 & 3 on your technical sketching
        worksheet homework).
   Three-Dimensional Geometry
       Geometry Basics: 3D Geometry
       Pyramids and Prisms
       Cylinders and Cones
   Right Circular
    Cylinder
   This is the rotunda in
    Birmingham, UK
   Sphere
   Water Tower
   Right Pentagonal
    Prism
   The Pentagon
   Ellipsoid
   Caravan Interior Light
   What object has a double curved surface and is
    shaped like a donut?
     A.   Ellipsoid
     B.   Torus
     C.   Sphere
     D.   Cylinder
   What object has two triangular bases and three
    additional faces?
     A.    Pyramid
     B.    Torus
     C.    Cone
     D.    Triangular Prism
   Make a list of solids that you saw today on
    your way to class, in your house, or at work.
   Sketch few of these shapes
   Present
• Triangles
• Quadrilaterals
• Polygons
• Circles
• Arcs
Three-dimensional figures are referred
to as solids. Solids are bounded by
the surfaces that contain them. These
surfaces can be one of the following four
types:


• Planar (flat)
• Single curved (one curved surface)
• Double curved (two curved surfaces)
• Warped (uneven surface)


Regardless of how complex a solid
may be, it is composed of combinations
of these basic types of surfaces.
   A two-dimensional figure, also called a plane or planar
    figure, is a set of line segments or sides and curve
    segments or arcs, all lying in a single plane. The sides
    and arcs are called the edges of the figure. The edges
    are one-dimensional, but they lie in the plane, which is
    two-dimensional.
   A triangle is a plan figure bounded by three
    straight lines
   The sum of the interior angles is always 180
    degrees
   A right triangle has one 90 degree angle
   A plane figure bounded by four straight sides
   If opposite sides are parallel, the quadrilateral
    is also a parallelogram
   A Trapezoid is a quadrilateral which has at
    least one pair of parallel sides
A Parallelogram is a four-sided
shape with two parallel sides.

Parallelograms have the following
characteristics:
• The opposite sides are equal in
  length.
• The opposite angles are equal.
• The diagonals bisect each other.

Examples are a
rectangle, rhombus, square.
   A trapezium is defined by the properties it
    does not have. It has no parallel sides. Any
    quadrilateral drawn at random would
    probably be a trapezium.
   A plane shape (two-
    dimensional) with
    straight sides.
   Examples:
    triangles, rectangles and
    pentagon
   Note: a circle is not a
    polygon because it has a
    curved side
   Be prepared to define a
    polygon up to an eight-
    sided figure (Figure
    4.3, page 125)
   Come up with a list of Polygons you see in
    nature, at work, driving around, at home . . .
    Etc.
   Sketch a few of these shapes.
   Present shapes
   A circle is a closed curve all points of which are the
    same distance from a point called the center.
   Circumference refers to the distance around the
    circle (equal to pi (3.1416 multiplied by the
    diameter)
   A diameter of a circle is any straight line segment
    that passes through the center of the circle and
    whose endpoints are on the circle
   A radius of a circle is the line from the center
    of a circle to a point on the circle.
   The quadrant of a circle is a quarter of a circle
    (made by two radiuses at right angles and the
    connecting arc)
   A chord of a circle is a line that links two points
    on a circle or curve.
   Concentric circles are circles that have their
    centers at the same point
   Eccentric circles are circles that do not have
    their centers at the same point
   An arc is a portion of the circumference of a
    circle
   An arc could be a portion of some other curved
    shape, such as an ellipse, but it almost always
    refers to a circle
   Tangent is a line (or arc) which touches a circle
    or ellipse at just one point. Below, the blue line
    is a tangent to the circle c. Note the radius to
    the point of tangency is always perpendicular
    to the tangent line.
   See Appendix for useful geometric formulas
    (pages A-32 to A-37)
   From A ad B draw
    equal arcs with radius
    greater than half AB
   Join Intersection D
    and E with a straight
    line to locate center C


                              Compass system
   Draw line AB 2.3 inches long
   Bisect this line using demonstrated method
Inclined lines can be drawn at standard angles with the 45° triangle and the
30° x 60° triangle. The triangles are transparent so that you can see the lines
of the drawing through them. A useful combination of triangles is the 30° x 60°
triangle with a long side of 10" and a 45° triangle with each side 8" long.
For measuring or setting off angles other than those obtainable with
triangles, use a protractor.


 Plastic protractors are
 satisfactory for most
 angular measurements


Nickel silver protractors are
available when high accuracy
is required
   A Song about Angles
   1. Lightly draw arc CR
   2. Lightly draw equal arcs r with radius
    slightly larger than half BC, to intersect at D
   3. Draw line AD, which bisects the angle
   1. Use any convenient radius R, and strike arcs
    from centers A and A’
   2. Strike equal arcs r, and draw side A’C’
   Draw any angle
   Label its vertex C
   Bisect the angle and transfer half the angle to
    place its vertex at arbitrary point D
   AB is the line, CD is the given distance
   Use CD distance as the radius and draw two
    arcs with center points E and F near the ends of
    the line AB
   Line GH (tangent to the arcs) is the required
    line.


                         T-square Method   For Curves
   Draw a line EF
   Use distance FH equal to 1.2”
   Draw a new line parallel to EF and distance
    GH away


                         T-square Method   For Curves
     When the Point is Not on the Line (AB & P given)
          From P, draw any convenient inclined line, PD on (a)
          Find center, C, of line PD
          Draw arc with radius CP
          Line EP is required perpendicular
          P as center, draw an arc to intersect AB at C and D (b)
          With C & D as centers and radius slightly greater than half CD,
           draw arcs to intersect at E
          Line PE is required perpendicular


    When the Point Is Not on the Line   When the Point Is on the Line   T-square Method
     When the Point is on the Line (AB & P given)
          With P as center and any radius, strike arcs to intersect AB at D
           and G (c)
          With D and G as centers and radius slightly greater than half
           DG, draw equal arcs to intersect at F.
          Line PF is the required perpendicular


    When the Point Is Not on the Line   When the Point Is on the Line   T-square Method
   Draw a line
   Draw a point on the line
   Draw a point through the point and
    perpendicular to the line
   Repeat process, but this time put the point not
    on the line
    Drawing a Triangle with Sides Given
1.   Draw one side, C
2.   Draw an arc with radius equal to A
3.   Lightly draw an arc with radius equal to B
4.   Draw sides A and B from the intersection of
     the arcs
    Drawing a right triangle with hypotenuse and
     one side given
1.   Given sides S and R
2.   With AB as diameter equal to S, draw a semicircle
3.   With A as center, R as radius, draw an arc
     intersecting the semicircle C.
4.   Draw AC and CB
   Draw a triangle with sides 3”, 3.35”, and 2.56.”
   Bisect the three interior angles
   The bisectors should meet at a point
   Draw a circle inscribed in the triangle with the
    point where the bisectors meet in the center
   Math Made Easy: Measuring Angles (part 1)
   Math Made Easy: Measure Angles (part 2)
   Many angles can be laid out directly with the
    protractor.
    Tangent Method
1.   Tangent = Opposite / Adjacent
2.   Tangent of angle is y/x
3.   Y = x tan
4.   Assume value for x, easy such as 10
5.   Look up tangent of and multiply by x (10)
6.   Measure y = 10 tan
    Sine Method
1.    Sine = opposite / hypotenuse
2.    Sine of angle is y/z
3.    Draw line x to easy length, 10
4.    Find sine of angle , multiply by 10
5.    Draw arc R = 10 sin
    Chord Method
1.   Chord = Line with both endpoints on a circle
2.   Draw line x to easy length, 10
3.   Draw an arc with convenient radius R
4.   C = 2 sin ( /2)
5.   Draw length C
   Draw two lines forming an angle of 35.5
    degrees using the tangent, sine, and chord
    methods
   Draw two lines forming an angle of 40 degrees
    using your protractor
   Side AB given
   With A & B as centers and radius AB, lightly
    construct arcs to intersect at C
   Draw lines AC and BC to complete triangle
   Draw a 2” line, AB
   Construct an equilateral triangle
1.   One side AB, given
2.   Draw a line perpendicular through point A
3.   With A as center, AB as radius, draw an arc
     intersecting the perpendicular line at C
4.   With B and C as centers and AB as radius,
     lightly construct arcs to intersect at D
5.   Draw lines CD and BD
Diameters Method
1. Given Circle

2. Draw diameters at right angles to each other

3. Intersections of diameters with circle are
   vertices of square
4. Draw lines
   Lightly draw a 2.2” diameter circle
   Inscribe a square inside the circle
   Circumscribe a square around the circle
    Dividers Method
      Divide the circumference of a circle into five equal
       parts with dividers
      Join points with straight line


    Dividers Method                  Geometric Method
    Geometric Method
     1.   Bisect radius OD at C
     2.   Use C as the center and CA as the radius to lightly draw
          arc AE
     3.   With A as center and AE as radius draw arc EB
     4.   Draw line AB, then measure off distances AB around the
          circumference of the circle, and draw the sides of the
          Pentagon through these points


    Dividers Method                     Geometric Method
   Lightly draw a 5” diameter circle
   Find the vertices of an inscribed regular
    pentagon
   Join vertices to form a five-pointed star
Each side of a hexagon is equal to the radius of the circumscribed circle


          Use a compass                         Centerline Variation


               Steps
   Method 1 – Use a Compass
     Each side of a hexagon is equal to the radius of the
      circumscribed circle
     Use the radius of the circle to mark the six sides of
      the hexagon around the circle
     Connect the points with straight lines
     Check that the opposite sides are parallel


                         Use a compass
   Method 2 – Centerline Variation
     Draw vertical and horizontal centerlines
     With A & B as centers and radius equal to that of the
      circle, draw arcs to intersect the circle at C, D, E, and
      F
     Complete the hexagon


                       Centerline Variation
   Lightly draw a 5” diameter circle
   Inscribe a hexagon
   Given a circumscribed square, (the distance
    “across flats”) draw the diagonals of the
    square.
   Use the corners of the square as centers and
    half the diagonal as the radius to draw arcs
    cutting the sides
   Use a straight edge to draw the eight sides
   Lightly draw a 5” diameter circle
   Inscribe an Octogon
   A,B, C are given points not on a straight line
   Draw lines AB and BC (chords of the circle)
   Draw perpendicular bisectors EO and DO
    intersecting at O
   With center at ), draw circle through the points
   Draw three points spaced apart randomly
   Create a circle through the three points
   Method 1
       This method uses the principle that any right triangle
        inscribed in a circle cuts off a semicircle
       Draw any cord AB, preferably horizontal
       Draw perpendiculars from A and B, cutting the circle
        at D and E
       Draw diagonals DB and EA whose intersection C will
        be the center of the circle
   Method 2 – Reverse the procedure (longer)
       Draw two nonparallel chords
       Draw perpendicular bisectors.
       The intersection of the bisectors will be the center of
        the circle.
   Draw a circle with a random radius on its own
    piece of paper
   Give your circle to your neighbor
   Find the center of the circle given to you
   Given a line AB and a point P on the line
   At P, draw a perpendicular to the line
   Mark the radius of the required circle on the
    perpendicular
   Draw a circle with radius CP
Tangents
For small radii, such as 1/8R for fillets and rounds, it is not practicable
to draw complete tangency constructions. Instead, draw a 45° bisector
of the angle and locate the center of the arc by trial along this line
Connecting Two Parallel Lines   Connecting Two Nonparallel Lines
The conic sections are curves produced by planes intersecting a right circular
cone.


                Four types of curves are produced: the circle, ellipse, parabola, and
                hyperbola, according to the position of the planes.
If a circle is viewed with the line of sight perpendicular to the plane
of the circle…


     …the circle will appear as a circle, in true size and shape
The intersection of like-numbered lines will be points on the ellipse. Locate points in the
remaining three quadrants in a similar manner. Sketch the ellipse lightly through the points,
then darken the final ellipse with the aid of an irregular curve.
These ellipse guides are usually designated by the ellipse angle, the
angle at which a circle is viewed to appear as an ellipse.
The curves are largely successive segments of geometric curves,
such as the ellipse, parabola, hyperbola, and involute.
For many purposes, particularly where a small ellipse is required, use the
approximate circular arc method.
The curve of intersection between a right circular cone and a plane parallel
to one of its elements is a parabola.
A helix is generated by a point moving around and along the surface of a
cylinder or cone with a uniform angular velocity about the axis, and with a
uniform linear velocity about the axis, and with a uniform velocity in the
direction of the axis
An involute is the path of a point on a string as the string unwinds from a
line, polygon, or circle.
A cycloid is generated by a point P on the circumference of a circle that
rolls along a straight line


                               Cycloid
Like cycloids, these curves are used to form the outlines of certain gear teeth and are therefore
of practical importance in machine design.
• Chapter 5 – Orthographic Projection
• Project Proposal due in two weeks (February
  22nd)
   On one of your sketches, answer the following
    two questions:
       What was the most useful thing that you learned
        today?
       What do you still have questions about?

Class 4 presentation posted

  • 1.
    Instructor: Laura Gerold,PE Catalog #10614113 Class # 22784, 24113, 24136, & 24138 Class Start: January 18, 2012 Class End: May 16, 2012
  • 3.
    Project Proposals are due in two weeks on February 22nd  Laura’s office hour will be cancelled next week on February 15th as she will be driving back from a 1 PM meeting in Milwaukee.  Please email any questions you may have about the homework or class!
  • 4.
    For ten extra points, write a question for our upcoming first exam (first exam is in one month on March 7th)  Question can be in any of the following formats  Question with a drawing/sketch for an answer  Essay Question  Fill in the blank question  True/False  Multiple Choice  Question can cover any topics we covered in class so far. Also can include tonight and next week.  Please include your answer  Question & Answer are due in two weeks on February 22nd for extra ten points
  • 6.
    The wrong scale is used for measurement  Architect Scale: 1/8 & ¼ scales are similar in the middle and wrong numbers can be read off  Plans are printed out on a different size paper than was designed on and wrong scale used (check scales)  Plans don’t fit to scale as they were printed out wrong (check scales)
  • 7.
    There are ANSI/ASMEstandards for international and U.S. sheet sizes. Note that drawing sheet size is given as height width. Most standard sheets use what is called a “landscape” orientation. * May also be used as a vertical sheet size at 11" tall by 8.5" wide.
  • 8.
    • Margins andBorders • Zones
  • 9.
    Units are not converted correctly  Not understanding the relationship between the different sides of the scale  Not understanding on engineer’s scale that 1”=20’ (etc.) and on Architect’s scale that ¼” = 1’ (etc.)  Engineer scale is divided by tens, Architect scale is divided by twelve  Architect 16 Scale – Sixteen divisions per inch
  • 10.
    Engineer Scale  Actual Length 1. Measure actual length with 10 scale 2. 1:2 is half size. Use 20 scale and measure out length from step 1. Draw 3. 2:1 is double size. Double measurement from step 1, measure on 10 scale. Draw  Using scale lengths to double 1. Measure length using 20 scale 2. 1:2 is half size. Use 40 scale to measure out length from step 1. Draw 3. 2:1 is double size. Use 10 scale to measure out length from step 1. Draw.
  • 11.
    Architect Scale  Actual Length 1. Measure actual length with 16 scale 2. 1:2 is half size. Divide length from Step 1 in 2. Use 16 scale and measure out length. Draw. 3. 2:1 is double size. Double measurement from step 1, measure on 16 scale. Draw.  Using scale lengths to double 1. Measure length using 1/4 scale 2. 1:2 is half size. Use 1/8 scale to measure out length from step 1. Draw. 3. 2:1 is double size. Use ½ scale to measure out length from step 1. Draw.
  • 12.
    Do the same exercise as 2.2 over again, using the line lengths from 2.1.  Maximum of ten points will be rewarded  Some tips  Label lines 1, 2, 3, etc.  Explain which scale you used and label on lines (engineer or architect, 20, 1/2 )  Include your measurements of the original lines  Highly recommended for students who were deducted points on this exercise (and bonus for those scale experts who were not)
  • 13.
    THICK! Use your7 mm mechanical pencil.
  • 14.
    How to Use the Ames Lettering Guide
  • 15.
    Very well! It is a course competency to be able to “describe solids”  You need to be able to describe the following:  Prisms  Cylinders  Pyramids  Cones  Spheres  Torus  Ellipsoids
  • 16.
    On a test, you may be asked to do one of the following:  Draw one of the solids  Give the definition of one of the solids (essay, fill in the blank, true/false, or multiple choice (like questions 2 & 3 on your technical sketching worksheet homework).
  • 17.
    Three-Dimensional Geometry  Geometry Basics: 3D Geometry  Pyramids and Prisms  Cylinders and Cones
  • 19.
    Right Circular Cylinder  This is the rotunda in Birmingham, UK
  • 21.
    Sphere  Water Tower
  • 23.
    Right Pentagonal Prism  The Pentagon
  • 25.
    Ellipsoid  Caravan Interior Light
  • 26.
    What object has a double curved surface and is shaped like a donut?  A. Ellipsoid  B. Torus  C. Sphere  D. Cylinder
  • 27.
    What object has two triangular bases and three additional faces?  A. Pyramid  B. Torus  C. Cone  D. Triangular Prism
  • 28.
    Make a list of solids that you saw today on your way to class, in your house, or at work.  Sketch few of these shapes  Present
  • 30.
    • Triangles • Quadrilaterals •Polygons • Circles • Arcs
  • 31.
    Three-dimensional figures arereferred to as solids. Solids are bounded by the surfaces that contain them. These surfaces can be one of the following four types: • Planar (flat) • Single curved (one curved surface) • Double curved (two curved surfaces) • Warped (uneven surface) Regardless of how complex a solid may be, it is composed of combinations of these basic types of surfaces.
  • 32.
    A two-dimensional figure, also called a plane or planar figure, is a set of line segments or sides and curve segments or arcs, all lying in a single plane. The sides and arcs are called the edges of the figure. The edges are one-dimensional, but they lie in the plane, which is two-dimensional.
  • 33.
    A triangle is a plan figure bounded by three straight lines  The sum of the interior angles is always 180 degrees  A right triangle has one 90 degree angle
  • 34.
    A plane figure bounded by four straight sides  If opposite sides are parallel, the quadrilateral is also a parallelogram  A Trapezoid is a quadrilateral which has at least one pair of parallel sides
  • 35.
    A Parallelogram isa four-sided shape with two parallel sides. Parallelograms have the following characteristics: • The opposite sides are equal in length. • The opposite angles are equal. • The diagonals bisect each other. Examples are a rectangle, rhombus, square.
  • 36.
    A trapezium is defined by the properties it does not have. It has no parallel sides. Any quadrilateral drawn at random would probably be a trapezium.
  • 37.
    A plane shape (two- dimensional) with straight sides.  Examples: triangles, rectangles and pentagon  Note: a circle is not a polygon because it has a curved side  Be prepared to define a polygon up to an eight- sided figure (Figure 4.3, page 125)
  • 38.
    Come up with a list of Polygons you see in nature, at work, driving around, at home . . . Etc.  Sketch a few of these shapes.  Present shapes
  • 39.
    A circle is a closed curve all points of which are the same distance from a point called the center.  Circumference refers to the distance around the circle (equal to pi (3.1416 multiplied by the diameter)  A diameter of a circle is any straight line segment that passes through the center of the circle and whose endpoints are on the circle
  • 40.
    A radius of a circle is the line from the center of a circle to a point on the circle.  The quadrant of a circle is a quarter of a circle (made by two radiuses at right angles and the connecting arc)  A chord of a circle is a line that links two points on a circle or curve.
  • 41.
    Concentric circles are circles that have their centers at the same point  Eccentric circles are circles that do not have their centers at the same point
  • 42.
    An arc is a portion of the circumference of a circle  An arc could be a portion of some other curved shape, such as an ellipse, but it almost always refers to a circle
  • 43.
    Tangent is a line (or arc) which touches a circle or ellipse at just one point. Below, the blue line is a tangent to the circle c. Note the radius to the point of tangency is always perpendicular to the tangent line.
  • 44.
    See Appendix for useful geometric formulas (pages A-32 to A-37)
  • 45.
    From A ad B draw equal arcs with radius greater than half AB  Join Intersection D and E with a straight line to locate center C Compass system
  • 46.
    Draw line AB 2.3 inches long  Bisect this line using demonstrated method
  • 47.
    Inclined lines canbe drawn at standard angles with the 45° triangle and the 30° x 60° triangle. The triangles are transparent so that you can see the lines of the drawing through them. A useful combination of triangles is the 30° x 60° triangle with a long side of 10" and a 45° triangle with each side 8" long.
  • 48.
    For measuring orsetting off angles other than those obtainable with triangles, use a protractor. Plastic protractors are satisfactory for most angular measurements Nickel silver protractors are available when high accuracy is required
  • 49.
    A Song about Angles
  • 50.
    1. Lightly draw arc CR  2. Lightly draw equal arcs r with radius slightly larger than half BC, to intersect at D  3. Draw line AD, which bisects the angle
  • 51.
    1. Use any convenient radius R, and strike arcs from centers A and A’  2. Strike equal arcs r, and draw side A’C’
  • 52.
    Draw any angle  Label its vertex C  Bisect the angle and transfer half the angle to place its vertex at arbitrary point D
  • 53.
    AB is the line, CD is the given distance  Use CD distance as the radius and draw two arcs with center points E and F near the ends of the line AB  Line GH (tangent to the arcs) is the required line. T-square Method For Curves
  • 54.
    Draw a line EF  Use distance FH equal to 1.2”  Draw a new line parallel to EF and distance GH away T-square Method For Curves
  • 55.
    When the Point is Not on the Line (AB & P given)  From P, draw any convenient inclined line, PD on (a)  Find center, C, of line PD  Draw arc with radius CP  Line EP is required perpendicular  P as center, draw an arc to intersect AB at C and D (b)  With C & D as centers and radius slightly greater than half CD, draw arcs to intersect at E  Line PE is required perpendicular When the Point Is Not on the Line When the Point Is on the Line T-square Method
  • 56.
    When the Point is on the Line (AB & P given)  With P as center and any radius, strike arcs to intersect AB at D and G (c)  With D and G as centers and radius slightly greater than half DG, draw equal arcs to intersect at F.  Line PF is the required perpendicular When the Point Is Not on the Line When the Point Is on the Line T-square Method
  • 57.
    Draw a line  Draw a point on the line  Draw a point through the point and perpendicular to the line  Repeat process, but this time put the point not on the line
  • 58.
    Drawing a Triangle with Sides Given 1. Draw one side, C 2. Draw an arc with radius equal to A 3. Lightly draw an arc with radius equal to B 4. Draw sides A and B from the intersection of the arcs
  • 59.
    Drawing a right triangle with hypotenuse and one side given 1. Given sides S and R 2. With AB as diameter equal to S, draw a semicircle 3. With A as center, R as radius, draw an arc intersecting the semicircle C. 4. Draw AC and CB
  • 60.
    Draw a triangle with sides 3”, 3.35”, and 2.56.”  Bisect the three interior angles  The bisectors should meet at a point  Draw a circle inscribed in the triangle with the point where the bisectors meet in the center
  • 61.
    Math Made Easy: Measuring Angles (part 1)  Math Made Easy: Measure Angles (part 2)  Many angles can be laid out directly with the protractor.
  • 62.
    Tangent Method 1. Tangent = Opposite / Adjacent 2. Tangent of angle is y/x 3. Y = x tan 4. Assume value for x, easy such as 10 5. Look up tangent of and multiply by x (10) 6. Measure y = 10 tan
  • 63.
    Sine Method 1. Sine = opposite / hypotenuse 2. Sine of angle is y/z 3. Draw line x to easy length, 10 4. Find sine of angle , multiply by 10 5. Draw arc R = 10 sin
  • 64.
    Chord Method 1. Chord = Line with both endpoints on a circle 2. Draw line x to easy length, 10 3. Draw an arc with convenient radius R 4. C = 2 sin ( /2) 5. Draw length C
  • 65.
    Draw two lines forming an angle of 35.5 degrees using the tangent, sine, and chord methods  Draw two lines forming an angle of 40 degrees using your protractor
  • 66.
    Side AB given  With A & B as centers and radius AB, lightly construct arcs to intersect at C  Draw lines AC and BC to complete triangle
  • 67.
    Draw a 2” line, AB  Construct an equilateral triangle
  • 68.
    1. One side AB, given 2. Draw a line perpendicular through point A 3. With A as center, AB as radius, draw an arc intersecting the perpendicular line at C 4. With B and C as centers and AB as radius, lightly construct arcs to intersect at D 5. Draw lines CD and BD
  • 69.
    Diameters Method 1. GivenCircle 2. Draw diameters at right angles to each other 3. Intersections of diameters with circle are vertices of square 4. Draw lines
  • 70.
    Lightly draw a 2.2” diameter circle  Inscribe a square inside the circle  Circumscribe a square around the circle
  • 71.
    Dividers Method  Divide the circumference of a circle into five equal parts with dividers  Join points with straight line Dividers Method Geometric Method
  • 72.
    Geometric Method 1. Bisect radius OD at C 2. Use C as the center and CA as the radius to lightly draw arc AE 3. With A as center and AE as radius draw arc EB 4. Draw line AB, then measure off distances AB around the circumference of the circle, and draw the sides of the Pentagon through these points Dividers Method Geometric Method
  • 73.
    Lightly draw a 5” diameter circle  Find the vertices of an inscribed regular pentagon  Join vertices to form a five-pointed star
  • 74.
    Each side ofa hexagon is equal to the radius of the circumscribed circle Use a compass Centerline Variation Steps
  • 75.
    Method 1 – Use a Compass  Each side of a hexagon is equal to the radius of the circumscribed circle  Use the radius of the circle to mark the six sides of the hexagon around the circle  Connect the points with straight lines  Check that the opposite sides are parallel Use a compass
  • 76.
    Method 2 – Centerline Variation  Draw vertical and horizontal centerlines  With A & B as centers and radius equal to that of the circle, draw arcs to intersect the circle at C, D, E, and F  Complete the hexagon Centerline Variation
  • 77.
    Lightly draw a 5” diameter circle  Inscribe a hexagon
  • 78.
    Given a circumscribed square, (the distance “across flats”) draw the diagonals of the square.  Use the corners of the square as centers and half the diagonal as the radius to draw arcs cutting the sides  Use a straight edge to draw the eight sides
  • 79.
    Lightly draw a 5” diameter circle  Inscribe an Octogon
  • 80.
    A,B, C are given points not on a straight line  Draw lines AB and BC (chords of the circle)  Draw perpendicular bisectors EO and DO intersecting at O  With center at ), draw circle through the points
  • 81.
    Draw three points spaced apart randomly  Create a circle through the three points
  • 82.
    Method 1  This method uses the principle that any right triangle inscribed in a circle cuts off a semicircle  Draw any cord AB, preferably horizontal  Draw perpendiculars from A and B, cutting the circle at D and E  Draw diagonals DB and EA whose intersection C will be the center of the circle
  • 83.
    Method 2 – Reverse the procedure (longer)  Draw two nonparallel chords  Draw perpendicular bisectors.  The intersection of the bisectors will be the center of the circle.
  • 84.
    Draw a circle with a random radius on its own piece of paper  Give your circle to your neighbor  Find the center of the circle given to you
  • 85.
    Given a line AB and a point P on the line  At P, draw a perpendicular to the line  Mark the radius of the required circle on the perpendicular  Draw a circle with radius CP
  • 86.
  • 87.
    For small radii,such as 1/8R for fillets and rounds, it is not practicable to draw complete tangency constructions. Instead, draw a 45° bisector of the angle and locate the center of the arc by trial along this line
  • 92.
    Connecting Two ParallelLines Connecting Two Nonparallel Lines
  • 93.
    The conic sectionsare curves produced by planes intersecting a right circular cone. Four types of curves are produced: the circle, ellipse, parabola, and hyperbola, according to the position of the planes.
  • 95.
    If a circleis viewed with the line of sight perpendicular to the plane of the circle… …the circle will appear as a circle, in true size and shape
  • 96.
    The intersection oflike-numbered lines will be points on the ellipse. Locate points in the remaining three quadrants in a similar manner. Sketch the ellipse lightly through the points, then darken the final ellipse with the aid of an irregular curve.
  • 97.
    These ellipse guidesare usually designated by the ellipse angle, the angle at which a circle is viewed to appear as an ellipse.
  • 98.
    The curves arelargely successive segments of geometric curves, such as the ellipse, parabola, hyperbola, and involute.
  • 99.
    For many purposes,particularly where a small ellipse is required, use the approximate circular arc method.
  • 100.
    The curve ofintersection between a right circular cone and a plane parallel to one of its elements is a parabola.
  • 101.
    A helix isgenerated by a point moving around and along the surface of a cylinder or cone with a uniform angular velocity about the axis, and with a uniform linear velocity about the axis, and with a uniform velocity in the direction of the axis
  • 102.
    An involute isthe path of a point on a string as the string unwinds from a line, polygon, or circle.
  • 103.
    A cycloid isgenerated by a point P on the circumference of a circle that rolls along a straight line Cycloid
  • 104.
    Like cycloids, thesecurves are used to form the outlines of certain gear teeth and are therefore of practical importance in machine design.
  • 105.
    • Chapter 5– Orthographic Projection • Project Proposal due in two weeks (February 22nd)
  • 106.
    On one of your sketches, answer the following two questions:  What was the most useful thing that you learned today?  What do you still have questions about?