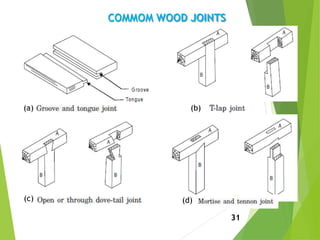
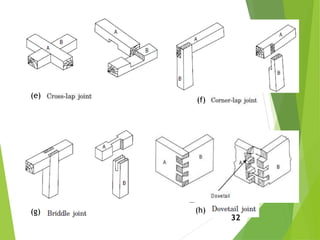
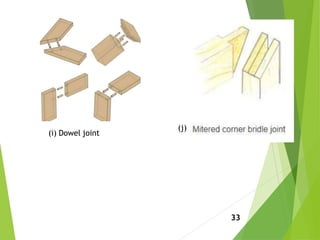
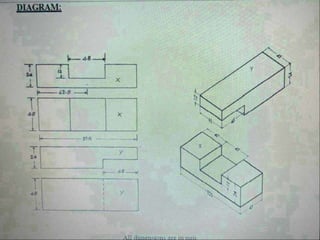
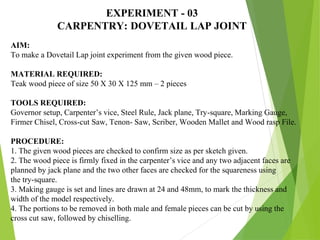
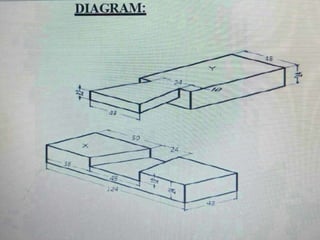
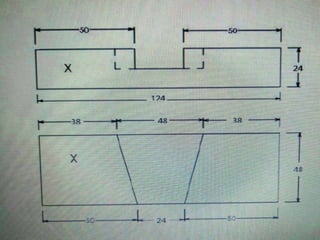
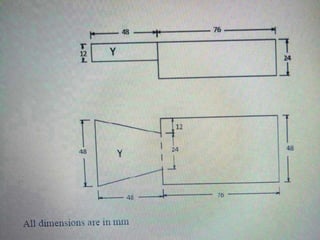
1. The document provides details about three carpentry experiments: making a sawing and grooving joint, a T-lap joint, and a dovetail lap joint from wood pieces.
2. It describes the materials, tools, and step-by-step procedures to make each joint, including marking, sawing, chiseling, planning and finishing the wood pieces.
3. The goals of the experiments are to learn how to properly make basic wood joints using tools such as saws, chisels, and planes while following safety precautions.
2. CARPENTRY
bridges, concrete formwork, etc.
Strictly speaking, carpentry deals with all works of a carpentry such
as roofs, floors, partitions, etc. of a building.
Another terms joinery deals with the making of doors, windows,
stairs and all interior fitments for a building. carpentry shop deals
with the timber, various types of tools and the art of joinery.
Timber and wood
Timber is the basic material used for any class of wood working. The term
timber is applied to the trees which provide us with wood.
What is carpentry?
is a skilled trade and a craft in which the primary work
is the cutting, shaping
Carpentry
performed
materials
and installation of building
during the construction of buildings, ships, timber
2
3. Hard and soft wood
3
Exogenous types are also known as outward growing trees which produce
timber for commercial use.
Endogenous trees are also known as inward growing.
4. (a) Natural seasoning
Seasoning of wood
Advantages:
Lighter in weight
More resilient
Less liable to twist, warp and split
Strength, hardness and stiffness increases
(b) Artificial s4easoning
7. (b) Try square (used for marking and testing angles of 90)
Stock
Blade (150 to 300 mm)
(c) Mitre square
Used to measure an angle of 45
Maximum blade length 300 mm
7
10. 2. Cutting tool
10
(b) Rip saw: used for cutting along the grain in thick wood
used for cutting along the grain in thick wood
Made of high grade tool steel
About 700 mm long
3 to 5 points or teeth per 25 mm
(a) Adze
used for rough cutting, squaring, to
chop inside curves and to produce concave surfaces
Its outer face is convex, inner face concave and edge is bevelled to form
a cutting edge
It is made of carbon steel.
11. (c) cross-cut saw (hand saw)
Used for cutting across the grain in thick wood
600 to 650 mm long
8 to 10 teeth per 25 mm
(d) Panel saw
500 mm long
10 to 12 teeth per 25 mm
It has finer blade & mostly used for fine work
11
12. (e) Tenon or back saw
Used for cross cutting when finer and more accurate finish is
required
250 to 400 mm long
13 teeth per 25 mm equilateral triangle shaped teeth
sometimes called “peg” teeth
(f) Dovetail saw
A smaller version of Tenon
Used where high accuracy needed
200 to 350 mm long
12 to 18 teeth per 25 mm
12
13. (g) Bow saw
Narrow blade used
The blade is held in tension by twisting the string with a smaller
wooden lever
Used for cutting quick curve
13
14. (h) Coping saw
Similar blade as bow saw
The blade is tensioned by screwing the handle
Used for cut small radius curve
(i) Compass saw
Narrow tapering blade
250to 400 mm long
Used for sawing small curve in confined space
(j) Pad or keyhole saw
Smallest saw
250 mm long
Used for interior cuts or cutting key holes
14
15. CHISEL
15
(a) Firmer chisel
Most useful for general purposes used by hand pressure or mallet
Flat blade about 125mm long
Width varies from 1.5-50 mm
(b) Bevelled edge firmer chisel
Used for more delicate and fine work
Useful for getting into corner where the ordinary firmer chisel would
be clumsy
(c) Paring chisel
Both firmer and bevelled edge chisels when they are made with
long thin blades are known as pairing chisel
16. (d) Mortise chisel
Used for chopping out mortices
Very nearly square in cross section
Withstand heavy blows from a mallet
(e) Gouges
Chisel with curved section
Inside or outside grounded
Inside grounded gouges are called scribing gauges
Outside ground gouges are called firmer gouges
16
19. Spokeshave plane
Spokeshave a wood shaving tool used for
fine finishing. Its small bearing surface makes
it perfect for shaping edged work and fine
tuning curves.
19
20. Router plane is a plane used for smoothing out sunken panels, and more generally
for all depressions below the general surface of the pattern. It planes the bottoms of
recesses to a uniform depth and can work into corners that otherwise can only be
reached with a chisel.
20
21. 4. Boring tool
Used to make round holes in wood.
21
Types of bits
Gimlet
Bradawl
Auger
Bradawl and Gimlet
23. 5. Striking tool
23
(a) Mallet
Wooden-headed hammer of round or rectangular cross-section
Used for giving light blows to the cutting tool like chisels and gouges
(b) Warrington hammer
The face of hammer is hardened, tempered
and ground slightly convex
The handle is made of wood
and is oval in cross-section to have a comfortable grip
The head is forged from tool steel and is obtainable in
various weights.
(a) Claw hammer
26. (c) Bar clamp
Clamps are commonly used
in pairs in gluing up
operations at the final
assembly of wood joinery
work
Both jaws of the sash
clamp are generally made
of malleable cast iron
which is tougher and less
brittle than ordinary cast
iron
26
34. EXPERIMENT - 01
CARPENTRY: SAWING AND GROOVING
AIM:
To make Sawing and Grooving experiment from the given wood piece.
MATERIAL REQUIRED:
Teak wood piece of size 50 X 30 X 125 mm – 1 piece
TOOLS REQUIRED:
Governor setup, Carpenter’s vice, Steel Rule, Jack plane, Try-square, Marking Gauge, Firmer
Chisel, Cross-cut Saw, Tenon- Saw, Scriber, Wooden Mallet and Wood rasp File.
PROCEDURE:
1. The given wood piece is checked to confirm size as per sketch given.
2. The wood piece is firmly fixed in the carpenter’s vice and any two adjacent faces are
planned by jack plane and the two other faces are checked for the squareness using the try-
square.
3. Making gauge is set and lines are drawn as per sketch given respectively.
35. 4.Using the cross cut saw the portions to be removed are cut in the wood piece.
5. Followed by chiselling the unwanted wood material can be removed.
6. A fine finishing is given by using wood rasp file.
Precautions:
1. Do not use firmer chisel without handle.
2. Do not put finger on cutting edge of chisel and Saw.
RESULT & CONCLUSION:
The Sawing and Grooving experiment is thus made by following the above sequence
of operations.
36.
37. EXPERIMENT - 02
CARPENTRY: T- LAP JOINT
AIM:
To make a T- LAP JOINT as shown in the figure from the given reaper.
MATERIAL REQUIRED:
Teak wood piece of size 50 X 30 X 125 mm – 2 pieces
TOOLS REQUIRED:
Governor setup, Carpenter’s vice, Steel Rule, Jack plane, Try-square, Marking Gauge,
Firmer Chisel, Cross-cut Saw, Tenon- Saw, Scriber, Wooden Mallet and Wood rasp File.
PROCEDURE:
1. The given reaper is checked to ensure its correct size.
2. The reaper is firmly clamped in the carpenter’s vice and any two adjacent faces are
planed by the jack plane and the two faces are checked for squareness with try-square.
3. Marking gauge is set and lines are drawn at 24 and 45mm to mark the thickness and
width of the model respectively.
4. The excess material is first chiselled out with firmer chisel an then planned to correct
size.
38. 5.The mating dimensions of the parts X and Y are then marked using scale and
marking gauge.
6. Using the cross cut saw, the portions to be removed are cut in both the pieces,
followed by chiselling.
7. The ends of both the parts are chiselled and filed by wood rasp file to the exact
length.
8. A fine finishing is given to the parts, if required so that proper fitting is obtained.
9. The parts are fitted to obtain a straight tight joint.
Precautions:
1. Do not use firmer chisel without handle.
2. Do not put finger on cutting edge of chisel and Saw.
RESULT & CONCLUSION:
The T-Lap Joint is thus made by following the above sequence of operations.
39.
40. EXPERIMENT - 03
CARPENTRY: DOVETAIL LAP JOINT
AIM:
To make a Dovetail Lap joint experiment from the given wood piece.
MATERIAL REQUIRED:
Teak wood piece of size 50 X 30 X 125 mm – 2 pieces
TOOLS REQUIRED:
Governor setup, Carpenter’s vice, Steel Rule, Jack plane, Try-square, Marking Gauge,
Firmer Chisel, Cross-cut Saw, Tenon- Saw, Scriber, Wooden Mallet and Wood rasp File.
PROCEDURE:
1. The given wood pieces are checked to confirm size as per sketch given.
2. The wood piece is firmly fixed in the carpenter’s vice and any two adjacent faces are
planned by jack plane and the two other faces are checked for the squareness using
the try-square.
3. Making gauge is set and lines are drawn at 24 and 48mm, to mark the thickness and
width of the model respectively.
4. The portions to be removed in both male and female pieces can be cut by using the
cross cut saw, followed by chiselling.
41. 5. A fine finishing is given by using wood rasp file.
6. The ends of both parts are chiselled and filed by Wood rasp file.
7. A fine finishing is given to the parts, if required so that, proper fitting is obtained.
8. The parts are fitted to obtain a slightly tight joint.
Precautions:
1. Do not use firmer chisel without handle.
2. Do not put finger on cutting edge of chisel and Saw.
RESULT & CONCLUSION:
The T-Lap Joint is thus made by following the above sequence of operations.