Lecturer:-Zeradam Y.
March, 2016
Ambo University
Institute of Technology
Department of Mechanical Engineering
Manufacturing Engineering
II (MEng 3182)
Outline
• Sheet metal forming operation
• Applications of sheet metal
• Cutting operation
Shearing
Blanking
Punching
• Engineering analysis of sheet metal
cutting
Part I
Sheet metal forming
 Sheet metal working includes cutting and forming
operations performed on relatively thin sheets of metal.
Shearing
Blanking
Punching
Bending
Drawing
Spinning
Stretching
Cutting Forming
Con..
 Typical sheet metal thicknesses are below 6mm (1/4in).
 When the thickness exceeds about 6mm,the stock is
usually referred to as plate rather than sheet.
 The sheet or plate stock used in sheet metalworking is
produced by rolling.
Applications
Construction
equipments
Automobile and truck
bodies
Ship building furnitureRailway Cars
Airplane
Con..
space industries;
Chemical industry;Drink & food industry.
Nuclear
Con..
Shower cabinets and othersWashing machines
Cookers
Refrigerator bodies
Domestic use
Five basic sheet metal
operations
Cutting
 Shearing
 Blanking
 Punching
Con..
Forming
 Bending,
 Spinning,
 Stretching,
 Drawing
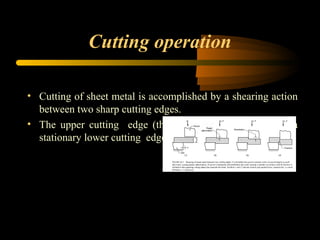
Cutting operation
• Cutting of sheet metal is accomplished by a shearing action
between two sharp cutting edges.
• The upper cutting edge (the punch) sweeps down past a
stationary lower cutting edge(the die).
Con..
c
(1)
Just before the punch
contact the work
Con..
• c
(2)
Punch begins to push into
the work, causing plastic
deformation
Con..
• c
(3)
Punch compresses and
penetrates into the work
and causing a smooth cut
surface
Con..
• c
(4)
Fracture is initiated at the
opposing cutting edges
that separate the sheet.
 Symbols V and F
represents motion and
applied force ,
respectively, t = stock
thickness , c = clearance.
Shearing
• Is a sheet metal cutting operation along a straight line
between two cutting edges.
• Shearing is typically used to cut large sheets into smaller
sections for subsequent press working operations.
Con..
• It is performed on a machine called a power shear, or squaring
shear.
• The upper blade of the power shears is often inclined (to reduce
cutting force).
• The shearing operation constitutes the first stage of any forming
process by producing either
 The starting material (cutting out of a sheet) OR
 Preparing an existing work piece e.g by punching a hole or a
series of holes before forming.
Blanking
• Involves cutting of sheet metal along a closed outline in a
single step to separate the piece from the surrounding
stock, as shown in figure a the part that is cut out is the
desired product in the operation and is called the blank.
Punching
• Is similar to blanking except that the separated piece is
scrap, called the slug. the remaining stock is desired part.
the distinction is illustrated in figure b.
Engineering analysis of
sheetmetal cutting
• One of the important parameters in sheet metal cutting is
clearance between the punch and die
• The clearance c in a shearing operation is the distance
between the punch and die.
• Typical clearance in conventional press working range
between 4% and 8% of the sheet metal thickness t.
Con..
• Measured perpendicular to
the direction of the blade
movement.
• It affects the finish of the
cut(burr) and machine’s
power consumption.
Con..
• If the clearance is too small,
then the fracture line tend to
pass each other ,causing a
double burnishing and large
cutting force.
con..
• If the clearance is too large ,the
metal becomes pinched between
the cutting edges and an
excessive burr results.
Con..
• The correct clearance depends on sheetmetal type and
thickness.
• The recommended clearance can be calculated by the
following formula:
C = Act
Where:
C=Clearance , mm;
Ac = Clearance allowance (percentage of the material
thickness)
t=Stock thickness, mm.
Con..
• The clearance allowance is determined according to the
type of metal 4.5%, 6% or 7.5% of the material
thickness.
• For convenience, metals are classified into three groups
with an associated allowance value for each group.
Clearance allowance for three sheet metal groups
Con..
• The calculated clearance values can be applied to
conventional blanking and hole-punching operations to
determine the proper punch and die sizes.
• The die opening must always be larger than the punch
size(obviously).
• Because of the geometry of the sheared edge, the outer
dimension of the part cut out of sheet will be larger than the
hole size.
Con..
• Punch and die sizes for a round blank of diameter Db are
determined as;
Blanking punch diameter =Db-2c
Blanking die diameter =Db
• Punch and die sizes for a round hole of diameter Dh are
determined as:
Hole punch diameter = Dh
Hole die diameter = Dh+2c
Con..
Angular Clearance
 Purpose: allows slug
or blank to drop
through die
 Typical values: 0.25°
to 1.5° on each side
Cutting force
• Estimates of cutting force are important because this force
determines the size (tonnage) of the press needed. Cutting
force F in sheetmetal working can be determined by
Where S= Shear strength of the metal, Mpa
t = Sthock thickness, mm
L= length of the cut edge,mm
• In blanking ,punching ,slotting ,and similar operations , L
is the perimeter length of the blank or hole being cut.
Con..
Example
A round disk of 150mm diameter is to be blanked from a
strip of 3.2mm cold rolled steel whose shear
strength=310MPa. Determine (a) the appropriate punch
and die diameters, and (b) blanking force.
Lesson II
Outline
Other sheet-metal
cutting operations
Sheet Metal Bending
Operation
Con..
Other sheet-metal cutting
operations
Cutoff
Is a shearing operation in which blanks are
separated from a sheet-metal strip by cutting the
opposite sides of the part in sequence.
Con..
With each cut, anew part is produced.
Distinguish it from a conventional shearing operation.
• The cut edges are not necessarily straight
Parting
 Involves cutting a sheet-metal strip by a punch
with two cutting edges that match the opposite
sides of the bank.
Con..
 This might be required because the part outline
has an irregular shape.
 Parting is less efficient than cutoff in the sense
that it results in some wasted materials.
Slotting
 Is the term sometimes used for a punching
operation that cuts out an elongated or rectangular
hole.
Perforating
 Involves the simultaneous punching of a pattern
of holes in sheet metal.
 The hole pattern is usually for decorative
purposes, or allow passage of light, gas, of fluid.
Notching and
Seminotching
• Notching involves cutting out a portion of metal
From the side of the sheet or strip.
• Seminotching removes a portion of metal from
the interior of the sheet.
Con..
 Seminotching might seem the same as punching
and slotting operation.
 The difference is that the metal removed by
seminotching creats part of the blank outline,
while punching and slotting creates holes in the
blank.
Shaving
 Shaving is a shearing operation performed with very small
clearance to obtain accurate dimensions and cut edges that are
smooth and straight, as pictured in figure (a).
 Shaving is typically performed as a secondary or finishing
Operation on apart that have been previously cut.
Fine blanking
 Is a shearing operation used to blank sheet metal parts with
close tolerances and smooth, straight edges in one step, as
illustrated in figure (b).
Con..
 Pressure pad applies holding force(Fh) in order to
prevent distortion.
 The punch then descends with slower than the
normal velocity and smaller clearance to provide
the desired dimension and cut edge.
 The process in usually for small stock thicknesses.
 v
Part II
Bending operation
 Bending in sheet metal work is defined as the straining of the
metal around a straight (bend) axis. (figure a).
 During bending the metal on the inside of the neutral plane is
compressed ,while the metal on the outside of the neutral plane is
stretched (figure b).
Con..
• The metal is plastically deformed so the bend
takes a permanent set upon removal of stresses
that caused it.
• Bending produces little or no change in the
thickness of the sheet metal.
V-Bending and Edge bending
 Bending operations are performed by using punch
and die tooling .
 The common bending methods are
1. V-Bending ,performed with a V-die.
Con..
2. Edge bending , performed with wiping die.
Con..
 Edge bending is limited to bend of 90° or less. More complicated
wiping dies can be designed for bend angles greater than 90°.
 Because of the pressure pad, wiping dies are more complicated
than V-dies and generally used for high production work.
Engineering analysis of bending
 The metal of thickness t is bend through an angle
called the bend angle α.
 This results in a sheet metal part with an included
angle α’, where α + α’= 180°
Con..
 R=Inside Bend radius
 W= The bend is made over the width of the work piece W.
 Kba= k factor ( the location of the neutral axis in the
material.
• Since neutral axis is the theoretical location at which the
material is neither compressed nor stretched .we use the
following recommended values of Kba.
Con..
 Recommended value of Kba
R<2t,Kba=0.33
R ≥2t,Kba=0.50
 t=stock thickness
Bend allowance
 The bend allowance (Ab) is the length of the neutral
axis between the bend lines, or the arc length of the
bend.
Where: α = bend angle
Spring back
 When the bending pressure removed at the end of deformation ,elastic
energy remains in the bent part ,causing it to recover particularly to its
original shape. This elastic recovery is called springback.
Figure: (1) during the operation ,the work is forced to take the radius Rt and
included angle α’t determined by the bending tool (punch in v-bending) (2) after
the punch is removed ,the work springs back to radius R and included angle α’.
Symbol: F=applied bending force.
Con..
• Spring back in bending show itself as a decrease
in bend angle and an increase in bend radius.
Sb= spring back
α’= Included angle of the sheet metal (after spring
back)
α’t =Included angle of the bending tool
Compensation for springback
 Can accomplished by several methods one of these
methods is over bending.
 Due to this elastic recovery, it is necessary to over-
bend the sheet a precise amount to achieve the
desired bend radius and bend angle . This is called
over bending.
Bending force
Bending Force: The force required to perform bending depends on
the Geometry of the punch and die and the strength, thickness, and
length of Sheetmtal. The maximum bending force can be estimated
by means of the following equation.
Con..
Where
F = Bending force
TS = Tensile strength of the sheet metal
W = Width of part in the direction of the bend axis.
t= stock thickness
D=die opening dimension
Kbf= Is a constant for differences encountered in actual
bending process. Its value depends on type of bending:
For V-bending, Kbf=1.33; and for edge bending,
Kbf=0.33
Con..
• Die opening
dimension a) V-die b)
Wiping Die
Con..
Example:
A sheet metal blank is to be bent as shown in figure below. The
metal has a modulus of elasticity=205(103
) MPa, yield
strength=275MPa, and tensile strength=450MPa. Determine (a) the
starting blank size and (b) the bending force if a V-die is used with
a die opening dimension = 25mm.
v
Other bending operations
Flanging
Con..
Con..
Miscellaneous bending operations
• Figure: miscellaneous
bending operations:
(a) Channel bending
(b) U-bending
(c) Air bending
(d) Offset bending
(e) Corrugating
symbol : F=applied
force.
Part III
Drawing
 Drawing is a sheet metal forming operation used
to make cup shaped ,box-shaped ,or other
complex curved, hollow shaped parts.
 It is performed by placing a piece of sheet metal
over a die cavity and pushing the metal into the
opening with a punch.
 The blank must be held down flat against the die
by blank holder.
Con..
( a ) Drawing of cup
shaped part :
(1) start of operation
before punch contacts
work, and
(2) near end of stroke
Con..
(b) Workpart:
(1) starting blank, and
(2) drawn part .
Symbols:
C=clearance,
Db=blank diameter,
Dp= punch diameter,
Rp=punch corner radius,
F=drawing force,
Fh=holding force.
Parts produced
Ammunition shellsBeverage
Sinks
and
Other parts
1
2
Mechanics of drawing
 A blank diameter Db is drawn into a die by means
of a punch of diameter Dp.
 The punch and die must have a corner radii, given
by Rp and Rd .
Con..
 If the punch and die were to have sharp corners
(Rp and Rd=0) a hole punching process would-be
accomplished rather than drawing operation.
 The sides of the punch and die are separated by a
clearance c.
 The clearance in drawing is about 10% grater than
the stock thickness.
C= 0.1t
Con..
The punch applies a downward force F to accomplish the
deformation of the metal, and a downward holding force
Fh is applied by the blankholder, as shown in the sketch.
Stages in deformation of the work
1) Punch makes
initial contact with
work
2) bending
Con..
3) straightening 4) Friction and
compression
5) Final cup
shape
Con..
Engineering analysis of drawing
Checking for feasibility of the operation
First
 Drawing ration: The ratio of blank diameter Db
to punch diameter Dp.
 Un upper limit on the drawing ration is a value
of 2.0 (DR≤2.0)
Con..
Second
 Reduction r
The value of reduction r should be
less than 0.50
Con..
Third
 Thickness to diameter ration
 It is desirable the ratio to be
greater than 1%.
Con..
Example 1
A drawing operation is used to form a cylindrical cup with inside
diameter=75mm and height = 50mm. The starting blank
size=138mm and the stock thickness=2.4mm.based on these
data, is the operation feasible?
Drawing force
F = Drawing force, N
t = Original blank thickness
TS= Tensile strength
Db and Dp = Starting blank and punch diameter.
Constant 0.7 is correction factor to account for friction.
Forces: The drawing force required to perform a given operation
can be estimated by the formula:
Con..
Where
Fh=holding force in drawing ,N
Y=yield strength of the sheet metal
t =starting stock thickness,mm
Rd=die corner radius, mm
The holding force (Fh) required can be calculated by using the
following formula.
Con..
Example 2
For the drawing operation of Example 1 determine(a)
drawing force and (b) holding force, given that the tensile
strength of the sheet metal(low-carbon steel)=300MPa and
yield strength=175MPa.The die corner radius=6mm.
Part IV
Stretch Forming
Con..
• Stretch forming: is a sheet metal deformation process in which
the sheet is internationally stretched and simultaneously bent in
order to achieve shape change.
• Figure below shows stretch forming for relatively simple gradual
bend.
Con..
The workpart is gripped by one or more jaws on each end and
then stretched and bent over a die containing the desired form.
The metal is stressed in tension to a level above its yield point.
When the tension loading is released, the metal has been
plastically deformed.
The combination of stretching and bending results in relatively
little springback in the part
Con..
Where; F=Stretching Force, N
L=length of the sheet in the direction perpendicular to stretching(mm)
t =Instantaneous stock thickness, mm
Yf=flow stress of the metal, Mpa
Con..
Yf=flow stress, Mpa; K=Strength coefficient , n =strain hardening exponent ε = True
strain
Con..
Example
• A 508 mm long sheet-metal workpiece is stretched in a stretch forming operation
to the dimensions shown in Figure next. The thickness of the beginning stock is
4.76mm and the width is 216mm. The metal has a flow curve defined by a
strength coefficient of 517 N/mm2 and a strain hardening exponent of 0.20. The
yield strength of the material is 207 N/mm2. (a) Find the stretching force F
required near the beginning of the operation when yielding first occurs.
Determine (b) true strain experienced by the metal, (c) stretching force F, and (d)
die force Fdie at the very end when the part is formed as indicated in Figure
next.
Use ε = 0.002 as start of yielding.
Part V
Sheet metal spinning
Con..
Spinning is a metal forming process in which an axially
symmetric part is gradually shaped over a mandrel or form by
means of a rounded roller.
• The tool or roller applies a very localized pressure(almost a point
contact) to deform the work by axial and radial motions over the
surface of the part.
Con..
• Basically, Cups, Cones, Hemispheres,
Tubes, and cylinders are produced.
• 3 types
1) Conventional spinning
2) Shear spinning
3) Tube spinning
Con..
Conventional Spinning:
A sheet metal disk is held against the end of a rotating Mandrel of the desired
inside shape of the final part, while the tool or roller deforms the metal against the
mandrel.
In some cases, the starting workpart is other than a flat Disk.
The process requires a series of steps, as indicated in the fig, to complete the
shaping Of the part.
•The tool position is controlled either by human operator, by an automatic
method such as numerical control.
Con..
 These alternatives are manual spinning and power
spinning.
 Power spinning has the capacity to apply higher forces
to the operation, resulting In fast cycle times and
greater work size capacity.
 It also achieves better process control Than manual
spinning.
Con..
Figure: conventional spinning: (1) setup at start of process ;(2) during spinning; and (3) completion of process
Conventional spinning bends the metal around a moving circular axis
to conform to the outside surface of the axisymmetric mandrel.
Con..
 The stock thickness of the metal therefore remains unchanged(more or
less) relative to the starting disk thickness.
 The diameter of the disk must therefore be somewhat larger than the
diameter of the resulting part.
 The required starting diameter can be figured by assuming constant
volume, before and after spinning.
Con..
Also known as flow turning ,shear forming, spin forging.
Figure: Shear spinning (1) setup and (2) completion of process
Shear spinning: in shear spinning, the part is formed over the mandrel
by a shear deformation process in which the outside diameter remains
constant and the wall thickness is therefore reduced, as in figure next.
Con..
• For the simple conical shape in our figure, the resulting
thickness of the spun wall can readily be determined by the
sine law relationship.
• Where tf=the final thickness of the wall after spinning=the
starting thickness of the disk, and α=the mandrel angle.
Thinning is sometimes quantified by the spinning reduction
r.
Con..
Figure :Tube spinning (a) external;(b) internal; and (c) profiling
Tube spinning: is used to reduce the wall thickness and increase the length of a tube by
means of a roller applied to the work over a cylindrical mandrel, as in figure next. Tube
spinning is similar to shear spinning except that the starting workpiece is a tube rather than a
flat disk. The operation can be performed by applying the roller against the work
externally(using a cylindrical mandrel on the inside of the tube ) or internally (using a die to
surround the tube).it is also possible to form a profile in the walls of cylinder ,as in figure
next.
The End

Manufacturing Engineering,Sheet Metal Forming

  • 1.
    Lecturer:-Zeradam Y. March, 2016 AmboUniversity Institute of Technology Department of Mechanical Engineering Manufacturing Engineering II (MEng 3182)
  • 2.
    Outline • Sheet metalforming operation • Applications of sheet metal • Cutting operation Shearing Blanking Punching • Engineering analysis of sheet metal cutting
  • 3.
    Part I Sheet metalforming  Sheet metal working includes cutting and forming operations performed on relatively thin sheets of metal. Shearing Blanking Punching Bending Drawing Spinning Stretching Cutting Forming
  • 4.
    Con..  Typical sheetmetal thicknesses are below 6mm (1/4in).  When the thickness exceeds about 6mm,the stock is usually referred to as plate rather than sheet.  The sheet or plate stock used in sheet metalworking is produced by rolling.
  • 5.
  • 6.
  • 7.
    Con.. Shower cabinets andothersWashing machines Cookers Refrigerator bodies Domestic use
  • 8.
    Five basic sheetmetal operations Cutting  Shearing  Blanking  Punching
  • 9.
  • 10.
    Cutting operation • Cuttingof sheet metal is accomplished by a shearing action between two sharp cutting edges. • The upper cutting edge (the punch) sweeps down past a stationary lower cutting edge(the die).
  • 11.
    Con.. c (1) Just before thepunch contact the work
  • 12.
    Con.. • c (2) Punch beginsto push into the work, causing plastic deformation
  • 13.
    Con.. • c (3) Punch compressesand penetrates into the work and causing a smooth cut surface
  • 14.
    Con.. • c (4) Fracture isinitiated at the opposing cutting edges that separate the sheet.  Symbols V and F represents motion and applied force , respectively, t = stock thickness , c = clearance.
  • 15.
    Shearing • Is asheet metal cutting operation along a straight line between two cutting edges. • Shearing is typically used to cut large sheets into smaller sections for subsequent press working operations.
  • 16.
    Con.. • It isperformed on a machine called a power shear, or squaring shear. • The upper blade of the power shears is often inclined (to reduce cutting force). • The shearing operation constitutes the first stage of any forming process by producing either  The starting material (cutting out of a sheet) OR  Preparing an existing work piece e.g by punching a hole or a series of holes before forming.
  • 17.
    Blanking • Involves cuttingof sheet metal along a closed outline in a single step to separate the piece from the surrounding stock, as shown in figure a the part that is cut out is the desired product in the operation and is called the blank.
  • 18.
    Punching • Is similarto blanking except that the separated piece is scrap, called the slug. the remaining stock is desired part. the distinction is illustrated in figure b.
  • 19.
    Engineering analysis of sheetmetalcutting • One of the important parameters in sheet metal cutting is clearance between the punch and die • The clearance c in a shearing operation is the distance between the punch and die. • Typical clearance in conventional press working range between 4% and 8% of the sheet metal thickness t.
  • 20.
    Con.. • Measured perpendicularto the direction of the blade movement. • It affects the finish of the cut(burr) and machine’s power consumption.
  • 21.
    Con.. • If theclearance is too small, then the fracture line tend to pass each other ,causing a double burnishing and large cutting force.
  • 22.
    con.. • If theclearance is too large ,the metal becomes pinched between the cutting edges and an excessive burr results.
  • 23.
    Con.. • The correctclearance depends on sheetmetal type and thickness. • The recommended clearance can be calculated by the following formula: C = Act Where: C=Clearance , mm; Ac = Clearance allowance (percentage of the material thickness) t=Stock thickness, mm.
  • 24.
    Con.. • The clearanceallowance is determined according to the type of metal 4.5%, 6% or 7.5% of the material thickness. • For convenience, metals are classified into three groups with an associated allowance value for each group. Clearance allowance for three sheet metal groups
  • 25.
    Con.. • The calculatedclearance values can be applied to conventional blanking and hole-punching operations to determine the proper punch and die sizes. • The die opening must always be larger than the punch size(obviously). • Because of the geometry of the sheared edge, the outer dimension of the part cut out of sheet will be larger than the hole size.
  • 26.
    Con.. • Punch anddie sizes for a round blank of diameter Db are determined as; Blanking punch diameter =Db-2c Blanking die diameter =Db • Punch and die sizes for a round hole of diameter Dh are determined as: Hole punch diameter = Dh Hole die diameter = Dh+2c
  • 27.
    Con.. Angular Clearance  Purpose:allows slug or blank to drop through die  Typical values: 0.25° to 1.5° on each side
  • 28.
    Cutting force • Estimatesof cutting force are important because this force determines the size (tonnage) of the press needed. Cutting force F in sheetmetal working can be determined by Where S= Shear strength of the metal, Mpa t = Sthock thickness, mm L= length of the cut edge,mm • In blanking ,punching ,slotting ,and similar operations , L is the perimeter length of the blank or hole being cut.
  • 29.
    Con.. Example A round diskof 150mm diameter is to be blanked from a strip of 3.2mm cold rolled steel whose shear strength=310MPa. Determine (a) the appropriate punch and die diameters, and (b) blanking force.
  • 30.
    Lesson II Outline Other sheet-metal cuttingoperations Sheet Metal Bending Operation
  • 31.
  • 32.
    Cutoff Is a shearingoperation in which blanks are separated from a sheet-metal strip by cutting the opposite sides of the part in sequence.
  • 33.
    Con.. With each cut,anew part is produced. Distinguish it from a conventional shearing operation. • The cut edges are not necessarily straight
  • 34.
    Parting  Involves cuttinga sheet-metal strip by a punch with two cutting edges that match the opposite sides of the bank.
  • 35.
    Con..  This mightbe required because the part outline has an irregular shape.  Parting is less efficient than cutoff in the sense that it results in some wasted materials.
  • 36.
    Slotting  Is theterm sometimes used for a punching operation that cuts out an elongated or rectangular hole.
  • 37.
    Perforating  Involves thesimultaneous punching of a pattern of holes in sheet metal.  The hole pattern is usually for decorative purposes, or allow passage of light, gas, of fluid.
  • 38.
    Notching and Seminotching • Notchinginvolves cutting out a portion of metal From the side of the sheet or strip. • Seminotching removes a portion of metal from the interior of the sheet.
  • 39.
    Con..  Seminotching mightseem the same as punching and slotting operation.  The difference is that the metal removed by seminotching creats part of the blank outline, while punching and slotting creates holes in the blank.
  • 40.
    Shaving  Shaving isa shearing operation performed with very small clearance to obtain accurate dimensions and cut edges that are smooth and straight, as pictured in figure (a).  Shaving is typically performed as a secondary or finishing Operation on apart that have been previously cut.
  • 41.
    Fine blanking  Isa shearing operation used to blank sheet metal parts with close tolerances and smooth, straight edges in one step, as illustrated in figure (b).
  • 42.
    Con..  Pressure padapplies holding force(Fh) in order to prevent distortion.  The punch then descends with slower than the normal velocity and smaller clearance to provide the desired dimension and cut edge.  The process in usually for small stock thicknesses.  v
  • 44.
  • 45.
    Bending operation  Bendingin sheet metal work is defined as the straining of the metal around a straight (bend) axis. (figure a).  During bending the metal on the inside of the neutral plane is compressed ,while the metal on the outside of the neutral plane is stretched (figure b).
  • 46.
    Con.. • The metalis plastically deformed so the bend takes a permanent set upon removal of stresses that caused it. • Bending produces little or no change in the thickness of the sheet metal.
  • 47.
    V-Bending and Edgebending  Bending operations are performed by using punch and die tooling .  The common bending methods are 1. V-Bending ,performed with a V-die.
  • 48.
    Con.. 2. Edge bending, performed with wiping die.
  • 49.
    Con..  Edge bendingis limited to bend of 90° or less. More complicated wiping dies can be designed for bend angles greater than 90°.  Because of the pressure pad, wiping dies are more complicated than V-dies and generally used for high production work.
  • 50.
    Engineering analysis ofbending  The metal of thickness t is bend through an angle called the bend angle α.  This results in a sheet metal part with an included angle α’, where α + α’= 180°
  • 51.
    Con..  R=Inside Bendradius  W= The bend is made over the width of the work piece W.  Kba= k factor ( the location of the neutral axis in the material. • Since neutral axis is the theoretical location at which the material is neither compressed nor stretched .we use the following recommended values of Kba.
  • 52.
    Con..  Recommended valueof Kba R<2t,Kba=0.33 R ≥2t,Kba=0.50  t=stock thickness
  • 53.
    Bend allowance  Thebend allowance (Ab) is the length of the neutral axis between the bend lines, or the arc length of the bend. Where: α = bend angle
  • 54.
    Spring back  Whenthe bending pressure removed at the end of deformation ,elastic energy remains in the bent part ,causing it to recover particularly to its original shape. This elastic recovery is called springback. Figure: (1) during the operation ,the work is forced to take the radius Rt and included angle α’t determined by the bending tool (punch in v-bending) (2) after the punch is removed ,the work springs back to radius R and included angle α’. Symbol: F=applied bending force.
  • 55.
    Con.. • Spring backin bending show itself as a decrease in bend angle and an increase in bend radius. Sb= spring back α’= Included angle of the sheet metal (after spring back) α’t =Included angle of the bending tool
  • 56.
    Compensation for springback Can accomplished by several methods one of these methods is over bending.  Due to this elastic recovery, it is necessary to over- bend the sheet a precise amount to achieve the desired bend radius and bend angle . This is called over bending.
  • 57.
    Bending force Bending Force:The force required to perform bending depends on the Geometry of the punch and die and the strength, thickness, and length of Sheetmtal. The maximum bending force can be estimated by means of the following equation.
  • 58.
    Con.. Where F = Bendingforce TS = Tensile strength of the sheet metal W = Width of part in the direction of the bend axis. t= stock thickness D=die opening dimension Kbf= Is a constant for differences encountered in actual bending process. Its value depends on type of bending: For V-bending, Kbf=1.33; and for edge bending, Kbf=0.33
  • 59.
    Con.. • Die opening dimensiona) V-die b) Wiping Die
  • 60.
    Con.. Example: A sheet metalblank is to be bent as shown in figure below. The metal has a modulus of elasticity=205(103 ) MPa, yield strength=275MPa, and tensile strength=450MPa. Determine (a) the starting blank size and (b) the bending force if a V-die is used with a die opening dimension = 25mm. v
  • 61.
  • 62.
  • 63.
  • 64.
    Miscellaneous bending operations •Figure: miscellaneous bending operations: (a) Channel bending (b) U-bending (c) Air bending (d) Offset bending (e) Corrugating symbol : F=applied force.
  • 65.
  • 66.
    Drawing  Drawing isa sheet metal forming operation used to make cup shaped ,box-shaped ,or other complex curved, hollow shaped parts.  It is performed by placing a piece of sheet metal over a die cavity and pushing the metal into the opening with a punch.  The blank must be held down flat against the die by blank holder.
  • 67.
    Con.. ( a )Drawing of cup shaped part : (1) start of operation before punch contacts work, and (2) near end of stroke
  • 68.
    Con.. (b) Workpart: (1) startingblank, and (2) drawn part . Symbols: C=clearance, Db=blank diameter, Dp= punch diameter, Rp=punch corner radius, F=drawing force, Fh=holding force.
  • 69.
  • 70.
    Mechanics of drawing A blank diameter Db is drawn into a die by means of a punch of diameter Dp.  The punch and die must have a corner radii, given by Rp and Rd .
  • 71.
    Con..  If thepunch and die were to have sharp corners (Rp and Rd=0) a hole punching process would-be accomplished rather than drawing operation.  The sides of the punch and die are separated by a clearance c.  The clearance in drawing is about 10% grater than the stock thickness. C= 0.1t
  • 72.
    Con.. The punch appliesa downward force F to accomplish the deformation of the metal, and a downward holding force Fh is applied by the blankholder, as shown in the sketch.
  • 73.
    Stages in deformationof the work 1) Punch makes initial contact with work 2) bending
  • 74.
    Con.. 3) straightening 4)Friction and compression 5) Final cup shape
  • 75.
  • 76.
    Engineering analysis ofdrawing Checking for feasibility of the operation First  Drawing ration: The ratio of blank diameter Db to punch diameter Dp.  Un upper limit on the drawing ration is a value of 2.0 (DR≤2.0)
  • 77.
    Con.. Second  Reduction r Thevalue of reduction r should be less than 0.50
  • 78.
    Con.. Third  Thickness todiameter ration  It is desirable the ratio to be greater than 1%.
  • 79.
    Con.. Example 1 A drawingoperation is used to form a cylindrical cup with inside diameter=75mm and height = 50mm. The starting blank size=138mm and the stock thickness=2.4mm.based on these data, is the operation feasible?
  • 80.
    Drawing force F =Drawing force, N t = Original blank thickness TS= Tensile strength Db and Dp = Starting blank and punch diameter. Constant 0.7 is correction factor to account for friction. Forces: The drawing force required to perform a given operation can be estimated by the formula:
  • 81.
    Con.. Where Fh=holding force indrawing ,N Y=yield strength of the sheet metal t =starting stock thickness,mm Rd=die corner radius, mm The holding force (Fh) required can be calculated by using the following formula.
  • 82.
    Con.. Example 2 For thedrawing operation of Example 1 determine(a) drawing force and (b) holding force, given that the tensile strength of the sheet metal(low-carbon steel)=300MPa and yield strength=175MPa.The die corner radius=6mm.
  • 83.
  • 84.
    Con.. • Stretch forming:is a sheet metal deformation process in which the sheet is internationally stretched and simultaneously bent in order to achieve shape change. • Figure below shows stretch forming for relatively simple gradual bend.
  • 85.
    Con.. The workpart isgripped by one or more jaws on each end and then stretched and bent over a die containing the desired form. The metal is stressed in tension to a level above its yield point. When the tension loading is released, the metal has been plastically deformed. The combination of stretching and bending results in relatively little springback in the part
  • 86.
    Con.. Where; F=Stretching Force,N L=length of the sheet in the direction perpendicular to stretching(mm) t =Instantaneous stock thickness, mm Yf=flow stress of the metal, Mpa
  • 87.
    Con.. Yf=flow stress, Mpa;K=Strength coefficient , n =strain hardening exponent ε = True strain
  • 88.
    Con.. Example • A 508mm long sheet-metal workpiece is stretched in a stretch forming operation to the dimensions shown in Figure next. The thickness of the beginning stock is 4.76mm and the width is 216mm. The metal has a flow curve defined by a strength coefficient of 517 N/mm2 and a strain hardening exponent of 0.20. The yield strength of the material is 207 N/mm2. (a) Find the stretching force F required near the beginning of the operation when yielding first occurs. Determine (b) true strain experienced by the metal, (c) stretching force F, and (d) die force Fdie at the very end when the part is formed as indicated in Figure next. Use ε = 0.002 as start of yielding.
  • 89.
  • 90.
    Con.. Spinning is ametal forming process in which an axially symmetric part is gradually shaped over a mandrel or form by means of a rounded roller. • The tool or roller applies a very localized pressure(almost a point contact) to deform the work by axial and radial motions over the surface of the part.
  • 91.
    Con.. • Basically, Cups,Cones, Hemispheres, Tubes, and cylinders are produced. • 3 types 1) Conventional spinning 2) Shear spinning 3) Tube spinning
  • 92.
    Con.. Conventional Spinning: A sheetmetal disk is held against the end of a rotating Mandrel of the desired inside shape of the final part, while the tool or roller deforms the metal against the mandrel. In some cases, the starting workpart is other than a flat Disk. The process requires a series of steps, as indicated in the fig, to complete the shaping Of the part. •The tool position is controlled either by human operator, by an automatic method such as numerical control.
  • 93.
    Con..  These alternativesare manual spinning and power spinning.  Power spinning has the capacity to apply higher forces to the operation, resulting In fast cycle times and greater work size capacity.  It also achieves better process control Than manual spinning.
  • 94.
    Con.. Figure: conventional spinning:(1) setup at start of process ;(2) during spinning; and (3) completion of process Conventional spinning bends the metal around a moving circular axis to conform to the outside surface of the axisymmetric mandrel.
  • 95.
    Con..  The stockthickness of the metal therefore remains unchanged(more or less) relative to the starting disk thickness.  The diameter of the disk must therefore be somewhat larger than the diameter of the resulting part.  The required starting diameter can be figured by assuming constant volume, before and after spinning.
  • 96.
    Con.. Also known asflow turning ,shear forming, spin forging. Figure: Shear spinning (1) setup and (2) completion of process Shear spinning: in shear spinning, the part is formed over the mandrel by a shear deformation process in which the outside diameter remains constant and the wall thickness is therefore reduced, as in figure next.
  • 97.
    Con.. • For thesimple conical shape in our figure, the resulting thickness of the spun wall can readily be determined by the sine law relationship. • Where tf=the final thickness of the wall after spinning=the starting thickness of the disk, and α=the mandrel angle. Thinning is sometimes quantified by the spinning reduction r.
  • 98.
    Con.. Figure :Tube spinning(a) external;(b) internal; and (c) profiling Tube spinning: is used to reduce the wall thickness and increase the length of a tube by means of a roller applied to the work over a cylindrical mandrel, as in figure next. Tube spinning is similar to shear spinning except that the starting workpiece is a tube rather than a flat disk. The operation can be performed by applying the roller against the work externally(using a cylindrical mandrel on the inside of the tube ) or internally (using a die to surround the tube).it is also possible to form a profile in the walls of cylinder ,as in figure next.
  • 99.