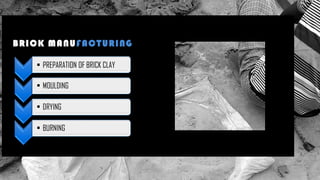
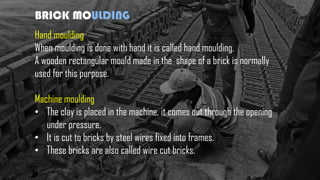
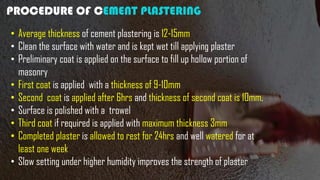
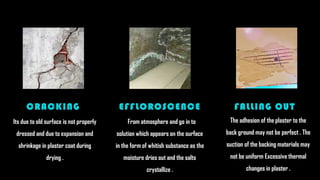
BRICK
A brick is building material used to make walls, pavements and other elements in
masonry construction
BRICK
CLASSIFICATION OF BRICKS :
1. BURNT BRICKS
2. MACHINE MADE BRICKS
BURNT BRICKS :
1. FIRST CLASS BRICKS
2. SECOND CLASS BRICKS
3. THIRD CLASS BRICKS
4. FOURTH CLASS BRICKS
• Made from good quality raw materials.
• Color of first class brick is uniform.
• These are regular in size and shape
• Doesn't absorb more than 20% water of its
own dry weight when immersed in fresh
water for 24 hours.
• The crushing strength of this type of brick
should be 105 kg/cm2.
FIRST CLASS BRICKS
• The quality of bricks of this type is little bit
less from first class brick.
• Such as it can be slightly over burned.
• The size and shape can be slightly differ from
standard.
• The crushing strength of this brick-type
should be above 70 kg/cm2.
• These bricks don't absorb more than 22%
water of its own weight after 24 hours
immersion in fresh water.
SECOND CLASS BRICKS
• This type of brick isn't uniform in size and
shape.
• It can be over burnt or under burnt.
• It doesn't absorb more than 25% water
of its own weight when immersed 24
hours in fresh water.
• Crushing strength of this type is more
than 30 kg/cm2.
THIRD CLASS BRICKS
• These bricks are over burnt.
• Brittle in nature.
• These bricks have irregular surface and dark
color.
• These bricks are very hard.
• These bricks are used as aggregates for
concrete foundation, floors, roads
FOURTH CLASS BRICKS
MACHINE
MADE
BRICK
• This kind of brick is made with machine,
• Has uniform size and shape
• Extra color can be added for attractive and unique looks.
A standard metric
brick has coordinating
dimensions of 225 x
112.5 x 75 mm (9” x
4.5” x 3”)
NOMINAL SIZE
Working dimensions
(actual
dimensions)of 215 x
102.5 x 65 mm (8.5”
x 4” x 2.5”)
ARCHITECTURAL SIZE
BRICK MANUFACTURING
• PREPARATION OF BRICK CLAY
• MOULDING
• DRYING
• BURNING
PREPARATION OF BRICK CLAY
Removal of loose soil
The top layer of the loose soil about 30 cm depth contains a lot of impurities
like organic matter and hence it should be taken out and thrown away.
Digging, spreading and cleaning
The earth is then dug out from the ground. This earth is spread into heaps
about 50 to 150 cm height.
Weathering
The earth is then exposed to atmosphere for softening.
Blending and tempering
The clay is then mixed with suitable ingredients . It is carried out by taking a
small portion of clay every time and by turning it up and down in vertical
direction
PREPARING
BRICK
CLAY
BRICK MOULDING
Hand moulding
When moulding is done with hand it is called hand moulding.
A wooden rectangular mould made in the shape of a brick is normally
used for this purpose.
Machine moulding
• The clay is placed in the machine, it comes out through the opening
under pressure.
• It is cut to bricks by steel wires fixed into frames.
• These bricks are also called wire cut bricks.
BRICK
MOULDING
DRYING OF BRICKS
• If damp bricks or green bricks are directly taken to burning then, they are likely to
be cracked and distorted
• To remove maximum moisture from the brick so as to save time and fuel during
burning
• To increase the strength of raw bricks
• The bricks are allowed to dry till they are left with 5 to 7 percent moisture
content.
• The drying period usually varies from 7 to 14days.
DRYING OF
BRICKS
BURNING OF BRICKS
• Bricks are burned at high temperature to gain the strength, durability, density and red color
appearance.
• All the water is removed at the temperature of 650 degrees but they are burnt at an
temperature of about 1100 degrees because the fusing of sand and lime takes place at this
temperature .
• Chemical bonding takes between these materials after the temperature is cooled down
resulting in the hard and dense mass.
BULL’S
TRENCH
KILN
TESTS FOR BRICKS
Absorption : The brick should not absorb water more than 20% of dry weight.
Crushing strength : The minimum crushing strength of bricks is 3.5 N/mm2
Hardness : Brick is treated to be sufficient hard if no impression could be made on the
surface of the brick by finger nail.
Soundness : Two bricks when struck with each other should emit metallic ringing
sound.
B R I C K M A S O N R Y
BRICK
MASONRY
The art of laying bricks in mortar in a proper systematic
manner gives homogeneous mass which can withstand forces
without disintegration, called Brick masonry.
TECHNICAL TERMS IN BRICK MASONRY
STRECHER
HEADER
BED JOINT
HEAD JOINT
I N S T R U M E N T S U S E D F O R B R I C K M A S O N R Y
TROWEL BRICK HAMMER STEEL TAPE SPIRIT LEVEL
Header
Brick which is laid with its length perpendicular to the face of the wall.
Stretcher
Full brick which is laid with its length parallel to the face of the wall.
Course
Horizontal layer of brick.
Header course
Course of brick work fully composed of header
Stretcher course
Course of brick work fully composed of stretchers.
King closer
Brick is cut in such a way that the width of its end is half of full brick.
Queen closer
Brick is half as wide as a full brick.
Half Bat
Portion of brick cut half across the width.
Bevelled closer
It is similar to king closer with the only difference that the whole length of he
brick is beveled .
HALF BAT
QUEENCLOSER
FULL BRICK
BRICK BOND TYPES
Bond is an arrangement of bricks in a course by which formation of continuous
vertical joints both in the face and body of the wall can be prevented and the
individual units are tied together.
BRICK BONDS
 Stretcher bond
 Header bond
 English bond
 Flemish bond
 Facing bond
 English cross bond
 Brick on edge bond
 Dutch bond
 Raking bond
 Zigzag bond
 Garden wall bond
STRECHER BOND
• Stretcher bond or stretching
bond is one in which all the
bricks are laid as stretchers on
the faces of walls.
• This pattern is used only for
those walls which have
thickness half brick i.e. 5 inch.
HEADER BOND
• Header bond or heading bond is
the one in which all the bricks are
laid as headers on the faces of
walls.
• This pattern is used only when the
thickness of the wall is equal to
one brick i.e. 10 inch.
ENGLISH
BOND
• This is most commonly used bond for all wall thickness.
• This bond is considered to be the strongest.
• The bond consists of alternate courses of headers and stretchers.
QUEEN CLOSER AT
ENGLISH BOND
In order to break vertical joints
in successive joints it is
essential to place queen closer
in each heading course.
FLEMISH BOND
Each course is
comprised of alternate
headers and stretchers
and header are
centered of stretchers
Every alternate course
starts with a header at
corner then queen
closer are placed
QUEEN CLOSER AT
FLEMISH BOND
SINGLE FLEMISH BOND
• Single Flemish bond is comprised of Flemish bond on facing side and English bond
on backing.
• Not suitable for wall thickness < 1.5 brick.
DOUBLE FLEMISH BOND
• In the double Flemish bond, each course presents the same appearance both in
the front face as well as in the back face. Alternate headers and stretchers are
laid in each course.
• Suitable for 1 brick wall
• This bond is similar to herring bone
bond except that the bricks are laid
in zig zag fashion.
• It is most commonly used for
making ornamental panels in brick
flooring.
ZIG-ZAG BOND
EXAMPLE OF BRICK MASONRY :
CREATING A BRICK WALL
PREPARATION OF CEMENT MORTAR
• Consists of mixture of cement, sand & water
in suitable proportion
• Stronger than any other mortar
Commonly used in the construction of load
• Bearing wall, columns etc.
• The proportion of cement to sand (volume
basis) varies from 1:2 to 1:6 or even more
DELIMATING THE AREA OF BUILDING THE WALL
Using set square and pencil, draw two perfectly parallel lines
along the floor, then along the walls: in this way you will delimit
the area where you will build the wall.
& CREATING A HORIZONTAL LINE USING ROPE OR STRING IS A
MUST!
APPLYING MORTAR & BUILDING THE FIRST LAYER OF BRICK WALL
• Using a trowel, past a cement mortar layer about five centimetres wide and just over
bricks.
• Starting from the track along the wall, place the first row of bricks on the first layer of
cement mortar.
• Put the mortar also on the side of the brick that will be in contact with the wall.
• Completed the first layer of bricks, check with the level: it must be perfectly straight .
• If you need to seat it, take lightly tapping with the mallet, before the mortar to solidify.
• Completed the first row, proceed in the same way with the second, however, remembering to
stagger the bricks in order to make the whole more solid and resistant structure.
• We can use a spirit level to indicate whether a surface is horizontal (level) or vertical (plumb)
DEFECTS IN BRICK MASONRY
• Sulphate attack : Sulphate salts present in bricks work react with
alumina content of cement . It occur in boundary walls.
• Crystallization of salts from bricks : Occur in masonry made out of
brick which contain excessive soluble salts . This phenomenon is also
known as efflorescence.
• Corrosion of embedded iron or steel : Iron or steel embedded in
brick work gets corroded in the presence of dampness .On corrosion
the metal expands in volume and tends to crack the brick work.
PROCESS OF REMOVING SALTSEFFLOROSCENCE
PLASTERING
WHAT IS PLASTERING
Plastering is the process of covering rough walls and uneven surfaces in the
construction of houses and other structures with a plastic material, called plaster or
mortar.
OBJECTIVE OF PLASTERING
• To provide an even, smooth, regular, clean and durable finished surface with improved
appearance.
• To preserve and protect the surface.
• To cover up the use of inferior quality and porous materials of the masonry work.
SAND FINAL MORTAR MIXCEMENT
M A T E R I A L S N E E D E D F O R P L A S T E R I N G
TYPES OF PLASTERS
• Cement Plastering
• Mud Plastering
• Lime Plastering
• Lime cement plaster
• Gypsum plaster/plaster of paris
• Water proof plaster
• Heat resistant plaster
• Stucco plastering
• Plaster of lath
LIME PLASTER
• Lime plaster is a mixture of calcium hydroxide and sand (or other inert fillers) in
1: 1 ratio.
• Carbon dioxide in the atmosphere causes the plaster to set by transforming the
calcium hydroxide into calcium carbonate (limestone).
• In order to improve building properties of lime plaster , gugal (a kind of fragrant
gum) @ 1.6 kg/m3 of mortar , is added when the mortar is being ground.
• In order to improve adhesive and tensile properties of lime mortar, sometimes,
small quantities of chopped hemp (i.e., vegetable fibres) @ 1kg/m3 are added to
the lime mortar.
• The lime mortar thus prepared is usually kept for 2 days before use.
CEMENT PLASTER
• Cement and sand in required proportions ( 1:3 or 4) are first
thoroughly mixed in dry conditions and then water is added to
form a paste of required consistency.
• Generally it is mixture sand, portland cement and water mixed
in a suitable proportion.
• This prepared mortar for plastering should be consumed within
30 minutes after the addition of water.
MUD PLASTER
• The surface to be plastered is prepared exactly in the
same manner as that for lime or cement plaster.
• Mud plaster is generally applied in two coats, the first
coat being 18mm thick while the thickness of the
second coat is kept 6mm.
I N S T R U M E N T S U S E D F O R P L A S T E R I N G
TROWEL FLOAT FINISHING
TROWEL
SPIRIT LEVEL
PROCEDURE OF CEMENT PLASTERING
• Average thickness of cement plastering is 12-15mm
• Clean the surface with water and is kept wet till applying plaster
• Preliminary coat is applied on the surface to fill up hollow portion of
masonry
• First coat is applied with a thickness of 9-10mm
• Second coat is applied after 6hrs and thickness of second coat is 10mm.
• Surface is polished with a trowel
• Third coat if required is applied with maximum thickness 3mm
• Completed plaster is allowed to rest for 24hrs and well watered for at
least one week
• Slow setting under higher humidity improves the strength of plaster
DEFECTS IN PLASTER WORK
• Cracking
• Efflorescence
• Falling out of plaster
• Blowing of plaster
• Flaking
• Peeling
• Popping
From atmosphere and go in to
solution which appears on the surface
in the form of whitish substance as the
moisture dries out and the salts
crystallize .
EFFLOROSCENCE
The adhesion of the plaster to the
back ground may not be perfect . The
suction of the backing materials may
not be uniform Excessive thermal
changes in plaster .
FALLING OUT
Its due to old surface is not properly
dressed and due to expansion and
shrinkage in plaster coat during
drying .
CRACKING
1510003
TANVIR ARAF
1510010
PARTHA SAHA
1510001
FAIEZ AHMED SHIPON
1510020
JANNATUL FERDOUS
1510030
MD. HASIB
1510016
ASHIQUL ALAM SHUVO

Bricks & Plastering

  • 2.
  • 3.
    A brick isbuilding material used to make walls, pavements and other elements in masonry construction BRICK
  • 4.
    CLASSIFICATION OF BRICKS: 1. BURNT BRICKS 2. MACHINE MADE BRICKS BURNT BRICKS : 1. FIRST CLASS BRICKS 2. SECOND CLASS BRICKS 3. THIRD CLASS BRICKS 4. FOURTH CLASS BRICKS
  • 5.
    • Made fromgood quality raw materials. • Color of first class brick is uniform. • These are regular in size and shape • Doesn't absorb more than 20% water of its own dry weight when immersed in fresh water for 24 hours. • The crushing strength of this type of brick should be 105 kg/cm2. FIRST CLASS BRICKS
  • 6.
    • The qualityof bricks of this type is little bit less from first class brick. • Such as it can be slightly over burned. • The size and shape can be slightly differ from standard. • The crushing strength of this brick-type should be above 70 kg/cm2. • These bricks don't absorb more than 22% water of its own weight after 24 hours immersion in fresh water. SECOND CLASS BRICKS
  • 7.
    • This typeof brick isn't uniform in size and shape. • It can be over burnt or under burnt. • It doesn't absorb more than 25% water of its own weight when immersed 24 hours in fresh water. • Crushing strength of this type is more than 30 kg/cm2. THIRD CLASS BRICKS
  • 8.
    • These bricksare over burnt. • Brittle in nature. • These bricks have irregular surface and dark color. • These bricks are very hard. • These bricks are used as aggregates for concrete foundation, floors, roads FOURTH CLASS BRICKS
  • 9.
    MACHINE MADE BRICK • This kindof brick is made with machine, • Has uniform size and shape • Extra color can be added for attractive and unique looks.
  • 10.
    A standard metric brickhas coordinating dimensions of 225 x 112.5 x 75 mm (9” x 4.5” x 3”) NOMINAL SIZE Working dimensions (actual dimensions)of 215 x 102.5 x 65 mm (8.5” x 4” x 2.5”) ARCHITECTURAL SIZE
  • 11.
    BRICK MANUFACTURING • PREPARATIONOF BRICK CLAY • MOULDING • DRYING • BURNING
  • 12.
    PREPARATION OF BRICKCLAY Removal of loose soil The top layer of the loose soil about 30 cm depth contains a lot of impurities like organic matter and hence it should be taken out and thrown away. Digging, spreading and cleaning The earth is then dug out from the ground. This earth is spread into heaps about 50 to 150 cm height. Weathering The earth is then exposed to atmosphere for softening. Blending and tempering The clay is then mixed with suitable ingredients . It is carried out by taking a small portion of clay every time and by turning it up and down in vertical direction
  • 13.
  • 18.
    BRICK MOULDING Hand moulding Whenmoulding is done with hand it is called hand moulding. A wooden rectangular mould made in the shape of a brick is normally used for this purpose. Machine moulding • The clay is placed in the machine, it comes out through the opening under pressure. • It is cut to bricks by steel wires fixed into frames. • These bricks are also called wire cut bricks.
  • 19.
  • 21.
    DRYING OF BRICKS •If damp bricks or green bricks are directly taken to burning then, they are likely to be cracked and distorted • To remove maximum moisture from the brick so as to save time and fuel during burning • To increase the strength of raw bricks • The bricks are allowed to dry till they are left with 5 to 7 percent moisture content. • The drying period usually varies from 7 to 14days.
  • 22.
  • 24.
    BURNING OF BRICKS •Bricks are burned at high temperature to gain the strength, durability, density and red color appearance. • All the water is removed at the temperature of 650 degrees but they are burnt at an temperature of about 1100 degrees because the fusing of sand and lime takes place at this temperature . • Chemical bonding takes between these materials after the temperature is cooled down resulting in the hard and dense mass.
  • 26.
  • 27.
    TESTS FOR BRICKS Absorption: The brick should not absorb water more than 20% of dry weight. Crushing strength : The minimum crushing strength of bricks is 3.5 N/mm2 Hardness : Brick is treated to be sufficient hard if no impression could be made on the surface of the brick by finger nail. Soundness : Two bricks when struck with each other should emit metallic ringing sound.
  • 29.
    B R IC K M A S O N R Y
  • 30.
    BRICK MASONRY The art oflaying bricks in mortar in a proper systematic manner gives homogeneous mass which can withstand forces without disintegration, called Brick masonry.
  • 31.
    TECHNICAL TERMS INBRICK MASONRY STRECHER HEADER BED JOINT HEAD JOINT
  • 32.
    I N ST R U M E N T S U S E D F O R B R I C K M A S O N R Y TROWEL BRICK HAMMER STEEL TAPE SPIRIT LEVEL
  • 33.
    Header Brick which islaid with its length perpendicular to the face of the wall. Stretcher Full brick which is laid with its length parallel to the face of the wall. Course Horizontal layer of brick. Header course Course of brick work fully composed of header Stretcher course Course of brick work fully composed of stretchers.
  • 34.
    King closer Brick iscut in such a way that the width of its end is half of full brick. Queen closer Brick is half as wide as a full brick. Half Bat Portion of brick cut half across the width. Bevelled closer It is similar to king closer with the only difference that the whole length of he brick is beveled .
  • 35.
  • 36.
    BRICK BOND TYPES Bondis an arrangement of bricks in a course by which formation of continuous vertical joints both in the face and body of the wall can be prevented and the individual units are tied together. BRICK BONDS  Stretcher bond  Header bond  English bond  Flemish bond  Facing bond  English cross bond  Brick on edge bond  Dutch bond  Raking bond  Zigzag bond  Garden wall bond
  • 37.
    STRECHER BOND • Stretcherbond or stretching bond is one in which all the bricks are laid as stretchers on the faces of walls. • This pattern is used only for those walls which have thickness half brick i.e. 5 inch.
  • 38.
    HEADER BOND • Headerbond or heading bond is the one in which all the bricks are laid as headers on the faces of walls. • This pattern is used only when the thickness of the wall is equal to one brick i.e. 10 inch.
  • 39.
    ENGLISH BOND • This ismost commonly used bond for all wall thickness. • This bond is considered to be the strongest. • The bond consists of alternate courses of headers and stretchers.
  • 40.
    QUEEN CLOSER AT ENGLISHBOND In order to break vertical joints in successive joints it is essential to place queen closer in each heading course.
  • 41.
    FLEMISH BOND Each courseis comprised of alternate headers and stretchers and header are centered of stretchers Every alternate course starts with a header at corner then queen closer are placed QUEEN CLOSER AT FLEMISH BOND
  • 42.
    SINGLE FLEMISH BOND •Single Flemish bond is comprised of Flemish bond on facing side and English bond on backing. • Not suitable for wall thickness < 1.5 brick. DOUBLE FLEMISH BOND • In the double Flemish bond, each course presents the same appearance both in the front face as well as in the back face. Alternate headers and stretchers are laid in each course. • Suitable for 1 brick wall
  • 43.
    • This bondis similar to herring bone bond except that the bricks are laid in zig zag fashion. • It is most commonly used for making ornamental panels in brick flooring. ZIG-ZAG BOND
  • 44.
    EXAMPLE OF BRICKMASONRY : CREATING A BRICK WALL PREPARATION OF CEMENT MORTAR • Consists of mixture of cement, sand & water in suitable proportion • Stronger than any other mortar Commonly used in the construction of load • Bearing wall, columns etc. • The proportion of cement to sand (volume basis) varies from 1:2 to 1:6 or even more
  • 46.
    DELIMATING THE AREAOF BUILDING THE WALL Using set square and pencil, draw two perfectly parallel lines along the floor, then along the walls: in this way you will delimit the area where you will build the wall. & CREATING A HORIZONTAL LINE USING ROPE OR STRING IS A MUST!
  • 47.
    APPLYING MORTAR &BUILDING THE FIRST LAYER OF BRICK WALL • Using a trowel, past a cement mortar layer about five centimetres wide and just over bricks. • Starting from the track along the wall, place the first row of bricks on the first layer of cement mortar. • Put the mortar also on the side of the brick that will be in contact with the wall. • Completed the first layer of bricks, check with the level: it must be perfectly straight . • If you need to seat it, take lightly tapping with the mallet, before the mortar to solidify.
  • 48.
    • Completed thefirst row, proceed in the same way with the second, however, remembering to stagger the bricks in order to make the whole more solid and resistant structure. • We can use a spirit level to indicate whether a surface is horizontal (level) or vertical (plumb)
  • 50.
    DEFECTS IN BRICKMASONRY • Sulphate attack : Sulphate salts present in bricks work react with alumina content of cement . It occur in boundary walls. • Crystallization of salts from bricks : Occur in masonry made out of brick which contain excessive soluble salts . This phenomenon is also known as efflorescence. • Corrosion of embedded iron or steel : Iron or steel embedded in brick work gets corroded in the presence of dampness .On corrosion the metal expands in volume and tends to crack the brick work.
  • 51.
    PROCESS OF REMOVINGSALTSEFFLOROSCENCE
  • 52.
  • 53.
    WHAT IS PLASTERING Plasteringis the process of covering rough walls and uneven surfaces in the construction of houses and other structures with a plastic material, called plaster or mortar. OBJECTIVE OF PLASTERING • To provide an even, smooth, regular, clean and durable finished surface with improved appearance. • To preserve and protect the surface. • To cover up the use of inferior quality and porous materials of the masonry work.
  • 54.
    SAND FINAL MORTARMIXCEMENT M A T E R I A L S N E E D E D F O R P L A S T E R I N G
  • 55.
    TYPES OF PLASTERS •Cement Plastering • Mud Plastering • Lime Plastering • Lime cement plaster • Gypsum plaster/plaster of paris • Water proof plaster • Heat resistant plaster • Stucco plastering • Plaster of lath
  • 56.
    LIME PLASTER • Limeplaster is a mixture of calcium hydroxide and sand (or other inert fillers) in 1: 1 ratio. • Carbon dioxide in the atmosphere causes the plaster to set by transforming the calcium hydroxide into calcium carbonate (limestone). • In order to improve building properties of lime plaster , gugal (a kind of fragrant gum) @ 1.6 kg/m3 of mortar , is added when the mortar is being ground. • In order to improve adhesive and tensile properties of lime mortar, sometimes, small quantities of chopped hemp (i.e., vegetable fibres) @ 1kg/m3 are added to the lime mortar. • The lime mortar thus prepared is usually kept for 2 days before use.
  • 57.
    CEMENT PLASTER • Cementand sand in required proportions ( 1:3 or 4) are first thoroughly mixed in dry conditions and then water is added to form a paste of required consistency. • Generally it is mixture sand, portland cement and water mixed in a suitable proportion. • This prepared mortar for plastering should be consumed within 30 minutes after the addition of water.
  • 58.
    MUD PLASTER • Thesurface to be plastered is prepared exactly in the same manner as that for lime or cement plaster. • Mud plaster is generally applied in two coats, the first coat being 18mm thick while the thickness of the second coat is kept 6mm.
  • 59.
    I N ST R U M E N T S U S E D F O R P L A S T E R I N G TROWEL FLOAT FINISHING TROWEL SPIRIT LEVEL
  • 61.
    PROCEDURE OF CEMENTPLASTERING • Average thickness of cement plastering is 12-15mm • Clean the surface with water and is kept wet till applying plaster • Preliminary coat is applied on the surface to fill up hollow portion of masonry • First coat is applied with a thickness of 9-10mm • Second coat is applied after 6hrs and thickness of second coat is 10mm. • Surface is polished with a trowel • Third coat if required is applied with maximum thickness 3mm • Completed plaster is allowed to rest for 24hrs and well watered for at least one week • Slow setting under higher humidity improves the strength of plaster
  • 63.
    DEFECTS IN PLASTERWORK • Cracking • Efflorescence • Falling out of plaster • Blowing of plaster • Flaking • Peeling • Popping
  • 64.
    From atmosphere andgo in to solution which appears on the surface in the form of whitish substance as the moisture dries out and the salts crystallize . EFFLOROSCENCE The adhesion of the plaster to the back ground may not be perfect . The suction of the backing materials may not be uniform Excessive thermal changes in plaster . FALLING OUT Its due to old surface is not properly dressed and due to expansion and shrinkage in plaster coat during drying . CRACKING
  • 65.
  • 66.