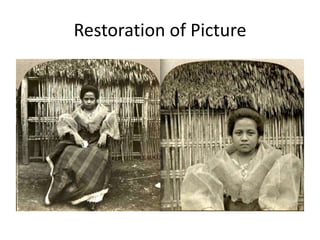
Tutorial 1 - Basics of Digital PhotographyFahad Golra
In the second session of this 5 session workshop, I am going to explain the photography gear (lens) with special focus on focal length and maximum aperture. Then we will discuss about the introduction of exposure in photography.
Understanding Exposure Triangle in PhotographyAbhijit Ghosh
The exposure triangle is a common way of associating the three variables that determine the exposure of a photograph: Aperture, Shutter speed, and ISO. One must balance all three of these to achieve a desired result, an adjustment of one requiring adjustments of at least one of the others. They do not only affect exposure, but are also the largest determiners of the global appearance of an image; thus, their mastery is absolutely crucial both for technique and composition.
Objective:
1. To learn how to use the exposure triangle to set a correct exposure in your camera.
2. To learn about the link between ISO, shutter speed and aperture.
3. To learn what aperture is, and how to use it creatively.
4. To learn what shutter speed is, and how to produce blur or freeze motion photos.
5. To learn what ISO is, and how to prevent 'noisy' photos.
Target Audience: Photography Enthusiasts
Agenda:
• To understand Correct Photograhy Exposure.
• To understand the components of Exposure Triangle.
• To know how to balance all the three elements of Exposure Triangle to achieve a desired result.
• Understanding the purpose and value of exposure is a must for photographers, particularly beginners who are serious about developing their craft.
Expected Outcomes:
By the end of the ppt/pdf, the participants will be able to:
1) Better understanding of each of the three exposure settings, how they are measured, what they do, and how they interact.
2) Better equipped to manipulate the exposure of your images, as well as the artistic presentation of motion, depth of field, and digital noise.
3) Better control of the manual mode in camera.
Learn the science and art of Photography. Right from knowing the camera, components, exposure triad (aperture, shutter speed and sensitivity), lighting and focus modes to basics of framing and composition.
A Complete Guide to Manual DSLR PhotographyLearnPick
It’s a commonly known fact that most beginner photographers use the auto mode on their DSLR cameras to click snapshots in the best possible manner.
It’s a fair enough practice; there’s no denying this fact but, at the same time, you must also remember that the auto mode of a DSLR doesn’t use the camera to its full potential.
So if you are willing to step out of your comfort zone to the "manual” mode, this presentation can help.
A basic course in the fundamentals of photography: Aperture, exposure and shutter speed, and how you can get them to work together to deliver the result you want. Thanks to Flickr and Penmachine.com for their good picture examples.
Photography 101 - a introduction to photography and the basics of exposure. Learn techniques for shutter speed, aperture and ISO and how they relate to one another.
A short presentation to introduce about basics of Photography. Its suitable for photo enthusiast and beginners. I have tried to design it in a simplified and example based presentation. Hope its helpful to you!
An attempt to demystify the basics underlying the art of photography that is all about color, light and perception.
by
Majid Pandit
For more, please visit
http://majidpandit.blogspot.com
Note: Photographs used in the presentation are shot by Majid Pandit
In the past, when all we had was film photography, we had to be very selective of the kind of pictures we wanted to take. I’m sure there wouldn't be half as many ‘selfies’ ‘photo bombs’ or ‘duck pouts’ as there are today. Images have a strong emotional factor, and emotions have a powerful pull on us as human beings.
So you got this beautiful new camera and you know how to turn it on. Now what? Advance beyond using the automatic settings on your digital camera to learn why and when to use the variations of shutter speed , aperture and ISO.
Basic camera handling - Few tips and tricksInspiria
Topics covered :
The exposure triangle, Three elements - ISO, Aperture, Shutter speed, Depth of field, Framing, Composition, Lighting, Story, Rule of thirds and examples for each of them
The exposure triangle in photography is definitely not a triangle with an eye in it. This guide will walk you through the triangle, and how it is fundamental for every photographer - https://xlightphotography.com/exposure-triangle-photography/
Boudoir photography, a genre that captures intimate and sensual images of individuals, has experienced significant transformation over the years, particularly in New York City (NYC). Known for its diversity and vibrant arts scene, NYC has been a hub for the evolution of various art forms, including boudoir photography. This article delves into the historical background, cultural significance, technological advancements, and the contemporary landscape of boudoir photography in NYC.
Brushstrokes of Inspiration: Four Major Influences in Victor Gilbert’s Artist...KendraJohnson54
Throughout his career, Victor Gilbert was influenced heavily by various factors, the most notable being his upbringing and the artistic movements of his time. A rich tapestry of inspirations appears in Gilbert’s work, ranging from their own experiences to the art movements of that period.
Hadj Ounis's most notable work is his sculpture titled "Metamorphosis." This piece showcases Ounis's mastery of form and texture, as he seamlessly combines metal and wood to create a dynamic and visually striking composition. The juxtaposition of the two materials creates a sense of tension and harmony, inviting viewers to contemplate the relationship between nature and industry.
This document announces the winners of the 2024 Youth Poster Contest organized by MATFORCE. It lists the grand prize and age category winners for grades K-6, 7-12, and individual age groups from 5 years old to 18 years old.
Fashionista Chic Couture Maze & Coloring Adventures is a coloring and activity book filled with many maze games and coloring activities designed to delight and engage young fashion enthusiasts. Each page offers a unique blend of fashion-themed mazes and stylish illustrations to color, inspiring creativity and problem-solving skills in children.
2. Objectives
• To able to know Basic Photography
• To able to know some small technique in
Photography.
• To identify some local Photographer and their
style
3. Understanding the Three Basic Elements of Photography (Aperture, Shutter,
ISO)
• Depending on which way you look at it, it can be argued
that photography has either not changed at all since its
inception, or has changed more than a Chinese whisper
shared between the cast of Glee.
On one hand, advancements in technology has seen
camera’s and equipment become both affordable and
practical to the point that the average person can create
professional images which would have been seen as
impossible to the amateur photographer just 20 years ago.
On the other hand however, every camera can still be
seen as essentially just a box with a hole in one end. Sure
that hole is quite important (being essentially where the
light comes through), and you still need the mechanics and
means to record a photo but at its simplest, the basic
elements to capture an image has not changed.
4. Exposure
• Exposure is the basic element of any photograph taken
and recorded. Essentially, it is exactly how it sounds,
exposure is how much light your shot was exposed to,
and this reflects on what is produced in your final
image, be it on film, or more likely nowadays, digitally.
Without light, obviously there is no picture.
• Think of exposure as your eye, if you are in a pitch
black room with no light, you obviously can’t see
anything. When we are looking at something we are
not actually seeing it directly, we are looking at the
light reflecting and bouncing off the objects in front of
us. Exposure is determined by three essential elements
which we will look at individually here.
5. Aperture
• Aperture is the setting which controls the size
of the opening of light which comes through
to the lens. Normally this is done by
controlling the aperture blades which can be
changed to allow the aperture to become
smaller, in which less light is let through, or
obviously larger where more light is allowed
to pass through.
8. Shutter Speed
• Shutter Speed is simply put, the amount of time that the
camera lets the light coming in, stay exposed and become
recorded. This can be changed quite easily and is measured in
fractions, i.e. 1/60, 1/125. This number relates to the timing
that the shutter is left open, for example 1/60 shutter speed
will mean the shutter stays open for 1 sixtieth of a second.
Most camera’s will have a larger range of varying shutter
speeds for the user to work with, from Sonic the Hedgehog
like speeds of 1/4000 which is great for capturing moving
action such as wildlife or freezing sports events, to long
exposures of sometimes over a minute long, perfect for
landscape photography or low light photography with a
tripod.
9. Shutter Speed
• Motion blur can also be achieved by panning
the camera to follow a subject, and the idea is
that the camera will keep the focus relatively
in focus because you are following it, but the
background which will move relative to your
camera will naturally blur. This is a common
technique if you want to convey a sense of
movement
11. ISO
• ISO is slightly less obvious as the above two as to what it is and
what role it plays, but has just as much importance in
determining correct exposure. ISO is normally measured from
100, 200, 400 etc., with a low a number as possible preferred.
This is because the higher ISO that is used, typically the more
‘noise’ you get on an image, where an image is not as sharp as
in the lower ISO’s. “So why don’t we shoot all shots with a low
ISO?” I hear you say. Well simply put, it’s sometimes not
possible, especially in difficult conditions such as low light.
Increasing the ISO can allow you to get images you would not
normally get, but at a cost, noise, if you want to just capture the
scene and pin sharp focus is a secondary thought then
increasing the ISO is an option. When you use a higher ISO, you
are increasing the sensitivity of the image sensor, so now the
sensor captures not just more light incoming, but also more
surrounding noise which reduces clarity in your image.
12. Combining the three
• Individually we have looked at the three
elements that make up exposure, so it’s
important to realize that all three need
to be in sync to get a ‘good’ exposure.
The key in the end however, as the same
with pretty much all aspects of learning
photography, is that practice makes
perfect. It’s about learning the particular
scene you want and then determining
what settings are the best. For example
for shooting a high speed sport event at
night like American Football, you may
need a high ISO as it is quite low light. To
freeze the quick burst of action a high
shutter speed will need to be used
(1/1000 is a good starting point). A slow
shutter speed will lead to images coming
out blurred. Aperture will likely be mid-
range, as the lowest settings won’t be
able to let enough light in.