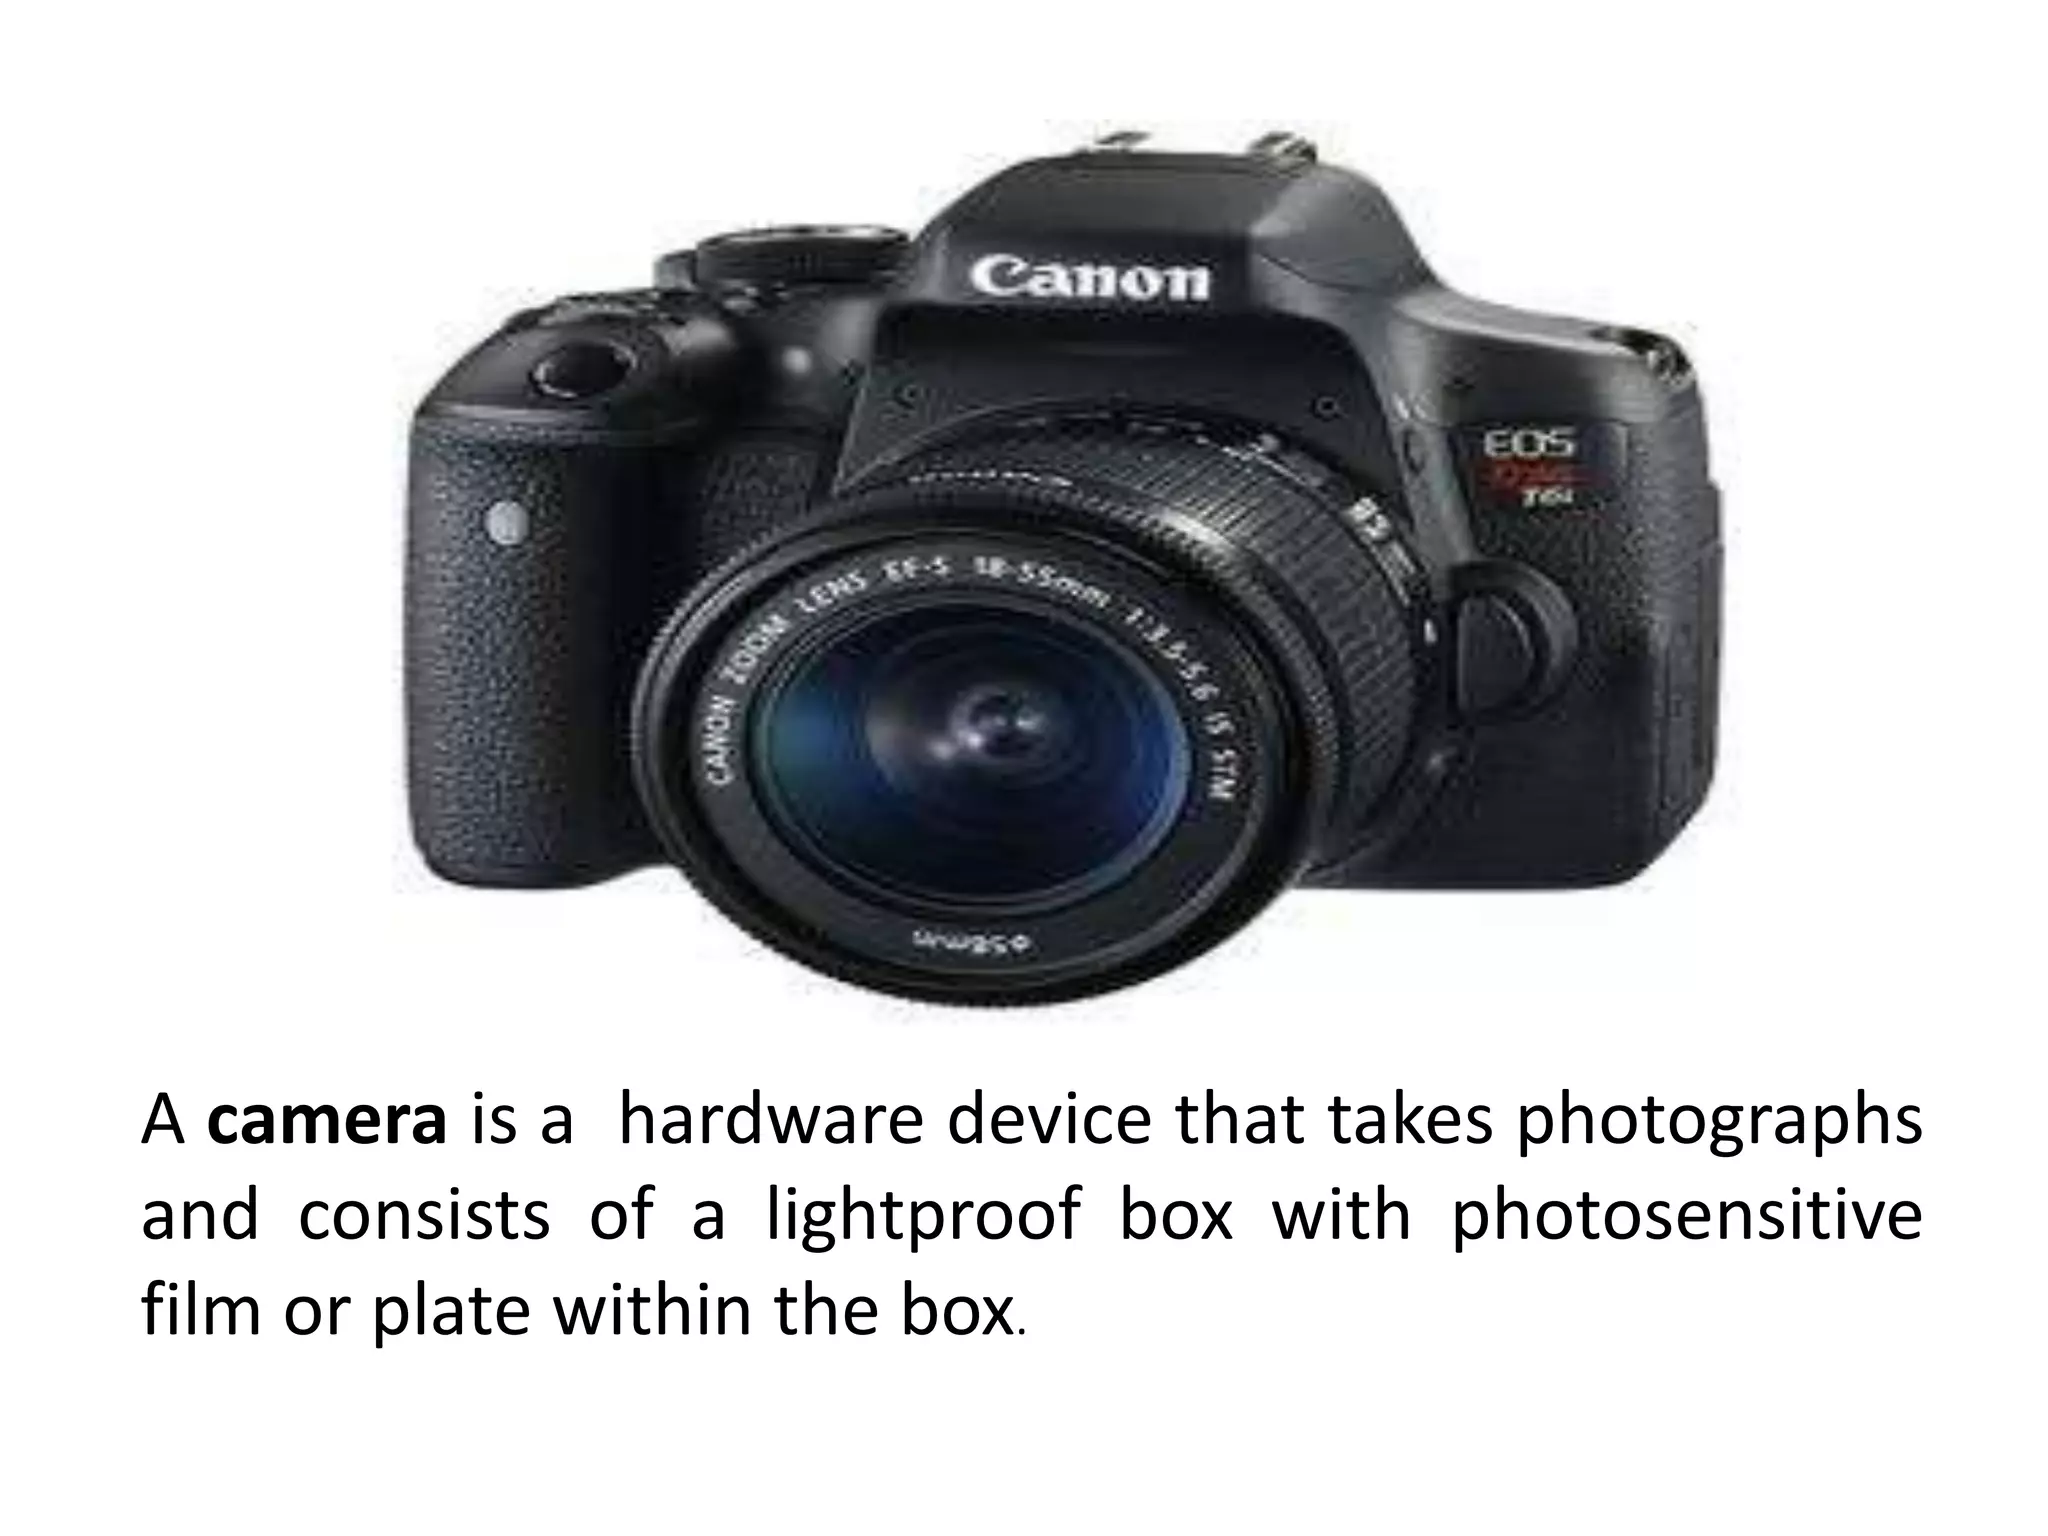
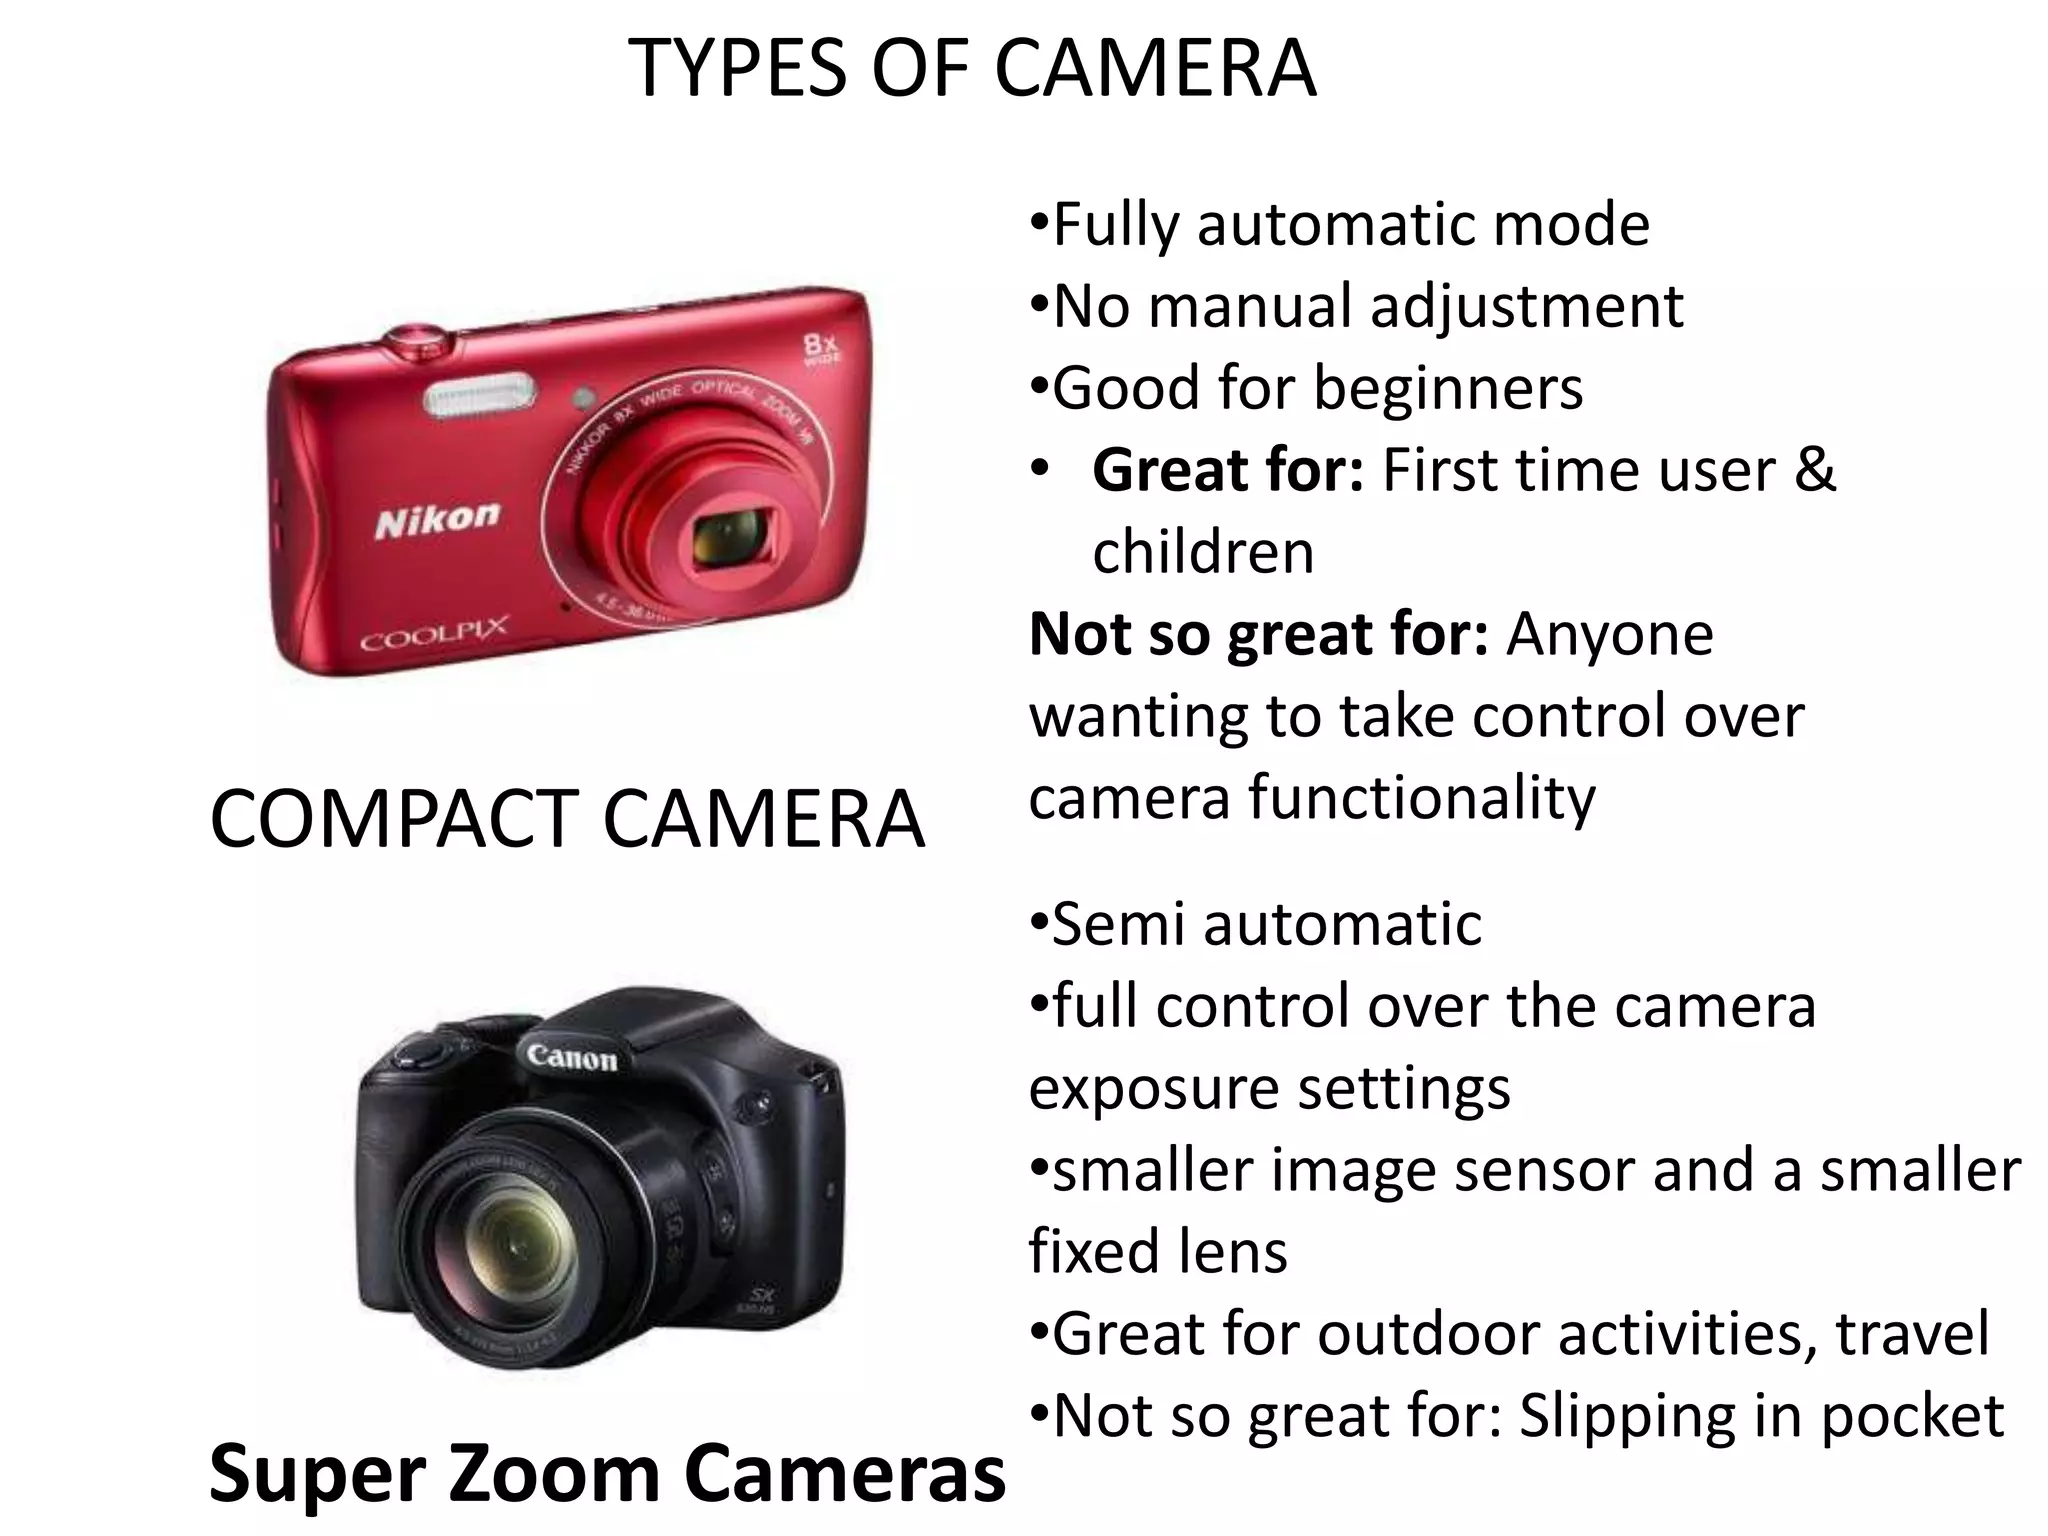
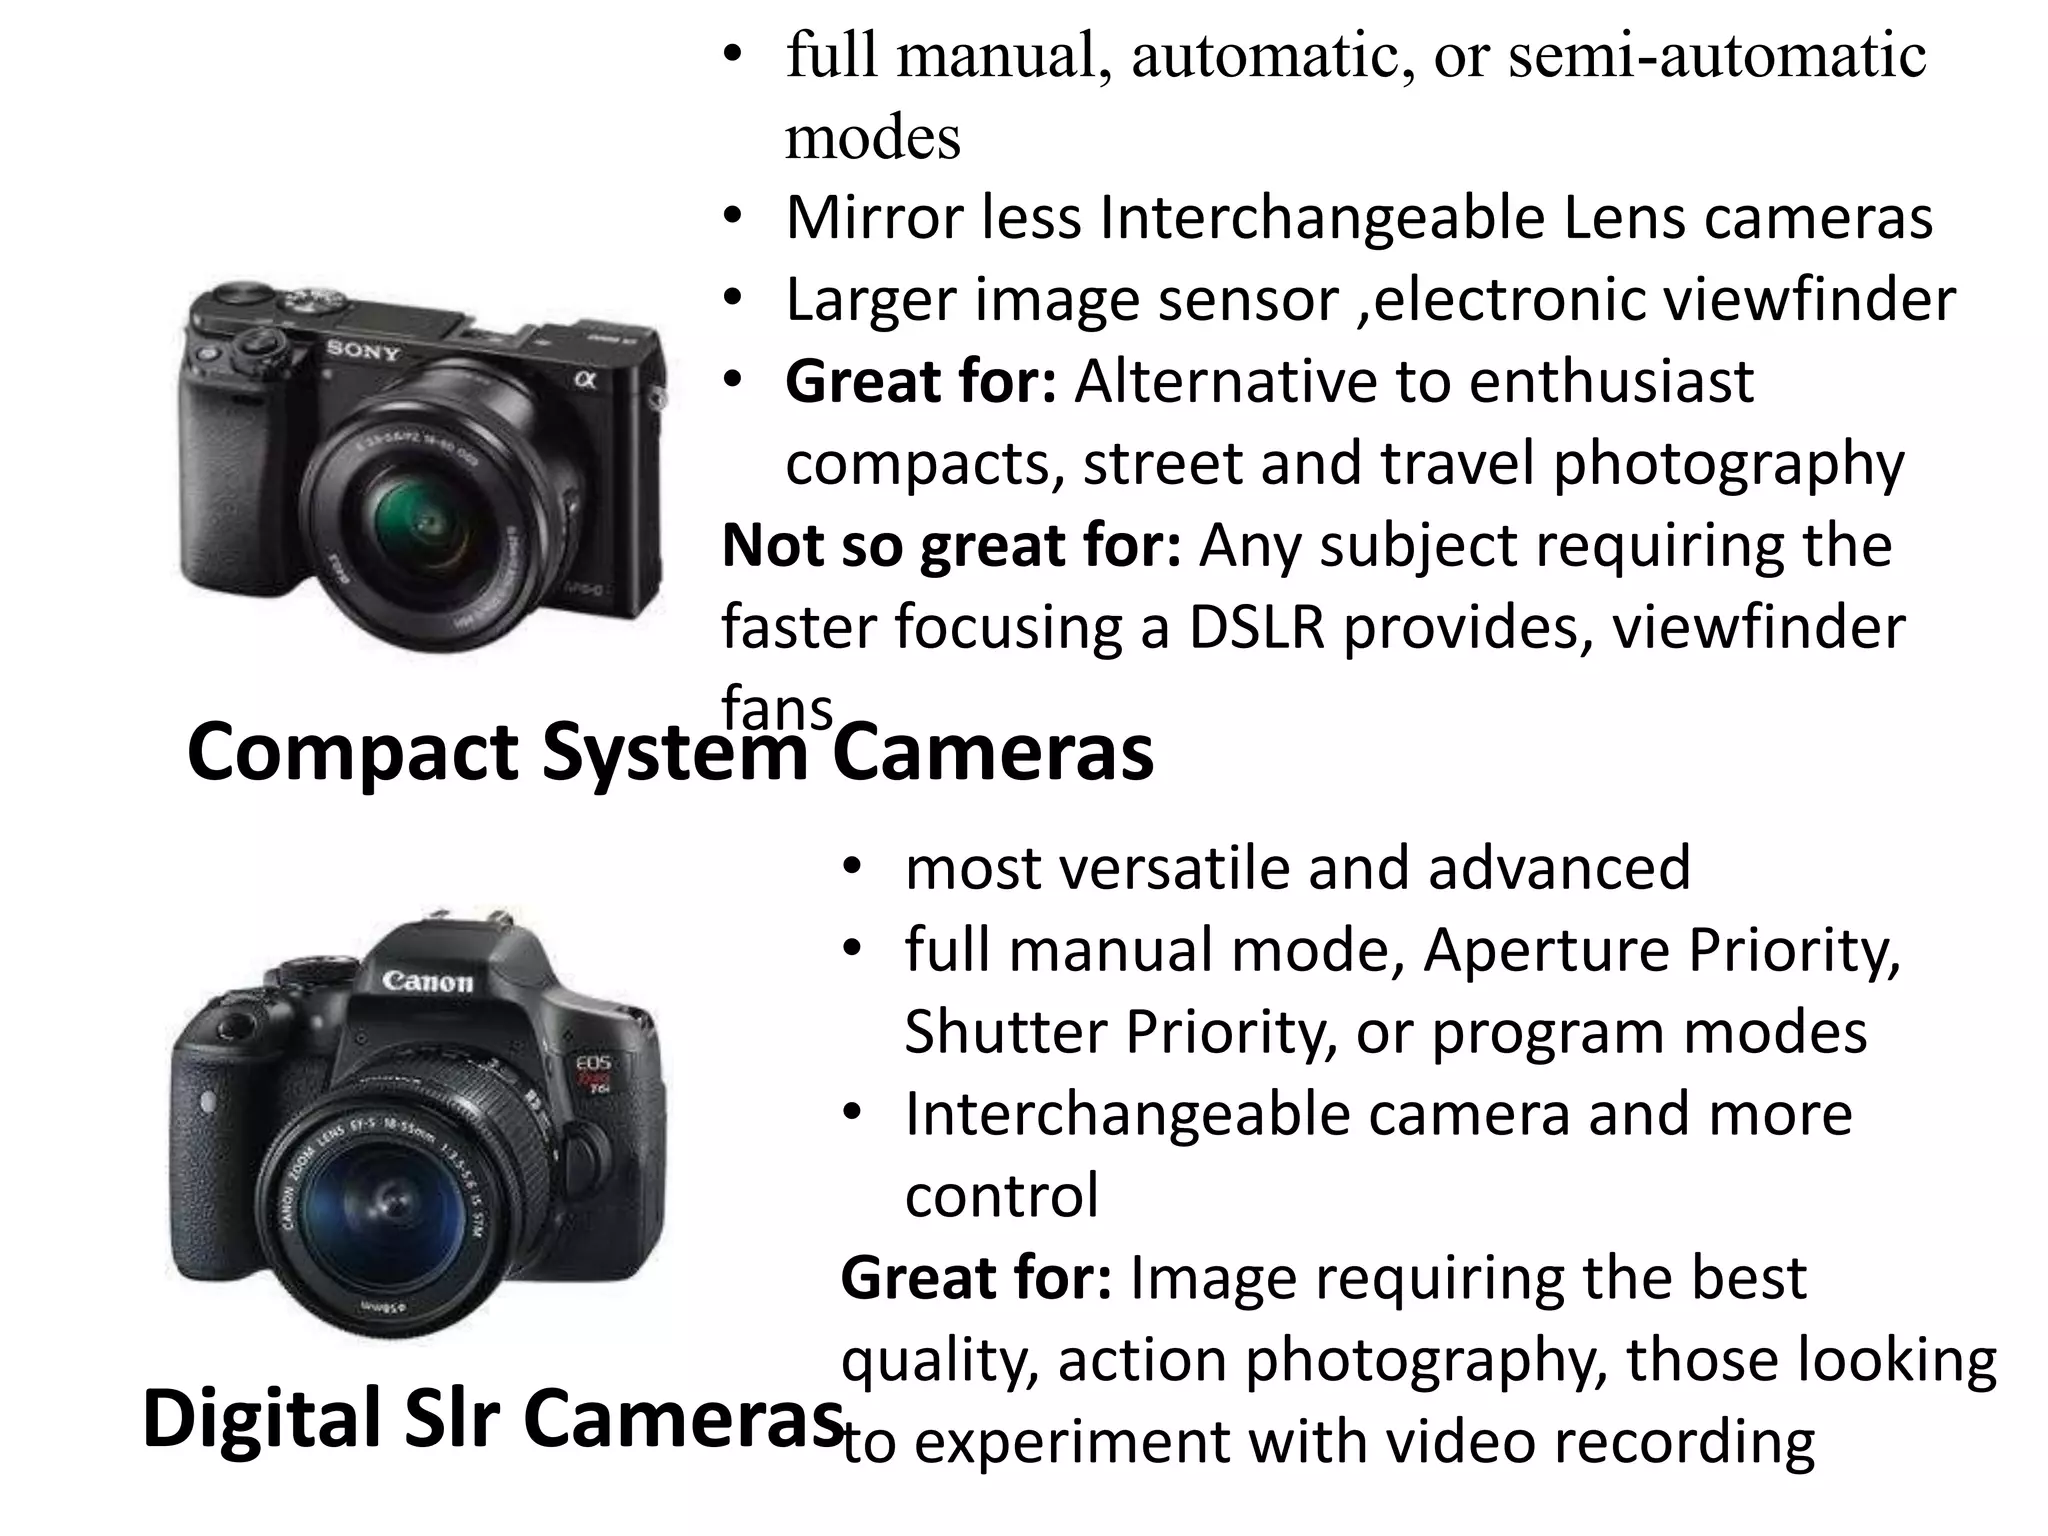
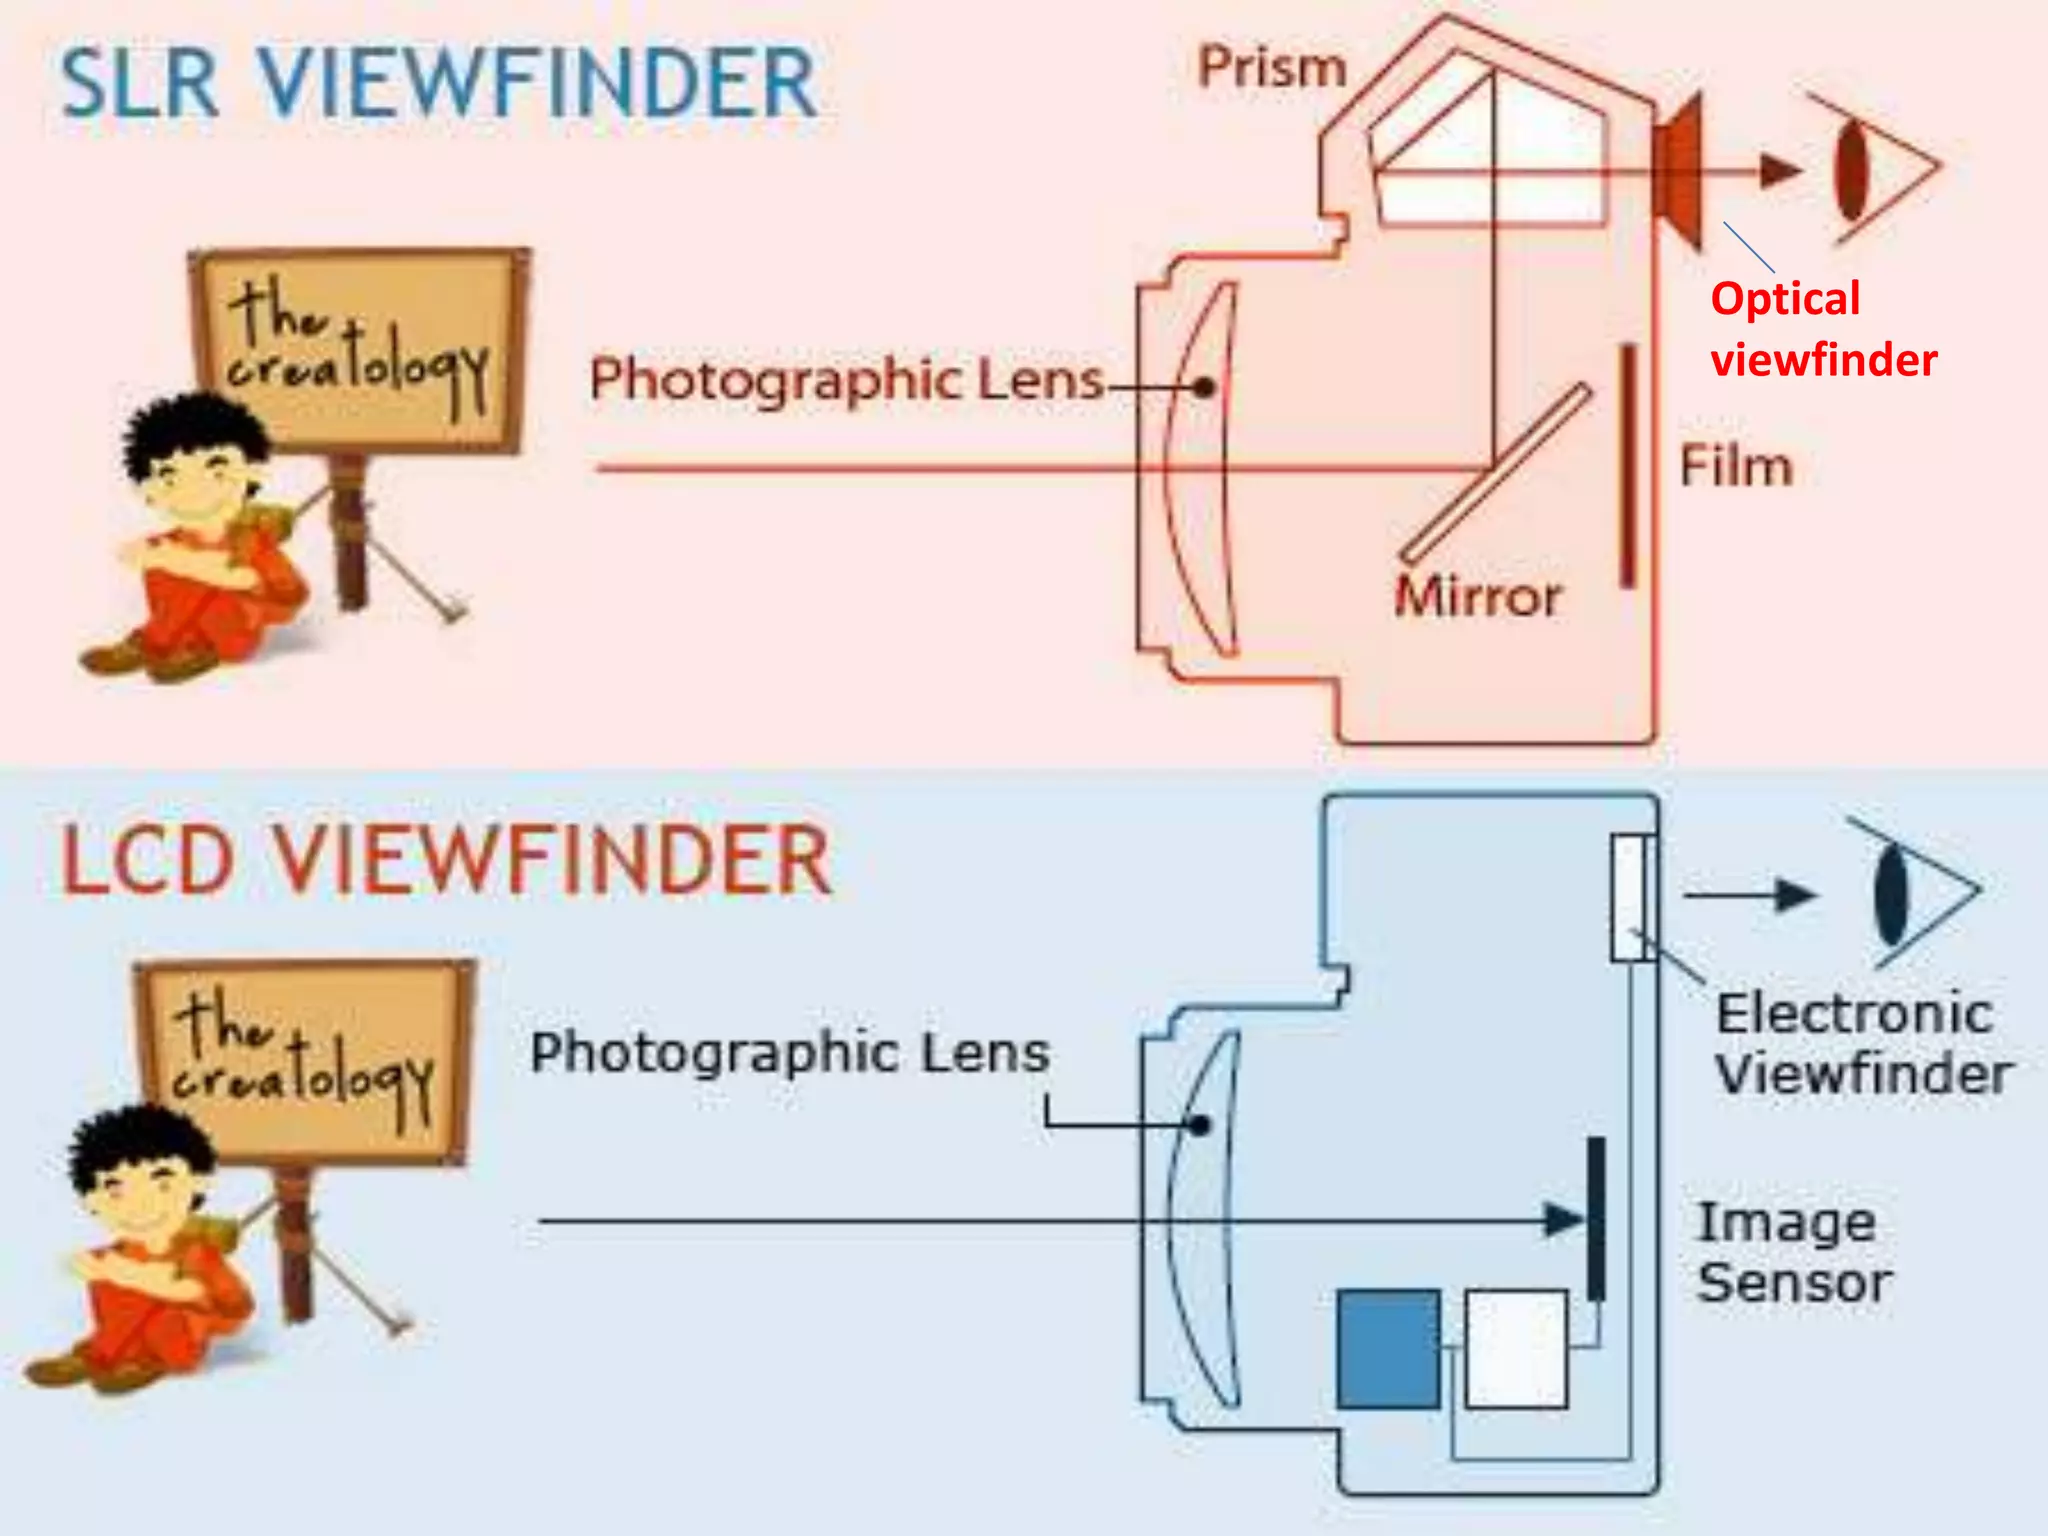
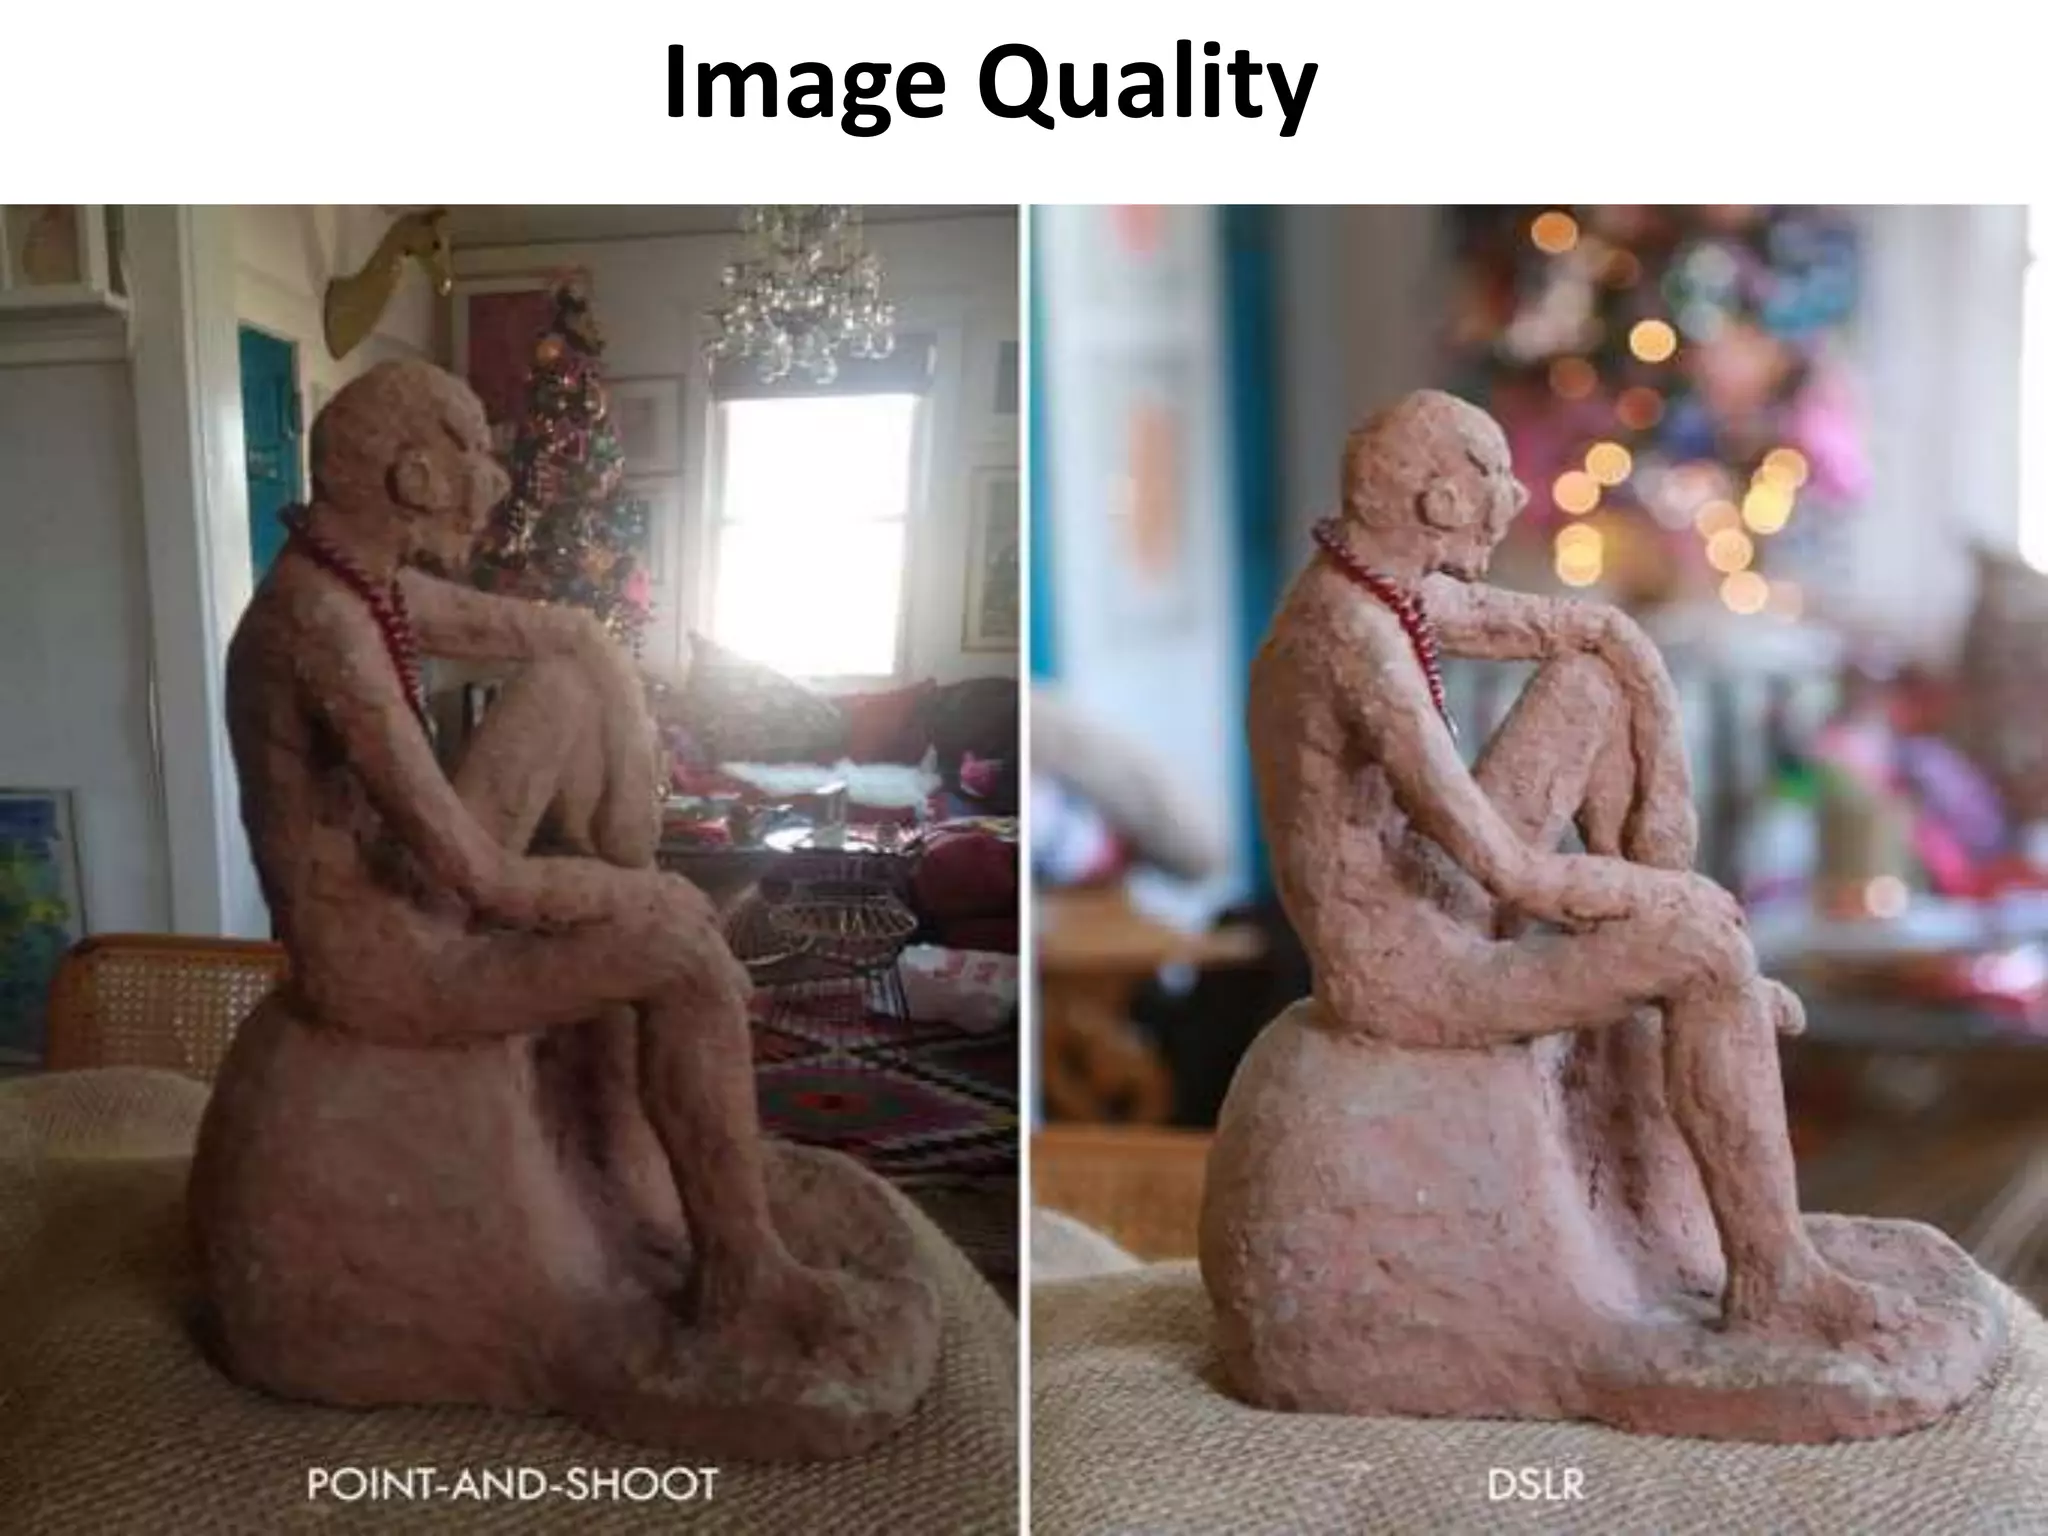
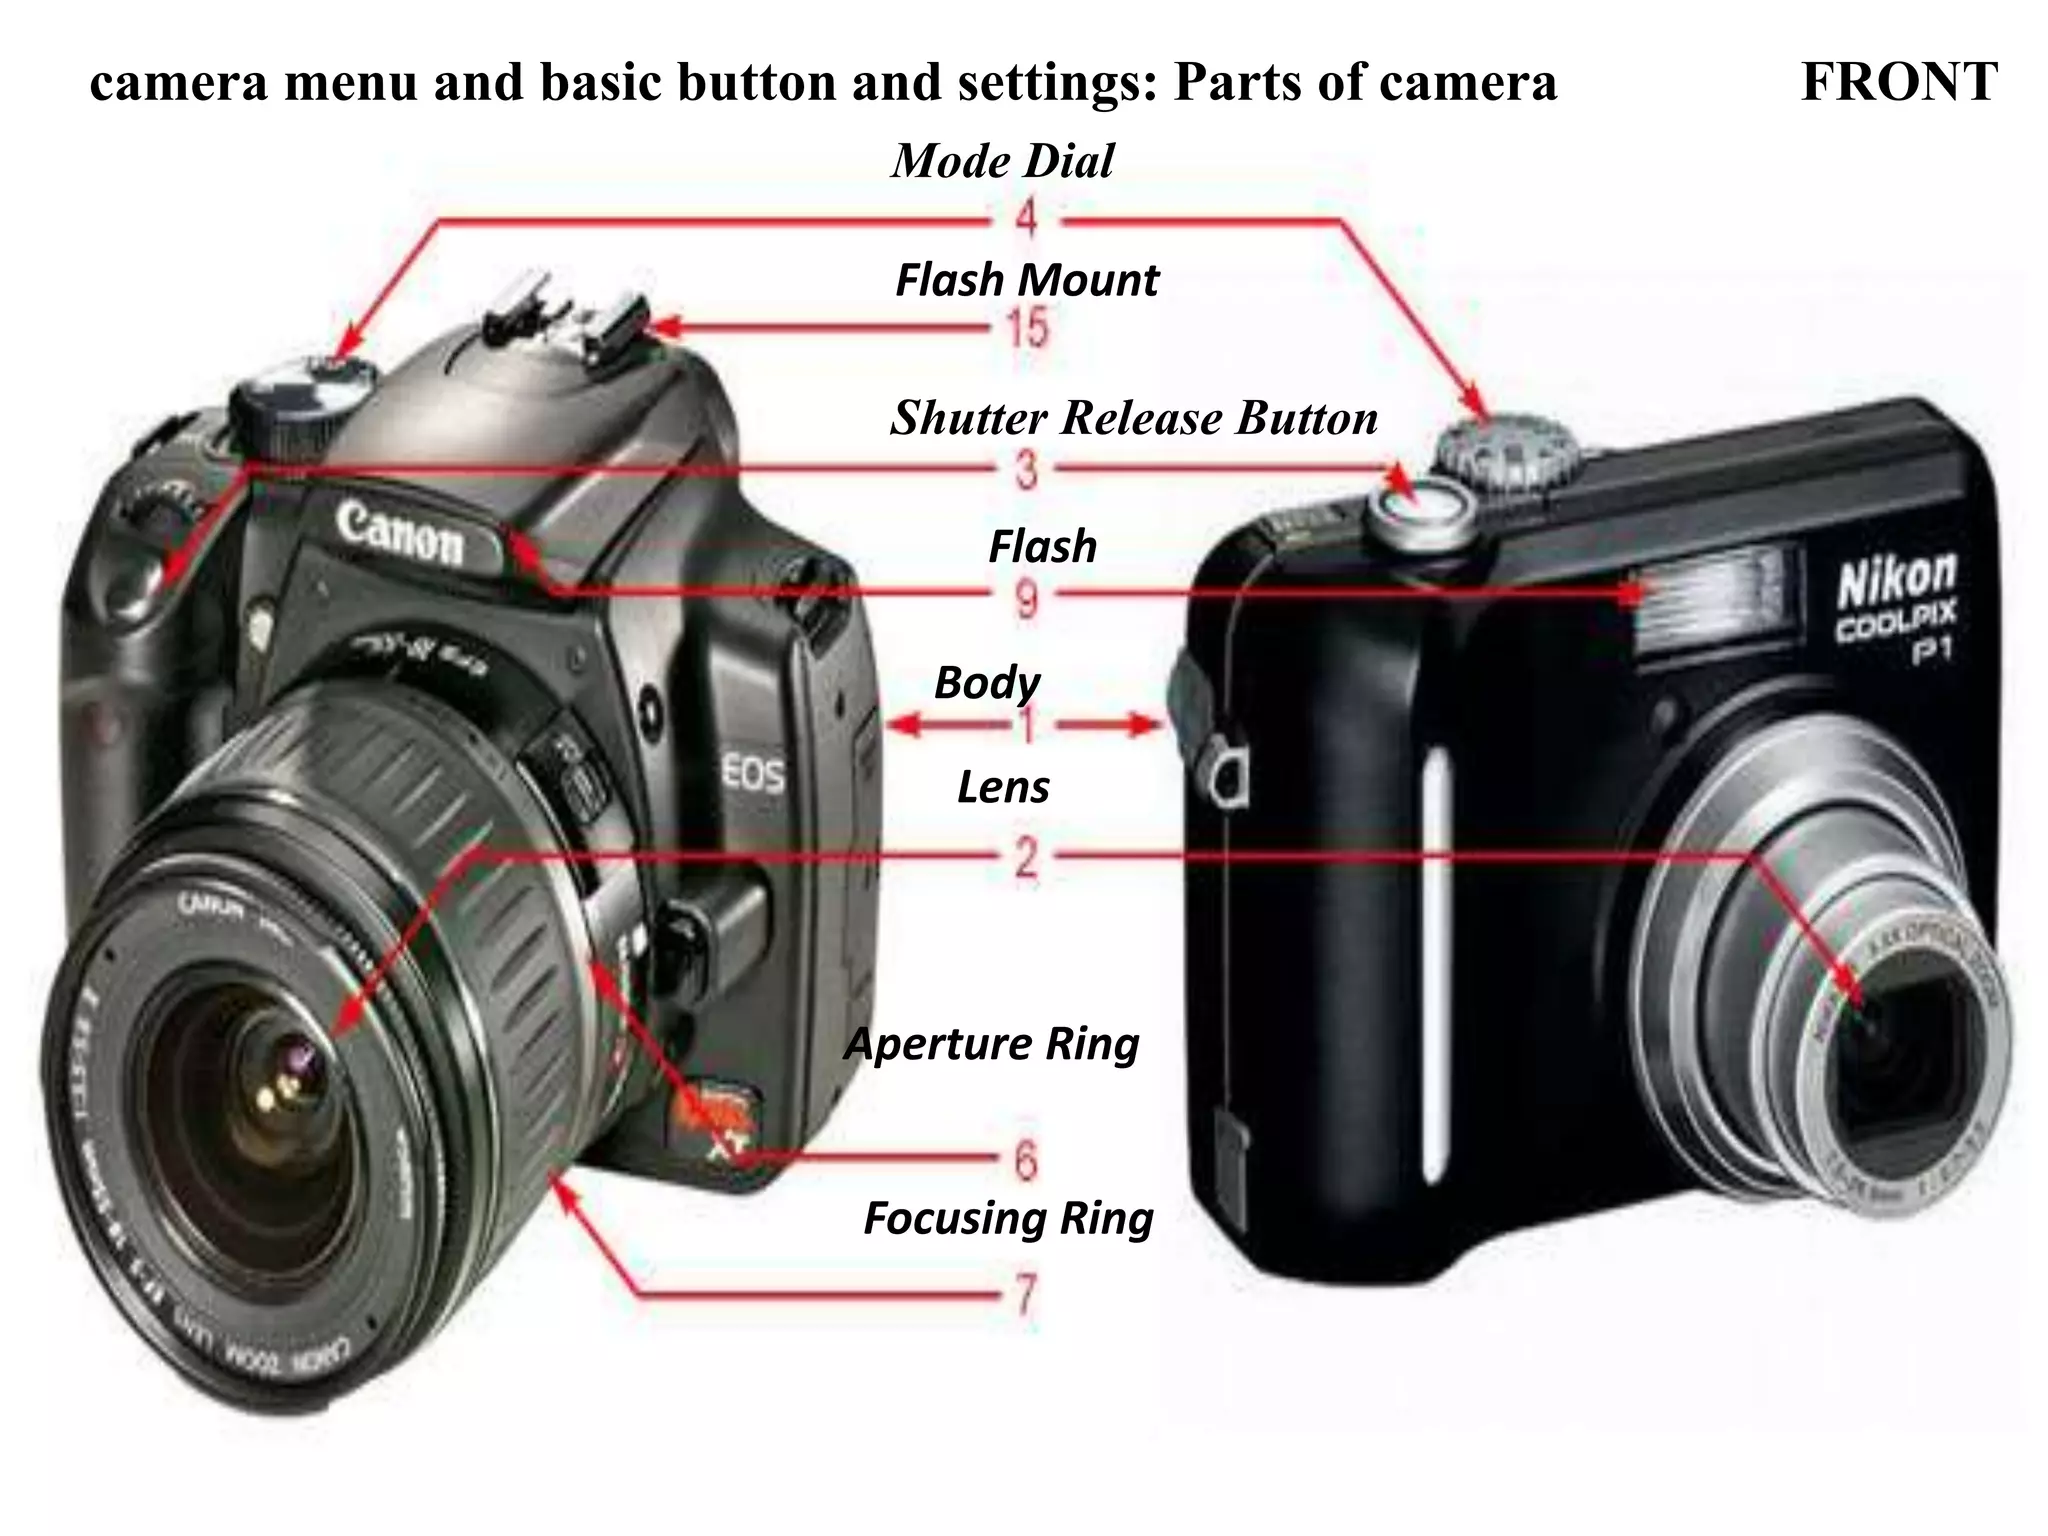
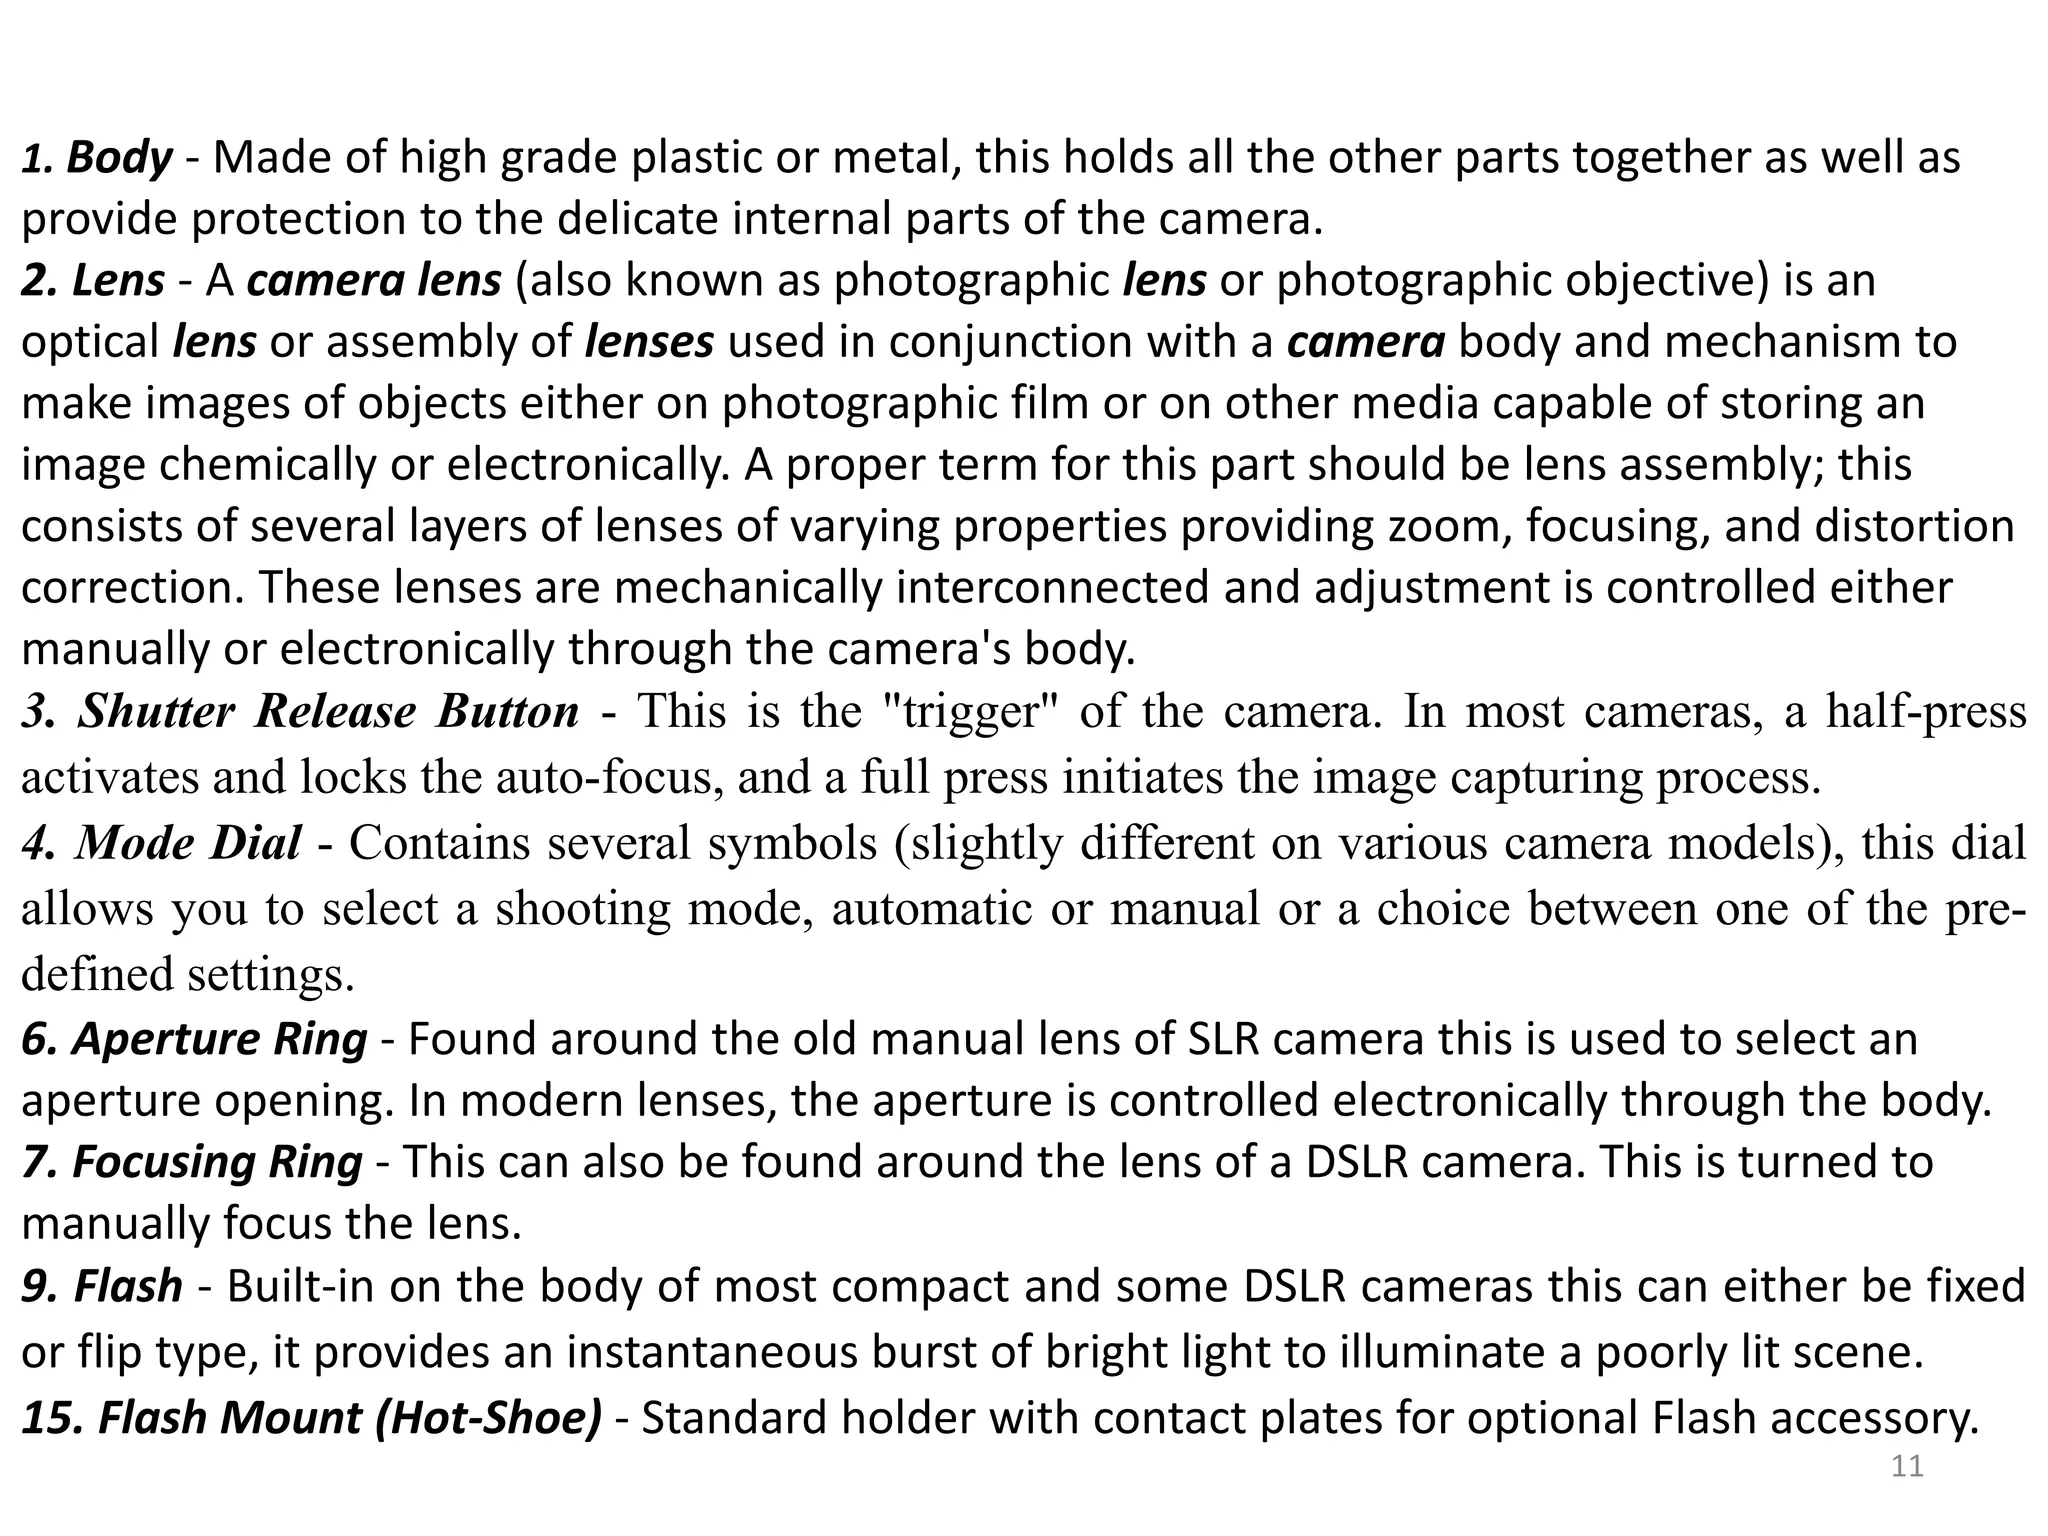
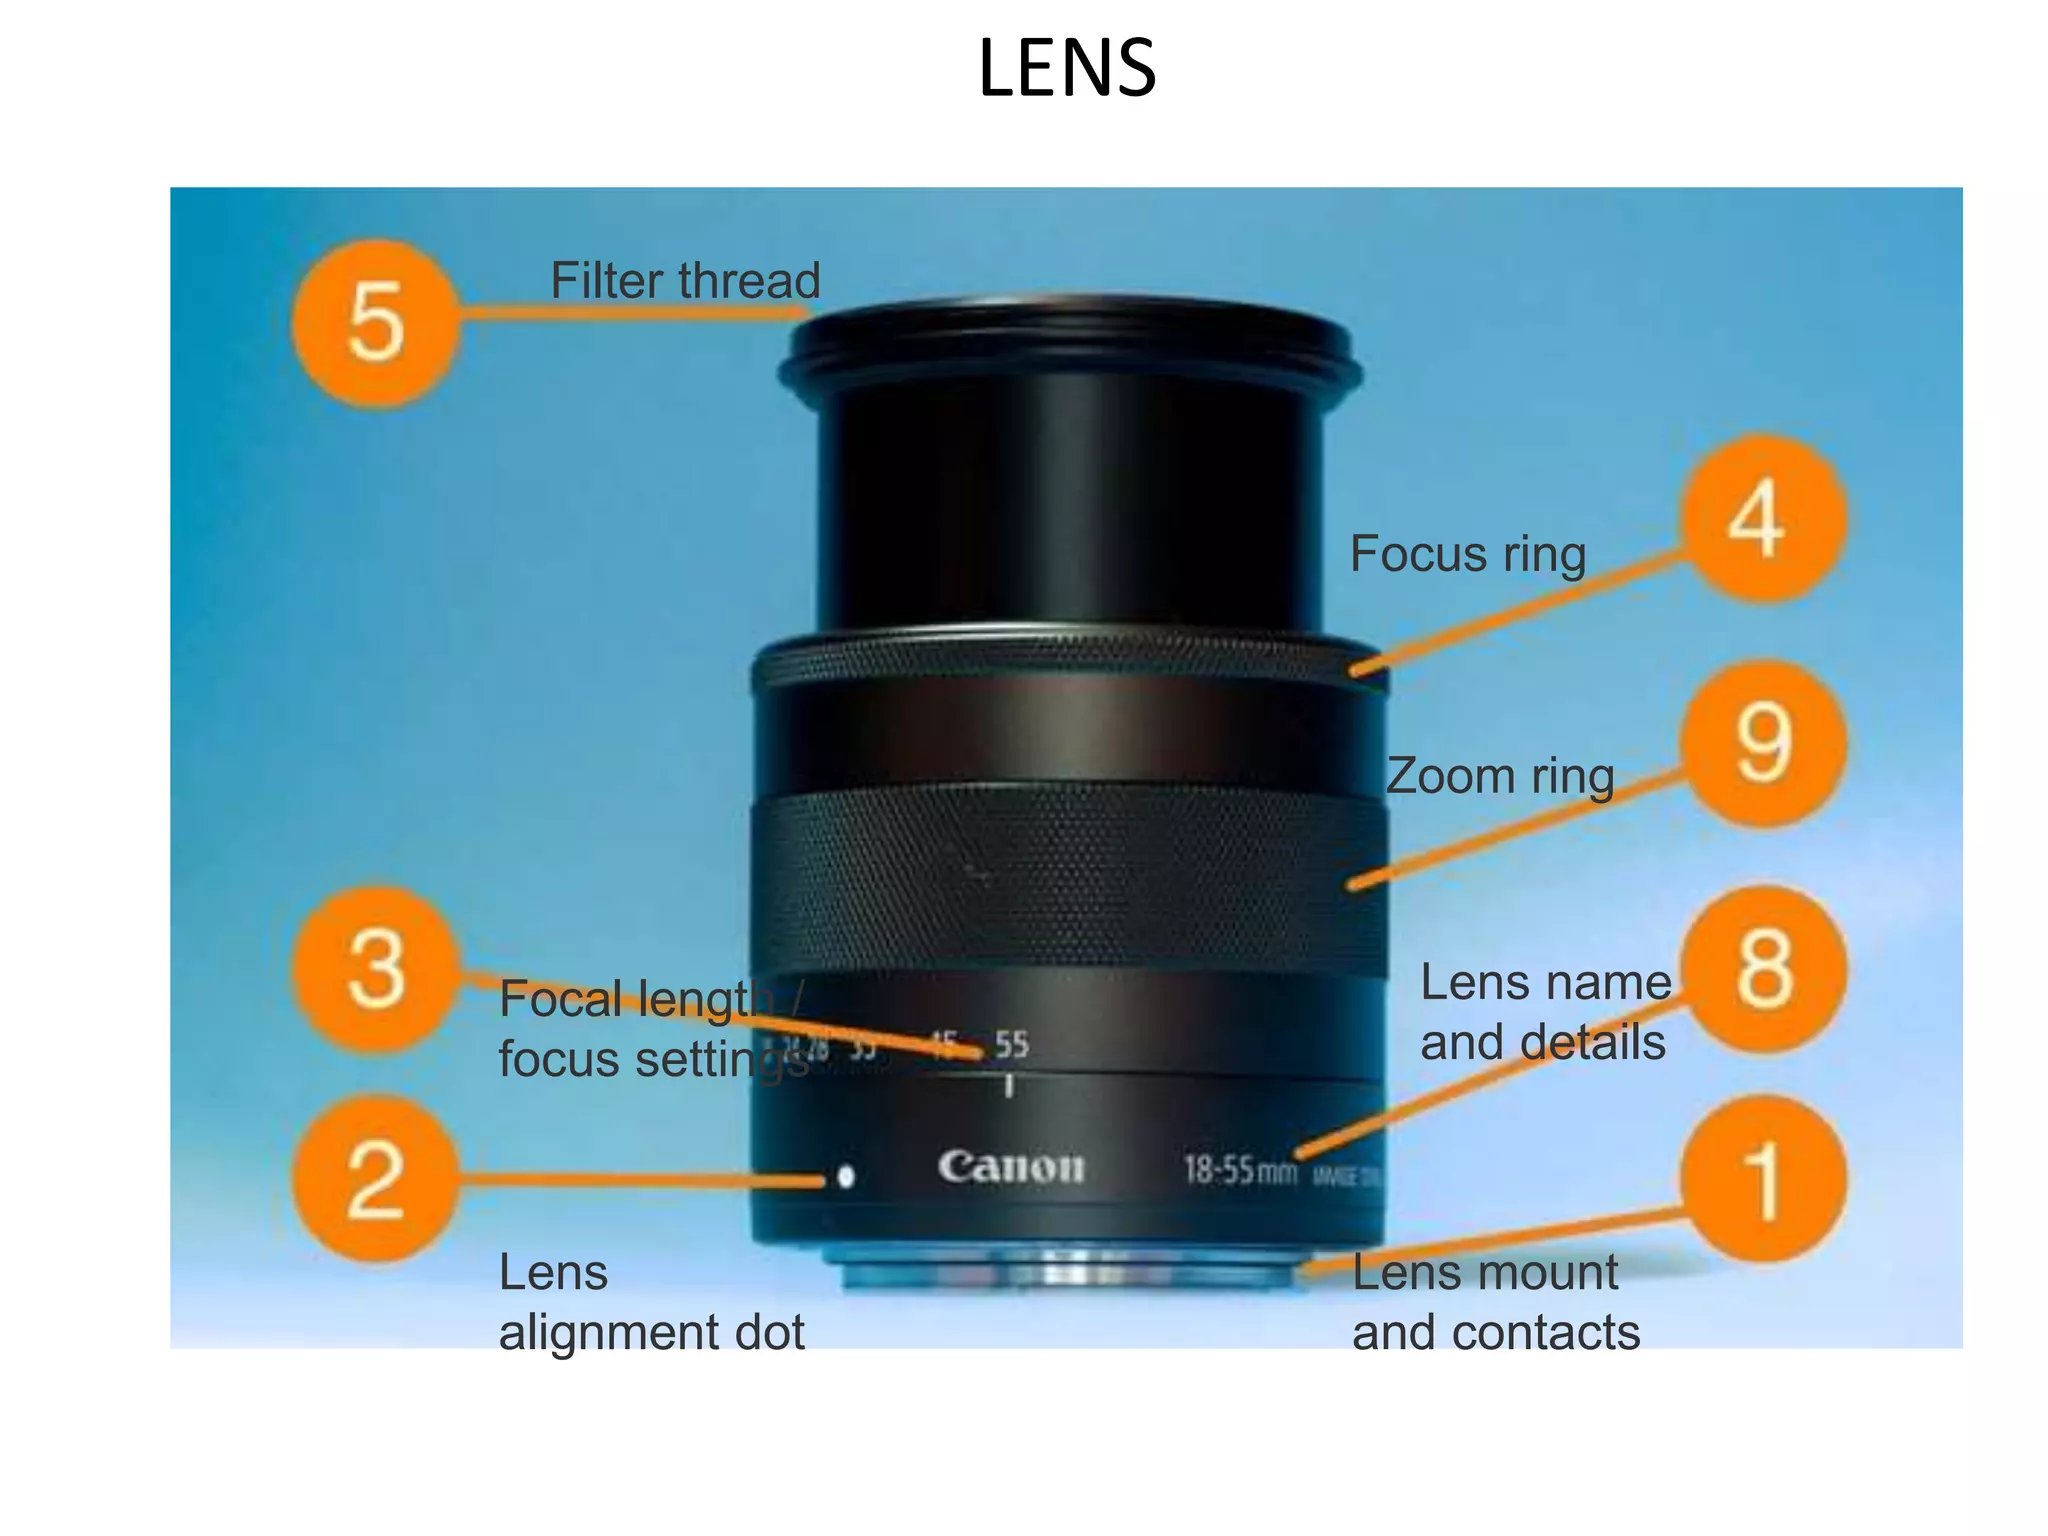
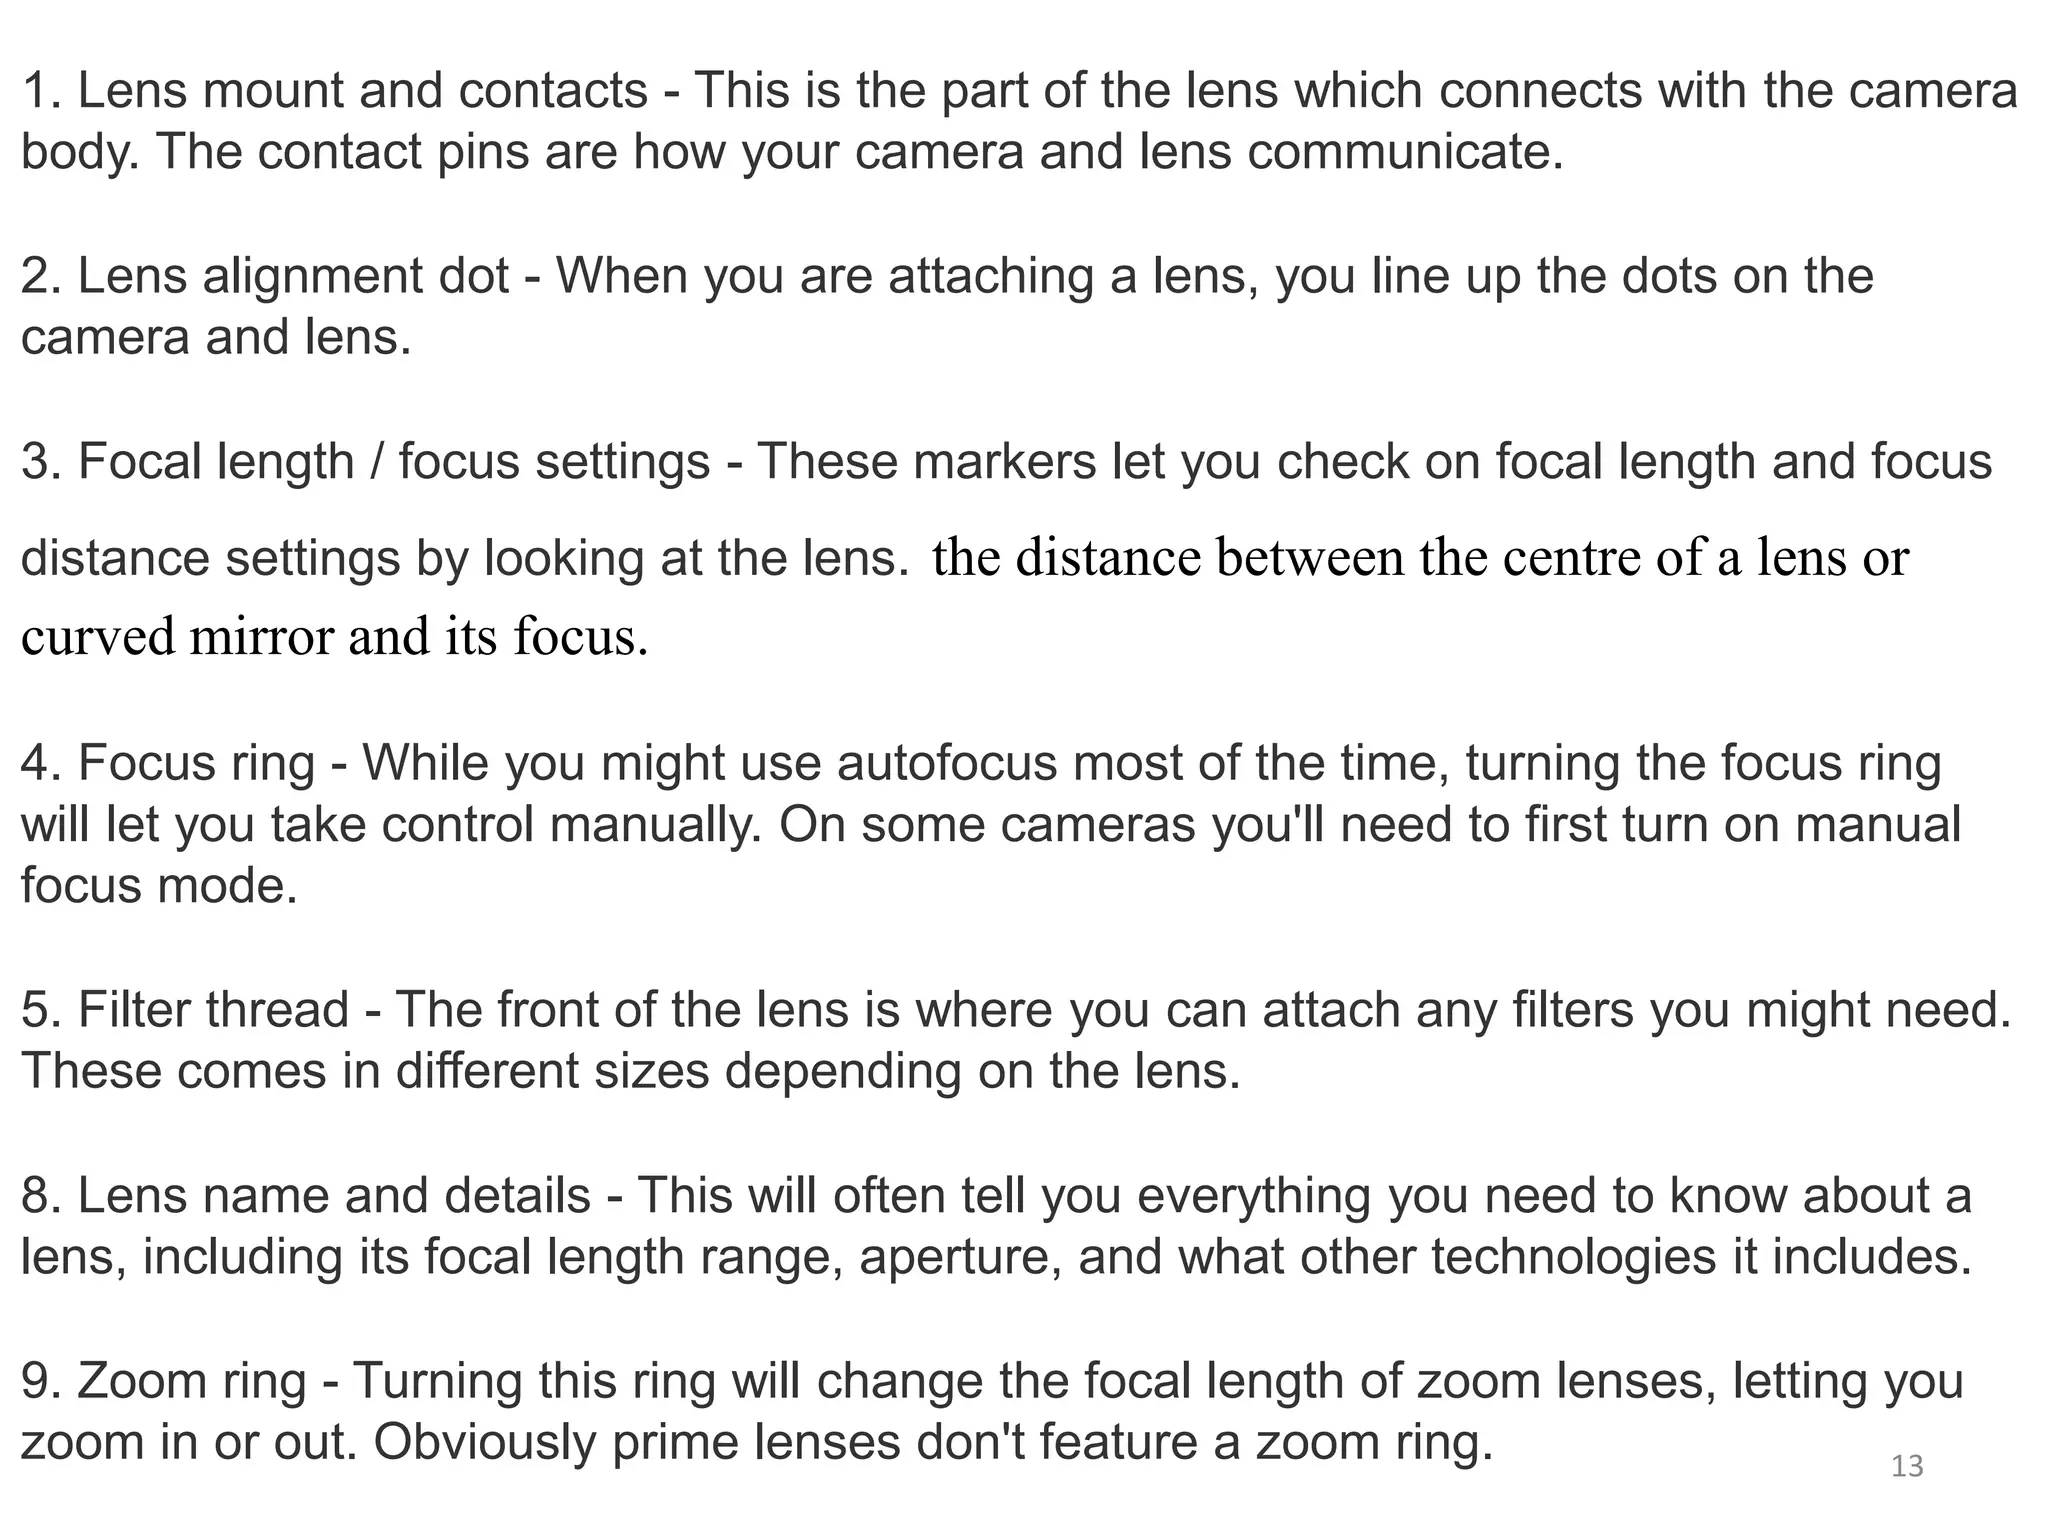
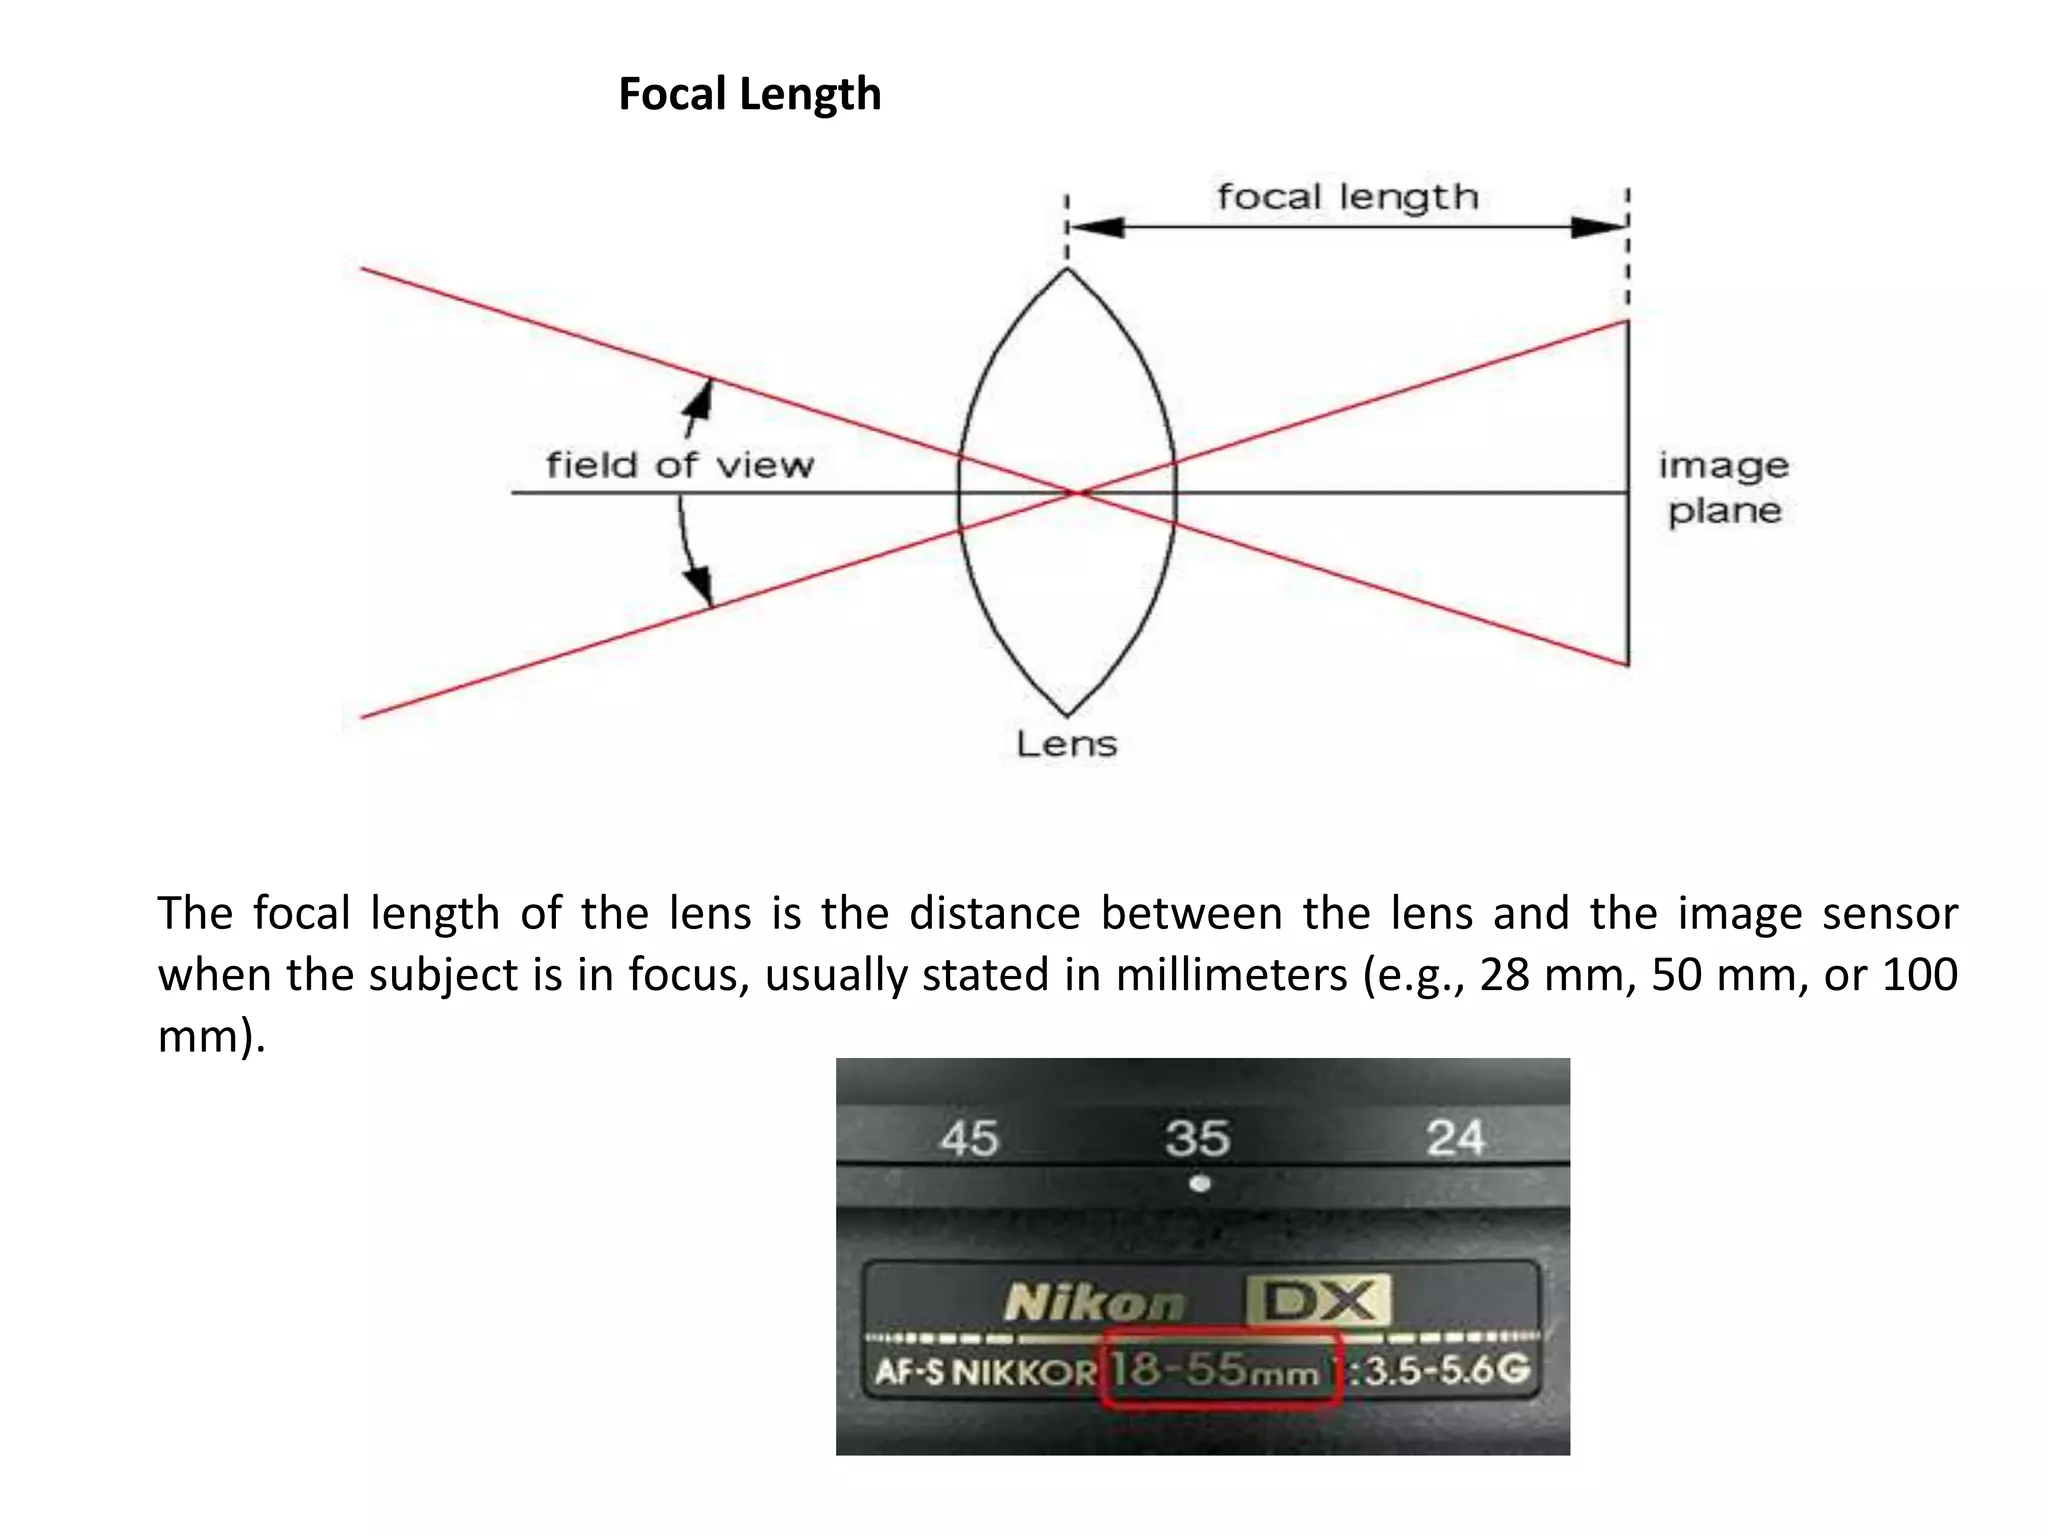
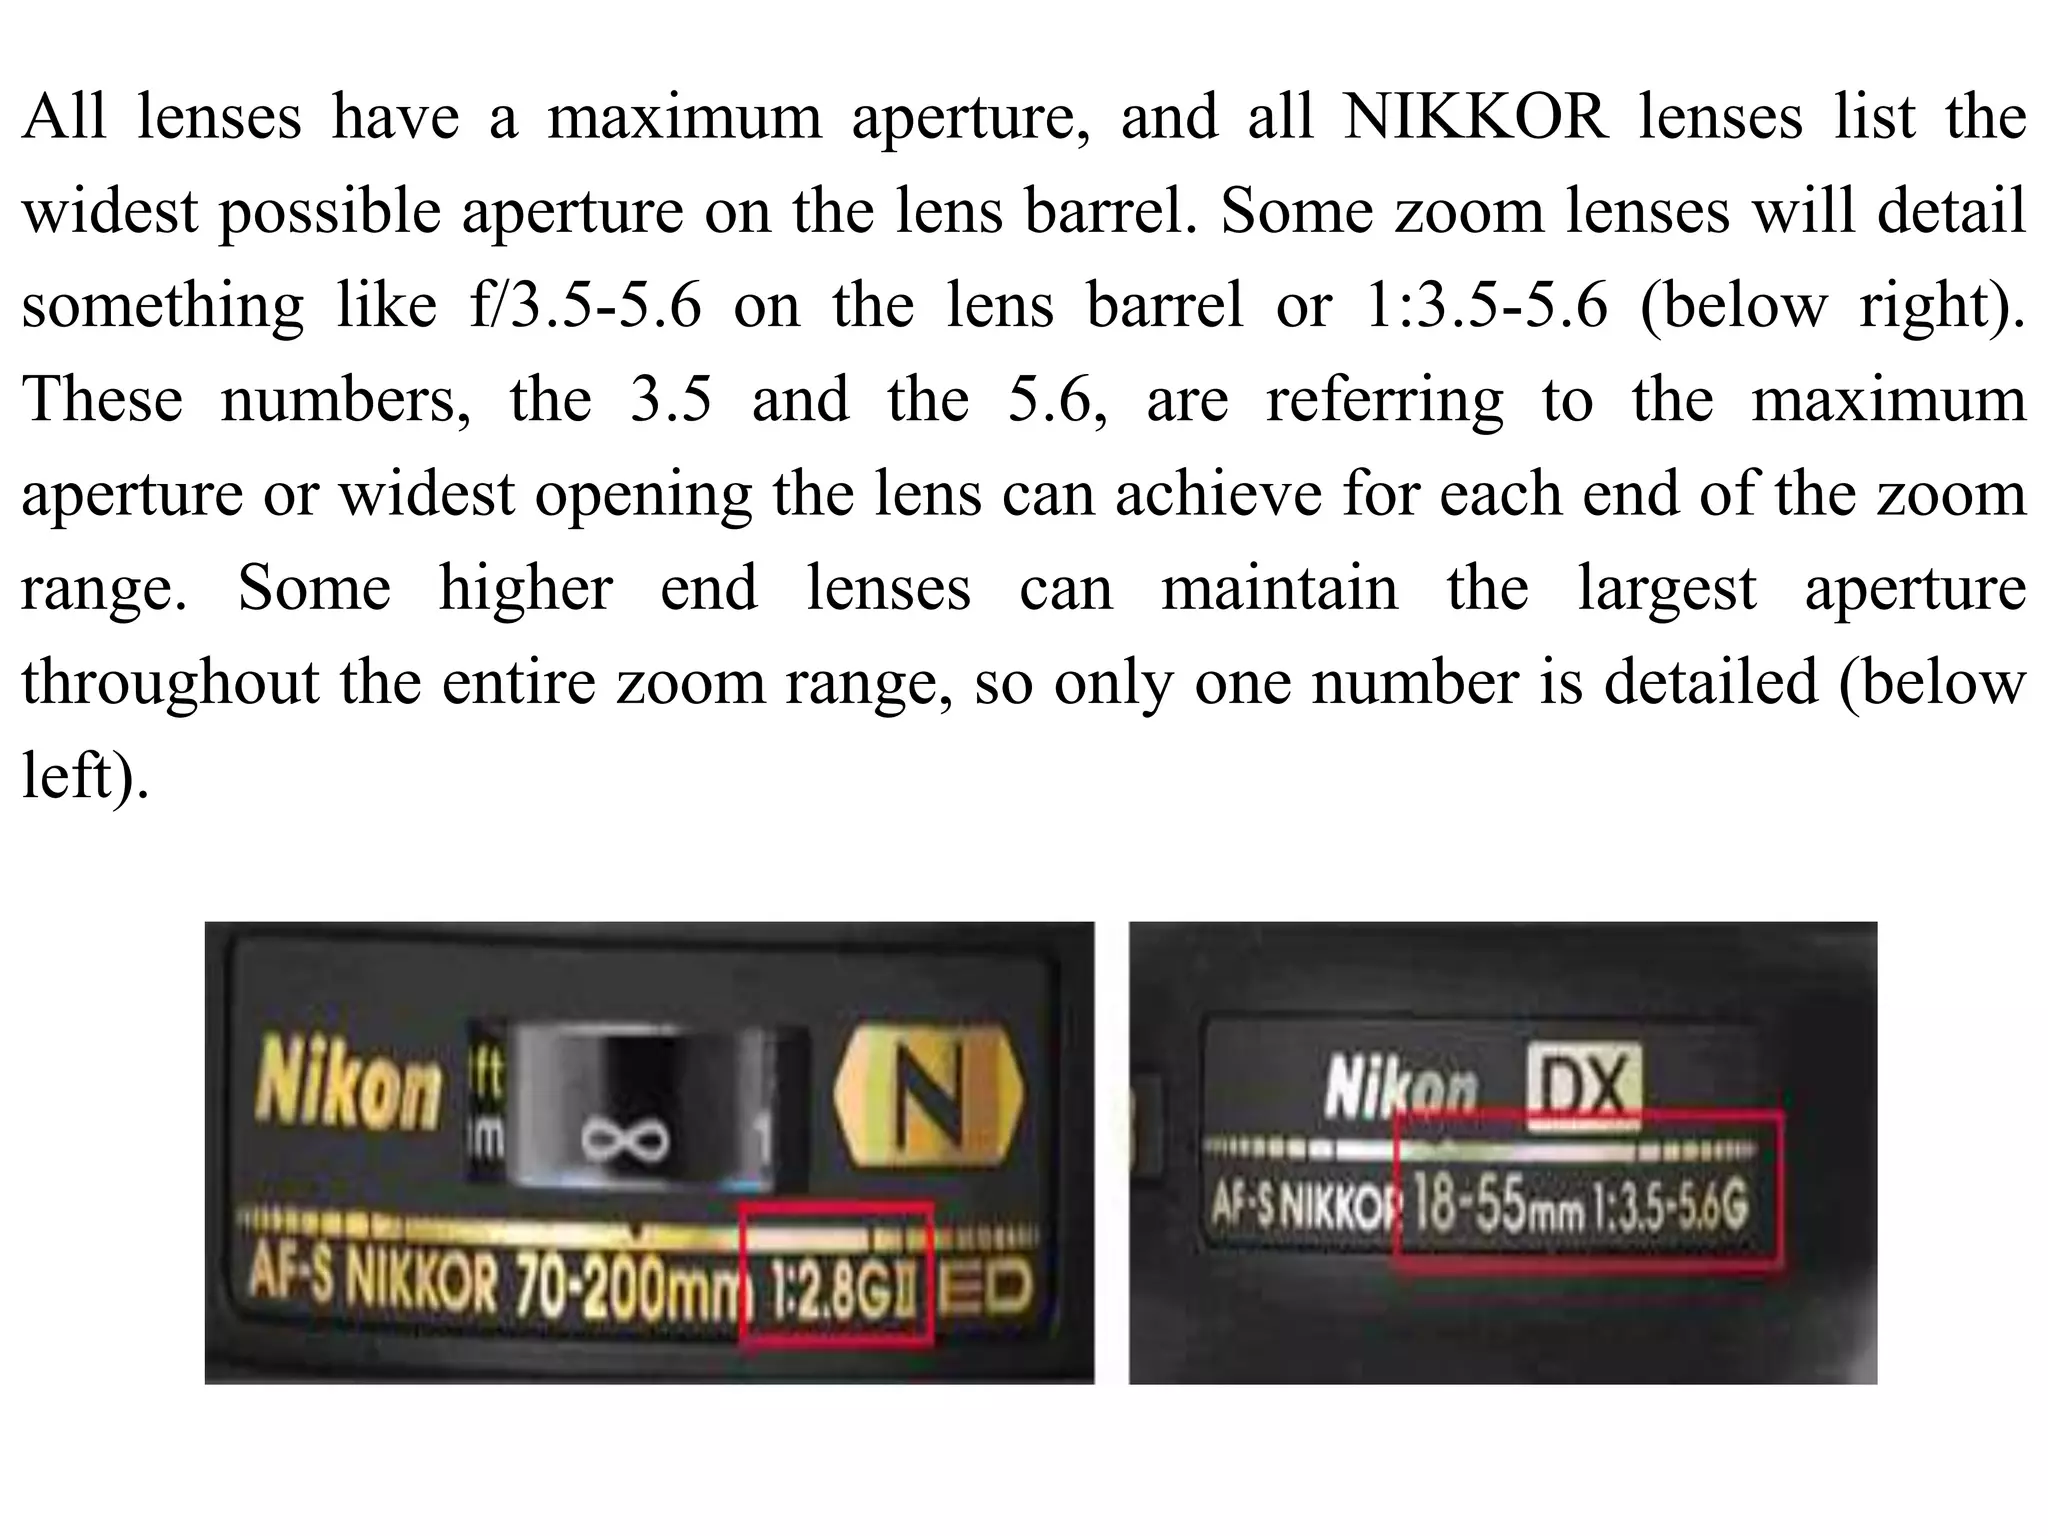
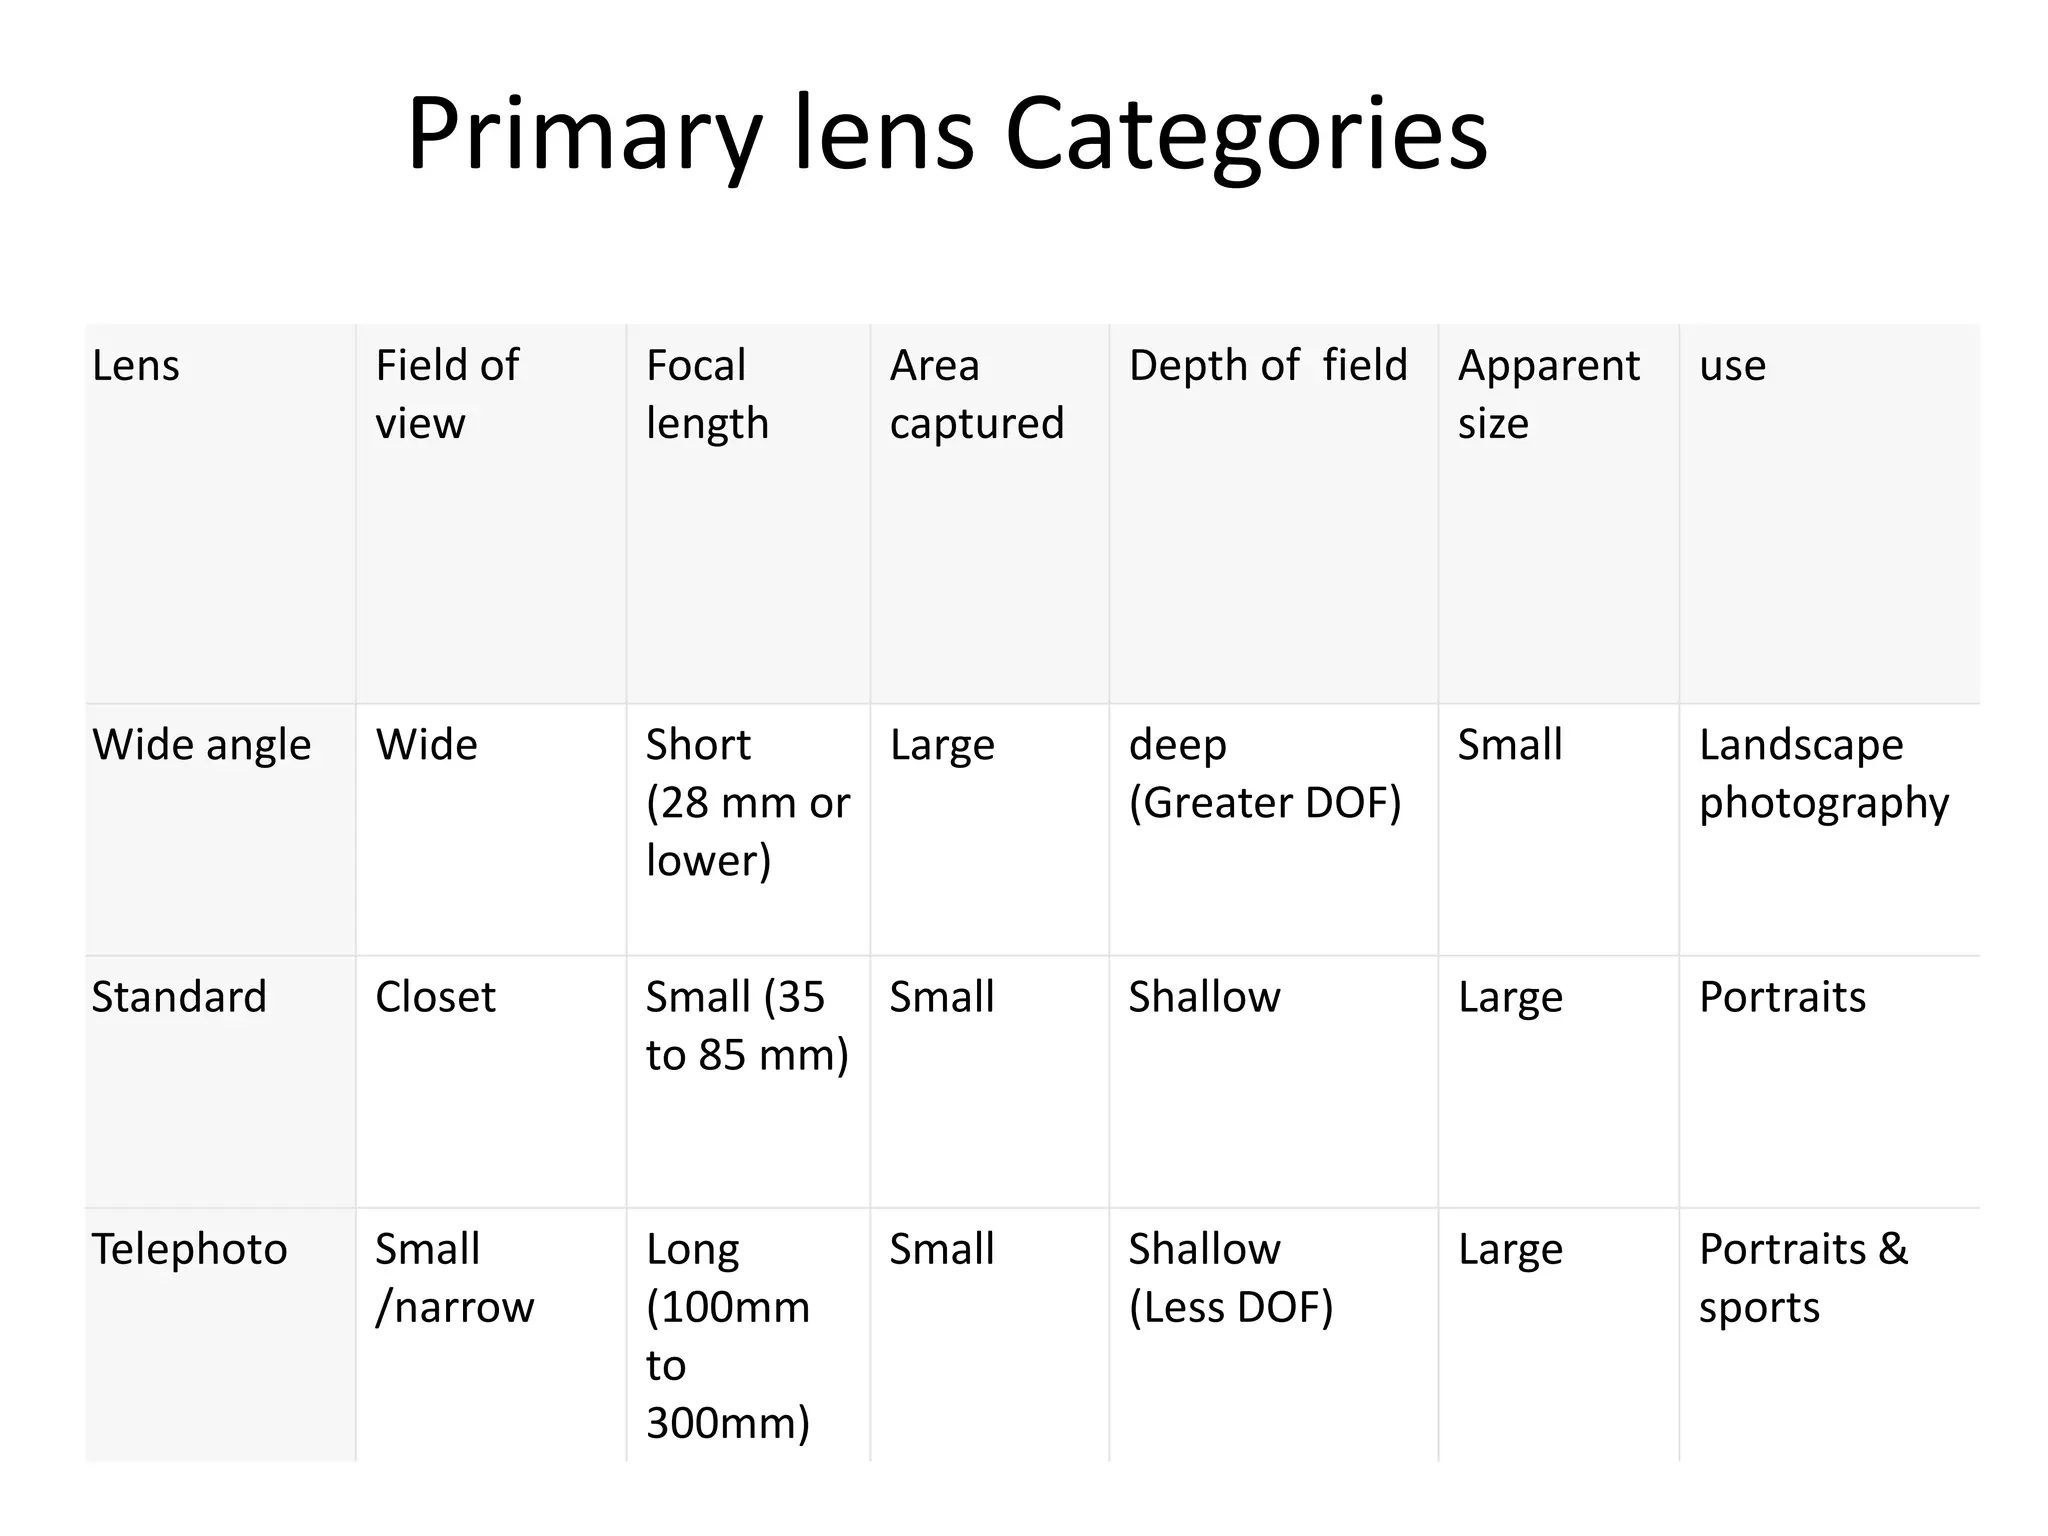
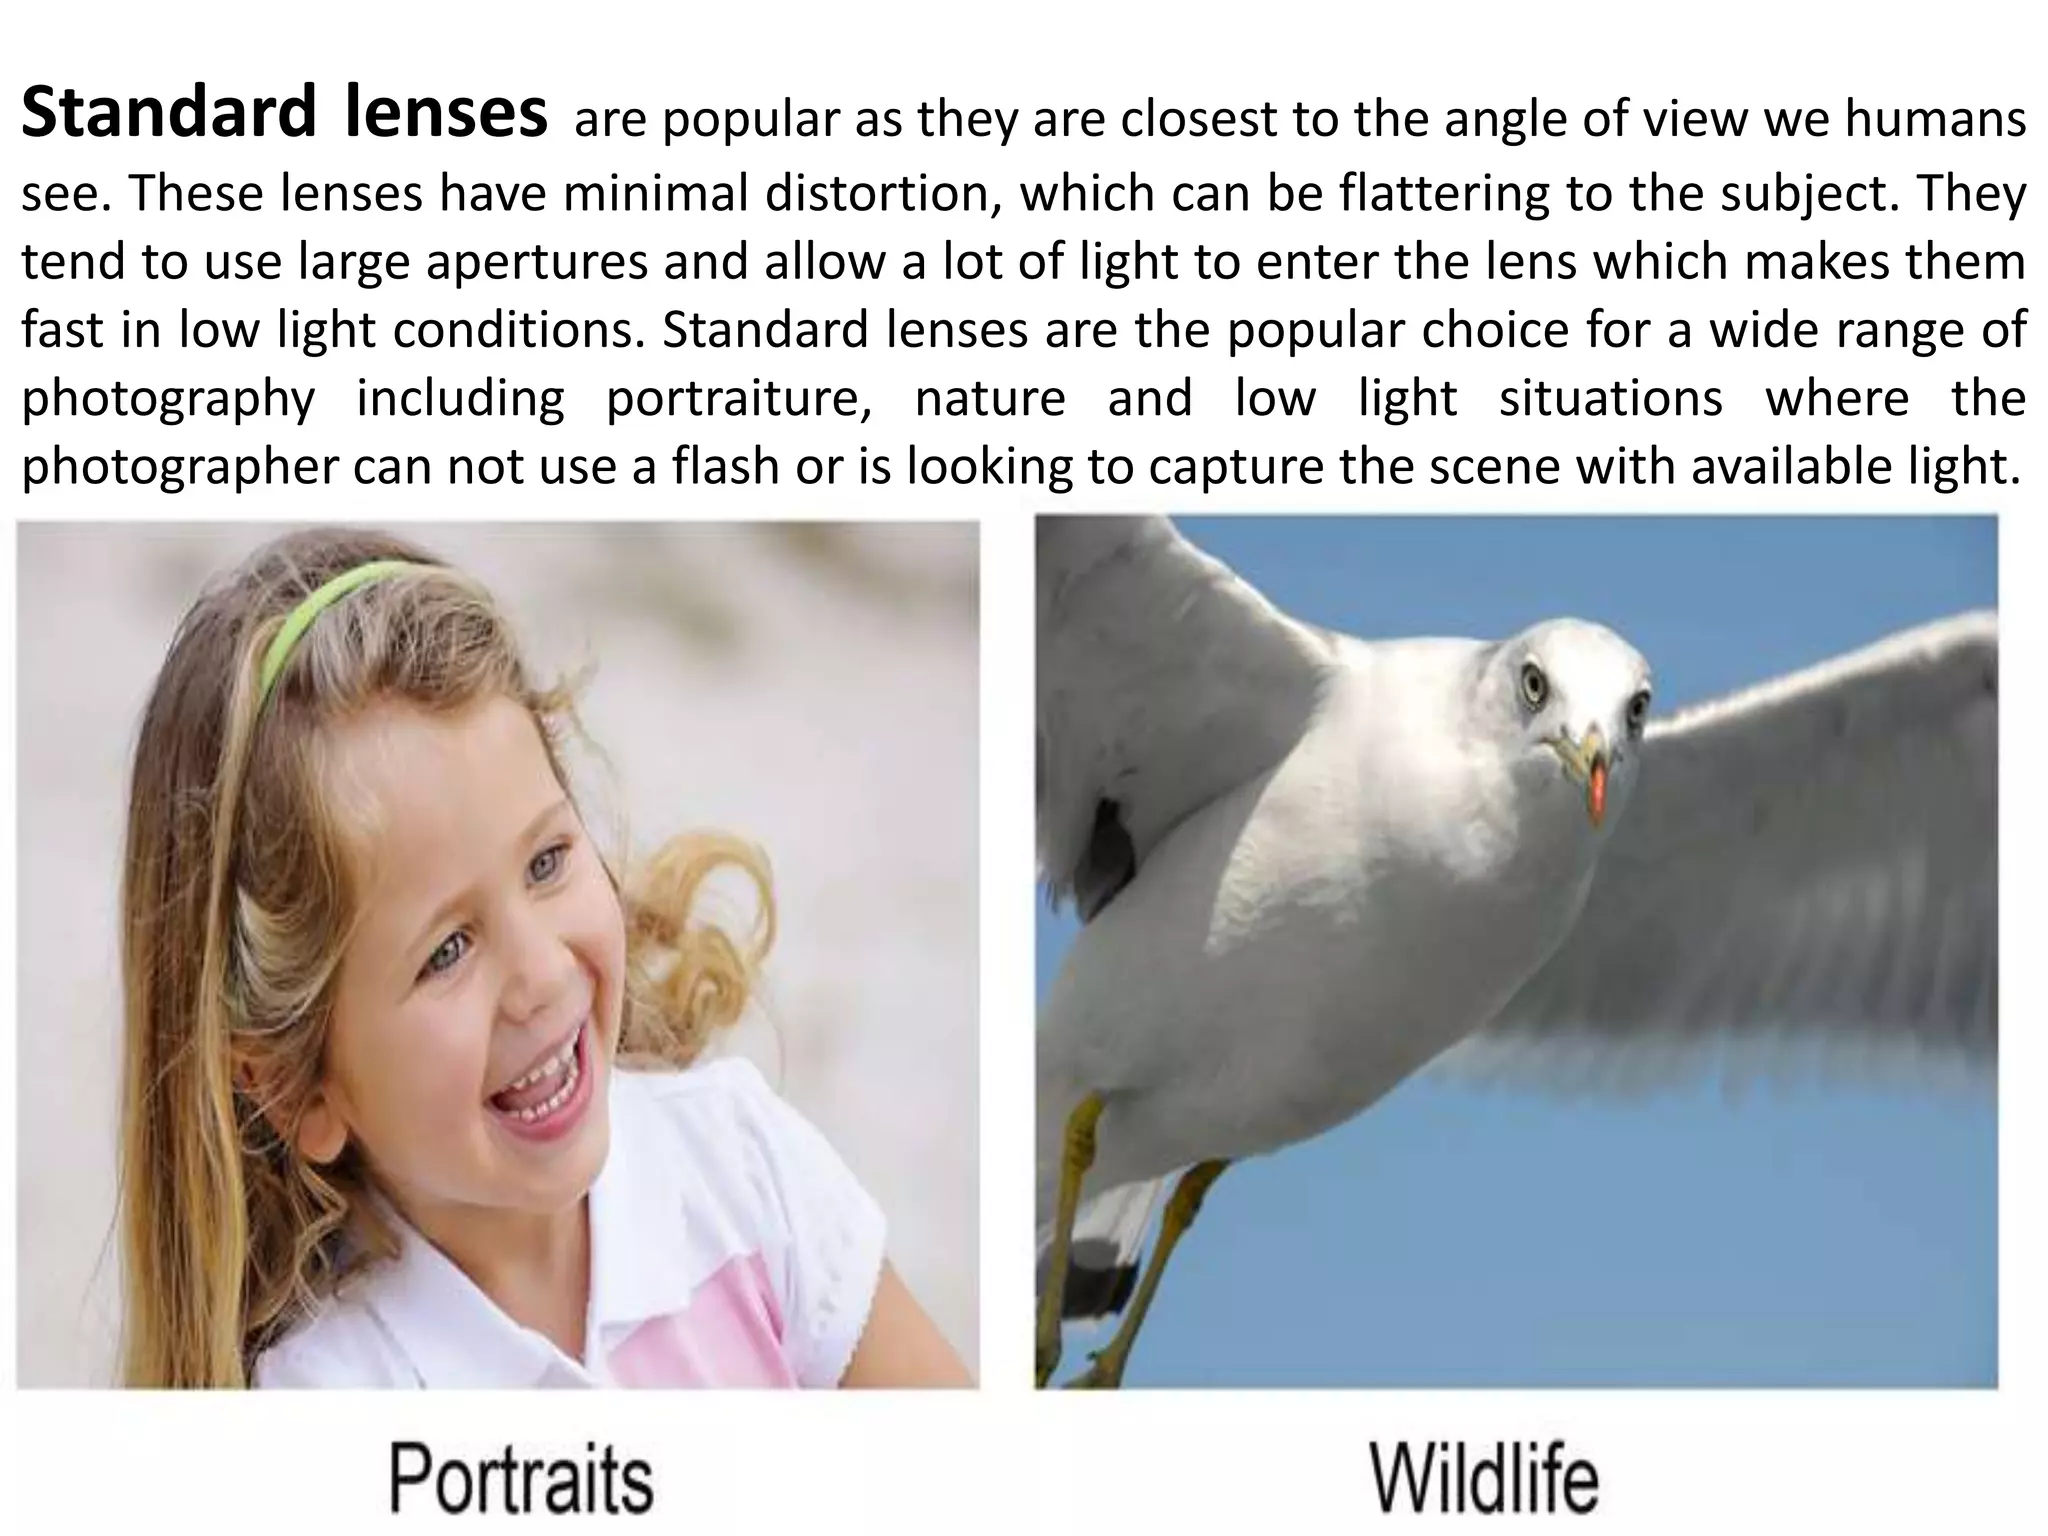
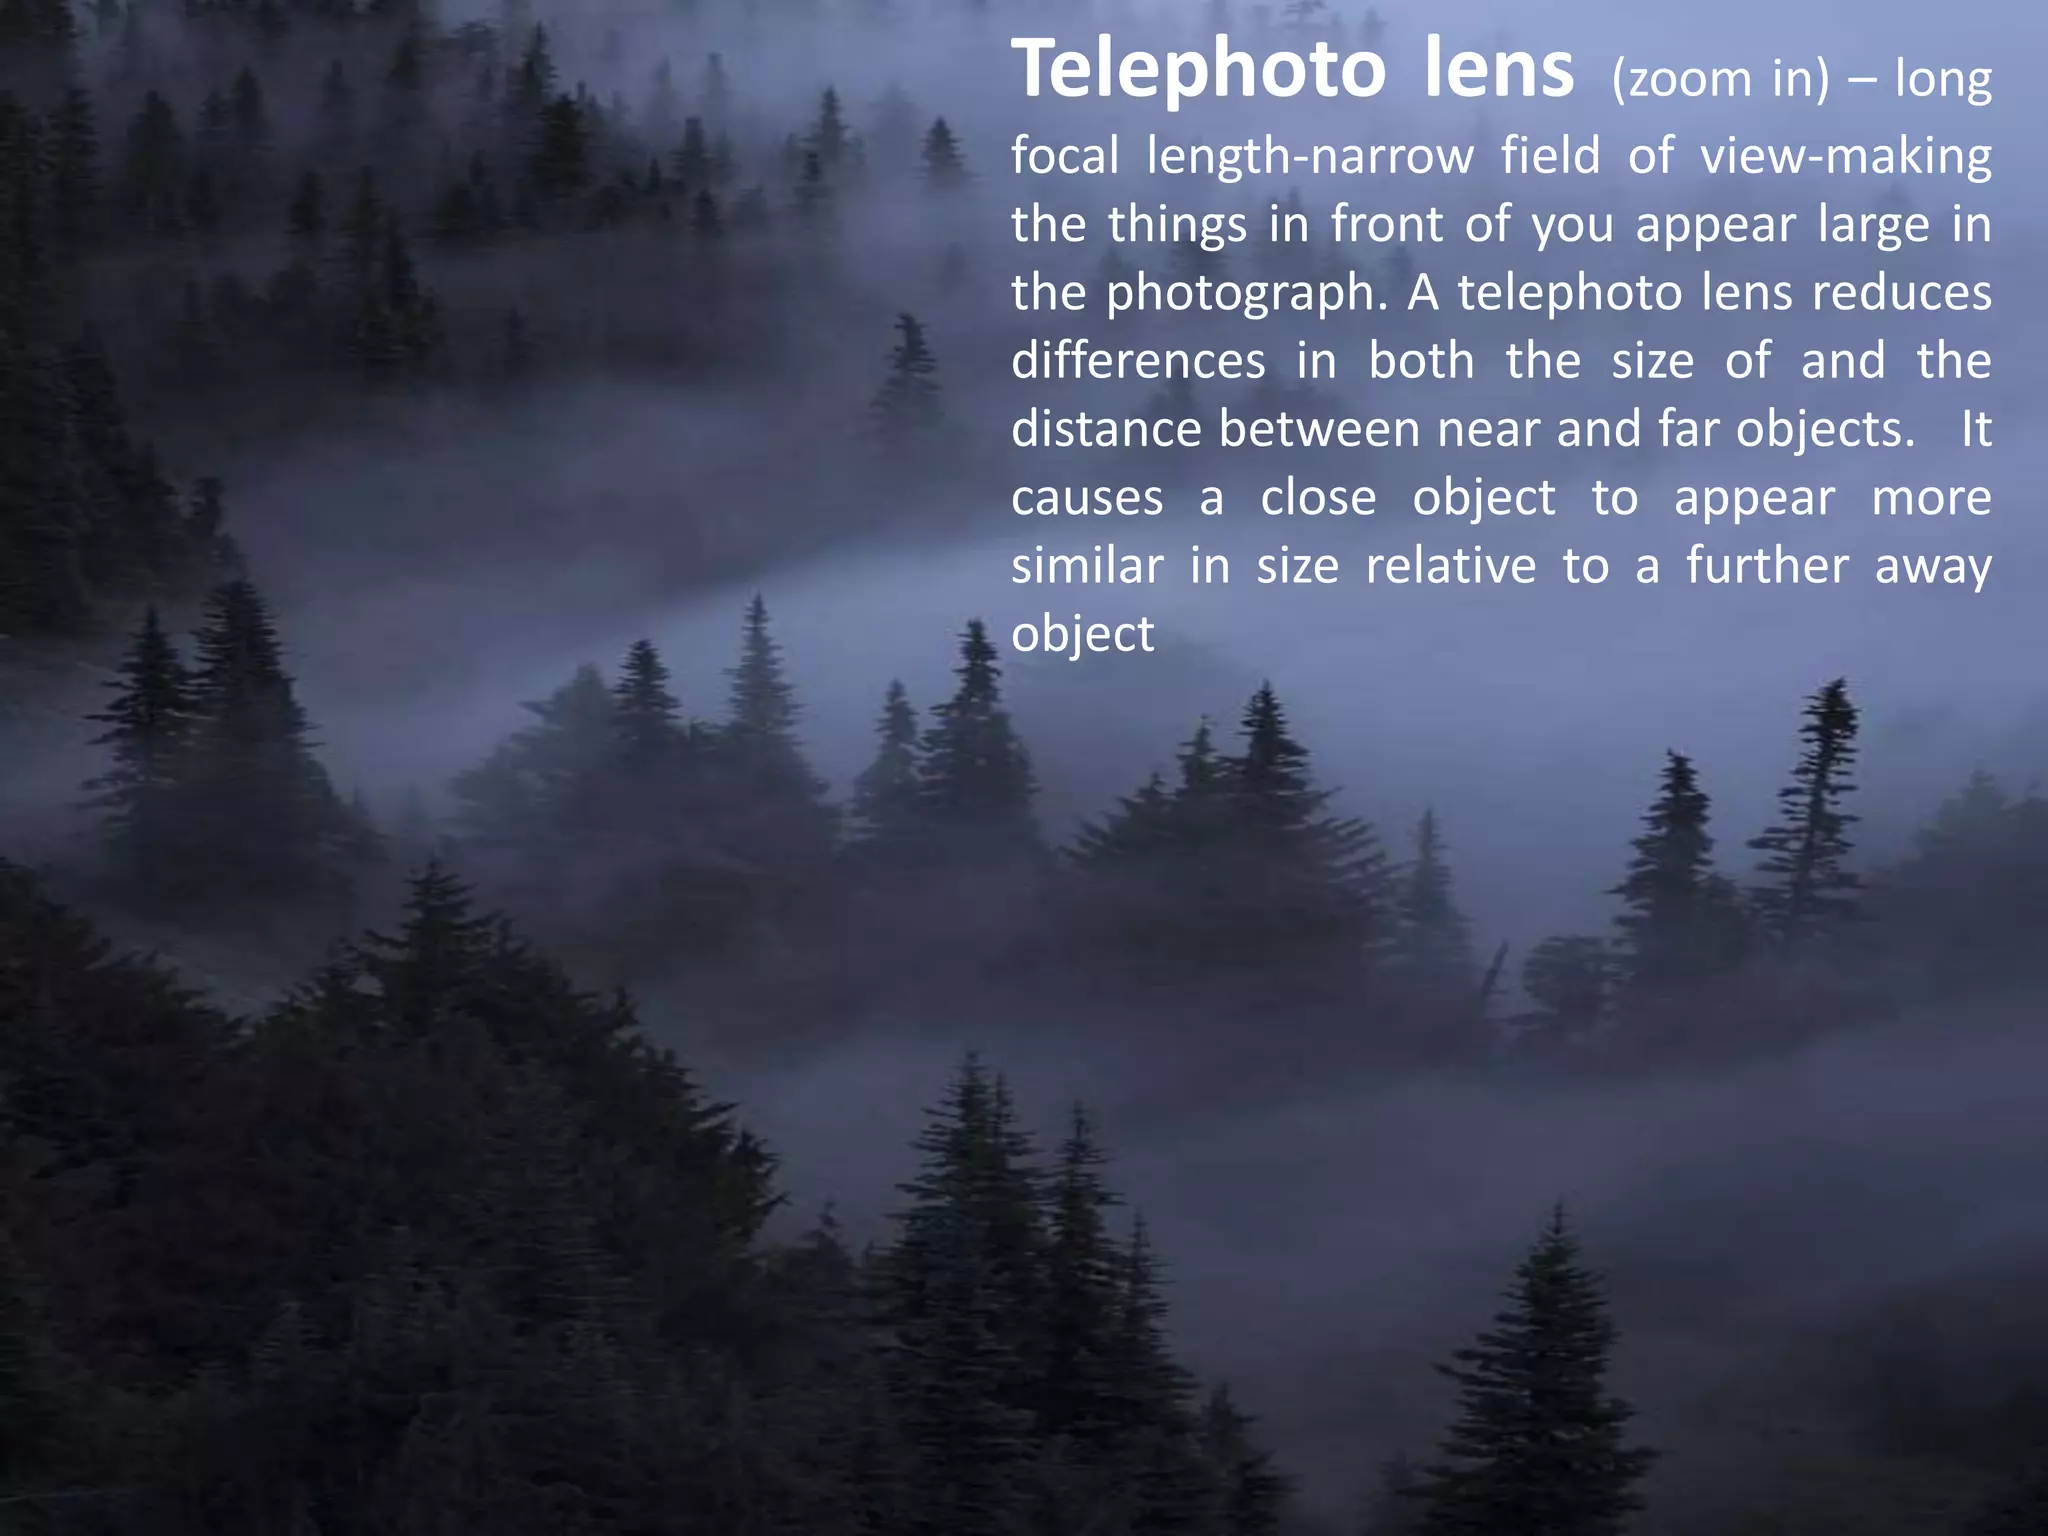
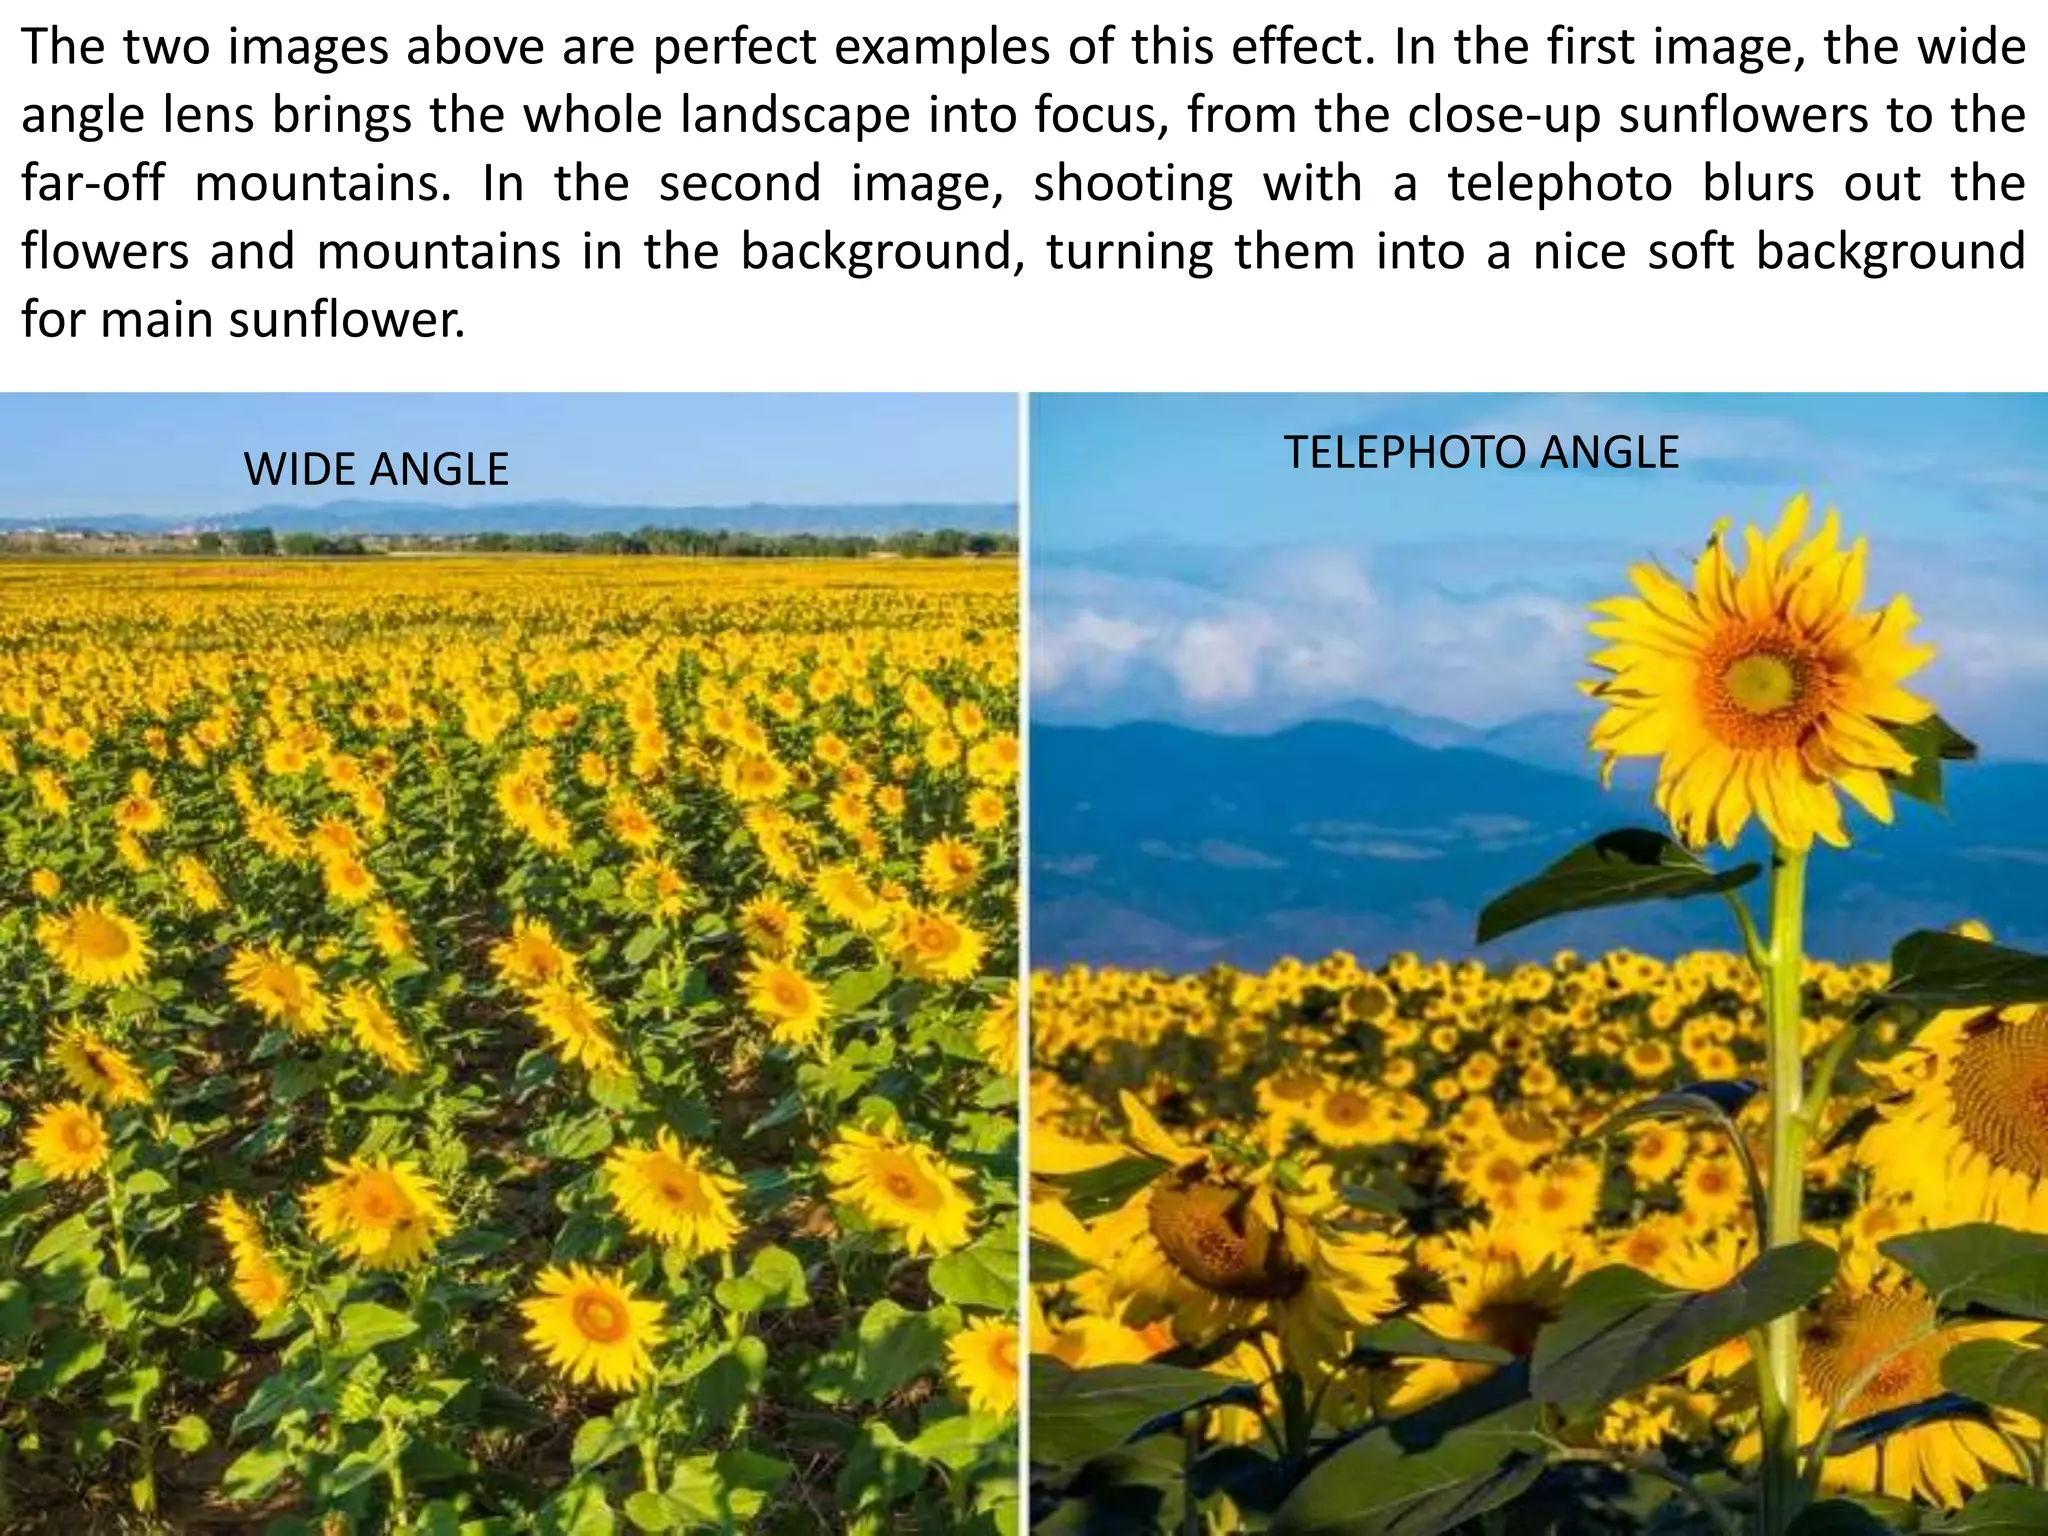
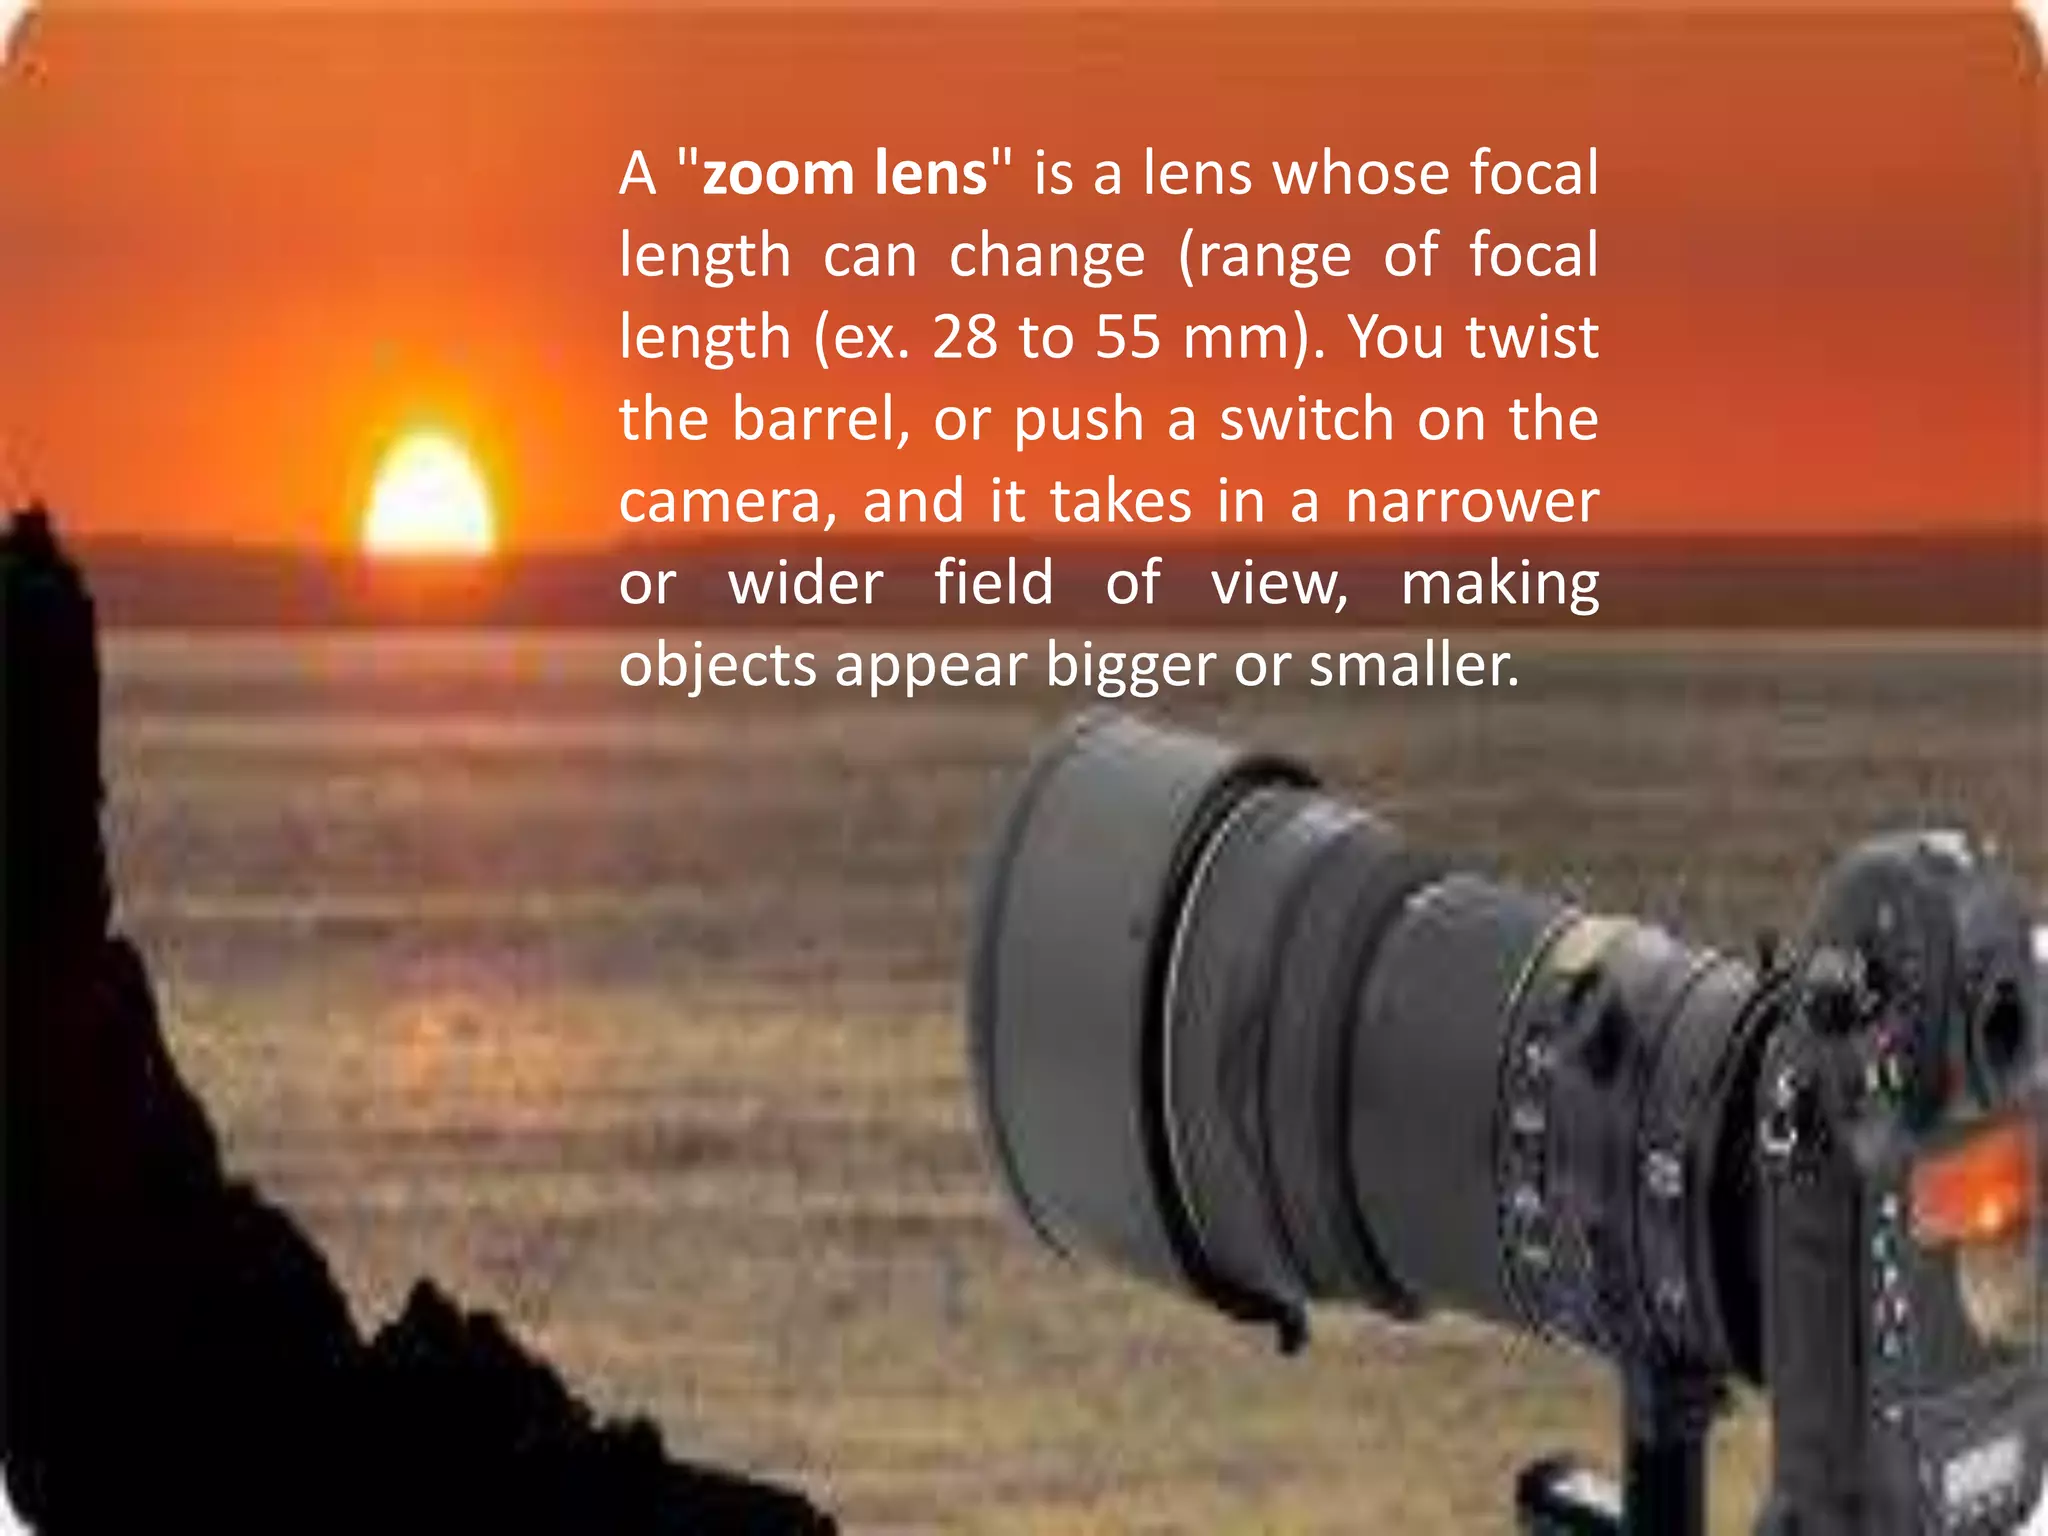
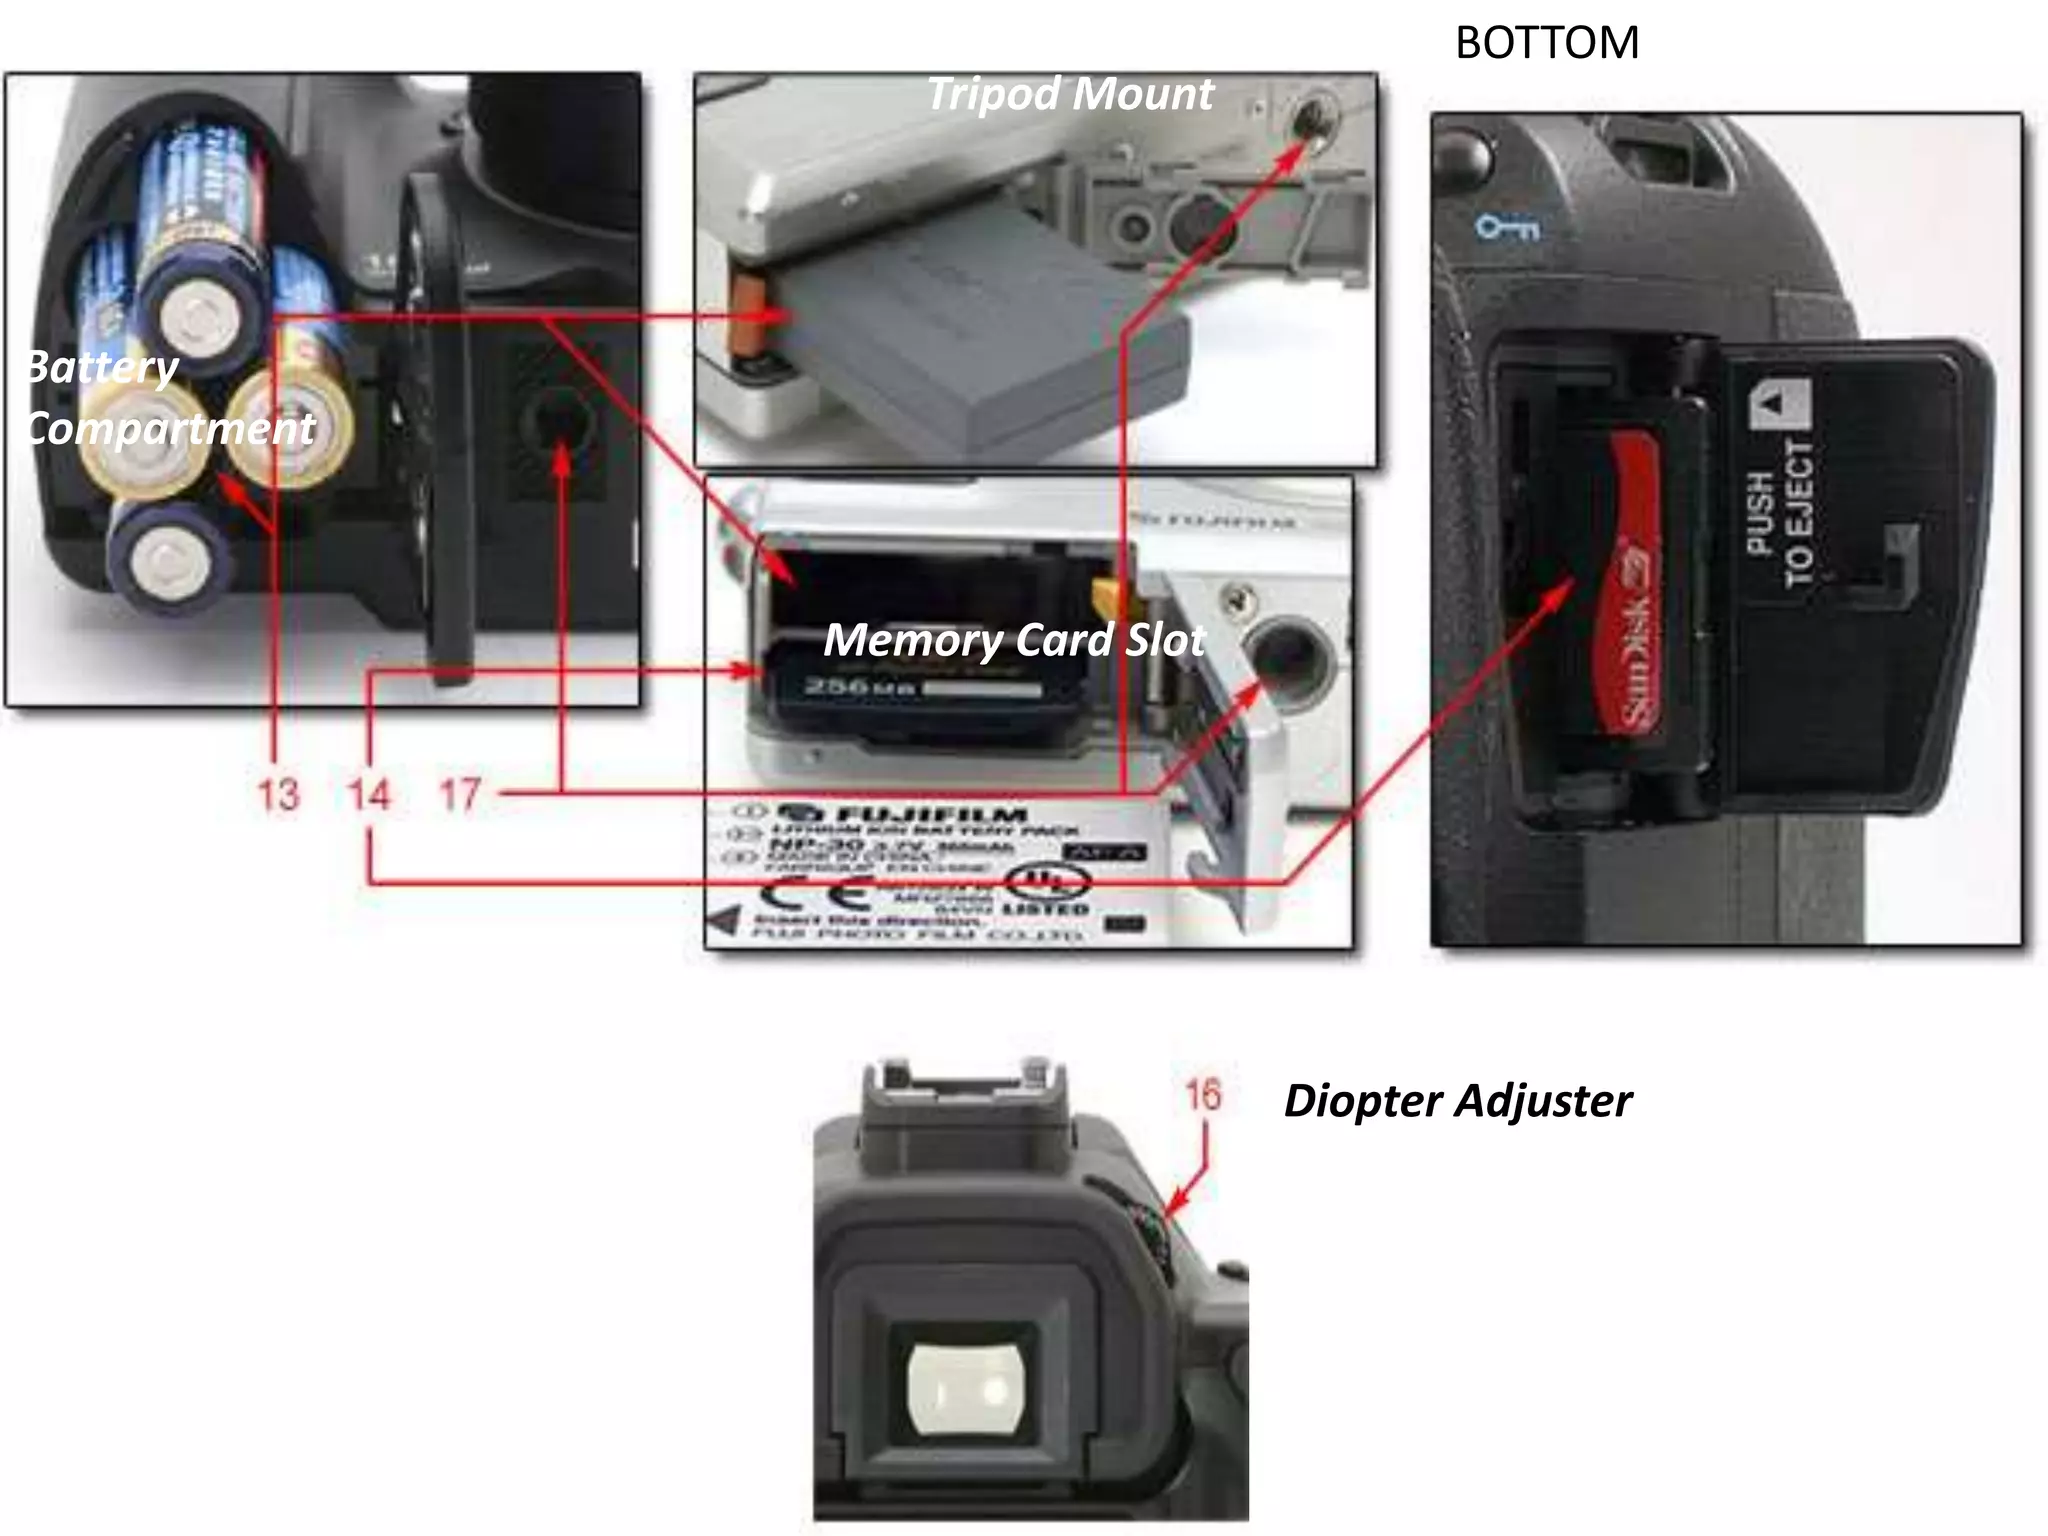
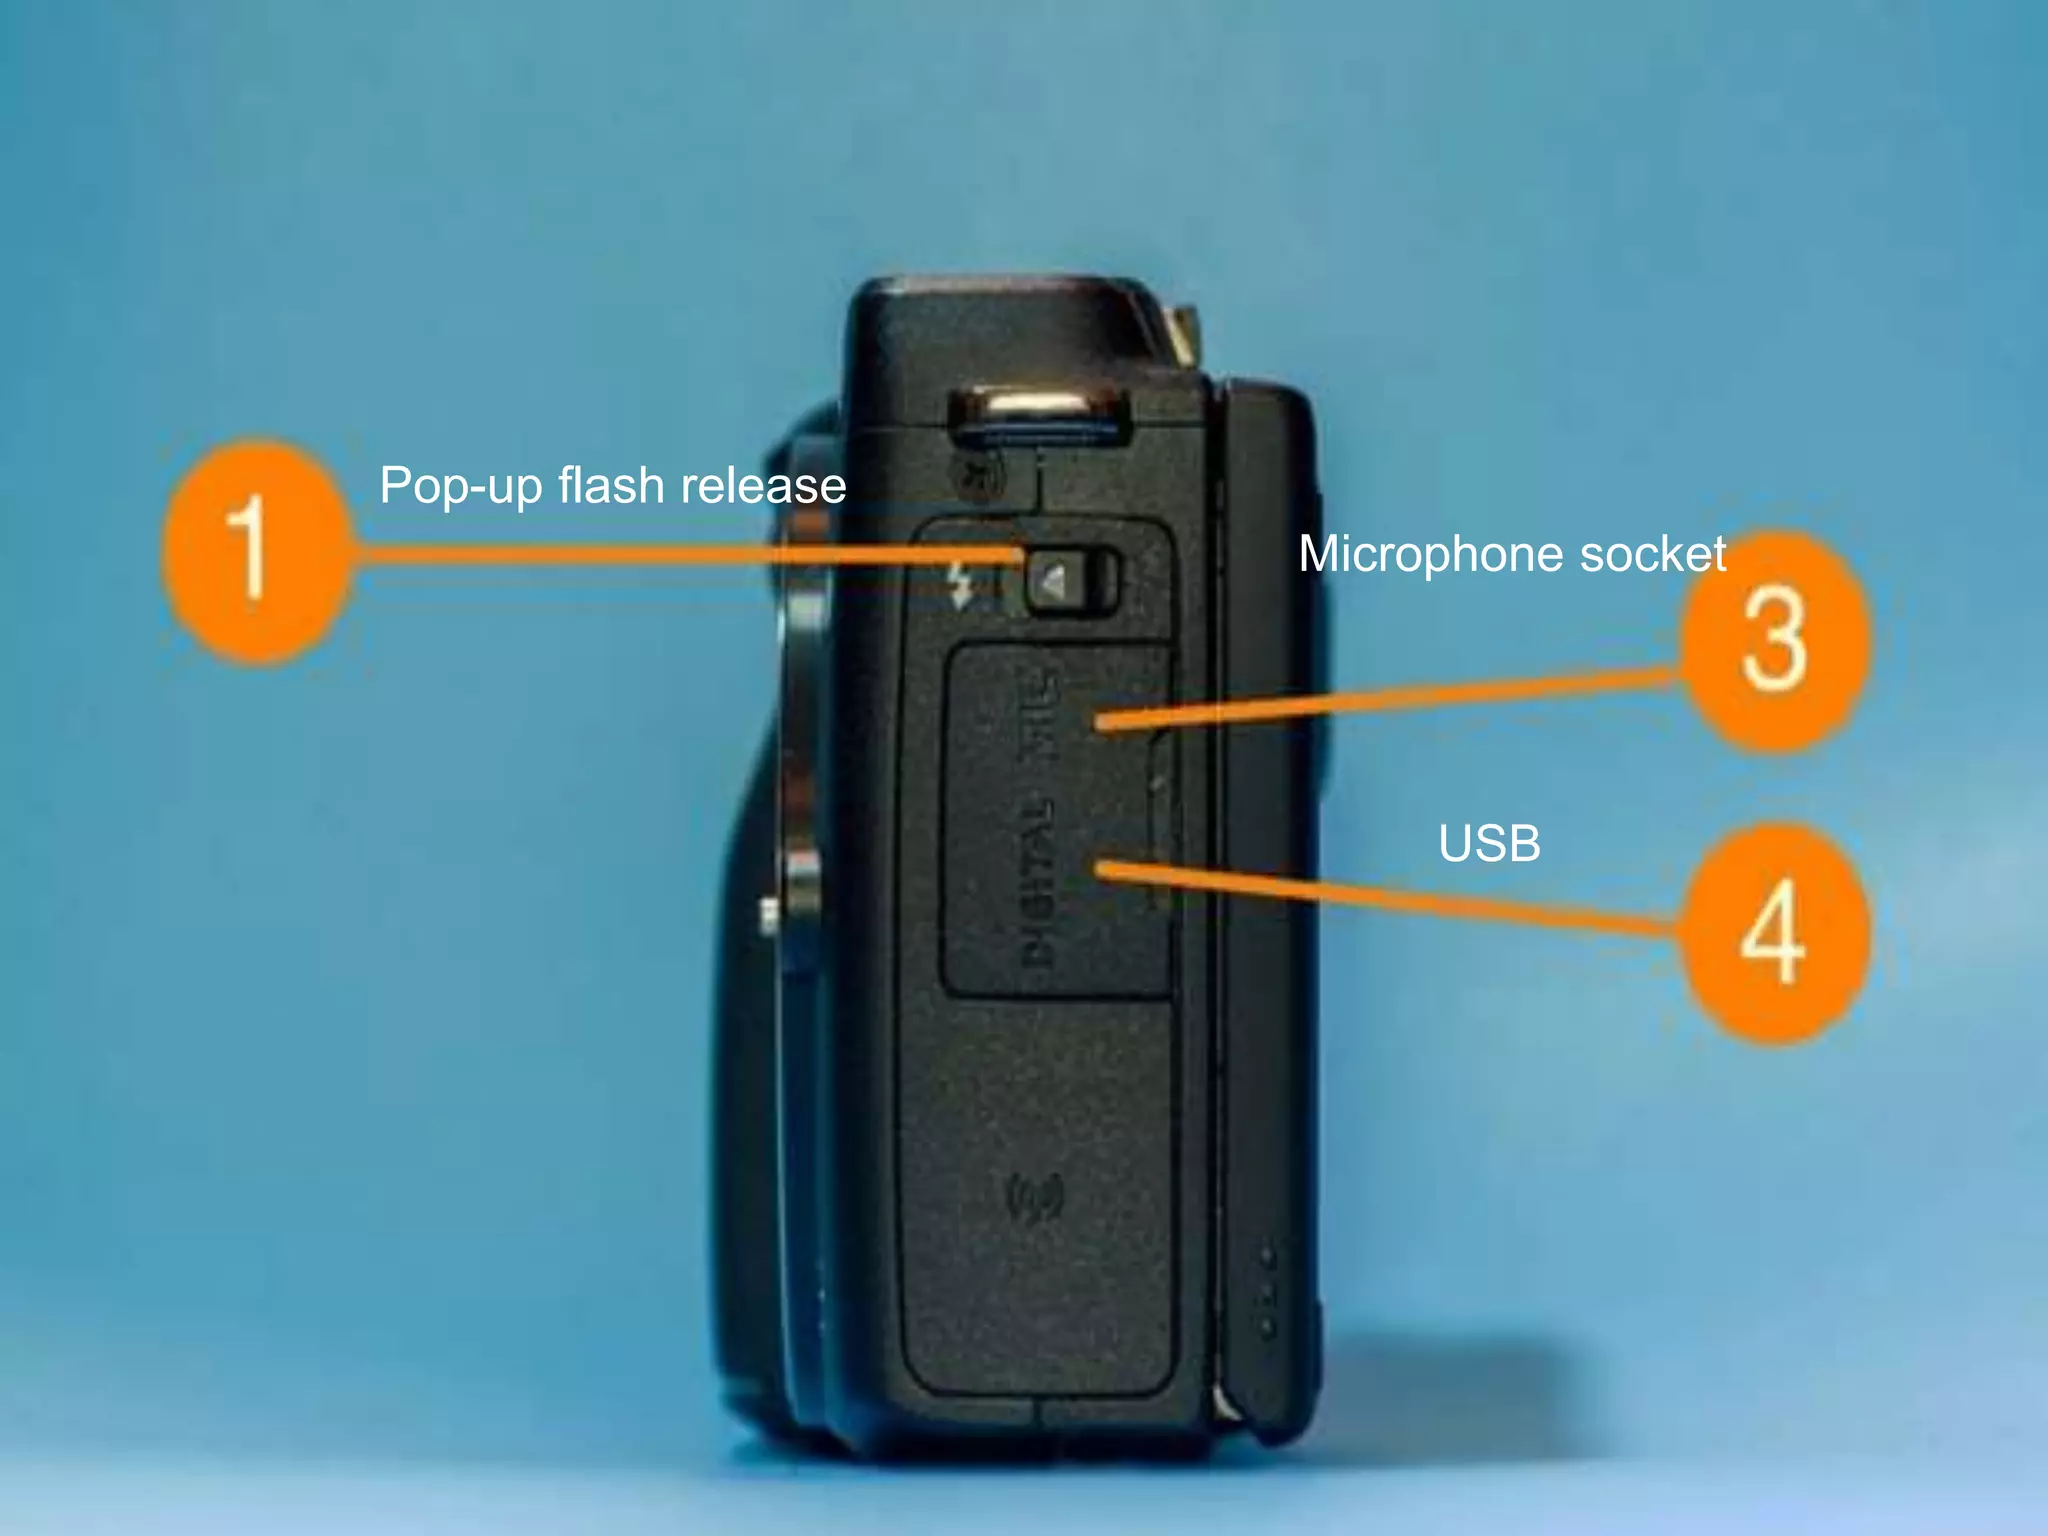
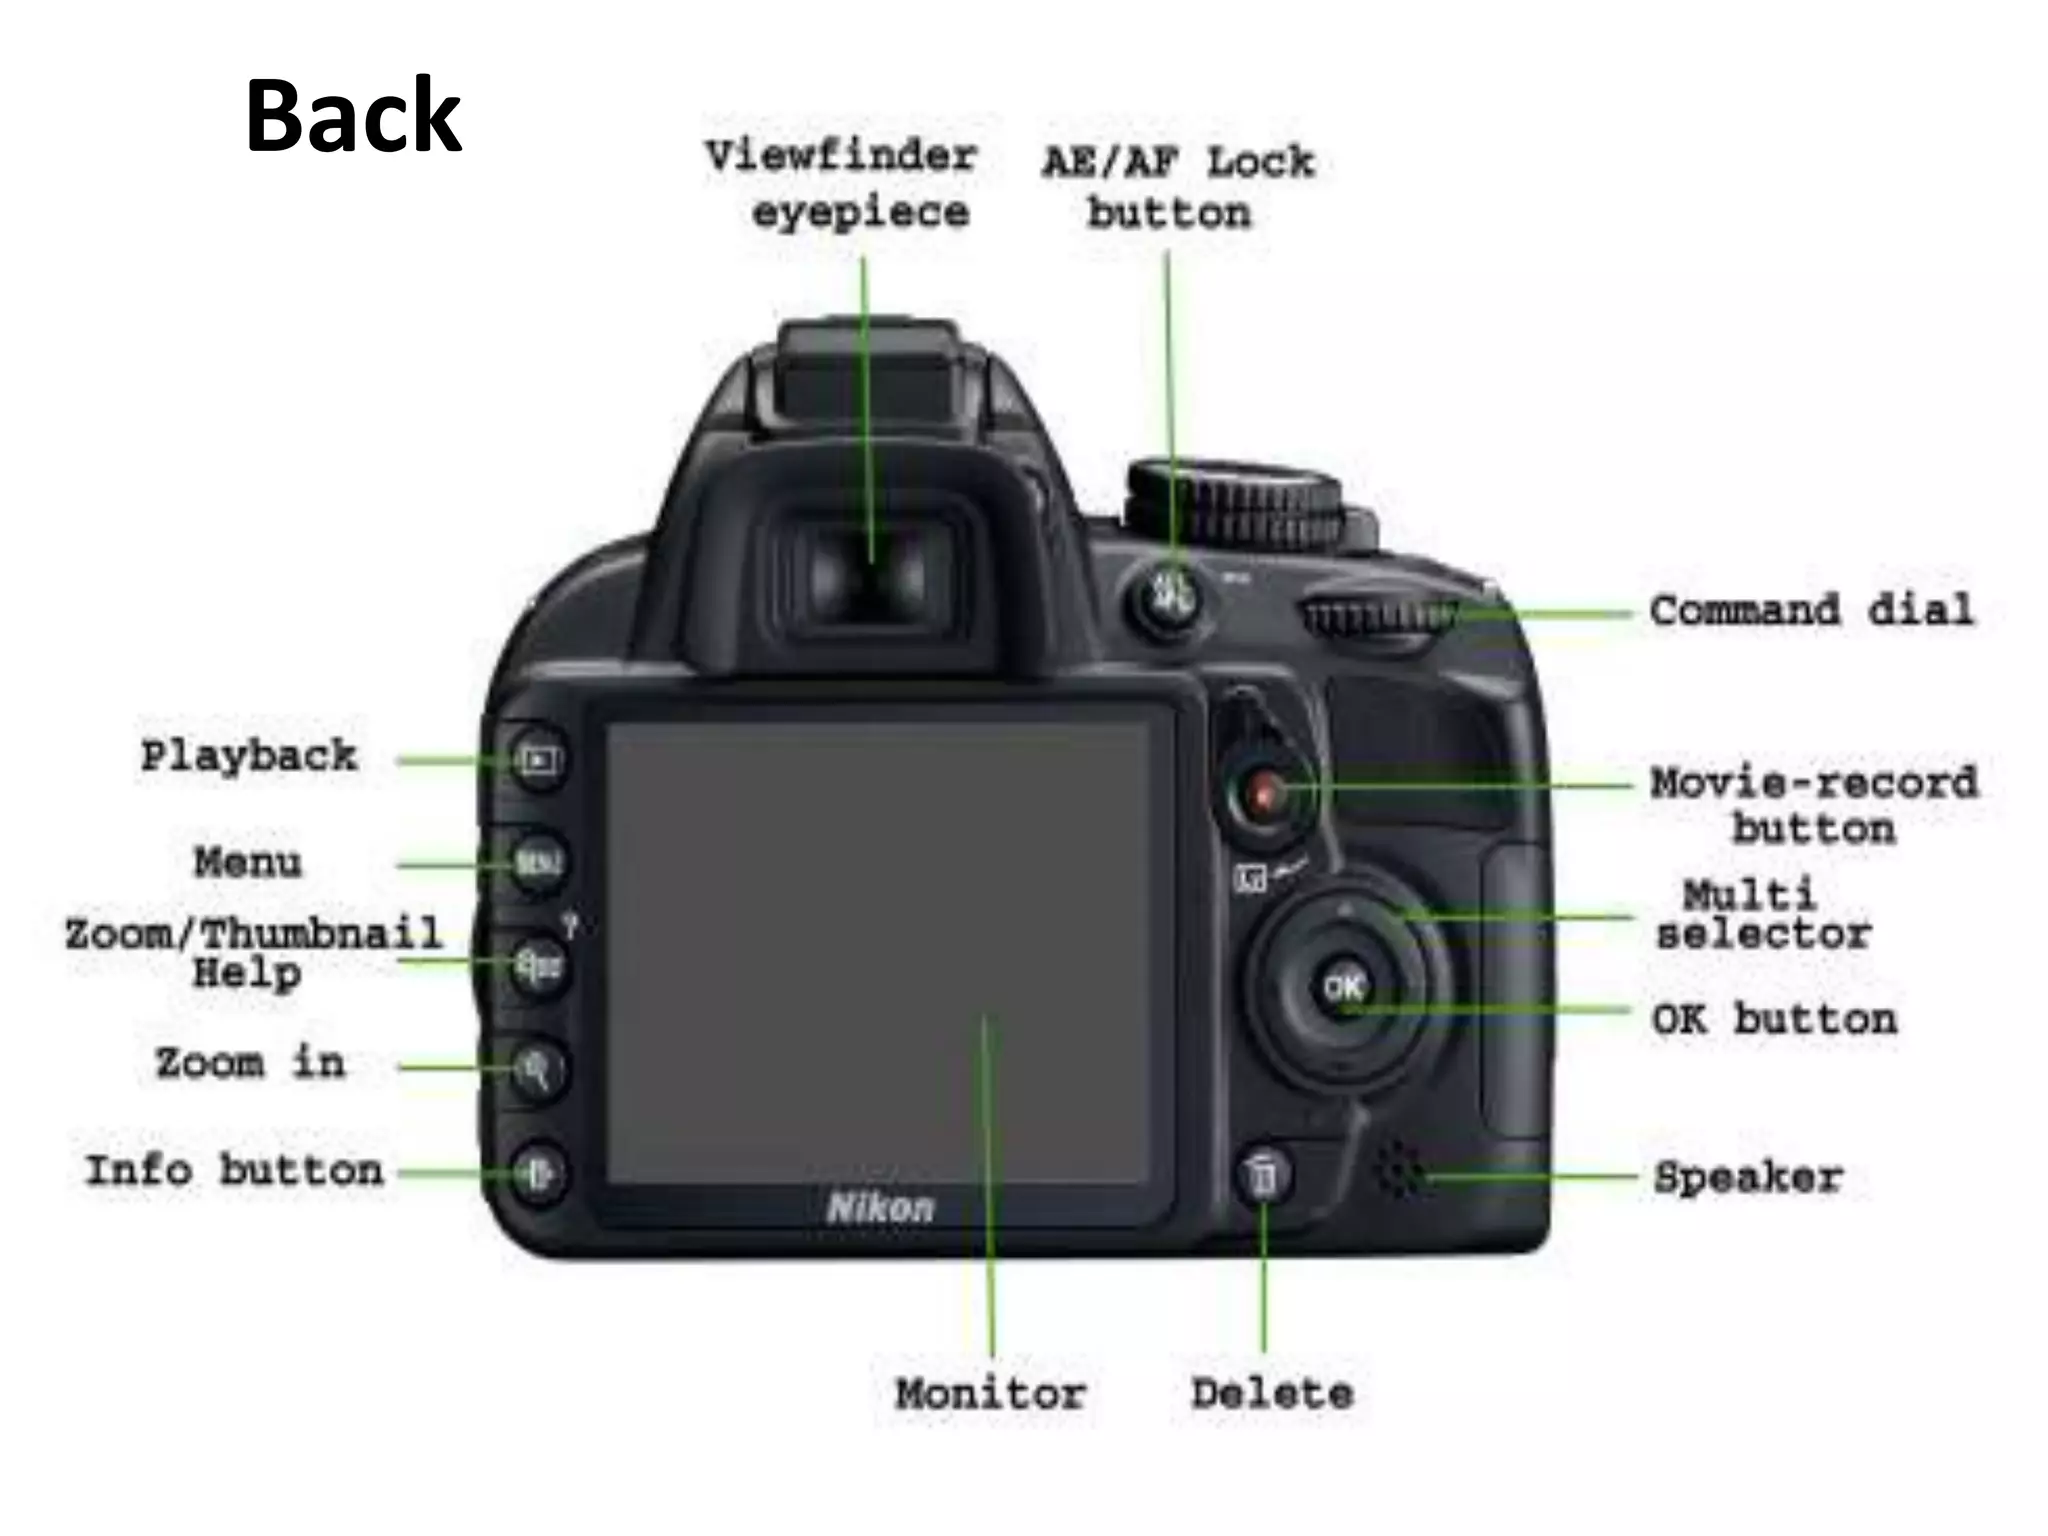
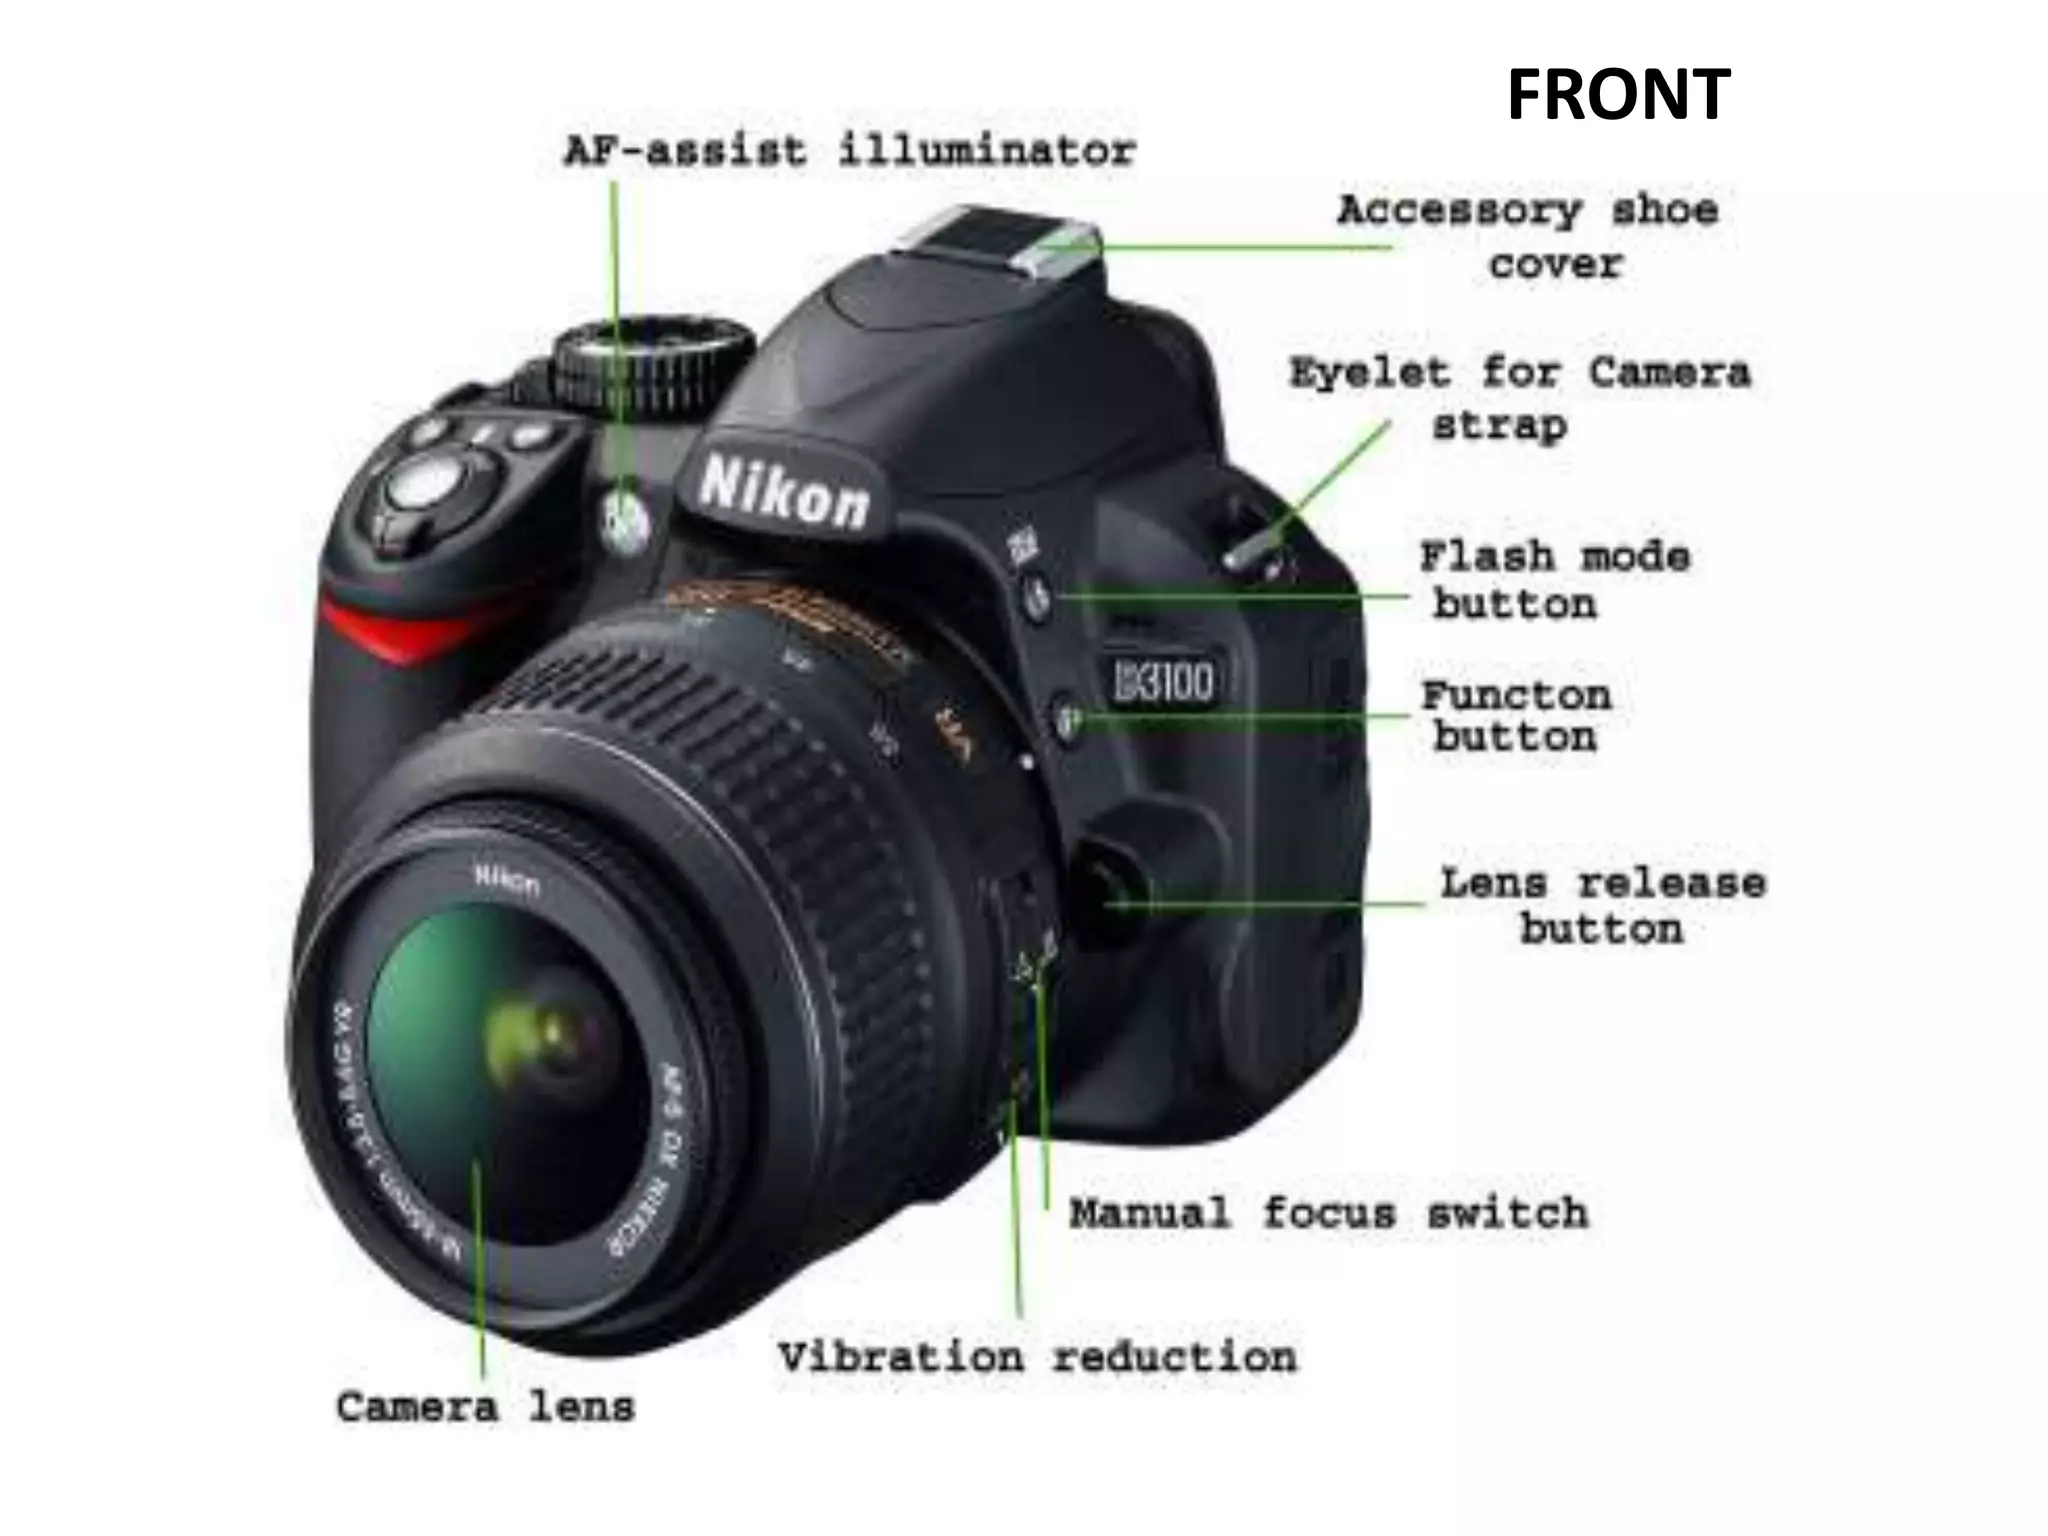
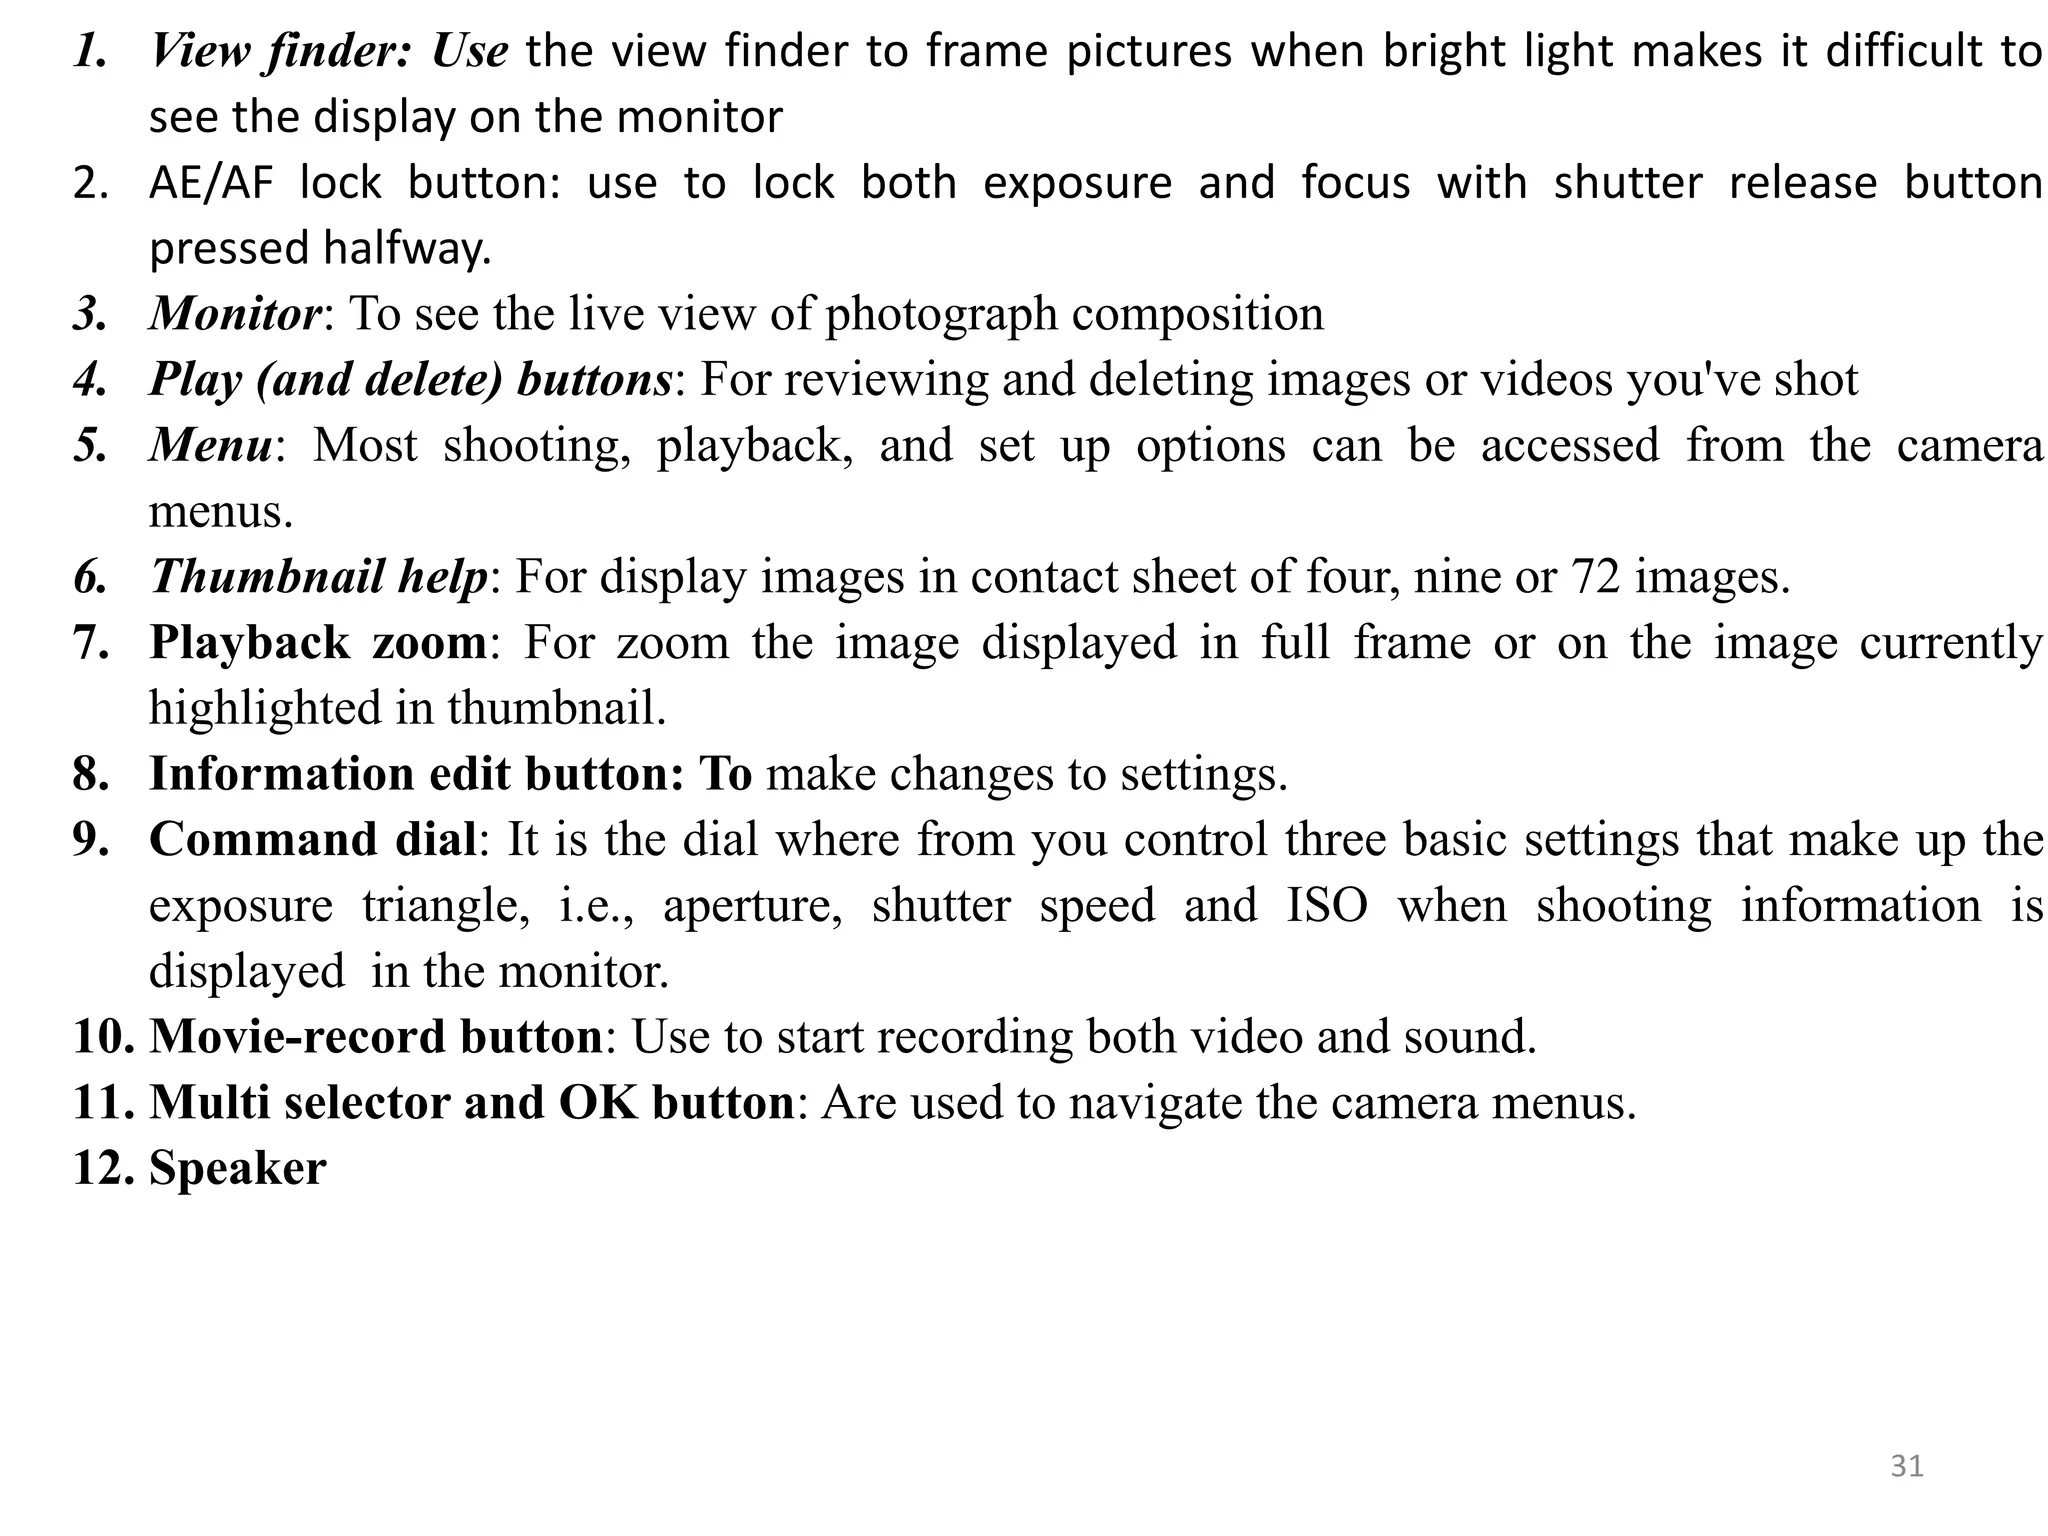
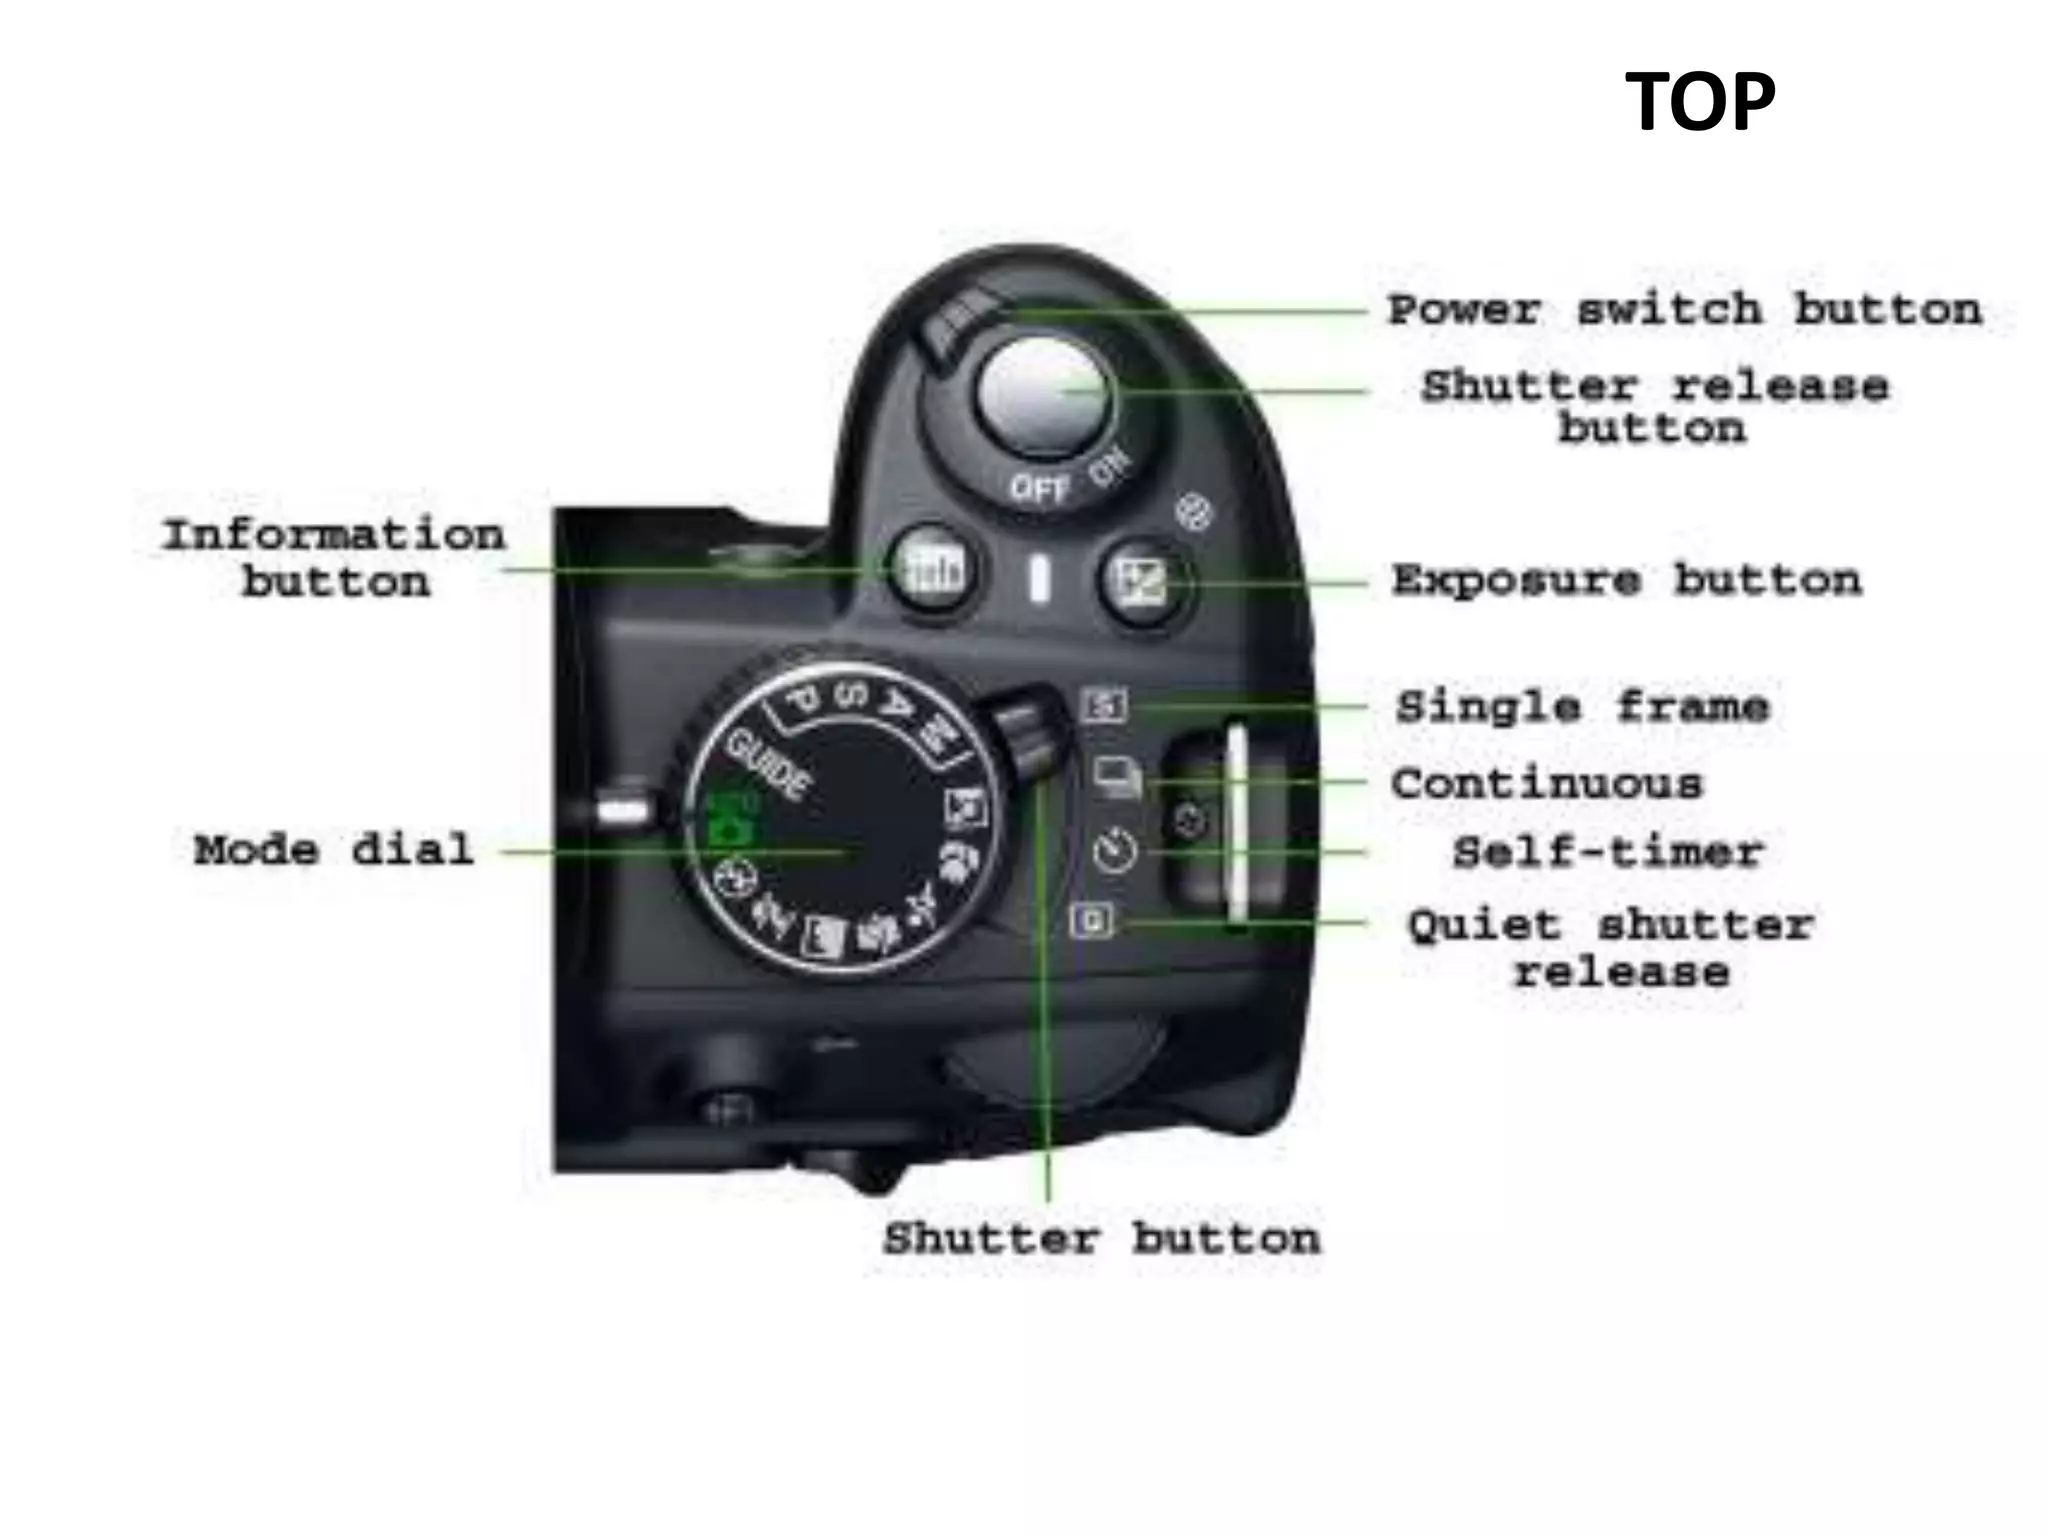
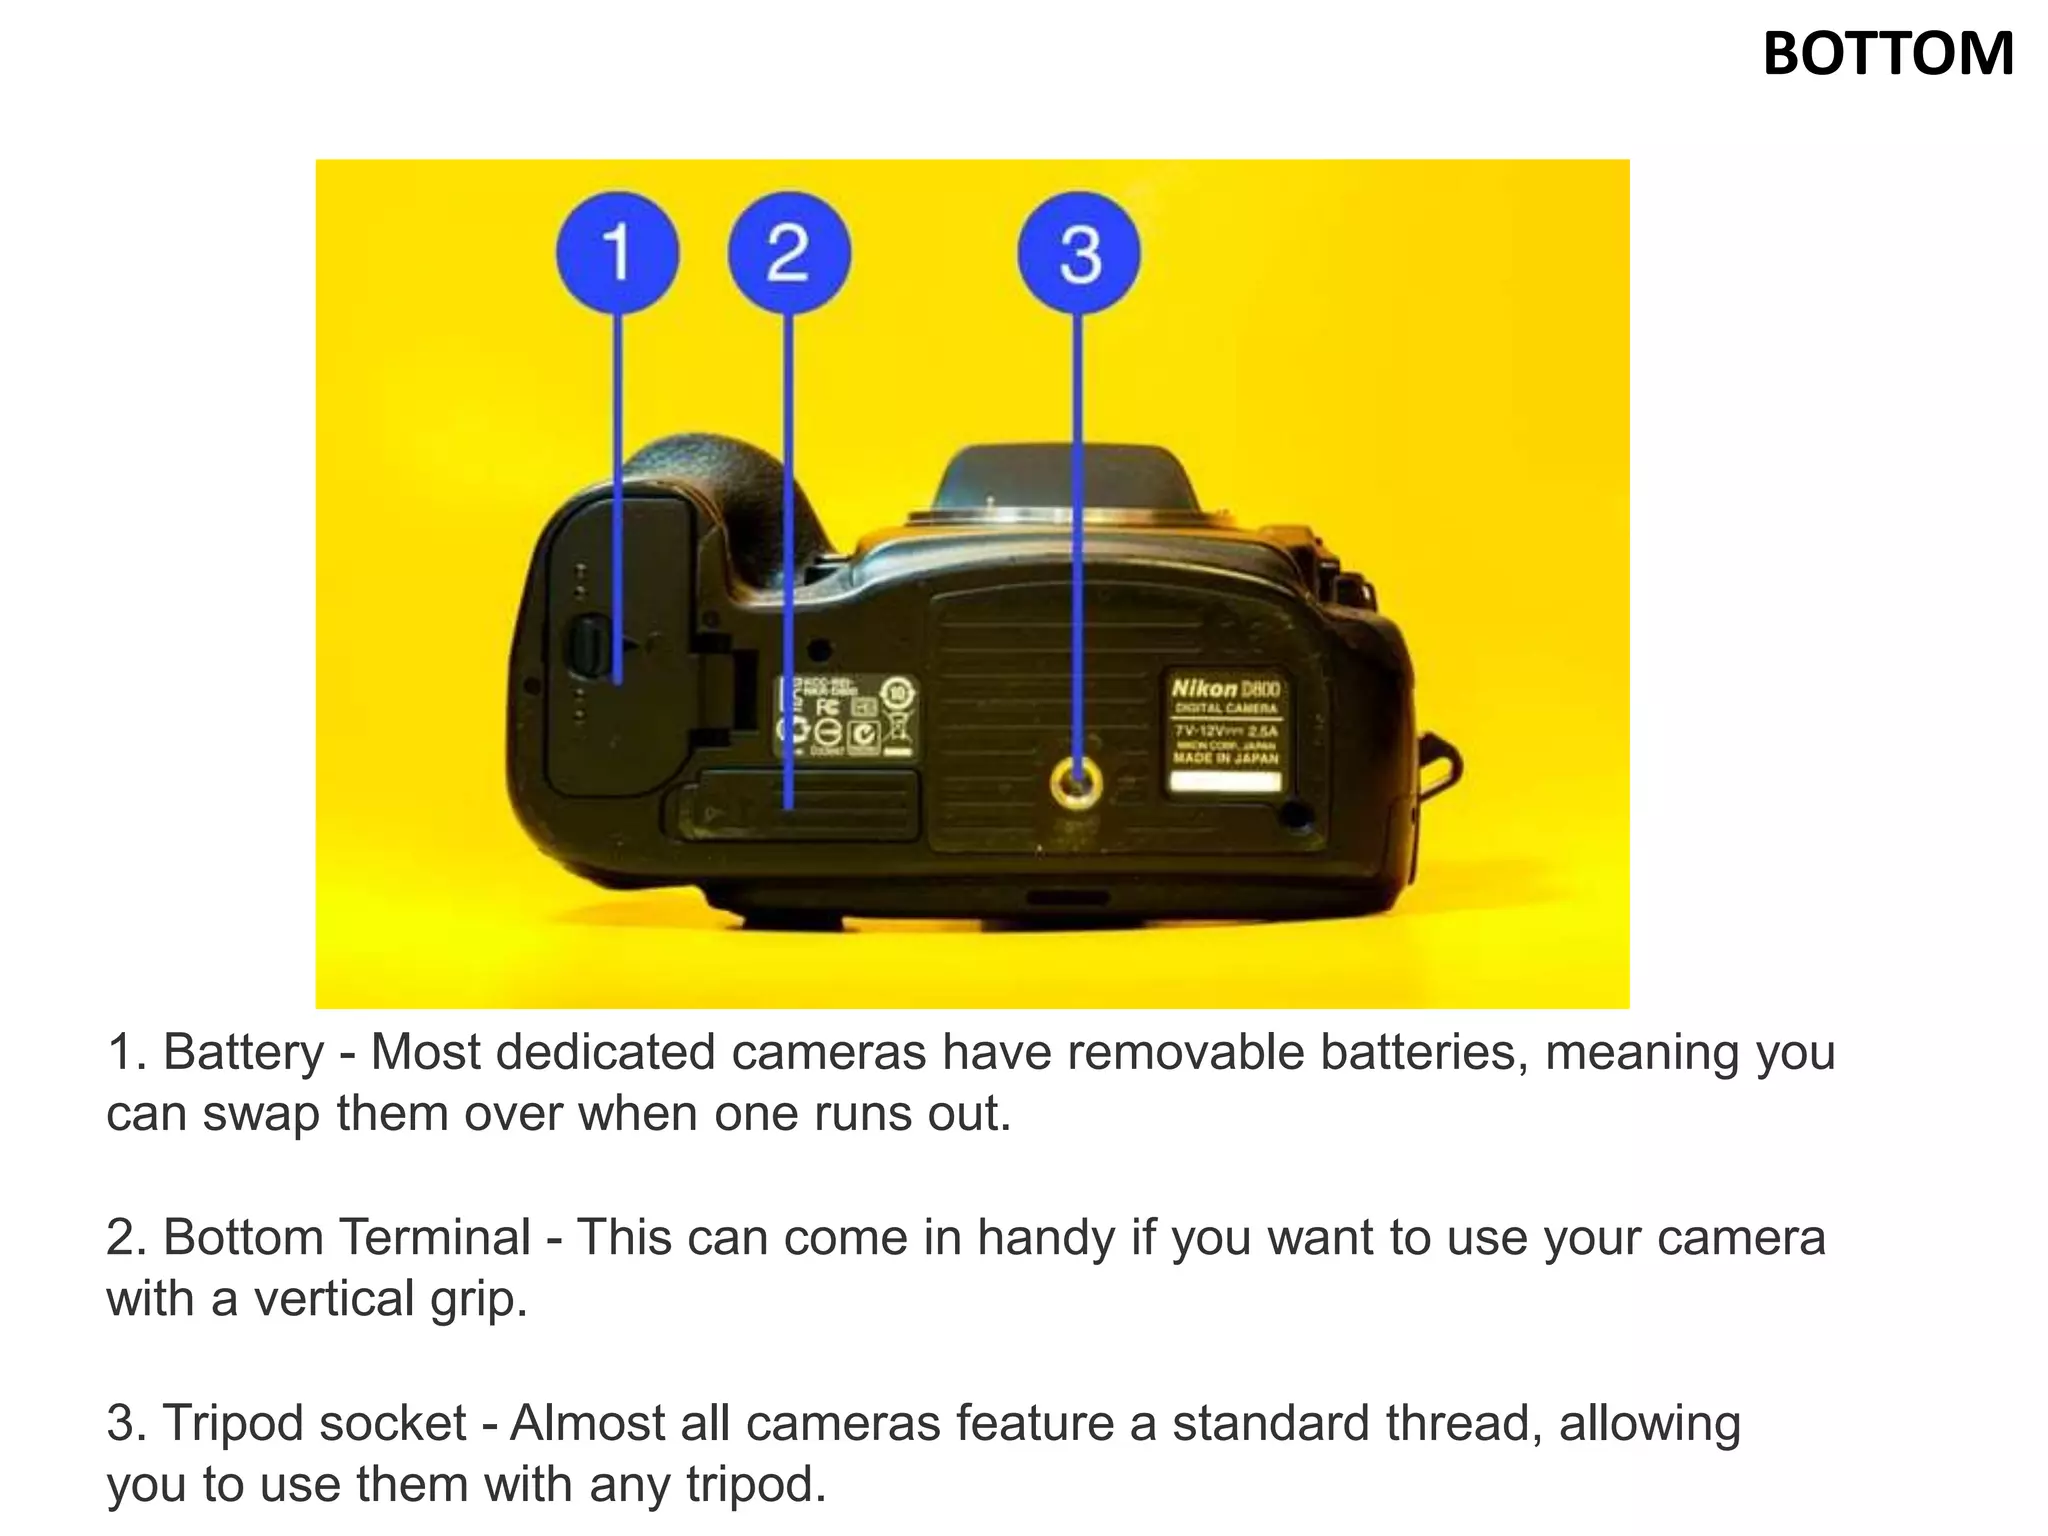
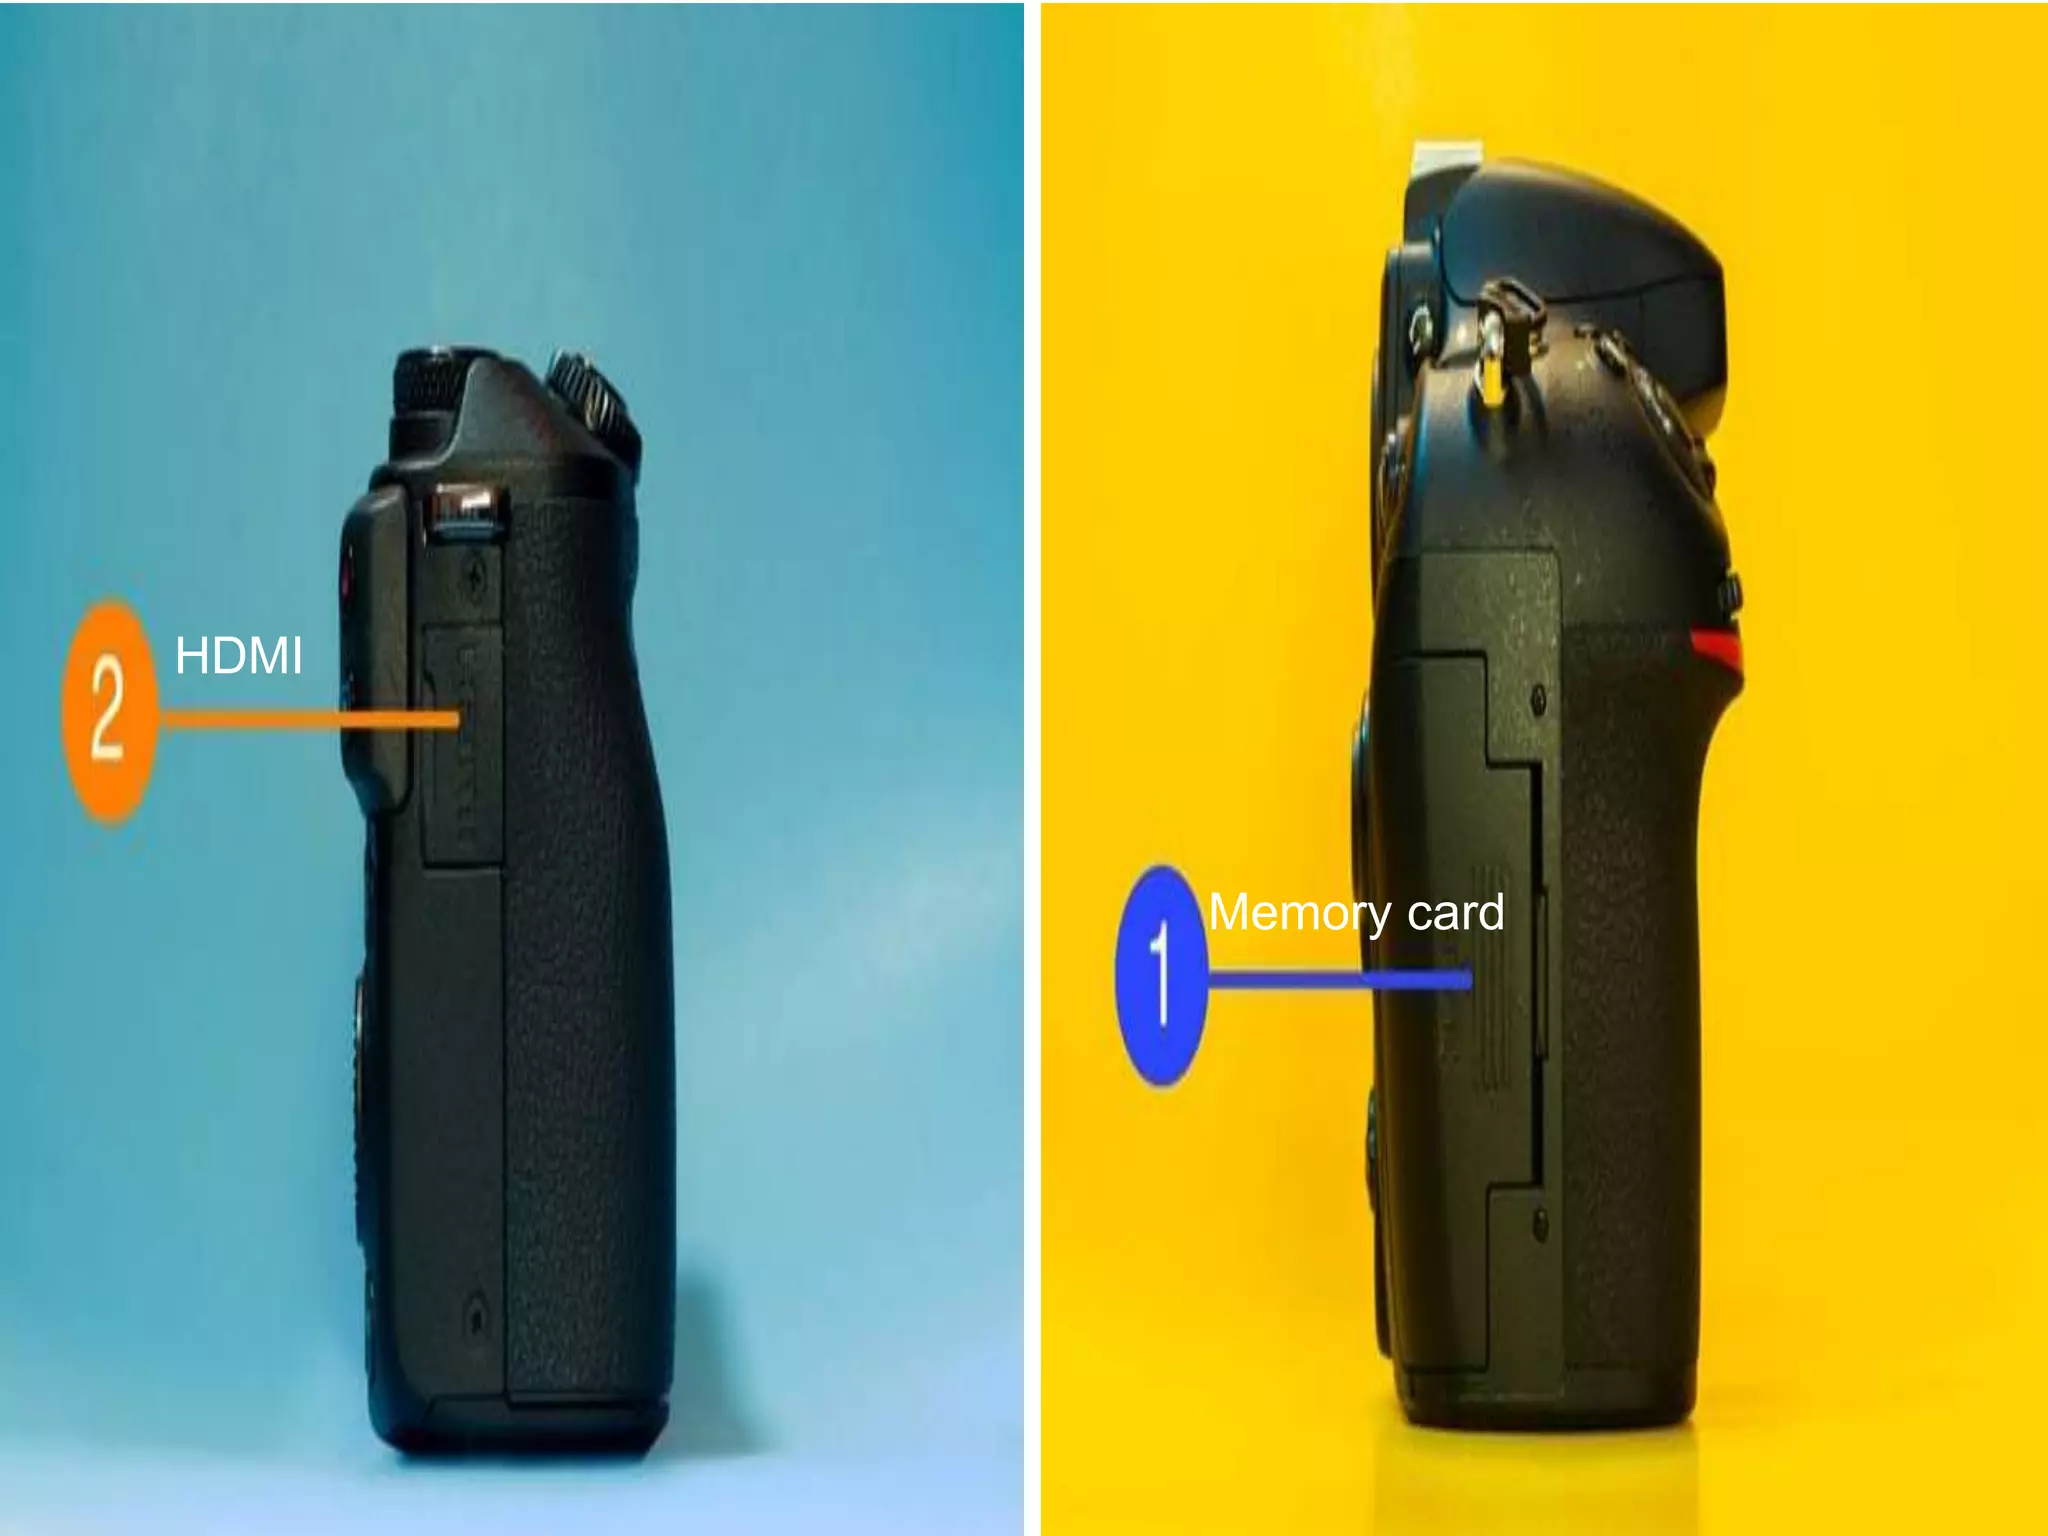
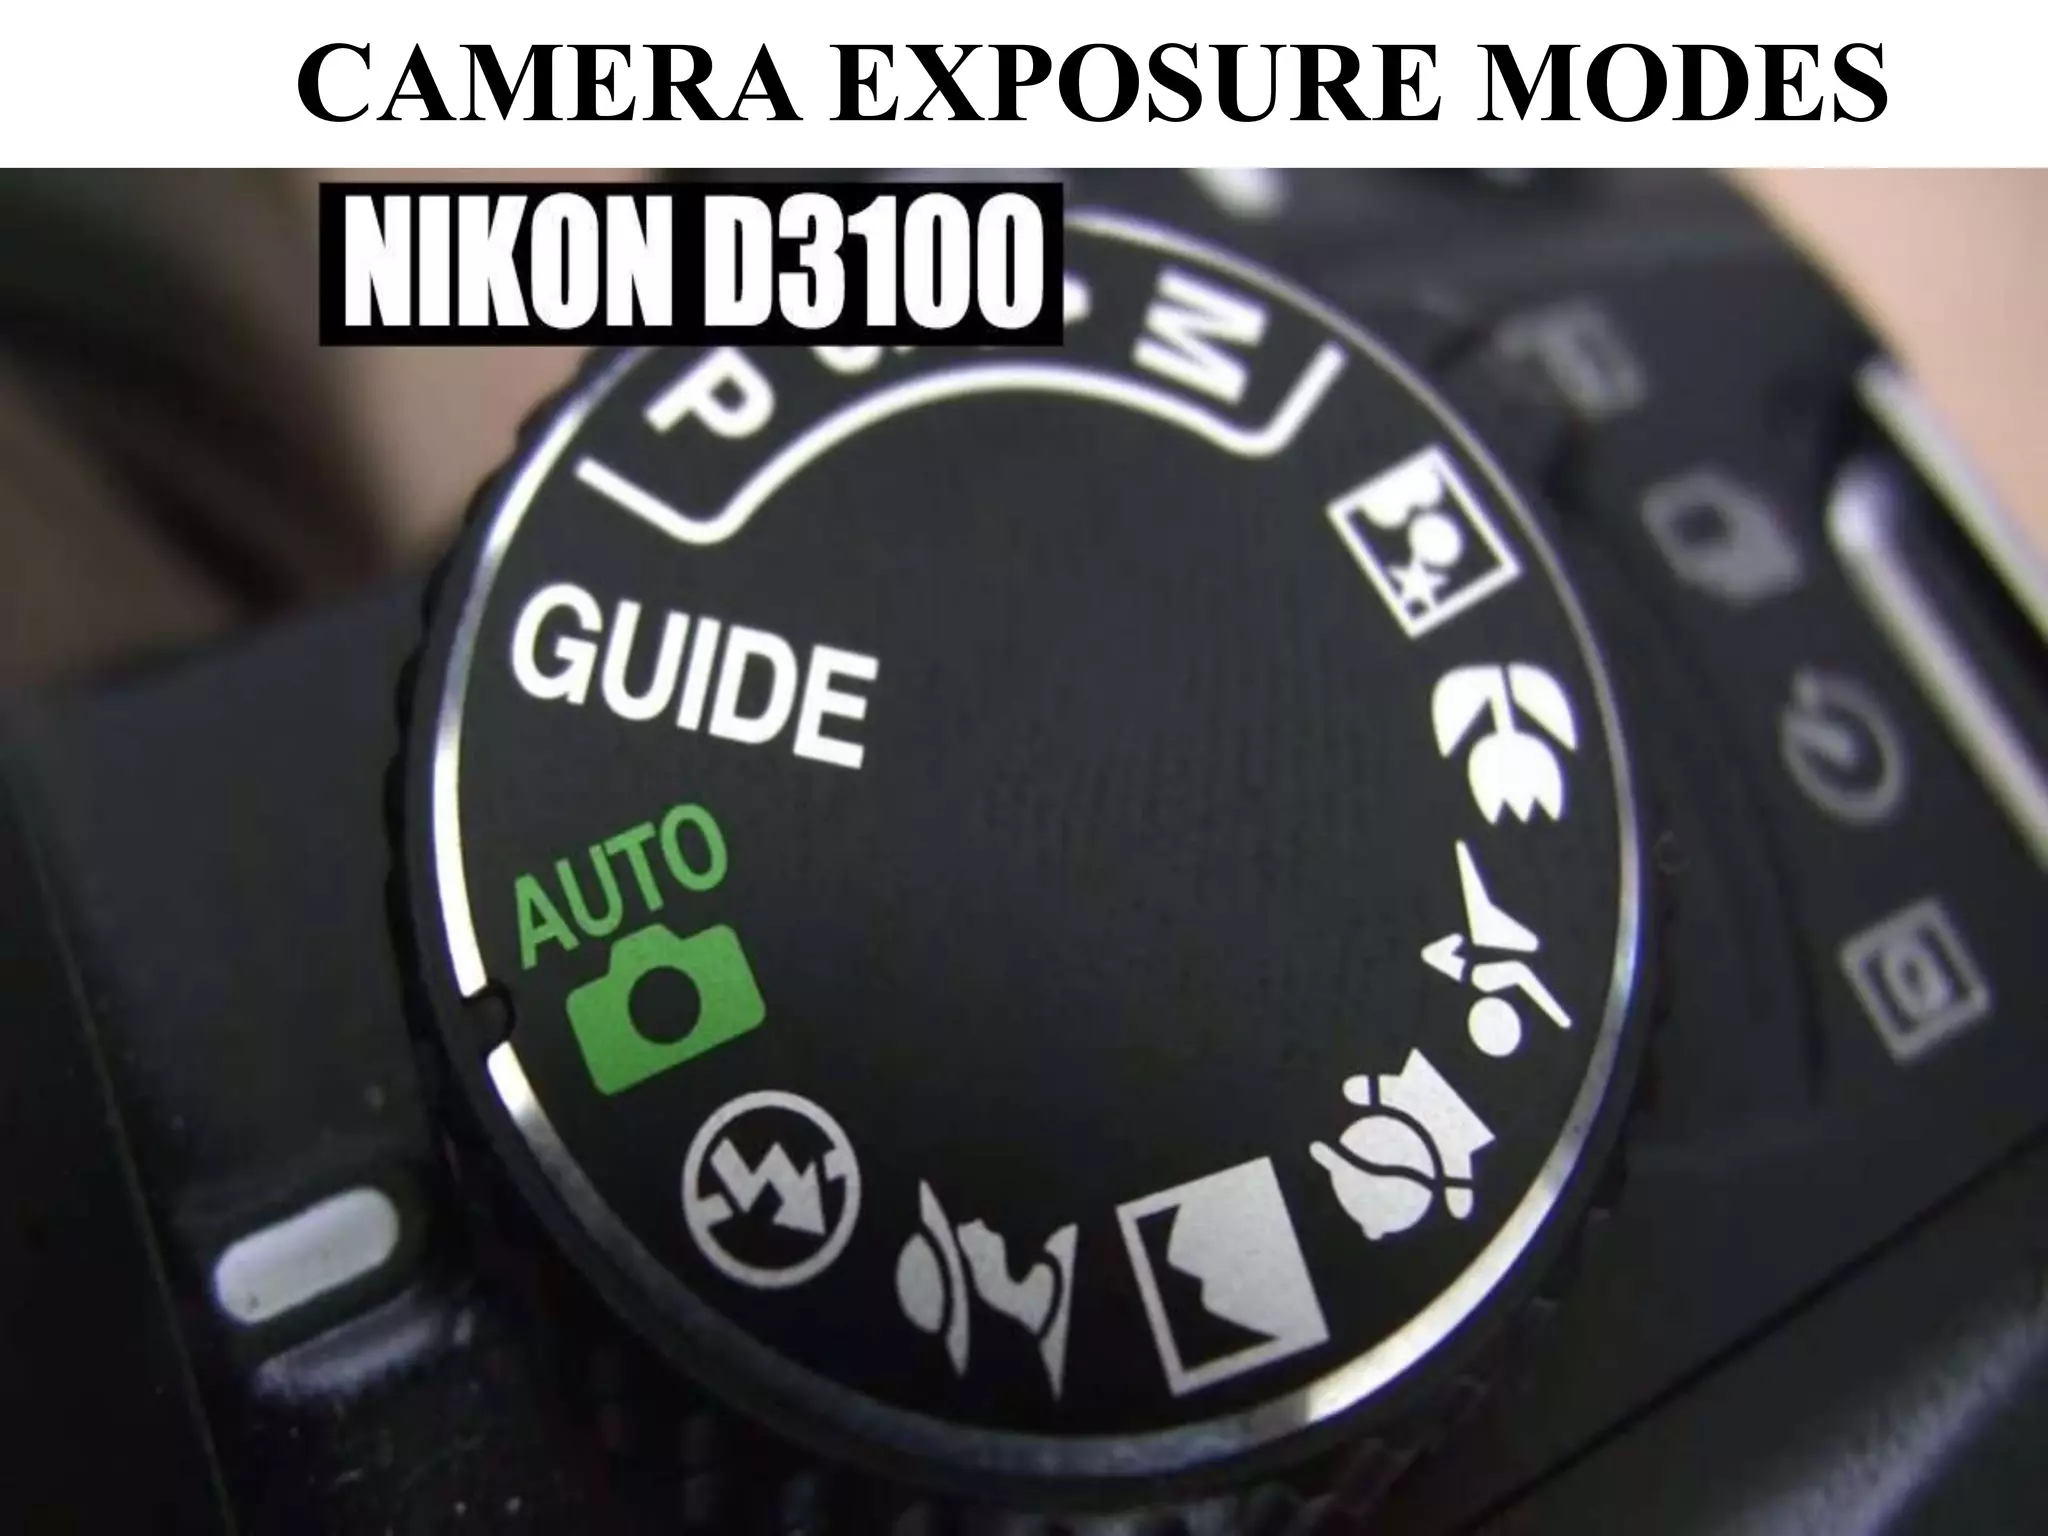
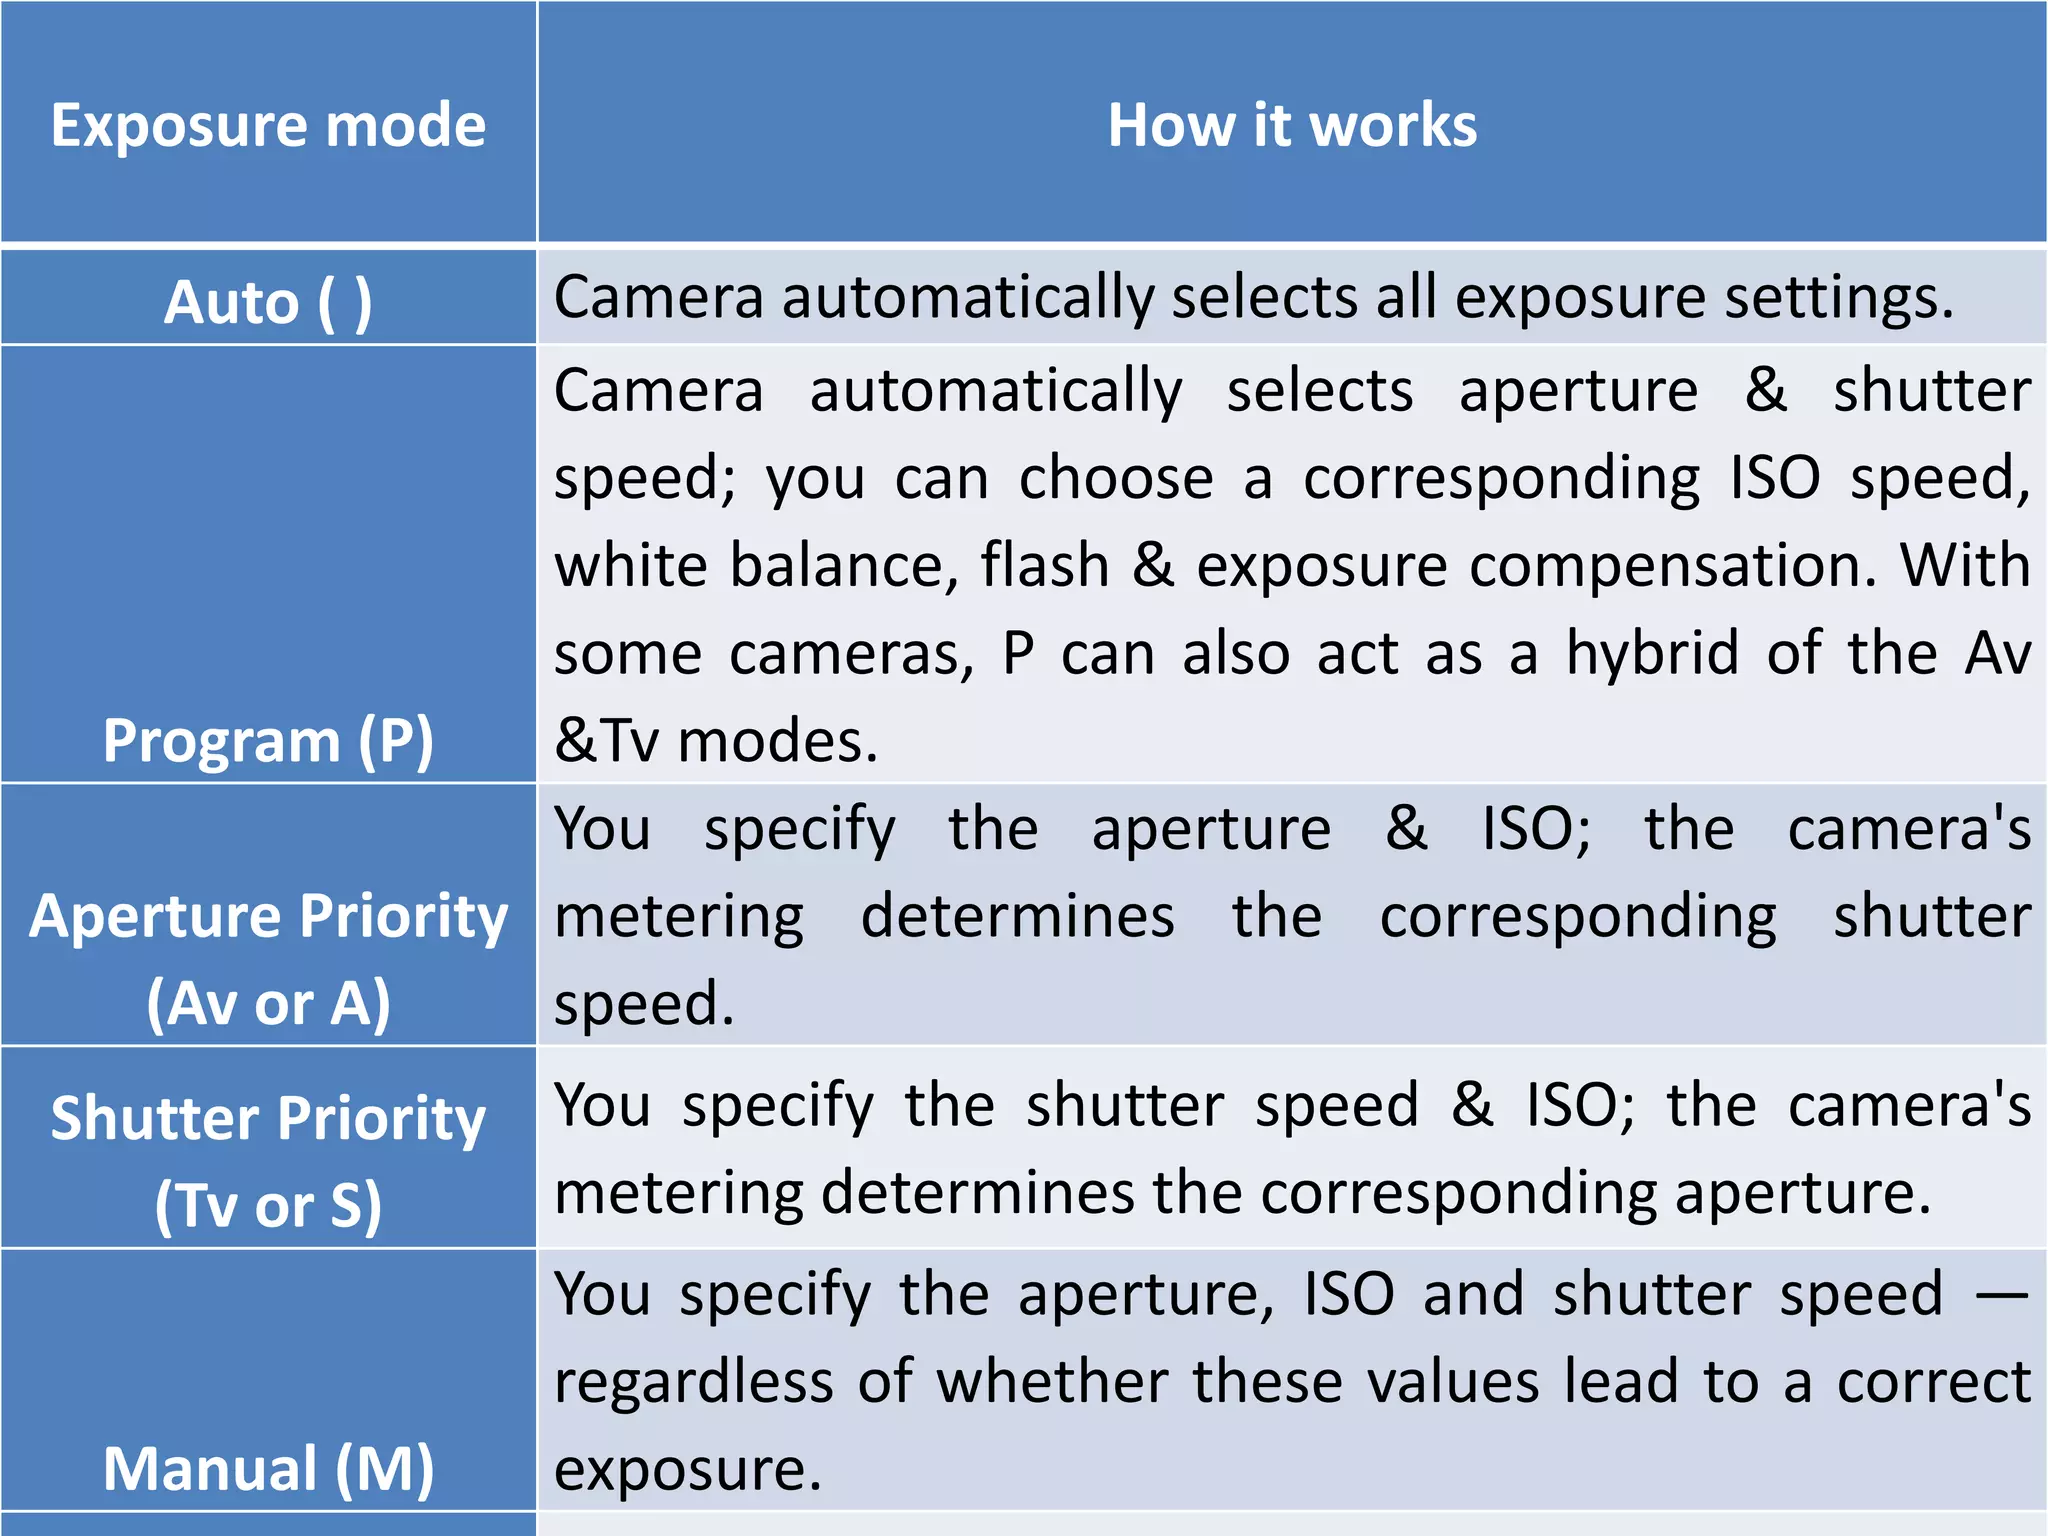
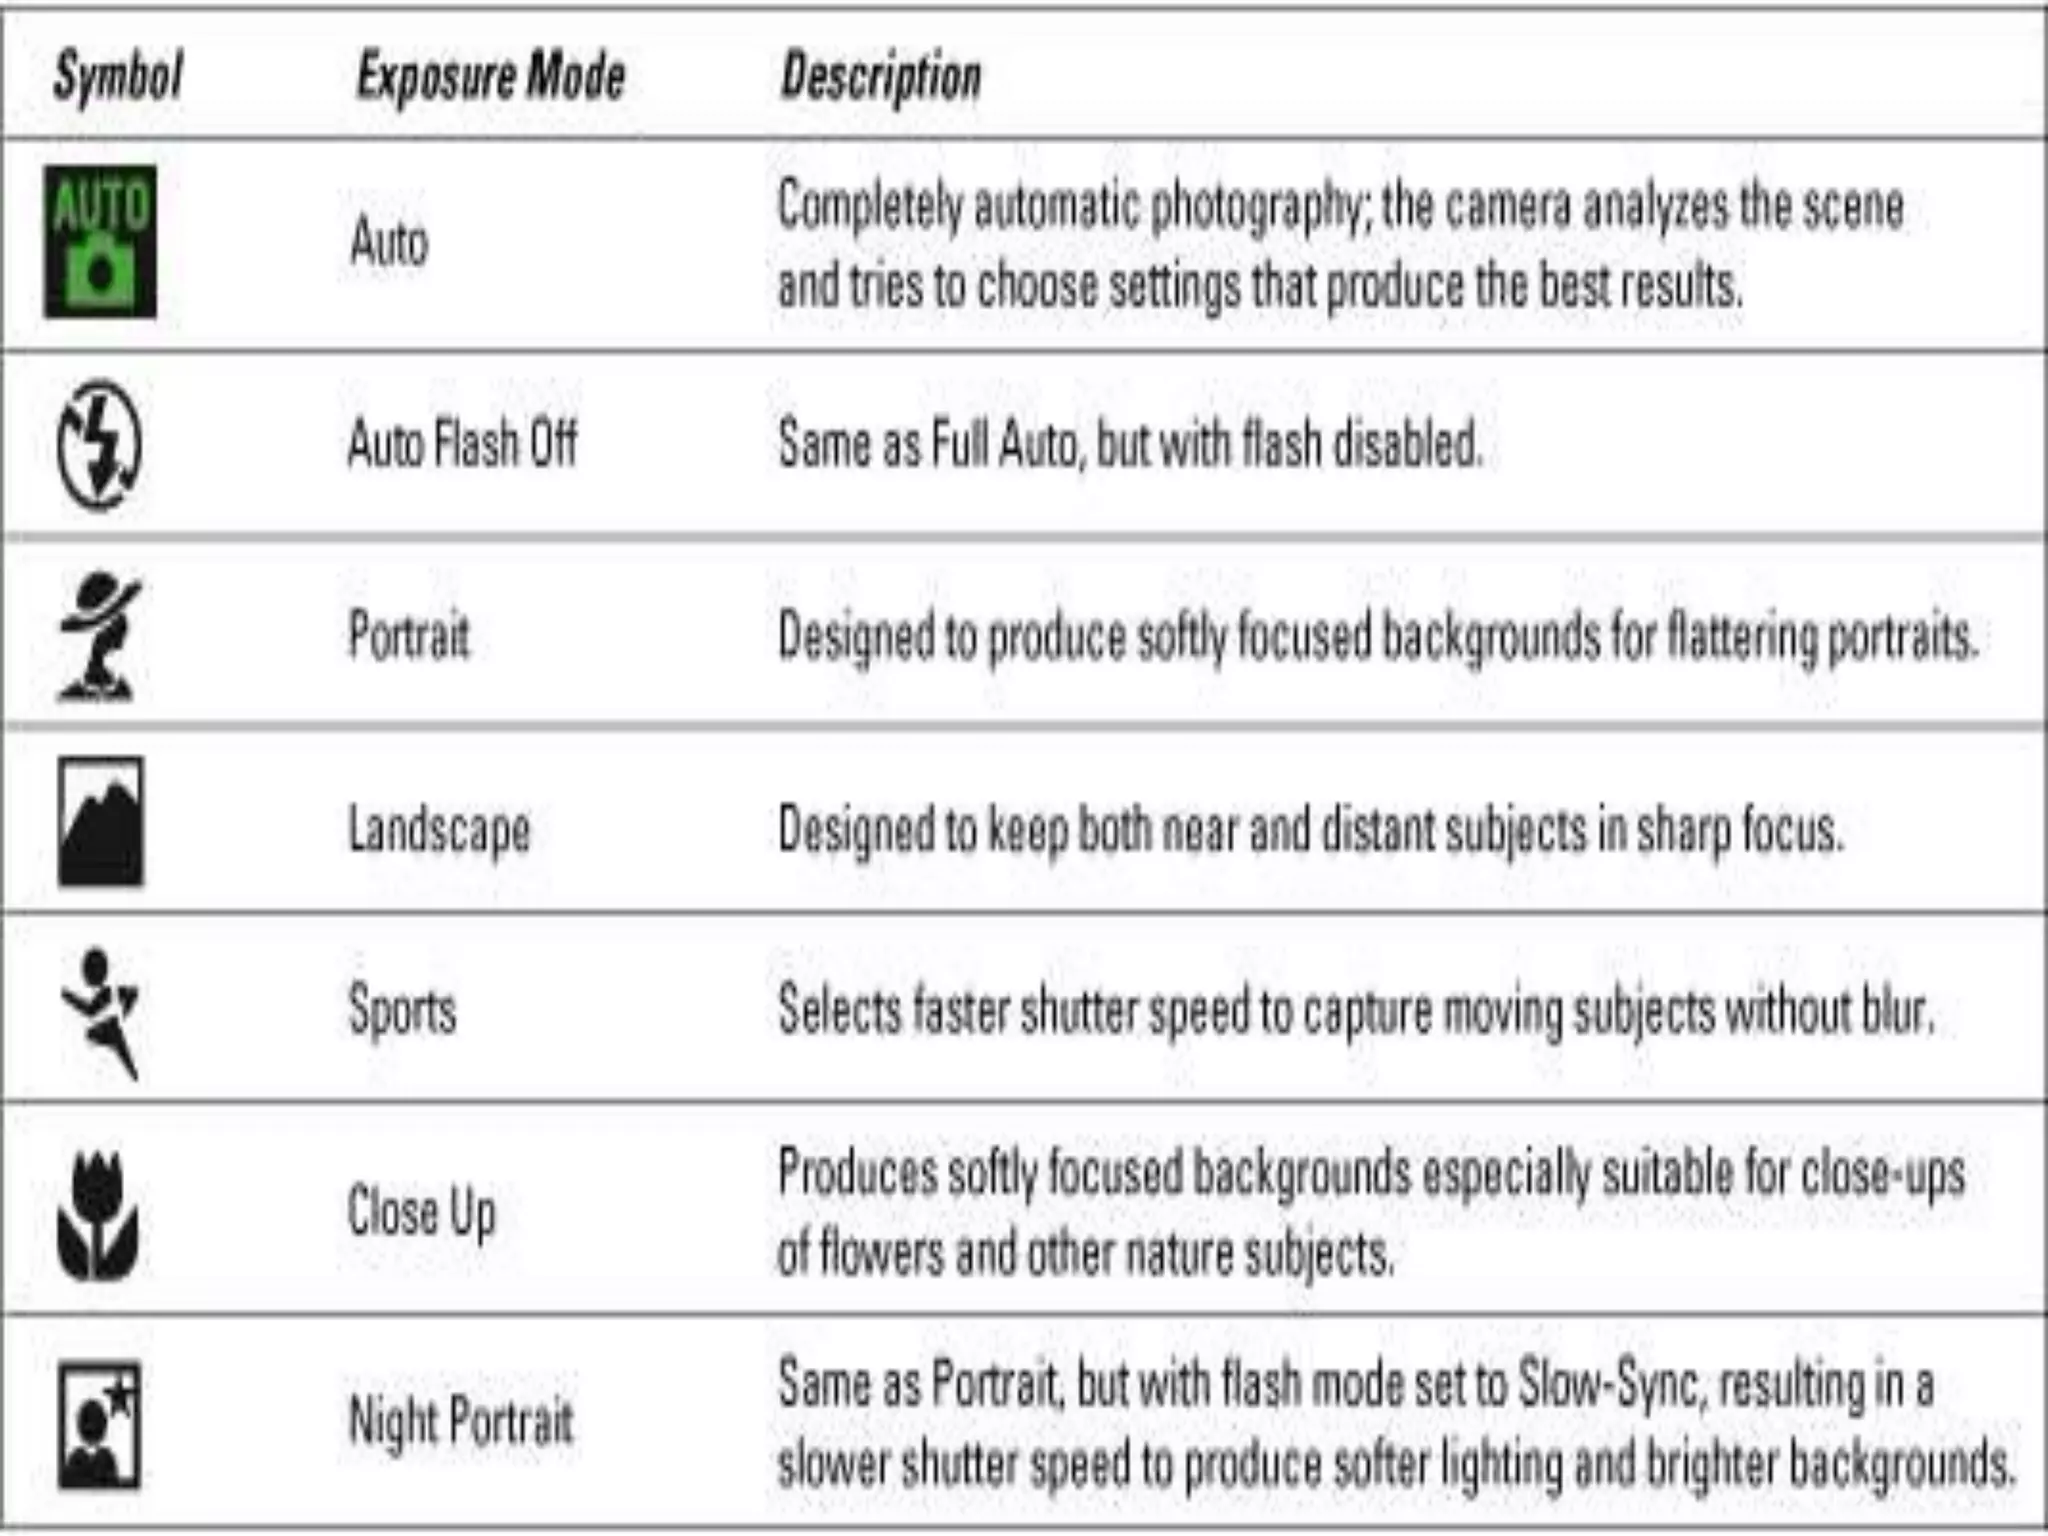
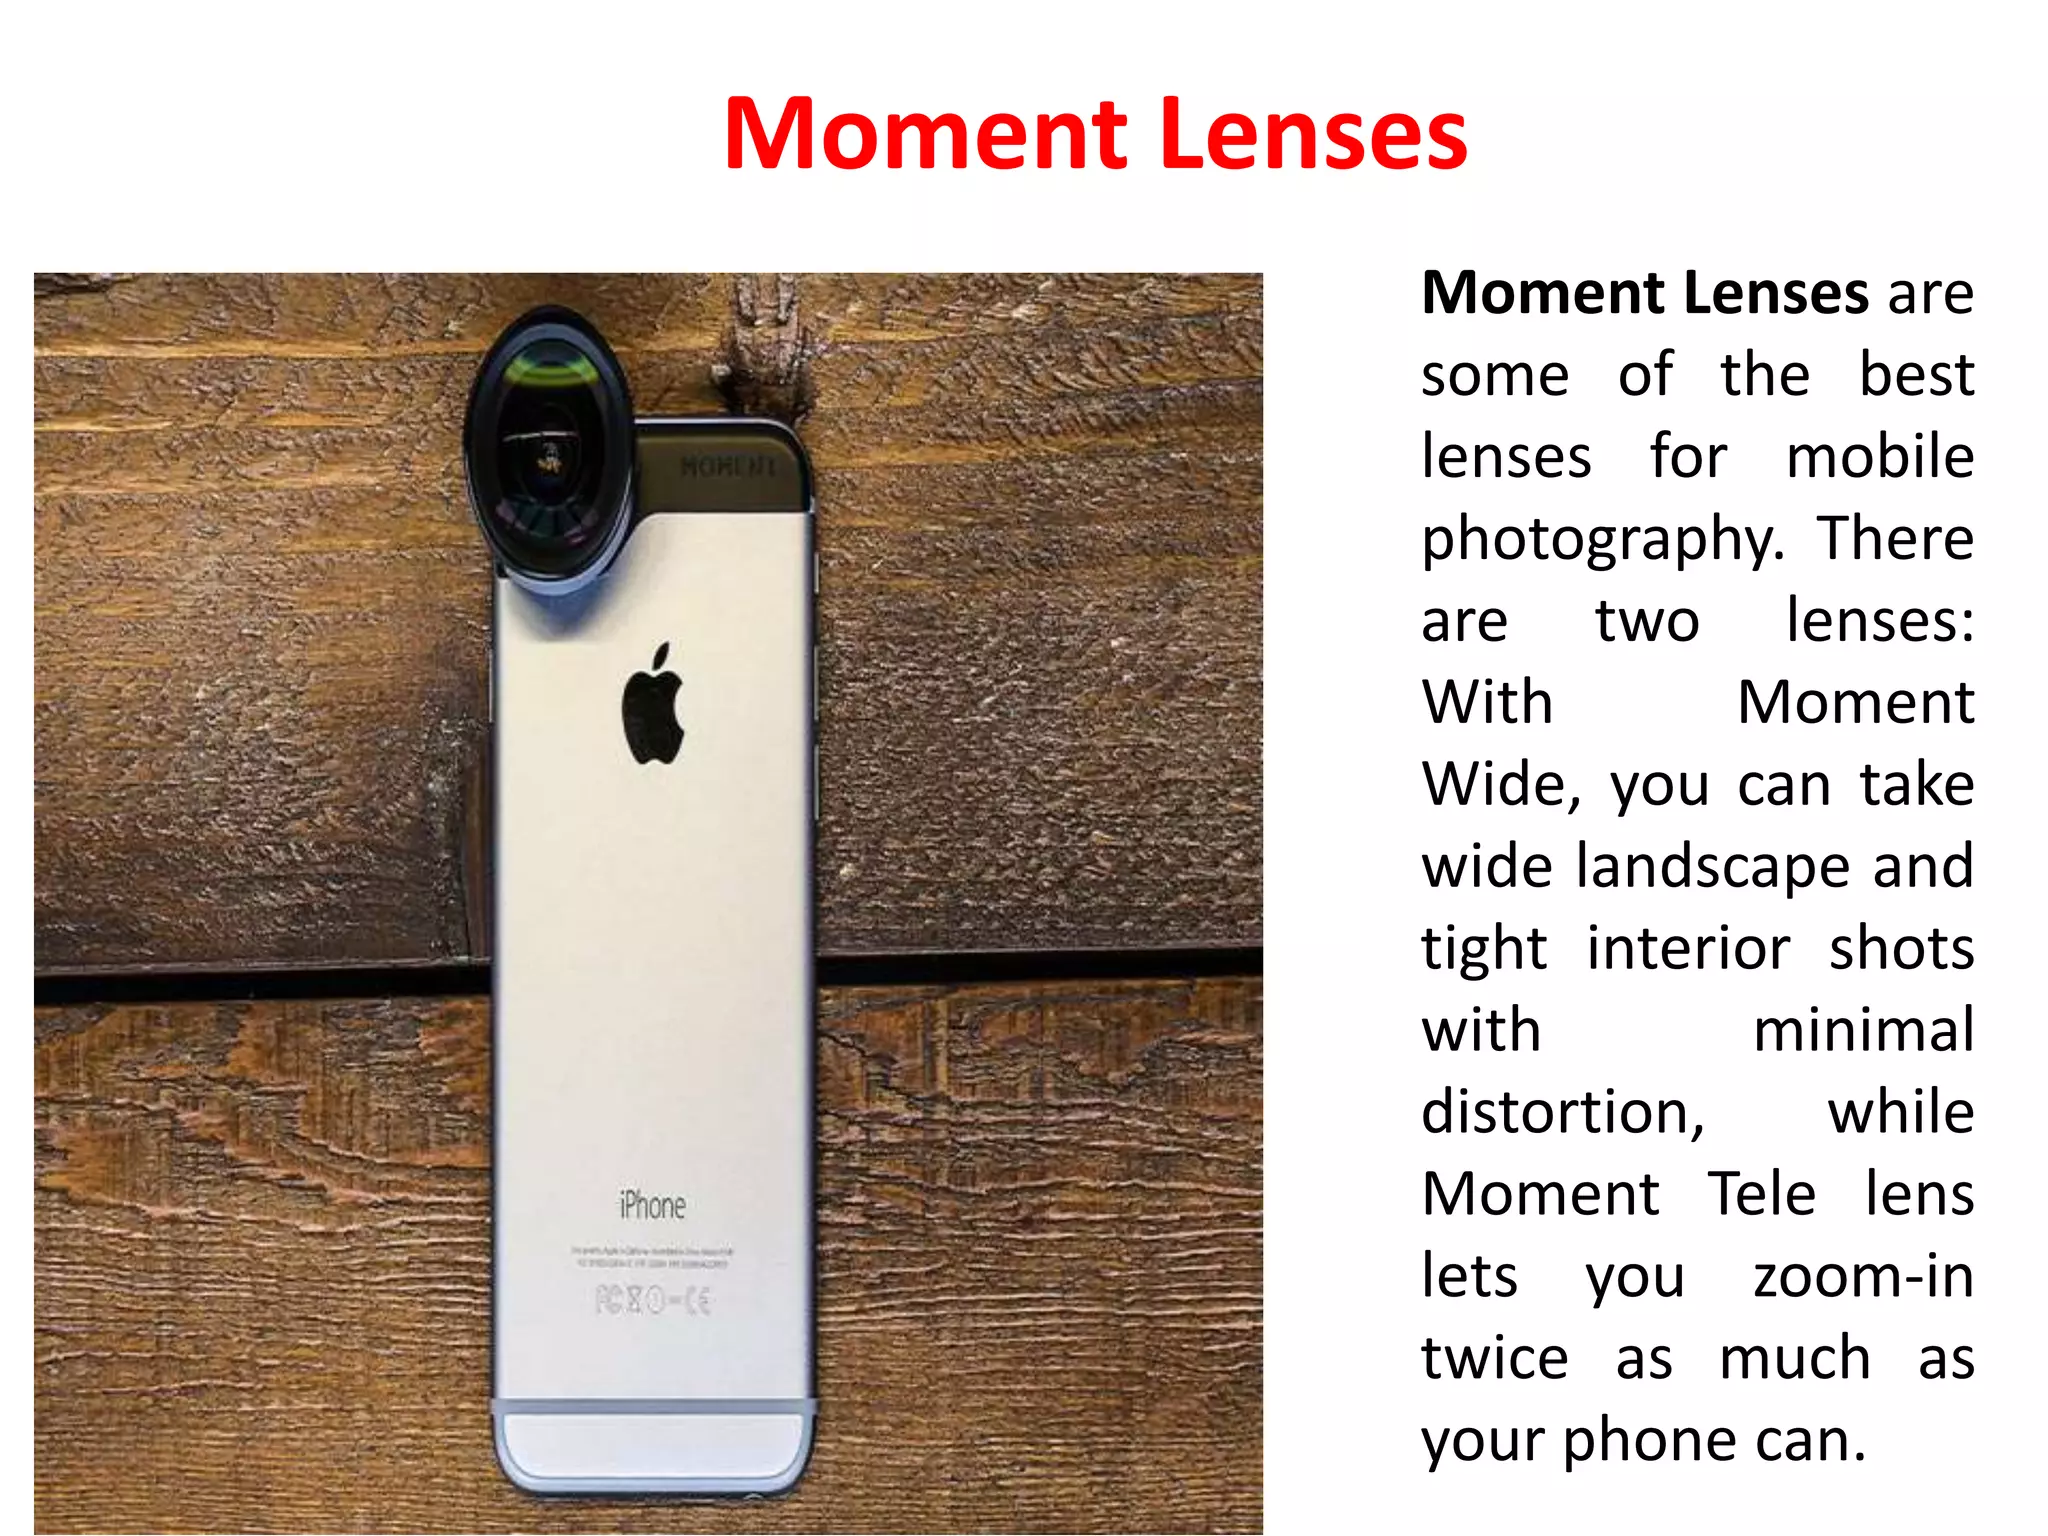
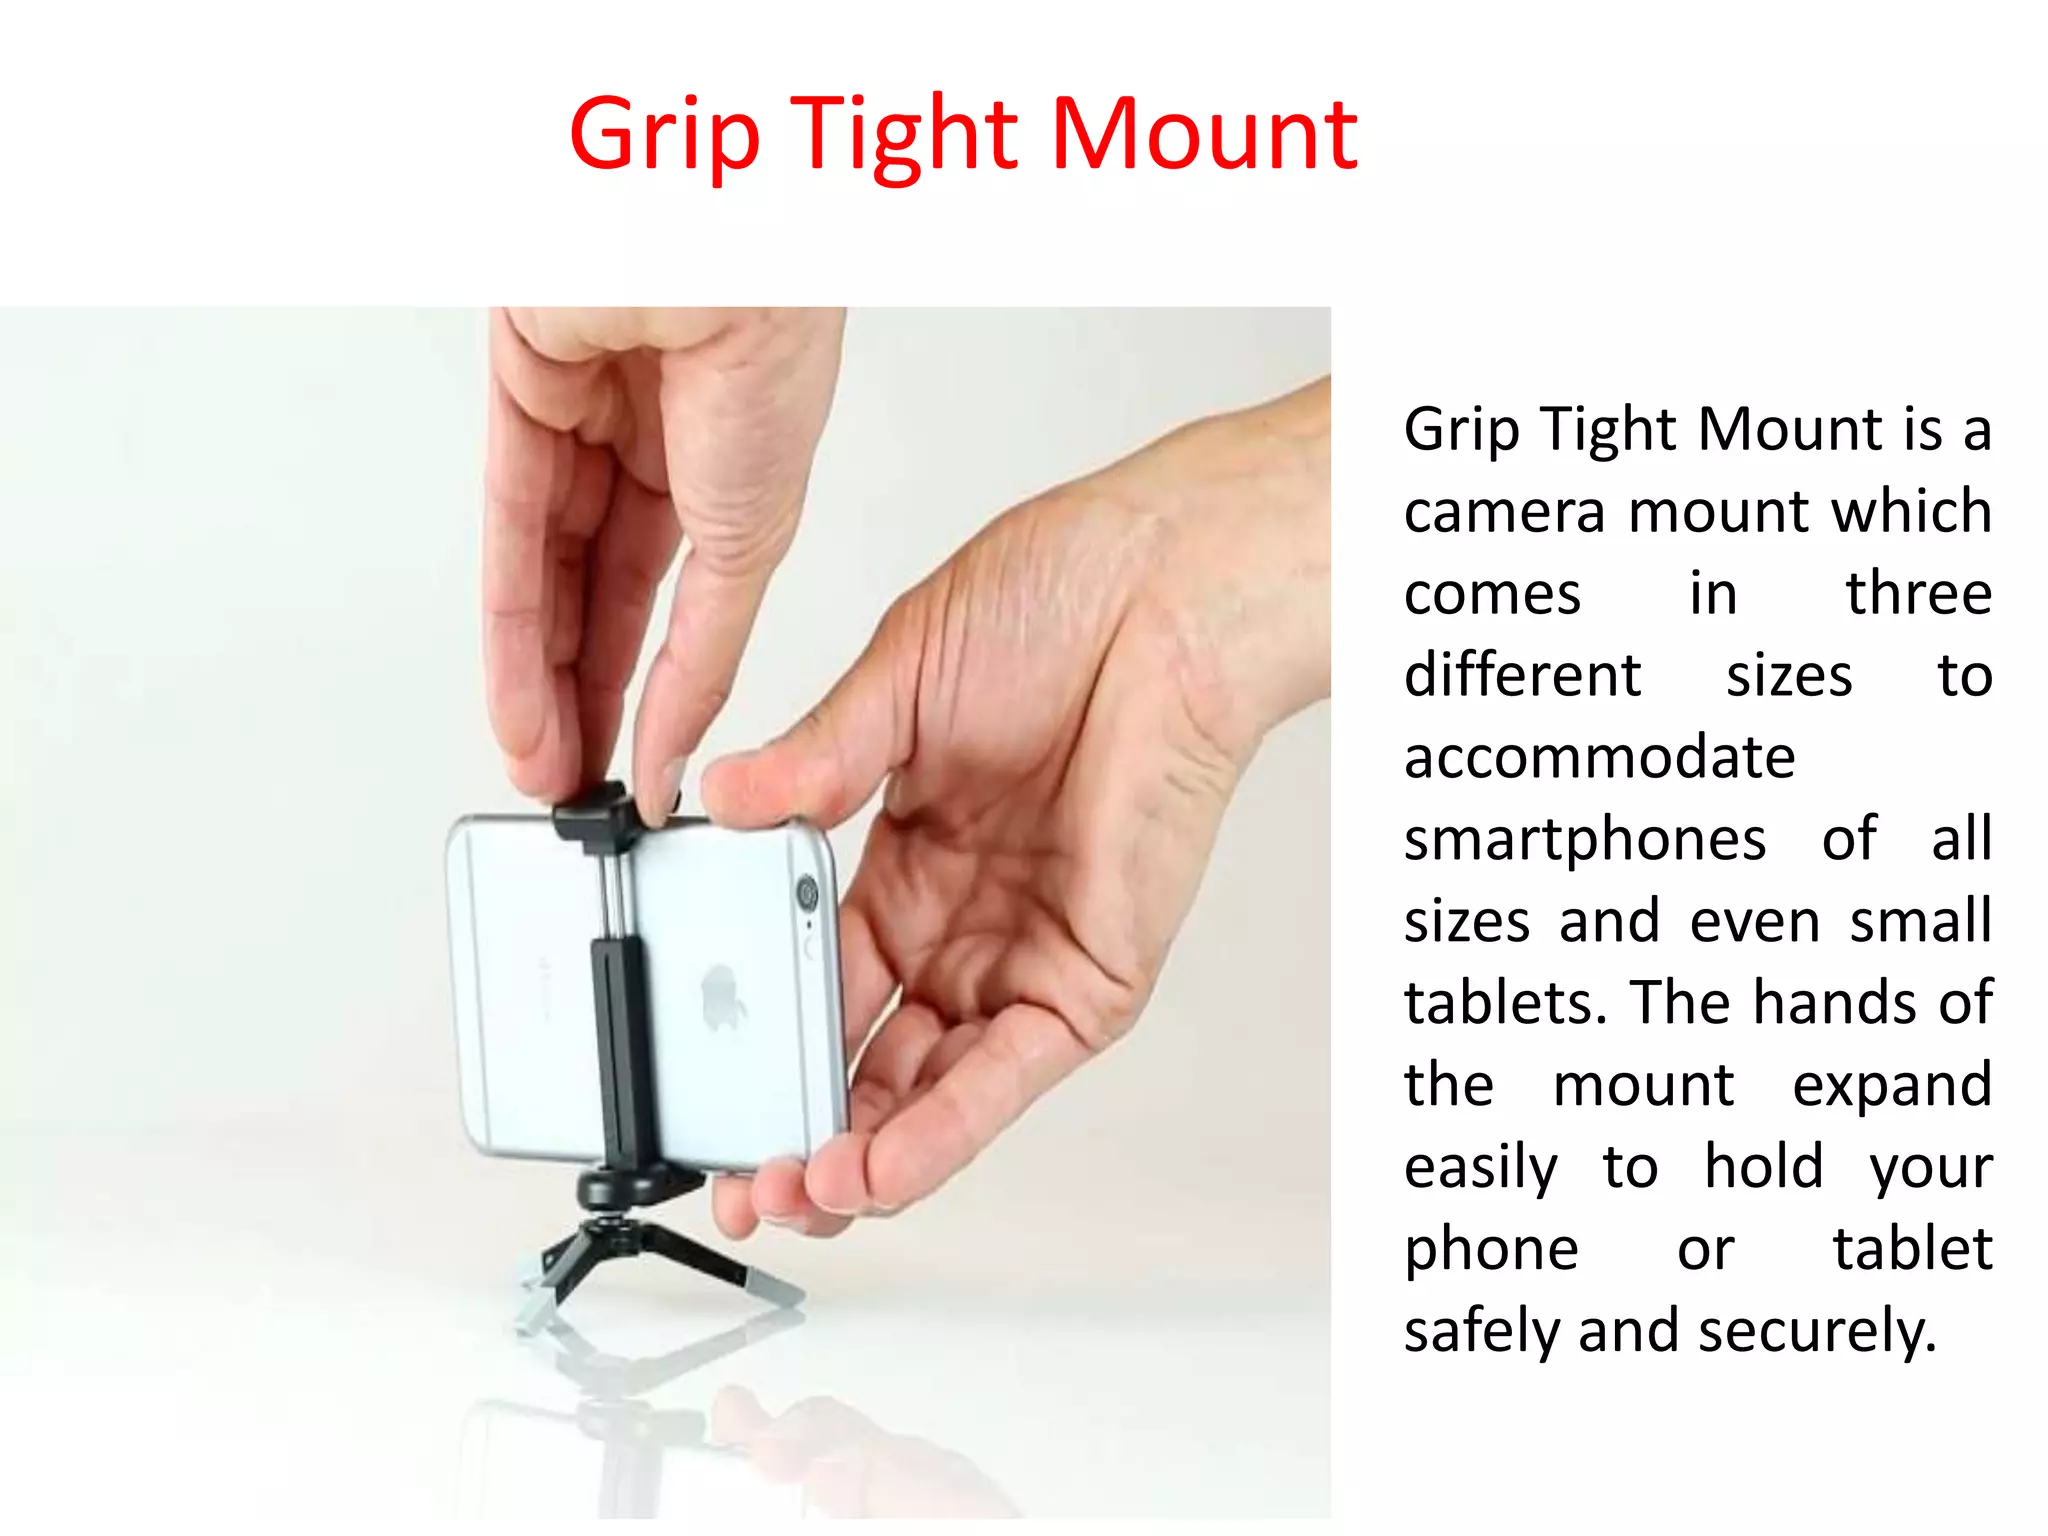
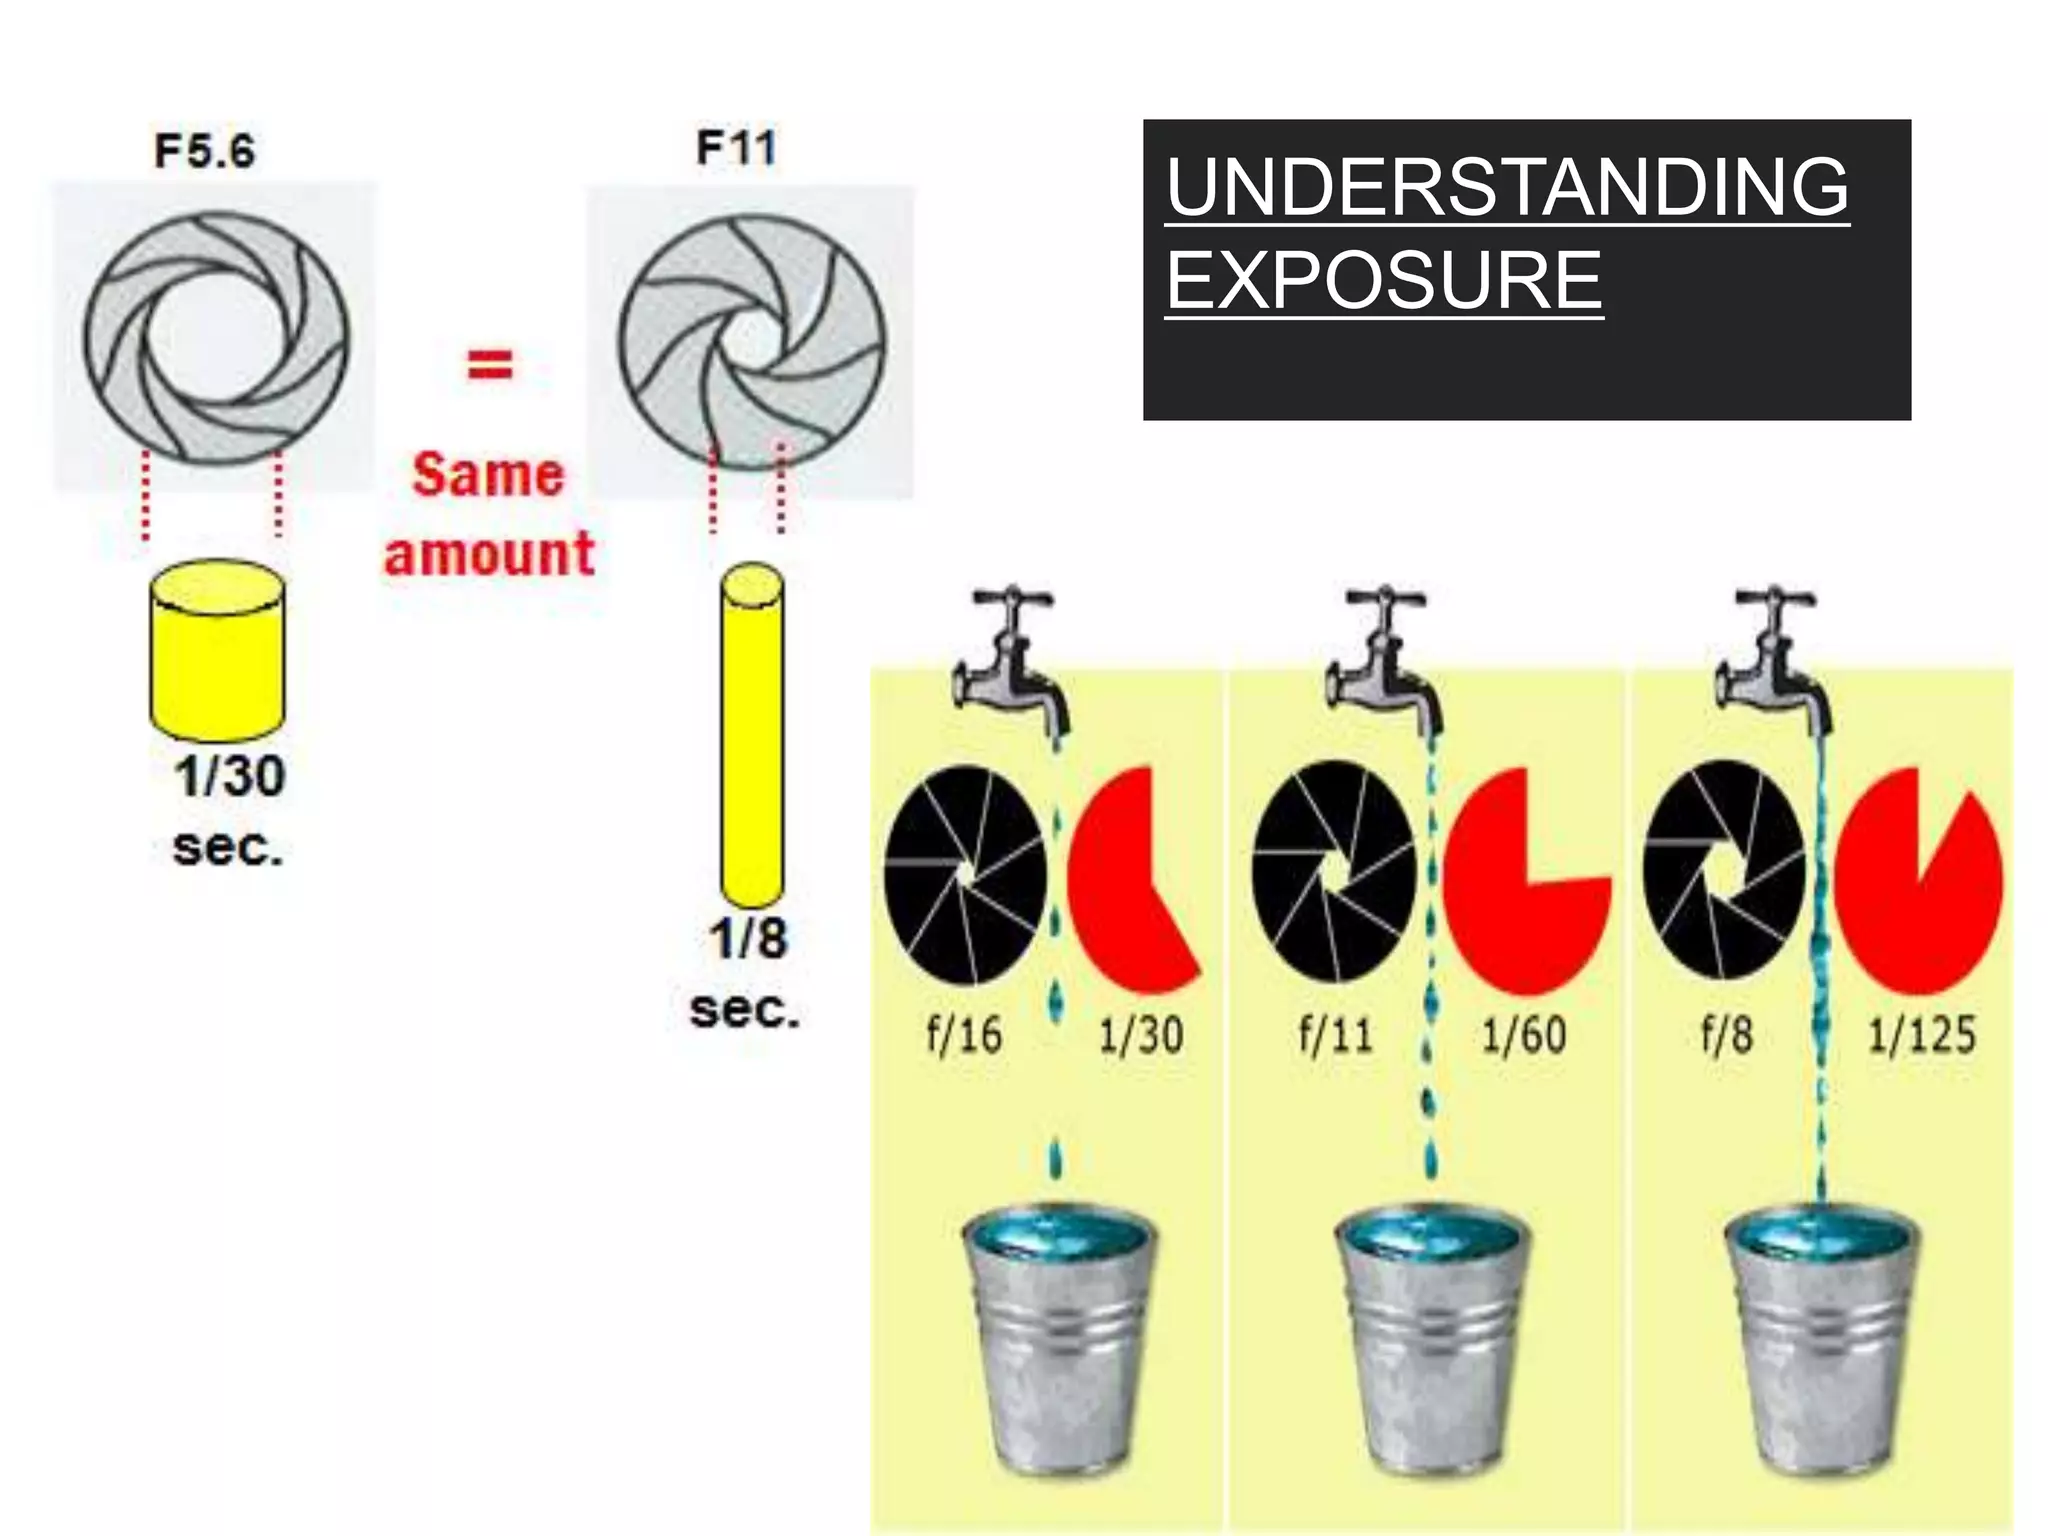
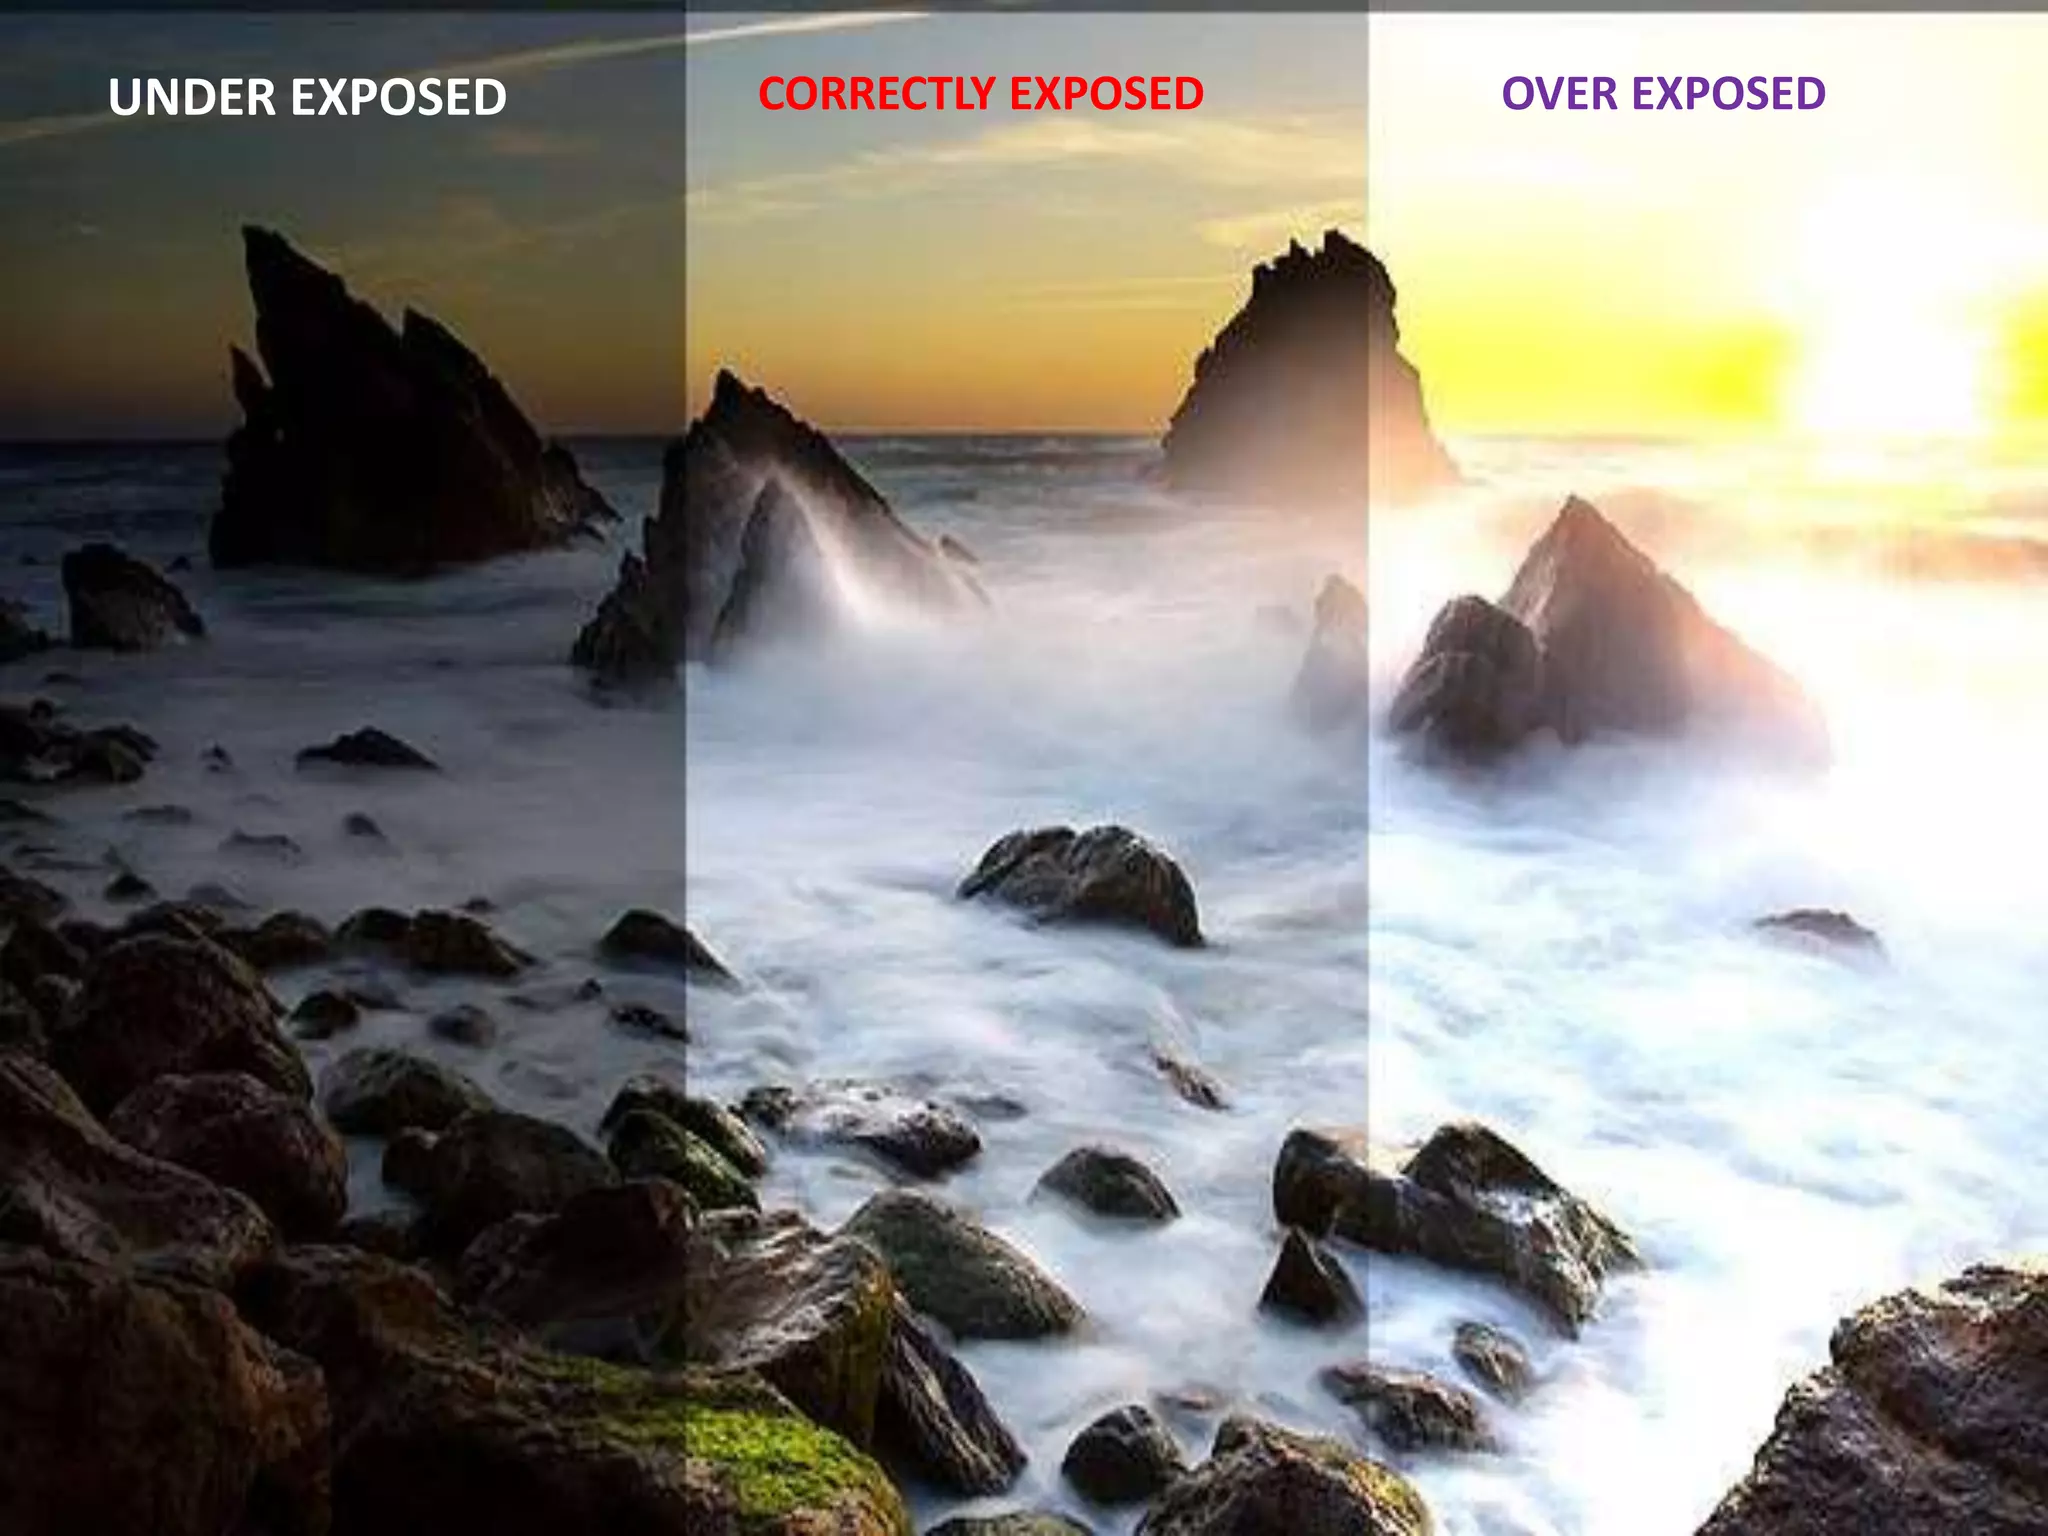
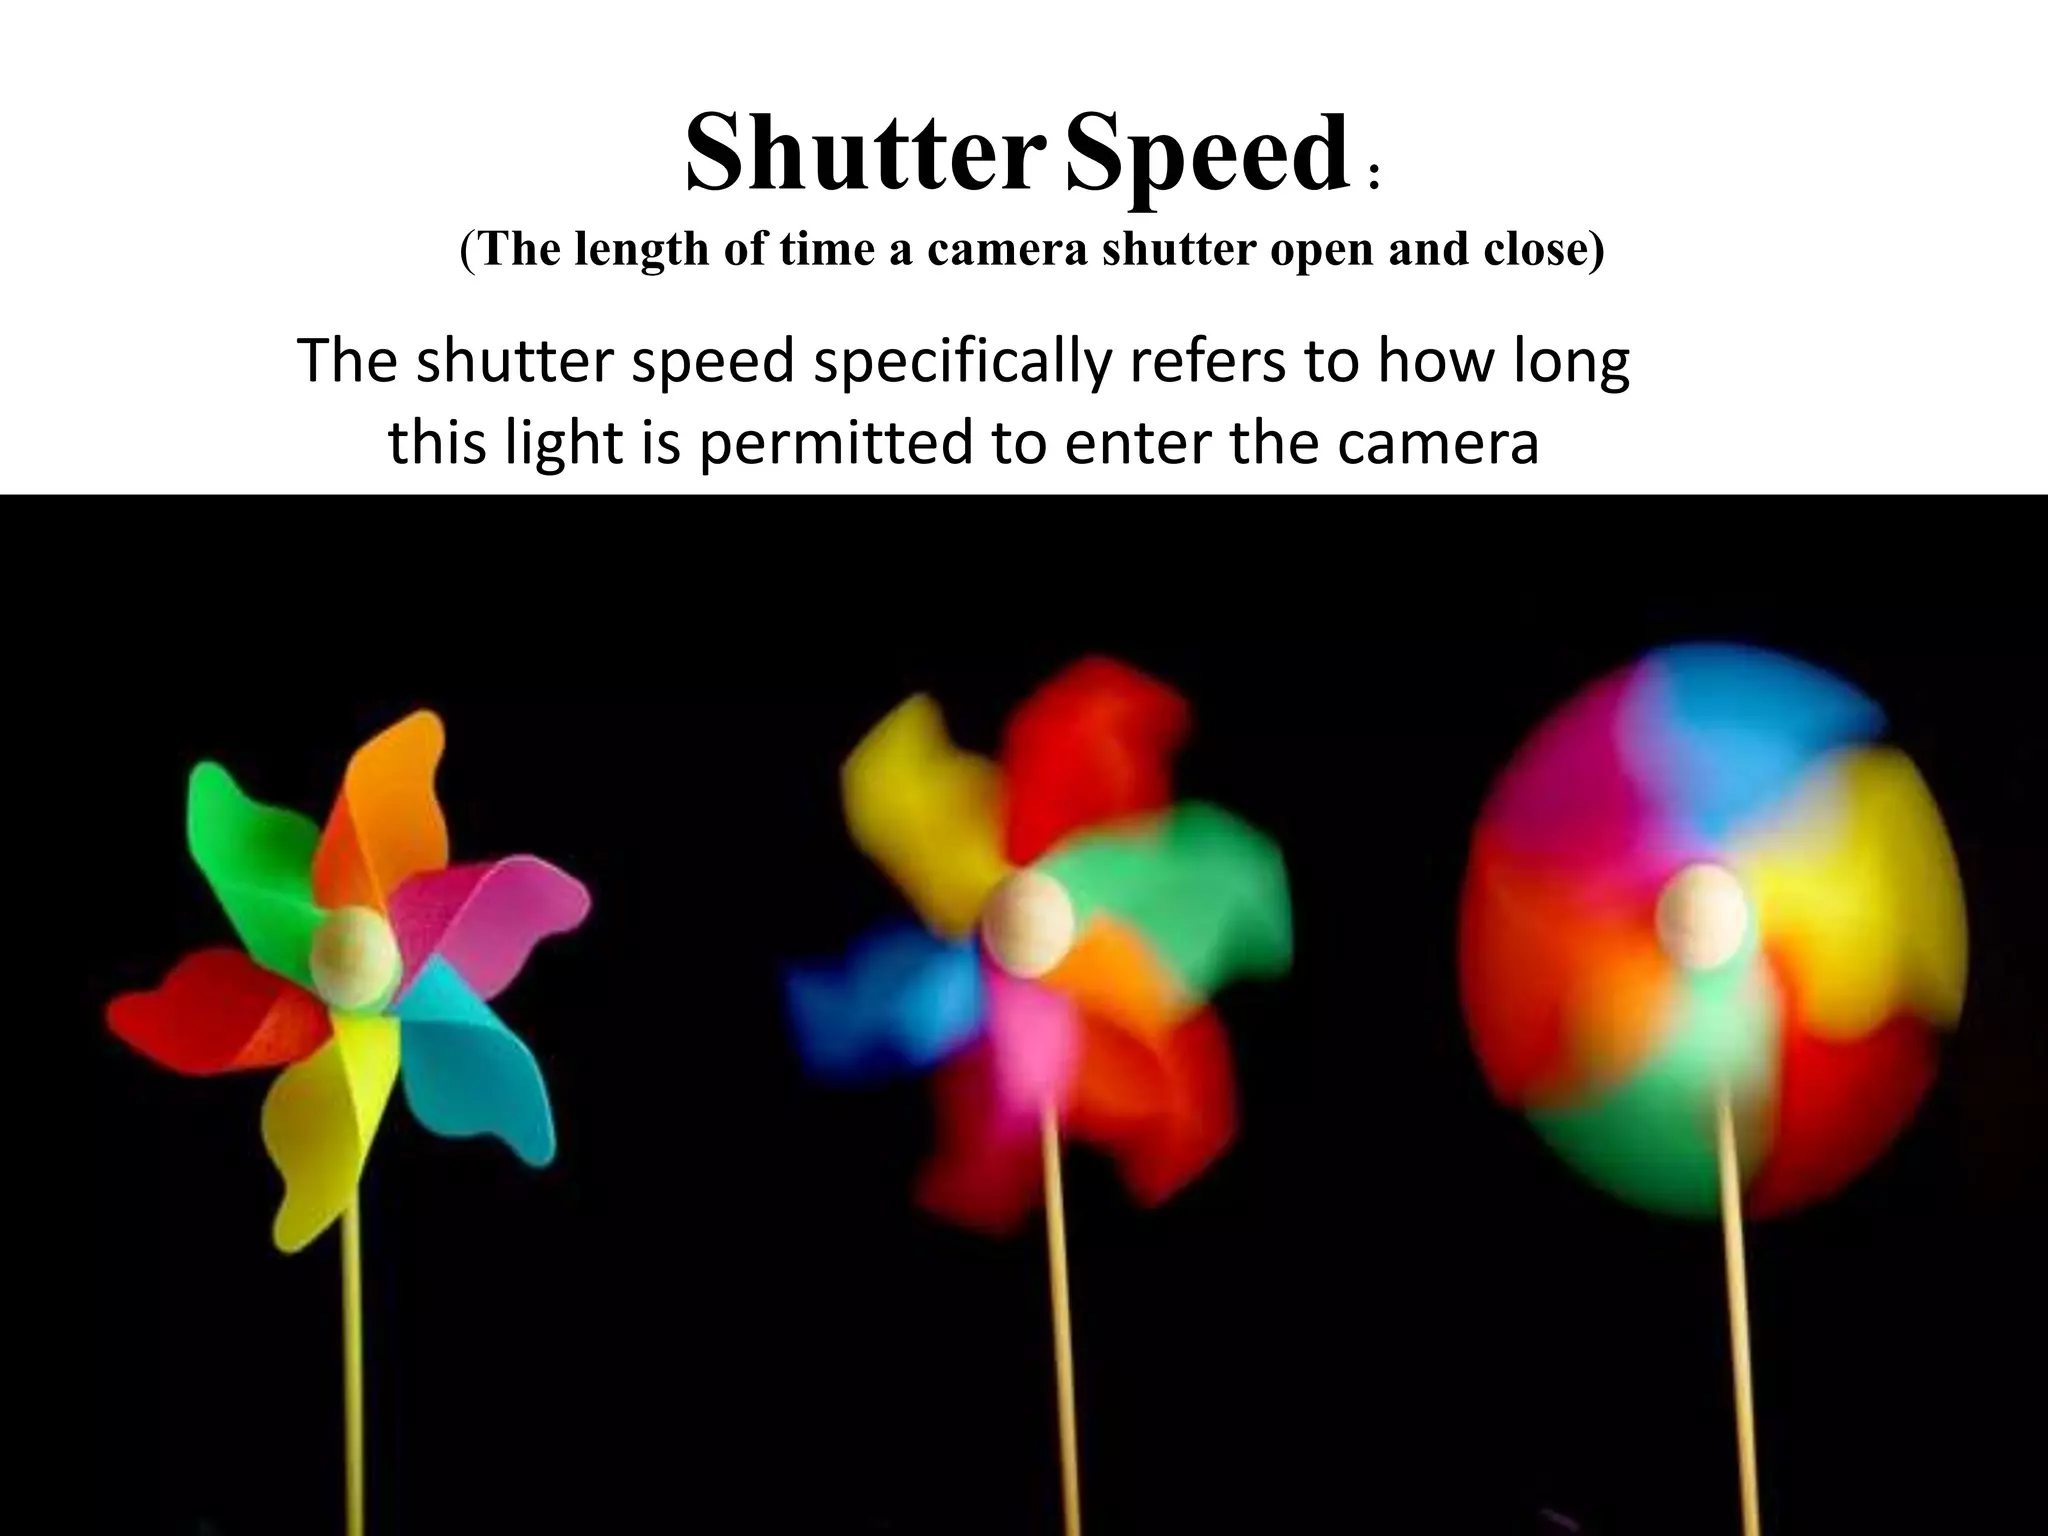
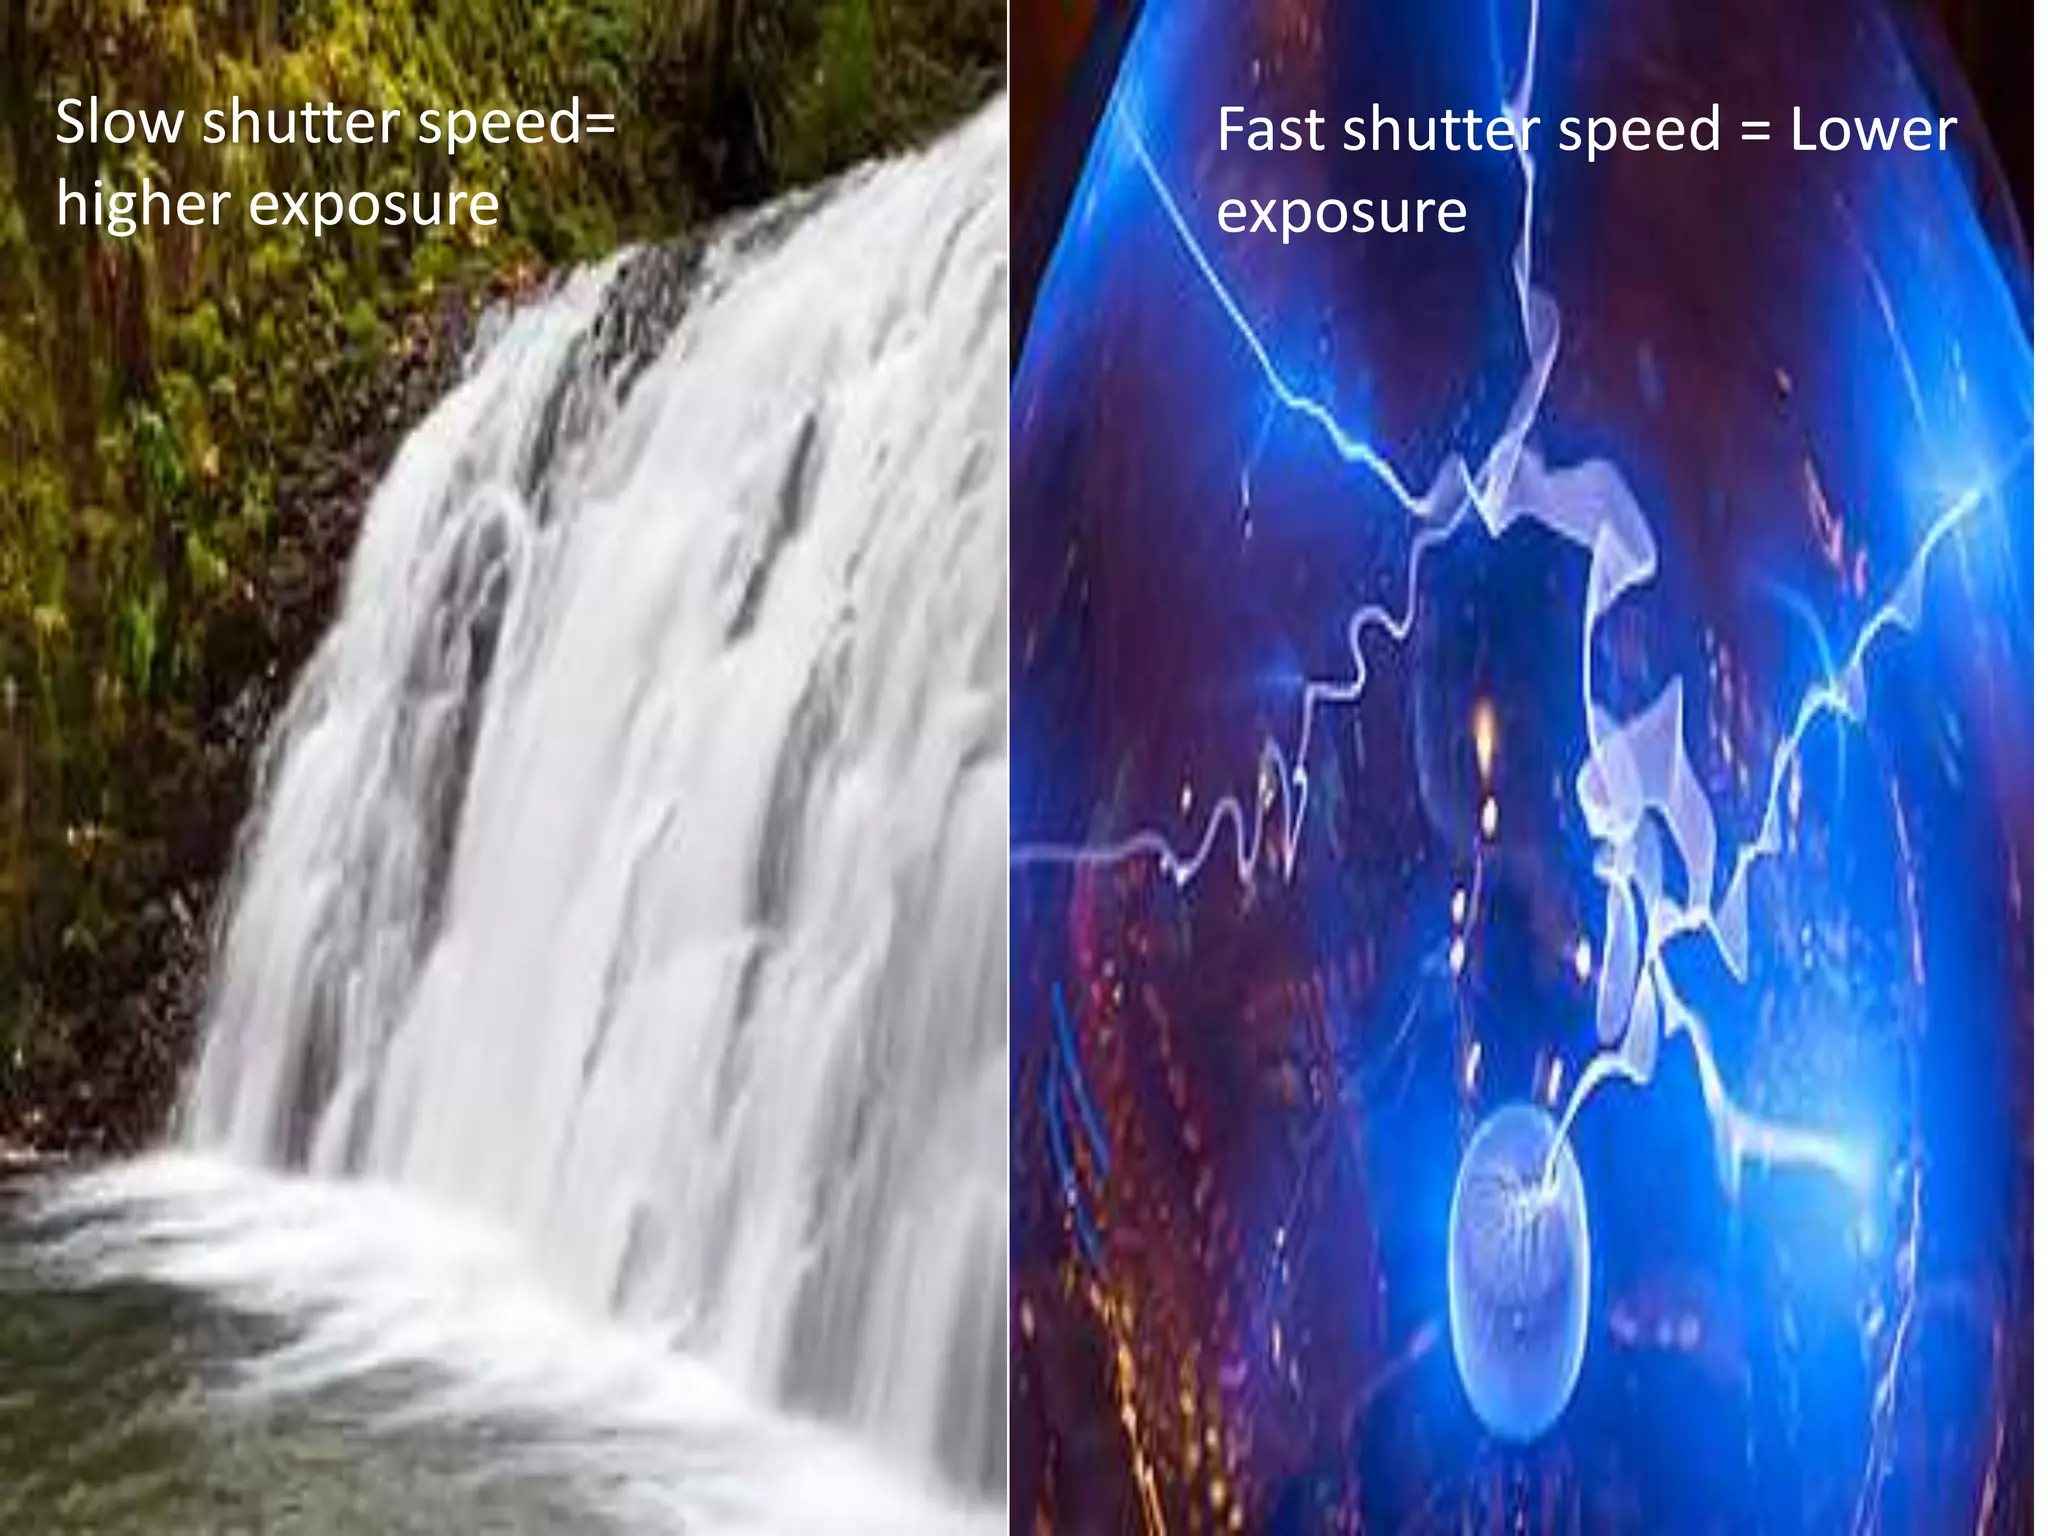
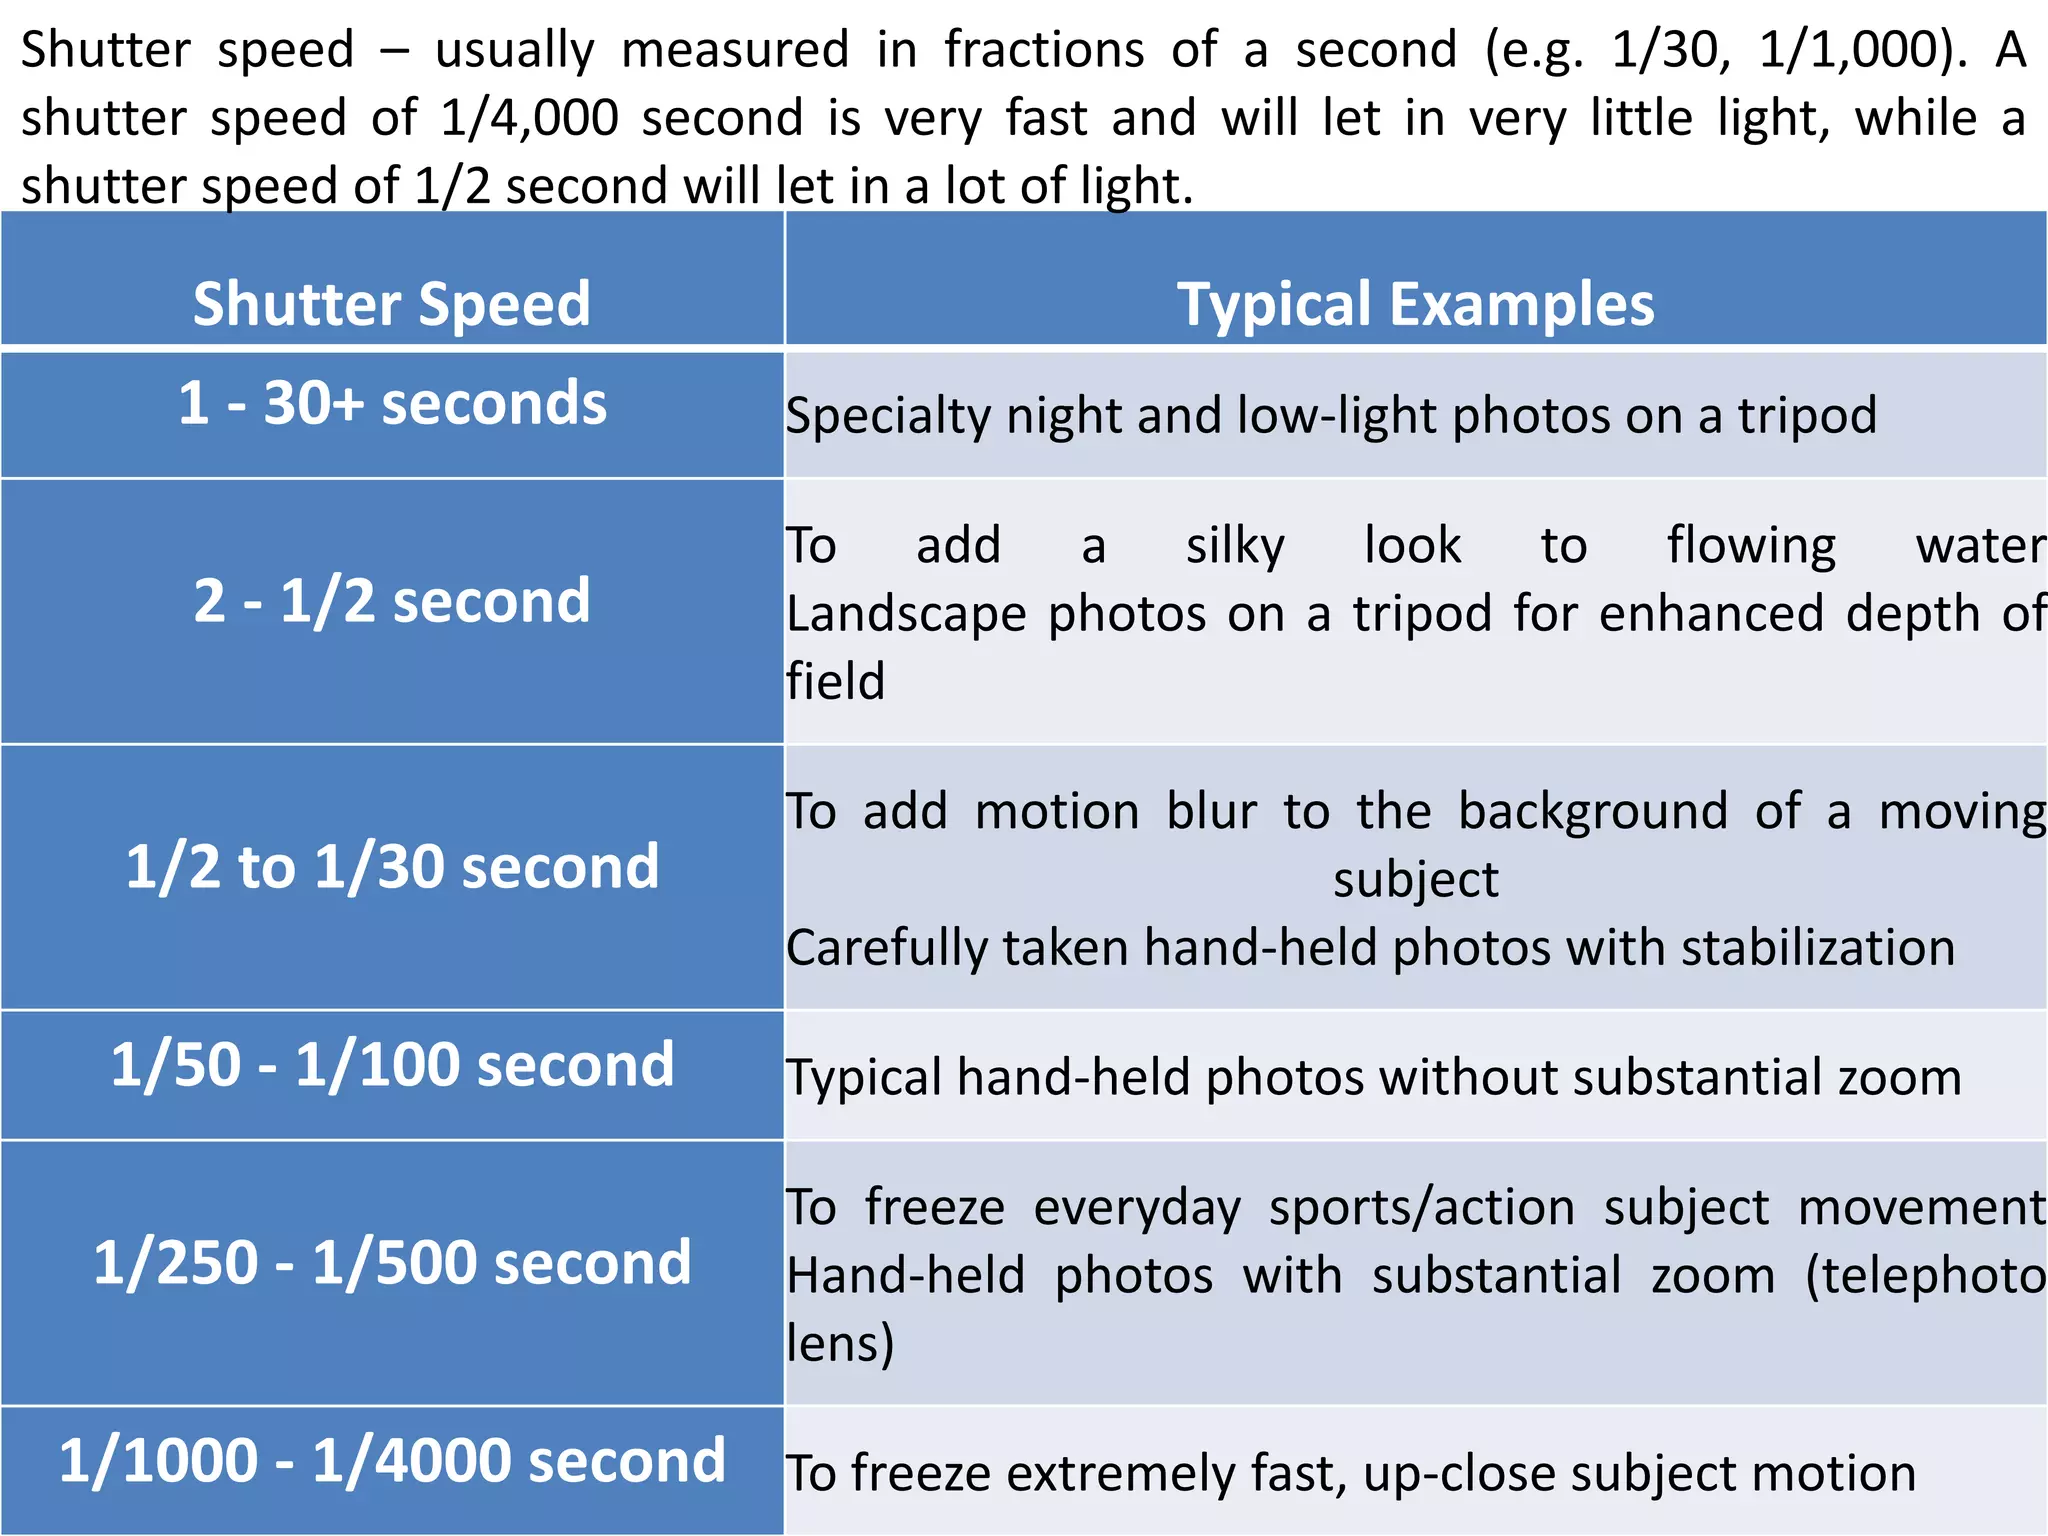
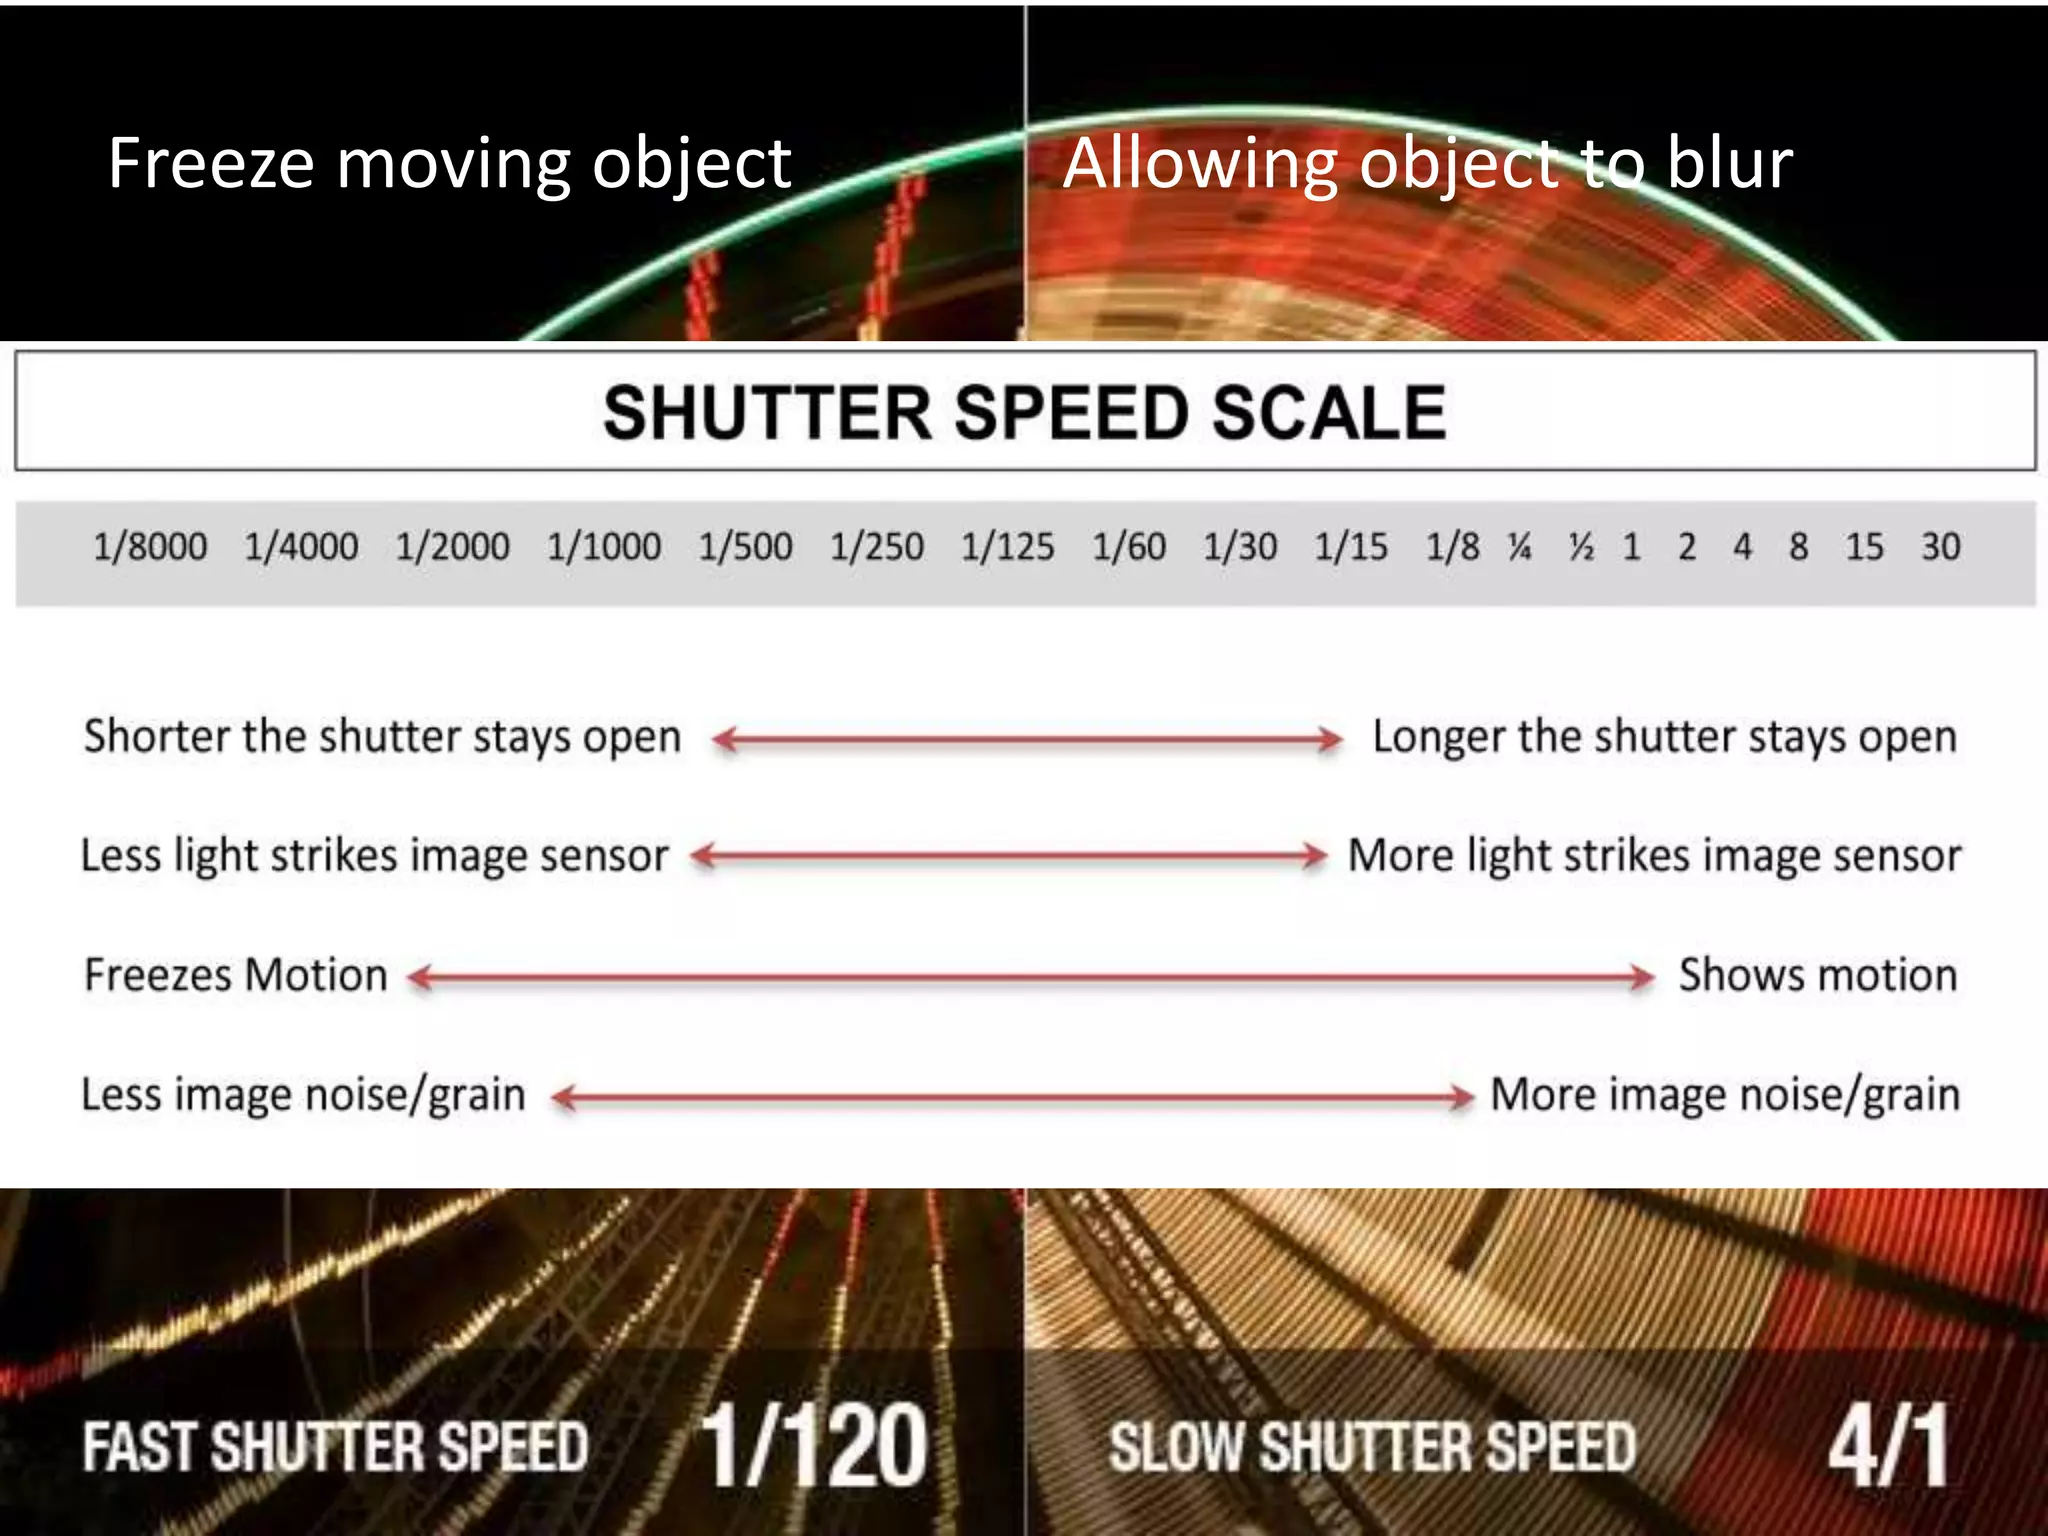
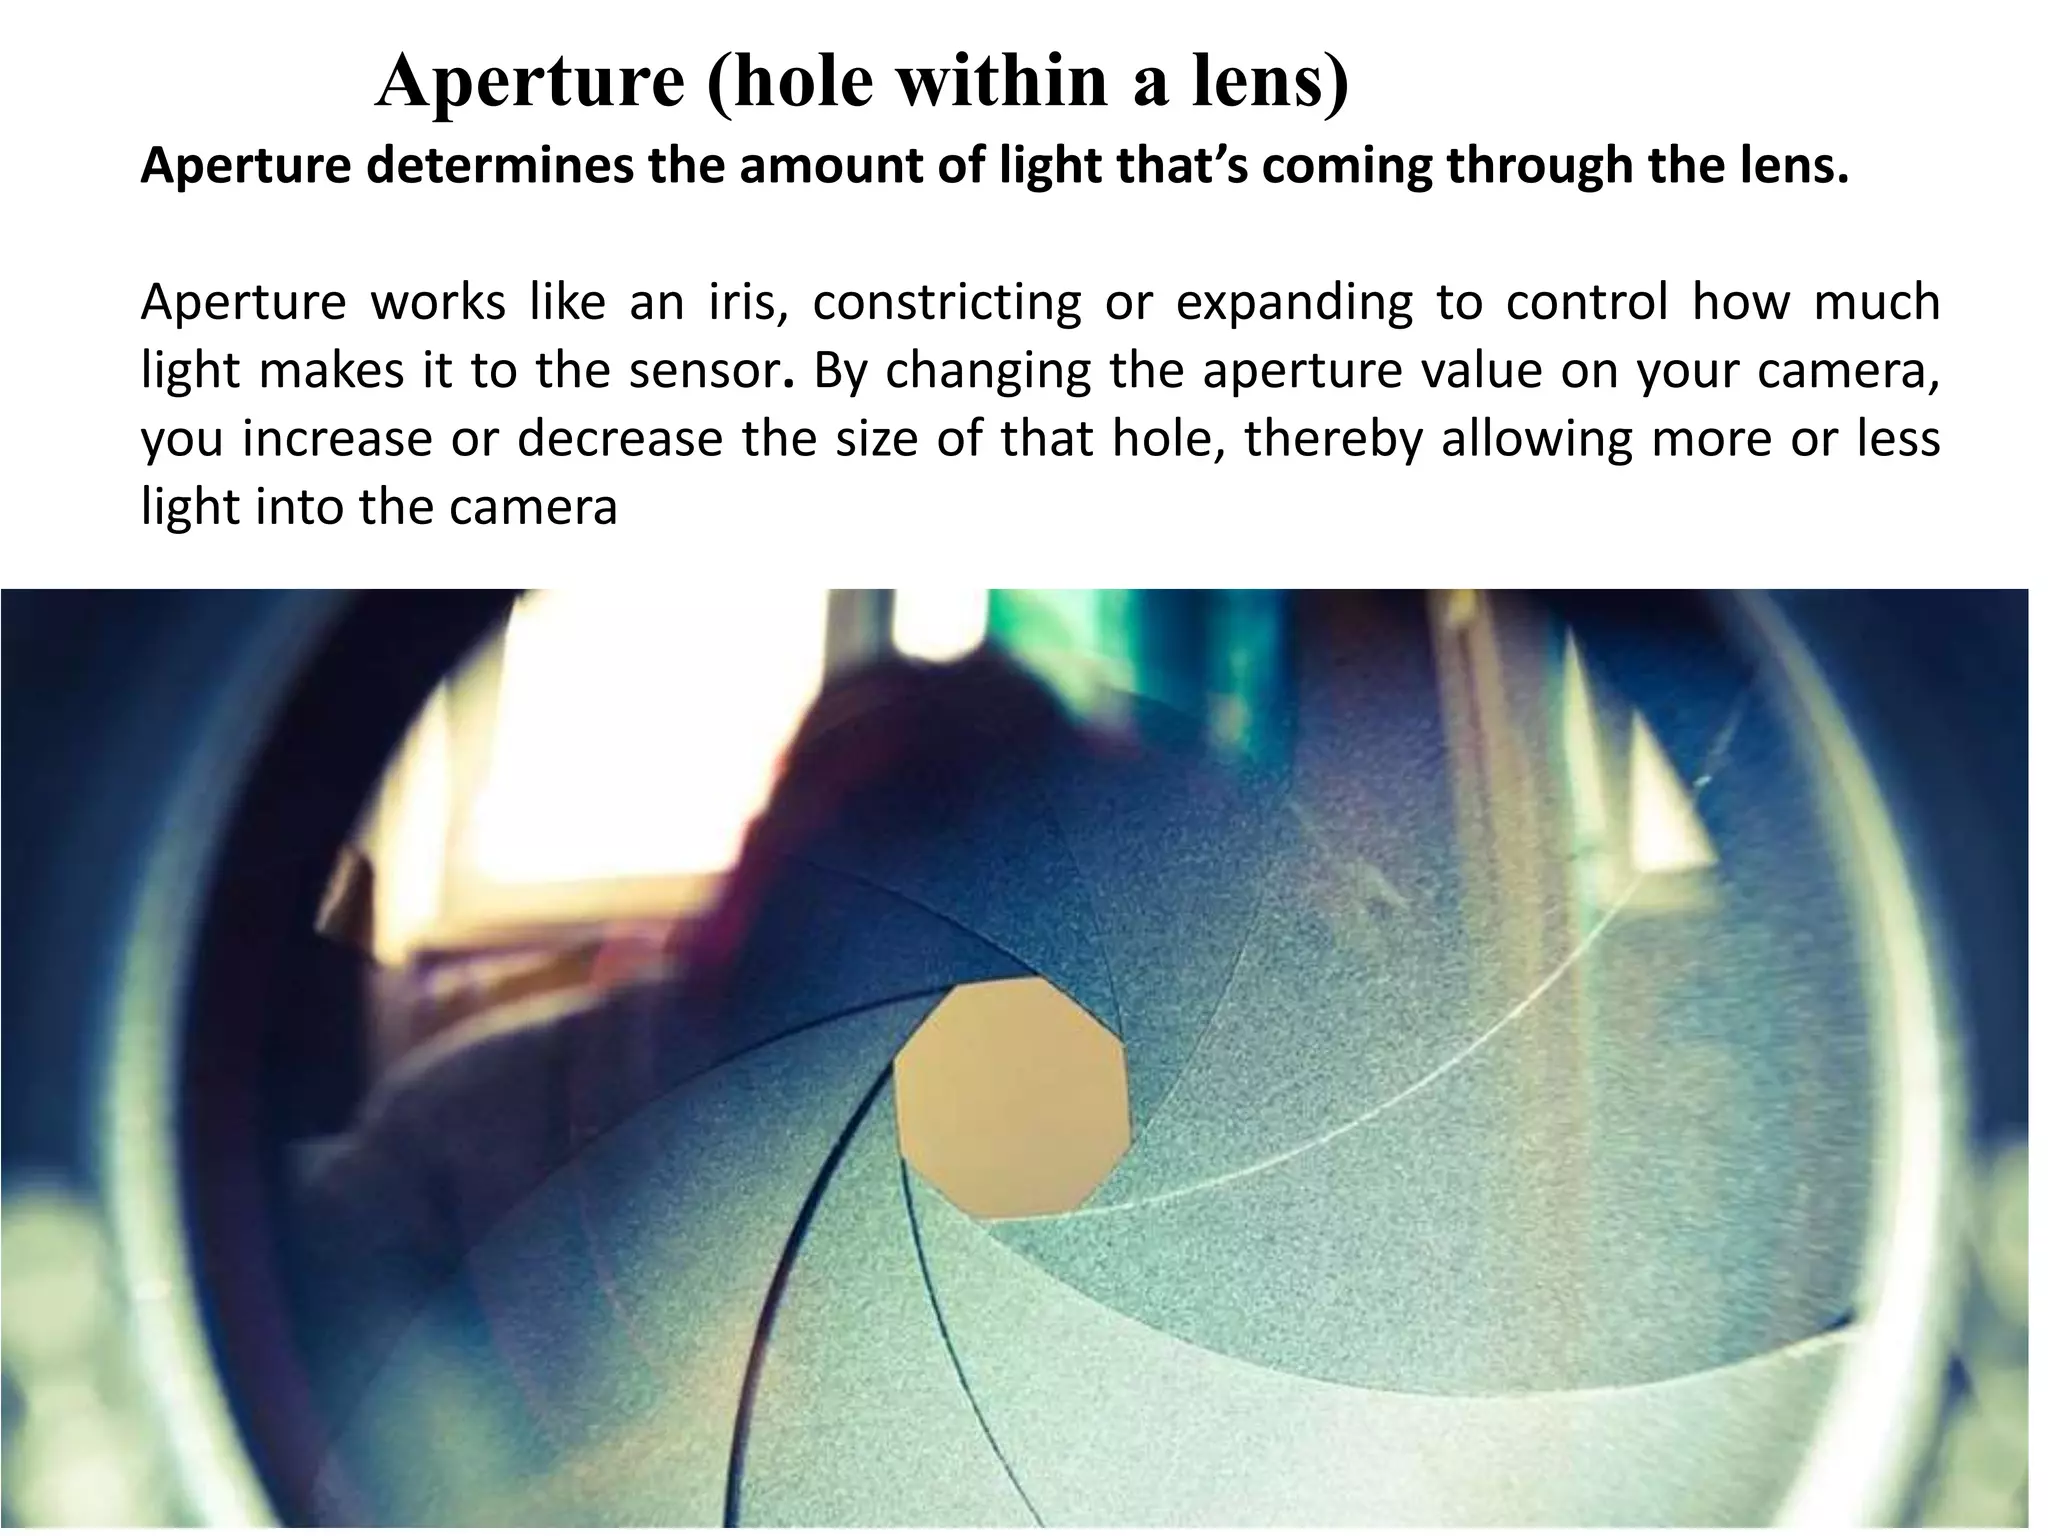
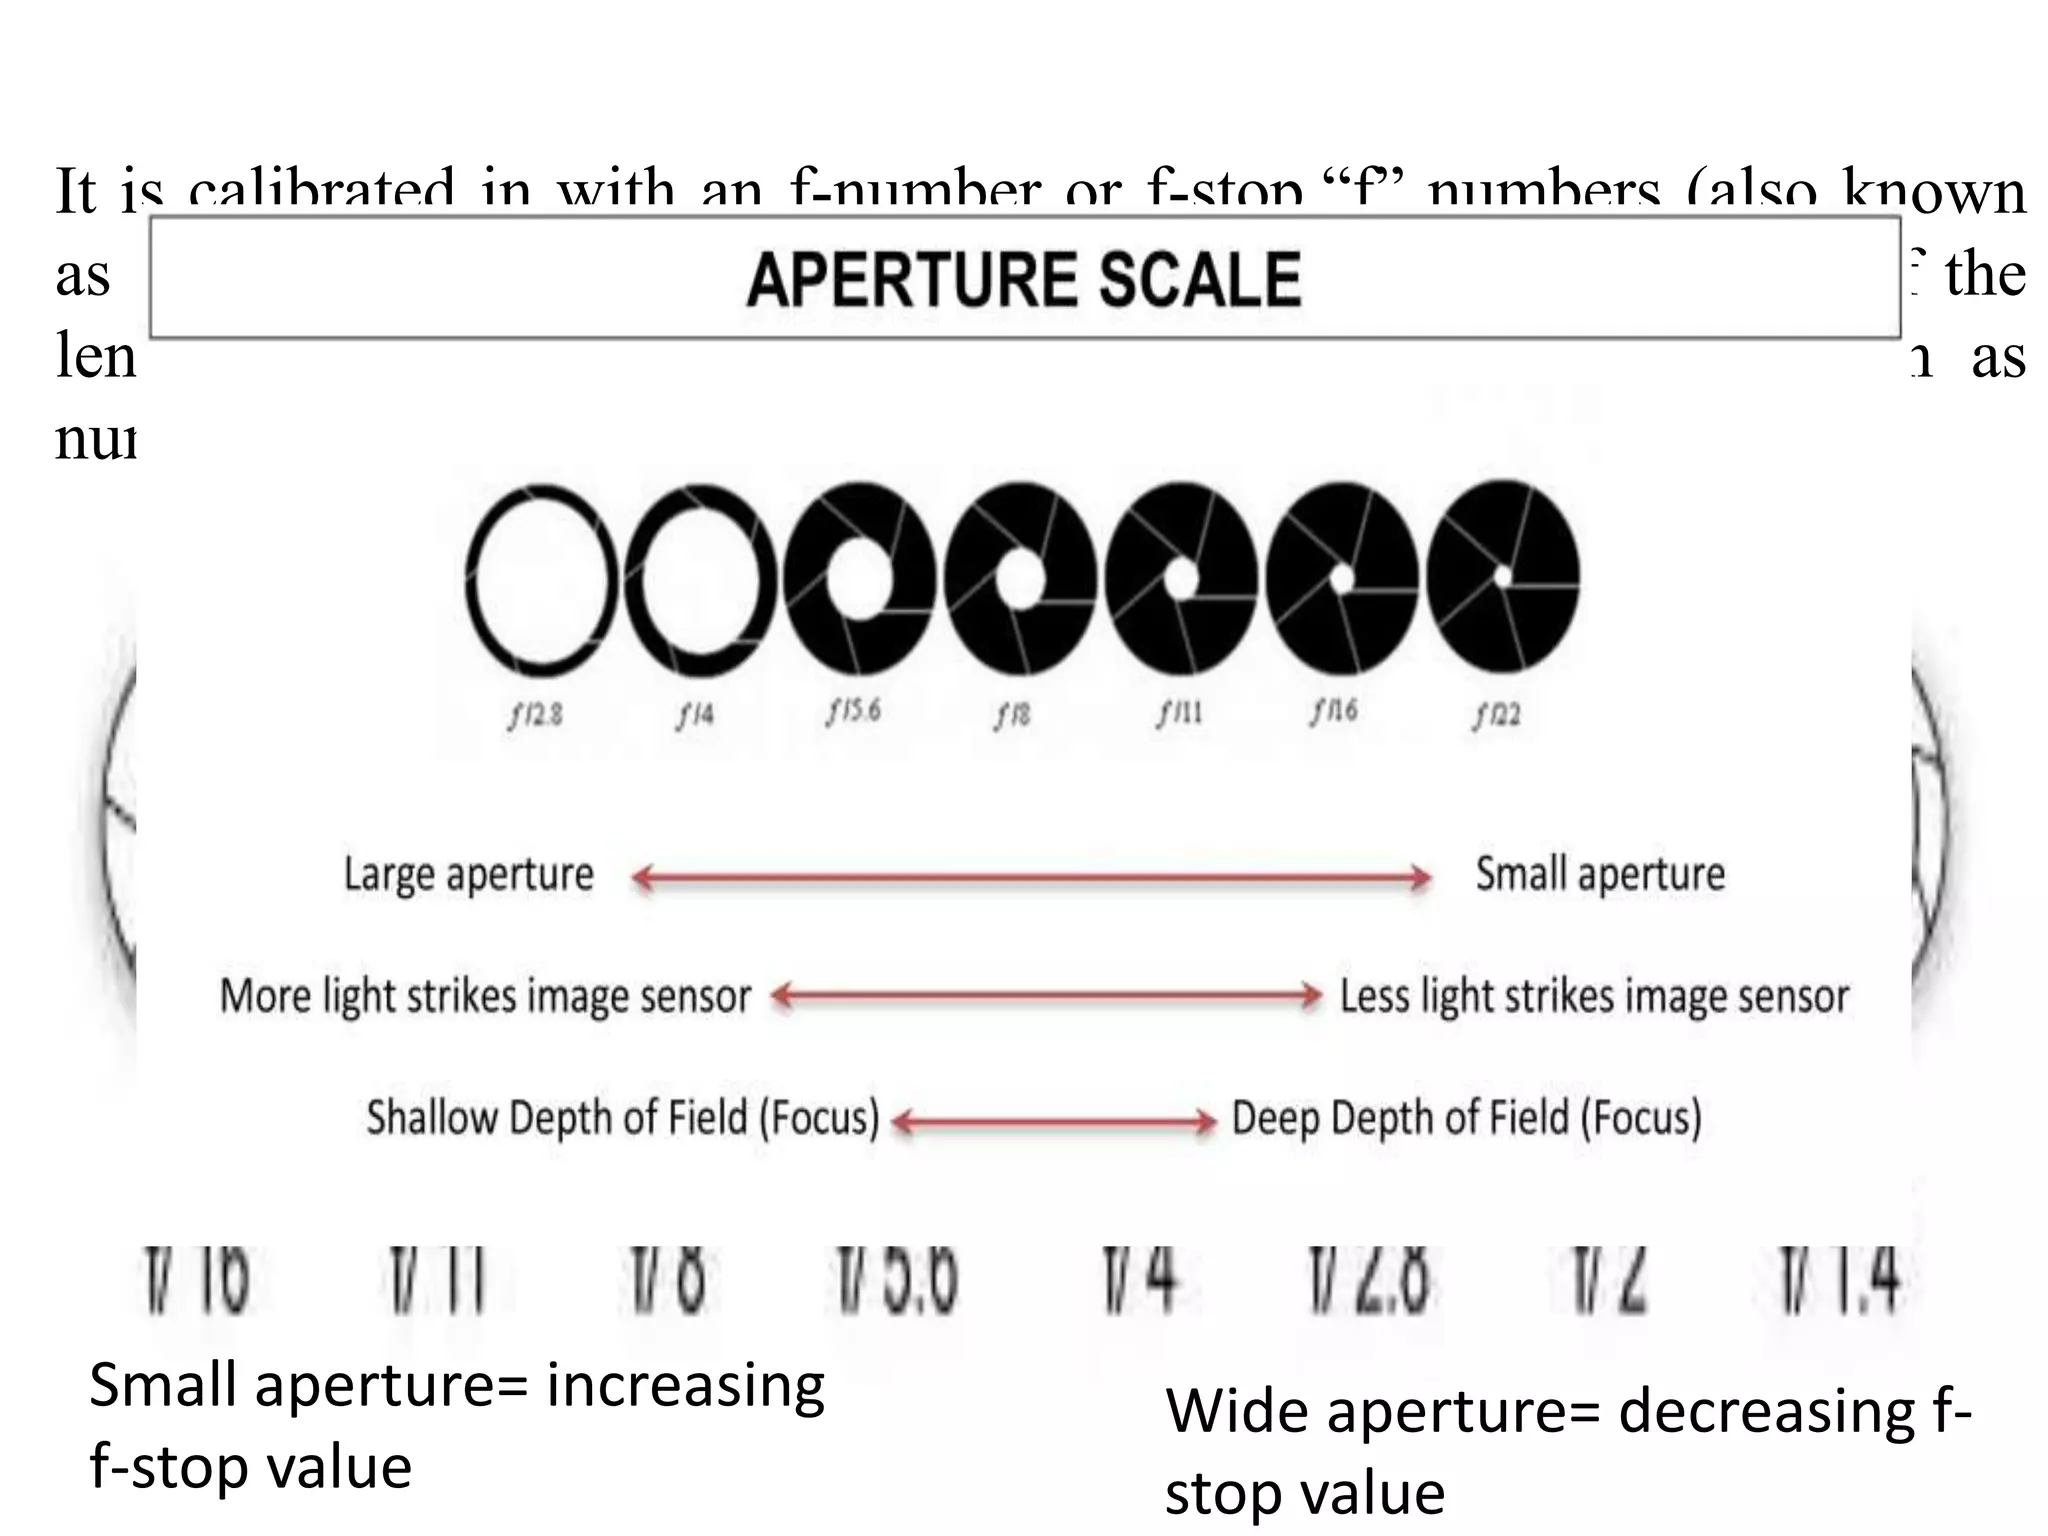
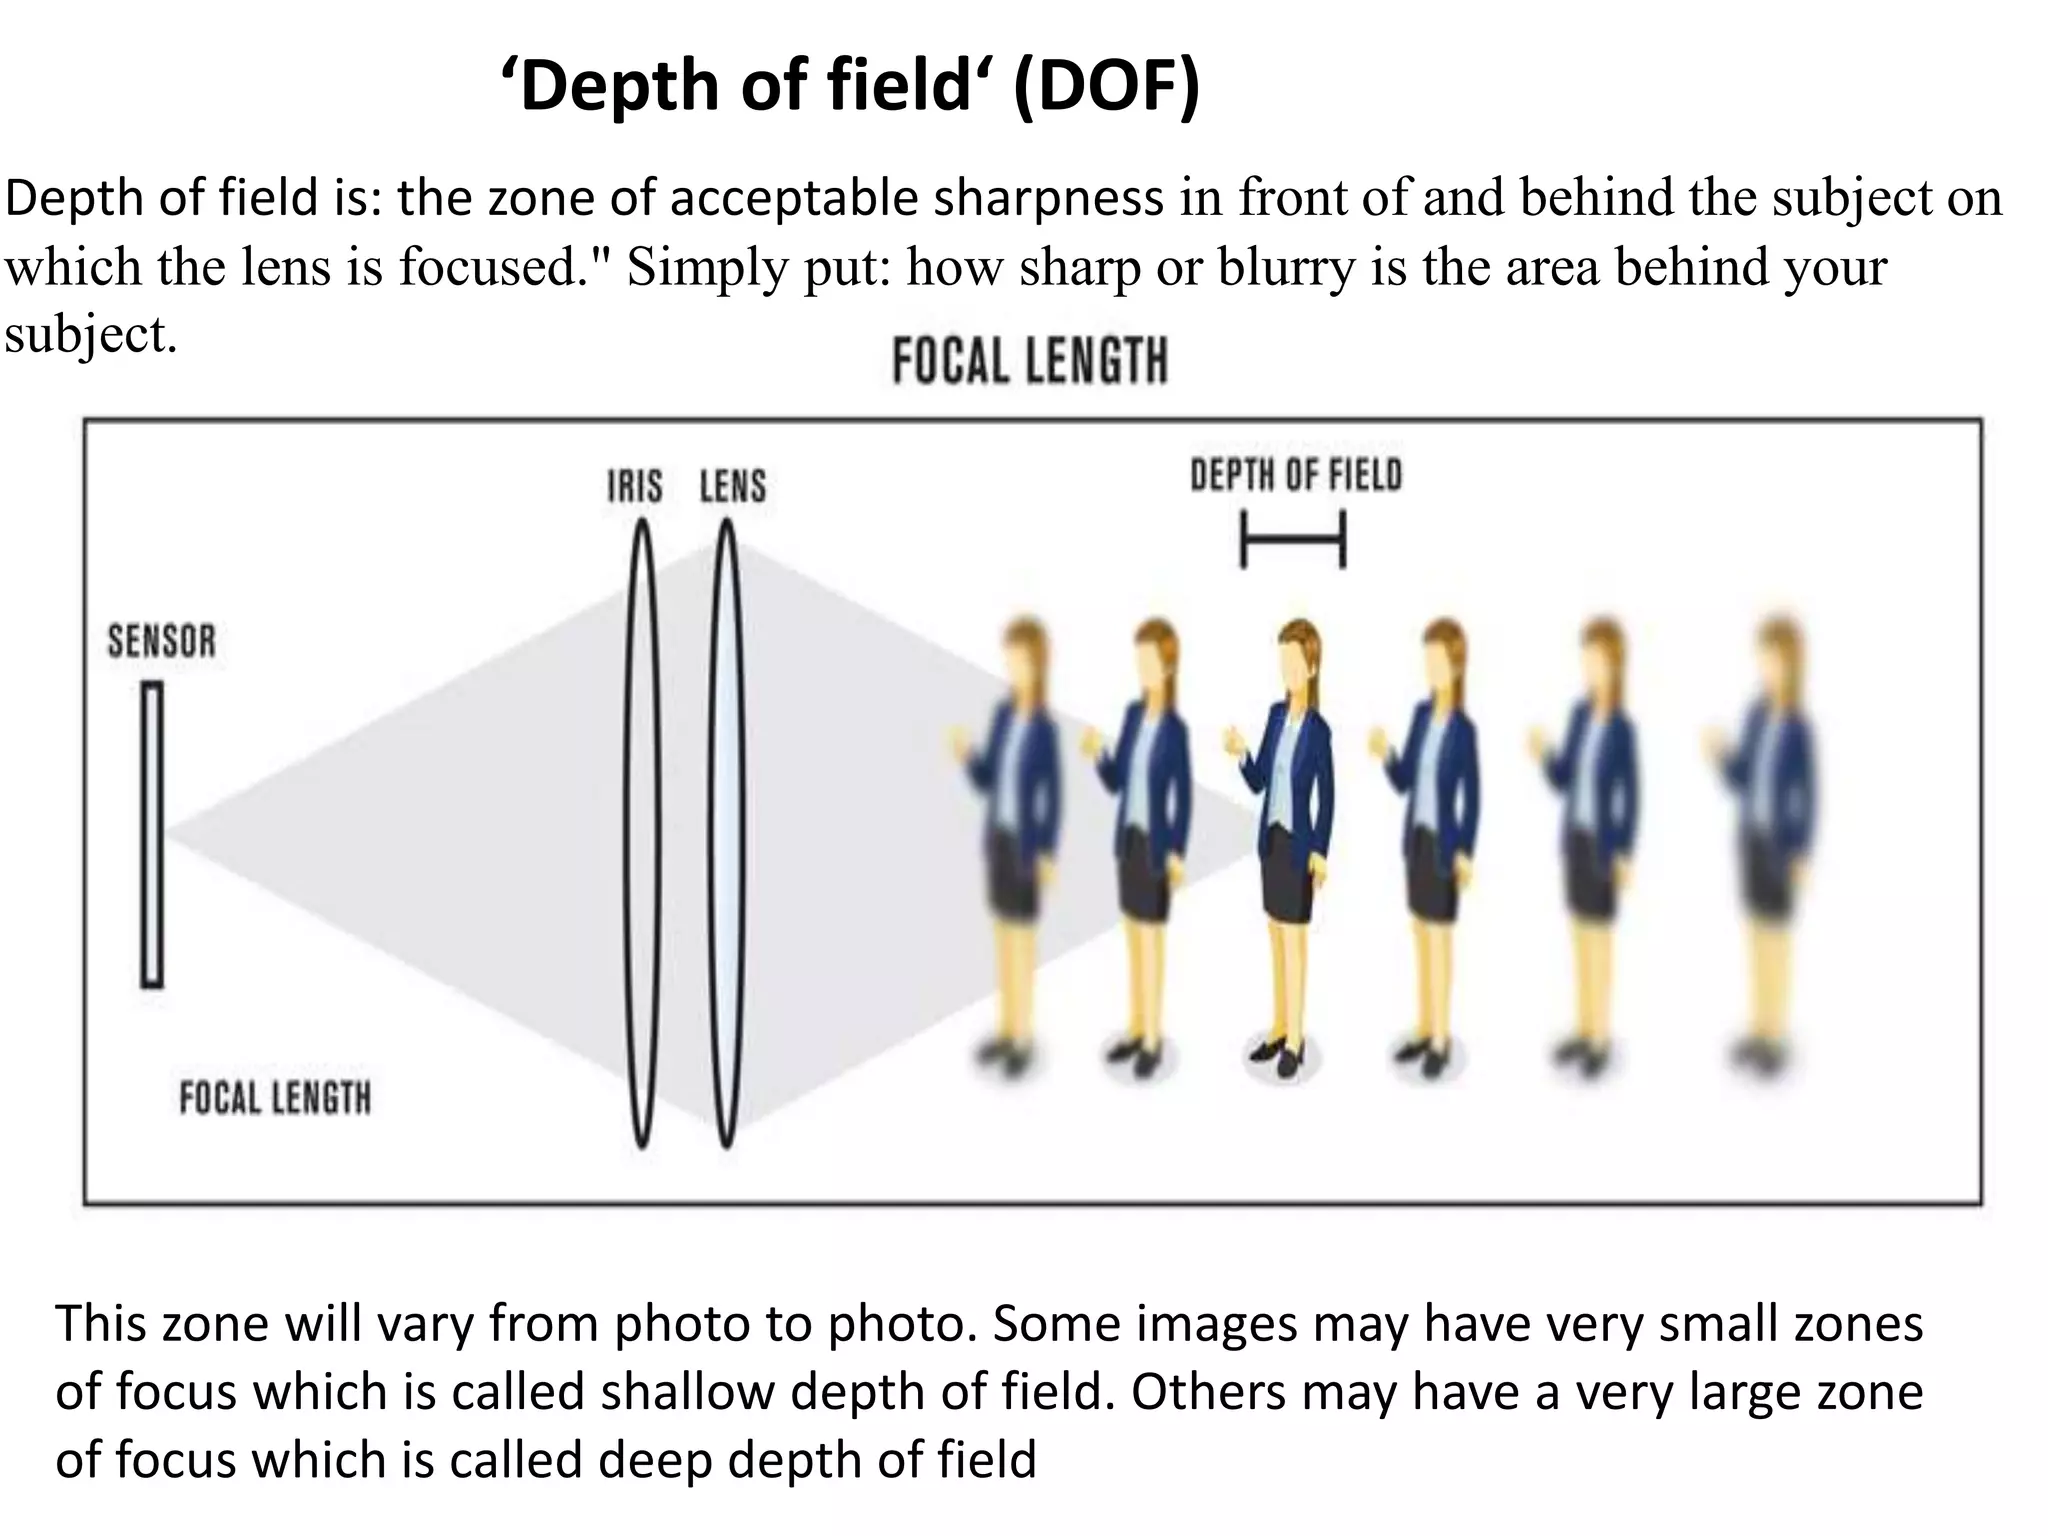
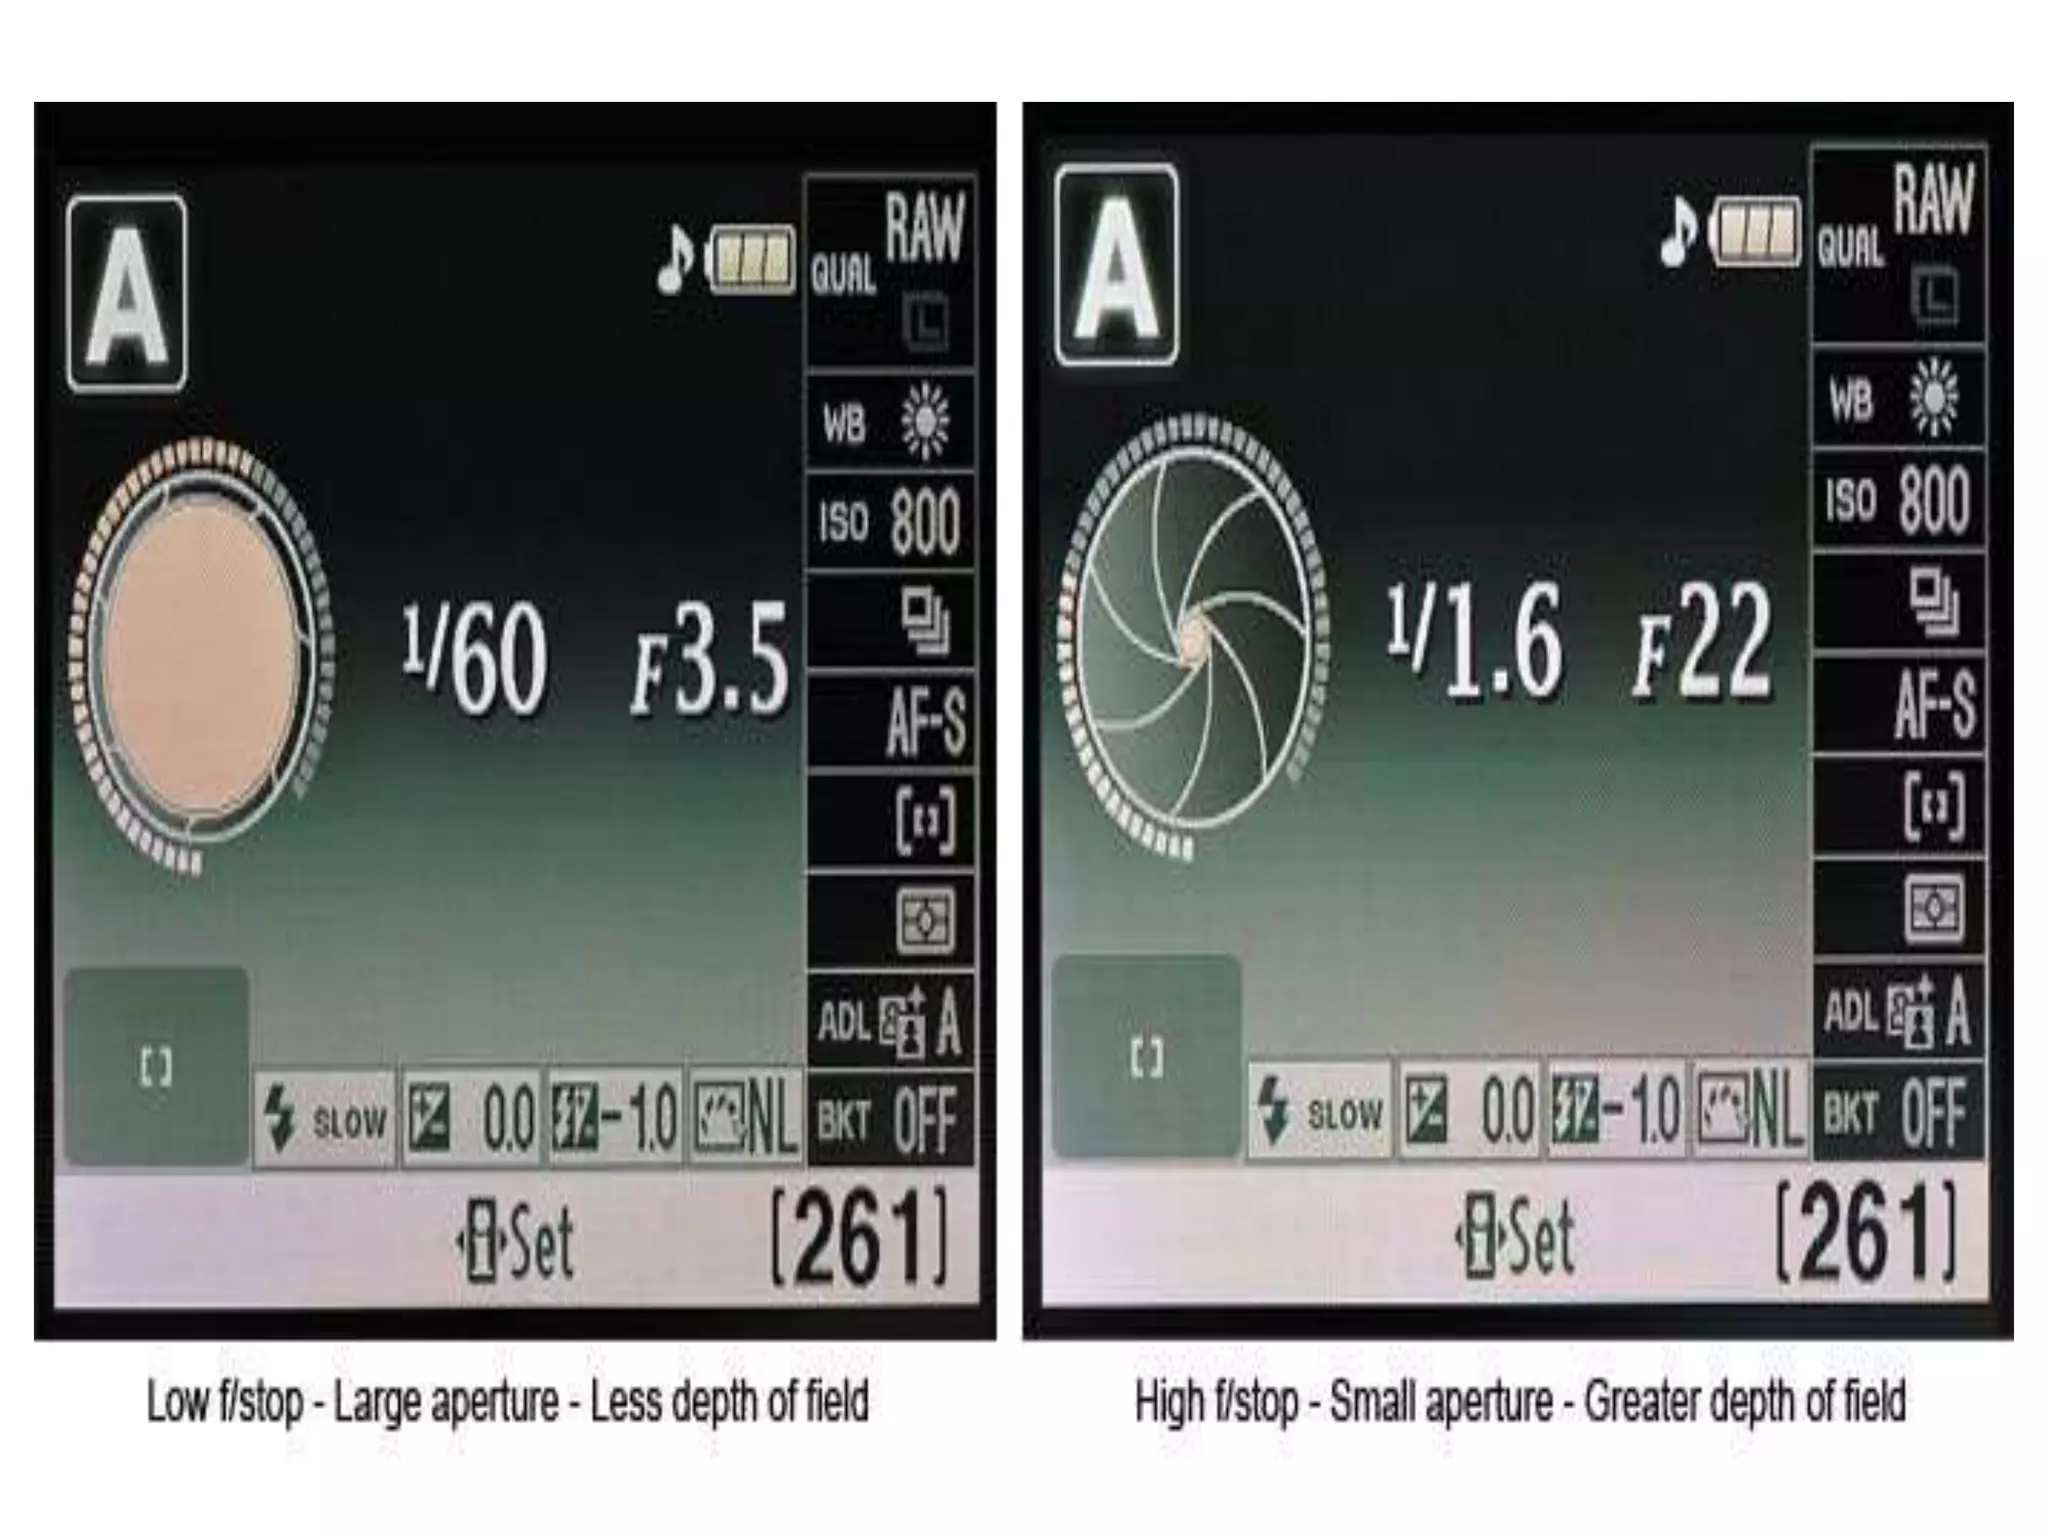
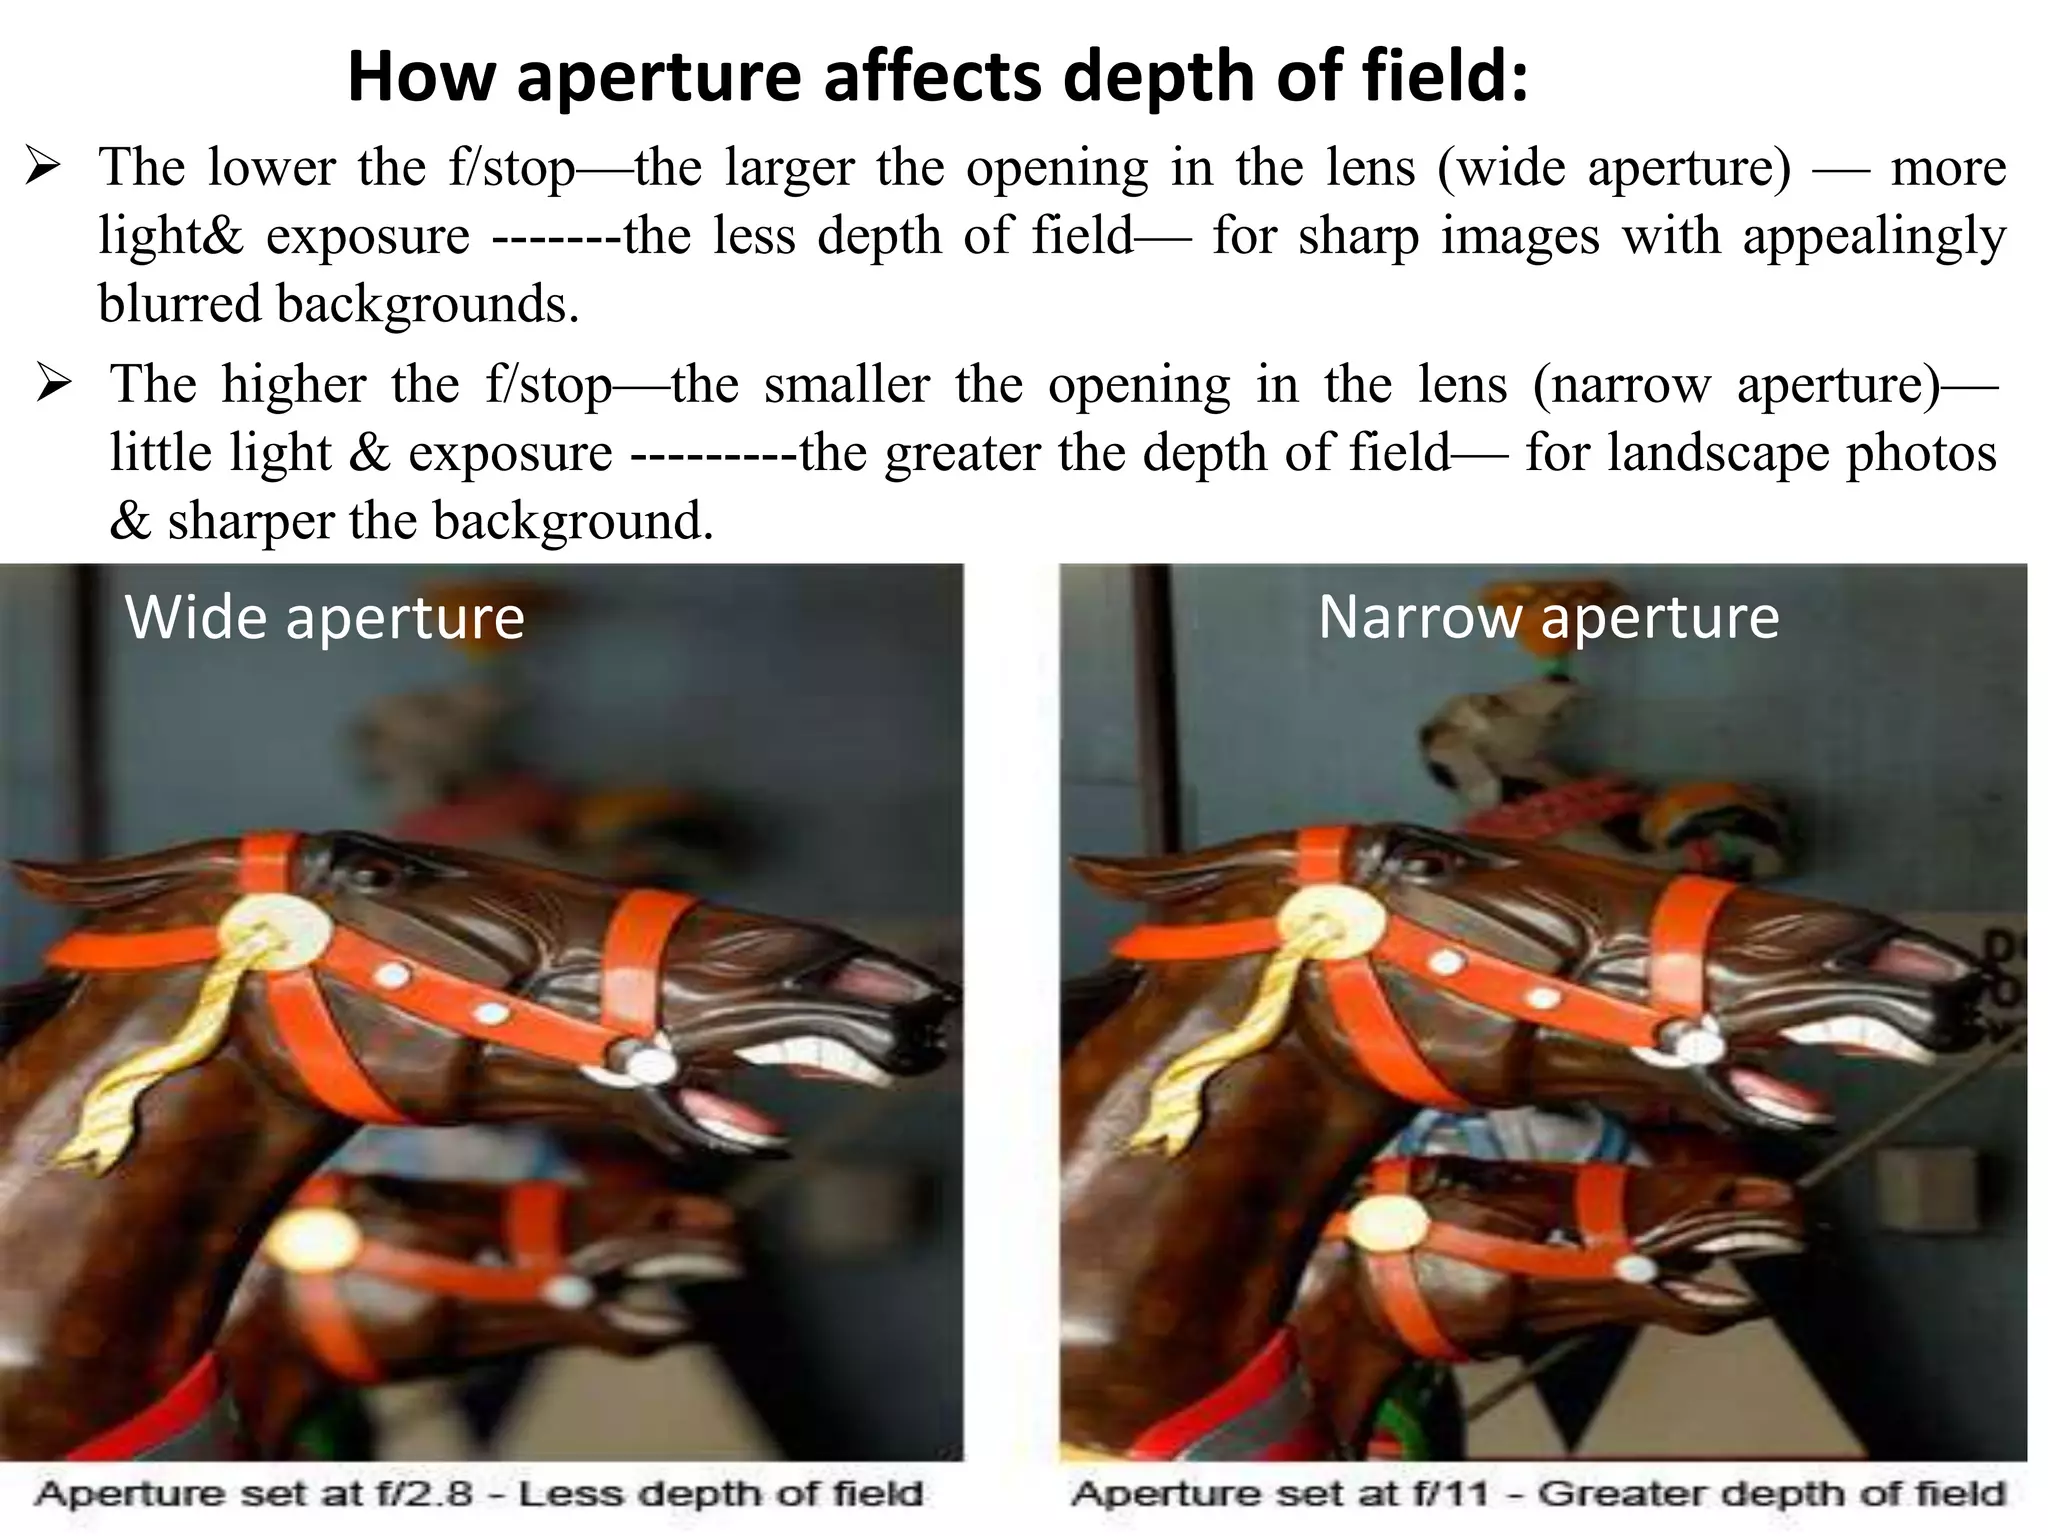
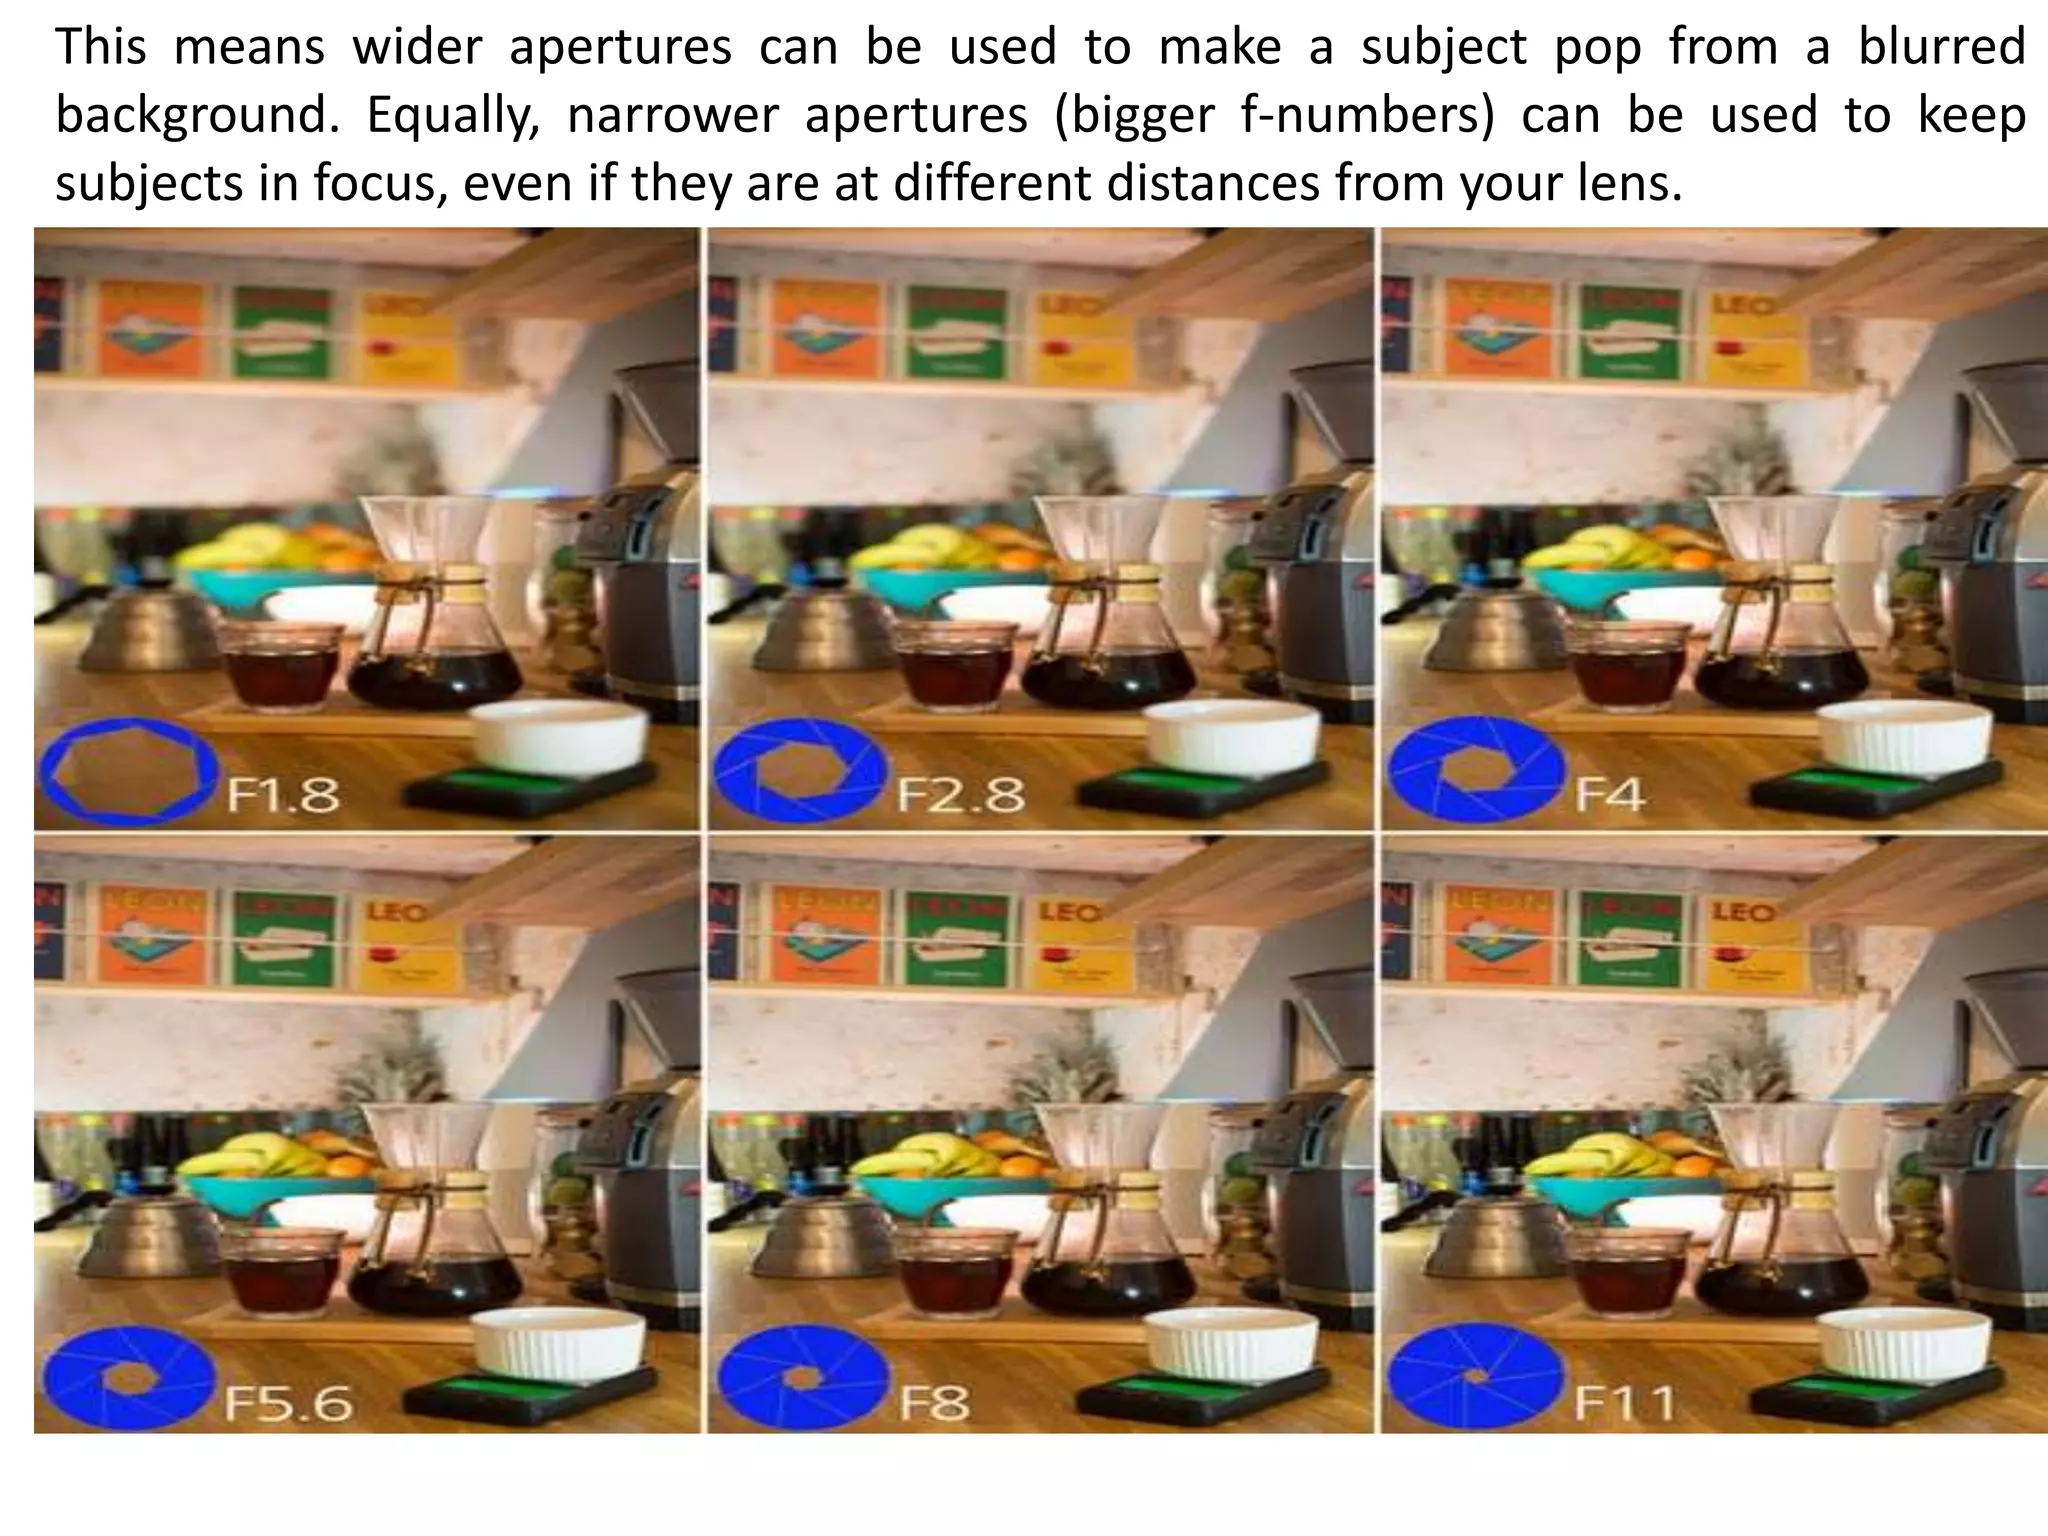
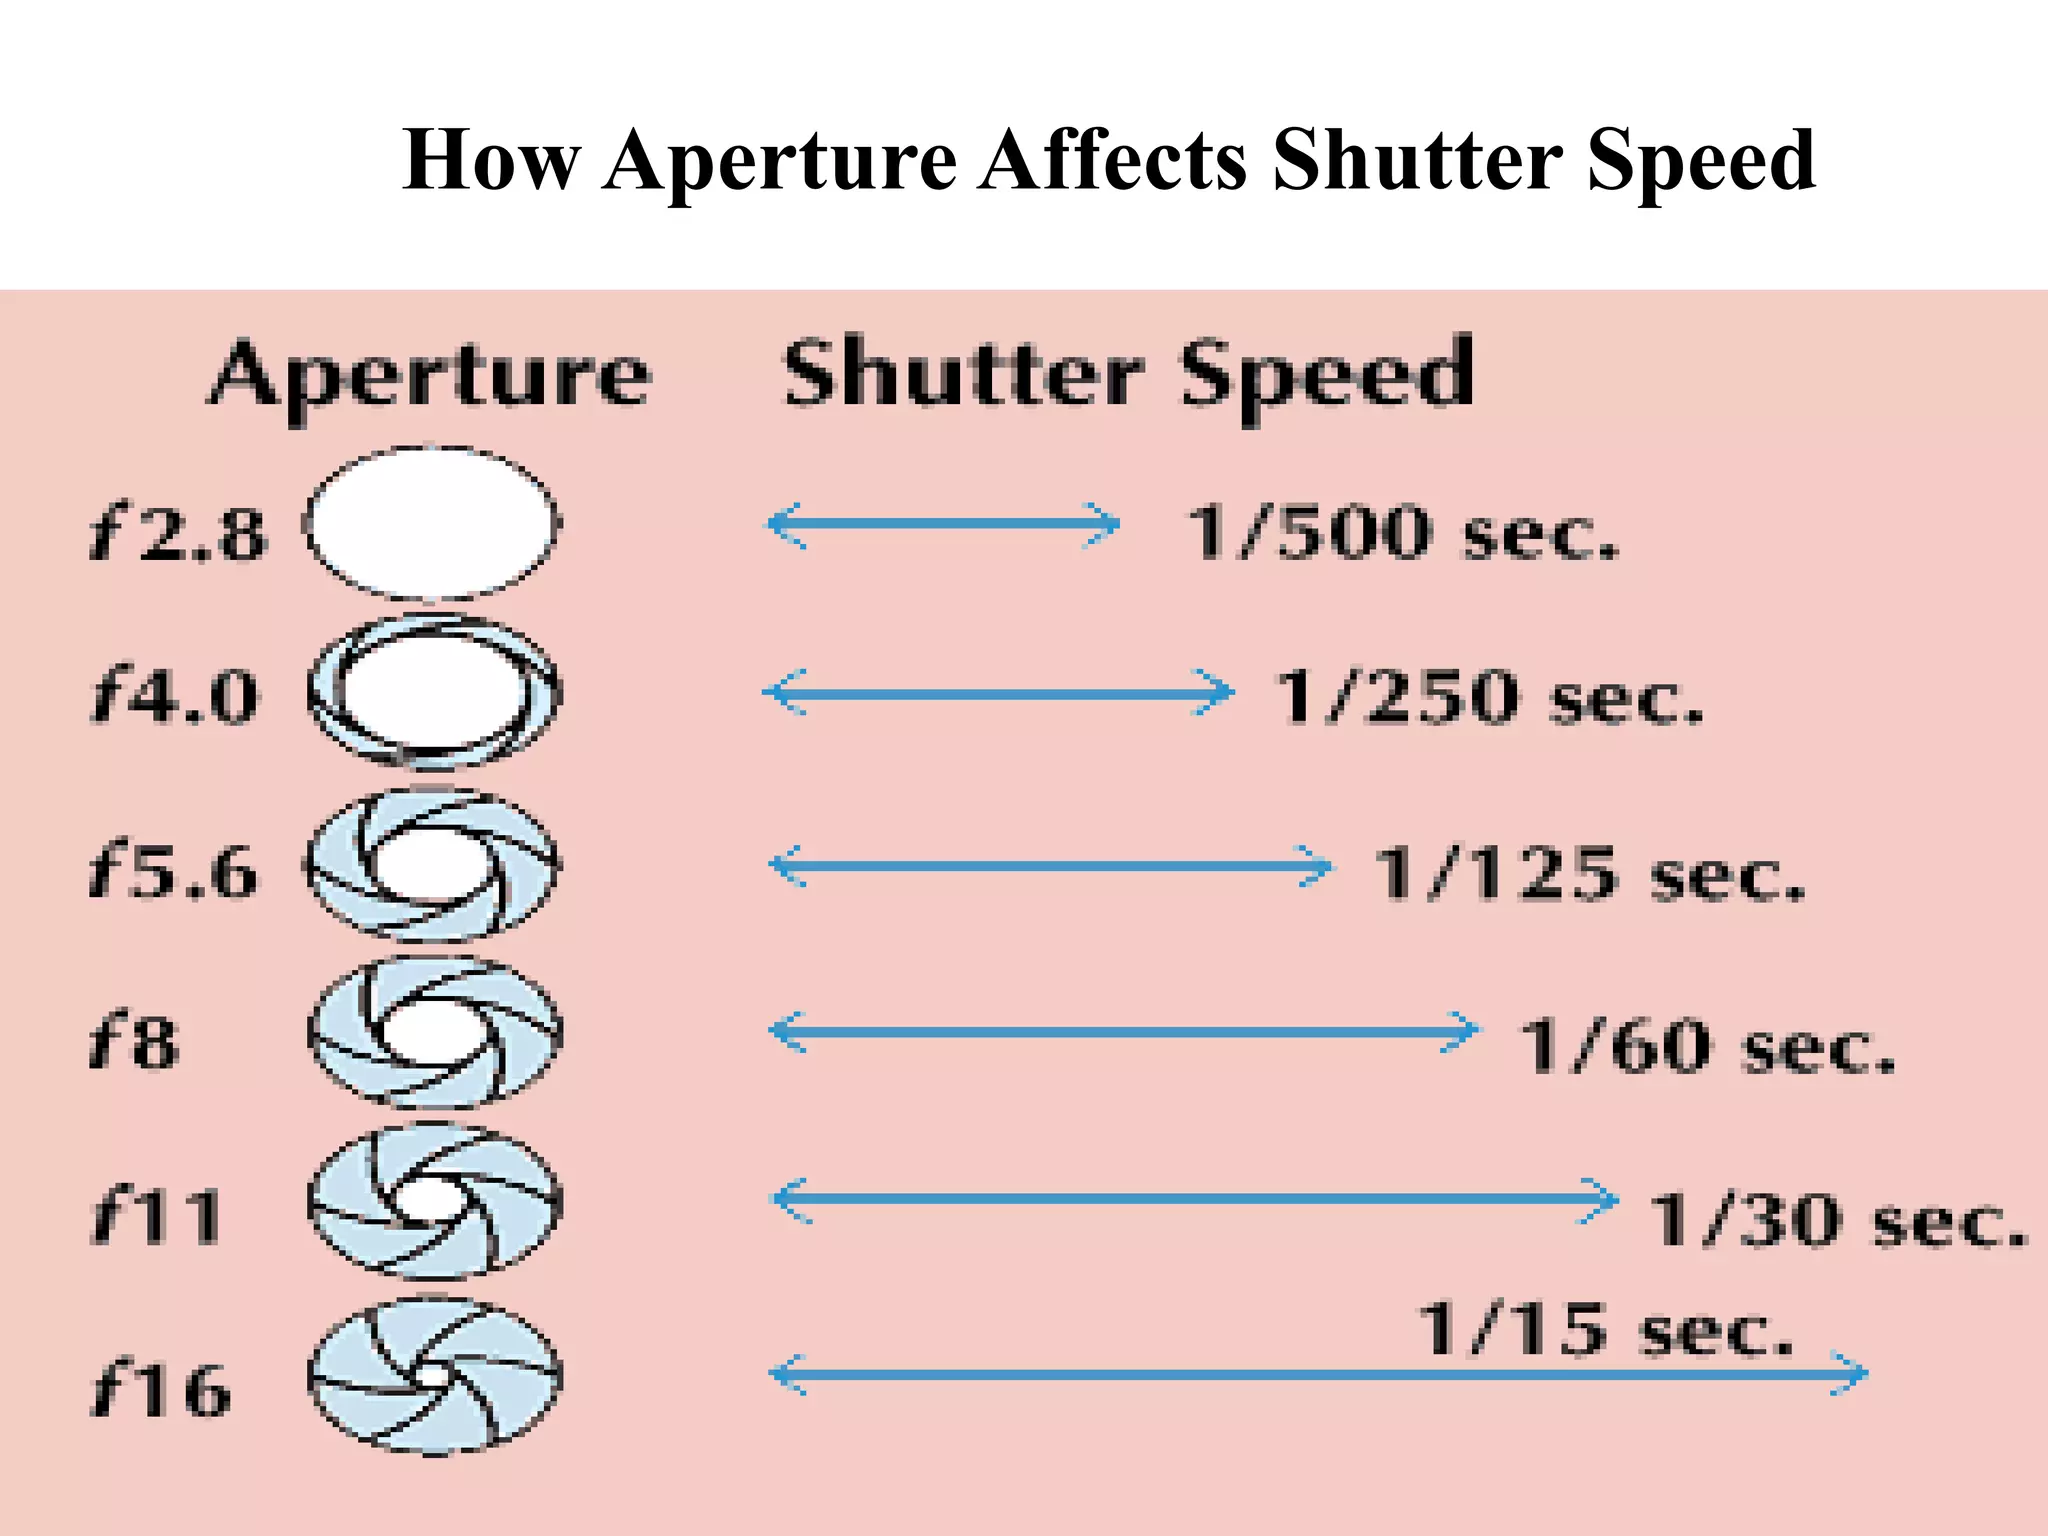
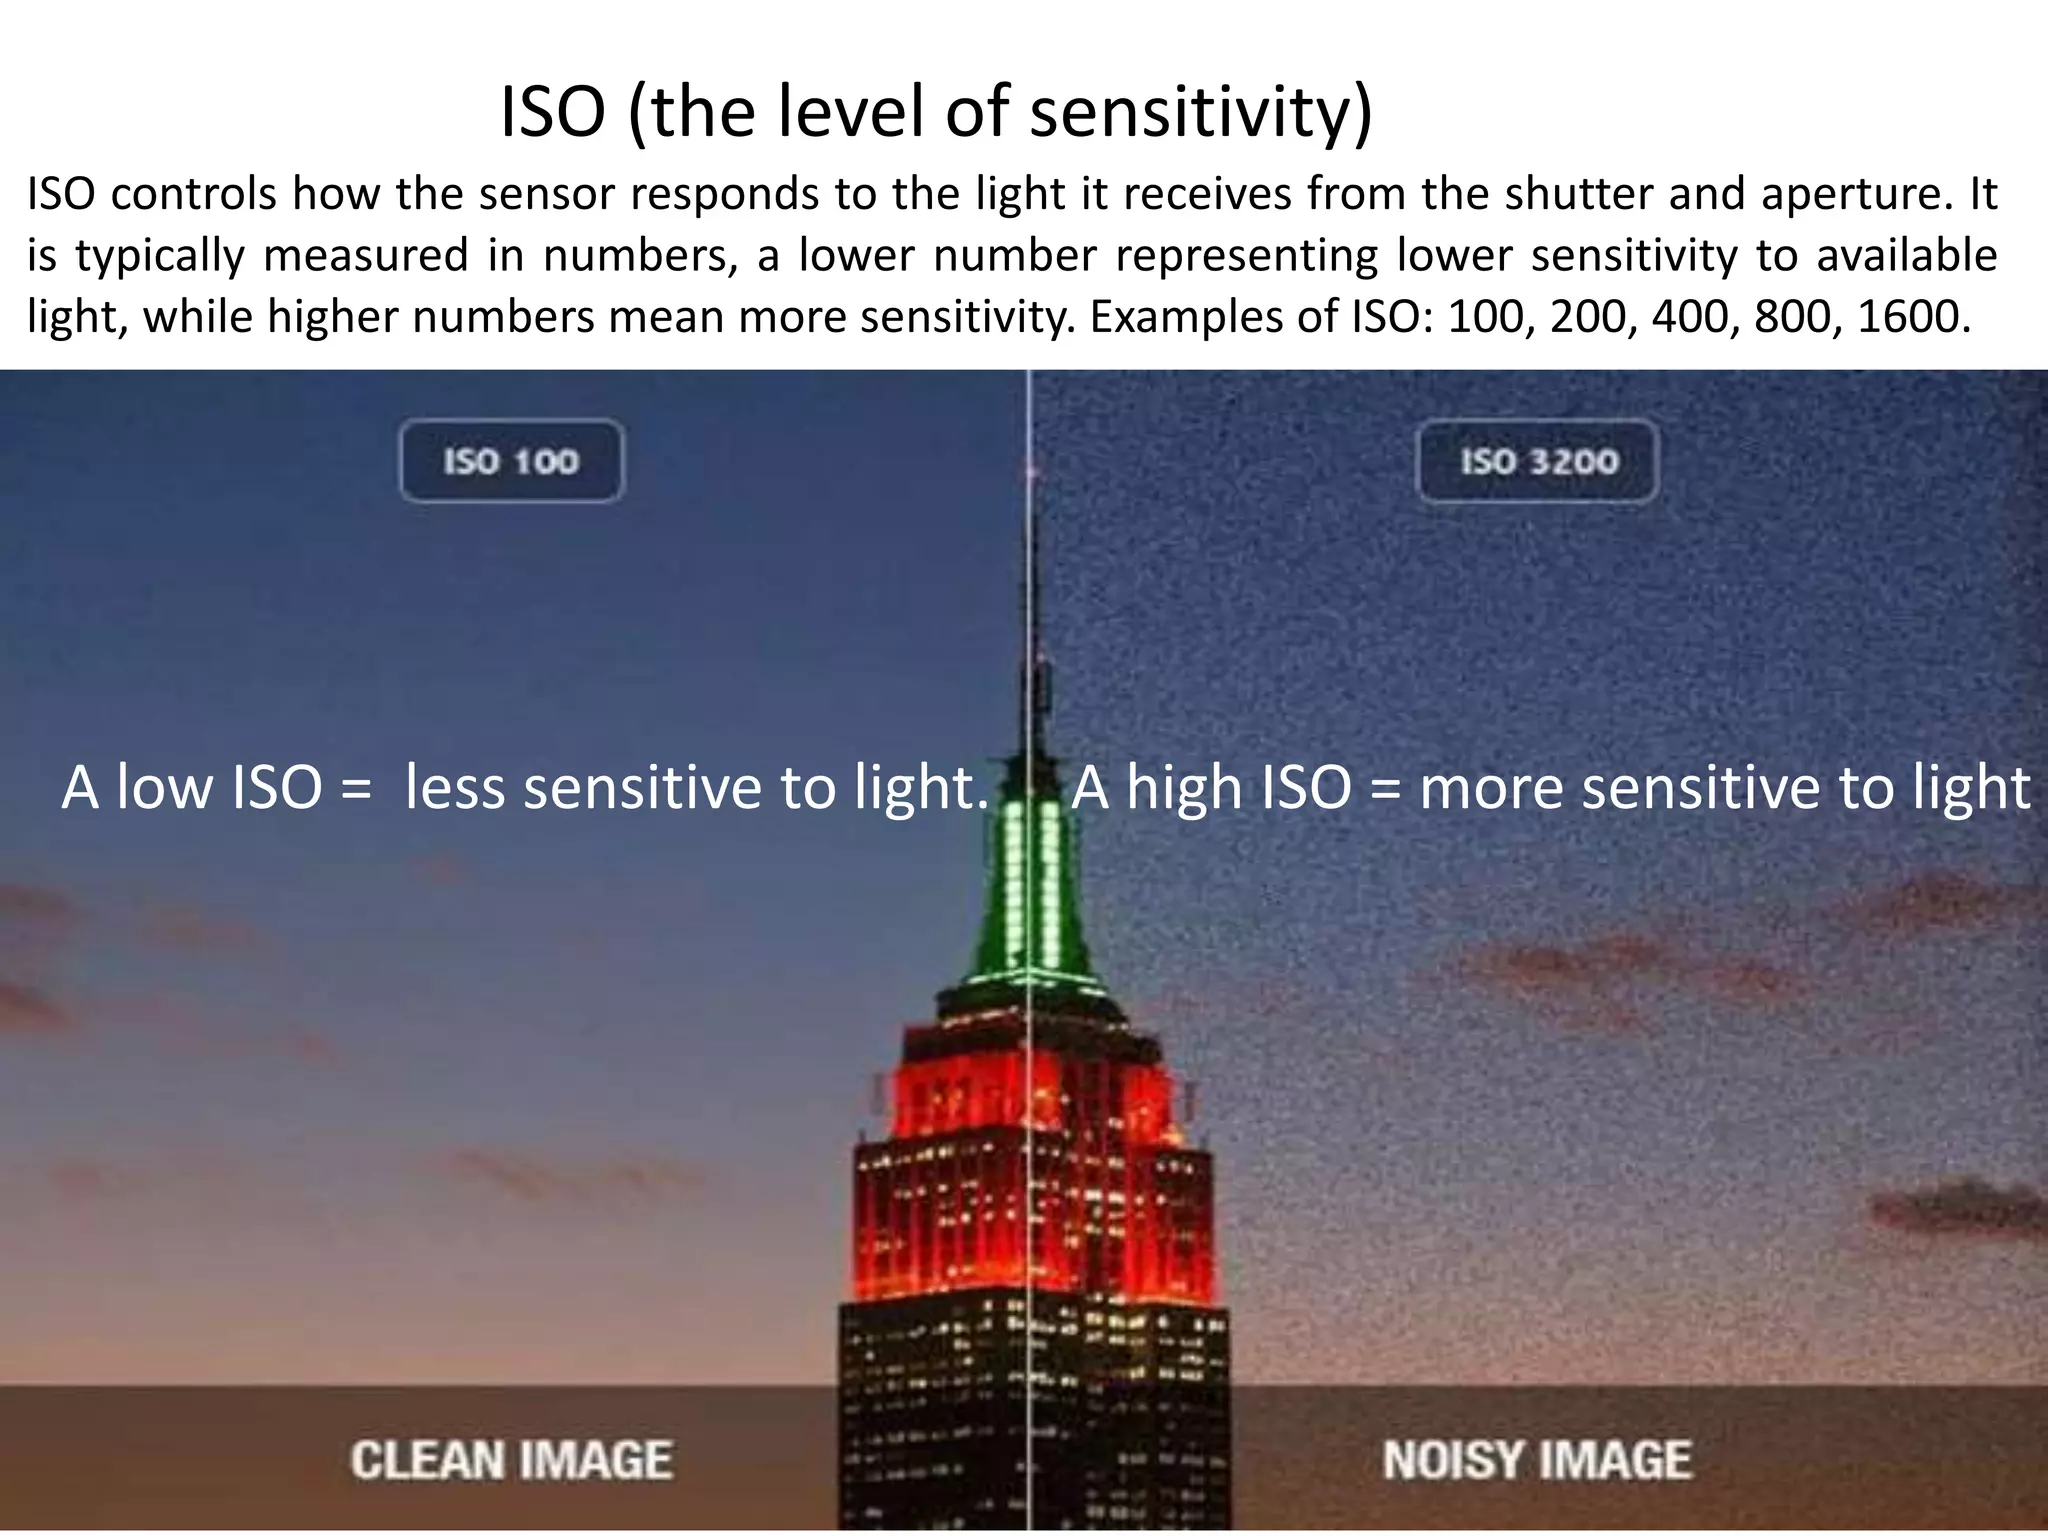
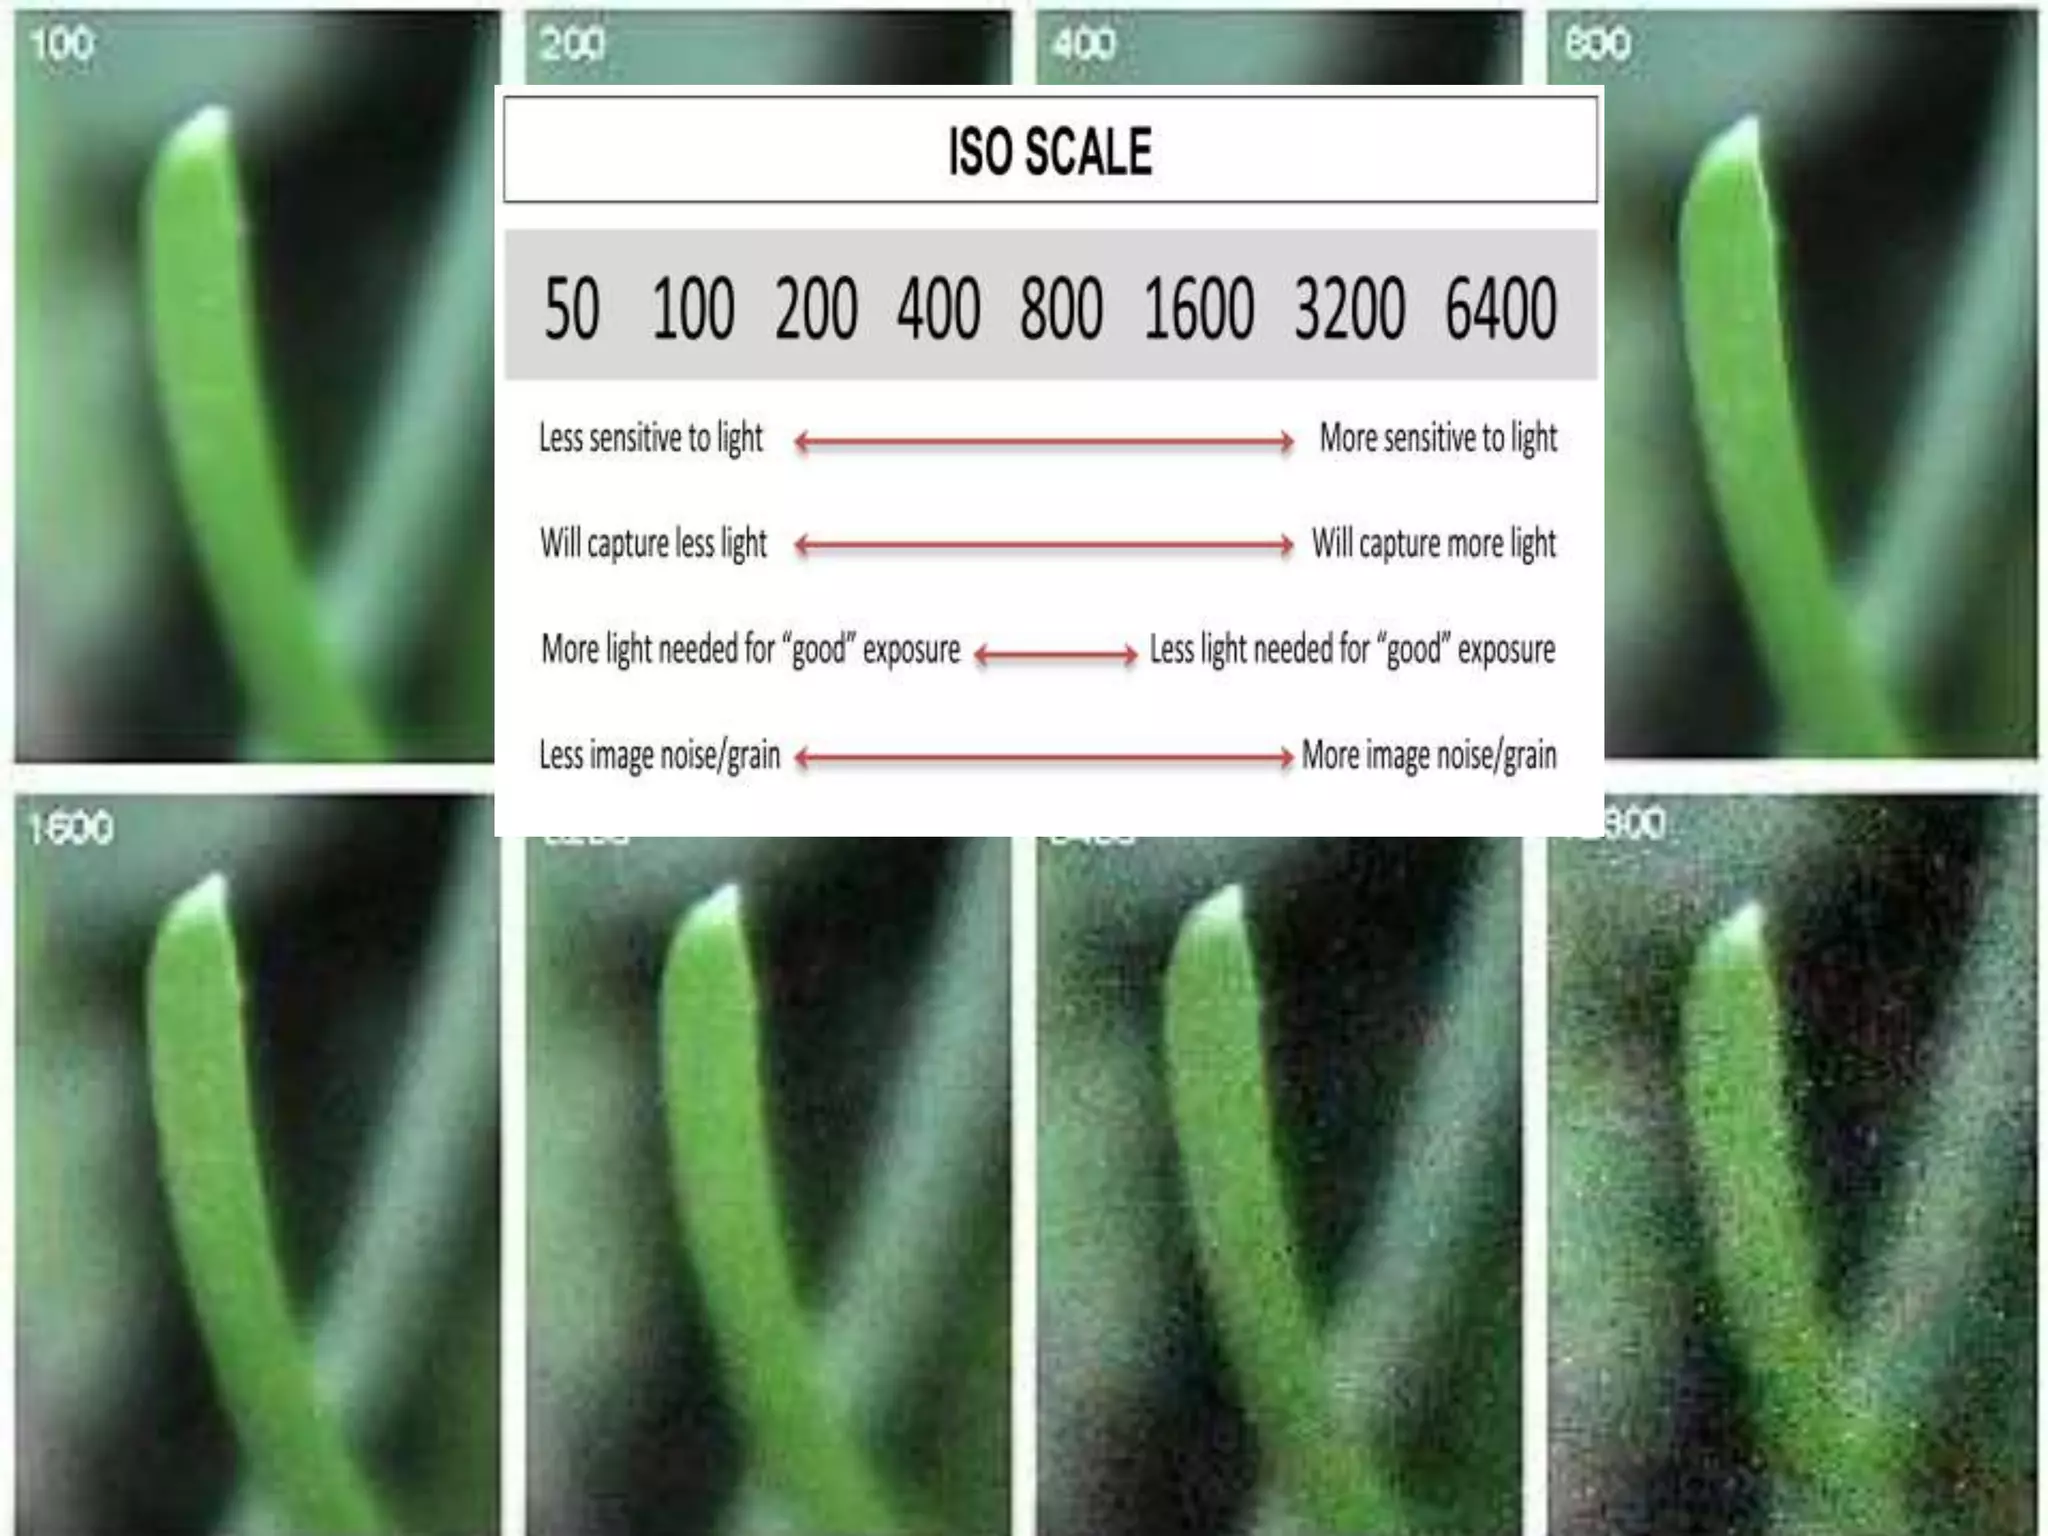
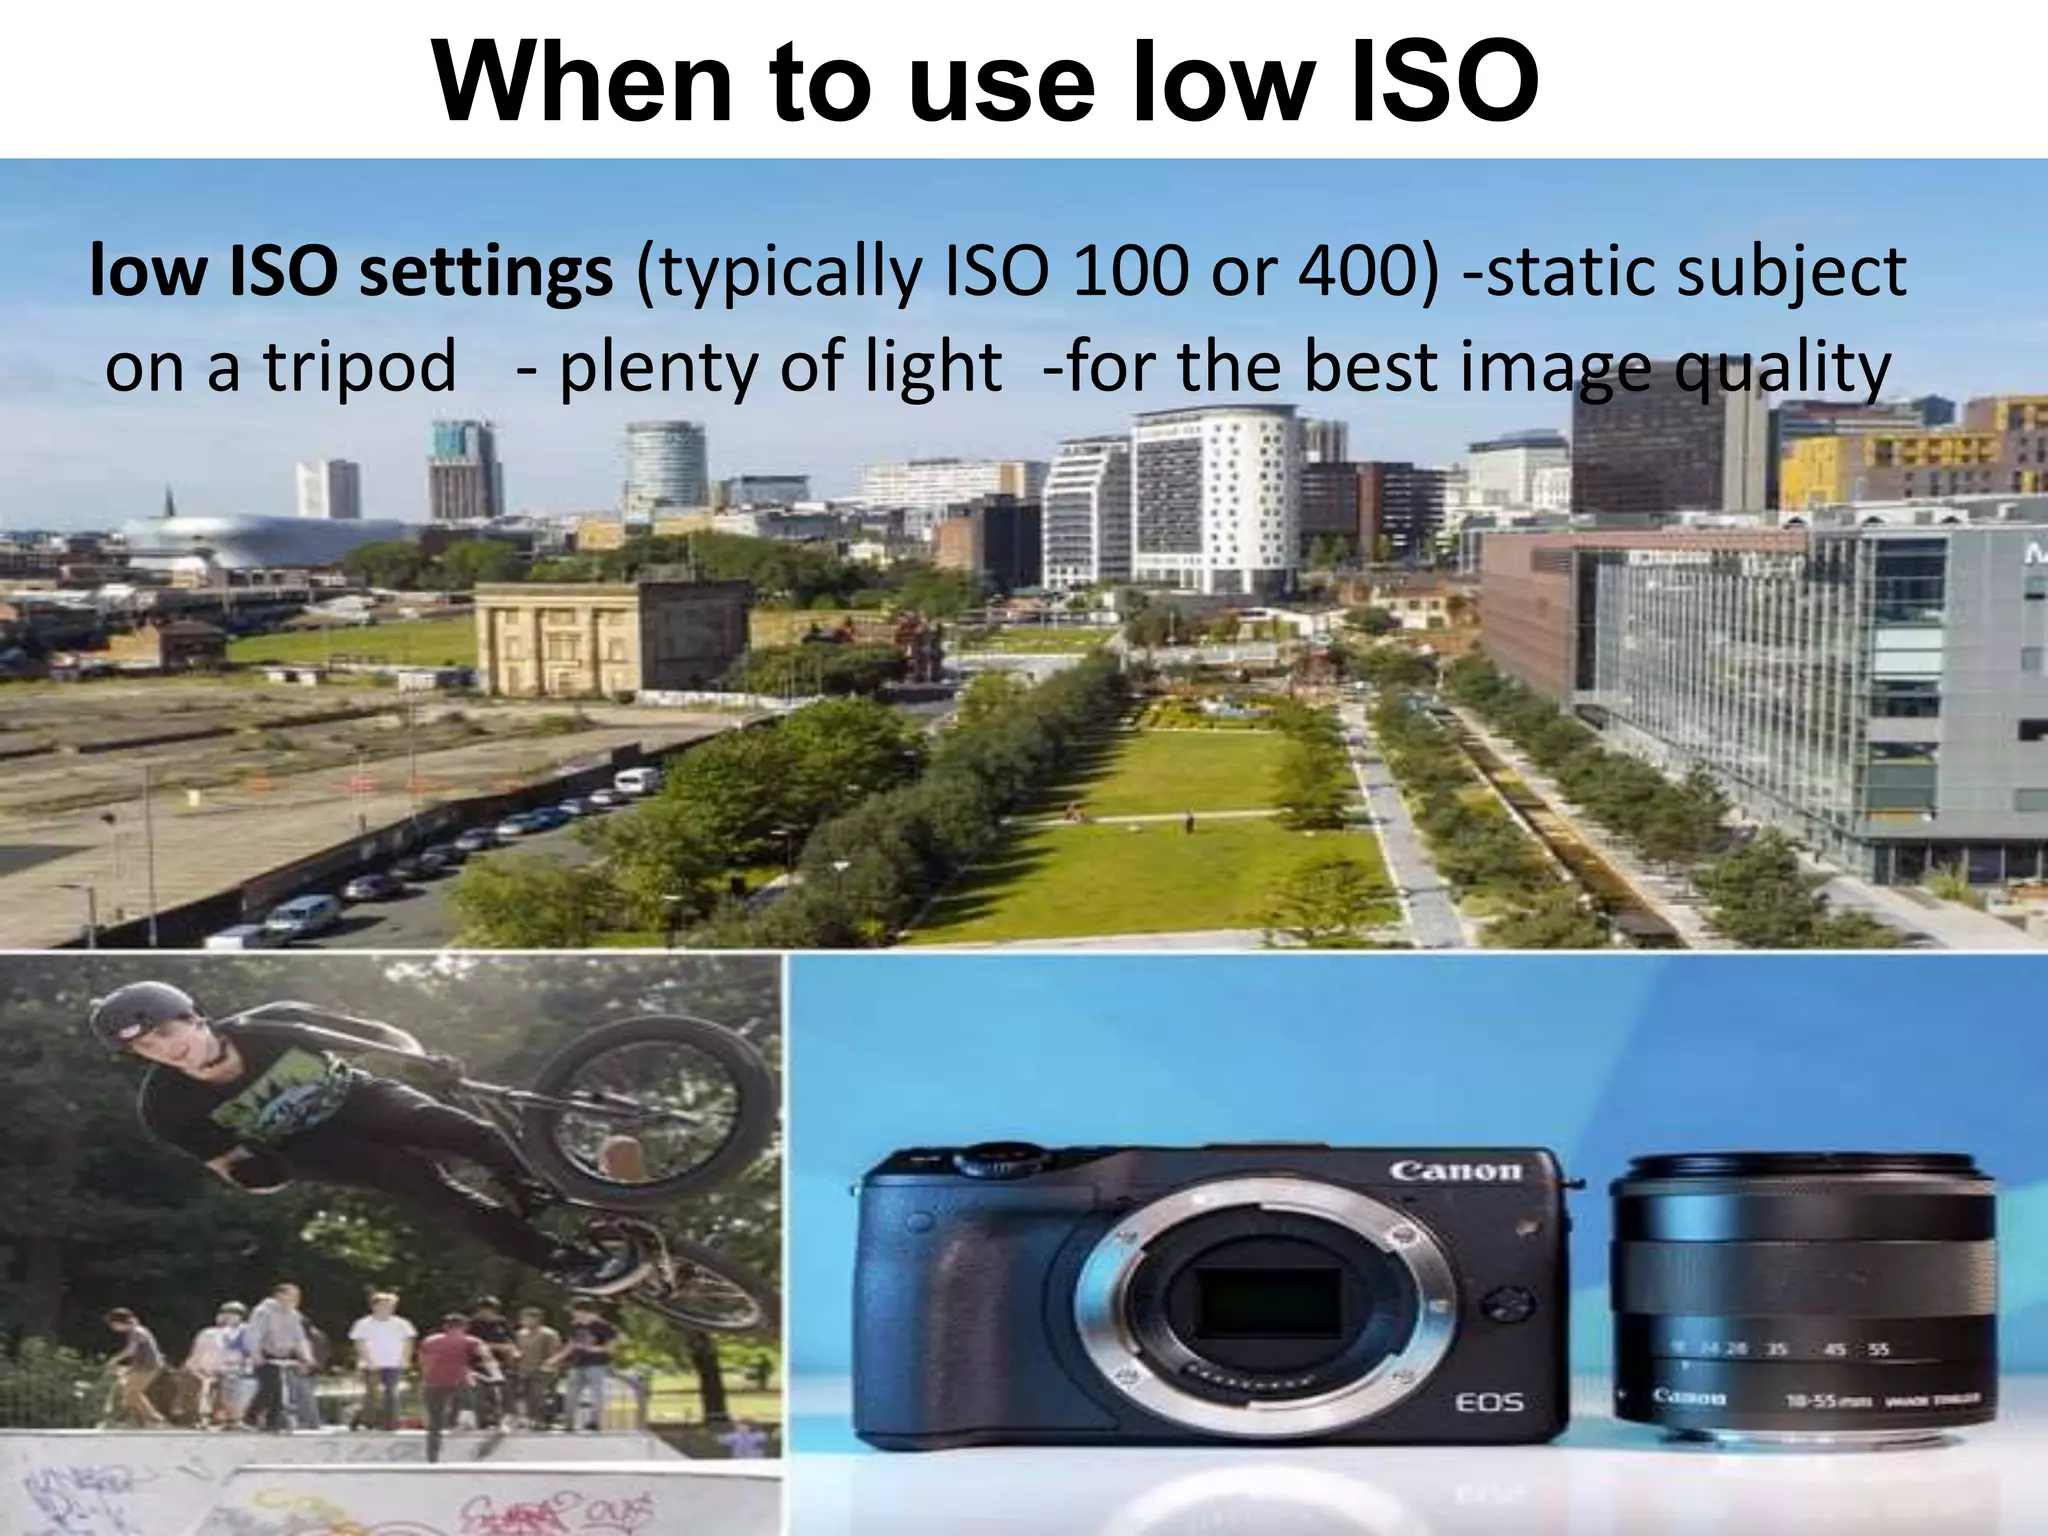
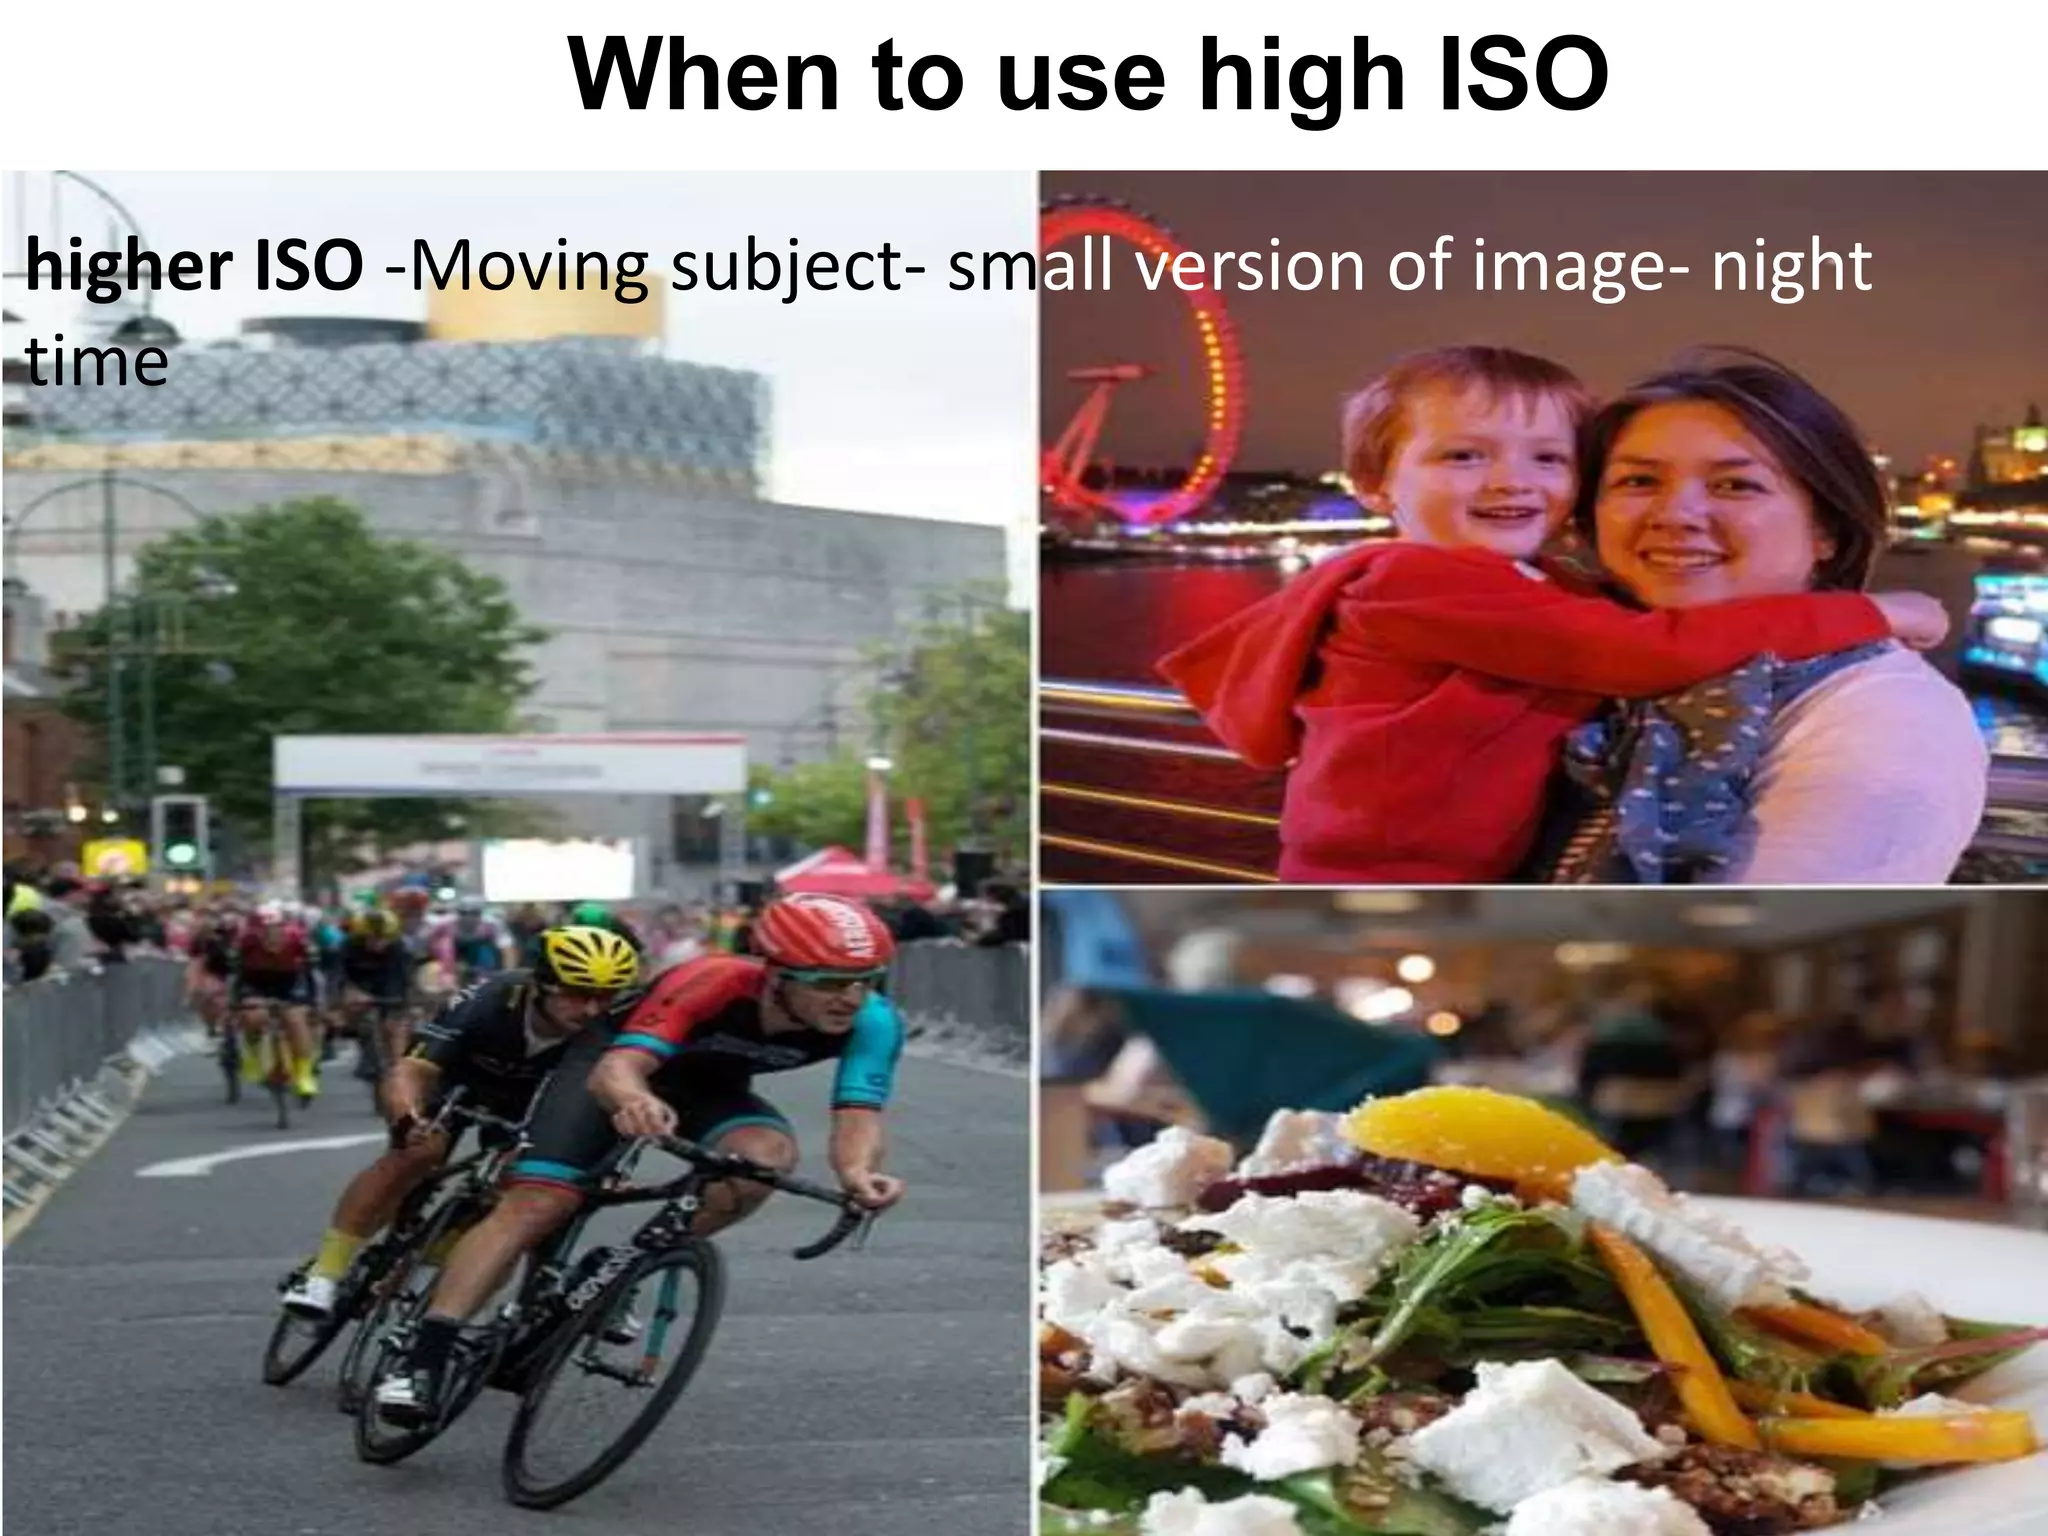
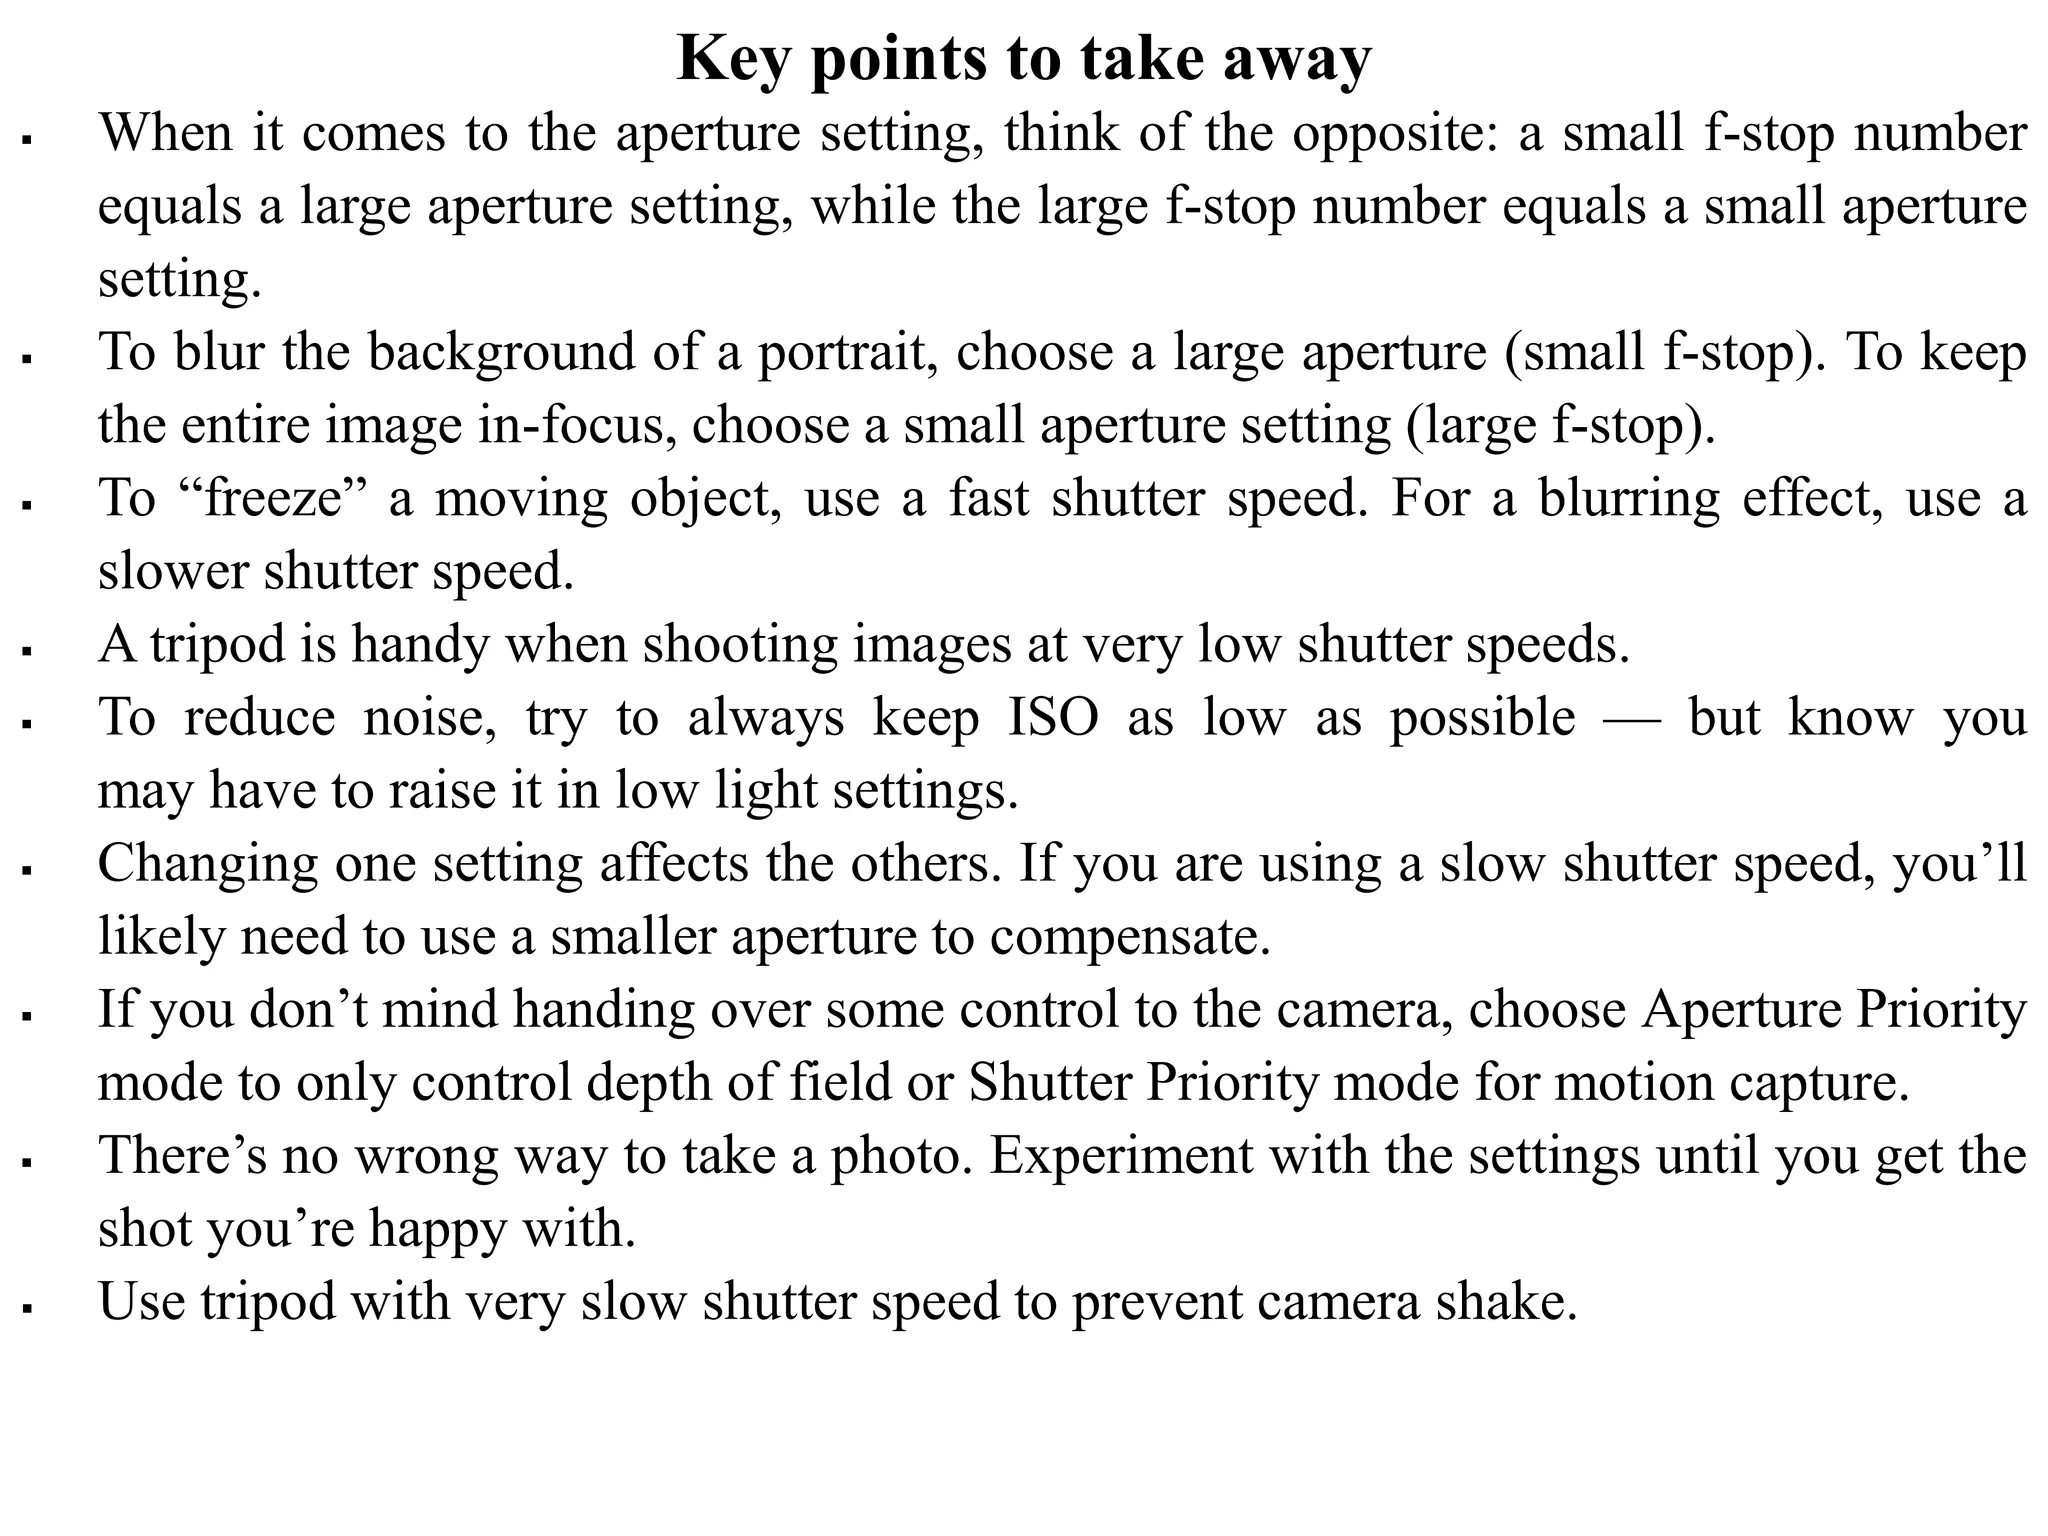
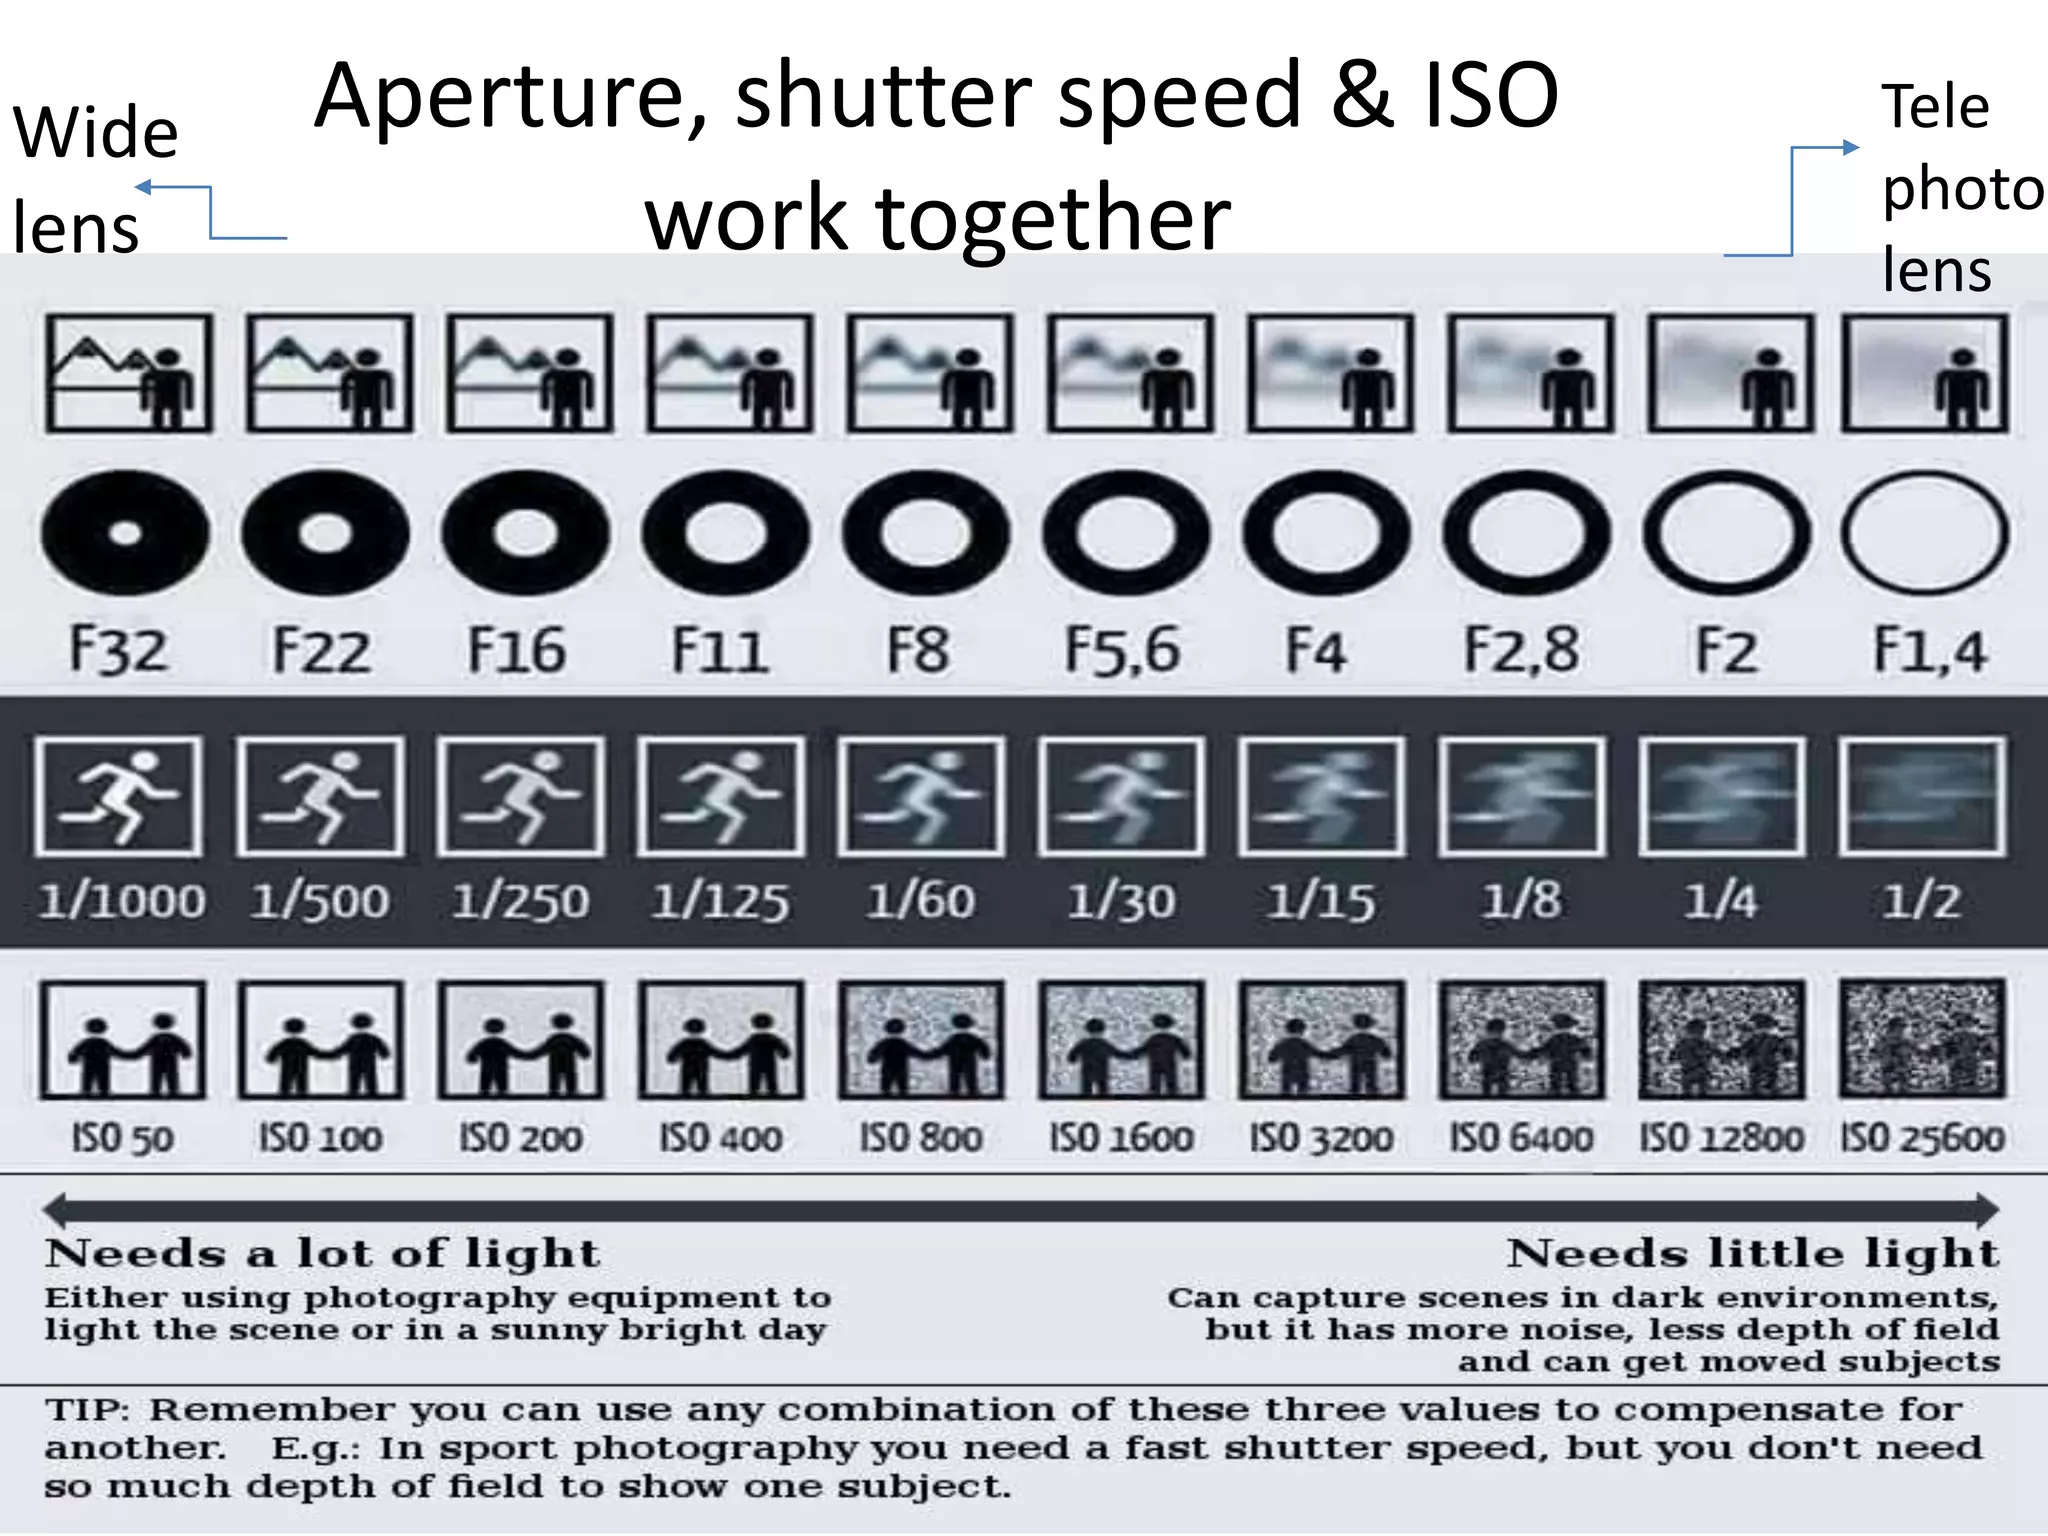
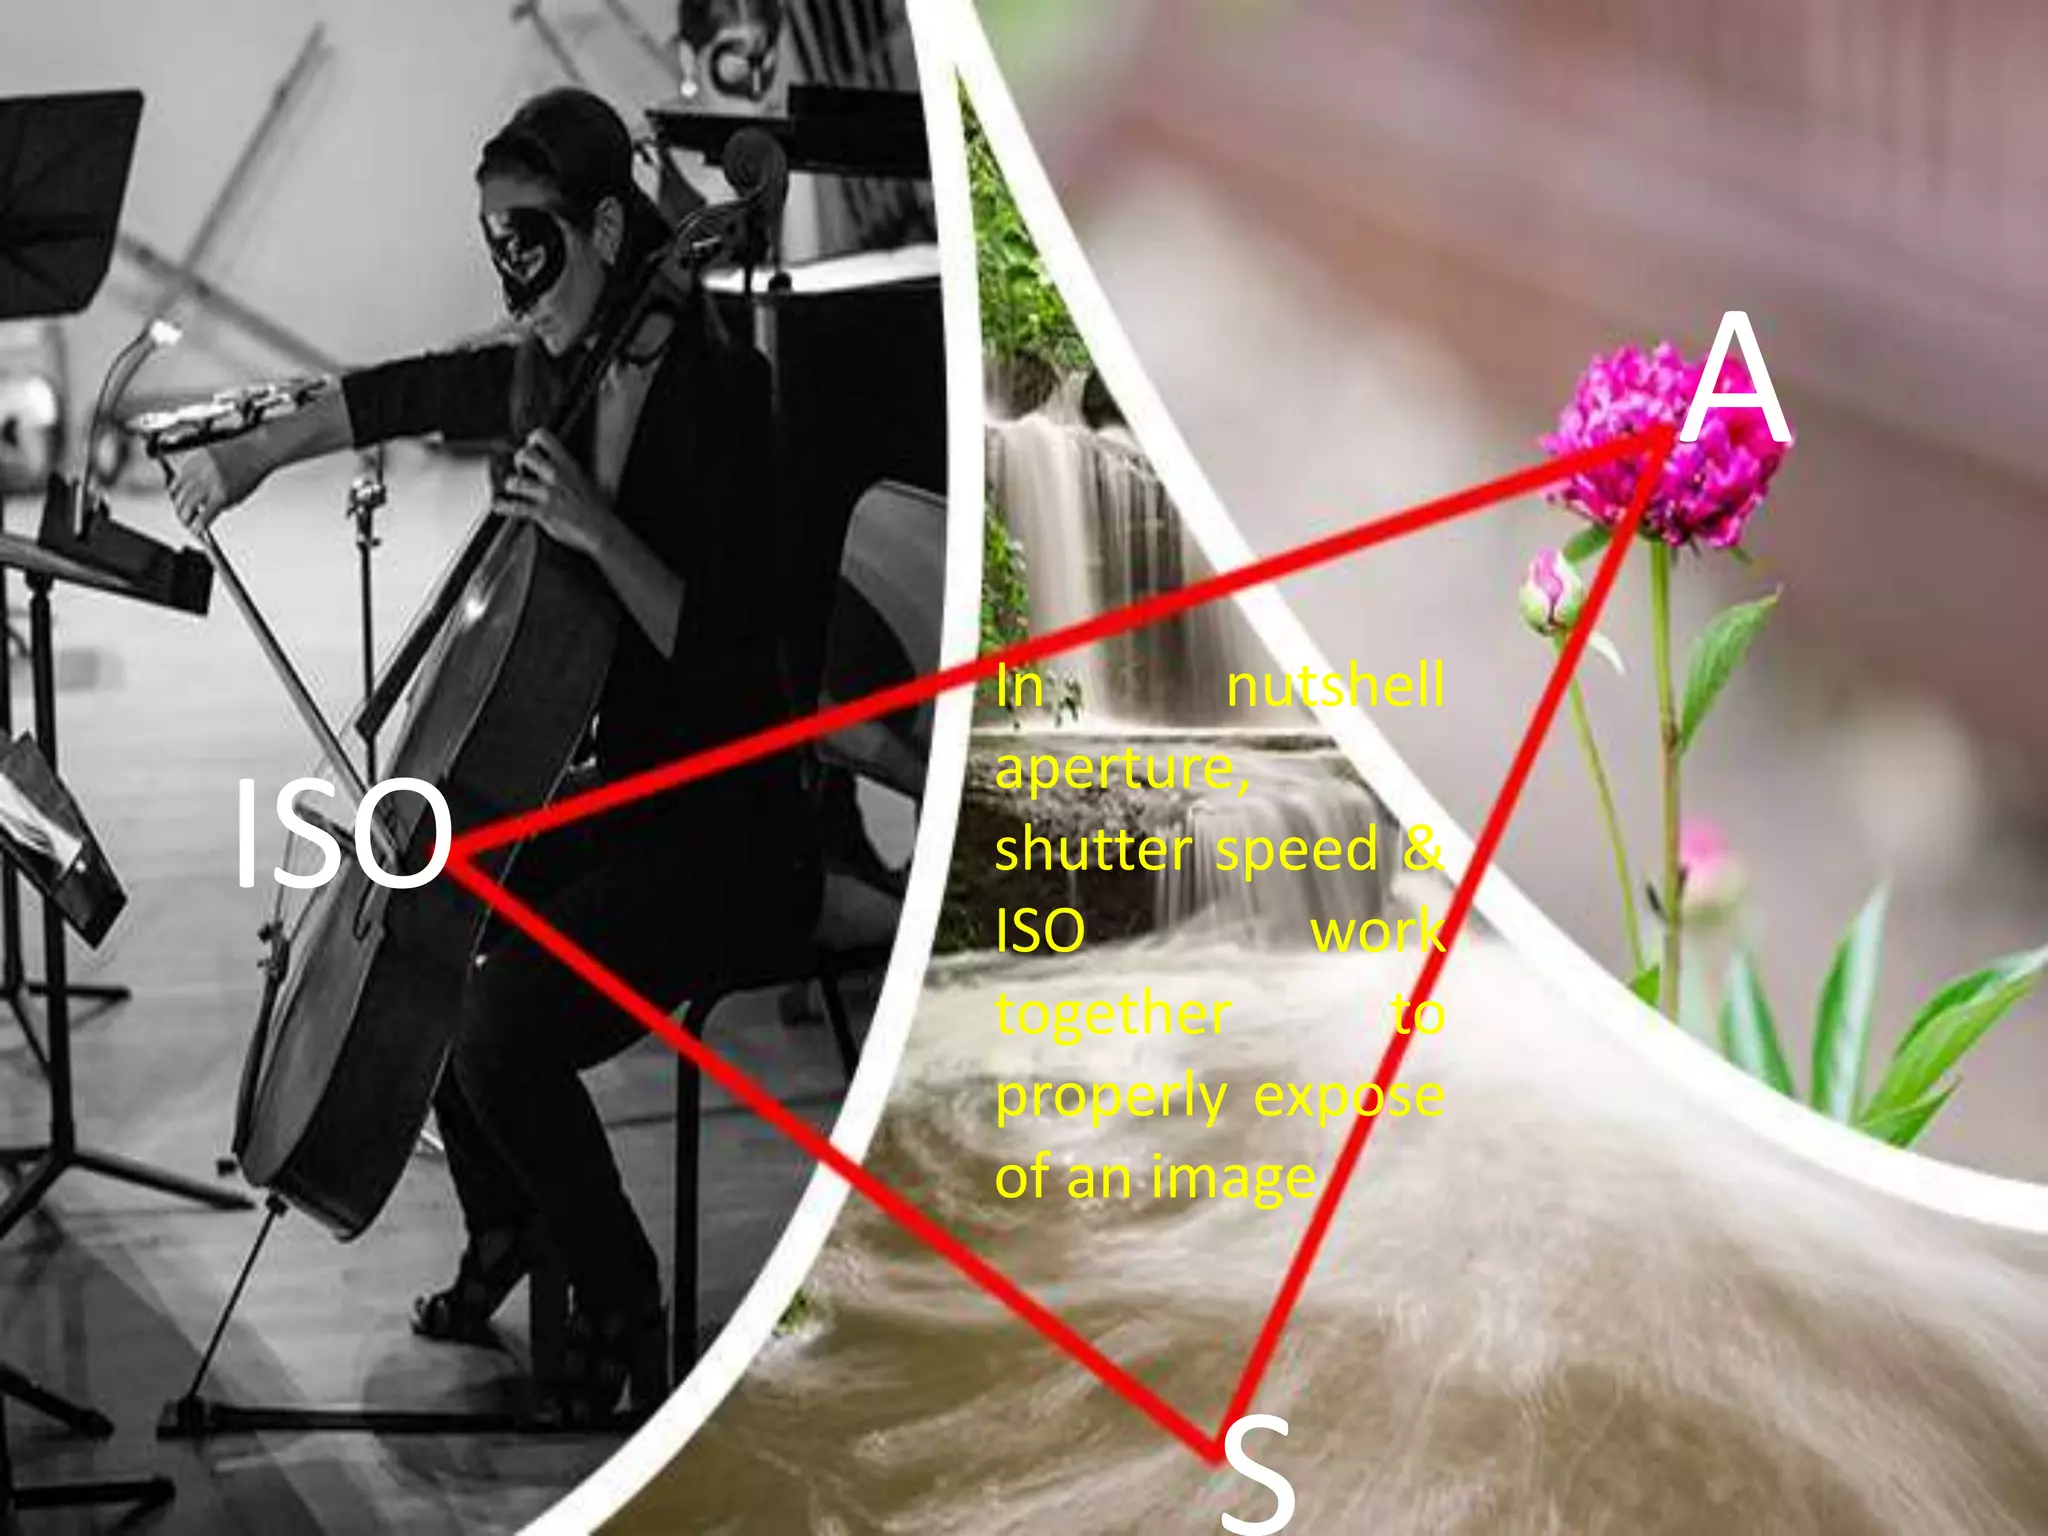
“True sign of intelligence is
imagination!!” – Albert Einstein
•Understanding camera menu
and basic buttons and settings
•Handling of external
accessories of digital camera
and smart phone camera
•Controlling light with shutter
speed, aperture and ISO
The word "photography" is a combination of the Greek root
words "photo-," meaning "light," and "-graphia," meaning
"writing" or "drawing." Thus, "photography" literally means
"writing or drawing with light."
A camera is a hardware device that takes photographs
and consists of a lightproof box with photosensitive
film or plate within the box.
TYPES OF CAMERA
COMPACT CAMERA
•Fully automatic mode
•No manual adjustment
•Good for beginners
• Great for: First time user &
children
Not so great for: Anyone
wanting to take control over
camera functionality
Super Zoom Cameras
•Semi automatic
•full control over the camera
exposure settings
•smaller image sensor and a smaller
fixed lens
•Great for outdoor activities, travel
•Not so great for: Slipping in pocket
Compact System Cameras
• full manual, automatic, or semi-automatic
modes
• Mirror less Interchangeable Lens cameras
• Larger image sensor ,electronic viewfinder
• Great for: Alternative to enthusiast
compacts, street and travel photography
Not so great for: Any subject requiring the
faster focusing a DSLR provides, viewfinder
fans
Digital Slr Cameras
• most versatile and advanced
• full manual mode, Aperture Priority,
Shutter Priority, or program modes
• Interchangeable camera and more
control
Great for: Image requiring the best
quality, action photography, those looking
to experiment with video recording
Optical
viewfinder
Image Quality
Camera Menu
and Basic Button
and Settings
Basic Parts of Camera
camera menu and basic button and settings: Parts of camera FRONT
Shutter Release Button
Mode Dial
Aperture Ring
Focusing Ring
Body
Lens
Flash
Flash Mount
1. Body - Made of high grade plastic or metal, this holds all the other parts together as well as
provide protection to the delicate internal parts of the camera.
2. Lens - A camera lens (also known as photographic lens or photographic objective) is an
optical lens or assembly of lenses used in conjunction with a camera body and mechanism to
make images of objects either on photographic film or on other media capable of storing an
image chemically or electronically. A proper term for this part should be lens assembly; this
consists of several layers of lenses of varying properties providing zoom, focusing, and distortion
correction. These lenses are mechanically interconnected and adjustment is controlled either
manually or electronically through the camera's body.
3. Shutter Release Button - This is the "trigger" of the camera. In most cameras, a half-press
activates and locks the auto-focus, and a full press initiates the image capturing process.
4. Mode Dial - Contains several symbols (slightly different on various camera models), this dial
allows you to select a shooting mode, automatic or manual or a choice between one of the pre-
defined settings.
6. Aperture Ring - Found around the old manual lens of SLR camera this is used to select an
aperture opening. In modern lenses, the aperture is controlled electronically through the body.
7. Focusing Ring - This can also be found around the lens of a DSLR camera. This is turned to
manually focus the lens.
9. Flash - Built-in on the body of most compact and some DSLR cameras this can either be fixed
or flip type, it provides an instantaneous burst of bright light to illuminate a poorly lit scene.
15. Flash Mount (Hot-Shoe) - Standard holder with contact plates for optional Flash accessory.
11
LENS
Lens mount
and contacts
Lens
alignment dot
Focal length /
focus settings
Focus ring
Filter thread
Lens name
and details
Zoom ring
1. Lens mount and contacts - This is the part of the lens which connects with the camera
body. The contact pins are how your camera and lens communicate.
2. Lens alignment dot - When you are attaching a lens, you line up the dots on the
camera and lens.
3. Focal length / focus settings - These markers let you check on focal length and focus
distance settings by looking at the lens. the distance between the centre of a lens or
curved mirror and its focus.
4. Focus ring - While you might use autofocus most of the time, turning the focus ring
will let you take control manually. On some cameras you'll need to first turn on manual
focus mode.
5. Filter thread - The front of the lens is where you can attach any filters you might need.
These comes in different sizes depending on the lens.
8. Lens name and details - This will often tell you everything you need to know about a
lens, including its focal length range, aperture, and what other technologies it includes.
9. Zoom ring - Turning this ring will change the focal length of zoom lenses, letting you
zoom in or out. Obviously prime lenses don't feature a zoom ring. 13
The focal length of the lens is the distance between the lens and the image sensor
when the subject is in focus, usually stated in millimeters (e.g., 28 mm, 50 mm, or 100
mm).
Focal Length
All lenses have a maximum aperture, and all NIKKOR lenses list the
widest possible aperture on the lens barrel. Some zoom lenses will detail
something like f/3.5-5.6 on the lens barrel or 1:3.5-5.6 (below right).
These numbers, the 3.5 and the 5.6, are referring to the maximum
aperture or widest opening the lens can achieve for each end of the zoom
range. Some higher end lenses can maintain the largest aperture
throughout the entire zoom range, so only one number is detailed (below
left).
Angle of View
The focal length tells us the angle of view—how much of the
scene will be captured—and the magnification—how large
individual elements will be. The longer the focal length (e.g. 55
mm), the narrower the angle of view and the and the larger the
subject appears to be. The shorter the focal length (e.g. 18
mm), the wider the angle of view and the lower the
magnification hence the greater the area captured.
Lens Field of
view
Focal
length
Area
captured
Depth of field Apparent
size
use
Wide angle Wide Short
(28 mm or
lower)
Large deep
(Greater DOF)
Small Landscape
photography
Standard Closet Small (35
to 85 mm)
Small Shallow Large Portraits
Telephoto Small
/narrow
Long
(100mm
to
300mm)
Small Shallow
(Less DOF)
Large Portraits &
sports
Primary lens Categories
More of the scene is allowed in wide angle lenses
(zoom out) as it has small focal length. Therefore it is
used for shooting landscapes for a reason, they naturally
give you the widest view and allow you to get the full
landscape into the frame, from the foreground to the
horizon.
Standard lenses are popular as they are closest to the angle of view we humans
see. These lenses have minimal distortion, which can be flattering to the subject. They
tend to use large apertures and allow a lot of light to enter the lens which makes them
fast in low light conditions. Standard lenses are the popular choice for a wide range of
photography including portraiture, nature and low light situations where the
photographer can not use a flash or is looking to capture the scene with available light.
Telephoto lens (zoom in) – long
focal length-narrow field of view-making
the things in front of you appear large in
the photograph. A telephoto lens reduces
differences in both the size of and the
distance between near and far objects. It
causes a close object to appear more
similar in size relative to a further away
object
Which one is better portrait
The two images above are perfect examples of this effect. In the first image, the wide
angle lens brings the whole landscape into focus, from the close-up sunflowers to the
far-off mountains. In the second image, shooting with a telephoto blurs out the
flowers and mountains in the background, turning them into a nice soft background
for main sunflower.
WIDE ANGLE TELEPHOTO ANGLE
A "zoom lens" is a lens whose focal
length can change (range of focal
length (ex. 28 to 55 mm). You twist
the barrel, or push a switch on the
camera, and it takes in a narrower
or wider field of view, making
objects appear bigger or smaller.
Battery
Compartment
Memory Card Slot
Tripod Mount
Diopter Adjuster
BOTTOM
Pop-up flash release
Microphone socket
USB
BASIC
CAMERA
CONTROL
AND
SETTINGS
Back
FRONT
1. View finder: Use the view finder to frame pictures when bright light makes it difficult to
see the display on the monitor
2. AE/AF lock button: use to lock both exposure and focus with shutter release button
pressed halfway.
3. Monitor: To see the live view of photograph composition
4. Play (and delete) buttons: For reviewing and deleting images or videos you've shot
5. Menu: Most shooting, playback, and set up options can be accessed from the camera
menus.
6. Thumbnail help: For display images in contact sheet of four, nine or 72 images.
7. Playback zoom: For zoom the image displayed in full frame or on the image currently
highlighted in thumbnail.
8. Information edit button: To make changes to settings.
9. Command dial: It is the dial where from you control three basic settings that make up the
exposure triangle, i.e., aperture, shutter speed and ISO when shooting information is
displayed in the monitor.
10. Movie-record button: Use to start recording both video and sound.
11. Multi selector and OK button: Are used to navigate the camera menus.
12. Speaker
31
TOP
BOTTOM
1. Battery - Most dedicated cameras have removable batteries, meaning you
can swap them over when one runs out.
2. Bottom Terminal - This can come in handy if you want to use your camera
with a vertical grip.
3. Tripod socket - Almost all cameras feature a standard thread, allowing
you to use them with any tripod.
Memory card
HDMI
CAMERA EXPOSURE MODES
Exposure mode How it works
Auto ( ) Camera automatically selects all exposure settings.
Program (P)
Camera automatically selects aperture & shutter
speed; you can choose a corresponding ISO speed,
white balance, flash & exposure compensation. With
some cameras, P can also act as a hybrid of the Av
&Tv modes.
Aperture Priority
(Av or A)
You specify the aperture & ISO; the camera's
metering determines the corresponding shutter
speed.
Shutter Priority
(Tv or S)
You specify the shutter speed & ISO; the camera's
metering determines the corresponding aperture.
Manual (M)
You specify the aperture, ISO and shutter speed —
regardless of whether these values lead to a correct
exposure.
Handling of external accessories' of digital camera:
1. Rechargeable Batteries:
2. Battery charger
3. Power connector, AC adapter
4. USB cable
5. Lens Protector – UV/NC Filter:
6. Body cap
7. Tripods
8. Camera Carrying Case
9. SDHC ( Secure Digital High Capacity) Cards
10. Lens hood
SMART PHONE CAMERA ACCESSORIES
The pocket
spotlight is
designed to
fix that,
providing
continuous
lighting when
flush of your
smartphone is
even worse.
pocket spotlight
Bevel is a
simple
attachment
to take 3D
pictures with
your
Smartphone or
tablet. Just
plug this
device into the
headphone
jack of your
mobile device,
and pan the
surroundings
for a 3D
photo.
Bevel
Moment Lenses are
some of the best
lenses for mobile
photography. There
are two lenses:
With Moment
Wide, you can take
wide landscape and
tight interior shots
with minimal
distortion, while
Moment Tele lens
lets you zoom-in
twice as much as
your phone can.
Moment Lenses
Selfie stick
If you love taking selfies
but don’t like using the
selfie stick, then maybe
Shuttr is the alternative
you have been waiting
for. Using a remote
control device, you can
trigger your
smartphone’s camera
app with at just the press
of a button. It works with
the iPhone, iPad and
Android devices. No
extra app necessary.
Shuttr
Grip Tight Mount is a
camera mount which
comes in three
different sizes to
accommodate
smartphones of all
sizes and even small
tablets. The hands of
the mount expand
easily to hold your
phone or tablet
safely and securely.
Grip Tight Mount
Camera Care:
 Carry a camera in its easel carry bag.
 Regularly clean dust off the camera with a soft brush. Do not use
any liquid soap, etc. to clean it.
 Do not clean the camera LCD screen with any liquid. Blow a bit of
moisture and clean it with a soft cloth.
 Remove exhausted batteries from camera after use-even before
packing the camera.
 Always remember to turn off your camera after photography.
 Operate all buttons on the camera gently.
 Keep the camera away from extreme heat and cold.
 Avoid condensation-formation of liquid drops from water vapour in
cameras. Condensation can cause irreparable damage to the camera.
 Use an umbrella when shooting in hot weather conditions. Same is
the case with rain!
Lens Care:
 Put on the lens cap when the camera is not in use. Prevent dust from settling on the
lens.
 Do not touch the lens. Grease marks from fingers take a lot of effort to remove from
the lens.
 Use a UV filter to protect the lens.
 If you have lens filters, keep them in their cases when not in use.
 Do not keep lens attachments near sources of heat.
Battery Care:
 Lion and the most popular and sturdy batteries often used with camcorders.
 Very hot or cold conditions can affect a battery's performance.
 Constantly note charged batteries and separate them from discharged ones.
 Always use the right battery charger, but do not overcharge. A common way of
charging batteries is after the day's shoot, when preparing for the next day.
 The internal temperature of the battery may rise while the battery is in use. Wait for
the battery to cool before charging.
 If you are travelling to places where there is no power supply, carry enough extra
fully-charged batteries.
 Remove batteries from camera after a shoot.
 Turn the product off before the replacing the battery.
CAMERA EXPOSURE
Slower= more motion blur
Faster= for fast moving object
Higher ISO= noise
Wide open= less F value
Small open= High F value
UNDERSTANDING
EXPOSURE
OVER EXPOSEDCORRECTLY EXPOSEDUNDER EXPOSED
ShutterSpeed:
(The length of time a camera shutter open and close)
The shutter speed specifically refers to how long
this light is permitted to enter the camera
Slow shutter speed=
higher exposure
Fast shutter speed = Lower
exposure
Shutter Speed Typical Examples
1 - 30+ seconds Specialty night and low-light photos on a tripod
2 - 1/2 second
To add a silky look to flowing water
Landscape photos on a tripod for enhanced depth of
field
1/2 to 1/30 second
To add motion blur to the background of a moving
subject
Carefully taken hand-held photos with stabilization
1/50 - 1/100 second Typical hand-held photos without substantial zoom
1/250 - 1/500 second
To freeze everyday sports/action subject movement
Hand-held photos with substantial zoom (telephoto
lens)
1/1000 - 1/4000 second To freeze extremely fast, up-close subject motion
Shutter speed – usually measured in fractions of a second (e.g. 1/30, 1/1,000). A
shutter speed of 1/4,000 second is very fast and will let in very little light, while a
shutter speed of 1/2 second will let in a lot of light.
Freeze moving object Allowing object to blur
Aperture (hole within a lens)
Aperture determines the amount of light that’s coming through the lens.
Aperture works like an iris, constricting or expanding to control how much
light makes it to the sensor. By changing the aperture value on your camera,
you increase or decrease the size of that hole, thereby allowing more or less
light into the camera
It is calibrated in with an f-number or f-stop.“f” numbers (also known
as “focal ratio”, since the f-number is the ratio of the diameter of the
lens aperture to the length of the lens). It is generally written as
numbers such as f/1.4, f/2.
Wide aperture= decreasing f-
stop value
Small aperture= increasing
f-stop value
‘Depth of field‘ (DOF)
Depth of field is: the zone of acceptable sharpness in front of and behind the subject on
which the lens is focused." Simply put: how sharp or blurry is the area behind your
subject.
This zone will vary from photo to photo. Some images may have very small zones
of focus which is called shallow depth of field. Others may have a very large zone
of focus which is called deep depth of field
Wide Aperture
f/2.0 - low f-stop
number
shallow depth of
field
Narrow Aperture
f/16 - high f-stop number
large depth of field
 The lower the f/stop—the larger the opening in the lens (wide aperture) — more
light& exposure -------the less depth of field— for sharp images with appealingly
blurred backgrounds.
 The higher the f/stop—the smaller the opening in the lens (narrow aperture)—
little light & exposure ---------the greater the depth of field— for landscape photos
& sharper the background.
How aperture affects depth of field:
Wide aperture Narrow aperture
This means wider apertures can be used to make a subject pop from a blurred
background. Equally, narrower apertures (bigger f-numbers) can be used to keep
subjects in focus, even if they are at different distances from your lens.
How Aperture Affects Shutter Speed
ISO (the level of sensitivity)
ISO controls how the sensor responds to the light it receives from the shutter and aperture. It
is typically measured in numbers, a lower number representing lower sensitivity to available
light, while higher numbers mean more sensitivity. Examples of ISO: 100, 200, 400, 800, 1600.
A high ISO = more sensitive to lightA low ISO = less sensitive to light.
What do different ISO numbers mean?
When to use low ISO
low ISO settings (typically ISO 100 or 400) -static subject
on a tripod - plenty of light -for the best image quality
When to use high ISO
higher ISO -Moving subject- small version of image- night
time
Key points to take away
 When it comes to the aperture setting, think of the opposite: a small f-stop number
equals a large aperture setting, while the large f-stop number equals a small aperture
setting.
 To blur the background of a portrait, choose a large aperture (small f-stop). To keep
the entire image in-focus, choose a small aperture setting (large f-stop).
 To “freeze” a moving object, use a fast shutter speed. For a blurring effect, use a
slower shutter speed.
 A tripod is handy when shooting images at very low shutter speeds.
 To reduce noise, try to always keep ISO as low as possible — but know you
may have to raise it in low light settings.
 Changing one setting affects the others. If you are using a slow shutter speed, you’ll
likely need to use a smaller aperture to compensate.
 If you don’t mind handing over some control to the camera, choose Aperture Priority
mode to only control depth of field or Shutter Priority mode for motion capture.
 There’s no wrong way to take a photo. Experiment with the settings until you get the
shot you’re happy with.
 Use tripod with very slow shutter speed to prevent camera shake.
Aperture, shutter speed & ISO
work together
Tele
photo
lens
Wide
lens
In nutshell
aperture,
shutter speed &
ISO work
together to
properly expose
of an image
A
S
ISO
Basic parts of camera and camera exposure

Basic parts of camera and camera exposure

  • 1.
    “True sign ofintelligence is imagination!!” – Albert Einstein •Understanding camera menu and basic buttons and settings •Handling of external accessories of digital camera and smart phone camera •Controlling light with shutter speed, aperture and ISO
  • 2.
    The word "photography"is a combination of the Greek root words "photo-," meaning "light," and "-graphia," meaning "writing" or "drawing." Thus, "photography" literally means "writing or drawing with light."
  • 3.
    A camera isa hardware device that takes photographs and consists of a lightproof box with photosensitive film or plate within the box.
  • 4.
    TYPES OF CAMERA COMPACTCAMERA •Fully automatic mode •No manual adjustment •Good for beginners • Great for: First time user & children Not so great for: Anyone wanting to take control over camera functionality Super Zoom Cameras •Semi automatic •full control over the camera exposure settings •smaller image sensor and a smaller fixed lens •Great for outdoor activities, travel •Not so great for: Slipping in pocket
  • 5.
    Compact System Cameras •full manual, automatic, or semi-automatic modes • Mirror less Interchangeable Lens cameras • Larger image sensor ,electronic viewfinder • Great for: Alternative to enthusiast compacts, street and travel photography Not so great for: Any subject requiring the faster focusing a DSLR provides, viewfinder fans Digital Slr Cameras • most versatile and advanced • full manual mode, Aperture Priority, Shutter Priority, or program modes • Interchangeable camera and more control Great for: Image requiring the best quality, action photography, those looking to experiment with video recording
  • 6.
  • 7.
  • 8.
    Camera Menu and BasicButton and Settings Basic Parts of Camera
  • 9.
    camera menu andbasic button and settings: Parts of camera FRONT Shutter Release Button Mode Dial Aperture Ring Focusing Ring Body Lens Flash Flash Mount
  • 11.
    1. Body -Made of high grade plastic or metal, this holds all the other parts together as well as provide protection to the delicate internal parts of the camera. 2. Lens - A camera lens (also known as photographic lens or photographic objective) is an optical lens or assembly of lenses used in conjunction with a camera body and mechanism to make images of objects either on photographic film or on other media capable of storing an image chemically or electronically. A proper term for this part should be lens assembly; this consists of several layers of lenses of varying properties providing zoom, focusing, and distortion correction. These lenses are mechanically interconnected and adjustment is controlled either manually or electronically through the camera's body. 3. Shutter Release Button - This is the "trigger" of the camera. In most cameras, a half-press activates and locks the auto-focus, and a full press initiates the image capturing process. 4. Mode Dial - Contains several symbols (slightly different on various camera models), this dial allows you to select a shooting mode, automatic or manual or a choice between one of the pre- defined settings. 6. Aperture Ring - Found around the old manual lens of SLR camera this is used to select an aperture opening. In modern lenses, the aperture is controlled electronically through the body. 7. Focusing Ring - This can also be found around the lens of a DSLR camera. This is turned to manually focus the lens. 9. Flash - Built-in on the body of most compact and some DSLR cameras this can either be fixed or flip type, it provides an instantaneous burst of bright light to illuminate a poorly lit scene. 15. Flash Mount (Hot-Shoe) - Standard holder with contact plates for optional Flash accessory. 11
  • 12.
    LENS Lens mount and contacts Lens alignmentdot Focal length / focus settings Focus ring Filter thread Lens name and details Zoom ring
  • 13.
    1. Lens mountand contacts - This is the part of the lens which connects with the camera body. The contact pins are how your camera and lens communicate. 2. Lens alignment dot - When you are attaching a lens, you line up the dots on the camera and lens. 3. Focal length / focus settings - These markers let you check on focal length and focus distance settings by looking at the lens. the distance between the centre of a lens or curved mirror and its focus. 4. Focus ring - While you might use autofocus most of the time, turning the focus ring will let you take control manually. On some cameras you'll need to first turn on manual focus mode. 5. Filter thread - The front of the lens is where you can attach any filters you might need. These comes in different sizes depending on the lens. 8. Lens name and details - This will often tell you everything you need to know about a lens, including its focal length range, aperture, and what other technologies it includes. 9. Zoom ring - Turning this ring will change the focal length of zoom lenses, letting you zoom in or out. Obviously prime lenses don't feature a zoom ring. 13
  • 14.
    The focal lengthof the lens is the distance between the lens and the image sensor when the subject is in focus, usually stated in millimeters (e.g., 28 mm, 50 mm, or 100 mm). Focal Length
  • 15.
    All lenses havea maximum aperture, and all NIKKOR lenses list the widest possible aperture on the lens barrel. Some zoom lenses will detail something like f/3.5-5.6 on the lens barrel or 1:3.5-5.6 (below right). These numbers, the 3.5 and the 5.6, are referring to the maximum aperture or widest opening the lens can achieve for each end of the zoom range. Some higher end lenses can maintain the largest aperture throughout the entire zoom range, so only one number is detailed (below left).
  • 16.
    Angle of View Thefocal length tells us the angle of view—how much of the scene will be captured—and the magnification—how large individual elements will be. The longer the focal length (e.g. 55 mm), the narrower the angle of view and the and the larger the subject appears to be. The shorter the focal length (e.g. 18 mm), the wider the angle of view and the lower the magnification hence the greater the area captured.
  • 18.
    Lens Field of view Focal length Area captured Depthof field Apparent size use Wide angle Wide Short (28 mm or lower) Large deep (Greater DOF) Small Landscape photography Standard Closet Small (35 to 85 mm) Small Shallow Large Portraits Telephoto Small /narrow Long (100mm to 300mm) Small Shallow (Less DOF) Large Portraits & sports Primary lens Categories
  • 19.
    More of thescene is allowed in wide angle lenses (zoom out) as it has small focal length. Therefore it is used for shooting landscapes for a reason, they naturally give you the widest view and allow you to get the full landscape into the frame, from the foreground to the horizon.
  • 20.
    Standard lenses arepopular as they are closest to the angle of view we humans see. These lenses have minimal distortion, which can be flattering to the subject. They tend to use large apertures and allow a lot of light to enter the lens which makes them fast in low light conditions. Standard lenses are the popular choice for a wide range of photography including portraiture, nature and low light situations where the photographer can not use a flash or is looking to capture the scene with available light.
  • 21.
    Telephoto lens (zoomin) – long focal length-narrow field of view-making the things in front of you appear large in the photograph. A telephoto lens reduces differences in both the size of and the distance between near and far objects. It causes a close object to appear more similar in size relative to a further away object
  • 23.
    Which one isbetter portrait
  • 24.
    The two imagesabove are perfect examples of this effect. In the first image, the wide angle lens brings the whole landscape into focus, from the close-up sunflowers to the far-off mountains. In the second image, shooting with a telephoto blurs out the flowers and mountains in the background, turning them into a nice soft background for main sunflower. WIDE ANGLE TELEPHOTO ANGLE
  • 25.
    A "zoom lens"is a lens whose focal length can change (range of focal length (ex. 28 to 55 mm). You twist the barrel, or push a switch on the camera, and it takes in a narrower or wider field of view, making objects appear bigger or smaller.
  • 26.
    Battery Compartment Memory Card Slot TripodMount Diopter Adjuster BOTTOM
  • 27.
  • 28.
  • 29.
  • 30.
  • 31.
    1. View finder:Use the view finder to frame pictures when bright light makes it difficult to see the display on the monitor 2. AE/AF lock button: use to lock both exposure and focus with shutter release button pressed halfway. 3. Monitor: To see the live view of photograph composition 4. Play (and delete) buttons: For reviewing and deleting images or videos you've shot 5. Menu: Most shooting, playback, and set up options can be accessed from the camera menus. 6. Thumbnail help: For display images in contact sheet of four, nine or 72 images. 7. Playback zoom: For zoom the image displayed in full frame or on the image currently highlighted in thumbnail. 8. Information edit button: To make changes to settings. 9. Command dial: It is the dial where from you control three basic settings that make up the exposure triangle, i.e., aperture, shutter speed and ISO when shooting information is displayed in the monitor. 10. Movie-record button: Use to start recording both video and sound. 11. Multi selector and OK button: Are used to navigate the camera menus. 12. Speaker 31
  • 32.
  • 33.
    BOTTOM 1. Battery -Most dedicated cameras have removable batteries, meaning you can swap them over when one runs out. 2. Bottom Terminal - This can come in handy if you want to use your camera with a vertical grip. 3. Tripod socket - Almost all cameras feature a standard thread, allowing you to use them with any tripod.
  • 34.
  • 35.
  • 36.
    Exposure mode Howit works Auto ( ) Camera automatically selects all exposure settings. Program (P) Camera automatically selects aperture & shutter speed; you can choose a corresponding ISO speed, white balance, flash & exposure compensation. With some cameras, P can also act as a hybrid of the Av &Tv modes. Aperture Priority (Av or A) You specify the aperture & ISO; the camera's metering determines the corresponding shutter speed. Shutter Priority (Tv or S) You specify the shutter speed & ISO; the camera's metering determines the corresponding aperture. Manual (M) You specify the aperture, ISO and shutter speed — regardless of whether these values lead to a correct exposure.
  • 38.
    Handling of externalaccessories' of digital camera: 1. Rechargeable Batteries: 2. Battery charger 3. Power connector, AC adapter 4. USB cable 5. Lens Protector – UV/NC Filter: 6. Body cap 7. Tripods 8. Camera Carrying Case 9. SDHC ( Secure Digital High Capacity) Cards 10. Lens hood
  • 39.
    SMART PHONE CAMERAACCESSORIES The pocket spotlight is designed to fix that, providing continuous lighting when flush of your smartphone is even worse. pocket spotlight
  • 40.
    Bevel is a simple attachment totake 3D pictures with your Smartphone or tablet. Just plug this device into the headphone jack of your mobile device, and pan the surroundings for a 3D photo. Bevel
  • 41.
    Moment Lenses are someof the best lenses for mobile photography. There are two lenses: With Moment Wide, you can take wide landscape and tight interior shots with minimal distortion, while Moment Tele lens lets you zoom-in twice as much as your phone can. Moment Lenses
  • 42.
  • 43.
    If you lovetaking selfies but don’t like using the selfie stick, then maybe Shuttr is the alternative you have been waiting for. Using a remote control device, you can trigger your smartphone’s camera app with at just the press of a button. It works with the iPhone, iPad and Android devices. No extra app necessary. Shuttr
  • 44.
    Grip Tight Mountis a camera mount which comes in three different sizes to accommodate smartphones of all sizes and even small tablets. The hands of the mount expand easily to hold your phone or tablet safely and securely. Grip Tight Mount
  • 45.
    Camera Care:  Carrya camera in its easel carry bag.  Regularly clean dust off the camera with a soft brush. Do not use any liquid soap, etc. to clean it.  Do not clean the camera LCD screen with any liquid. Blow a bit of moisture and clean it with a soft cloth.  Remove exhausted batteries from camera after use-even before packing the camera.  Always remember to turn off your camera after photography.  Operate all buttons on the camera gently.  Keep the camera away from extreme heat and cold.  Avoid condensation-formation of liquid drops from water vapour in cameras. Condensation can cause irreparable damage to the camera.  Use an umbrella when shooting in hot weather conditions. Same is the case with rain!
  • 46.
    Lens Care:  Puton the lens cap when the camera is not in use. Prevent dust from settling on the lens.  Do not touch the lens. Grease marks from fingers take a lot of effort to remove from the lens.  Use a UV filter to protect the lens.  If you have lens filters, keep them in their cases when not in use.  Do not keep lens attachments near sources of heat. Battery Care:  Lion and the most popular and sturdy batteries often used with camcorders.  Very hot or cold conditions can affect a battery's performance.  Constantly note charged batteries and separate them from discharged ones.  Always use the right battery charger, but do not overcharge. A common way of charging batteries is after the day's shoot, when preparing for the next day.  The internal temperature of the battery may rise while the battery is in use. Wait for the battery to cool before charging.  If you are travelling to places where there is no power supply, carry enough extra fully-charged batteries.  Remove batteries from camera after a shoot.  Turn the product off before the replacing the battery.
  • 47.
    CAMERA EXPOSURE Slower= moremotion blur Faster= for fast moving object Higher ISO= noise Wide open= less F value Small open= High F value
  • 48.
  • 49.
  • 50.
    ShutterSpeed: (The length oftime a camera shutter open and close) The shutter speed specifically refers to how long this light is permitted to enter the camera
  • 51.
    Slow shutter speed= higherexposure Fast shutter speed = Lower exposure
  • 52.
    Shutter Speed TypicalExamples 1 - 30+ seconds Specialty night and low-light photos on a tripod 2 - 1/2 second To add a silky look to flowing water Landscape photos on a tripod for enhanced depth of field 1/2 to 1/30 second To add motion blur to the background of a moving subject Carefully taken hand-held photos with stabilization 1/50 - 1/100 second Typical hand-held photos without substantial zoom 1/250 - 1/500 second To freeze everyday sports/action subject movement Hand-held photos with substantial zoom (telephoto lens) 1/1000 - 1/4000 second To freeze extremely fast, up-close subject motion Shutter speed – usually measured in fractions of a second (e.g. 1/30, 1/1,000). A shutter speed of 1/4,000 second is very fast and will let in very little light, while a shutter speed of 1/2 second will let in a lot of light.
  • 53.
    Freeze moving objectAllowing object to blur
  • 54.
    Aperture (hole withina lens) Aperture determines the amount of light that’s coming through the lens. Aperture works like an iris, constricting or expanding to control how much light makes it to the sensor. By changing the aperture value on your camera, you increase or decrease the size of that hole, thereby allowing more or less light into the camera
  • 55.
    It is calibratedin with an f-number or f-stop.“f” numbers (also known as “focal ratio”, since the f-number is the ratio of the diameter of the lens aperture to the length of the lens). It is generally written as numbers such as f/1.4, f/2. Wide aperture= decreasing f- stop value Small aperture= increasing f-stop value
  • 56.
    ‘Depth of field‘(DOF) Depth of field is: the zone of acceptable sharpness in front of and behind the subject on which the lens is focused." Simply put: how sharp or blurry is the area behind your subject. This zone will vary from photo to photo. Some images may have very small zones of focus which is called shallow depth of field. Others may have a very large zone of focus which is called deep depth of field
  • 58.
    Wide Aperture f/2.0 -low f-stop number shallow depth of field Narrow Aperture f/16 - high f-stop number large depth of field  The lower the f/stop—the larger the opening in the lens (wide aperture) — more light& exposure -------the less depth of field— for sharp images with appealingly blurred backgrounds.  The higher the f/stop—the smaller the opening in the lens (narrow aperture)— little light & exposure ---------the greater the depth of field— for landscape photos & sharper the background. How aperture affects depth of field: Wide aperture Narrow aperture
  • 59.
    This means widerapertures can be used to make a subject pop from a blurred background. Equally, narrower apertures (bigger f-numbers) can be used to keep subjects in focus, even if they are at different distances from your lens.
  • 60.
    How Aperture AffectsShutter Speed
  • 61.
    ISO (the levelof sensitivity) ISO controls how the sensor responds to the light it receives from the shutter and aperture. It is typically measured in numbers, a lower number representing lower sensitivity to available light, while higher numbers mean more sensitivity. Examples of ISO: 100, 200, 400, 800, 1600. A high ISO = more sensitive to lightA low ISO = less sensitive to light.
  • 62.
    What do differentISO numbers mean?
  • 64.
    When to uselow ISO low ISO settings (typically ISO 100 or 400) -static subject on a tripod - plenty of light -for the best image quality
  • 65.
    When to usehigh ISO higher ISO -Moving subject- small version of image- night time
  • 66.
    Key points totake away  When it comes to the aperture setting, think of the opposite: a small f-stop number equals a large aperture setting, while the large f-stop number equals a small aperture setting.  To blur the background of a portrait, choose a large aperture (small f-stop). To keep the entire image in-focus, choose a small aperture setting (large f-stop).  To “freeze” a moving object, use a fast shutter speed. For a blurring effect, use a slower shutter speed.  A tripod is handy when shooting images at very low shutter speeds.  To reduce noise, try to always keep ISO as low as possible — but know you may have to raise it in low light settings.  Changing one setting affects the others. If you are using a slow shutter speed, you’ll likely need to use a smaller aperture to compensate.  If you don’t mind handing over some control to the camera, choose Aperture Priority mode to only control depth of field or Shutter Priority mode for motion capture.  There’s no wrong way to take a photo. Experiment with the settings until you get the shot you’re happy with.  Use tripod with very slow shutter speed to prevent camera shake.
  • 68.
    Aperture, shutter speed& ISO work together Tele photo lens Wide lens
  • 69.
    In nutshell aperture, shutter speed& ISO work together to properly expose of an image A S ISO