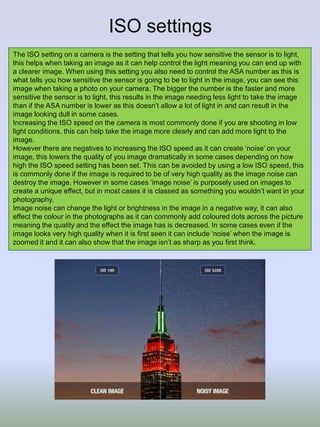
SlideShare a Scribd company logo
1
Aperture (AV mode)
Aperture allows you to control the depth of field, this is how much of the photograph is in
focus. The different settings on this particular tool change the picture as you can have a wider
aperture meaning that you can make the background as out of focus as you like or you can
have a narrow aperture that makes the focus on a larger area meaning you can see things in
the background as well as the objects that may be closer up. A narrow aperture is used a lot
in landscape photography as they need to capture a larger area and in most cases need to
allow a lot of the image in focus, including the things that may be further in the background.
The wider aperture is used a lot more on portraits because they want the background to be
blurry meaning that the model is the main focus in the image, this aperture may also be used
in some cases where the photographer just wants to focus on one thing but have other things
in the background as well but looking less clear and visible.
The aperture size is measured with ‘F-numbers’, the smaller the F number the wider the
aperture which means that the depth of field is a lot smaller and focused on one area. This
results in the lens letting in more light making it easier to take the image as it avoids the
image being dull or too dark to see. However the bigger the F number the smaller and more
narrow the aperture is which means that the image focused on a much wider area, but this
doesn’t let as much light come in to the image making it quite dull in some cases. This may
mean that a tripod is needed to focus and you need to wait longer for the exposure time
which can correct the loss of light in the image.
For example,
A low F number like f1.4 would be used if the photographer wanted to focus on one main
object in the image as this would make the aperture wider meaning the depth of field is
smaller and narrower which closes off the background objects and allows much more light to
come through the lens.
However a higher F number like f8 would be used if the photographer wanted a lot of the
image to be in focus and cover a large area that needed to be in focus. This would make the
aperture smaller meaning the depth of field is wider and more can be seen clearer in the
image.
I have used the lowest F number for this
image which is F5.6, this means the
aperture is fairly big which has made the
depth of field narrow and has let it focus
on a smaller area as the models face in
is full focus. You can also see that by
using this smaller F number it has
blurred the background making it
obvious that the main focus is the model.
Here I have used F13, this is
considerably bigger than the other image
and you can see this as it has focused
on a slightly larger area, however this
shows that the larger the F number the
wider the depth of field as you can see
some of the background in clearer detail
but this still isn't entirely focused. If the F
number was bigger than this the
background would be much sharper.
I have used F25 for this image and you
can see the slight change as the image
is a lot more focused and sharper on the
background in comparison to the others.
Using a larger F number has made the
aperture smaller meaning that the depth
of field is far wider and has made a lot of
the background in focus.
F 5.6
F13
F25
Shutter Speed (Tv mode)
The shutter speed is the amount of time that the shutter is open from when you press the
button to take the photograph, the settings in the shutter priority mode allows you to change
the amount of time the shutter is open. This changes a lot of things with the photograph as it
can change the amount of light that is let in to the lens and it also changes what the image is
going to look like. The shutter speed is shown on the camera by fractions of a second, the
smaller the number is the quicker the photo is taken as the shutter opens and closes quicker
than if the number is higher. The numbers can be anything from 1/1000 s or higher which
means the photo is taken very quickly and captures the image as it is when you see it,
instead of if it is at 1 whole second which means the photo is taken a lot slower and the
image will be very different as it may not capture exactly what you have seen as it has taken
longer.
Many people chose to use a slower shutter speed if they wish to capture movement in an
image, this shutter speed can capture movement as it takes longer to take it meaning the
movement won’t freeze it can be shown in the image instead. This shutter speed can also
capture movement so well as it gives more time for the movement to be seen, registered and
taken in the image so you can actually see the movement.
However if the shutter speed is a lot quicker it actually freezes movement as it is happening
as the shutter is opening and capturing the image so quickly. If the image is taken with this
shutter speed it means that you can see the image in a different way that you may have seen
it in person as the camera can capture all of the movement that has happened but in a stand
still. The faster the shutter speed means that the image can capture things that the naked eye
cannot register and see as it just freezes the whole scene.
Using a slow shutter speed means that a lot of light can be let in to the image as the light has
longer to get in to the image, however this does mean that tripods have to be used
sometimes as it takes longer meaning that the chances of camera shake are greater. A faster
shutter speed is different from this as because the picture is being taken quicker it doesn’t
show the movement happening. This shutter speed means that the image is a lot sharper and
clearer as it can capture something that we cant see ourselves as it can freeze what we can
see and what is happening.
This is a fast shutter speed as it has
captured the model running, yet it hasn’t
blurred it out and it has frozen the image
entirely meaning we can see it in more
clarity. We can see that this is a faster
shutter speed as it shows the image is
clearer and a lot sharper than the images
below. We can also see that this image
is slightly darker in comparison to the
others, this is due to the shutter speed
as the light hasn’t had enough time to
enter the lens as the shutter was so
quick.
We can see by this image that the
shutter speed has got slightly slower
than the image above as we can see it is
very blurry and definitely not as sharp as
the first image. This is because the
shutter has taken longer to close and
hasn’t been able to capture the image in
a still position.
On this image it is clear that the shutter
speed has got a lot slower as it has
made the movement on the image very
blurry and hasn’t been able to take the
image in focus like the fast shutter speed
can do. This is because the shutter has
taken longer to open and close and
capture the image meaning that it
doesn’t actually have time to capture it in
focus. We can also see that this image is
a lot lighter than the others as the shutter
was open longer, allowing more light to
enter the image.
1/3200
1/500
1/160
ISO settings
The ISO setting on a camera is the setting that tells you how sensitive the sensor is to light,
this helps when taking an image as it can help control the light meaning you can end up with
a clearer image. When using this setting you also need to control the ASA number as this is
what tells you how sensitive the sensor is going to be to light in the image, you can see this
image when taking a photo on your camera. The bigger the number is the faster and more
sensitive the sensor is to light, this results in the image needing less light to take the image
than if the ASA number is lower as this doesn’t allow a lot of light in and can result in the
image looking dull in some cases.
Increasing the ISO speed on the camera is most commonly done if you are shooting in low
light conditions, this can help take the image more clearly and can add more light to the
image.
However there are negatives to increasing the ISO speed as it can create ‘noise’ on your
image, this lowers the quality of you image dramatically in some cases depending on how
high the ISO speed setting has been set. This can be avoided by using a low ISO speed, this
is commonly done if the image is required to be of very high quality as the image noise can
destroy the image. However in some cases ‘image noise’ is purposely used on images to
create a unique effect, but in most cases it is classed as something you wouldn’t want in your
photography.
Image noise can change the light or brightness in the image in a negative way, it can also
effect the colour in the photographs as it can commonly add coloured dots across the picture
meaning the quality and the effect the image has is decreased. In some cases even if the
image looks very high quality when it is first seen it can include ‘noise’ when the image is
zoomed it and it can also show that the image isn’t as sharp as you first think.
This has been set at a very low ISO
setting of 100, this has made the image
much sharper and clearer than the
others meaning that the image noise is
at a minimum and not too visible.
This ISO setting has been set a lot
higher than the first one as it is now as
1600, we can see this as the image
starts to get some noise which is slightly
more visible and has made the image
appear less sharp.
In the last image I have used a much
higher ISO setting, this shows as there is
much more image noise that is more
visible than the others. The noise is
especially clear in the blue colour as I
have zoomed in further to the image
making it less sharp and in focus.
ISO 100
ISO 1600
ISO 6400
White Balance
The white balance setting helps the camera to understand and register what white is, without
this the white in images would be very dull or maybe another colour as it wouldn’t be able to
register what is white and what is colour in each image. The auto-white setting is most
commonly used when taking photographs as usually this usually helps the camera to register
what is white, however in some cases the camera settings need to be adjusted slightly to
understand colour.
For example if you change your camera to the ‘cloudy’ setting in daylight it can change the
images colour and make it appear slightly yellow and have a warmer look to it.
This setting can be used in some cases to correct the colour in the image, however some
people will use this setting to purposely add different colours to it making it more unique and
different from how it really looks in person. The different colour settings add different moods
to the image, it can make it blue which symbolises a cold look, a yellow tint which shows a
more welcoming and warm approach and you can also set the image to a more neutral colour
which doesn’t change it too much.
White balance can remove unrealistic colours that have shown up on the image but aren’t
really there in real life, this is used regularly as many images can change and show different
colours in the camera. White balance is really useful when this happens in images as it
removes the different colours and shows the white that you can see in real life.
. From taking these images I have seen that this setting can really change the effect the
colour has on the image, the bottom right hand corner shows a cold, dull image and
doesn’t look as it would in real life as it was bright and showed daylight. The bottom left
hand corner shows the most neutral look for the image as it hasn’t changed the colouring
to yellow or blue like the others, this has only brightened the image. The top right image
looks a little lilac and blue and the setting has made it look quite old much like the bottom
right hand corner image. Lastly the top left image looks fairly neutral, however we can see
some change as it has given the image a yellow tint which makes it look a lot warmer than
it does without these effects. Overall I have seen that these effects can really help with
lighting and if the auto white balance setting isn’t working. It can help with lighting as it
allows you to darken or lighten an image, and it can also help as it can change the mood
of your image or it can be a good substitute if the auto white balance setting isn’t having
the effect you want it to.
White FluorescentCloudy
Tungsten LightFlash
Original image
Cropped
Levels
Dodging and burning
Colour adjustments
Curve
13
1/6 sec; f/29; ISO 800
14
1/100 sec; f/9; ISO 200
1/100 sec; f/11; ISO 200
15
White fluorescent light
Tuscan light

More Related Content

What's hot

Canon getting started guide
Canon getting started guideCanon getting started guide
Canon getting started guideOliviaBolt
 
Canon getting started guide
Canon getting started guideCanon getting started guide
Canon getting started guidePJG123
 
Photography lo2!
Photography lo2!Photography lo2!
Photography lo2!AlanSmith96
 
Task 2 canon getting started guide
 Task 2 canon getting started guide Task 2 canon getting started guide
Task 2 canon getting started guide
HannahMizen
 
Canon getting started guide
Canon getting started guideCanon getting started guide
Canon getting started guidePJG123
 
Canon getting started guide
Canon getting started guideCanon getting started guide
Canon getting started guidePJG123
 
Task 2 v2
Task 2 v2Task 2 v2
Task 2 v2
Mel Storey
 
Photography LO2!
Photography LO2!Photography LO2!
Photography LO2!AlanSmith96
 
Canon getting started guide --
Canon getting started guide --Canon getting started guide --
Canon getting started guide --
Jonah Adshead
 
3 Canon getting started guide 2
3 Canon getting started guide 23 Canon getting started guide 2
3 Canon getting started guide 2RichardBurnn
 
Task 2 reuploaded
Task 2 reuploadedTask 2 reuploaded
Task 2 reuploadedMel Storey
 
PhotographyTerminologyComplete
PhotographyTerminologyCompletePhotographyTerminologyComplete
PhotographyTerminologyCompleteChloeKyri
 
Canon getting started guide2
Canon getting started guide2Canon getting started guide2
Canon getting started guide2HannahMizen
 
Photography terminology work
Photography terminology workPhotography terminology work
Photography terminology workSarahMurrayy
 
Photography terminology work
Photography terminology workPhotography terminology work
Photography terminology workSarahMurrayy
 
Canon getting started guideupdated
Canon getting started guideupdatedCanon getting started guideupdated
Canon getting started guideupdated
HannahMizen
 
Canon getting started guide
Canon getting started guideCanon getting started guide
Canon getting started guideJonah Adshead
 
Canon getting started guide
Canon getting started guideCanon getting started guide
Canon getting started guideRichardBurnn
 
Canon getting started guide 3
Canon getting started guide 3Canon getting started guide 3
Canon getting started guide 3RichardBurnn
 
photography
photography photography
photography
dhruval patel
 

What's hot (20)

Canon getting started guide
Canon getting started guideCanon getting started guide
Canon getting started guide
 
Canon getting started guide
Canon getting started guideCanon getting started guide
Canon getting started guide
 
Photography lo2!
Photography lo2!Photography lo2!
Photography lo2!
 
Task 2 canon getting started guide
 Task 2 canon getting started guide Task 2 canon getting started guide
Task 2 canon getting started guide
 
Canon getting started guide
Canon getting started guideCanon getting started guide
Canon getting started guide
 
Canon getting started guide
Canon getting started guideCanon getting started guide
Canon getting started guide
 
Task 2 v2
Task 2 v2Task 2 v2
Task 2 v2
 
Photography LO2!
Photography LO2!Photography LO2!
Photography LO2!
 
Canon getting started guide --
Canon getting started guide --Canon getting started guide --
Canon getting started guide --
 
3 Canon getting started guide 2
3 Canon getting started guide 23 Canon getting started guide 2
3 Canon getting started guide 2
 
Task 2 reuploaded
Task 2 reuploadedTask 2 reuploaded
Task 2 reuploaded
 
PhotographyTerminologyComplete
PhotographyTerminologyCompletePhotographyTerminologyComplete
PhotographyTerminologyComplete
 
Canon getting started guide2
Canon getting started guide2Canon getting started guide2
Canon getting started guide2
 
Photography terminology work
Photography terminology workPhotography terminology work
Photography terminology work
 
Photography terminology work
Photography terminology workPhotography terminology work
Photography terminology work
 
Canon getting started guideupdated
Canon getting started guideupdatedCanon getting started guideupdated
Canon getting started guideupdated
 
Canon getting started guide
Canon getting started guideCanon getting started guide
Canon getting started guide
 
Canon getting started guide
Canon getting started guideCanon getting started guide
Canon getting started guide
 
Canon getting started guide 3
Canon getting started guide 3Canon getting started guide 3
Canon getting started guide 3
 
photography
photography photography
photography
 

Viewers also liked

Improvements for social action
Improvements for social action Improvements for social action
Improvements for social action
em-monsey
 
Digital graphics
Digital graphics Digital graphics
Digital graphics
em-monsey
 
Task 10 nuj
Task 10 nuj Task 10 nuj
Task 10 nuj
em-monsey
 
Interview q&a
Interview   q&aInterview   q&a
Interview q&a
em-monsey
 
Criticalapproaches
CriticalapproachesCriticalapproaches
Criticalapproachesem-monsey
 
Task 10 improved
Task 10   improvedTask 10   improved
Task 10 improved
em-monsey
 
Case study pusic magpie
Case study pusic magpieCase study pusic magpie
Case study pusic magpie
HannahMizen
 
Research and Questionnaire Analysis
Research and Questionnaire Analysis Research and Questionnaire Analysis
Research and Questionnaire Analysis cloestead
 

Viewers also liked (8)

Improvements for social action
Improvements for social action Improvements for social action
Improvements for social action
 
Digital graphics
Digital graphics Digital graphics
Digital graphics
 
Task 10 nuj
Task 10 nuj Task 10 nuj
Task 10 nuj
 
Interview q&a
Interview   q&aInterview   q&a
Interview q&a
 
Criticalapproaches
CriticalapproachesCriticalapproaches
Criticalapproaches
 
Task 10 improved
Task 10   improvedTask 10   improved
Task 10 improved
 
Case study pusic magpie
Case study pusic magpieCase study pusic magpie
Case study pusic magpie
 
Research and Questionnaire Analysis
Research and Questionnaire Analysis Research and Questionnaire Analysis
Research and Questionnaire Analysis
 

Similar to Task 2 photography

Canongettingstartedguide 140225031859-phpapp02
Canongettingstartedguide 140225031859-phpapp02Canongettingstartedguide 140225031859-phpapp02
Canongettingstartedguide 140225031859-phpapp02Jonah Adshead
 
Canon getting started guide pro forma
Canon getting started guide pro formaCanon getting started guide pro forma
Canon getting started guide pro forma
Dan Bell
 
Task 2 photography terminology
Task 2 photography terminology Task 2 photography terminology
Task 2 photography terminology
LouiseMaher18
 
Canon getting started guideeter
Canon getting started guideeterCanon getting started guideeter
Canon getting started guideeter
JakeSellers
 
2. camera getting started guide
2. camera getting started guide2. camera getting started guide
2. camera getting started guideEmma Wells
 
Canon getting started guide
Canon getting started guideCanon getting started guide
Canon getting started guideHannahMizen
 
Canon getting started guide2
Canon getting started guide2Canon getting started guide2
Canon getting started guide2HannahMizen
 
Task 2 photography terminology work sheet
Task 2 photography terminology work sheetTask 2 photography terminology work sheet
Task 2 photography terminology work sheet
LewisDunn
 
Unit 57 photography evidence template
Unit 57 photography evidence templateUnit 57 photography evidence template
Unit 57 photography evidence template
Callumknight
 
Assignment presentation
Assignment presentation Assignment presentation
Assignment presentation
Louise Reed
 
What is ios, shutter speed and aperture photography
What is ios, shutter speed and aperture  photographyWhat is ios, shutter speed and aperture  photography
What is ios, shutter speed and aperture photography
jackoregan1996
 

Similar to Task 2 photography (14)

Canongettingstartedguide 140225031859-phpapp02
Canongettingstartedguide 140225031859-phpapp02Canongettingstartedguide 140225031859-phpapp02
Canongettingstartedguide 140225031859-phpapp02
 
Canon getting started guide pro forma
Canon getting started guide pro formaCanon getting started guide pro forma
Canon getting started guide pro forma
 
Task 2 photography terminology
Task 2 photography terminology Task 2 photography terminology
Task 2 photography terminology
 
Canon getting started guideeter
Canon getting started guideeterCanon getting started guideeter
Canon getting started guideeter
 
2. camera getting started guide
2. camera getting started guide2. camera getting started guide
2. camera getting started guide
 
Canon getting started guide
Canon getting started guideCanon getting started guide
Canon getting started guide
 
Canon getting started guide2
Canon getting started guide2Canon getting started guide2
Canon getting started guide2
 
Task 2 photography terminology work sheet
Task 2 photography terminology work sheetTask 2 photography terminology work sheet
Task 2 photography terminology work sheet
 
M a-s-p
M a-s-pM a-s-p
M a-s-p
 
M a-s-p
M a-s-pM a-s-p
M a-s-p
 
Unit 57 photography evidence template
Unit 57 photography evidence templateUnit 57 photography evidence template
Unit 57 photography evidence template
 
Canon guide
Canon guideCanon guide
Canon guide
 
Assignment presentation
Assignment presentation Assignment presentation
Assignment presentation
 
What is ios, shutter speed and aperture photography
What is ios, shutter speed and aperture  photographyWhat is ios, shutter speed and aperture  photography
What is ios, shutter speed and aperture photography
 

More from em-monsey

Production
ProductionProduction
Production
em-monsey
 
Production
ProductionProduction
Production
em-monsey
 
Production
ProductionProduction
Production
em-monsey
 
Moodboards
MoodboardsMoodboards
Moodboards
em-monsey
 
Moodboards
MoodboardsMoodboards
Moodboards
em-monsey
 
Task 3 social action
Task 3 social actionTask 3 social action
Task 3 social action
em-monsey
 
Sas factfile
Sas factfileSas factfile
Sas factfile
em-monsey
 
Research template
Research templateResearch template
Research template
em-monsey
 
Lo4 pro forma(3)
Lo4 pro forma(3)Lo4 pro forma(3)
Lo4 pro forma(3)
em-monsey
 
Presentation1
Presentation1Presentation1
Presentation1
em-monsey
 
Evaluations
EvaluationsEvaluations
Evaluations
em-monsey
 
Magazines 2
Magazines 2Magazines 2
Magazines 2
em-monsey
 

More from em-monsey (20)

Production
ProductionProduction
Production
 
Production
ProductionProduction
Production
 
Production
ProductionProduction
Production
 
Moodboards
MoodboardsMoodboards
Moodboards
 
Moodboards
MoodboardsMoodboards
Moodboards
 
Task 3 social action
Task 3 social actionTask 3 social action
Task 3 social action
 
Sas factfile
Sas factfileSas factfile
Sas factfile
 
Task 10
Task 10Task 10
Task 10
 
Task 3
Task 3Task 3
Task 3
 
.
..
.
 
Research template
Research templateResearch template
Research template
 
Task 4
Task 4Task 4
Task 4
 
Lo4 pro forma(3)
Lo4 pro forma(3)Lo4 pro forma(3)
Lo4 pro forma(3)
 
Presentation1
Presentation1Presentation1
Presentation1
 
Task 3
Task 3Task 3
Task 3
 
Task 3
Task 3Task 3
Task 3
 
Evaluations
EvaluationsEvaluations
Evaluations
 
Magazines 2
Magazines 2Magazines 2
Magazines 2
 
Task 10
Task 10Task 10
Task 10
 
Task 10
Task 10Task 10
Task 10
 

Recently uploaded

Multithreading_in_C++ - std::thread, race condition
Multithreading_in_C++ - std::thread, race conditionMultithreading_in_C++ - std::thread, race condition
Multithreading_in_C++ - std::thread, race condition
Mohammed Sikander
 
Marketing internship report file for MBA
Marketing internship report file for MBAMarketing internship report file for MBA
Marketing internship report file for MBA
gb193092
 
Group Presentation 2 Economics.Ariana Buscigliopptx
Group Presentation 2 Economics.Ariana BuscigliopptxGroup Presentation 2 Economics.Ariana Buscigliopptx
Group Presentation 2 Economics.Ariana Buscigliopptx
ArianaBusciglio
 
Introduction to AI for Nonprofits with Tapp Network
Introduction to AI for Nonprofits with Tapp NetworkIntroduction to AI for Nonprofits with Tapp Network
Introduction to AI for Nonprofits with Tapp Network
TechSoup
 
2024.06.01 Introducing a competency framework for languag learning materials ...
2024.06.01 Introducing a competency framework for languag learning materials ...2024.06.01 Introducing a competency framework for languag learning materials ...
2024.06.01 Introducing a competency framework for languag learning materials ...
Sandy Millin
 
Acetabularia Information For Class 9 .docx
Acetabularia Information For Class 9  .docxAcetabularia Information For Class 9  .docx
Acetabularia Information For Class 9 .docx
vaibhavrinwa19
 
The French Revolution Class 9 Study Material pdf free download
The French Revolution Class 9 Study Material pdf free downloadThe French Revolution Class 9 Study Material pdf free download
The French Revolution Class 9 Study Material pdf free download
Vivekanand Anglo Vedic Academy
 
Biological Screening of Herbal Drugs in detailed.
Biological Screening of Herbal Drugs in detailed.Biological Screening of Herbal Drugs in detailed.
Biological Screening of Herbal Drugs in detailed.
Ashokrao Mane college of Pharmacy Peth-Vadgaon
 
A Survey of Techniques for Maximizing LLM Performance.pptx
A Survey of Techniques for Maximizing LLM Performance.pptxA Survey of Techniques for Maximizing LLM Performance.pptx
A Survey of Techniques for Maximizing LLM Performance.pptx
thanhdowork
 
Azure Interview Questions and Answers PDF By ScholarHat
Azure Interview Questions and Answers PDF By ScholarHatAzure Interview Questions and Answers PDF By ScholarHat
Azure Interview Questions and Answers PDF By ScholarHat
Scholarhat
 
Francesca Gottschalk - How can education support child empowerment.pptx
Francesca Gottschalk - How can education support child empowerment.pptxFrancesca Gottschalk - How can education support child empowerment.pptx
Francesca Gottschalk - How can education support child empowerment.pptx
EduSkills OECD
 
A Strategic Approach: GenAI in Education
A Strategic Approach: GenAI in EducationA Strategic Approach: GenAI in Education
A Strategic Approach: GenAI in Education
Peter Windle
 
How to Make a Field invisible in Odoo 17
How to Make a Field invisible in Odoo 17How to Make a Field invisible in Odoo 17
How to Make a Field invisible in Odoo 17
Celine George
 
Unit 8 - Information and Communication Technology (Paper I).pdf
Unit 8 - Information and Communication Technology (Paper I).pdfUnit 8 - Information and Communication Technology (Paper I).pdf
Unit 8 - Information and Communication Technology (Paper I).pdf
Thiyagu K
 
Supporting (UKRI) OA monographs at Salford.pptx
Supporting (UKRI) OA monographs at Salford.pptxSupporting (UKRI) OA monographs at Salford.pptx
Supporting (UKRI) OA monographs at Salford.pptx
Jisc
 
The Accursed House by Émile Gaboriau.pptx
The Accursed House by Émile Gaboriau.pptxThe Accursed House by Émile Gaboriau.pptx
The Accursed House by Émile Gaboriau.pptx
DhatriParmar
 
The basics of sentences session 5pptx.pptx
The basics of sentences session 5pptx.pptxThe basics of sentences session 5pptx.pptx
The basics of sentences session 5pptx.pptx
heathfieldcps1
 
Embracing GenAI - A Strategic Imperative
Embracing GenAI - A Strategic ImperativeEmbracing GenAI - A Strategic Imperative
Embracing GenAI - A Strategic Imperative
Peter Windle
 
1.4 modern child centered education - mahatma gandhi-2.pptx
1.4 modern child centered education - mahatma gandhi-2.pptx1.4 modern child centered education - mahatma gandhi-2.pptx
1.4 modern child centered education - mahatma gandhi-2.pptx
JosvitaDsouza2
 
TESDA TM1 REVIEWER FOR NATIONAL ASSESSMENT WRITTEN AND ORAL QUESTIONS WITH A...
TESDA TM1 REVIEWER  FOR NATIONAL ASSESSMENT WRITTEN AND ORAL QUESTIONS WITH A...TESDA TM1 REVIEWER  FOR NATIONAL ASSESSMENT WRITTEN AND ORAL QUESTIONS WITH A...
TESDA TM1 REVIEWER FOR NATIONAL ASSESSMENT WRITTEN AND ORAL QUESTIONS WITH A...
EugeneSaldivar
 

Recently uploaded (20)

Multithreading_in_C++ - std::thread, race condition
Multithreading_in_C++ - std::thread, race conditionMultithreading_in_C++ - std::thread, race condition
Multithreading_in_C++ - std::thread, race condition
 
Marketing internship report file for MBA
Marketing internship report file for MBAMarketing internship report file for MBA
Marketing internship report file for MBA
 
Group Presentation 2 Economics.Ariana Buscigliopptx
Group Presentation 2 Economics.Ariana BuscigliopptxGroup Presentation 2 Economics.Ariana Buscigliopptx
Group Presentation 2 Economics.Ariana Buscigliopptx
 
Introduction to AI for Nonprofits with Tapp Network
Introduction to AI for Nonprofits with Tapp NetworkIntroduction to AI for Nonprofits with Tapp Network
Introduction to AI for Nonprofits with Tapp Network
 
2024.06.01 Introducing a competency framework for languag learning materials ...
2024.06.01 Introducing a competency framework for languag learning materials ...2024.06.01 Introducing a competency framework for languag learning materials ...
2024.06.01 Introducing a competency framework for languag learning materials ...
 
Acetabularia Information For Class 9 .docx
Acetabularia Information For Class 9  .docxAcetabularia Information For Class 9  .docx
Acetabularia Information For Class 9 .docx
 
The French Revolution Class 9 Study Material pdf free download
The French Revolution Class 9 Study Material pdf free downloadThe French Revolution Class 9 Study Material pdf free download
The French Revolution Class 9 Study Material pdf free download
 
Biological Screening of Herbal Drugs in detailed.
Biological Screening of Herbal Drugs in detailed.Biological Screening of Herbal Drugs in detailed.
Biological Screening of Herbal Drugs in detailed.
 
A Survey of Techniques for Maximizing LLM Performance.pptx
A Survey of Techniques for Maximizing LLM Performance.pptxA Survey of Techniques for Maximizing LLM Performance.pptx
A Survey of Techniques for Maximizing LLM Performance.pptx
 
Azure Interview Questions and Answers PDF By ScholarHat
Azure Interview Questions and Answers PDF By ScholarHatAzure Interview Questions and Answers PDF By ScholarHat
Azure Interview Questions and Answers PDF By ScholarHat
 
Francesca Gottschalk - How can education support child empowerment.pptx
Francesca Gottschalk - How can education support child empowerment.pptxFrancesca Gottschalk - How can education support child empowerment.pptx
Francesca Gottschalk - How can education support child empowerment.pptx
 
A Strategic Approach: GenAI in Education
A Strategic Approach: GenAI in EducationA Strategic Approach: GenAI in Education
A Strategic Approach: GenAI in Education
 
How to Make a Field invisible in Odoo 17
How to Make a Field invisible in Odoo 17How to Make a Field invisible in Odoo 17
How to Make a Field invisible in Odoo 17
 
Unit 8 - Information and Communication Technology (Paper I).pdf
Unit 8 - Information and Communication Technology (Paper I).pdfUnit 8 - Information and Communication Technology (Paper I).pdf
Unit 8 - Information and Communication Technology (Paper I).pdf
 
Supporting (UKRI) OA monographs at Salford.pptx
Supporting (UKRI) OA monographs at Salford.pptxSupporting (UKRI) OA monographs at Salford.pptx
Supporting (UKRI) OA monographs at Salford.pptx
 
The Accursed House by Émile Gaboriau.pptx
The Accursed House by Émile Gaboriau.pptxThe Accursed House by Émile Gaboriau.pptx
The Accursed House by Émile Gaboriau.pptx
 
The basics of sentences session 5pptx.pptx
The basics of sentences session 5pptx.pptxThe basics of sentences session 5pptx.pptx
The basics of sentences session 5pptx.pptx
 
Embracing GenAI - A Strategic Imperative
Embracing GenAI - A Strategic ImperativeEmbracing GenAI - A Strategic Imperative
Embracing GenAI - A Strategic Imperative
 
1.4 modern child centered education - mahatma gandhi-2.pptx
1.4 modern child centered education - mahatma gandhi-2.pptx1.4 modern child centered education - mahatma gandhi-2.pptx
1.4 modern child centered education - mahatma gandhi-2.pptx
 
TESDA TM1 REVIEWER FOR NATIONAL ASSESSMENT WRITTEN AND ORAL QUESTIONS WITH A...
TESDA TM1 REVIEWER  FOR NATIONAL ASSESSMENT WRITTEN AND ORAL QUESTIONS WITH A...TESDA TM1 REVIEWER  FOR NATIONAL ASSESSMENT WRITTEN AND ORAL QUESTIONS WITH A...
TESDA TM1 REVIEWER FOR NATIONAL ASSESSMENT WRITTEN AND ORAL QUESTIONS WITH A...
 

Task 2 photography

  • 1. 1
  • 2. Aperture (AV mode) Aperture allows you to control the depth of field, this is how much of the photograph is in focus. The different settings on this particular tool change the picture as you can have a wider aperture meaning that you can make the background as out of focus as you like or you can have a narrow aperture that makes the focus on a larger area meaning you can see things in the background as well as the objects that may be closer up. A narrow aperture is used a lot in landscape photography as they need to capture a larger area and in most cases need to allow a lot of the image in focus, including the things that may be further in the background. The wider aperture is used a lot more on portraits because they want the background to be blurry meaning that the model is the main focus in the image, this aperture may also be used in some cases where the photographer just wants to focus on one thing but have other things in the background as well but looking less clear and visible. The aperture size is measured with ‘F-numbers’, the smaller the F number the wider the aperture which means that the depth of field is a lot smaller and focused on one area. This results in the lens letting in more light making it easier to take the image as it avoids the image being dull or too dark to see. However the bigger the F number the smaller and more narrow the aperture is which means that the image focused on a much wider area, but this doesn’t let as much light come in to the image making it quite dull in some cases. This may mean that a tripod is needed to focus and you need to wait longer for the exposure time which can correct the loss of light in the image. For example, A low F number like f1.4 would be used if the photographer wanted to focus on one main object in the image as this would make the aperture wider meaning the depth of field is smaller and narrower which closes off the background objects and allows much more light to come through the lens. However a higher F number like f8 would be used if the photographer wanted a lot of the image to be in focus and cover a large area that needed to be in focus. This would make the aperture smaller meaning the depth of field is wider and more can be seen clearer in the image.
  • 3. I have used the lowest F number for this image which is F5.6, this means the aperture is fairly big which has made the depth of field narrow and has let it focus on a smaller area as the models face in is full focus. You can also see that by using this smaller F number it has blurred the background making it obvious that the main focus is the model. Here I have used F13, this is considerably bigger than the other image and you can see this as it has focused on a slightly larger area, however this shows that the larger the F number the wider the depth of field as you can see some of the background in clearer detail but this still isn't entirely focused. If the F number was bigger than this the background would be much sharper. I have used F25 for this image and you can see the slight change as the image is a lot more focused and sharper on the background in comparison to the others. Using a larger F number has made the aperture smaller meaning that the depth of field is far wider and has made a lot of the background in focus. F 5.6 F13 F25
  • 4. Shutter Speed (Tv mode) The shutter speed is the amount of time that the shutter is open from when you press the button to take the photograph, the settings in the shutter priority mode allows you to change the amount of time the shutter is open. This changes a lot of things with the photograph as it can change the amount of light that is let in to the lens and it also changes what the image is going to look like. The shutter speed is shown on the camera by fractions of a second, the smaller the number is the quicker the photo is taken as the shutter opens and closes quicker than if the number is higher. The numbers can be anything from 1/1000 s or higher which means the photo is taken very quickly and captures the image as it is when you see it, instead of if it is at 1 whole second which means the photo is taken a lot slower and the image will be very different as it may not capture exactly what you have seen as it has taken longer. Many people chose to use a slower shutter speed if they wish to capture movement in an image, this shutter speed can capture movement as it takes longer to take it meaning the movement won’t freeze it can be shown in the image instead. This shutter speed can also capture movement so well as it gives more time for the movement to be seen, registered and taken in the image so you can actually see the movement. However if the shutter speed is a lot quicker it actually freezes movement as it is happening as the shutter is opening and capturing the image so quickly. If the image is taken with this shutter speed it means that you can see the image in a different way that you may have seen it in person as the camera can capture all of the movement that has happened but in a stand still. The faster the shutter speed means that the image can capture things that the naked eye cannot register and see as it just freezes the whole scene. Using a slow shutter speed means that a lot of light can be let in to the image as the light has longer to get in to the image, however this does mean that tripods have to be used sometimes as it takes longer meaning that the chances of camera shake are greater. A faster shutter speed is different from this as because the picture is being taken quicker it doesn’t show the movement happening. This shutter speed means that the image is a lot sharper and clearer as it can capture something that we cant see ourselves as it can freeze what we can see and what is happening.
  • 5. This is a fast shutter speed as it has captured the model running, yet it hasn’t blurred it out and it has frozen the image entirely meaning we can see it in more clarity. We can see that this is a faster shutter speed as it shows the image is clearer and a lot sharper than the images below. We can also see that this image is slightly darker in comparison to the others, this is due to the shutter speed as the light hasn’t had enough time to enter the lens as the shutter was so quick. We can see by this image that the shutter speed has got slightly slower than the image above as we can see it is very blurry and definitely not as sharp as the first image. This is because the shutter has taken longer to close and hasn’t been able to capture the image in a still position. On this image it is clear that the shutter speed has got a lot slower as it has made the movement on the image very blurry and hasn’t been able to take the image in focus like the fast shutter speed can do. This is because the shutter has taken longer to open and close and capture the image meaning that it doesn’t actually have time to capture it in focus. We can also see that this image is a lot lighter than the others as the shutter was open longer, allowing more light to enter the image. 1/3200 1/500 1/160
  • 6. ISO settings The ISO setting on a camera is the setting that tells you how sensitive the sensor is to light, this helps when taking an image as it can help control the light meaning you can end up with a clearer image. When using this setting you also need to control the ASA number as this is what tells you how sensitive the sensor is going to be to light in the image, you can see this image when taking a photo on your camera. The bigger the number is the faster and more sensitive the sensor is to light, this results in the image needing less light to take the image than if the ASA number is lower as this doesn’t allow a lot of light in and can result in the image looking dull in some cases. Increasing the ISO speed on the camera is most commonly done if you are shooting in low light conditions, this can help take the image more clearly and can add more light to the image. However there are negatives to increasing the ISO speed as it can create ‘noise’ on your image, this lowers the quality of you image dramatically in some cases depending on how high the ISO speed setting has been set. This can be avoided by using a low ISO speed, this is commonly done if the image is required to be of very high quality as the image noise can destroy the image. However in some cases ‘image noise’ is purposely used on images to create a unique effect, but in most cases it is classed as something you wouldn’t want in your photography. Image noise can change the light or brightness in the image in a negative way, it can also effect the colour in the photographs as it can commonly add coloured dots across the picture meaning the quality and the effect the image has is decreased. In some cases even if the image looks very high quality when it is first seen it can include ‘noise’ when the image is zoomed it and it can also show that the image isn’t as sharp as you first think.
  • 7. This has been set at a very low ISO setting of 100, this has made the image much sharper and clearer than the others meaning that the image noise is at a minimum and not too visible. This ISO setting has been set a lot higher than the first one as it is now as 1600, we can see this as the image starts to get some noise which is slightly more visible and has made the image appear less sharp. In the last image I have used a much higher ISO setting, this shows as there is much more image noise that is more visible than the others. The noise is especially clear in the blue colour as I have zoomed in further to the image making it less sharp and in focus. ISO 100 ISO 1600 ISO 6400
  • 8. White Balance The white balance setting helps the camera to understand and register what white is, without this the white in images would be very dull or maybe another colour as it wouldn’t be able to register what is white and what is colour in each image. The auto-white setting is most commonly used when taking photographs as usually this usually helps the camera to register what is white, however in some cases the camera settings need to be adjusted slightly to understand colour. For example if you change your camera to the ‘cloudy’ setting in daylight it can change the images colour and make it appear slightly yellow and have a warmer look to it. This setting can be used in some cases to correct the colour in the image, however some people will use this setting to purposely add different colours to it making it more unique and different from how it really looks in person. The different colour settings add different moods to the image, it can make it blue which symbolises a cold look, a yellow tint which shows a more welcoming and warm approach and you can also set the image to a more neutral colour which doesn’t change it too much. White balance can remove unrealistic colours that have shown up on the image but aren’t really there in real life, this is used regularly as many images can change and show different colours in the camera. White balance is really useful when this happens in images as it removes the different colours and shows the white that you can see in real life.
  • 9. . From taking these images I have seen that this setting can really change the effect the colour has on the image, the bottom right hand corner shows a cold, dull image and doesn’t look as it would in real life as it was bright and showed daylight. The bottom left hand corner shows the most neutral look for the image as it hasn’t changed the colouring to yellow or blue like the others, this has only brightened the image. The top right image looks a little lilac and blue and the setting has made it look quite old much like the bottom right hand corner image. Lastly the top left image looks fairly neutral, however we can see some change as it has given the image a yellow tint which makes it look a lot warmer than it does without these effects. Overall I have seen that these effects can really help with lighting and if the auto white balance setting isn’t working. It can help with lighting as it allows you to darken or lighten an image, and it can also help as it can change the mood of your image or it can be a good substitute if the auto white balance setting isn’t having the effect you want it to. White FluorescentCloudy Tungsten LightFlash
  • 13. 13 1/6 sec; f/29; ISO 800
  • 14. 14 1/100 sec; f/9; ISO 200 1/100 sec; f/11; ISO 200