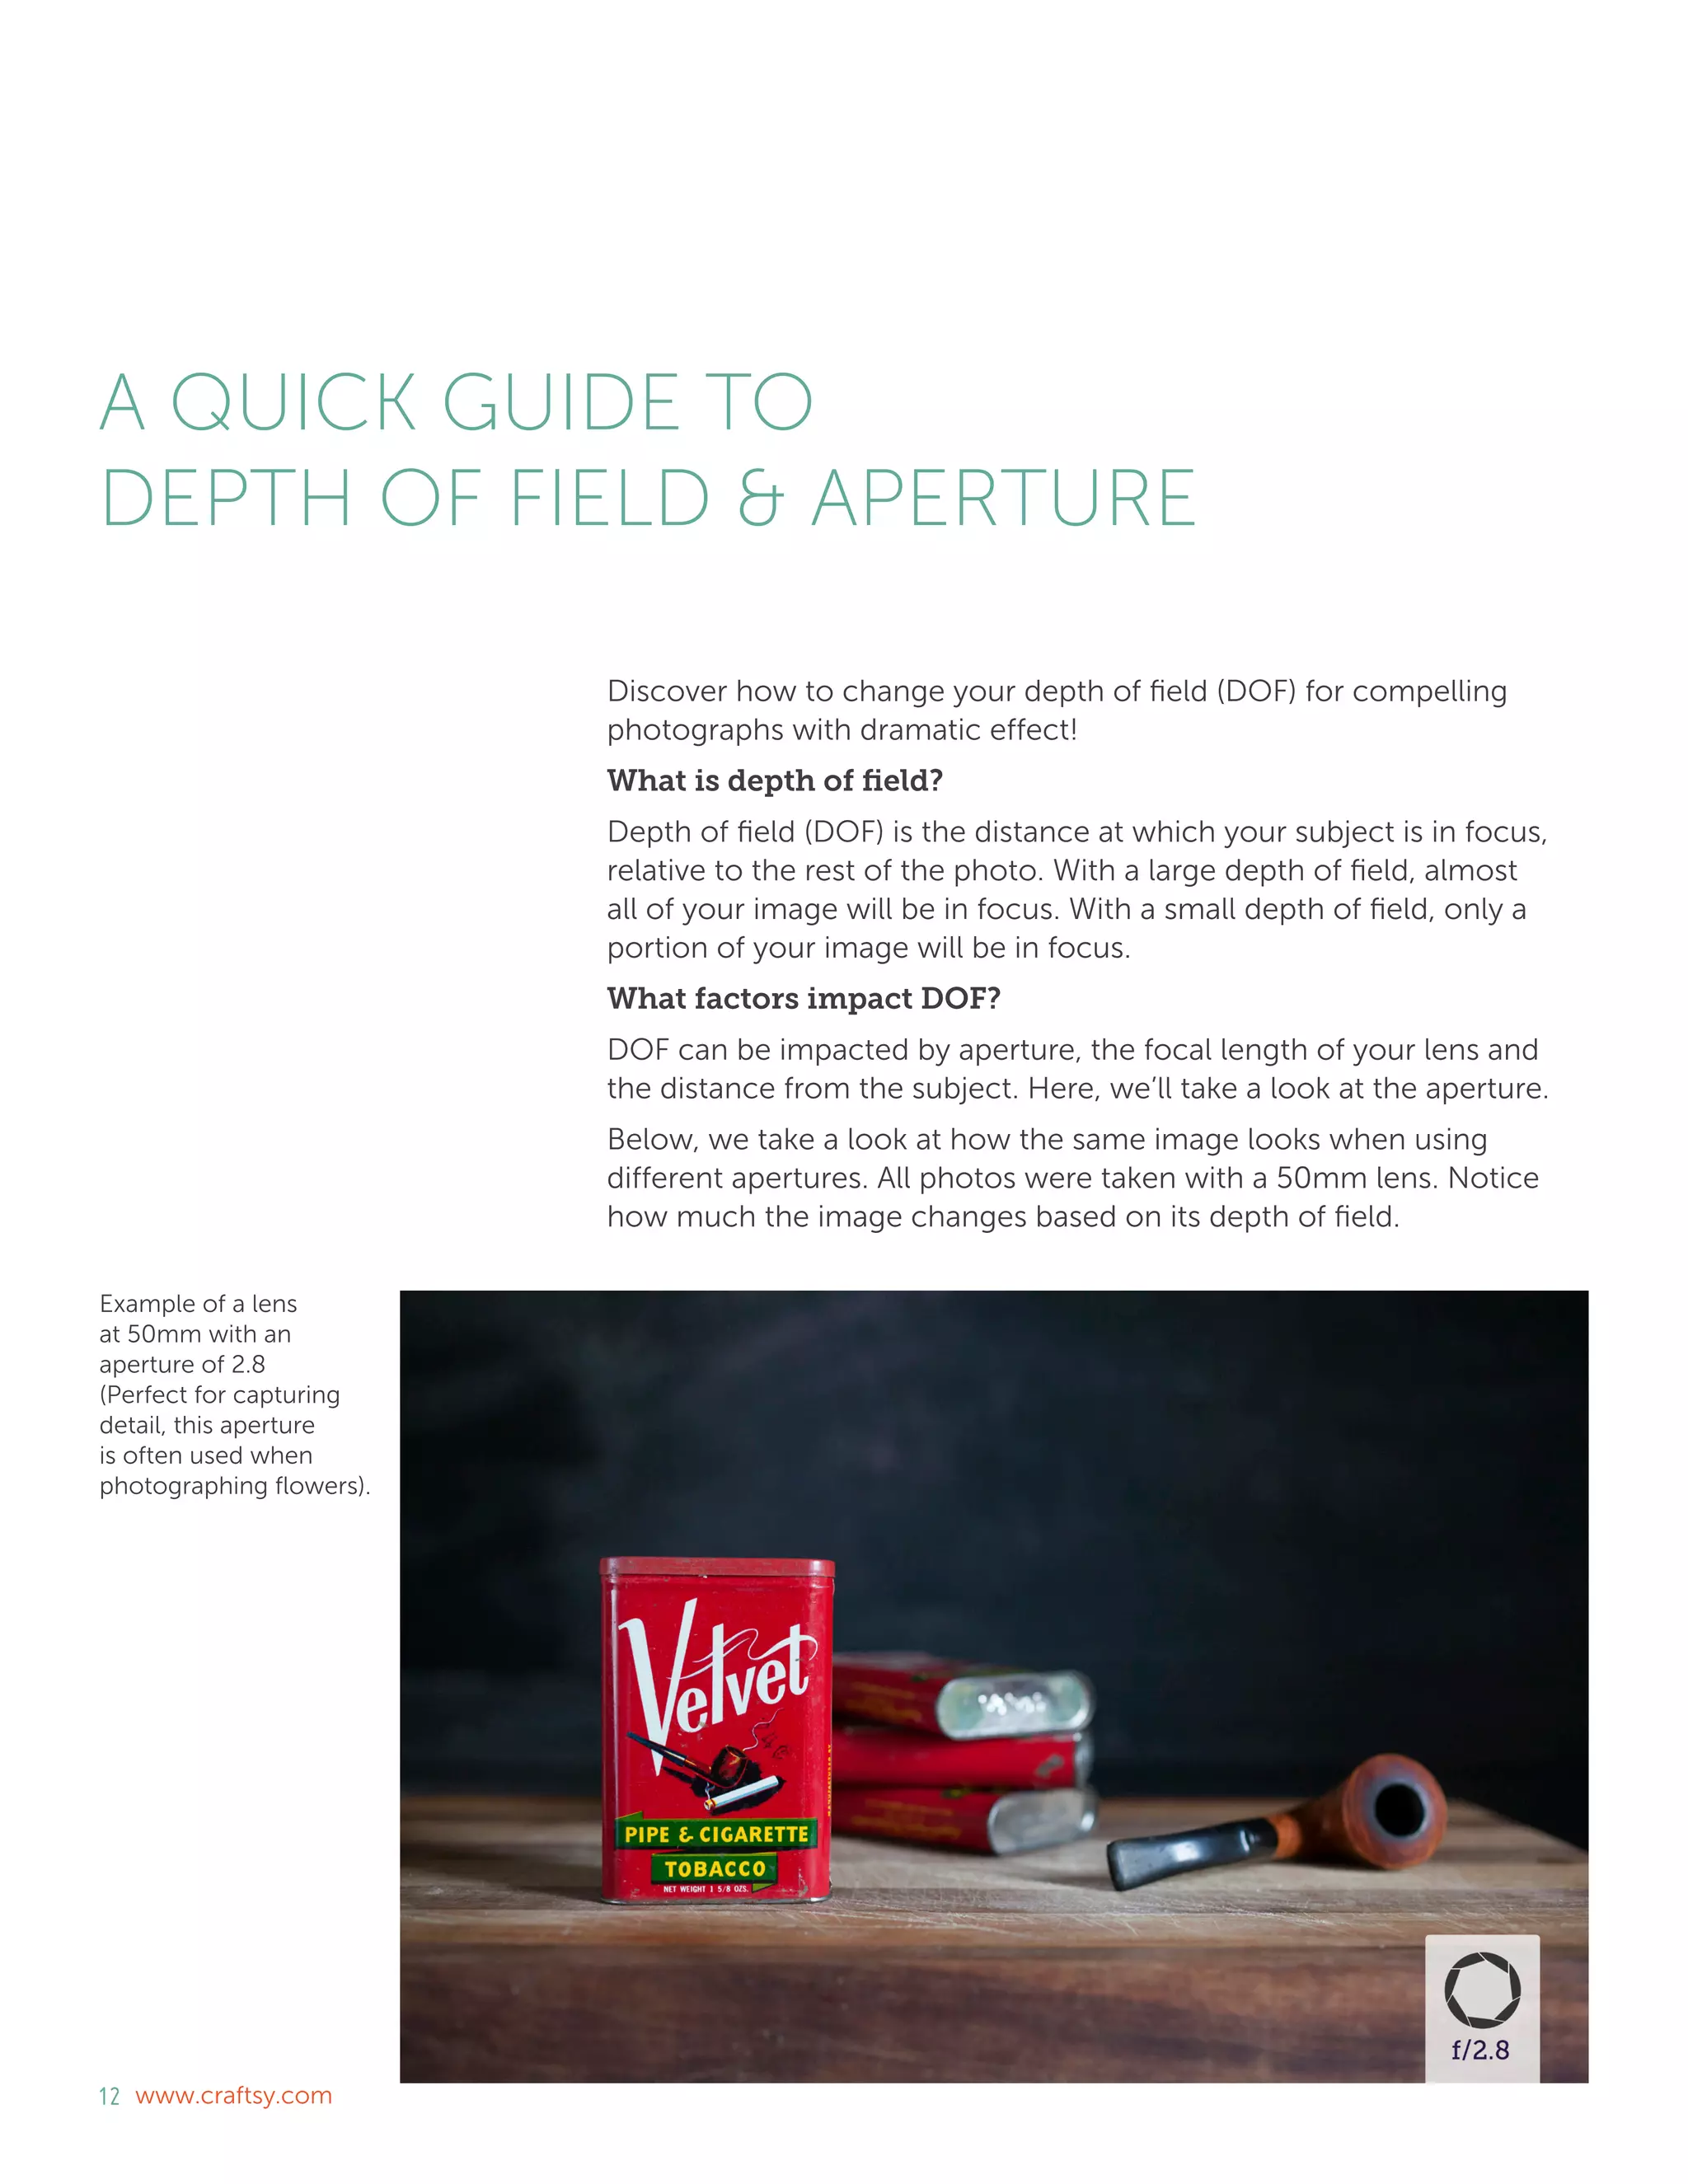
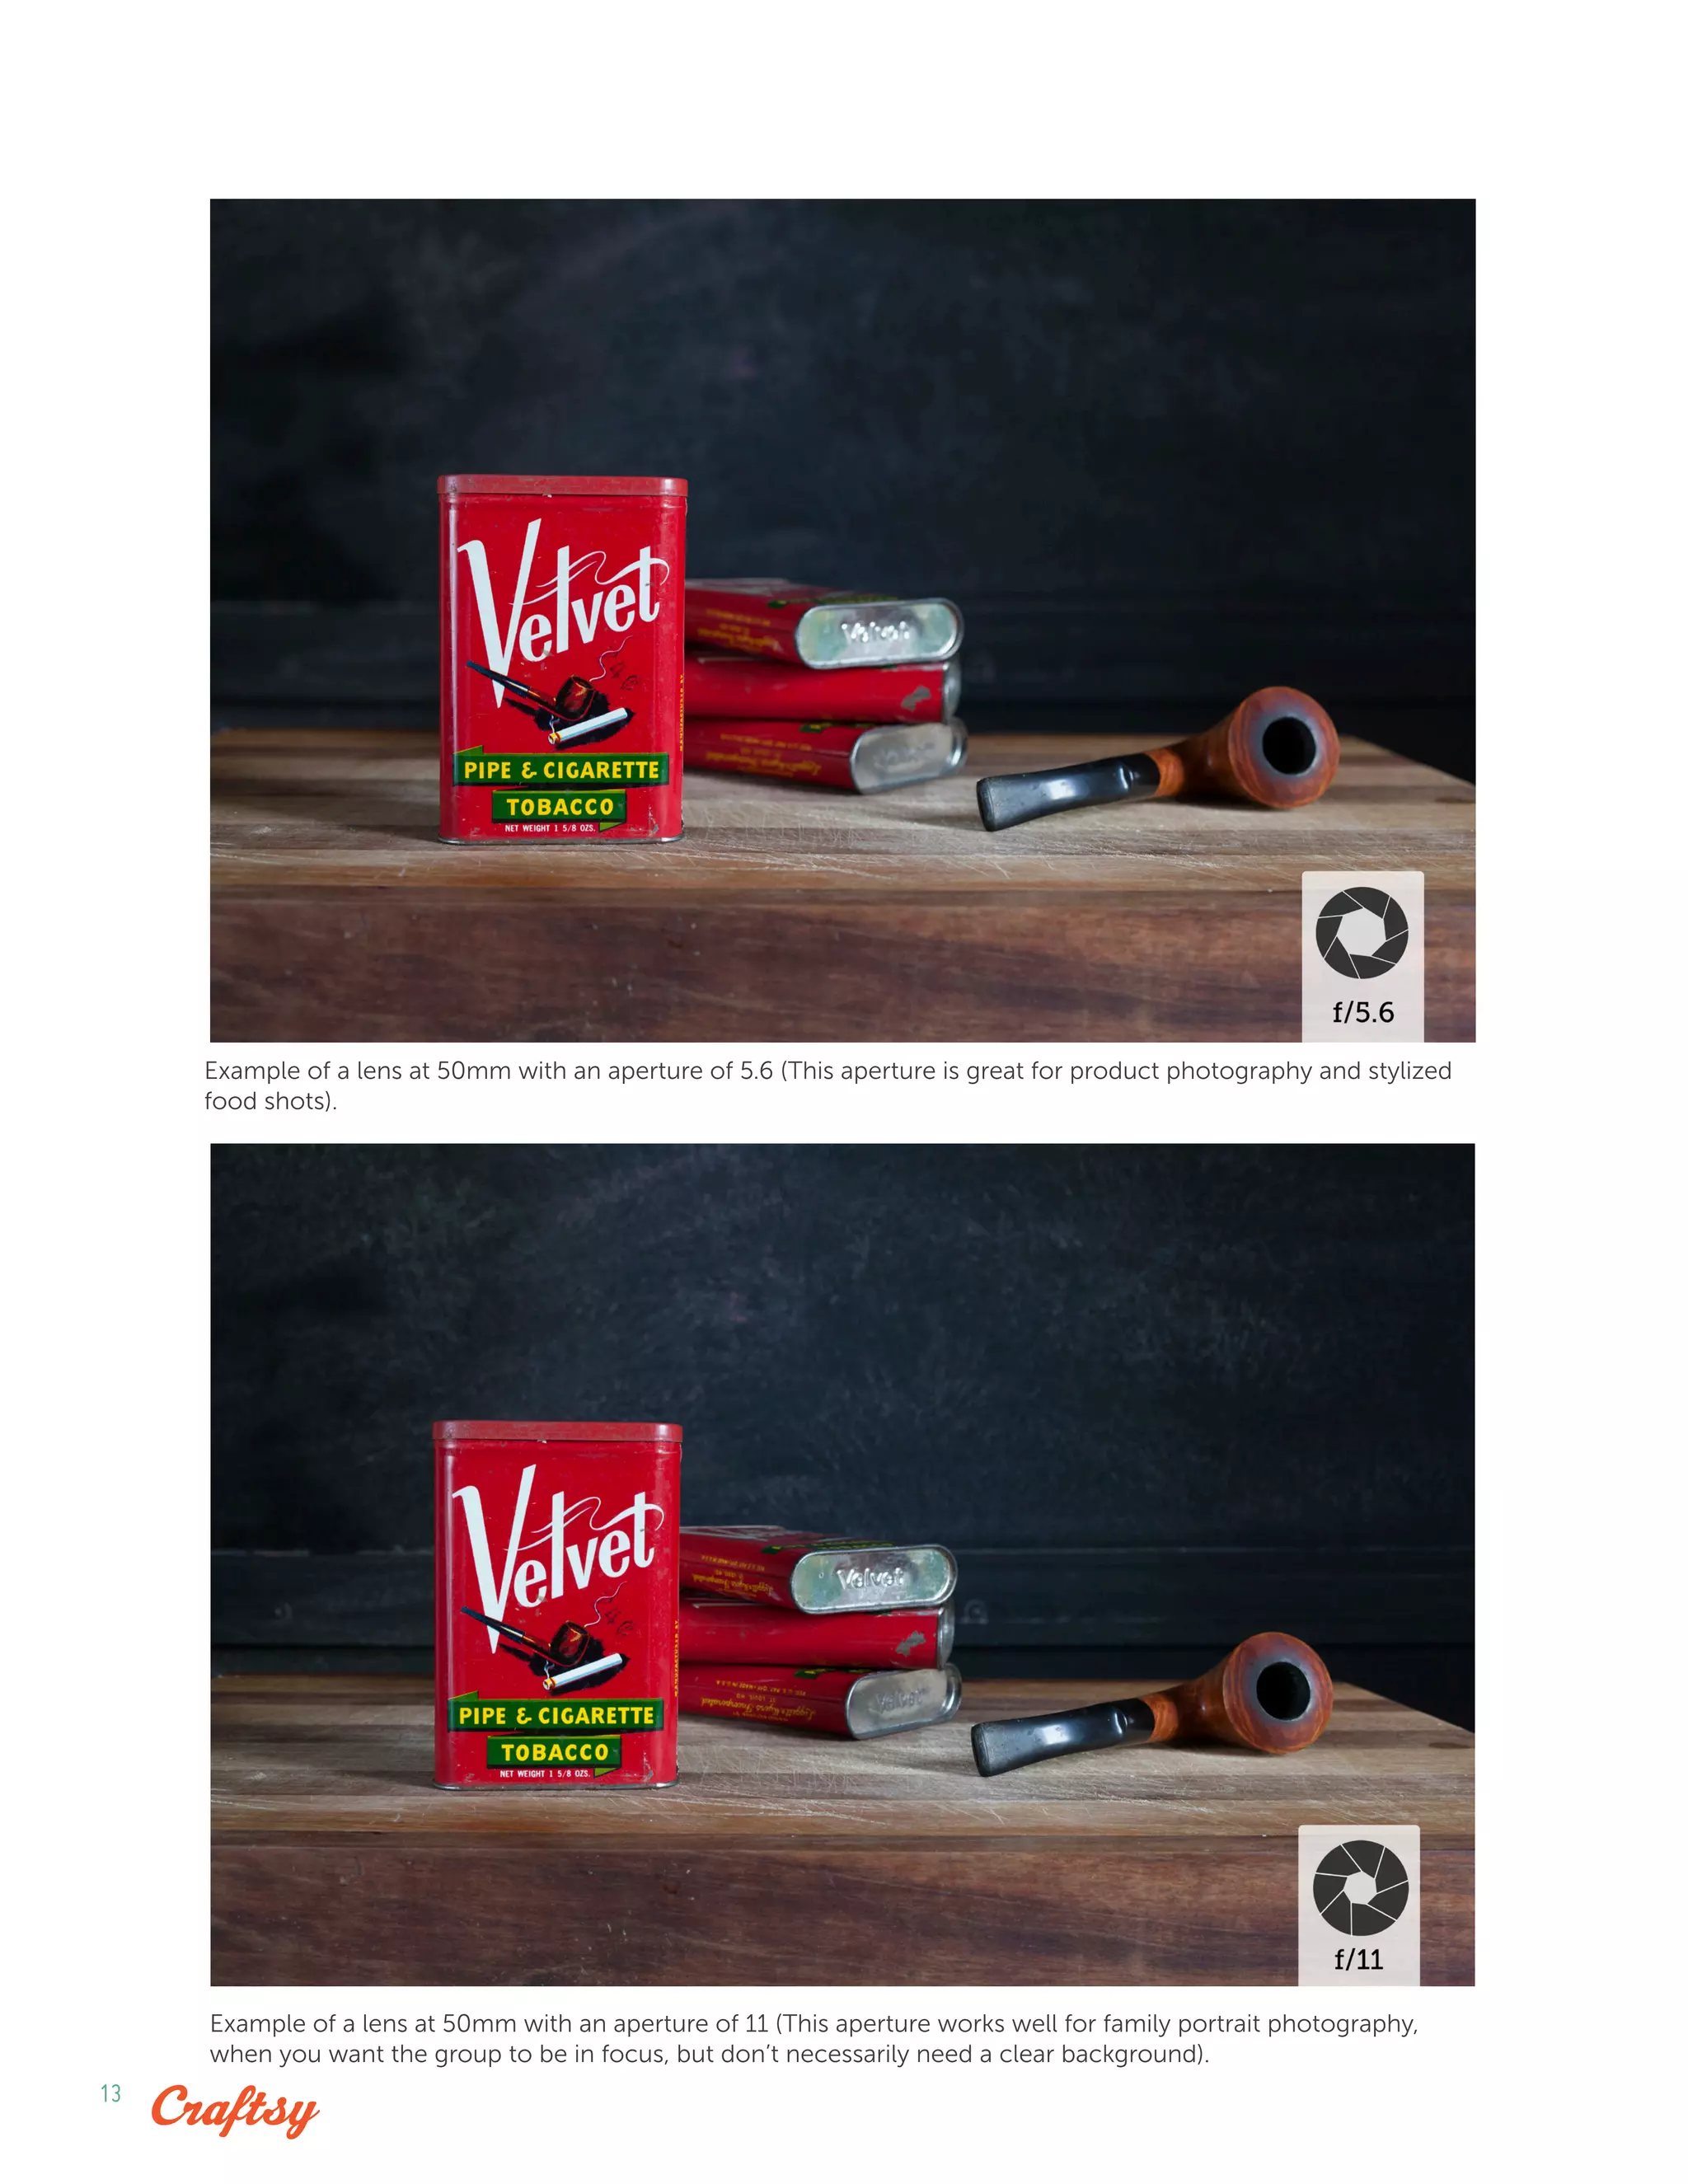
Understanding Exposure
for Better Photos Now
Beginner Photography Tutorials
Created exclusively for Craftsy
by Nicholas Donner
ii www.craftsy.com
TABLE OF CONTENTS
Meet the Expert
Shutter Speed
Aperture
ISO
Creating Proper Exposure
A Quick Guide to Depth of Field & Aperture
02
01
05
07
10
12
1
Nicholas Donner
Nicholas Donner is a photographer and artist based in Washington, DC.
After studying graphic design in California (when he wasn’t surfing
or mountain biking) and starting a successful freelance business,
he turned his attention to photography. Over the last 5 years he’s built
up a portfolio that includes portraits of star athletes and musicians,
several magazine covers, destination and U.S. weddings, landscapes
and architectural photos. He still loves learning new things about light
and composition, and trying out new technology and software.
And he loves sharing his knowledge with people who are also
interested in photography. See more of Nick’s work on his website:
www.donnerphotos.com
MEET THE EXPERT
2 www.craftsy.com
SHUTTER SPEED
Photography is as much science as it is art, and there are three major
variables you must have a working knowledge of on the technical side
of making a proper exposure: shutter speed, aperture and ISO. These
are the foundations of the photographic process. Let’s begin by taking
a look at shutter speed.
What is shutter speed?
SLR cameras have a mirror that covers the sensor and lets you see
through your lens from the viewfinder. When you press the shutter
release button, the mirror moves for a period of time. This period
of time is the shutter speed.
The math is pretty simple on this one. If your shutter speed is twice
as fast, you will let half the amount of light hit the sensor. So, a shutter
speed of one second is twice the amount of light as ½ second, and
four times the amount of light of ¼ second. Easy, right?
Each time you double the light, you bring the exposure up one
“stop.” And each time you half the light, you bring the exposure
down one stop.
In practice, your shutter speed has a lot to do with getting
a correct exposure and how your image looks.
You can use a fast shutter speed in very bright situations, like
taking a photo of a very bright sky, or the sun as it is rising. Sports
photographers use fast shutter speeds — 1/1000 second or
more — to freeze the action. Athletes can move very quickly and
slower shutter speeds result in blurry subjects.
Wildlife photographers also often need fast shutter speeds to capture
birds in flight or animals that move quickly. The shutter speed depends
3
on how quickly your subject is
moving, but again 1/1000 or
faster is very common
for wildlife.
Slow shutters speeds are
useful if you would like
to show motion.
A little bit of blurriness in the
subject or background can
give a sense of movement.
By using a slower shutter speed
and panning with your subject,
say 1/60 second for a race car
passing by, you can convey
the speed at which the car is
moving. In low light situations,
like nighttime landscapes,
a slow shutter speed may also
be useful. If you use a tripod,
you can still get a sharp image using a slow shutter speed. Even in
a very dark place, you might be surprised at the amount of light you
can gather into your photo with a long shutter speed.
Some other useful tips for setting your shutter speed:
1.	 If you’re hand-holding the camera and not sure where to start,
use the inverse rule.
A 30mm lens needs a 1/30 second shutter speed, while a 100mm
lens needs a 1/100 second shutter speed. If you use a shutter
Shot at 1/1,600 second. You can still see some motion blur in the ball.
Shot at 0.8 seconds on a tripod. Even a little movement in the subject will look blurry.
4 www.craftsy.com
speed that is too slow while holding the camera, say a 1/30 of
a second at 100mm, there’s a good chance you won’t be able
to hold it steady enough to get a sharp image. The longer the
lens, the faster your shutter must be to eliminate camera shake.
This is a loose rule because some people have steadier hands
than others and because image stabilization technology has
compensated for some camera shake.
2.	For portraits, my rule of thumb is 1/60 of a second or faster.
No matter whether you are hand-holding the camera, the
camera is on a tripod, or you’re using a short focal length
(shorter than 60mm, using the inverse rule), you need a shutter
speed fast enough to freeze your subject. When someone
is standing still posing for a photo 1/60 of a second is usually fast
enough to get a sharp photo free of any motion blur. My shutter
speed guidelines are based on my experience and came from
many blurry sports photos and not-so-sharp portraits.
5
What is aperture?
Aperture is simply the size of the opening in the
lens that lets light into the sensor. Inside your lens
are blades that create a circular opening, letting
light go from one end of the lens to the other. You
can open them up to let more light through, or
close them down to let less light through.
The f-stop is the nomenclature for the
opening size.
Technically speaking, the f-stop is the ratio
of the distance from the sensor to the aperture
blade opening, divided by the diameter of the
opening. Simply, the lower the f-number,
the larger the aperture blades are opening and
the more light is let into the camera. In turn, the higher the f-number,
the smaller the opening and the less light in the camera. You’ll have
to remember these as opposites: small f-number = large opening,
large f-number = small opening.
Like shutter speed and ISO, aperture works in increments
of stops.
Each stop is twice as much light as the one before it as you open up,
and half as much light as the one before as you close down. So, f/1 is
twice as much light as f/1.4. And f/2 is twice as much light as f/2.8.
Unfortunately, the scale is not as simple as shutter speed and ISO,
just doubling numbers. The scale is easiest memorized and goes like
this: f1, f1.4, f2, f2.8, f4, f5.6, f8, f11, f16, f22, f32, f45 and on up. Each
f-number is half the light of the last.
APERTURE
Reference this chart when adjusting your aperture.
6 www.craftsy.com
Most cameras have additional f-numbers in between these, which
represent half of a stop or a third of a stop to give you additional
flexibility in your exposure.
Depth of field is most easily manipulated using
the aperture.
Larger apertures (smaller f-numbers) give you less depth of field,
which means that backgrounds are blurry. Smaller apertures mean
that more of the image is in focus. Very narrow depth of field is
a cool effect for many photos, so having a lens with the ability to
open up really wide is helpful.
The aperture blades are what contribute to the bokeh effect on
fast lenses.
I consider anything from f/1 to f/2.8 to be fast, although I suppose
it’s possible to see the effect at smaller apertures. Bokeh is basically
the shapes that you see in the out-of-focus areas of your photo.
If you have many blades and they make the aperture rounded, your
bokeh will be round. If the blades are fewer and make more of
a hexagon shape, the bokeh will be hexagonal.
Portraits usually look great on wide open apertures.
With their narrow depth of field, you can get your subject sharp and
let the background fade out of focus. Stop your lens all the way down
as low as it will go and see how it looks on people. Ideally, you have
something that goes to f/2 or f/2.8 or lower. If not, see what you can
do at your lowest aperture. Most lenses will do at least f/3.5 or f/4.
The background is out of focus with a
shallow depth of field.
The circles that are forming in the background leaves are the bokeh.
7
Now that we’ve developed
a better understanding around
shutter speed and aperture when
it comes to making a proper
exposure in photography, let’s dive
further into the foundations of
the photographic process with
a look at ISO.
ISO is rated by sensitivity
to light.
ISO 100 is less sensitive, 400
is more sensitive and 1600 is very
sensitive. It’s interesting to note
that digital ISO is much the same as it was for film cameras. Higher
ISO films were quicker to record light but had the disadvantage of
graininess. In the digital age, higher ISO settings are also quicker to
record light but lead to digital noise. By cranking up the ISO on your
digital camera, you decrease the number of photons that are recorded
accurately due to increased heat and electrical activity — and this gives
you noise.
Digital noise is almost never something we want in our
photographs, so a general rule of thumb is to use the lowest
ISO setting you can.
I like to start at 100 (as low as my camera will go) and then decide
what my shutter speed and aperture need to be. If I can’t get my
aperture any wider or my shutter speed any slower and still get the
image I want, then I’ll start to crank up the ISO. Sometimes, the digital
noise is a compromise you have to live with in order to get your shot.
ISO
Reference this chart when adjusting your ISO.
8 www.craftsy.com
Like shutter speed and aperture, ISO is measured
in stops.
It’s an easy system to figure out: 200 is twice as sensitive to light as
100, and 800 is four times as sensitive as 200. The ISO scale measures
in full stops would look something like this: 25, 50, 100, 200, 400, 800,
1600, 3200, 6400, etc. Some cameras will do extreme ISO settings like
25,600 for dark situations where you need a lot of sensitivity to light.
This is helpful, but also typically comes with a lot of digital noise
Under normal conditions, with practice, you will have a good
idea of what kind of ISO settings you need to have.
For example, outside on a sunny day ISO 100 is almost always the best
setting. Shooting indoor in a place with windows, you might go up
to ISO 400. Shooting in a room without windows and only light fixtures
lighting up your subjects you might go up to ISO 800. Shooting
wedding photography in a dark church probably means you are going
to be using ISO 1600 or 3200, if you aren’t using a flash. Of course,
these settings depend on your shutter speed and aperture, but as
you shoot in different situations, you’ll know where your ISO settings
need to be.
In addition to camera manufacturers making higher ISO less noisy
with each new model, there are software companies that have
created noise reduction software to clean up images that are shot
at higher ISO.
Adobe Lightroom has great noise reduction features to make an image
cleaner and sharper. I also like using Nik Software’s Dfine to get rid
of some of the graininess in high ISO photos. The ability to take away
noise in a photo in post can change the way you create your exposure.
This is a dark church at ISO 3200. Many modern digital cameras have relatively low
noise at high ISO.
9
Straight out of the camera without any noise reduction. Using the Noise Reduction feature in Lightroom.
Knowing I can compromise on a low light image by adjusting my ISO
rather than my shutter speed or aperture, without much change in
overall image quality, is huge.
10 www.craftsy.com
Now that we’ve covered the three major factors of controlling
exposure: shutter speed, aperture and ISO, let’s explore how to work
with shutter speed, aperture and ISO to create the proper exposure
for the types of photographs you want to take.
Shutter speed, aperture and ISO all work together to give us the
tones and quality we want in a photograph.
It’s a three-way balance of light, and most of the time, you have some
options in how you choose to balance them. Earlier we talked about
how to take shutter speed, aperture and ISO up a stop (letting in twice
as much light) and down a stop (letting in half as much light) and the
numbers associated with each.
Once you find the proper exposure for your photo (using your
camera’s light meter), you can adjust it based on whichever of the
three variables is most important to your photograph.
Let’s say that I know my shutter speed needs to be at least 1/60
second. I’m doing a portrait and it’s the slowest I can hand-hold the
camera. If my meter says that an even exposure (not overexposed
or underexposed) can happen at f/4 and 800 ISO, then I have a few
options:
•	 If I can take my aperture up a stop to f/2.8, then I can take my
CREATING PROPER EXPOSURE
11
shutter speed down a stop to 1/125. If you go up one stop in one
area you must go down one stop in another.
•	 Using this rule, another option would be to take the ISO up two
stops to ISO 3200 and then take the shutter speed down two
stops to 1/250 second.
•	 Or, I could take the ISO up two stops and take the shutter speed
down one stop and the aperture down one stop. The point is,
once you have a proper exposure, the balance must remain.
The first step when choosing your settings is to decide which
of the three variables are most important to your photograph.
Here are some examples:
If you are shooting sports in a stadium at night, you
will most likely have low light.
My first decision would be to take the ISO as high
as it will go while still being of an acceptable quality
— probably ISO 3200 on my camera. Then, I would
take the aperture as open as it will go — let’s say
f/2.8. This leaves me with the fastest shutter speed
possible, great for capturing action. If it’s bright
enough in the stadium and my shutter speed is
maxing out at 1/8000 second, I can consider
changing the other variables.
For sports, I care least about the depth of field,
so I would bring my ISO down to improve the quality
of the shot.
If I’m shooting a landscape on a bright, sunny day
without a tripod, I will most likely set my ISO first.
With plenty of light, I know I can keep the ISO
at 100, which will give me the highest quality (least
digital noise) for my photo. Next, I would make sure
my shutter speed was fast enough to hand-hold
the camera — at least 1/60 second for my wide
angle lens and no tripod. The aperture is of little
consequence since I won’t be all that concerned
with depth of field for a landscape. It could be f/4
or f/22. It won’t make much of a difference.
For a window-lit portrait on a cloudy day, my most
important variable is aperture.
I want a shallow depth of field and to focus on eyes.
I know that my shutter speed needs to be at least
1/125 to hand-hold the lens I’m using, so I’ll start there. If it’s still not
enough light to get a proper exposure, I will bump up the ISO until
I have enough light.
If you take enough photos, you will find yourself using the entire range
of shutter speeds, apertures and ISO speeds. And you will quickly learn
how to balance all three.
ISO 1600 was fast enough to shoot at 1/2000 sec. I could have
gone to ISO 3200, but the decrease in quality wasn’t worth the
speed since I was already getting a sharp image.
1/640 second at f/6.3 and 100 ISO. Having a low ISO was most
important in this shot.
12 www.craftsy.com
A QUICK GUIDE TO
DEPTH OF FIELD & APERTURE
Discover how to change your depth of field (DOF) for compelling
photographs with dramatic effect!
What is depth of field?
Depth of field (DOF) is the distance at which your subject is in focus,
relative to the rest of the photo. With a large depth of field, almost
all of your image will be in focus. With a small depth of field, only a
portion of your image will be in focus.
What factors impact DOF?
DOF can be impacted by aperture, the focal length of your lens and
the distance from the subject. Here, we’ll take a look at the aperture.
Below, we take a look at how the same image looks when using
different apertures. All photos were taken with a 50mm lens. Notice
how much the image changes based on its depth of field.
Example of a lens
at 50mm with an
aperture of 2.8
(Perfect for capturing
detail, this aperture
is often used when
photographing flowers).
13
Example of a lens at 50mm with an aperture of 5.6 (This aperture is great for product photography and stylized
food shots).
Example of a lens at 50mm with an aperture of 11 (This aperture works well for family portrait photography,
when you want the group to be in focus, but don’t necessarily need a clear background).
14 www.craftsy.com
Example of a lens at 50mm with an aperture of 22 (When you are photographing landscapes, this aperture is
ideal for capturing the whole scene).
For more detailed guidance on how you can take start taking better
photographs today, check out Craftsy’s growing collection
of online photography classes. You’ll learn at your own pace
while enjoying personalized guidance and critique from expert
photographers without ever leaving your home!
SPECIAL OFFER!
Click here to enjoy an exclusive 25% off your next photography class!

Beginner photography blogeguide

  • 1.
    Understanding Exposure for BetterPhotos Now Beginner Photography Tutorials Created exclusively for Craftsy by Nicholas Donner
  • 2.
    ii www.craftsy.com TABLE OFCONTENTS Meet the Expert Shutter Speed Aperture ISO Creating Proper Exposure A Quick Guide to Depth of Field & Aperture 02 01 05 07 10 12
  • 3.
    1 Nicholas Donner Nicholas Donneris a photographer and artist based in Washington, DC. After studying graphic design in California (when he wasn’t surfing or mountain biking) and starting a successful freelance business, he turned his attention to photography. Over the last 5 years he’s built up a portfolio that includes portraits of star athletes and musicians, several magazine covers, destination and U.S. weddings, landscapes and architectural photos. He still loves learning new things about light and composition, and trying out new technology and software. And he loves sharing his knowledge with people who are also interested in photography. See more of Nick’s work on his website: www.donnerphotos.com MEET THE EXPERT
  • 4.
    2 www.craftsy.com SHUTTER SPEED Photographyis as much science as it is art, and there are three major variables you must have a working knowledge of on the technical side of making a proper exposure: shutter speed, aperture and ISO. These are the foundations of the photographic process. Let’s begin by taking a look at shutter speed. What is shutter speed? SLR cameras have a mirror that covers the sensor and lets you see through your lens from the viewfinder. When you press the shutter release button, the mirror moves for a period of time. This period of time is the shutter speed. The math is pretty simple on this one. If your shutter speed is twice as fast, you will let half the amount of light hit the sensor. So, a shutter speed of one second is twice the amount of light as ½ second, and four times the amount of light of ¼ second. Easy, right? Each time you double the light, you bring the exposure up one “stop.” And each time you half the light, you bring the exposure down one stop. In practice, your shutter speed has a lot to do with getting a correct exposure and how your image looks. You can use a fast shutter speed in very bright situations, like taking a photo of a very bright sky, or the sun as it is rising. Sports photographers use fast shutter speeds — 1/1000 second or more — to freeze the action. Athletes can move very quickly and slower shutter speeds result in blurry subjects. Wildlife photographers also often need fast shutter speeds to capture birds in flight or animals that move quickly. The shutter speed depends
  • 5.
    3 on how quicklyyour subject is moving, but again 1/1000 or faster is very common for wildlife. Slow shutters speeds are useful if you would like to show motion. A little bit of blurriness in the subject or background can give a sense of movement. By using a slower shutter speed and panning with your subject, say 1/60 second for a race car passing by, you can convey the speed at which the car is moving. In low light situations, like nighttime landscapes, a slow shutter speed may also be useful. If you use a tripod, you can still get a sharp image using a slow shutter speed. Even in a very dark place, you might be surprised at the amount of light you can gather into your photo with a long shutter speed. Some other useful tips for setting your shutter speed: 1. If you’re hand-holding the camera and not sure where to start, use the inverse rule. A 30mm lens needs a 1/30 second shutter speed, while a 100mm lens needs a 1/100 second shutter speed. If you use a shutter Shot at 1/1,600 second. You can still see some motion blur in the ball. Shot at 0.8 seconds on a tripod. Even a little movement in the subject will look blurry.
  • 6.
    4 www.craftsy.com speed thatis too slow while holding the camera, say a 1/30 of a second at 100mm, there’s a good chance you won’t be able to hold it steady enough to get a sharp image. The longer the lens, the faster your shutter must be to eliminate camera shake. This is a loose rule because some people have steadier hands than others and because image stabilization technology has compensated for some camera shake. 2. For portraits, my rule of thumb is 1/60 of a second or faster. No matter whether you are hand-holding the camera, the camera is on a tripod, or you’re using a short focal length (shorter than 60mm, using the inverse rule), you need a shutter speed fast enough to freeze your subject. When someone is standing still posing for a photo 1/60 of a second is usually fast enough to get a sharp photo free of any motion blur. My shutter speed guidelines are based on my experience and came from many blurry sports photos and not-so-sharp portraits.
  • 7.
    5 What is aperture? Apertureis simply the size of the opening in the lens that lets light into the sensor. Inside your lens are blades that create a circular opening, letting light go from one end of the lens to the other. You can open them up to let more light through, or close them down to let less light through. The f-stop is the nomenclature for the opening size. Technically speaking, the f-stop is the ratio of the distance from the sensor to the aperture blade opening, divided by the diameter of the opening. Simply, the lower the f-number, the larger the aperture blades are opening and the more light is let into the camera. In turn, the higher the f-number, the smaller the opening and the less light in the camera. You’ll have to remember these as opposites: small f-number = large opening, large f-number = small opening. Like shutter speed and ISO, aperture works in increments of stops. Each stop is twice as much light as the one before it as you open up, and half as much light as the one before as you close down. So, f/1 is twice as much light as f/1.4. And f/2 is twice as much light as f/2.8. Unfortunately, the scale is not as simple as shutter speed and ISO, just doubling numbers. The scale is easiest memorized and goes like this: f1, f1.4, f2, f2.8, f4, f5.6, f8, f11, f16, f22, f32, f45 and on up. Each f-number is half the light of the last. APERTURE Reference this chart when adjusting your aperture.
  • 8.
    6 www.craftsy.com Most camerashave additional f-numbers in between these, which represent half of a stop or a third of a stop to give you additional flexibility in your exposure. Depth of field is most easily manipulated using the aperture. Larger apertures (smaller f-numbers) give you less depth of field, which means that backgrounds are blurry. Smaller apertures mean that more of the image is in focus. Very narrow depth of field is a cool effect for many photos, so having a lens with the ability to open up really wide is helpful. The aperture blades are what contribute to the bokeh effect on fast lenses. I consider anything from f/1 to f/2.8 to be fast, although I suppose it’s possible to see the effect at smaller apertures. Bokeh is basically the shapes that you see in the out-of-focus areas of your photo. If you have many blades and they make the aperture rounded, your bokeh will be round. If the blades are fewer and make more of a hexagon shape, the bokeh will be hexagonal. Portraits usually look great on wide open apertures. With their narrow depth of field, you can get your subject sharp and let the background fade out of focus. Stop your lens all the way down as low as it will go and see how it looks on people. Ideally, you have something that goes to f/2 or f/2.8 or lower. If not, see what you can do at your lowest aperture. Most lenses will do at least f/3.5 or f/4. The background is out of focus with a shallow depth of field. The circles that are forming in the background leaves are the bokeh.
  • 9.
    7 Now that we’vedeveloped a better understanding around shutter speed and aperture when it comes to making a proper exposure in photography, let’s dive further into the foundations of the photographic process with a look at ISO. ISO is rated by sensitivity to light. ISO 100 is less sensitive, 400 is more sensitive and 1600 is very sensitive. It’s interesting to note that digital ISO is much the same as it was for film cameras. Higher ISO films were quicker to record light but had the disadvantage of graininess. In the digital age, higher ISO settings are also quicker to record light but lead to digital noise. By cranking up the ISO on your digital camera, you decrease the number of photons that are recorded accurately due to increased heat and electrical activity — and this gives you noise. Digital noise is almost never something we want in our photographs, so a general rule of thumb is to use the lowest ISO setting you can. I like to start at 100 (as low as my camera will go) and then decide what my shutter speed and aperture need to be. If I can’t get my aperture any wider or my shutter speed any slower and still get the image I want, then I’ll start to crank up the ISO. Sometimes, the digital noise is a compromise you have to live with in order to get your shot. ISO Reference this chart when adjusting your ISO.
  • 10.
    8 www.craftsy.com Like shutterspeed and aperture, ISO is measured in stops. It’s an easy system to figure out: 200 is twice as sensitive to light as 100, and 800 is four times as sensitive as 200. The ISO scale measures in full stops would look something like this: 25, 50, 100, 200, 400, 800, 1600, 3200, 6400, etc. Some cameras will do extreme ISO settings like 25,600 for dark situations where you need a lot of sensitivity to light. This is helpful, but also typically comes with a lot of digital noise Under normal conditions, with practice, you will have a good idea of what kind of ISO settings you need to have. For example, outside on a sunny day ISO 100 is almost always the best setting. Shooting indoor in a place with windows, you might go up to ISO 400. Shooting in a room without windows and only light fixtures lighting up your subjects you might go up to ISO 800. Shooting wedding photography in a dark church probably means you are going to be using ISO 1600 or 3200, if you aren’t using a flash. Of course, these settings depend on your shutter speed and aperture, but as you shoot in different situations, you’ll know where your ISO settings need to be. In addition to camera manufacturers making higher ISO less noisy with each new model, there are software companies that have created noise reduction software to clean up images that are shot at higher ISO. Adobe Lightroom has great noise reduction features to make an image cleaner and sharper. I also like using Nik Software’s Dfine to get rid of some of the graininess in high ISO photos. The ability to take away noise in a photo in post can change the way you create your exposure. This is a dark church at ISO 3200. Many modern digital cameras have relatively low noise at high ISO.
  • 11.
    9 Straight out ofthe camera without any noise reduction. Using the Noise Reduction feature in Lightroom. Knowing I can compromise on a low light image by adjusting my ISO rather than my shutter speed or aperture, without much change in overall image quality, is huge.
  • 12.
    10 www.craftsy.com Now thatwe’ve covered the three major factors of controlling exposure: shutter speed, aperture and ISO, let’s explore how to work with shutter speed, aperture and ISO to create the proper exposure for the types of photographs you want to take. Shutter speed, aperture and ISO all work together to give us the tones and quality we want in a photograph. It’s a three-way balance of light, and most of the time, you have some options in how you choose to balance them. Earlier we talked about how to take shutter speed, aperture and ISO up a stop (letting in twice as much light) and down a stop (letting in half as much light) and the numbers associated with each. Once you find the proper exposure for your photo (using your camera’s light meter), you can adjust it based on whichever of the three variables is most important to your photograph. Let’s say that I know my shutter speed needs to be at least 1/60 second. I’m doing a portrait and it’s the slowest I can hand-hold the camera. If my meter says that an even exposure (not overexposed or underexposed) can happen at f/4 and 800 ISO, then I have a few options: • If I can take my aperture up a stop to f/2.8, then I can take my CREATING PROPER EXPOSURE
  • 13.
    11 shutter speed downa stop to 1/125. If you go up one stop in one area you must go down one stop in another. • Using this rule, another option would be to take the ISO up two stops to ISO 3200 and then take the shutter speed down two stops to 1/250 second. • Or, I could take the ISO up two stops and take the shutter speed down one stop and the aperture down one stop. The point is, once you have a proper exposure, the balance must remain. The first step when choosing your settings is to decide which of the three variables are most important to your photograph. Here are some examples: If you are shooting sports in a stadium at night, you will most likely have low light. My first decision would be to take the ISO as high as it will go while still being of an acceptable quality — probably ISO 3200 on my camera. Then, I would take the aperture as open as it will go — let’s say f/2.8. This leaves me with the fastest shutter speed possible, great for capturing action. If it’s bright enough in the stadium and my shutter speed is maxing out at 1/8000 second, I can consider changing the other variables. For sports, I care least about the depth of field, so I would bring my ISO down to improve the quality of the shot. If I’m shooting a landscape on a bright, sunny day without a tripod, I will most likely set my ISO first. With plenty of light, I know I can keep the ISO at 100, which will give me the highest quality (least digital noise) for my photo. Next, I would make sure my shutter speed was fast enough to hand-hold the camera — at least 1/60 second for my wide angle lens and no tripod. The aperture is of little consequence since I won’t be all that concerned with depth of field for a landscape. It could be f/4 or f/22. It won’t make much of a difference. For a window-lit portrait on a cloudy day, my most important variable is aperture. I want a shallow depth of field and to focus on eyes. I know that my shutter speed needs to be at least 1/125 to hand-hold the lens I’m using, so I’ll start there. If it’s still not enough light to get a proper exposure, I will bump up the ISO until I have enough light. If you take enough photos, you will find yourself using the entire range of shutter speeds, apertures and ISO speeds. And you will quickly learn how to balance all three. ISO 1600 was fast enough to shoot at 1/2000 sec. I could have gone to ISO 3200, but the decrease in quality wasn’t worth the speed since I was already getting a sharp image. 1/640 second at f/6.3 and 100 ISO. Having a low ISO was most important in this shot.
  • 14.
    12 www.craftsy.com A QUICKGUIDE TO DEPTH OF FIELD & APERTURE Discover how to change your depth of field (DOF) for compelling photographs with dramatic effect! What is depth of field? Depth of field (DOF) is the distance at which your subject is in focus, relative to the rest of the photo. With a large depth of field, almost all of your image will be in focus. With a small depth of field, only a portion of your image will be in focus. What factors impact DOF? DOF can be impacted by aperture, the focal length of your lens and the distance from the subject. Here, we’ll take a look at the aperture. Below, we take a look at how the same image looks when using different apertures. All photos were taken with a 50mm lens. Notice how much the image changes based on its depth of field. Example of a lens at 50mm with an aperture of 2.8 (Perfect for capturing detail, this aperture is often used when photographing flowers).
  • 15.
    13 Example of alens at 50mm with an aperture of 5.6 (This aperture is great for product photography and stylized food shots). Example of a lens at 50mm with an aperture of 11 (This aperture works well for family portrait photography, when you want the group to be in focus, but don’t necessarily need a clear background).
  • 16.
    14 www.craftsy.com Example ofa lens at 50mm with an aperture of 22 (When you are photographing landscapes, this aperture is ideal for capturing the whole scene). For more detailed guidance on how you can take start taking better photographs today, check out Craftsy’s growing collection of online photography classes. You’ll learn at your own pace while enjoying personalized guidance and critique from expert photographers without ever leaving your home! SPECIAL OFFER! Click here to enjoy an exclusive 25% off your next photography class!