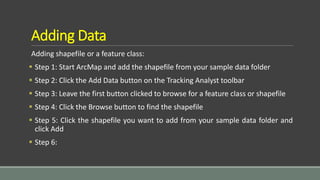
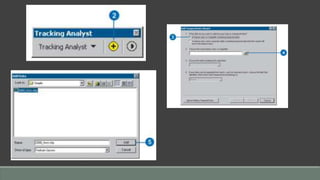
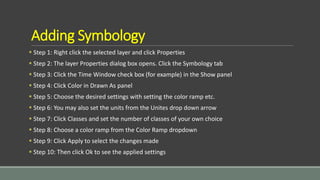
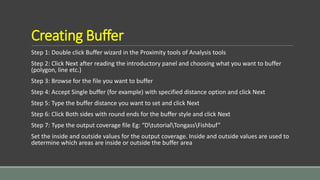
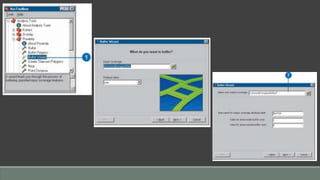
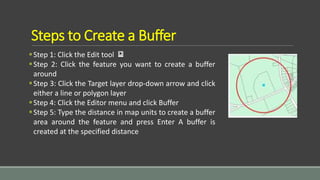
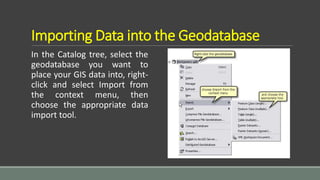
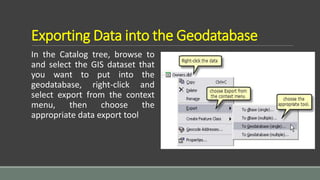
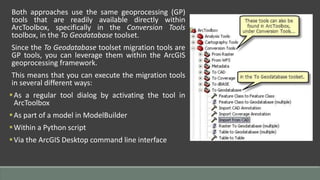
BASIC COMMANDS
Adding Data
Adding shapefile or a feature class:
 Step 1: Start ArcMap and add the shapefile from your sample data folder
 Step 2: Click the Add Data button on the Tracking Analyst toolbar
 Step 3: Leave the first button clicked to browse for a feature class or shapefile
 Step 4: Click the Browse button to find the shapefile
 Step 5: Click the shapefile you want to add from your sample data folder and
click Add
 Step 6:
Adding Symbology
 Step 1: Right click the selected layer and click Properties
 Step 2: The layer Properties dialog box opens. Click the Symbology tab
 Step 3: Click the Time Window check box (for example) in the Show panel
 Step 4: Click Color in Drawn As panel
 Step 5: Choose the desired settings with setting the color ramp etc.
 Step 6: You may also set the units from the Unites drop down arrow
 Step 7: Click Classes and set the number of classes of your own choice
 Step 8: Choose a color ramp from the Color Ramp dropdown
 Step 9: Click Apply to select the changes made
 Step 10: Then click Ok to see the applied settings
Creating Buffer
Step 1: Double click Buffer wizard in the Proximity tools of Analysis tools
Step 2: Click Next after reading the introductory panel and choosing what you want to buffer
(polygon, line etc.)
Step 3: Browse for the file you want to buffer
Step 4: Accept Single buffer (for example) with specified distance option and click Next
Step 5: Type the buffer distance you want to set and click Next
Step 6: Click Both sides with round ends for the buffer style and click Next
Step 7: Type the output coverage file Eg: “DtutorialTongassFishbuf”
Set the inside and outside values for the output coverage. Inside and outside values are used to
determine which areas are inside or outside the buffer area
Creating a Buffer
 You can create a buffer around selected points, lines, or area features by using the Buffer
command
 Buffered features are stored in the target layer, which must contain either line or polygon
features
 For instance, you might use buffers to show an ecological zone around a waterway, distances
from schools or public buildings that certain retail stores are located, or the area around a
contaminated well. You can buffer more than one feature at once, but a separate buffer will be
created around each feature
 The buffer distance is given in map units by default. You can also give the value in other units by
specifying a distance units abbreviation with the value that you enter
 There are several other ways to create buffers in ArcGIS, including the Buffer geoprocessing tool
 While the editing Buffer command creates new features in the target layer in ArcMap, the
Buffer geoprocessing tool creates them in a feature class on disk
Steps to Create a Buffer
Step 1: Click the Edit tool
Step 2: Click the feature you want to create a buffer
around
Step 3: Click the Target layer drop-down arrow and click
either a line or polygon layer
Step 4: Click the Editor menu and click Buffer
Step 5: Type the distance in map units to create a buffer
area around the feature and press Enter A buffer is
created at the specified distance
Importing Data into the Geodatabase
In the Catalog tree, select the
geodatabase you want to
place your GIS data into, right-
click and select Import from
the context menu, then
choose the appropriate data
import tool.
Exporting Data into the Geodatabase
In the Catalog tree, browse to
and select the GIS dataset that
you want to put into the
geodatabase, right-click and
select export from the context
menu, then choose the
appropriate data export tool
Both approaches use the same geoprocessing (GP)
tools that are readily available directly within
ArcToolbox, specifically in the Conversion Tools
toolbox, in the To Geodatabase toolset.
Since the To Geodatabase toolset migration tools are
GP tools, you can leverage them within the ArcGIS
geoprocessing framework.
This means that you can execute the migration tools
in several different ways:
As a regular tool dialog by activating the tool in
ArcToolbox
As part of a model in ModelBuilder
Within a Python script
Via the ArcGIS Desktop command line interface
Migrating Shapefiles into a Geodatabase
So first, let’s look at migrating shapefiles into the geodatabase. A shapefile is the
native data format for ArcView GIS 3.x technology. It is a type of feature class
and therefore directly maps to the geodatabase as a single feature class when
you migrate it to the geodatabase.
There are two key GP tools for migrating your shapefiles into the geodatabase:
1. Feature Class to Feature Class
2. Feature Class to Geodatabase
The Feature Class to Feature Class tool works on a single shapefile
The Feature Class to Geodatabase tool works on multiple shapefiles
Feature Class to Feature Class
You will need to specify the following:
 Input Features – you can browse to a shapefile or drag and drop one into the input box
 Output location – this can be the geodatabase or a feature dataset within the geodatabase. Again you can browse to
a location or drag and drop one into the input box
 Output Feature Class – the name of the output feature class that will be created
There are also 3 optional input parameters:
 Expression – enables you to define a SQL expression to select a subset of the rows in the input table to migrate
 Field Map – provides options to add, rename, or delete fields when the input shapefile is converted to the output
feature class
 Configuration Keyword – this is used to specify storage parameters in ArcSDE geodatabases and File geodatabases
For the Field Map parameter, we recommended that you drop the FID, shape_length, and shape_area attribute
fields, because these will be replaced by new fields when the shapefile becomes a feature class in the geodatabase.
Feature Class to Geodatabase
Idealy you would use this tool over the Feature Class to Feature Class tool if you
had many shape files to migrate to a Geodatabase. To use this tool you specify
one or more shapefiles to convert and the output geodatabase location. By
default, the shapefiles will have the same names as the original shapefiles when
they are migrated into the geodatabase
Using GP tools makes the task of migrating shapefile data into a geodatabase
quick and painless. As mentioned before, GP tools can be used in a number of
different ways including initiating the tools through ArcCatalog, using them
directly from the toolbox, or scripting the tool execution in python
Basic commands of ArcGIS

Basic commands of ArcGIS

  • 1.
  • 2.
    Adding Data Adding shapefileor a feature class:  Step 1: Start ArcMap and add the shapefile from your sample data folder  Step 2: Click the Add Data button on the Tracking Analyst toolbar  Step 3: Leave the first button clicked to browse for a feature class or shapefile  Step 4: Click the Browse button to find the shapefile  Step 5: Click the shapefile you want to add from your sample data folder and click Add  Step 6:
  • 4.
    Adding Symbology  Step1: Right click the selected layer and click Properties  Step 2: The layer Properties dialog box opens. Click the Symbology tab  Step 3: Click the Time Window check box (for example) in the Show panel  Step 4: Click Color in Drawn As panel  Step 5: Choose the desired settings with setting the color ramp etc.  Step 6: You may also set the units from the Unites drop down arrow  Step 7: Click Classes and set the number of classes of your own choice  Step 8: Choose a color ramp from the Color Ramp dropdown  Step 9: Click Apply to select the changes made  Step 10: Then click Ok to see the applied settings
  • 6.
    Creating Buffer Step 1:Double click Buffer wizard in the Proximity tools of Analysis tools Step 2: Click Next after reading the introductory panel and choosing what you want to buffer (polygon, line etc.) Step 3: Browse for the file you want to buffer Step 4: Accept Single buffer (for example) with specified distance option and click Next Step 5: Type the buffer distance you want to set and click Next Step 6: Click Both sides with round ends for the buffer style and click Next Step 7: Type the output coverage file Eg: “DtutorialTongassFishbuf” Set the inside and outside values for the output coverage. Inside and outside values are used to determine which areas are inside or outside the buffer area
  • 8.
    Creating a Buffer You can create a buffer around selected points, lines, or area features by using the Buffer command  Buffered features are stored in the target layer, which must contain either line or polygon features  For instance, you might use buffers to show an ecological zone around a waterway, distances from schools or public buildings that certain retail stores are located, or the area around a contaminated well. You can buffer more than one feature at once, but a separate buffer will be created around each feature  The buffer distance is given in map units by default. You can also give the value in other units by specifying a distance units abbreviation with the value that you enter  There are several other ways to create buffers in ArcGIS, including the Buffer geoprocessing tool  While the editing Buffer command creates new features in the target layer in ArcMap, the Buffer geoprocessing tool creates them in a feature class on disk
  • 9.
    Steps to Createa Buffer Step 1: Click the Edit tool Step 2: Click the feature you want to create a buffer around Step 3: Click the Target layer drop-down arrow and click either a line or polygon layer Step 4: Click the Editor menu and click Buffer Step 5: Type the distance in map units to create a buffer area around the feature and press Enter A buffer is created at the specified distance
  • 10.
    Importing Data intothe Geodatabase In the Catalog tree, select the geodatabase you want to place your GIS data into, right- click and select Import from the context menu, then choose the appropriate data import tool.
  • 11.
    Exporting Data intothe Geodatabase In the Catalog tree, browse to and select the GIS dataset that you want to put into the geodatabase, right-click and select export from the context menu, then choose the appropriate data export tool
  • 12.
    Both approaches usethe same geoprocessing (GP) tools that are readily available directly within ArcToolbox, specifically in the Conversion Tools toolbox, in the To Geodatabase toolset. Since the To Geodatabase toolset migration tools are GP tools, you can leverage them within the ArcGIS geoprocessing framework. This means that you can execute the migration tools in several different ways: As a regular tool dialog by activating the tool in ArcToolbox As part of a model in ModelBuilder Within a Python script Via the ArcGIS Desktop command line interface
  • 13.
    Migrating Shapefiles intoa Geodatabase So first, let’s look at migrating shapefiles into the geodatabase. A shapefile is the native data format for ArcView GIS 3.x technology. It is a type of feature class and therefore directly maps to the geodatabase as a single feature class when you migrate it to the geodatabase. There are two key GP tools for migrating your shapefiles into the geodatabase: 1. Feature Class to Feature Class 2. Feature Class to Geodatabase The Feature Class to Feature Class tool works on a single shapefile The Feature Class to Geodatabase tool works on multiple shapefiles
  • 14.
    Feature Class toFeature Class You will need to specify the following:  Input Features – you can browse to a shapefile or drag and drop one into the input box  Output location – this can be the geodatabase or a feature dataset within the geodatabase. Again you can browse to a location or drag and drop one into the input box  Output Feature Class – the name of the output feature class that will be created There are also 3 optional input parameters:  Expression – enables you to define a SQL expression to select a subset of the rows in the input table to migrate  Field Map – provides options to add, rename, or delete fields when the input shapefile is converted to the output feature class  Configuration Keyword – this is used to specify storage parameters in ArcSDE geodatabases and File geodatabases For the Field Map parameter, we recommended that you drop the FID, shape_length, and shape_area attribute fields, because these will be replaced by new fields when the shapefile becomes a feature class in the geodatabase.
  • 16.
    Feature Class toGeodatabase Idealy you would use this tool over the Feature Class to Feature Class tool if you had many shape files to migrate to a Geodatabase. To use this tool you specify one or more shapefiles to convert and the output geodatabase location. By default, the shapefiles will have the same names as the original shapefiles when they are migrated into the geodatabase Using GP tools makes the task of migrating shapefile data into a geodatabase quick and painless. As mentioned before, GP tools can be used in a number of different ways including initiating the tools through ArcCatalog, using them directly from the toolbox, or scripting the tool execution in python