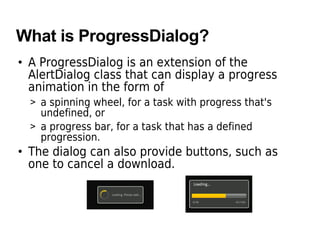
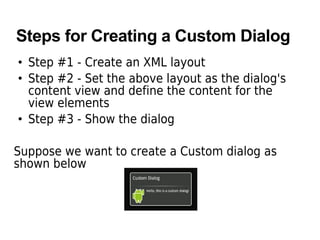
1
Android UI Dialog
Topics
• What is a Dialog?
• AlertDialog
• ProgressDialog
• Creating a custom Dialog
What is a Dialog?
• A dialog is usually a small window that appears
in front of the current Activity.
• The underlying Activity loses focus and the
dialog accepts all user interaction.
• Dialogs are normally used for notifications and
short activities that directly relate to the
application in progress.
Types of Dialog
• AlertDialog
• ProgressDialog
• DatePickerDialog
• TimePickerDialog
AlertDialog
What is AlertDialog?
• An AlertDialog is an extension of the Dialog
class.
• It is capable of constructing most dialog user
interfaces and is the suggested dialog type.
• You should use it for dialogs that use any of the
following features
> A title
> A text message
> One, two, or three buttons
> A list of selectable items (with optional checkboxes
or radio buttons)
How to Create AlertDialog?
• Get a Builder with AlertDialog.Builder(Context)
and then use the class's public methods to
define all of the AlertDialog properties.
• After you're done with the Builder, retrieve the
AlertDialog object with create()
Adding Buttons to AlertDialog
AlertDialog.Builder builder = new AlertDialog.Builder(this);
builder.setMessage("Are you sure you want to exit?")
.setCancelable(false)
.setPositiveButton("Yes", new DialogInterface.OnClickListener() {
public void onClick(DialogInterface dialog, int id) {
MyActivity.this.finish();
}
})
.setNegativeButton("No", new DialogInterface.OnClickListener() {
public void onClick(DialogInterface dialog, int id) {
dialog.cancel();
}
});
AlertDialog alert = builder.create();
Adding a list to AlertDialog
final CharSequence[] items = {"Red", "Green", "Blue"};
AlertDialog.Builder builder = new AlertDialog.Builder(this);
builder.setTitle("Pick a color");
builder.setItems(items, new DialogInterface.OnClickListener() {
public void onClick(DialogInterface dialog, int item) {
Toast.makeText(getApplicationContext(), items[item],
Toast.LENGTH_SHORT).show();
}
});
AlertDialog alert = builder.create();
Adding checkboxes and radio buttons
final CharSequence[] items = {"Red", "Green", "Blue"};
AlertDialog.Builder builder = new AlertDialog.Builder(this);
builder.setTitle("Pick a color");
builder.setSingleChoiceItems(items, -1, new
DialogInterface.OnClickListener() {
public void onClick(DialogInterface dialog, int item) {
Toast.makeText(getApplicationContext(), items[item],
Toast.LENGTH_SHORT).show();
}
});
AlertDialog alert = builder.create();
ProgressDialog
What is ProgressDialog?
• A ProgressDialog is an extension of the
AlertDialog class that can display a progress
animation in the form of
> a spinning wheel, for a task with progress that's
undefined, or
> a progress bar, for a task that has a defined
progression.
• The dialog can also provide buttons, such as
one to cancel a download.
Creating a Progress Bar?
ProgressDialog progressDialog;
progressDialog = new ProgressDialog(mContext);
progressDialog.setProgressStyle(ProgressDialog.STYLE_HORIZONTAL);
progressDialog.setMessage("Loading...");
progressDialog.setCancelable(false);
Creating a Custom
Dialog
Steps for Creating a Custom Dialog
• Step #1 - Create an XML layout
• Step #2 - Set the above layout as the dialog's
content view and define the content for the
view elements
• Step #3 - Show the dialog
Suppose we want to create a Custom dialog as
shown below
Step #1: Create XML Layout
<LinearLayout
xmlns:android="http://schemas.android.com/apk/res/android"
android:id="@+id/layout_root"
android:orientation="horizontal"
android:layout_width="fill_parent"
android:layout_height="fill_parent"
android:padding="10dp"
>
<ImageView android:id="@+id/image"
android:layout_width="wrap_content"
android:layout_height="fill_parent"
android:layout_marginRight="10dp"
/>
<TextView android:id="@+id/text"
android:layout_width="wrap_content"
android:layout_height="fill_parent"
android:textColor="#FFF"
/>
</LinearLayout>
Step #2: Create Dialog
Context mContext = getApplicationContext();
Dialog dialog = new Dialog(mContext);
dialog.setContentView(R.layout.custom_dialog);
dialog.setTitle("Custom Dialog");
TextView text = (TextView) dialog.findViewById(R.id.text);
text.setText("Hello, this is a custom dialog!");
ImageView image = (ImageView) dialog.findViewById(R.id.image);
image.setImageResource(R.drawable.android);
Thank you

Android ui dialog

  • 1.
  • 2.
    Topics • What isa Dialog? • AlertDialog • ProgressDialog • Creating a custom Dialog
  • 3.
    What is aDialog? • A dialog is usually a small window that appears in front of the current Activity. • The underlying Activity loses focus and the dialog accepts all user interaction. • Dialogs are normally used for notifications and short activities that directly relate to the application in progress.
  • 4.
    Types of Dialog •AlertDialog • ProgressDialog • DatePickerDialog • TimePickerDialog
  • 5.
  • 6.
    What is AlertDialog? •An AlertDialog is an extension of the Dialog class. • It is capable of constructing most dialog user interfaces and is the suggested dialog type. • You should use it for dialogs that use any of the following features > A title > A text message > One, two, or three buttons > A list of selectable items (with optional checkboxes or radio buttons)
  • 7.
    How to CreateAlertDialog? • Get a Builder with AlertDialog.Builder(Context) and then use the class's public methods to define all of the AlertDialog properties. • After you're done with the Builder, retrieve the AlertDialog object with create()
  • 8.
    Adding Buttons toAlertDialog AlertDialog.Builder builder = new AlertDialog.Builder(this); builder.setMessage("Are you sure you want to exit?") .setCancelable(false) .setPositiveButton("Yes", new DialogInterface.OnClickListener() { public void onClick(DialogInterface dialog, int id) { MyActivity.this.finish(); } }) .setNegativeButton("No", new DialogInterface.OnClickListener() { public void onClick(DialogInterface dialog, int id) { dialog.cancel(); } }); AlertDialog alert = builder.create();
  • 9.
    Adding a listto AlertDialog final CharSequence[] items = {"Red", "Green", "Blue"}; AlertDialog.Builder builder = new AlertDialog.Builder(this); builder.setTitle("Pick a color"); builder.setItems(items, new DialogInterface.OnClickListener() { public void onClick(DialogInterface dialog, int item) { Toast.makeText(getApplicationContext(), items[item], Toast.LENGTH_SHORT).show(); } }); AlertDialog alert = builder.create();
  • 10.
    Adding checkboxes andradio buttons final CharSequence[] items = {"Red", "Green", "Blue"}; AlertDialog.Builder builder = new AlertDialog.Builder(this); builder.setTitle("Pick a color"); builder.setSingleChoiceItems(items, -1, new DialogInterface.OnClickListener() { public void onClick(DialogInterface dialog, int item) { Toast.makeText(getApplicationContext(), items[item], Toast.LENGTH_SHORT).show(); } }); AlertDialog alert = builder.create();
  • 11.
  • 12.
    What is ProgressDialog? •A ProgressDialog is an extension of the AlertDialog class that can display a progress animation in the form of > a spinning wheel, for a task with progress that's undefined, or > a progress bar, for a task that has a defined progression. • The dialog can also provide buttons, such as one to cancel a download.
  • 13.
    Creating a ProgressBar? ProgressDialog progressDialog; progressDialog = new ProgressDialog(mContext); progressDialog.setProgressStyle(ProgressDialog.STYLE_HORIZONTAL); progressDialog.setMessage("Loading..."); progressDialog.setCancelable(false);
  • 14.
  • 15.
    Steps for Creatinga Custom Dialog • Step #1 - Create an XML layout • Step #2 - Set the above layout as the dialog's content view and define the content for the view elements • Step #3 - Show the dialog Suppose we want to create a Custom dialog as shown below
  • 16.
    Step #1: CreateXML Layout <LinearLayout xmlns:android="http://schemas.android.com/apk/res/android" android:id="@+id/layout_root" android:orientation="horizontal" android:layout_width="fill_parent" android:layout_height="fill_parent" android:padding="10dp" > <ImageView android:id="@+id/image" android:layout_width="wrap_content" android:layout_height="fill_parent" android:layout_marginRight="10dp" /> <TextView android:id="@+id/text" android:layout_width="wrap_content" android:layout_height="fill_parent" android:textColor="#FFF" /> </LinearLayout>
  • 17.
    Step #2: CreateDialog Context mContext = getApplicationContext(); Dialog dialog = new Dialog(mContext); dialog.setContentView(R.layout.custom_dialog); dialog.setTitle("Custom Dialog"); TextView text = (TextView) dialog.findViewById(R.id.text); text.setText("Hello, this is a custom dialog!"); ImageView image = (ImageView) dialog.findViewById(R.id.image); image.setImageResource(R.drawable.android);
  • 18.