Download as PDF, PPTX

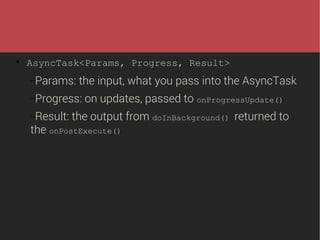
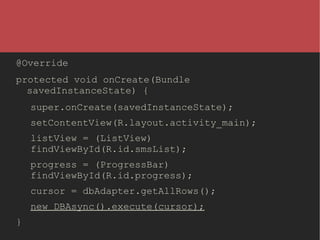
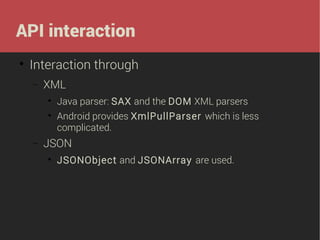
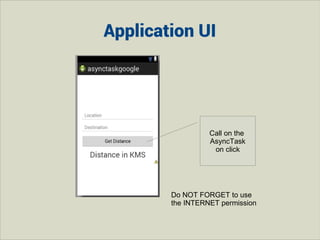
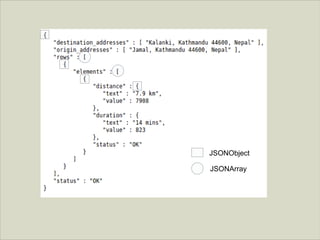
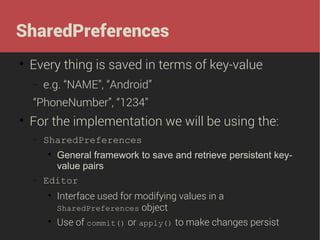
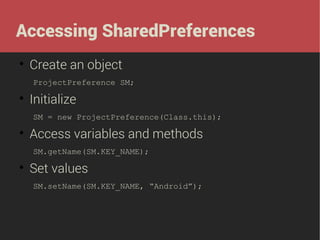
![doInBackground
protected String doInBackground(String... input) {
try {
int time;
if (input[1].equalsIgnoreCase("")) {
time = 0;
} else {
time = Integer.parseInt(input[1]) * 1000;
for (int i = 1; i <= time / 1000; i++) {
publishProgress(i, time);
Thread.sleep(1000);
}
Call to onProgressUpdate
}
} catch (InterruptedException e) {
e.printStackTrace();
}
return input[0];
}
Passing parameter to onPostExecute](https://image.slidesharecdn.com/dayfive-131114223111-phpapp02/85/Day-5-10-320.jpg)
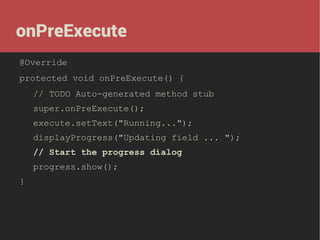
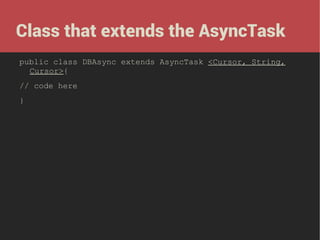
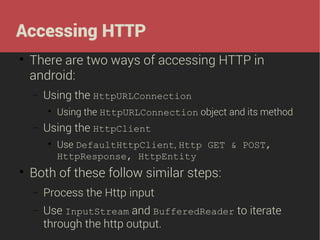
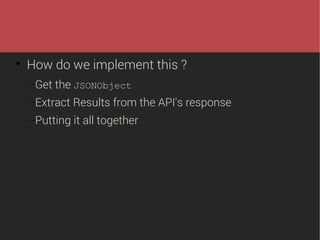
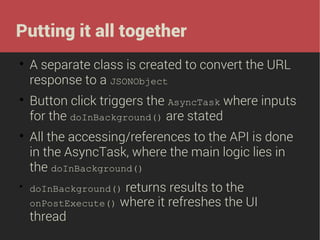
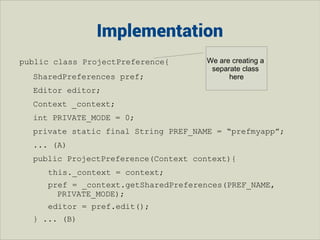
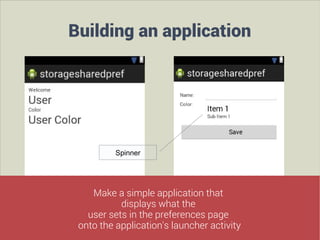
![onProgressUpdate
@Override
protected void onProgressUpdate(Integer...
values) {
// TODO Auto-generated method stub
super.onProgressUpdate(values);
displayProgress("Updating field ... " +
values[0] + " of "+ values[1] / 1000);
}
Interaction with the UI](https://image.slidesharecdn.com/dayfive-131114223111-phpapp02/85/Day-5-11-320.jpg)

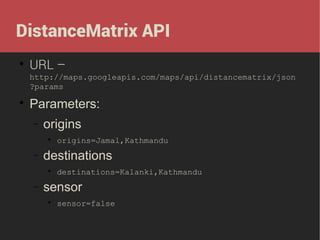
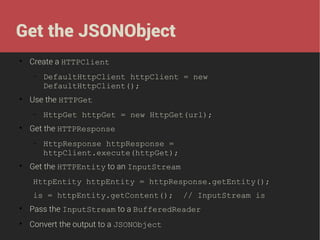
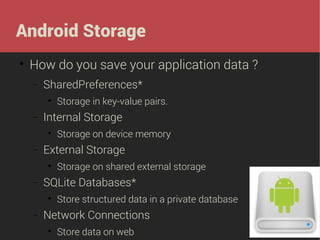
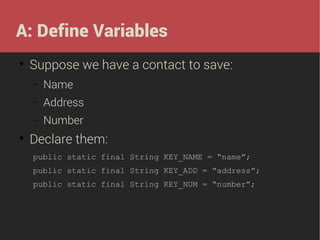
![doInBackground
@Override
protected Cursor doInBackground(Cursor...
cursor) {
// TODO Auto-generated method stub
return cursor[0];
}](https://image.slidesharecdn.com/dayfive-131114223111-phpapp02/85/Day-5-18-320.jpg)
![onPostExecute
@Override
protected void onPostExecute(String result) {
// TODO Auto-generated method stub
super.onPostExecute(result);
progress.dismiss();
String[] from = new String[] { dbAdapter.KEY_ROWID,
dbAdapter.KEY_NAME, dbAdapter.KEY_ADD };
int[] to = new int[] { R.id.list_id, R.id.list_name,
R.id.list_address };
SimpleCursorAdapter adapter = new
SimpleCursorAdapter(getApplicationContext(),
R.layout.result_layout, result, from, to, 1);
listView.setAdapter(adapter);
}](https://image.slidesharecdn.com/dayfive-131114223111-phpapp02/85/Day-5-19-320.jpg)


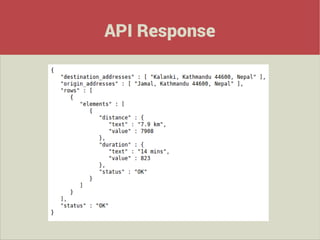
![Accessing JSON
JSONObject googleObject1, googleObject2, googleObject3, googleObject4;
JSONArray googleArray1, googleArray2;
...
String distanceBetween = "";
try{
//Getting array of the API
UserFunctions users = new UserFunctions();
googleObject1 = users.distanceGET(places[0], places[1]);
//places[0] and places[1] are values passed on button click
googleArray1 = googleObject1.getJSONArray(TAG_ROW);
googleObject2 = googleArray1.getJSONObject(0);
googleArray2 = googleObject2.getJSONArray(TAG_ELEMENTS);
googleObject3 = googleArray2.getJSONObject(0);
googleObject4 = googleObject3.getJSONObject(TAG_DISTANCE);
distanceBetween = googleObject4.getString(TAG_TEXT);
}catch(JSONException e){
e.printStackTrace();
Full code: http://bit.ly/HTGTm1](https://image.slidesharecdn.com/dayfive-131114223111-phpapp02/85/Day-5-36-320.jpg)


The document discusses using AsyncTask in Android to perform background operations and update the UI thread. It provides an example of using AsyncTask to fetch distance data from the Google Distance Matrix API in the background. Some key points: 1. AsyncTask allows performing operations in the background using doInBackground() and updating the UI using onPostExecute(). 2. The example API call is made in doInBackground() and the results are extracted from the JSON response. 3. OnPostExecute() receives the results and updates the UI by setting the distance text on button click. 4. Accessing APIs involves getting a JSONObject from the response and extracting the required values using JSON tags. 5


![[Android] Multiple Background Threads](https://cdn.slidesharecdn.com/ss_thumbnails/trainingandroidlesson9-130304083605-phpapp01-thumbnail.jpg?width=640&height=640&fit=bounds)