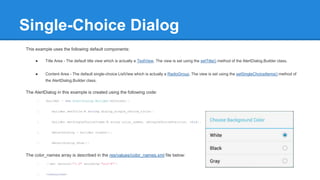
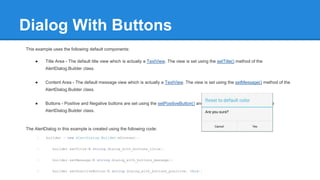
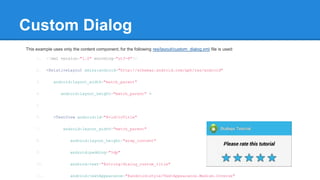
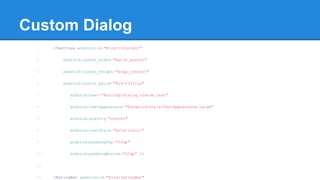
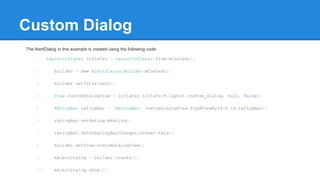
Android Dialogs
Perfect APK
Android Dialogs Tutorial
Popups or dialogs are a common to prompt the user to take action. Android popups are called Dialogs. The base dialog class is extended by
AlertDialog class, which is extended by more specific dialog classes:
● DatePickerDialog
● ProgressDialog
● TimePickerDialog
In this tutorial we will create AlertDialogs using the AlertDialog.Builder helper class.
AlertDialogs are divided into the following components:
● Title Area
● Content Area
● Buttons - Positive, negative and neutral
None of the components are mandatory, and for each components there is a default view. In this tutorial we will see 3 examples:
● Single-Choice Dialog
● Dialog with buttons
Single-Choice Dialog
This example uses the following default components:
● Title Area - The default title view which is actually a TextView. The view is set using the setTitle() method of the AlertDialog.Builder class.
● Content Area - The default single-choice ListView which is actually a RadioGroup. The view is set using the setSingleChoiceItems() method of
the AlertDialog.Builder class.
The AlertDialog in this example is created using the following code:
1. builder = new AlertDialog.Builder(mContext);
2. builder.setTitle(R.string.dialog_single_choice_title);
3. builder.setSingleChoiceItems(R.array.color_names, mSingleChoicePosition, this);
4. mAlertDialog = builder.create();
5. mAlertDialog.show();
The color_names array is described in the res/values/color_names.xml file below:
1. <?xml version="1.0" encoding="utf-8"?>
2. <resources>
Dialog With Buttons
This example uses the following default components:
● Title Area - The default title view which is actually a TextView. The view is set using the setTitle() method of the
AlertDialog.Builder class.
● Content Area - The default message view which is actually a TextView. The view is set using the setMessage() method of the
AlertDialog.Builder class.
● Buttons - Positive and Negative buttons are set using the setPositiveButton() and setNegativeButton() methods of the
AlertDialog.Builder class.
The AlertDialog in this example is created using the following code:
1. builder = new AlertDialog.Builder(mContext);
2. builder.setTitle(R.string.dialog_with_buttons_title);
3. builder.setMessage(R.string.dialog_with_buttons_message);
4. builder.setPositiveButton(R.string.dialog_with_buttons_positive, this);
Custom Dialog
This example uses only the content component, for the following res/layout/custom_dialog.xml file is used:
1. <?xml version="1.0" encoding="utf-8"?>
2. <RelativeLayout xmlns:android="http://schemas.android.com/apk/res/android"
3. android:layout_width="match_parent"
4. android:layout_height="match_parent" >
5.
6. <TextView android:id="@+id/tvTitle"
7. android:layout_width="match_parent"
8. android:layout_height="wrap_content"
9. android:padding="5dp"
10. android:text="@string/dialog_custom_title"
11. android:textAppearance="@android:style/TextAppearance.Medium.Inverse"
Custom Dialog
1. <TextView android:id="@+id/tvContent"
2. android:layout_width="match_parent"
3. android:layout_height="wrap_content"
4. android:layout_below="@id/tvTitle"
5. android:text="@string/dialog_custom_text"
6. android:textAppearance="@android:style/TextAppearance.Large"
7. android:gravity="center"
8. android:textStyle="bold|italic"
9. android:paddingTop="20dp"
10. android:paddingBottom="20dp" />
11.
12. <RatingBar android:id="@+id/ratingBar"
Custom Dialog
The AlertDialog in this example is created using the following code:
1. LayoutInflater inflater = LayoutInflater.from(mContext);
2. builder = new AlertDialog.Builder(mContext);
3. builder.setTitle(null);
4. View customDialogView = inflater.inflate(R.layout.custom_dialog, null, false);
5. RatingBar ratingBar = (RatingBar) customDialogView.findViewById(R.id.ratingBar);
6. ratingBar.setRating(mRating);
7. ratingBar.setOnRatingBarChangeListener(this);
8. builder.setView(customDialogView);
9. mAlertDialog = builder.create();
10. mAlertDialog.show();

Android Dialogs Tutorial

  • 1.
  • 2.
    Android Dialogs Tutorial Popupsor dialogs are a common to prompt the user to take action. Android popups are called Dialogs. The base dialog class is extended by AlertDialog class, which is extended by more specific dialog classes: ● DatePickerDialog ● ProgressDialog ● TimePickerDialog In this tutorial we will create AlertDialogs using the AlertDialog.Builder helper class. AlertDialogs are divided into the following components: ● Title Area ● Content Area ● Buttons - Positive, negative and neutral None of the components are mandatory, and for each components there is a default view. In this tutorial we will see 3 examples: ● Single-Choice Dialog ● Dialog with buttons
  • 3.
    Single-Choice Dialog This exampleuses the following default components: ● Title Area - The default title view which is actually a TextView. The view is set using the setTitle() method of the AlertDialog.Builder class. ● Content Area - The default single-choice ListView which is actually a RadioGroup. The view is set using the setSingleChoiceItems() method of the AlertDialog.Builder class. The AlertDialog in this example is created using the following code: 1. builder = new AlertDialog.Builder(mContext); 2. builder.setTitle(R.string.dialog_single_choice_title); 3. builder.setSingleChoiceItems(R.array.color_names, mSingleChoicePosition, this); 4. mAlertDialog = builder.create(); 5. mAlertDialog.show(); The color_names array is described in the res/values/color_names.xml file below: 1. <?xml version="1.0" encoding="utf-8"?> 2. <resources>
  • 4.
    Dialog With Buttons Thisexample uses the following default components: ● Title Area - The default title view which is actually a TextView. The view is set using the setTitle() method of the AlertDialog.Builder class. ● Content Area - The default message view which is actually a TextView. The view is set using the setMessage() method of the AlertDialog.Builder class. ● Buttons - Positive and Negative buttons are set using the setPositiveButton() and setNegativeButton() methods of the AlertDialog.Builder class. The AlertDialog in this example is created using the following code: 1. builder = new AlertDialog.Builder(mContext); 2. builder.setTitle(R.string.dialog_with_buttons_title); 3. builder.setMessage(R.string.dialog_with_buttons_message); 4. builder.setPositiveButton(R.string.dialog_with_buttons_positive, this);
  • 5.
    Custom Dialog This exampleuses only the content component, for the following res/layout/custom_dialog.xml file is used: 1. <?xml version="1.0" encoding="utf-8"?> 2. <RelativeLayout xmlns:android="http://schemas.android.com/apk/res/android" 3. android:layout_width="match_parent" 4. android:layout_height="match_parent" > 5. 6. <TextView android:id="@+id/tvTitle" 7. android:layout_width="match_parent" 8. android:layout_height="wrap_content" 9. android:padding="5dp" 10. android:text="@string/dialog_custom_title" 11. android:textAppearance="@android:style/TextAppearance.Medium.Inverse"
  • 6.
    Custom Dialog 1. <TextViewandroid:id="@+id/tvContent" 2. android:layout_width="match_parent" 3. android:layout_height="wrap_content" 4. android:layout_below="@id/tvTitle" 5. android:text="@string/dialog_custom_text" 6. android:textAppearance="@android:style/TextAppearance.Large" 7. android:gravity="center" 8. android:textStyle="bold|italic" 9. android:paddingTop="20dp" 10. android:paddingBottom="20dp" /> 11. 12. <RatingBar android:id="@+id/ratingBar"
  • 7.
    Custom Dialog The AlertDialogin this example is created using the following code: 1. LayoutInflater inflater = LayoutInflater.from(mContext); 2. builder = new AlertDialog.Builder(mContext); 3. builder.setTitle(null); 4. View customDialogView = inflater.inflate(R.layout.custom_dialog, null, false); 5. RatingBar ratingBar = (RatingBar) customDialogView.findViewById(R.id.ratingBar); 6. ratingBar.setRating(mRating); 7. ratingBar.setOnRatingBarChangeListener(this); 8. builder.setView(customDialogView); 9. mAlertDialog = builder.create(); 10. mAlertDialog.show();