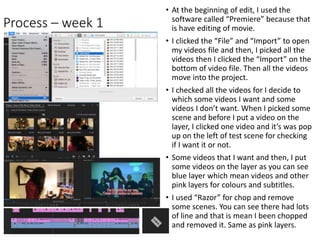
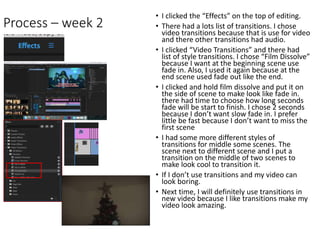
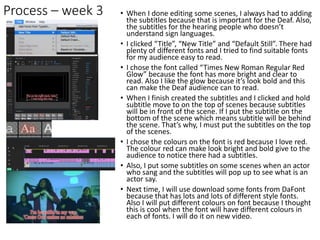
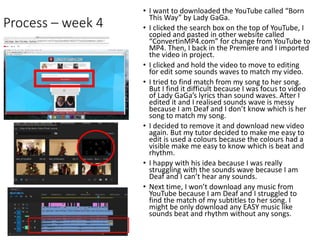
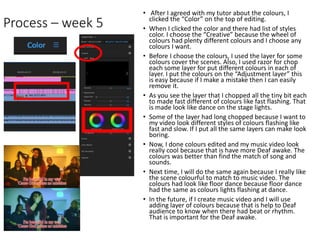
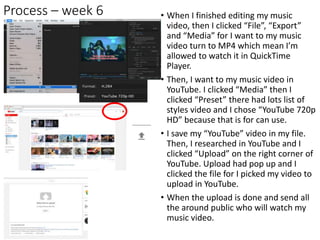
Stage 5
Production Reflections
Jack Bevens
Process – week 1
• At the beginning of edit, I used the
software called “Premiere” because that
is have editing of movie.
• I clicked the “File” and “Import” to open
my videos file and then, I picked all the
videos then I clicked the “Import” on the
bottom of video file. Then all the videos
move into the project.
• I checked all the videos for I decide to
which some videos I want and some
videos I don’t want. When I picked some
scene and before I put a video on the
layer, I clicked one video and it’s was pop
up on the left of test scene for checking
if I want it or not.
• Some videos that I want and then, I put
some videos on the layer as you can see
blue layer which mean videos and other
pink layers for colours and subtitles.
• I used “Razor” for chop and remove
some scenes. You can see there had lots
of line and that is mean I been chopped
and removed it. Same as pink layers.
Process – week 2
• I clicked the “Effects” on the top of editing.
• There had a lots list of transitions. I chose
video transitions because that is use for video
and there other transitions had audio.
• I clicked “Video Transitions” and there had
list of style transitions. I chose “Film Dissolve”
because I want at the beginning scene use
fade in. Also, I used it again because at the
end scene used fade out like the end.
• I clicked and hold film dissolve and put it on
the side of scene to make look like fade in.
there had time to choose how long seconds
fade will be start to finish. I chose 2 seconds
because I don’t want slow fade in. I prefer
little be fast because I don’t want to miss the
first scene
• I had some more different styles of
transitions for middle some scenes. The
scene next to different scene and I put a
transition on the middle of two scenes to
make look cool to transition it.
• If I don’t use transitions and my video can
look boring.
• Next time, I will definitely use transitions in
new video because I like transitions make my
video look amazing.
Process – week 3 • When I done editing some scenes, I always had to adding
the subtitles because that is important for the Deaf. Also,
the subtitles for the hearing people who doesn’t
understand sign languages.
• I clicked “Title”, “New Title” and “Default Still”. There had
plenty of different fonts and I tried to find suitable fonts
for my audience easy to read.
• I chose the font called “Times New Roman Regular Red
Glow” because the font has more bright and clear to
read. Also I like the glow because it’s look bold and this
can make the Deaf audience can to read.
• When I finish created the subtitles and I clicked and hold
subtitle move to on the top of scenes because subtitles
will be in front of the scene. If I put the subtitle on the
bottom of the scene which means subtitle will be behind
the scene. That’s why, I must put the subtitles on the top
of the scenes.
• I chose the colours on the font is red because I love red.
The colour red can make look bright and bold give to the
audience to notice there had a subtitles.
• Also, I put some subtitles on some scenes when an actor
who sang and the subtitles will pop up to see what is an
actor say.
• Next time, I will use download some fonts from DaFont
because that has lots and lots of different style fonts.
Also I will put different colours on font because I thought
this is cool when the font will have different colours in
each of fonts. I will do it on new video.
Process – week 4
• I want to downloaded the YouTube called “Born
This Way” by Lady GaGa.
• I clicked the search box on the top of YouTube, I
copied and pasted in other website called
“ConvertinMP4.com” for change from YouTube to
MP4. Then, I back in the Premiere and I imported
the video in project.
• I clicked and hold the video to move to editing
for edit some sounds waves to match my video.
• I tried to find match from my song to her song.
But I find it difficult because I was focus to video
of Lady GaGa’s lyrics than sound waves. After I
edited it and I realised sounds wave is messy
because I am Deaf and I don’t know which is her
song to match my song.
• I decided to remove it and download new video
again. But my tutor decided to make me easy to
edit is used a colours because the colours had a
visible make me easy to know which is beat and
rhythm.
• I happy with his idea because I was really
struggling with the sounds wave because I am
Deaf and I can’t hear any sounds.
• Next time, I won’t download any music from
YouTube because I am Deaf and I struggled to
find the match of my subtitles to her song. I
might be only download any EASY music like
sounds beat and rhythm without any songs.
Process – week 5
• After I agreed with my tutor about the colours, I
clicked the “Color” on the top of editing.
• When I clicked the color and there had list of styles
color. I choose the “Creative” because the wheel of
colours had plenty different colours and I choose any
colours I want.
• Before I choose the colours, I used the layer for some
colours cover the scenes. Also, I used razor for chop
each some layer for put different colours in each of
layer. I put the colours on the “Adjustment layer” this
is easy because if I make a mistake then I can easily
remove it.
• As you see the layer that I chopped all the tiny bit each
to made fast different of colours like fast flashing. That
is made look like dance on the stage lights.
• Some of the layer had long chopped because I want to
my video look different styles of colours flashing like
fast and slow. If I put all the same layers can make look
boring.
• Now, I done colours edited and my music video look
really cool because that is have more Deaf awake. The
colours was better than find the match of song and
sounds.
• Next time, I will do the same again because I really like
the scene colourful to match to music video. The
colours had look like floor dance because floor dance
had the same as colours lights flashing at dance.
• In the future, if I create music video and I will use
adding layer of colours because that is help to Deaf
audience to know when there had beat or rhythm.
That is important for the Deaf awake.
Process – week 6 • When I finished editing my music
video, then I clicked “File”, “Export”
and “Media” for I want to my music
video turn to MP4 which mean I’m
allowed to watch it in QuickTime
Player.
• Then, I want to my music video in
YouTube. I clicked “Media” then I
clicked “Preset” there had lots list of
styles video and I chose “YouTube 720p
HD” because that is for can use.
• I save my “YouTube” video in my file.
Then, I researched in YouTube and I
clicked “Upload” on the right corner of
YouTube. Upload had pop up and I
clicked the file for I picked my video to
upload in YouTube.
• When the upload is done and send all
the around public who will watch my
music video.

5. production reflection

  • 1.
  • 2.
    Process – week1 • At the beginning of edit, I used the software called “Premiere” because that is have editing of movie. • I clicked the “File” and “Import” to open my videos file and then, I picked all the videos then I clicked the “Import” on the bottom of video file. Then all the videos move into the project. • I checked all the videos for I decide to which some videos I want and some videos I don’t want. When I picked some scene and before I put a video on the layer, I clicked one video and it’s was pop up on the left of test scene for checking if I want it or not. • Some videos that I want and then, I put some videos on the layer as you can see blue layer which mean videos and other pink layers for colours and subtitles. • I used “Razor” for chop and remove some scenes. You can see there had lots of line and that is mean I been chopped and removed it. Same as pink layers.
  • 3.
    Process – week2 • I clicked the “Effects” on the top of editing. • There had a lots list of transitions. I chose video transitions because that is use for video and there other transitions had audio. • I clicked “Video Transitions” and there had list of style transitions. I chose “Film Dissolve” because I want at the beginning scene use fade in. Also, I used it again because at the end scene used fade out like the end. • I clicked and hold film dissolve and put it on the side of scene to make look like fade in. there had time to choose how long seconds fade will be start to finish. I chose 2 seconds because I don’t want slow fade in. I prefer little be fast because I don’t want to miss the first scene • I had some more different styles of transitions for middle some scenes. The scene next to different scene and I put a transition on the middle of two scenes to make look cool to transition it. • If I don’t use transitions and my video can look boring. • Next time, I will definitely use transitions in new video because I like transitions make my video look amazing.
  • 4.
    Process – week3 • When I done editing some scenes, I always had to adding the subtitles because that is important for the Deaf. Also, the subtitles for the hearing people who doesn’t understand sign languages. • I clicked “Title”, “New Title” and “Default Still”. There had plenty of different fonts and I tried to find suitable fonts for my audience easy to read. • I chose the font called “Times New Roman Regular Red Glow” because the font has more bright and clear to read. Also I like the glow because it’s look bold and this can make the Deaf audience can to read. • When I finish created the subtitles and I clicked and hold subtitle move to on the top of scenes because subtitles will be in front of the scene. If I put the subtitle on the bottom of the scene which means subtitle will be behind the scene. That’s why, I must put the subtitles on the top of the scenes. • I chose the colours on the font is red because I love red. The colour red can make look bright and bold give to the audience to notice there had a subtitles. • Also, I put some subtitles on some scenes when an actor who sang and the subtitles will pop up to see what is an actor say. • Next time, I will use download some fonts from DaFont because that has lots and lots of different style fonts. Also I will put different colours on font because I thought this is cool when the font will have different colours in each of fonts. I will do it on new video.
  • 5.
    Process – week4 • I want to downloaded the YouTube called “Born This Way” by Lady GaGa. • I clicked the search box on the top of YouTube, I copied and pasted in other website called “ConvertinMP4.com” for change from YouTube to MP4. Then, I back in the Premiere and I imported the video in project. • I clicked and hold the video to move to editing for edit some sounds waves to match my video. • I tried to find match from my song to her song. But I find it difficult because I was focus to video of Lady GaGa’s lyrics than sound waves. After I edited it and I realised sounds wave is messy because I am Deaf and I don’t know which is her song to match my song. • I decided to remove it and download new video again. But my tutor decided to make me easy to edit is used a colours because the colours had a visible make me easy to know which is beat and rhythm. • I happy with his idea because I was really struggling with the sounds wave because I am Deaf and I can’t hear any sounds. • Next time, I won’t download any music from YouTube because I am Deaf and I struggled to find the match of my subtitles to her song. I might be only download any EASY music like sounds beat and rhythm without any songs.
  • 6.
    Process – week5 • After I agreed with my tutor about the colours, I clicked the “Color” on the top of editing. • When I clicked the color and there had list of styles color. I choose the “Creative” because the wheel of colours had plenty different colours and I choose any colours I want. • Before I choose the colours, I used the layer for some colours cover the scenes. Also, I used razor for chop each some layer for put different colours in each of layer. I put the colours on the “Adjustment layer” this is easy because if I make a mistake then I can easily remove it. • As you see the layer that I chopped all the tiny bit each to made fast different of colours like fast flashing. That is made look like dance on the stage lights. • Some of the layer had long chopped because I want to my video look different styles of colours flashing like fast and slow. If I put all the same layers can make look boring. • Now, I done colours edited and my music video look really cool because that is have more Deaf awake. The colours was better than find the match of song and sounds. • Next time, I will do the same again because I really like the scene colourful to match to music video. The colours had look like floor dance because floor dance had the same as colours lights flashing at dance. • In the future, if I create music video and I will use adding layer of colours because that is help to Deaf audience to know when there had beat or rhythm. That is important for the Deaf awake.
  • 7.
    Process – week6 • When I finished editing my music video, then I clicked “File”, “Export” and “Media” for I want to my music video turn to MP4 which mean I’m allowed to watch it in QuickTime Player. • Then, I want to my music video in YouTube. I clicked “Media” then I clicked “Preset” there had lots list of styles video and I chose “YouTube 720p HD” because that is for can use. • I save my “YouTube” video in my file. Then, I researched in YouTube and I clicked “Upload” on the right corner of YouTube. Upload had pop up and I clicked the file for I picked my video to upload in YouTube. • When the upload is done and send all the around public who will watch my music video.

Editor's Notes

  • #3 Discuss the tools and processes used in your production. Log your thoughts and feelings about your work.
  • #5 Discuss the tools and processes used in your production. Log your thoughts and feelings about your work.
  • #6 Discuss the tools and processes used in your production. Log your thoughts and feelings about your work.
  • #7 Discuss the tools and processes used in your production. Log your thoughts and feelings about your work.
  • #8 Discuss the tools and processes used in your production. Log your thoughts and feelings about your work.