IRJET- IoT based Advanced Security Intelligence System using Python
•
0 likes•28 views

https://www.irjet.net/archives/V6/i5/IRJET-V6I5347.pdf

Recommended
Recommended
More Related Content
What's hot
What's hot (20)
Similar to IRJET- IoT based Advanced Security Intelligence System using Python
Similar to IRJET- IoT based Advanced Security Intelligence System using Python (20)
More from IRJET Journal
More from IRJET Journal (20)
Recently uploaded
Recently uploaded (20)
IRJET- IoT based Advanced Security Intelligence System using Python
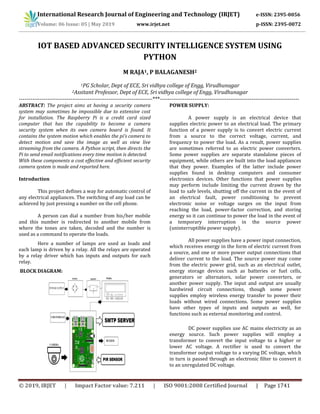
- 1. International Research Journal of Engineering and Technology (IRJET) e-ISSN: 2395-0056 Volume: 06 Issue: 05 | May 2019 www.irjet.net p-ISSN: 2395-0072 © 2019, IRJET | Impact Factor value: 7.211 | ISO 9001:2008 Certified Journal | Page 1741 IOT BASED ADVANCED SECURITY INTELLIGENCE SYSTEM USING PYTHON M RAJA1, P BALAGANESH2 1PG Scholar, Dept of ECE, Sri vidhya college of Engg, Virudhunagar 2Assitant Professor, Dept of ECE, Sri vidhya college of Engg, Virudhunagar ----------------------------------------------------------------------***------------------------------------------------------------------------- ABSTRACT: The project aims at having a security camera system may sometimes be impossible due to extensive cost for installation. The Raspberry Pi is a credit card sized computer that has the capability to become a camera security system when its own camera board is found. It contains the system motion which enables the pi’s camera to detect motion and save the image as well as view live streaming from the camera. A Python script, then directs the Pi to send email notifications every time motion is detected. With these components a cost effective and efficient security camera system is made and reported here. Introduction This project defines a way for automatic control of any electrical appliances. The switching of any load can be achieved by just pressing a number on the cell phone. A person can dial a number from his/her mobile and this number is redirected to another mobile from where the tones are taken, decoded and the number is used as a command to operate the loads. Here a number of lamps are used as loads and each lamp is driven by a relay. All the relays are operated by a relay driver which has inputs and outputs for each relay. BLOCK DIAGRAM: POWER SUPPLY: A power supply is an electrical device that supplies electric power to an electrical load. The primary function of a power supply is to convert electric current from a source to the correct voltage, current, and frequency to power the load. As a result, power supplies are sometimes referred to as electric power converters. Some power supplies are separate standalone pieces of equipment, while others are built into the load appliances that they power. Examples of the latter include power supplies found in desktop computers and consumer electronics devices. Other functions that power supplies may perform include limiting the current drawn by the load to safe levels, shutting off the current in the event of an electrical fault, power conditioning to prevent electronic noise or voltage surges on the input from reaching the load, power-factor correction, and storing energy so it can continue to power the load in the event of a temporary interruption in the source power (uninterruptible power supply). All power supplies have a power input connection, which receives energy in the form of electric current from a source, and one or more power output connections that deliver current to the load. The source power may come from the electric power grid, such as an electrical outlet, energy storage devices such as batteries or fuel cells, generators or alternators, solar power converters, or another power supply. The input and output are usually hardwired circuit connections, though some power supplies employ wireless energy transfer to power their loads without wired connections. Some power supplies have other types of inputs and outputs as well, for functions such as external monitoring and control. DC power supplies use AC mains electricity as an energy source. Such power supplies will employ a transformer to convert the input voltage to a higher or lower AC voltage. A rectifier is used to convert the transformer output voltage to a varying DC voltage, which in turn is passed through an electronic filter to convert it to an unregulated DC voltage.
- 2. International Research Journal of Engineering and Technology (IRJET) e-ISSN: 2395-0056 Volume: 06 Issue: 05 | May 2019 www.irjet.net p-ISSN: 2395-0072 © 2019, IRJET | Impact Factor value: 7.211 | ISO 9001:2008 Certified Journal | Page 1742 The filter removes most, but not all of the AC voltage variations; the remaining AC voltage is known as ripple. The electric load's tolerance of ripple dictates the minimum amount of filtering that must be provided by a power supply. In some applications, high ripple is tolerated and therefore no filtering is required. For example, in some battery charging applications it is possible to implement a mains-powered DC power supply with nothing more than a transformer and a single rectifier diode, with a resistor in series with the output to limit charging current. Raspberry Pi Introduction In the applications, high ripple is tolerated and therefore no filtering is required. For example, in some battery charging applications it is The Raspberry Pi is a credit-card sized Computer. It can be plugged into your TV and a keyboard and can be used for many of the things that your average desktop does-spreadsheets, word- processing, games and it also plays high-definition video. Hardware The Raspberry Pi hardware has evolved through several versions that feature variations in memory capacity and peripheral-device support. This block diagram describes Model B and B+; Model A, A+, and the Pi Zero are similar, but lack the Ethernet and USB hub components. The Ethernet adapter is internally connected to an additional USB port. In Model A, A+, and the Pi Zero, the USB port is connected directly to the system on a chip (SoC). On the Pi 1 Model B+ and later models the USB/Ethernet chip contains a five-port USB hub, of which four ports are available, while the Pi 1 Model B only provides two. On the Pi Zero, the USB port is also connected directly to the SoC, but it uses a micro USB (OTG) port. Raspberry Pi Hardware Specifications The raspberry pi board comprises a program memory (RAM), processor and graphics chip, CPU, GPU, Ethernet port, GPIO pins, Xbee socket, UART, power source connector. And various interfaces for other external devices. It also requires mass storage, for that we use an SD flash memory card. So that raspberry pi board will boot from this SD card similarly as a PC boots up into windows from its hard disk. Essential hardware specifications of raspberry pi board mainly include SD card containing Linux OS, US keyboard, monitor, power supply and video cable. Optional hardware specifications include USB mouse, powered USB hub, case, internet connection, the Model A or B: USB Wi-Fi adaptor is used and internet connection to Model B is LAN cable. Hardware Specifications of Raspberry pi Memory The raspberry pi model Aboard is designed with 256MB of SDRAM and model B is designed with 51MB.Raspberry pi is a small size PC compare with other PCs. The normal PCs RAM memory is available in gigabytes. But in raspberry pi board, the RAM memory is available more than 256MB or 512MB CPU (Central Processing Unit) The Central processing unit is the brain of the raspberry pi board and that is responsible for carrying out the instructions of the computer through logical and mathematical operations. The raspberry pi uses ARM11 series processor, which has joined the ranks of the Samsung galaxy phone.
- 3. International Research Journal of Engineering and Technology (IRJET) e-ISSN: 2395-0056 Volume: 06 Issue: 05 | May 2019 www.irjet.net p-ISSN: 2395-0072 © 2019, IRJET | Impact Factor value: 7.211 | ISO 9001:2008 Certified Journal | Page 1743 GPU (Graphics Processing Unit) The GPU is a specialized chip in the raspberry pi board and that is designed to speed up the operation of image calculations. This board designed with a Broadcom video core IV and it supports OpenGL Ethernet Port The Ethernet port of the raspberry pi is the main gateway for communicating with additional devices. The raspberry pi Ethernet port is used to plug your home router to access the internet. GPIO Pins The general-purpose input & output pins are used in the raspberry pi to associate with the other electronic boards. These pins can accept input & output commands based on programming raspberry pi. The raspberry pi affords digital GPIO pins. These pins are used to connect other electronic components. For example, you can connect it to the temperature sensor to transmit digital data. XBee Socket The XBee socket is used in raspberry pi board for the wireless communication purpose. Power Source Connector The power source cable is a small switch, which is placed on side of the shield. The main purpose of the power source connector is to enable an external power source. UART The Universal Asynchronous Receiver/ Transmitter is a serial input & output port. That can be used to transfer the serial data in the form of text and it is useful for converting the debugging code. Display The connection options of the raspberry pi board are two types such as HDMI and Composite.Many LCD and HD TV monitors can be attached using an HDMI male cable and with a low-cost adaptor. The versions of HDMI are 1.3 and 1.4 are supported and 1.4 version cable is recommended. The O/Ps of the Raspberry Pi audio and video through HDMI, but does not support HDMI I/p. Older TVs can be connected using composite video. When using a composite video connection, audio is available from the 3.5mm jack socket and can be sent to your TV. To send audio to your TV, you need a cable which adjusts from 3.5mm to double RCA connectors. Model A Raspberry Pi Board The Raspberry Pi board is a Broadcom(BCM2835) SOC(system on chip) board. It comes equipped with an ARM1176JZF-S core CPU, 256 MB of SDRAM and 700 MHz,. The raspberry pi USB 2.0 ports use only external data connectivity options. The board draws its power from a micro USB adapter, with min range of 2. Watts (500 MA). The graphics, specialized chip is designed to speed up the operation of image calculations. This is in built with Broadcom video core IV cable, that is useful if you want to run a game and video through your raspberry pi. Model A Raspberry Pi Board Features of Raspberry PI Model A ● The Model A raspberry pi features mainly includes ● 256 MB SDRAM memory ● Single 2.0 USB connector ● Dual Core VideoCore IV Multimedia coprocessor ● HDMI (rev 1.3 & 1.4) Composite RCA (PAL and NTSC) Video Out ● 3.5 MM Jack, HDMI, Audio Out ● SD, MMC, SDIO Card slot on board storage ● Linux Operating system ● Broadcom BCM2835 SoC full HD multimedia processor ● 8.6cm*5.4cm*1.5cm dimensions
- 4. International Research Journal of Engineering and Technology (IRJET) e-ISSN: 2395-0056 Volume: 06 Issue: 05 | May 2019 www.irjet.net p-ISSN: 2395-0072 © 2019, IRJET | Impact Factor value: 7.211 | ISO 9001:2008 Certified Journal | Page 1744 Model B Raspberry pi Board The Raspberry Pi is a Broadcom BCM2835 SOC (system on chip board). It comes equipped with a 700 MHz, 512 MB of SDRAM and ARM1176JZF-S core CPU. The USB 2.0 port of the raspberry pi boars uses only external data connectivity options. The Ethernet in the raspberry pi is the main gateway to interconnect with other devices and the internet in model B. This draws its power from a micro USB adapter, with a minimum range of 2.5 watts (500 MA). The graphics, specialized chip is designed to speed up the manipulation of image calculations. This is in built with Broadcom video core IV cable, that is useful if you want to run a game and video through your raspberry pi. Model B Raspberry pi Board Features of Raspberry PI Model B ● 512 MB SDRAM memory ● Broadcom BCM2835 SoC full high definition multimedia processor ● Dual Core Video Core IV Multimedia coprocessor ● Single 2.0 USB connector ● HDMI (rev 1.3 and 1.4) Composite RCA (PAL & NTSC) Video Out ● 3.5 MM Jack, HDMI Audio Out ● MMC, SD, SDIO Card slot on board storage ● Linux Operating system ● Dimensions are 8.6cm*5.4cm*1.7cm ● On board 10/100 Ethernet RJ45 jack To Set Up & Start your Raspberry Pi The Raspberry Pi board comes equipped with an SD card. This slot permits us to insert an SD card and that can use it as our devices. The SD card is a main storage device for raspberry pi board like a hard disk of a personal computer. The bootable Linux operating system is loaded onto the card, you are planning to use. The raspberry pi supports Linux, Qtonpi, ARM, Mac operating systems. You can select one OS; you will need to write it to an SD card using a Disk manager application. You can also use other storage mechanism, like USB external hard drive or USB drive. There are a numerous brands of SD cards are available in the market in different sizes. The raspberry pi supports max 64 GB SD card. Before you start your raspberry pi, you are going to need to connect a display, keyboard, mouse like as a PC. It supports three different O/Ps like HDMI video, composite video, and DSI video, where the DSI video needs some specific hardware. When you buy a raspberry pi board it may sold with or without an SD card. It is a very important specification in raspberry pi board. Because, it keeps its operating system, documents and programs. If your raspberry pi did not come with an SD card, then the min size you should get is 4GB. Advantages of the raspberry pi is, it is small in size, and it works as a normal computer at low cost server to handle web traffic. Applications of Raspberry Pi The raspberry pi boards are used in many applications like Media streamer, Arcade machine, Tablet computer, Home automation, Carputer, Internet radio, Controlling robots, Cosmic Computer, Hunting for meteorites, Coffee and also in raspberry pi based projects. Raspberry Pi based Motor Speed Control The main intention of this project is to control the speed of a DC Motor using Raspberry Pi. Hardware and software Requirements DC Motor, Raspberry pi model, TV or PC monitor, Motor Driver IC, LED, Resistors, Capacitors, Diode, Transformer, Voltage Regulator and PHP program/wiring pi Raspberry Pi based Motor Speed Control Block Diagram This project uses a Raspberry Pi board to control the DC motor speed. The speed of a DC motor is directly proportional to the voltage applied across its terminals, When the voltage across the motor terminal is varied, then the speed also gets varied accordingly. So this is the main principle of this project. A keyboard is connected to the
- 5. International Research Journal of Engineering and Technology (IRJET) e-ISSN: 2395-0056 Volume: 06 Issue: 05 | May 2019 www.irjet.net p-ISSN: 2395-0072 © 2019, IRJET | Impact Factor value: 7.211 | ISO 9001:2008 Certified Journal | Page 1745 Raspberry pi board to run the motor at different speeds by pressing the key. According to the program, the PWM (pulse width modulation) is caused at the output, and it can be programmed by using PHP/wiring pi. Depending on the duty cycle, the average current and voltage change, so the speed of the DC motor will also change. A motor driver IC is interfaced to the board for receiving PWM signals and sending desired O/P to the DC motor. Auto Intensity control of Street lights by using Raspberry Pi The main goal of this project is designed to control auto intensity of street lights using Raspberry pi. Hardware and Software Requirements Transformer, Diodes, Capacitors, Resistors, LEDs, Raspberry pi board, TV or PC monitor, White LEDs, MOSFET, Crystal, PHP program or Wiring Pi This project uses a bunch of LEDs as street lights which consume less power, and lifetime of the LEDs is also more when compared to the HID lamps. A raspberry pi is used to control the intensity by developing pulse width modulation signals that drive a MOSFET to switch the LEDs to attain desired operation. The intensity of LEDs progressively varies from evening to next day morning, particularly during the peak hours, with full light intensity and then, the decreasing lights’ intensity slowly reduced. MOSFET switching by pulse width modulation technique is implemented in the raspberry pi program to have variable voltage across the LEDs PIR Sensor The term PIR is the short form of the Passive InfraRed. The term “passive” indicates that the sensor does not actively take part in the process, which means, it does not emit the referred IR signals itself, rather passively detects the infrared radiations coming from the human body in the surrounding area. The detected radiations are converted into an electrical charge, which is proportional to the detected level of the radiation. Then this charge is further improved by a built in FET and fed to the output pin of the device which becomes applicable to an external circuit for further triggering and amplification of the alarm stages. PIR sensor range is up to 10 meters at an angle of +15o or -15o. The below image shows a typical pin configuration of the PIR sensor, which is quite simple to understand the pinouts; and, one may easily arrange them into a working circuit with the help of the following points: The Passive infrared sensors consist of three pins as indicated in the diagram shown above. ● Pin1 corresponds to the drain terminal of the device, which should be connected to the positive supply 5V DC. ● Pin2 corresponds to the source terminal of the device, which should be connected to the
- 6. International Research Journal of Engineering and Technology (IRJET) e-ISSN: 2395-0056 Volume: 06 Issue: 05 | May 2019 www.irjet.net p-ISSN: 2395-0072 © 2019, IRJET | Impact Factor value: 7.211 | ISO 9001:2008 Certified Journal | Page 1746 ground terminal via a 100K or 47K resistor. The Pin2 is the output pin of the sensor, and the detected IR signal is carried forward to an amplifier from the pin 2 of the sensor. ● Pin3 of the sensor is connected to the ground. PIR Sensor Working Principle The PIR sensors are more complicated than the other sensors as they consist of two slots. These slots are made of a special material which is sensitive to IR. The Fresnel lens is used to see that the two slots of the PIR can see out past some distance. When the sensor is inactive, then the two slots sense the same amount of IR. The ambient amount radiates from the outdoors, walls or room,etc. When a human body or any animal passes by, then it intercepts the first slot of the PIR sensor. This causes a positive differential change between the two bisects.When a human body leaves the sensing area,the sensor generates a negative differential change between the two bisects. The infrared sensor itself is housed in a hermetically sealed metal to improve humidity/temperature/noise/immunity. There is a window which is made of typically coated silicon material to protect the sensing element. RECTIFIER We require DC voltage for operation. We can easily convert the AC voltage or AC current into DC voltage or DC current by using a device called P-N Junction Diode.One of the most important applications of a P-N junction diode is the rectification of Alternating Current(AC) into Direct Current(DC). A P-N junction diode allows electric current in only forward bias condition and blocks electric current in reverse bias condition. In simple words, a diode allows electric current in one direction. This unique property of the diode allows it to acts like a rectifier. Rectifier A rectifier is an electrical device that converts an Alternating Current (AC) into a Direct Current (DC) by using one or more P-N junction diodes. When the voltage is applied to the P-N junction diode in such a way that the positive terminal of the battery is connected to the p-type semiconductor and the negative terminal of the battery is connected to the n-type semiconductor, the diode is said to be forward biased. When this forward bias voltage is applied to the P- N junction diode, a large number of free electrons(majority carriers) in the n-type semiconductor experience a repulsive force from the negative terminal of the battery similarly a large number of holes(majority carriers) in the p-type semiconductor experience a repulsive force from the positive terminal of the battery. As a result, the free electrons in the n-type semiconductor start moving from
- 7. International Research Journal of Engineering and Technology (IRJET) e-ISSN: 2395-0056 Volume: 06 Issue: 05 | May 2019 www.irjet.net p-ISSN: 2395-0072 © 2019, IRJET | Impact Factor value: 7.211 | ISO 9001:2008 Certified Journal | Page 1747 n-side to p-side similarly the holes in the p-type semiconductor start moving from p-side to n-side. We know that electric current means the flow of charge carriers (free electrons and holes). Therefore, the flow of electrons from n-side to p-side and the flow of holes from p-side to n-side conduct electric current. The majority carriers produce the electric current in forward bias condition. So the electric current produced in forward bias condition is also known as majority current. When the voltage is applied to the P-N junction diode in such a way that the positive terminal of the battery is connected to the n-type semiconductor and the negative terminal of the battery is connected to the p-type semiconductor, the diode is said to be reverse biased. When this reverse bias voltage is applied to the P- N junction diode, a large number of free electrons (majority carriers) in the n-type semiconductor experience an attractive force from the positive terminal of the battery similarly a large number of holes (majority carriers) in the p-type semiconductor experience an attractive force from the negative terminal of the battery. The AC voltage or AC current is often represented by a sinusoidal waveform whereas the DC current is represented by a straight horizontal line. In the sinusoidal waveform, the upper half cycle represents the positive half cycle and the lower half cycle represents the negative half cycle. The positive half cycle of the AC voltage is analogous to the forward bias DC voltage and the negative half cycle of the AC voltage is analogous to the reverse bias DC voltage. The alternating current starts from zero and grows to peak forward current or peak positive current. The positive peak of the sinusoidal waveform represents the maximum or peak forward current. After reaching the peak forward current, it starts decreasing and reaches to zero. After a short period, the alternating current starts increasing in the reverse or negative direction and grows to peak reverse current or peak negative current. The negative peak of the sinusoidal waveform represents the maximum or peak reverse current. After reaching the peak reverse current, it starts decreasing and reaches to zero. Likewise, the alternating current continuously changes its direction in a short period. Bridge Rectifier A bridge rectifier is a type of full wave rectifier which uses four or more diodes in a bridge circuit configuration to efficiently convert the Alternating Current (AC) into Direct Current (DC). Bridge Rectifier Configuration The construction diagram of a bridge rectifier is shown in the below figure. The bridge rectifier is made up of four diodes namely D1, D2, D3, D4 and load resistor RL. The four diodes are connected in a closed loop (Bridge) configuration to efficiently convert the Alternating Current (AC) into Direct Current (DC). The main advantage of this bridge circuit configuration is that we do not require an expensive center tapped transformer, thereby reducing its cost and size.
- 8. International Research Journal of Engineering and Technology (IRJET) e-ISSN: 2395-0056 Volume: 06 Issue: 05 | May 2019 www.irjet.net p-ISSN: 2395-0072 © 2019, IRJET | Impact Factor value: 7.211 | ISO 9001:2008 Certified Journal | Page 1748 The input AC signal is applied across two terminals A and B and the output DC signal is obtained across the load resistor RL which is connected between the terminals C and D. The four diodes D1, D2, D3, D4 are arranged in series with only two diodes allowing electric Current during each half cycle. For example, diodes D1 and D3 are considered as one pair which allows electric current during the positive half cycle whereas diodes D2 and D4 are considered as another pair which allows electric current during the negative half cycle of the input AC signal. Bridge rectifier works When input AC signal is applied across the bridge rectifier, during the positive half cycle diodes D1 and D3 are forward biased and allows electric current while the diodes D2 and D4 are reverse biased and blocks electric current. On the other hand, during the negative half cycle diodes D2 and D4 are forward biased and allows electric current while diodes D1and D3 are reverse biased and blocks electric current. During the positive half cycle, the terminal A becomes positive while the terminal B becomes negative. This causes the diodes D1 and D3 forward biased and at the same time, it causes the diodes D2 and D4 reverse biased. The current flow direction during the positive half cycle is shown in the figure A (I.e. A to D to C to B). During the negative half cycle, the terminal B becomes positive while the terminal A becomes negative. This causes the diodes D2 and D4 forward biased and at the same time, it causes the diodes D1 and D3 reverse biased. The current flow direction during negative half cycle is shown in the figure B (I.e. B to D to C to A). From the above two figures (A and B), we can observe that the direction of current flow across load resistor RL is same during the positive half cycle and negative half cycle. Therefore, the polarity of the output DC signal is same for both positive and negative half cycles. The output DC signal polarity may be either completely positive or negative. In our case, it is completely positive. If the direction of diodes is reversed then we get a complete negative DC voltage.
- 9. International Research Journal of Engineering and Technology (IRJET) e-ISSN: 2395-0056 Volume: 06 Issue: 05 | May 2019 www.irjet.net p-ISSN: 2395-0072 © 2019, IRJET | Impact Factor value: 7.211 | ISO 9001:2008 Certified Journal | Page 1749 Thus, a bridge rectifier allows electric current during both positive and negative half cycles of the input AC signal. The output waveforms of the bridge rectifier is shown in the below figure. REGULATOR A voltage regulator is a system designed to automatically maintain a constant voltage level. A voltage regulator may use a simple feed-forward design or may include negative feedback. It may use an electromechanical mechanism, or electronic components. CAMERA A camera has mainly three parts. They are ● Mechanical part or the camera body ● Optical part or the lens section ● The chemical part or the film The way in which these three parts are connected represents the different types of cameras. Thus by combining these three parts and using them under the correct calibration produces a correct picture. They are capable of working in both the visible spectrum as well as in other portions of the electromagnetic spectrum. The basic shape of a camera needs an enclosed hollow chamber with an opening at one end. This opening, also called aperture helps in the entrance of light. This light is the actual image that has to be captured. So a capturing mechanism is set at the other end. All cameras have the lens assembled in the front. This lens helps in capturing the light, which is in turn captured and stored by the recording surface. Most ordinary cameras can take one image at a time. Most video cameras can take a maximum of 24 film frames/sec. Mechanism of a camera To know the complete mechanism of the camera, it is better to know each and every parameter of the camera. A camera’s focus greatly depends on the clarity of the picture taken. But the focus can be limited only to a certain distance. This range is limited to the range of the lens. This range when adjusted to get a perfect image is called the focus of the camera. For accurate focussing of cameras, the device is comprised of a fixed focus and also consists of a wide-angle lens and a small aperture in front of the camera. The range of focus will be clearly indicated in the camera with symbols like two people standing upright, mountains and so on. For a simple camera, a reasonable focus of about 3 meters to infinity is available. The focus available on each camera is different. Single-lens reflex (SLR) cameras have a focus that can be changed according to our like. This is done by providing a objective lens and a moving mirror so as to projecting the image to a ground glass or plastic micro-prism screen. Similarly each camera has different settings which will be explained briefly later. The focus of a camera depends on two main features. They are ● The structure and position of the lens. ● The angle in which the light beams enter into the lens. Consider a pencil kept at a short distance from the lens. When the distance is altered, that is kept near and then farther away from the lens, the angle of entry of the light changes accordingly. This light is hit on the film surface kept inside the camera. The angle becomes sharper when the image is close to the lens and will become narrower when the image is kept far away. Thus when the lens is focused farther and then nearer from the pencil, the image is actually moving closer or farther away from the film surface. The correct image will be obtained when the focus is adjusted in such a way that you can line up the focused real image of an object so it falls directly on the film surface.
- 10. International Research Journal of Engineering and Technology (IRJET) e-ISSN: 2395-0056 Volume: 06 Issue: 05 | May 2019 www.irjet.net p-ISSN: 2395-0072 © 2019, IRJET | Impact Factor value: 7.211 | ISO 9001:2008 Certified Journal | Page 1750 Camera Focus 2. Camera Lens The quality of the photograph taken largely depends on the type of lens used. The precision of a lens depends on a factor called “bending angle”. This in turn, depends on the structure of the lens. If the lens has a flat shape, the bending angle is less. Thus the light beams will converge a little distance farther away from the lens. Thus the image is also formed farther away. Thus when the distance increases, the size of the image also increases, though the size of the film is constant. If the lens has a round shape, the bending angle will be high. Thus the image will be formed a lot more nearer to the lens. Costly cameras have a lot of lenses, which are replaced or combined according to the magnification required. This magnification power of a lens is called the focal length. Greater the focal length, greater the magnification. 3. Camera Film For an image to be recorded and viewed it must be stored in a film. When an image is captured, it is actually being “chemically” recorded onto a film. The film mainly consists of millions of light-sensitive grains, which are suspended on a plastic strip. These grains chemically react, when exposed to light. This reaction causes the image to be recorded on the film. This film is then developed by reacting it with other chemicals. For black and white films, the chemicals cause the grains to appear darker when exposed to light. Thus, the darker areas appear lighter and the lighter areas appear darker. This is reversed while printing out the photos. For producing colour films, the film consists of light sensitive materials that respond to colours red, green and blue. When they are washed and chemically reacted, you get a negative of a colour photo. Different camera designs There are a lot of types of cameras like Plate camera, large format camera, medium format camera, folding camera, rangefinder camera and so on. Out of these the most used ones are the single-lens reflex camera (SLR) and the point and shoot camera. The difference comes in the manner in which the photographer visualizes the scene. In a point and shoot camera, you do not see the real image through the camera lens. Instead, you get to see only a blurred vision of the image. In an SLR camera, you can see the real image of the scee you are about to capture. It has the same configuration as that of a periscope. When the image is seen from the lens, it hits the lower mirror and bounces from there. It then hits the prism. This prism flips the image to form the original image. The mirror and translucent screen help in providing the exact image to the photographer. Thus, you can focus and compose the image so as to get the exact picture you have in mind. SLR Camera With upcoming technology, the point and shoot cameras are nowadays fully automatic. SLR is built with both manual and automatic controls. The only difference
- 11. International Research Journal of Engineering and Technology (IRJET) e-ISSN: 2395-0056 Volume: 06 Issue: 05 | May 2019 www.irjet.net p-ISSN: 2395-0072 © 2019, IRJET | Impact Factor value: 7.211 | ISO 9001:2008 Certified Journal | Page 1751 between the manual and automatic cameras is that the former will be controlled by a central processor, instead of the photographer. The focus system and the light meter transmit the signals to the microprocessor and thus activate all the motors accordingly. These motors control the adjusting lens and also open and close the aperture. LINUX Introduction Using Windows for your design needs is easy because you have access to a wide array of options for everything from simulation to IDEs, part footprint generators and full-blown schematic capture/PCB layout tools. You may find however that using Linux --whether it's because of the low/nonexistent cost, system stability, or because you're a big fan of free and open-source software (FOSS)-- is more appealing. This article is intended to make the switch seem a little less daunting, and give you a solid grasp of what's available to you when you've made the move. Compilers Getting your code compiled for a specific microcontroller architecture doesn't leave you with many options on Linux, but the ones you have are good. If you've used Cygwin on Windows, their terminal interfaces might look familiar: 1. gcc: As part of the GNU toolchain, gcc is your go-to for compiling for x86, ARM (with the packages gcc-arm-linux-gnueabi and binutils-arm-linux- gnueabi), and Atmel micros (with a toolchain consisting of three main packages: avr-gcc, avr- libc and avrdude). This is very popular and well- documented, making it easy to use from the command line. Below you'll see a screenshot of the man page for avrdude. GDB (the GNU Debugger) also supports AVR and ARM microcontrollers, which provides you with a way to debug your code now that you don't have many of the IDEs common on Windows. 2. sdcc: For command-line PIC development, there is the Small Device C Compiler, which works with PIC as well as other architectures such as Intel- 8051 and STMicroelectronics STM8. PIC however does have a couple of IDE options, which we'll see in the next section. 3. mbed: If you're using one of the supported ARM micros, then this website is still a decent option (as long as you're okay with the browser-based environment) Text Editors and IDEs This is where you'll find yourself almost overwhelmed with options, and there are many more than can be listed here. While you won't have access to popular embedded IDEs like AVR Studio or IAR Embedded Workbench, the aforementioned gcc and sdcc suites give you the debugging tools to replace them, and you have the freedom to use a wide variety of editors to write the code you need: 1. vi, nano and emacs: These three text editors have long histories and most developers will have a differing opinion on which is best, but really it comes down to whichever you like the features of more. Vi (also known as Vim or Vi IMproved) is often more intimidating to new users, but it is guaranteed to be installed on pretty much any Unix or Unix-like system. We'll use nano a little later on in the terminal overview. 2. gedit, atom, sublime: These are only a few of the many graphical text editor options (there exists a GUI-based Vim editor called gVim). Of the three, only gedit comes pre-installed on Ubuntu, but it's arguably one of the most popular text editors available. If you're uncomfortable with command line editors you'll probably find yourself using one of these before writing and debugging with the GNU toolchain. 3. Eclipse, mbeddr, MPLab, Piklab, Code::Blocks, Arduino IDE: As mentioned before, you won't find IAR Embedded Workbench AVR Studio versions for Linux, but you can configure other IDEs to use the toolchains you want for your projects. MPLab
- 12. International Research Journal of Engineering and Technology (IRJET) e-ISSN: 2395-0056 Volume: 06 Issue: 05 | May 2019 www.irjet.net p-ISSN: 2395-0072 © 2019, IRJET | Impact Factor value: 7.211 | ISO 9001:2008 Certified Journal | Page 1752 and Piklab are also available as options for PIC- based designs, with the latter being cited as lighter and more functional. The FreeRTOS website has an older, but still useful for using Eclipse with FreeRTOS, including a section on using microcontroller programming tools from inside the IDE. Simulation Here's another area with a lot of options available. The best part is that even if you aren't interested in doing any coding of your own, several of these (as well as the Arduino IDE mentioned above) are available in the Ubuntu Software Center: 1. ngspice, Qucs and LTSpice: For simulating analog circuit behavior, there are several choices like ngspice available, but they function either through the command-line (listing nodes and component descriptions), or doing the same through a GUI. However, if you are willing to use the Wine compatibility software, you can run LTSpice IV quite easily, giving you access to one of the better simulation tools out there with little trouble. Qucs is an interesting tool that is still under development, and possesses a lot of features, including VHDL and Verilog for digital simulations. 2. Logisim(KDE version): Available in the Ubuntu Software Center, these are two graphical programs that you can use to simulate digital circuits. Either one would be a good complement to one of the simulators above. 3. Simulavr and avrsim: The two of these are very handy if you're using Atmel microcontrollers. 4. Ksimus: This is another simulator with both digital and analog capabilities, although it seems to be geared more towards the former. 5. Icarus Verilog and Verilator: Icarus Verilog is a totally free Verilog implementation including a compiler and virtual machine for simulating, as well as a handful of useful addons. Verilator is a Verilog HDL simulator whose claim to fame is its speed, focused specifically on synthesis. Schematic Capture and PCB Design There are not as many choices for Linux-based schematic capture and PCB design as there are for software development. Here are a few alternatives: 1. EAGLE and Upverter: CadSoft EAGLE offering is available on Linux, and is one of your only options if you are looking for software backed by a large company. Upverter is newer and has an excellent interface, as well as being browser-based, but the license prohibits commercialization of your designs if you are using the Community (free) version. 2. gEDA and Fritzing: gEDA was developed as a response to the lack of free PCB design options out there. It is often compared to KiCAD and offers a similar set of tools for basic design. Fritzing was covered previously on our website, and includes a breadboarding aspect you don't often see elsewhere. 3. KiCAD: This design suite used to receive criticism for not being production-ready, but since CERN recently jumpstarted its development, it's improved drastically and has a variety of great new features and bug-fixes. The next part of this article will cover basic KiCAD use. Commands This is the interface you'll find yourself using a lot of the time on Ubuntu. If working via terminals and/or command line is unfamiliar to you, think of this like viewing your system in a text-only fashion; instead of clicking on an icon, you typically have to type a program's name, and it may be followed by options (we'll see more of this in a bit). There are numerous commands and programs, and plenty of good tutorials out there on this, so I'll give you a very short overview of the tools you'll need to navigate your system. Here are the ones you'll need to get started right away:
- 13. International Research Journal of Engineering and Technology (IRJET) e-ISSN: 2395-0056 Volume: 06 Issue: 05 | May 2019 www.irjet.net p-ISSN: 2395-0072 © 2019, IRJET | Impact Factor value: 7.211 | ISO 9001:2008 Certified Journal | Page 1753 1. man or info 2. ls 3. cd 4. pwd 5. mv 6. rm 7. nano 8. apt-get 9. apt-cache 10.chmod The first entry is extremely useful when it comes to figuring out what everything does. Using man or info followed by the name of a command or program (try it on the others in the list, or by typing "man firefox", or even "man man") provides you with the documentation for the program, including intended use, available options, authors, and more. This also includes things like C library calls, meaning you've got a reference for code you may find yourself using. Note that names are case-sensitive. The commands ls, cd and pwd are your general navigational tools - "ls" lists the contents of the directory you are currently in, while "cd" followed by a directory name moves you into that directory, and "pwd" prints out the full filename of the directory you're in. The directory you start in when you open a terminal is the Home directory (labeled with your account name in your file browser). Moving to different parts of your system ("cd .." to move up a level in the directory; "cd " to move into a directory). You may find mv and rm less immediately useful, as they allow you to move and remove files, respectively (there is also a command called rmdir for empty directories). I'll cover nano, apt-get, apt-cache and chmod towards the end of the article. You'll see examples of the use of "ls", "pwd", "cd" and "man", as well as output in the terminals below, along with the manual output for the C function "snprintf" (you can open multiple instances of the terminal by pressing CTRL+ALT+T again): Continuing on, "nano" is one of many simple text editors available on Ubuntu, and is the one you'll be using here. Like I stated above, you can use "man nano" to read the documentation for the program. Below is a terminal window showing nano opened in a new file called "test.c". In order to do the same, just type "nano test.c" (make sure you're in your home directory by typing "cd" with no arguments). Download the code after the screenshot, or write your own short Hello World-esque program in nano, then press CTRL+X. You'll be prompted about confirmation.
- 14. International Research Journal of Engineering and Technology (IRJET) e-ISSN: 2395-0056 Volume: 06 Issue: 05 | May 2019 www.irjet.net p-ISSN: 2395-0072 © 2019, IRJET | Impact Factor value: 7.211 | ISO 9001:2008 Certified Journal | Page 1754 PCB DESIGN: A printed circuit board (PCB) mechanically supports and electrically connects electronic components or electrical components using conductive tracks, pads and other features etched from one or more sheet layers of copper laminated onto and/or between sheet layers of a non-conductive substrate. Components are generally soldered onto the PCB to both electrically connect and mechanically fasten them to it. Printed circuit boards are used in all but the simplest electronic products. They are also used in some electrical products, such as passive switch boxes. Alternatives to PCBs include wire wrap and point- to-point construction, both once popular but now rarely used. PCBs require additional design effort to lay out the circuit, but manufacturing and assembly can be automated. Specialized CAD software is available to do much of the work of layout. Mass-producing circuits with PCBs is cheaper and faster than with other wiring methods, as components are mounted and wired in one operation. Large numbers of PCBs can be fabricated at the same time, and the layout only has to be done once. PCBs can also be made manually in small quantities, with reduced benefits. PCBs can be single-sided (one copper layer), double-sided (two copper layers on both sides of one substrate layer), or multilayer (outer and inner layers of copper, alternating with layers of substrate). Multi-layer PCBs allow for much higher component density, because circuit traces on the inner layers would otherwise take up surface space between components. The rise in popularity of multilayer PCBs with more than two, and especially with more than four, copper planes was concurrent with the adoption of surface mount technology. However, multilayer PCBs make repair, analysis, and field modification of circuits much more difficult and usually impractical. ADVANTAGE CONCLUSION BIBLIOGRAPHY https://www.allaboutcircuits.com/technical- articles/electronics-design-on-linux/ https://opensource.com/resources/raspberry-pi http://www.circuitstoday.com/pir-sensor-based-security- system https://www.slideshare.net/anija03/raspberry-pi- 26689656 https://www.elprocus.com/linux-operating-system/