MS Excel 2010 tutorial 2
•
1 like•592 views

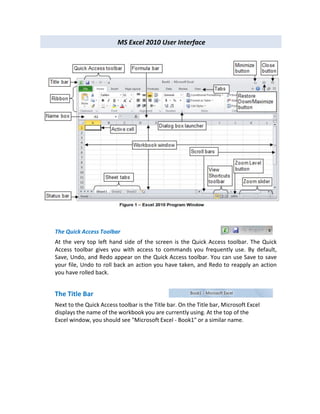
The Quick Access toolbar provides quick access to commonly used commands like Save, Undo, and Redo. The title bar displays the active workbook name. The Ribbon contains tabs that display command groups and buttons to issue commands or access menus and dialog boxes. Microsoft Excel consists of worksheets containing rows and columns to enter data into cells referenced by their address like A1, E10. The formula bar displays the current cell address and contents. The status bar provides information about selected data. Arrows keys, page keys, and navigation features like the name box allow moving around the worksheet.

Recommended
More Related Content
What's hot
What's hot (20)
Viewers also liked
Viewers also liked (12)
Similar to MS Excel 2010 tutorial 2
Similar to MS Excel 2010 tutorial 2 (20)
More from Khalfan Alshuaili
More from Khalfan Alshuaili (20)
Recently uploaded
Recently uploaded (20)
MS Excel 2010 tutorial 2
- 1. MS Excel 2010 User Interface The Quick Access Toolbar At the very top left hand side of the screen is the Quick Access toolbar. The Quick Access toolbar gives you with access to commands you frequently use. By default, Save, Undo, and Redo appear on the Quick Access toolbar. You can use Save to save your file, Undo to roll back an action you have taken, and Redo to reapply an action you have rolled back. The Title Bar Next to the Quick Access toolbar is the Title bar. On the Title bar, Microsoft Excel displays the name of the workbook you are currently using. At the top of the Excel window, you should see "Microsoft Excel - Book1" or a similar name.
- 2. The Ribbon Tabs Buttons Font Group Dialog Box Launcher You use commands to tell Microsoft Excel what to do. In Microsoft Excel 2010, you use the Ribbon to issue commands. The Ribbon is located near the top of the Excel window, below the Quick Access toolbar. At the top of the Ribbon are several tabs; clicking a tab displays several related command groups. Within each group are related command buttons. You click buttons to issue commands or to access menus and dialog boxes. You may also find a dialog box launcher in the bottom-right corner of a group. When you click the dialog box launcher, a dialog box makes additional commands available. Worksheets Microsoft Excel consists of worksheets. Each worksheet contains columns and rows. The columns are lettered A to Z and then continuing with AA, AB, AC and so on; the rows are numbered 1 to 1,048,576. The number of columns and rows you can have in a worksheet is limited by your computer memory and your system resources. The combination of a column coordinate and a row coordinate make up a cell address. For example, the cell located in the upper-left corner of the worksheet is cell A1, meaning column A, row 1. Cell E10 is located under column E on row 10. You enter your data into the cells on the worksheet. The Formula Bar Formula Bar If the Formula bar is turned on, the cell address of the cell you are in displays in the Name box which is located on the left side of the Formula bar. Cell entries display on the right side of the Formula bar. If you do not see the Formula bar in your window, perform the following steps: 1. Choose the View tab. 2. Click Formula Bar in the Show/Hide group. The Formula bar appears.
- 3. Note: The current cell address displays on the left side of the Formula bar. The Status Bar The Status bar appears at the very bottom of the Excel window and provides such information as the sum, average, minimum, and maximum value of selected numbers. You can change what displays on the Status bar by right-clicking on the Status bar and selecting the options you want from the Customize Status Bar menu. You click a menu item to select it. You click it again to deselect it. A check mark next to an item means the item is selected. Move around a Worksheet By using the arrow keys, you can move around your worksheet. You can use the down arrow key to move downward one cell at a time. You can use the up arrow key to move upward one cell at a time. You can use the Tab key to move across the page to the right, one cell at a time. You can hold down the Shift key and then press the Tab key to move to the left, one cell at a time. You can use the right and left arrow keys to move right or left one cell at a time. The Page Up and Page Down keys move up and down one page at a time. If you hold down the Ctrl key and then press the Home key, you move to the beginning of the worksheet. The Name Box You can also use the Name box to go to a specific cell. Just type the cell you want to go to in the Name box and then press Enter. 1. Type B10 in the Name box. 2. Press Enter. Excel moves to cell B10.