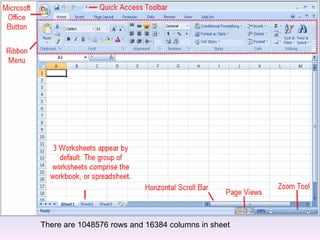
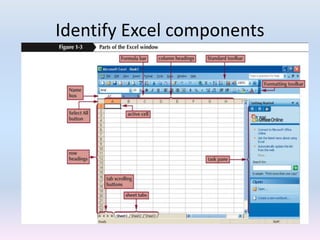
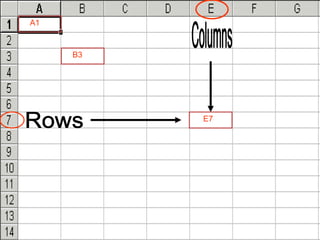
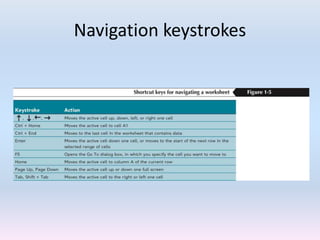
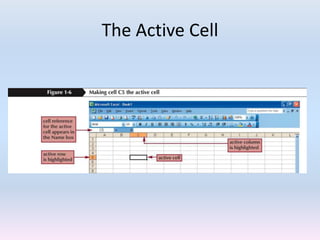
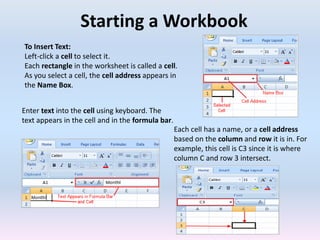
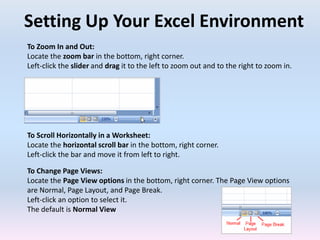
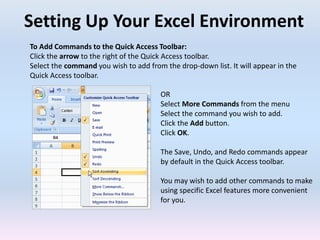
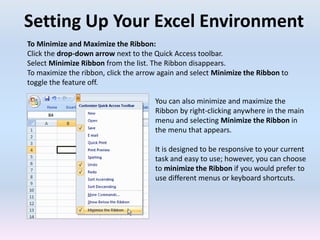
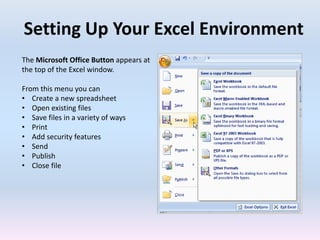
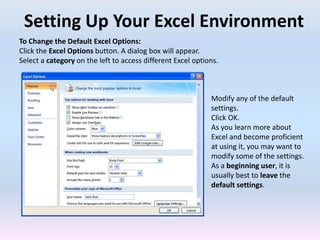
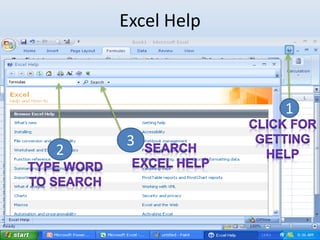
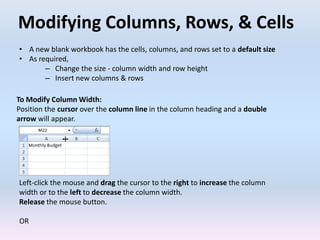
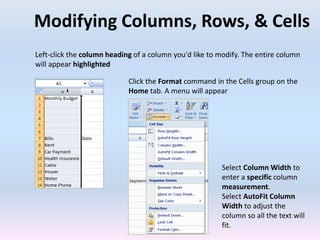
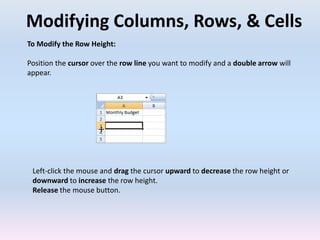
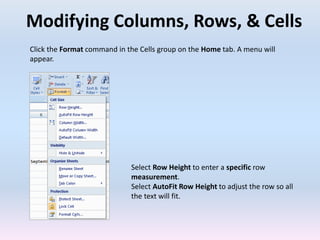
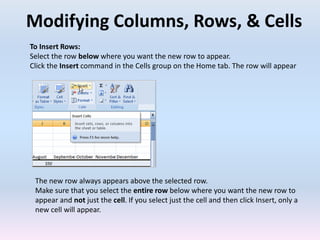
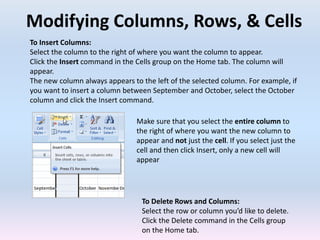
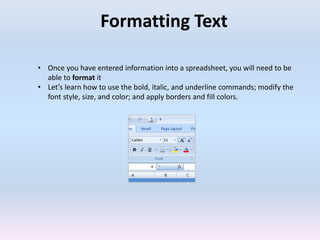
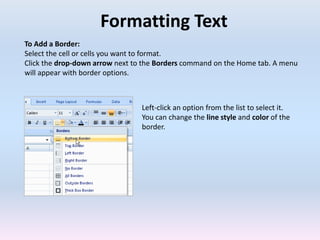
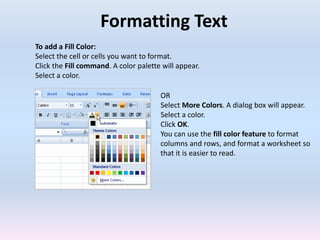
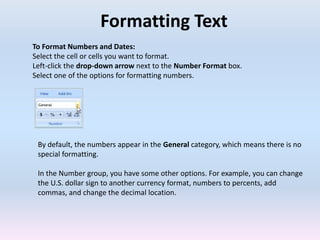
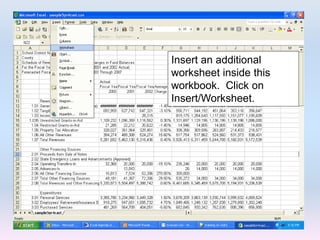
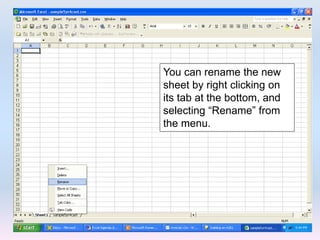
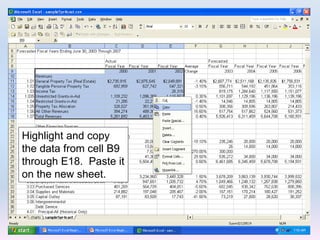
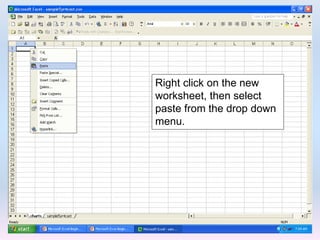
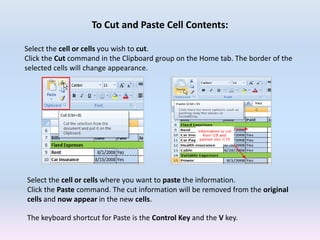
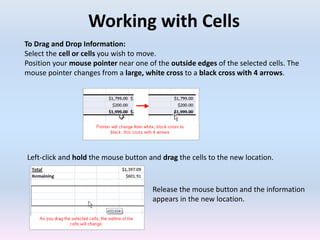
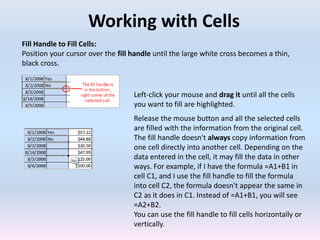
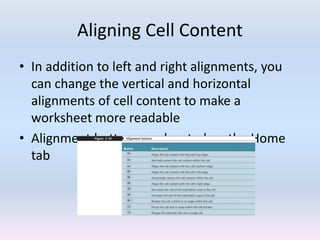
SlideShare a Scribd company logo
MS EXCEL
A Beginner's Tutorial
MS EXCEL – An Introduction
• Excel – is the world’s most widely used
spreadsheet calculating program
• It is used in many places like hospitals,
hotels, school and companies etc.
• A program that allows you to use data to
forecast, manage, predict, and present
information
Much of the appeal of Excel is due to the fact that it’s
so versatile.
Number crunching – Budget Creation, Analysis
Creating customized charts
Organizing lists: row-and-column layout & list
Accessing other data: Import data
Creating graphical dashboards – summarize in
concise format
Agenda
1. Excel - Overview
2. Creating Simple Formulas
3. Creating Complex Formulas
4. Working with Basic Functions
5. Sorting, Grouping, and Filtering Cells
6. Formatting Tables
7. The Fill Handle
8. Data Forms
9. Working with Worksheets
10. Using Conditional Formatting
To open the Ms Excel:-
1
2
3
4
Starting a Workbook
Create a New, Blank Workbook:
Left-click the Microsoft Office Button.
Select New
Starting a Workbook
- the dialog box opens and Blank Workbook is highlighted by default
Click Create. A new, blank workbook appears in the window.
When you first open Excel, the software opens to a new, blank workbook.
Setting Up & Exploring Excel Spreadsheet
Let’s familiarize with few key tasks and features
• Tabbed Ribbon menu system – Navigate features & commands
• minimize and maximize the Ribbon
• Configure the Quick Access toolbar
• Switch page views
• Access Excel options.
• Microsoft Office Button - important options such as New, Save, Save As, and
Print
• By default the Quick Access Toolbar is pinned next to the Microsoft Office
Button, and includes commands such as Undo and Redo.
There are 1048576 rows and 16384 columns in sheet
Identify Excel components
A1
B3
E7
Data Types
Navigation keystrokes
The Active Cell
Starting a Workbook
To Insert Text:
Left-click a cell to select it.
Each rectangle in the worksheet is called a cell.
As you select a cell, the cell address appears in
the Name Box.
Enter text into the cell using keyboard. The
text appears in the cell and in the formula bar.
Each cell has a name, or a cell address
based on the column and row it is in. For
example, this cell is C3 since it is where
column C and row 3 intersect.
Starting a Workbook
To Edit or Delete Text:
Select the cell.
Press the Backspace key on your keyboard to delete text and make a correction.
Press the Delete key to delete the entire contents of a cell.
You can also make changes to and delete text from the formula bar. Just select the cell
and place your insertion point in the formula bar.
To Move Through a Worksheet Using the Keyboard:
Press the Tab key to move to the right of the selected cell.
Press the Shift key and then the Tab key to move to the left of the selected cell.
Use the Page Up and Page Down keys to navigate the worksheet.
Use the arrow keys.
To Save the Workbook:
Left-click the Microsoft Office Button.
Select Save or Save As.
Save As allows you to name the file and choose a location to save the spreadsheet.
Choose Save As if you'd like to save the file for the first time or if you'd like to save
the file as a different name.
Select Save if the file has already been named.
Starting a Workbook
You can save a workbook in many ways, but
the two most common are as an Excel
Workbook, which saves it with a 2007 file
extension, and as an Excel 97-2003 Workbook,
which saves the file in a compatible format so
people who have earlier versions of Excel can
open the file.
Setting Up Your Excel Environment
To Zoom In and Out:
Locate the zoom bar in the bottom, right corner.
Left-click the slider and drag it to the left to zoom out and to the right to zoom in.
To Scroll Horizontally in a Worksheet:
Locate the horizontal scroll bar in the bottom, right corner.
Left-click the bar and move it from left to right.
To Change Page Views:
Locate the Page View options in the bottom, right corner. The Page View options
are Normal, Page Layout, and Page Break.
Left-click an option to select it.
The default is Normal View
Setting Up Your Excel Environment
To Add Commands to the Quick Access Toolbar:
Click the arrow to the right of the Quick Access toolbar.
Select the command you wish to add from the drop-down list. It will appear in the
Quick Access toolbar.
OR
Select More Commands from the menu
Select the command you wish to add.
Click the Add button.
Click OK.
The Save, Undo, and Redo commands appear
by default in the Quick Access toolbar.
You may wish to add other commands to make
using specific Excel features more convenient
for you.
Setting Up Your Excel Environment
To Minimize and Maximize the Ribbon:
Click the drop-down arrow next to the Quick Access toolbar.
Select Minimize Ribbon from the list. The Ribbon disappears.
To maximize the ribbon, click the arrow again and select Minimize the Ribbon to
toggle the feature off.
You can also minimize and maximize the
Ribbon by right-clicking anywhere in the main
menu and selecting Minimize the Ribbon in
the menu that appears.
It is designed to be responsive to your current
task and easy to use; however, you can choose
to minimize the Ribbon if you would prefer to
use different menus or keyboard shortcuts.
Setting Up Your Excel Environment
The Microsoft Office Button appears at
the top of the Excel window.
From this menu you can
• Create a new spreadsheet
• Open existing files
• Save files in a variety of ways
• Print
• Add security features
• Send
• Publish
• Close file
Setting Up Your Excel Environment
To Change the Default Excel Options:
Click the Excel Options button. A dialog box will appear.
Select a category on the left to access different Excel options.
Modify any of the default
settings.
Click OK.
As you learn more about
Excel and become proficient
at using it, you may want to
modify some of the settings.
As a beginning user, it is
usually best to leave the
default settings.
Excel Help
1
2
3
Modifying Columns, Rows, & Cells
To Modify Column Width:
Position the cursor over the column line in the column heading and a double
arrow will appear.
Left-click the mouse and drag the cursor to the right to increase the column
width or to the left to decrease the column width.
Release the mouse button.
OR
• A new blank workbook has the cells, columns, and rows set to a default size
• As required,
– Change the size - column width and row height
– Insert new columns & rows
Modifying Columns, Rows, & Cells
Left-click the column heading of a column you'd like to modify. The entire column
will appear highlighted
Click the Format command in the Cells group on the
Home tab. A menu will appear
Select Column Width to
enter a specific column
measurement.
Select AutoFit Column
Width to adjust the
column so all the text will
fit.
Modifying Columns, Rows, & Cells
To Modify the Row Height:
Position the cursor over the row line you want to modify and a double arrow will
appear.
Left-click the mouse and drag the cursor upward to decrease the row height or
downward to increase the row height.
Release the mouse button.
Modifying Columns, Rows, & Cells
Click the Format command in the Cells group on the Home tab. A menu will
appear.
Select Row Height to enter a specific row
measurement.
Select AutoFit Row Height to adjust the row so all
the text will fit.
Modifying Columns, Rows, & Cells
To Insert Rows:
Select the row below where you want the new row to appear.
Click the Insert command in the Cells group on the Home tab. The row will appear
The new row always appears above the selected row.
Make sure that you select the entire row below where you want the new row to
appear and not just the cell. If you select just the cell and then click Insert, only a
new cell will appear.
Modifying Columns, Rows, & Cells
To Insert Columns:
Select the column to the right of where you want the column to appear.
Click the Insert command in the Cells group on the Home tab. The column will
appear.
The new column always appears to the left of the selected column. For example, if
you want to insert a column between September and October, select the October
column and click the Insert command.
Make sure that you select the entire column to
the right of where you want the new column to
appear and not just the cell. If you select just the
cell and then click Insert, only a new cell will
appear
To Delete Rows and Columns:
Select the row or column you’d like to delete.
Click the Delete command in the Cells group
on the Home tab.
Formatting Text
• Once you have entered information into a spreadsheet, you will need to be
able to format it
• Let’s learn how to use the bold, italic, and underline commands; modify the
font style, size, and color; and apply borders and fill colors.
Formatting Text
To Format Text in Bold or Italics:
Left-click a cell to select it or drag your cursor over the text in the formula bar to
select it.
Click the Bold or Italics command.
You can select entire columns and rows, or specific cells. To select the entire
column, just left-click the column heading and the entire column will appear as
selected. To select specific cells, just left-click a cell and drag your mouse to
select the other cells. Then, release the mouse button.
Formatting Text
To Format Text as Underlined:
Select the cell or cells you want to format.
Click the drop-down arrow next to the Underline command.
Select the Single Underline or Double Underline option.
To Change the Font Style
Select the cell or cells you want to format.
Left-click the drop-down arrow next to the
Font Style box on the Home tab.
Select a font style from the list.
As you move over the font list, the Live Preview feature previews the font for you in
the spreadsheet.
Formatting Text
To Change the Font Size:
Select the cell or cells you want to format.
Left-click the drop-down arrow next to the Font Size box on the Home tab.
Select a font size from the list.
To Change the Text Color:
Select the cell or cells you want to format.
Left-click the drop-down arrow next to the
Text Color command. A color palette will
appear.
Select a color from the palette.
OR
Select More Colors. A dialog box will appear.
Select a color.
Click OK.
Formatting Text
To Add a Border:
Select the cell or cells you want to format.
Click the drop-down arrow next to the Borders command on the Home tab. A menu
will appear with border options.
Left-click an option from the list to select it.
You can change the line style and color of the
border.
Formatting Text
To add a Fill Color:
Select the cell or cells you want to format.
Click the Fill command. A color palette will appear.
Select a color.
OR
Select More Colors. A dialog box will appear.
Select a color.
Click OK.
You can use the fill color feature to format
columns and rows, and format a worksheet so
that it is easier to read.
Formatting Text
To Format Numbers and Dates:
Select the cell or cells you want to format.
Left-click the drop-down arrow next to the Number Format box.
Select one of the options for formatting numbers.
By default, the numbers appear in the General category, which means there is no
special formatting.
In the Number group, you have some other options. For example, you can change
the U.S. dollar sign to another currency format, numbers to percents, add
commas, and change the decimal location.
Hiding Worksheet Data
• Hiding rows, columns, and worksheets is an
excellent way to conceal extraneous or
distracting information
• In the Cells group on the Home tab, click the
Format button, point to Hide & Unhide, and
then click your desired option
New Perspectives on Microsoft
Office Excel 2007
37
Insert an additional
worksheet inside this
workbook. Click on
Insert/Worksheet.
You can rename the new
sheet by right clicking on
its tab at the bottom, and
selecting “Rename” from
the menu.
Highlight and copy
the data from cell B9
through E18. Paste it
on the new sheet.
Right click on the new
worksheet, then select
paste from the drop down
menu.
Page Setup dialog box.
Click on File/Page Setup.
To see all printing
options, make
sure you select
print from the file
menu. Clicking on
the printer icon on
your toolbar will
allow to print
directly to your
default printer with
default options.
Working with Cells
Cut – Copy – Paste – Drag n Drop:
• Move information from one cell to another in Excel
• This small tricks ways will save you time and make working with Excel easier
To Copy and Paste Cell Contents:
Select the cell or cells you wish to copy.
Click the Copy command in the Clipboard group on the Home tab. The border of
the selected cells will change appearance.
To select more than one adjoining cell, left-click one of the cells, drag the cursor
until all the cells are selected, and release the mouse button.
The copied cell will stay selected until you perform your next task, or you can
double-click the cell to deselect it.
Select the cell or cells where you want to paste the information.
Click the Paste command. The copied information will now appear in the new cells.
To Cut and Paste Cell Contents:
Select the cell or cells you wish to cut.
Click the Cut command in the Clipboard group on the Home tab. The border of the
selected cells will change appearance.
Select the cell or cells where you want to paste the information.
Click the Paste command. The cut information will be removed from the original
cells and now appear in the new cells.
The keyboard shortcut for Paste is the Control Key and the V key.
Working with Cells
To Drag and Drop Information:
Select the cell or cells you wish to move.
Position your mouse pointer near one of the outside edges of the selected cells. The
mouse pointer changes from a large, white cross to a black cross with 4 arrows.
Left-click and hold the mouse button and drag the cells to the new location.
Release the mouse button and the information
appears in the new location.
Working with Cells
Fill Handle to Fill Cells:
Position your cursor over the fill handle until the large white cross becomes a thin,
black cross.
Left-click your mouse and drag it until all the cells
you want to fill are highlighted.
Release the mouse button and all the selected cells
are filled with the information from the original cell.
The fill handle doesn't always copy information from
one cell directly into another cell. Depending on the
data entered in the cell, it may fill the data in other
ways. For example, if I have the formula =A1+B1 in
cell C1, and I use the fill handle to fill the formula
into cell C2, the formula doesn't appear the same in
C2 as it does in C1. Instead of =A1+B1, you will see
=A2+B2.
You can use the fill handle to fill cells horizontally or
vertically.
Aligning Cell Content
• In addition to left and right alignments, you
can change the vertical and horizontal
alignments of cell content to make a
worksheet more readable
• Alignment buttons are located on the Home
tab
Indenting Cell Content
• You increase the indentation by roughly one
character each time you click the Increase
Indent button in the Alignment group on the
Home tab
Merging Cells
• One way to align text over several columns or
rows is to merge, or combine, several cells
into one cell
Rotating Cell Content
• To save space or to provide visual interest to a
worksheet, you can rotate the cell contents so
that they appear at any angle or orientation
• Select the range
• In the Alignment group, click the Orientation
button and choose a proper rotation
Rotating Cell Content
Working with the
Format Cells Dialog Box
• The Format Cells dialog
box has six tabs, each
focusing on a different
set of formatting options
Copying Formats
with the Format Painter
• The Format Painter copies the formatting
from one cell or range to another cell or
range, without duplicating any of the data
• Select the range containing the format you
wish to copy
• Click the Format Painter button on the Home
tab
• Click the cell to which you want to apply the
format
Copying Formats with the
Paste Options Button
Copying Formats with Paste Special
Alt+E+S
Thank You

More Related Content

What's hot

Microsoft excel beginner
Microsoft excel beginnerMicrosoft excel beginner
Microsoft excel beginner
denstar ricardo silalahi
 
Uses of Excel
Uses of ExcelUses of Excel
Uses of Excel
jarleewil
 
Intro to Microsoft Excel 2007
Intro to Microsoft Excel 2007Intro to Microsoft Excel 2007
Intro to Microsoft Excel 2007
Westerville Library
 
Excel 2010
Excel 2010Excel 2010
Excel 2010
nhumar
 
Excel 2007 Training 2012 Module 1 (Self Study Materials)
Excel 2007 Training 2012 Module 1 (Self Study Materials)Excel 2007 Training 2012 Module 1 (Self Study Materials)
Excel 2007 Training 2012 Module 1 (Self Study Materials)
Amann Group
 
Introduction to Microsoft Excel for beginners
Introduction to Microsoft Excel for beginnersIntroduction to Microsoft Excel for beginners
Introduction to Microsoft Excel for beginners
Blogger Mumma
 
Introduction to Microsoft Excel basics | Excel Intro | Excel | Excel for star...
Introduction to Microsoft Excel basics | Excel Intro | Excel | Excel for star...Introduction to Microsoft Excel basics | Excel Intro | Excel | Excel for star...
Introduction to Microsoft Excel basics | Excel Intro | Excel | Excel for star...
Corp-sKool
 
Aprender excel ingles
Aprender excel inglesAprender excel ingles
Aprender excel inglesCecilia Perez
 
Microsoft excel part 1
Microsoft excel part 1Microsoft excel part 1
Microsoft excel part 1
Hoboken Public Library
 
Excel chapter 1
Excel chapter 1Excel chapter 1
Excel chapter 1jhaastrup1
 
Microsoft Excel Seminar
Microsoft Excel SeminarMicrosoft Excel Seminar
Microsoft Excel Seminar
Meridian Career Institute
 
Microsoft excel training
Microsoft excel trainingMicrosoft excel training
Microsoft excel trainingMohamed Hassan
 
Using Multiple Workbooks & Consolidation in Microsoft Excel
Using Multiple Workbooks & Consolidation in Microsoft ExcelUsing Multiple Workbooks & Consolidation in Microsoft Excel
Using Multiple Workbooks & Consolidation in Microsoft Excel
Excel
 
Teaching Excel
Teaching ExcelTeaching Excel
Teaching Excelsam ran
 
MS EXCEL PPT PRESENTATION
MS EXCEL PPT PRESENTATIONMS EXCEL PPT PRESENTATION
MS EXCEL PPT PRESENTATION
Mridul Bansal
 
MS Word Advanced Training
MS Word Advanced TrainingMS Word Advanced Training
MS Word Advanced Training
guest99ab68
 

What's hot (20)

Microsoft excel beginner
Microsoft excel beginnerMicrosoft excel beginner
Microsoft excel beginner
 
Uses of Excel
Uses of ExcelUses of Excel
Uses of Excel
 
MS Excel 2010 tutorial 4
MS Excel 2010 tutorial 4MS Excel 2010 tutorial 4
MS Excel 2010 tutorial 4
 
Intro to Microsoft Excel 2007
Intro to Microsoft Excel 2007Intro to Microsoft Excel 2007
Intro to Microsoft Excel 2007
 
Excel 2010
Excel 2010Excel 2010
Excel 2010
 
Excel 2007 Training 2012 Module 1 (Self Study Materials)
Excel 2007 Training 2012 Module 1 (Self Study Materials)Excel 2007 Training 2012 Module 1 (Self Study Materials)
Excel 2007 Training 2012 Module 1 (Self Study Materials)
 
Introduction to Microsoft Excel for beginners
Introduction to Microsoft Excel for beginnersIntroduction to Microsoft Excel for beginners
Introduction to Microsoft Excel for beginners
 
Introduction to Microsoft Excel basics | Excel Intro | Excel | Excel for star...
Introduction to Microsoft Excel basics | Excel Intro | Excel | Excel for star...Introduction to Microsoft Excel basics | Excel Intro | Excel | Excel for star...
Introduction to Microsoft Excel basics | Excel Intro | Excel | Excel for star...
 
Aprender excel ingles
Aprender excel inglesAprender excel ingles
Aprender excel ingles
 
Microsoft excel part 1
Microsoft excel part 1Microsoft excel part 1
Microsoft excel part 1
 
Excel chapter 1
Excel chapter 1Excel chapter 1
Excel chapter 1
 
Microsoft Excel Seminar
Microsoft Excel SeminarMicrosoft Excel Seminar
Microsoft Excel Seminar
 
Microsoft excel training
Microsoft excel trainingMicrosoft excel training
Microsoft excel training
 
Excel Tutorial
Excel TutorialExcel Tutorial
Excel Tutorial
 
Using Multiple Workbooks & Consolidation in Microsoft Excel
Using Multiple Workbooks & Consolidation in Microsoft ExcelUsing Multiple Workbooks & Consolidation in Microsoft Excel
Using Multiple Workbooks & Consolidation in Microsoft Excel
 
Excel 2007 Unit C
Excel 2007 Unit CExcel 2007 Unit C
Excel 2007 Unit C
 
MS Excel 2010 tutorial 6
MS Excel 2010 tutorial 6MS Excel 2010 tutorial 6
MS Excel 2010 tutorial 6
 
Teaching Excel
Teaching ExcelTeaching Excel
Teaching Excel
 
MS EXCEL PPT PRESENTATION
MS EXCEL PPT PRESENTATIONMS EXCEL PPT PRESENTATION
MS EXCEL PPT PRESENTATION
 
MS Word Advanced Training
MS Word Advanced TrainingMS Word Advanced Training
MS Word Advanced Training
 

Similar to Excel training basic

Uses & applications of microsoft excel in vph research
Uses & applications of microsoft excel in vph researchUses & applications of microsoft excel in vph research
Uses & applications of microsoft excel in vph research
Dr Alok Bharti
 
Microsoft Office Excel 2003 Tutorials (Sasha Y7)
Microsoft Office Excel 2003 Tutorials (Sasha Y7) Microsoft Office Excel 2003 Tutorials (Sasha Y7)
Microsoft Office Excel 2003 Tutorials (Sasha Y7) Aimina Salsabila
 
Learning MS Excel - A Handout
Learning MS Excel - A HandoutLearning MS Excel - A Handout
Learning MS Excel - A Handout
sayyadimran2000
 
Excel 2007 for Retail
Excel 2007 for RetailExcel 2007 for Retail
Excel 2007 for Retail
Soumit Ghosh
 
kiromax.ppt
kiromax.pptkiromax.ppt
kiromax.ppt
ChemOyasan1
 
MODULE 9 EXELLE.pptx
MODULE 9 EXELLE.pptxMODULE 9 EXELLE.pptx
MODULE 9 EXELLE.pptx
kndnewguade
 
Excel slide show
Excel slide showExcel slide show
Excel slide show
Remon sai
 
Microsoft excel training module
Microsoft excel training moduleMicrosoft excel training module
Microsoft excel training moduleJeff Piontek
 
Excel basics
Excel basicsExcel basics
Excel basics
Lotus Yon
 
Excel basics
Excel basicsExcel basics
Excel basics
Lotus Yon, CRCR
 
Chapter 5 microsoft excel 2010
Chapter 5 microsoft excel 2010Chapter 5 microsoft excel 2010
Chapter 5 microsoft excel 2010
home
 
Advanced Excel Study Materials | Sourav Sir Academy.pptx
Advanced Excel Study Materials | Sourav Sir Academy.pptxAdvanced Excel Study Materials | Sourav Sir Academy.pptx
Advanced Excel Study Materials | Sourav Sir Academy.pptx
SBOfficial2
 
Excel for Dummies
Excel for DummiesExcel for Dummies
Excel for Dummies
eduCBA
 
Excel 2011-cheat-sheet
Excel 2011-cheat-sheetExcel 2011-cheat-sheet
Excel 2011-cheat-sheet
SchoolVision Inc.
 
W5_MSEXCEL.pdf
W5_MSEXCEL.pdfW5_MSEXCEL.pdf
W5_MSEXCEL.pdf
ExtremelyDarkness2
 

Similar to Excel training basic (20)

Uses & applications of microsoft excel in vph research
Uses & applications of microsoft excel in vph researchUses & applications of microsoft excel in vph research
Uses & applications of microsoft excel in vph research
 
Microsoft Office Excel 2003 Tutorials (Sasha Y7)
Microsoft Office Excel 2003 Tutorials (Sasha Y7) Microsoft Office Excel 2003 Tutorials (Sasha Y7)
Microsoft Office Excel 2003 Tutorials (Sasha Y7)
 
Learning MS Excel - A Handout
Learning MS Excel - A HandoutLearning MS Excel - A Handout
Learning MS Excel - A Handout
 
Excel 2007 for Retail
Excel 2007 for RetailExcel 2007 for Retail
Excel 2007 for Retail
 
kiromax.ppt
kiromax.pptkiromax.ppt
kiromax.ppt
 
MODULE 9 EXELLE.pptx
MODULE 9 EXELLE.pptxMODULE 9 EXELLE.pptx
MODULE 9 EXELLE.pptx
 
Excel.01
Excel.01Excel.01
Excel.01
 
Excel slide show
Excel slide showExcel slide show
Excel slide show
 
Microsoft excel training module
Microsoft excel training moduleMicrosoft excel training module
Microsoft excel training module
 
Excel basics
Excel basicsExcel basics
Excel basics
 
Excel basics
Excel basicsExcel basics
Excel basics
 
Chapter 5 microsoft excel 2010
Chapter 5 microsoft excel 2010Chapter 5 microsoft excel 2010
Chapter 5 microsoft excel 2010
 
Advanced Excel Study Materials | Sourav Sir Academy.pptx
Advanced Excel Study Materials | Sourav Sir Academy.pptxAdvanced Excel Study Materials | Sourav Sir Academy.pptx
Advanced Excel Study Materials | Sourav Sir Academy.pptx
 
Excel.01
Excel.01Excel.01
Excel.01
 
Excel 2010 tutorial
Excel 2010 tutorialExcel 2010 tutorial
Excel 2010 tutorial
 
Manual de microsoft excel 2010
Manual de microsoft excel 2010Manual de microsoft excel 2010
Manual de microsoft excel 2010
 
Manual de microsoft excel 2010
Manual de microsoft excel 2010Manual de microsoft excel 2010
Manual de microsoft excel 2010
 
Excel for Dummies
Excel for DummiesExcel for Dummies
Excel for Dummies
 
Excel 2011-cheat-sheet
Excel 2011-cheat-sheetExcel 2011-cheat-sheet
Excel 2011-cheat-sheet
 
W5_MSEXCEL.pdf
W5_MSEXCEL.pdfW5_MSEXCEL.pdf
W5_MSEXCEL.pdf
 

More from TimesRide

Squares & Cubes till 30
Squares & Cubes till 30Squares & Cubes till 30
Squares & Cubes till 30
TimesRide
 
Business review
Business reviewBusiness review
Business review
TimesRide
 
Bill gates vs steve jobs
Bill gates vs steve jobsBill gates vs steve jobs
Bill gates vs steve jobs
TimesRide
 
11. introduction to internet
11. introduction to internet11. introduction to internet
11. introduction to internet
TimesRide
 
10. introduction to windows
10. introduction to windows10. introduction to windows
10. introduction to windows
TimesRide
 
09. caveats usage and other computing
09. caveats   usage and other computing09. caveats   usage and other computing
09. caveats usage and other computing
TimesRide
 
06. system unit computer
06. system unit   computer06. system unit   computer
06. system unit computer
TimesRide
 
05. input devices computer
05. input devices   computer05. input devices   computer
05. input devices computer
TimesRide
 
01. introduction to computer history - generation
01. introduction to computer   history - generation01. introduction to computer   history - generation
01. introduction to computer history - generation
TimesRide
 
02. types of computer
02. types of computer02. types of computer
02. types of computer
TimesRide
 
Introduction to microsoft office
Introduction to microsoft officeIntroduction to microsoft office
Introduction to microsoft office
TimesRide
 

More from TimesRide (11)

Squares & Cubes till 30
Squares & Cubes till 30Squares & Cubes till 30
Squares & Cubes till 30
 
Business review
Business reviewBusiness review
Business review
 
Bill gates vs steve jobs
Bill gates vs steve jobsBill gates vs steve jobs
Bill gates vs steve jobs
 
11. introduction to internet
11. introduction to internet11. introduction to internet
11. introduction to internet
 
10. introduction to windows
10. introduction to windows10. introduction to windows
10. introduction to windows
 
09. caveats usage and other computing
09. caveats   usage and other computing09. caveats   usage and other computing
09. caveats usage and other computing
 
06. system unit computer
06. system unit   computer06. system unit   computer
06. system unit computer
 
05. input devices computer
05. input devices   computer05. input devices   computer
05. input devices computer
 
01. introduction to computer history - generation
01. introduction to computer   history - generation01. introduction to computer   history - generation
01. introduction to computer history - generation
 
02. types of computer
02. types of computer02. types of computer
02. types of computer
 
Introduction to microsoft office
Introduction to microsoft officeIntroduction to microsoft office
Introduction to microsoft office
 

Recently uploaded

Home assignment II on Spectroscopy 2024 Answers.pdf
Home assignment II on Spectroscopy 2024 Answers.pdfHome assignment II on Spectroscopy 2024 Answers.pdf
Home assignment II on Spectroscopy 2024 Answers.pdf
Tamralipta Mahavidyalaya
 
Overview on Edible Vaccine: Pros & Cons with Mechanism
Overview on Edible Vaccine: Pros & Cons with MechanismOverview on Edible Vaccine: Pros & Cons with Mechanism
Overview on Edible Vaccine: Pros & Cons with Mechanism
DeeptiGupta154
 
1.4 modern child centered education - mahatma gandhi-2.pptx
1.4 modern child centered education - mahatma gandhi-2.pptx1.4 modern child centered education - mahatma gandhi-2.pptx
1.4 modern child centered education - mahatma gandhi-2.pptx
JosvitaDsouza2
 
Francesca Gottschalk - How can education support child empowerment.pptx
Francesca Gottschalk - How can education support child empowerment.pptxFrancesca Gottschalk - How can education support child empowerment.pptx
Francesca Gottschalk - How can education support child empowerment.pptx
EduSkills OECD
 
Embracing GenAI - A Strategic Imperative
Embracing GenAI - A Strategic ImperativeEmbracing GenAI - A Strategic Imperative
Embracing GenAI - A Strategic Imperative
Peter Windle
 
The French Revolution Class 9 Study Material pdf free download
The French Revolution Class 9 Study Material pdf free downloadThe French Revolution Class 9 Study Material pdf free download
The French Revolution Class 9 Study Material pdf free download
Vivekanand Anglo Vedic Academy
 
How to Make a Field invisible in Odoo 17
How to Make a Field invisible in Odoo 17How to Make a Field invisible in Odoo 17
How to Make a Field invisible in Odoo 17
Celine George
 
The Challenger.pdf DNHS Official Publication
The Challenger.pdf DNHS Official PublicationThe Challenger.pdf DNHS Official Publication
The Challenger.pdf DNHS Official Publication
Delapenabediema
 
special B.ed 2nd year old paper_20240531.pdf
special B.ed 2nd year old paper_20240531.pdfspecial B.ed 2nd year old paper_20240531.pdf
special B.ed 2nd year old paper_20240531.pdf
Special education needs
 
Lapbook sobre os Regimes Totalitários.pdf
Lapbook sobre os Regimes Totalitários.pdfLapbook sobre os Regimes Totalitários.pdf
Lapbook sobre os Regimes Totalitários.pdf
Jean Carlos Nunes Paixão
 
Model Attribute Check Company Auto Property
Model Attribute  Check Company Auto PropertyModel Attribute  Check Company Auto Property
Model Attribute Check Company Auto Property
Celine George
 
Instructions for Submissions thorugh G- Classroom.pptx
Instructions for Submissions thorugh G- Classroom.pptxInstructions for Submissions thorugh G- Classroom.pptx
Instructions for Submissions thorugh G- Classroom.pptx
Jheel Barad
 
aaaaaaaaaaaaaaaaaaaaaaaaaaaaaaaaaaaaaaaaa
aaaaaaaaaaaaaaaaaaaaaaaaaaaaaaaaaaaaaaaaaaaaaaaaaaaaaaaaaaaaaaaaaaaaaaaaaaaaaaaaaa
aaaaaaaaaaaaaaaaaaaaaaaaaaaaaaaaaaaaaaaaa
siemaillard
 
Introduction to AI for Nonprofits with Tapp Network
Introduction to AI for Nonprofits with Tapp NetworkIntroduction to AI for Nonprofits with Tapp Network
Introduction to AI for Nonprofits with Tapp Network
TechSoup
 
Palestine last event orientationfvgnh .pptx
Palestine last event orientationfvgnh .pptxPalestine last event orientationfvgnh .pptx
Palestine last event orientationfvgnh .pptx
RaedMohamed3
 
Sha'Carri Richardson Presentation 202345
Sha'Carri Richardson Presentation 202345Sha'Carri Richardson Presentation 202345
Sha'Carri Richardson Presentation 202345
beazzy04
 
Honest Reviews of Tim Han LMA Course Program.pptx
Honest Reviews of Tim Han LMA Course Program.pptxHonest Reviews of Tim Han LMA Course Program.pptx
Honest Reviews of Tim Han LMA Course Program.pptx
timhan337
 
The basics of sentences session 5pptx.pptx
The basics of sentences session 5pptx.pptxThe basics of sentences session 5pptx.pptx
The basics of sentences session 5pptx.pptx
heathfieldcps1
 
Additional Benefits for Employee Website.pdf
Additional Benefits for Employee Website.pdfAdditional Benefits for Employee Website.pdf
Additional Benefits for Employee Website.pdf
joachimlavalley1
 
The approach at University of Liverpool.pptx
The approach at University of Liverpool.pptxThe approach at University of Liverpool.pptx
The approach at University of Liverpool.pptx
Jisc
 

Recently uploaded (20)

Home assignment II on Spectroscopy 2024 Answers.pdf
Home assignment II on Spectroscopy 2024 Answers.pdfHome assignment II on Spectroscopy 2024 Answers.pdf
Home assignment II on Spectroscopy 2024 Answers.pdf
 
Overview on Edible Vaccine: Pros & Cons with Mechanism
Overview on Edible Vaccine: Pros & Cons with MechanismOverview on Edible Vaccine: Pros & Cons with Mechanism
Overview on Edible Vaccine: Pros & Cons with Mechanism
 
1.4 modern child centered education - mahatma gandhi-2.pptx
1.4 modern child centered education - mahatma gandhi-2.pptx1.4 modern child centered education - mahatma gandhi-2.pptx
1.4 modern child centered education - mahatma gandhi-2.pptx
 
Francesca Gottschalk - How can education support child empowerment.pptx
Francesca Gottschalk - How can education support child empowerment.pptxFrancesca Gottschalk - How can education support child empowerment.pptx
Francesca Gottschalk - How can education support child empowerment.pptx
 
Embracing GenAI - A Strategic Imperative
Embracing GenAI - A Strategic ImperativeEmbracing GenAI - A Strategic Imperative
Embracing GenAI - A Strategic Imperative
 
The French Revolution Class 9 Study Material pdf free download
The French Revolution Class 9 Study Material pdf free downloadThe French Revolution Class 9 Study Material pdf free download
The French Revolution Class 9 Study Material pdf free download
 
How to Make a Field invisible in Odoo 17
How to Make a Field invisible in Odoo 17How to Make a Field invisible in Odoo 17
How to Make a Field invisible in Odoo 17
 
The Challenger.pdf DNHS Official Publication
The Challenger.pdf DNHS Official PublicationThe Challenger.pdf DNHS Official Publication
The Challenger.pdf DNHS Official Publication
 
special B.ed 2nd year old paper_20240531.pdf
special B.ed 2nd year old paper_20240531.pdfspecial B.ed 2nd year old paper_20240531.pdf
special B.ed 2nd year old paper_20240531.pdf
 
Lapbook sobre os Regimes Totalitários.pdf
Lapbook sobre os Regimes Totalitários.pdfLapbook sobre os Regimes Totalitários.pdf
Lapbook sobre os Regimes Totalitários.pdf
 
Model Attribute Check Company Auto Property
Model Attribute  Check Company Auto PropertyModel Attribute  Check Company Auto Property
Model Attribute Check Company Auto Property
 
Instructions for Submissions thorugh G- Classroom.pptx
Instructions for Submissions thorugh G- Classroom.pptxInstructions for Submissions thorugh G- Classroom.pptx
Instructions for Submissions thorugh G- Classroom.pptx
 
aaaaaaaaaaaaaaaaaaaaaaaaaaaaaaaaaaaaaaaaa
aaaaaaaaaaaaaaaaaaaaaaaaaaaaaaaaaaaaaaaaaaaaaaaaaaaaaaaaaaaaaaaaaaaaaaaaaaaaaaaaaa
aaaaaaaaaaaaaaaaaaaaaaaaaaaaaaaaaaaaaaaaa
 
Introduction to AI for Nonprofits with Tapp Network
Introduction to AI for Nonprofits with Tapp NetworkIntroduction to AI for Nonprofits with Tapp Network
Introduction to AI for Nonprofits with Tapp Network
 
Palestine last event orientationfvgnh .pptx
Palestine last event orientationfvgnh .pptxPalestine last event orientationfvgnh .pptx
Palestine last event orientationfvgnh .pptx
 
Sha'Carri Richardson Presentation 202345
Sha'Carri Richardson Presentation 202345Sha'Carri Richardson Presentation 202345
Sha'Carri Richardson Presentation 202345
 
Honest Reviews of Tim Han LMA Course Program.pptx
Honest Reviews of Tim Han LMA Course Program.pptxHonest Reviews of Tim Han LMA Course Program.pptx
Honest Reviews of Tim Han LMA Course Program.pptx
 
The basics of sentences session 5pptx.pptx
The basics of sentences session 5pptx.pptxThe basics of sentences session 5pptx.pptx
The basics of sentences session 5pptx.pptx
 
Additional Benefits for Employee Website.pdf
Additional Benefits for Employee Website.pdfAdditional Benefits for Employee Website.pdf
Additional Benefits for Employee Website.pdf
 
The approach at University of Liverpool.pptx
The approach at University of Liverpool.pptxThe approach at University of Liverpool.pptx
The approach at University of Liverpool.pptx
 

Excel training basic

  • 2. MS EXCEL – An Introduction • Excel – is the world’s most widely used spreadsheet calculating program • It is used in many places like hospitals, hotels, school and companies etc. • A program that allows you to use data to forecast, manage, predict, and present information
  • 3. Much of the appeal of Excel is due to the fact that it’s so versatile. Number crunching – Budget Creation, Analysis Creating customized charts Organizing lists: row-and-column layout & list Accessing other data: Import data Creating graphical dashboards – summarize in concise format
  • 4. Agenda 1. Excel - Overview 2. Creating Simple Formulas 3. Creating Complex Formulas 4. Working with Basic Functions 5. Sorting, Grouping, and Filtering Cells 6. Formatting Tables 7. The Fill Handle 8. Data Forms 9. Working with Worksheets 10. Using Conditional Formatting
  • 5. To open the Ms Excel:- 1 2 3 4
  • 6. Starting a Workbook Create a New, Blank Workbook: Left-click the Microsoft Office Button. Select New
  • 7. Starting a Workbook - the dialog box opens and Blank Workbook is highlighted by default Click Create. A new, blank workbook appears in the window. When you first open Excel, the software opens to a new, blank workbook.
  • 8. Setting Up & Exploring Excel Spreadsheet Let’s familiarize with few key tasks and features • Tabbed Ribbon menu system – Navigate features & commands • minimize and maximize the Ribbon • Configure the Quick Access toolbar • Switch page views • Access Excel options. • Microsoft Office Button - important options such as New, Save, Save As, and Print • By default the Quick Access Toolbar is pinned next to the Microsoft Office Button, and includes commands such as Undo and Redo.
  • 9. There are 1048576 rows and 16384 columns in sheet
  • 15. Starting a Workbook To Insert Text: Left-click a cell to select it. Each rectangle in the worksheet is called a cell. As you select a cell, the cell address appears in the Name Box. Enter text into the cell using keyboard. The text appears in the cell and in the formula bar. Each cell has a name, or a cell address based on the column and row it is in. For example, this cell is C3 since it is where column C and row 3 intersect.
  • 16. Starting a Workbook To Edit or Delete Text: Select the cell. Press the Backspace key on your keyboard to delete text and make a correction. Press the Delete key to delete the entire contents of a cell. You can also make changes to and delete text from the formula bar. Just select the cell and place your insertion point in the formula bar. To Move Through a Worksheet Using the Keyboard: Press the Tab key to move to the right of the selected cell. Press the Shift key and then the Tab key to move to the left of the selected cell. Use the Page Up and Page Down keys to navigate the worksheet. Use the arrow keys. To Save the Workbook: Left-click the Microsoft Office Button. Select Save or Save As. Save As allows you to name the file and choose a location to save the spreadsheet. Choose Save As if you'd like to save the file for the first time or if you'd like to save the file as a different name. Select Save if the file has already been named.
  • 17. Starting a Workbook You can save a workbook in many ways, but the two most common are as an Excel Workbook, which saves it with a 2007 file extension, and as an Excel 97-2003 Workbook, which saves the file in a compatible format so people who have earlier versions of Excel can open the file.
  • 18. Setting Up Your Excel Environment To Zoom In and Out: Locate the zoom bar in the bottom, right corner. Left-click the slider and drag it to the left to zoom out and to the right to zoom in. To Scroll Horizontally in a Worksheet: Locate the horizontal scroll bar in the bottom, right corner. Left-click the bar and move it from left to right. To Change Page Views: Locate the Page View options in the bottom, right corner. The Page View options are Normal, Page Layout, and Page Break. Left-click an option to select it. The default is Normal View
  • 19. Setting Up Your Excel Environment To Add Commands to the Quick Access Toolbar: Click the arrow to the right of the Quick Access toolbar. Select the command you wish to add from the drop-down list. It will appear in the Quick Access toolbar. OR Select More Commands from the menu Select the command you wish to add. Click the Add button. Click OK. The Save, Undo, and Redo commands appear by default in the Quick Access toolbar. You may wish to add other commands to make using specific Excel features more convenient for you.
  • 20. Setting Up Your Excel Environment To Minimize and Maximize the Ribbon: Click the drop-down arrow next to the Quick Access toolbar. Select Minimize Ribbon from the list. The Ribbon disappears. To maximize the ribbon, click the arrow again and select Minimize the Ribbon to toggle the feature off. You can also minimize and maximize the Ribbon by right-clicking anywhere in the main menu and selecting Minimize the Ribbon in the menu that appears. It is designed to be responsive to your current task and easy to use; however, you can choose to minimize the Ribbon if you would prefer to use different menus or keyboard shortcuts.
  • 21. Setting Up Your Excel Environment The Microsoft Office Button appears at the top of the Excel window. From this menu you can • Create a new spreadsheet • Open existing files • Save files in a variety of ways • Print • Add security features • Send • Publish • Close file
  • 22. Setting Up Your Excel Environment To Change the Default Excel Options: Click the Excel Options button. A dialog box will appear. Select a category on the left to access different Excel options. Modify any of the default settings. Click OK. As you learn more about Excel and become proficient at using it, you may want to modify some of the settings. As a beginning user, it is usually best to leave the default settings.
  • 24. Modifying Columns, Rows, & Cells To Modify Column Width: Position the cursor over the column line in the column heading and a double arrow will appear. Left-click the mouse and drag the cursor to the right to increase the column width or to the left to decrease the column width. Release the mouse button. OR • A new blank workbook has the cells, columns, and rows set to a default size • As required, – Change the size - column width and row height – Insert new columns & rows
  • 25. Modifying Columns, Rows, & Cells Left-click the column heading of a column you'd like to modify. The entire column will appear highlighted Click the Format command in the Cells group on the Home tab. A menu will appear Select Column Width to enter a specific column measurement. Select AutoFit Column Width to adjust the column so all the text will fit.
  • 26. Modifying Columns, Rows, & Cells To Modify the Row Height: Position the cursor over the row line you want to modify and a double arrow will appear. Left-click the mouse and drag the cursor upward to decrease the row height or downward to increase the row height. Release the mouse button.
  • 27. Modifying Columns, Rows, & Cells Click the Format command in the Cells group on the Home tab. A menu will appear. Select Row Height to enter a specific row measurement. Select AutoFit Row Height to adjust the row so all the text will fit.
  • 28. Modifying Columns, Rows, & Cells To Insert Rows: Select the row below where you want the new row to appear. Click the Insert command in the Cells group on the Home tab. The row will appear The new row always appears above the selected row. Make sure that you select the entire row below where you want the new row to appear and not just the cell. If you select just the cell and then click Insert, only a new cell will appear.
  • 29. Modifying Columns, Rows, & Cells To Insert Columns: Select the column to the right of where you want the column to appear. Click the Insert command in the Cells group on the Home tab. The column will appear. The new column always appears to the left of the selected column. For example, if you want to insert a column between September and October, select the October column and click the Insert command. Make sure that you select the entire column to the right of where you want the new column to appear and not just the cell. If you select just the cell and then click Insert, only a new cell will appear To Delete Rows and Columns: Select the row or column you’d like to delete. Click the Delete command in the Cells group on the Home tab.
  • 30. Formatting Text • Once you have entered information into a spreadsheet, you will need to be able to format it • Let’s learn how to use the bold, italic, and underline commands; modify the font style, size, and color; and apply borders and fill colors.
  • 31. Formatting Text To Format Text in Bold or Italics: Left-click a cell to select it or drag your cursor over the text in the formula bar to select it. Click the Bold or Italics command. You can select entire columns and rows, or specific cells. To select the entire column, just left-click the column heading and the entire column will appear as selected. To select specific cells, just left-click a cell and drag your mouse to select the other cells. Then, release the mouse button.
  • 32. Formatting Text To Format Text as Underlined: Select the cell or cells you want to format. Click the drop-down arrow next to the Underline command. Select the Single Underline or Double Underline option. To Change the Font Style Select the cell or cells you want to format. Left-click the drop-down arrow next to the Font Style box on the Home tab. Select a font style from the list. As you move over the font list, the Live Preview feature previews the font for you in the spreadsheet.
  • 33. Formatting Text To Change the Font Size: Select the cell or cells you want to format. Left-click the drop-down arrow next to the Font Size box on the Home tab. Select a font size from the list. To Change the Text Color: Select the cell or cells you want to format. Left-click the drop-down arrow next to the Text Color command. A color palette will appear. Select a color from the palette. OR Select More Colors. A dialog box will appear. Select a color. Click OK.
  • 34. Formatting Text To Add a Border: Select the cell or cells you want to format. Click the drop-down arrow next to the Borders command on the Home tab. A menu will appear with border options. Left-click an option from the list to select it. You can change the line style and color of the border.
  • 35. Formatting Text To add a Fill Color: Select the cell or cells you want to format. Click the Fill command. A color palette will appear. Select a color. OR Select More Colors. A dialog box will appear. Select a color. Click OK. You can use the fill color feature to format columns and rows, and format a worksheet so that it is easier to read.
  • 36. Formatting Text To Format Numbers and Dates: Select the cell or cells you want to format. Left-click the drop-down arrow next to the Number Format box. Select one of the options for formatting numbers. By default, the numbers appear in the General category, which means there is no special formatting. In the Number group, you have some other options. For example, you can change the U.S. dollar sign to another currency format, numbers to percents, add commas, and change the decimal location.
  • 37. Hiding Worksheet Data • Hiding rows, columns, and worksheets is an excellent way to conceal extraneous or distracting information • In the Cells group on the Home tab, click the Format button, point to Hide & Unhide, and then click your desired option New Perspectives on Microsoft Office Excel 2007 37
  • 38. Insert an additional worksheet inside this workbook. Click on Insert/Worksheet.
  • 39. You can rename the new sheet by right clicking on its tab at the bottom, and selecting “Rename” from the menu.
  • 40. Highlight and copy the data from cell B9 through E18. Paste it on the new sheet.
  • 41. Right click on the new worksheet, then select paste from the drop down menu.
  • 42. Page Setup dialog box. Click on File/Page Setup.
  • 43. To see all printing options, make sure you select print from the file menu. Clicking on the printer icon on your toolbar will allow to print directly to your default printer with default options.
  • 44. Working with Cells Cut – Copy – Paste – Drag n Drop: • Move information from one cell to another in Excel • This small tricks ways will save you time and make working with Excel easier To Copy and Paste Cell Contents: Select the cell or cells you wish to copy. Click the Copy command in the Clipboard group on the Home tab. The border of the selected cells will change appearance.
  • 45. To select more than one adjoining cell, left-click one of the cells, drag the cursor until all the cells are selected, and release the mouse button. The copied cell will stay selected until you perform your next task, or you can double-click the cell to deselect it. Select the cell or cells where you want to paste the information. Click the Paste command. The copied information will now appear in the new cells.
  • 46. To Cut and Paste Cell Contents: Select the cell or cells you wish to cut. Click the Cut command in the Clipboard group on the Home tab. The border of the selected cells will change appearance. Select the cell or cells where you want to paste the information. Click the Paste command. The cut information will be removed from the original cells and now appear in the new cells. The keyboard shortcut for Paste is the Control Key and the V key.
  • 47. Working with Cells To Drag and Drop Information: Select the cell or cells you wish to move. Position your mouse pointer near one of the outside edges of the selected cells. The mouse pointer changes from a large, white cross to a black cross with 4 arrows. Left-click and hold the mouse button and drag the cells to the new location. Release the mouse button and the information appears in the new location.
  • 48. Working with Cells Fill Handle to Fill Cells: Position your cursor over the fill handle until the large white cross becomes a thin, black cross. Left-click your mouse and drag it until all the cells you want to fill are highlighted. Release the mouse button and all the selected cells are filled with the information from the original cell. The fill handle doesn't always copy information from one cell directly into another cell. Depending on the data entered in the cell, it may fill the data in other ways. For example, if I have the formula =A1+B1 in cell C1, and I use the fill handle to fill the formula into cell C2, the formula doesn't appear the same in C2 as it does in C1. Instead of =A1+B1, you will see =A2+B2. You can use the fill handle to fill cells horizontally or vertically.
  • 49. Aligning Cell Content • In addition to left and right alignments, you can change the vertical and horizontal alignments of cell content to make a worksheet more readable • Alignment buttons are located on the Home tab
  • 50. Indenting Cell Content • You increase the indentation by roughly one character each time you click the Increase Indent button in the Alignment group on the Home tab
  • 51. Merging Cells • One way to align text over several columns or rows is to merge, or combine, several cells into one cell
  • 52. Rotating Cell Content • To save space or to provide visual interest to a worksheet, you can rotate the cell contents so that they appear at any angle or orientation • Select the range • In the Alignment group, click the Orientation button and choose a proper rotation
  • 54. Working with the Format Cells Dialog Box • The Format Cells dialog box has six tabs, each focusing on a different set of formatting options
  • 55. Copying Formats with the Format Painter • The Format Painter copies the formatting from one cell or range to another cell or range, without duplicating any of the data • Select the range containing the format you wish to copy • Click the Format Painter button on the Home tab • Click the cell to which you want to apply the format
  • 56. Copying Formats with the Paste Options Button
  • 57. Copying Formats with Paste Special Alt+E+S