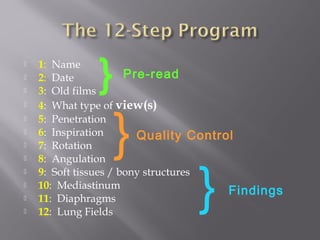
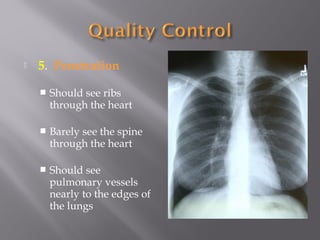
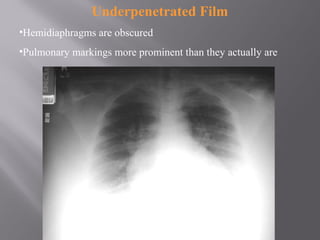
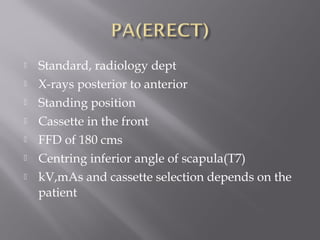
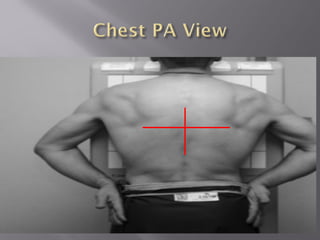
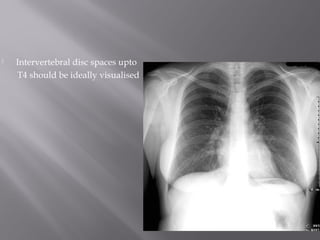
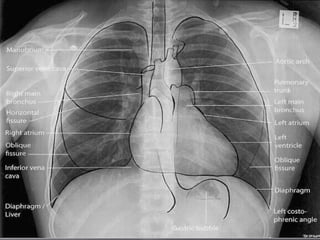
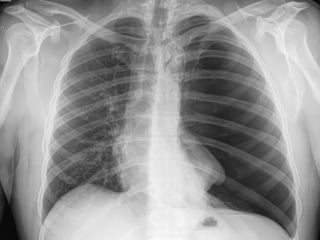
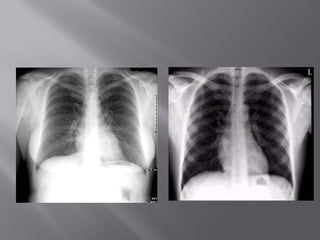
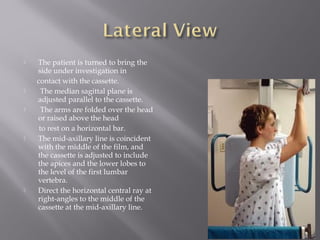
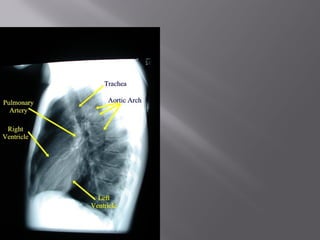
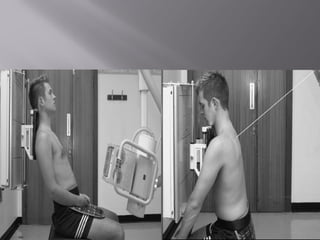
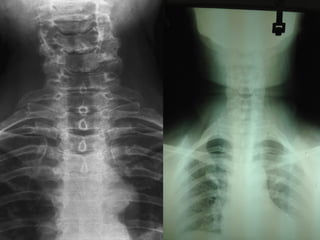
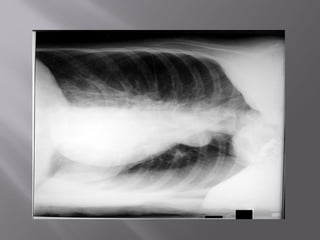
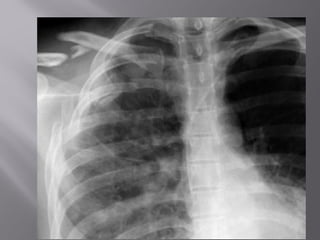
By
Dr Kushagra V Garg
 Most common radiological investigation
 Standard component of a pulmonary
examination
 Systematic review is vital in interpretation of
chest x-rays
 Chest radiographs are one of the most difficult
X Rays to interpret because of subject to subject
variation.
 2 dimensional image of a 3 dimensional
structure
 X-ray findings may lag behind other clinical
features
 Normal x-ray does not rule out pathology
 Dependent on good quality image
 1: Name
 2: Date
 3: Old films
 4: What type of view(s)
 5: Penetration
 6: Inspiration
 7: Rotation
 8: Angulation
 9: Soft tissues / bony structures
 10: Mediastinum
 11: Diaphragms
 12: Lung Fields
Quality Control
Findings
}
}
Pre-read
}
 1. Check the name
 2. Check the date/Side
 3. Obtain old films if available
 4. Which view(s) do you have?
 PA / AP, lateral, decubitus, AP lordotic
 5. Penetration
 Should see ribs
through the heart
 Barely see the spine
through the heart
 Should see
pulmonary vessels
nearly to the edges of
the lungs
Overpenetrated Film
• Lung fields darker than
normal—may obscure
subtle pathologies
• See spine well beyond the
diaphragms
• Inadequate lung detail
Underpenetrated Film
•Hemidiaphragms are obscured
•Pulmonary markings more prominent than they actually are
 Should be kept minimum to
decrease/minimize motion unsharpness
 For faster cassette we have to compromise on
the kV and penetration but exposure time is
minimized
 6. Inspiration
 Should be able to
count 9-10 posterior
ribs
 Heart shadow should
not be hidden by the
diaphragm
1
2
3
4
5
6
7
8
9
10
9-10 posterior ribs are
9
About 8 posterior ribs are
showing
8
With better inspiration,
the “disease process” at
the lung bases has
cleared
 7. Rotation
 Medial ends of
bilateral clavicles are
equidistant from the
midline or vertebral
bodies
If spinous process appears closer to the right clavicle (red arrow),
the patient is rotated toward their own left side
If spinous process appears closer to the left clavicle (red arrow),
the patient is rotated toward their own right side
 8. Angulation
 Clavicle should lay
over 3rd
rib
1
2
3
Pitfall Due to AngulationPitfall Due to Angulation
A film which is apical lordotic (beam is angled upA film which is apical lordotic (beam is angled up
toward head) will have an unusually shaped heart andtoward head) will have an unusually shaped heart and
the usually sharp border of the left hemidiaphragm willthe usually sharp border of the left hemidiaphragm will
be absentbe absent
Apical lordotic Same patient, not lordotic
 9. Soft tissue and
bony structures
 Check for
 Symmetry
 Deformities
 Fractures
 Masses
 Calcifications
 Lytic lesions
 10. Mediastinum
 Check for
 Cardiomegaly
 Mediastinal and
Hilar contours
for hilar masses
 11. Diaphragms
 Check sharpness of
borders
 Right is normally
higher than left
 Check for free air,
gastric bubble,
pleural effusions
 Posteroanterior – PA(erect)
 Anteroposterior – AP(mostly supine)
 Lateral
 Decubitus
 Lordotic
 Thoracic Inlet View
 Standard, radiology dept
 X-rays posterior to anterior
 Standing position
 Cassette in the front
 FFD of 180 cms
 Centring inferior angle of scapula(T7)
 kV,mAs and cassette selection depends on the
patient
 Intervertebral disc spaces upto
T4 should be ideally visualised
 Chest PA Expiration study
 Expiratory view demonstrates
air trapping and diaphragm
movement
 Exp : pneumothorax,
interstitial shadowing,
obstructive emphysema
(foreign body)
 Cassette placed behind patient
 X-rays anterior to posterior
 Sitting in chair, semi-erect in bed, supine
 AP marked on film
 Heart enlarged, poor inspiration
 Collimation
 Cassette above lung
apices.
 MSP perpendicular to
cassette
 Shoulder brought
downwards, hand
behind the back and
elbows way forward
 The central ray is then
angled until it is
coincident with the
middle of the film
Normal AP
 upper edge of cassette
just above the lung
apices
 arms laterally rotated
 Central beam is
directed towards
sternal notch
 FFD of 120cms.
 Level of diaphragm is
on a higher level
 Cassette should be
parallel to the coronal
plane
 Central ray is angled
till it is coincidental
with middle of the
cassette
 Centring is at sternal
notch
 Used to visualize ribs
 Used for non ambulatory patients
 Used for pediatric age group
 The patient is turned to bring the
side under investigation in
contact with the cassette.
 The median sagittal plane is
adjusted parallel to the cassette.
 The arms are folded over the head
or raised above the head
to rest on a horizontal bar.
 The mid-axillary line is coincident
with the middle of the film, and
the cassette is adjusted to include
the apices and the lower lobes to
the level of the first lumbar
vertebra.
 Direct the horizontal central ray at
right-angles to the middle of the
cassette at the mid-axillary line.
 With the patient in the
position for the postero-
anterior projection, the
central ray is angled 30
degrees caudally towards the
seventh cervical spinous
process coincident with the
sternal angle.
 With the patient in the
position for the antero-
posterior projection,
the central ray is angled 30
cephalad head towards the
sternal angle
 The patient is placed for the
postero-anterior projection.
 he clasps the sides of the
vertical Bucky, the patient
bends backwards at the
waist.
 The degree of dorsiflexion
varies for each subject, but in
general it is about 30–40
degrees.
 The horizontal ray is
directed at right-angles to
the cassette and towards the
middle of the film.
 The patient lies supine, with the
median sagittal plane adjusted
to coincide with the central long
axis of the imaging couch.
 The chin is raised to bring the
radiographic baseline to an
angle of 20 degrees from the
vertical.
 The cassette is centred at the
level of the sternal notch.
 Central beam is directed at the
midline at the level of the
sternal notch.
 Exposure is made on forced
expiration.
 Antero-posterior radiograph of trachea showing paratracheal
lymph node mass.
 The patient stands or sits with
either shoulder against a
vertical Bucky.
 The median sagittal plane of
the trunk and head are parallel
to the cassette.
 The cassette should be large
enough to include from the
lower pharynx to the lower end
of the trachea at the level
of the sternal angle.
 The shoulders are pulled well
backwards to enable the
visualization of the trachea.
 This position is aided by the
patient clasping their hands
behind the back and pulling
their arms backwards.
 The cassette is centred at the
level of the sternal notch.
 Patient lie semi prone on the affected side.
 Arms over the head
 Upper edge of the cassette is placed just above the lung apices
 Centering is at the middle of the cassette or at the level of T7.
 AP setup should be made.
 Knee flexed and should be on top of one another
 The affected side should be supported by some radiolucent
material so that the affected side completely comes in the xray.
 Marker
 Decubitus - useful for differentiating pleural effusions from
consolidation (e.g. pneumonia) ; Loculated effusions from free
fluid in the pleura. Abscess
 Radiographic positioning by clarks
 Wikipedia
 Radiographic positioning and procedures by
Greathouse
 Valuble inputs by Dr Kirti and Dr Gandhi
Thank You for The long and ?? BoringThank You for The long and ?? Boring
presenTaTionpresenTaTion
 CT
 Hrct
 MRI
 Angiography
But due to limitation of time and topic these
modalities will be covered in subsequent
presentations

Thoracic positioning

  • 1.
  • 2.
     Most commonradiological investigation  Standard component of a pulmonary examination  Systematic review is vital in interpretation of chest x-rays  Chest radiographs are one of the most difficult X Rays to interpret because of subject to subject variation.
  • 3.
     2 dimensionalimage of a 3 dimensional structure  X-ray findings may lag behind other clinical features  Normal x-ray does not rule out pathology  Dependent on good quality image
  • 4.
     1: Name 2: Date  3: Old films  4: What type of view(s)  5: Penetration  6: Inspiration  7: Rotation  8: Angulation  9: Soft tissues / bony structures  10: Mediastinum  11: Diaphragms  12: Lung Fields Quality Control Findings } } Pre-read }
  • 5.
     1. Checkthe name  2. Check the date/Side  3. Obtain old films if available  4. Which view(s) do you have?  PA / AP, lateral, decubitus, AP lordotic
  • 6.
     5. Penetration Should see ribs through the heart  Barely see the spine through the heart  Should see pulmonary vessels nearly to the edges of the lungs
  • 7.
    Overpenetrated Film • Lungfields darker than normal—may obscure subtle pathologies • See spine well beyond the diaphragms • Inadequate lung detail
  • 8.
    Underpenetrated Film •Hemidiaphragms areobscured •Pulmonary markings more prominent than they actually are
  • 12.
     Should bekept minimum to decrease/minimize motion unsharpness  For faster cassette we have to compromise on the kV and penetration but exposure time is minimized
  • 13.
     6. Inspiration Should be able to count 9-10 posterior ribs  Heart shadow should not be hidden by the diaphragm 1 2 3 4 5 6 7 8 9 10
  • 14.
    9-10 posterior ribsare 9 About 8 posterior ribs are showing 8 With better inspiration, the “disease process” at the lung bases has cleared
  • 15.
     7. Rotation Medial ends of bilateral clavicles are equidistant from the midline or vertebral bodies
  • 17.
    If spinous processappears closer to the right clavicle (red arrow), the patient is rotated toward their own left side If spinous process appears closer to the left clavicle (red arrow), the patient is rotated toward their own right side
  • 18.
     8. Angulation Clavicle should lay over 3rd rib 1 2 3
  • 19.
    Pitfall Due toAngulationPitfall Due to Angulation A film which is apical lordotic (beam is angled upA film which is apical lordotic (beam is angled up toward head) will have an unusually shaped heart andtoward head) will have an unusually shaped heart and the usually sharp border of the left hemidiaphragm willthe usually sharp border of the left hemidiaphragm will be absentbe absent Apical lordotic Same patient, not lordotic
  • 20.
     9. Softtissue and bony structures  Check for  Symmetry  Deformities  Fractures  Masses  Calcifications  Lytic lesions
  • 21.
     10. Mediastinum Check for  Cardiomegaly  Mediastinal and Hilar contours for hilar masses
  • 22.
     11. Diaphragms Check sharpness of borders  Right is normally higher than left  Check for free air, gastric bubble, pleural effusions
  • 23.
     Posteroanterior –PA(erect)  Anteroposterior – AP(mostly supine)  Lateral  Decubitus  Lordotic  Thoracic Inlet View
  • 24.
     Standard, radiologydept  X-rays posterior to anterior  Standing position  Cassette in the front  FFD of 180 cms  Centring inferior angle of scapula(T7)  kV,mAs and cassette selection depends on the patient
  • 26.
     Intervertebral discspaces upto T4 should be ideally visualised
  • 29.
     Chest PAExpiration study  Expiratory view demonstrates air trapping and diaphragm movement  Exp : pneumothorax, interstitial shadowing, obstructive emphysema (foreign body)
  • 30.
     Cassette placedbehind patient  X-rays anterior to posterior  Sitting in chair, semi-erect in bed, supine  AP marked on film  Heart enlarged, poor inspiration  Collimation
  • 31.
     Cassette abovelung apices.  MSP perpendicular to cassette  Shoulder brought downwards, hand behind the back and elbows way forward  The central ray is then angled until it is coincident with the middle of the film
  • 32.
  • 34.
     upper edgeof cassette just above the lung apices  arms laterally rotated  Central beam is directed towards sternal notch  FFD of 120cms.
  • 35.
     Level ofdiaphragm is on a higher level
  • 36.
     Cassette shouldbe parallel to the coronal plane  Central ray is angled till it is coincidental with middle of the cassette  Centring is at sternal notch
  • 37.
     Used tovisualize ribs  Used for non ambulatory patients  Used for pediatric age group
  • 38.
     The patientis turned to bring the side under investigation in contact with the cassette.  The median sagittal plane is adjusted parallel to the cassette.  The arms are folded over the head or raised above the head to rest on a horizontal bar.  The mid-axillary line is coincident with the middle of the film, and the cassette is adjusted to include the apices and the lower lobes to the level of the first lumbar vertebra.  Direct the horizontal central ray at right-angles to the middle of the cassette at the mid-axillary line.
  • 41.
     With thepatient in the position for the postero- anterior projection, the central ray is angled 30 degrees caudally towards the seventh cervical spinous process coincident with the sternal angle.  With the patient in the position for the antero- posterior projection, the central ray is angled 30 cephalad head towards the sternal angle
  • 45.
     The patientis placed for the postero-anterior projection.  he clasps the sides of the vertical Bucky, the patient bends backwards at the waist.  The degree of dorsiflexion varies for each subject, but in general it is about 30–40 degrees.  The horizontal ray is directed at right-angles to the cassette and towards the middle of the film.
  • 48.
     The patientlies supine, with the median sagittal plane adjusted to coincide with the central long axis of the imaging couch.  The chin is raised to bring the radiographic baseline to an angle of 20 degrees from the vertical.  The cassette is centred at the level of the sternal notch.  Central beam is directed at the midline at the level of the sternal notch.  Exposure is made on forced expiration.
  • 50.
     Antero-posterior radiographof trachea showing paratracheal lymph node mass.
  • 51.
     The patientstands or sits with either shoulder against a vertical Bucky.  The median sagittal plane of the trunk and head are parallel to the cassette.  The cassette should be large enough to include from the lower pharynx to the lower end of the trachea at the level of the sternal angle.  The shoulders are pulled well backwards to enable the visualization of the trachea.  This position is aided by the patient clasping their hands behind the back and pulling their arms backwards.  The cassette is centred at the level of the sternal notch.
  • 53.
     Patient liesemi prone on the affected side.  Arms over the head  Upper edge of the cassette is placed just above the lung apices  Centering is at the middle of the cassette or at the level of T7.  AP setup should be made.  Knee flexed and should be on top of one another  The affected side should be supported by some radiolucent material so that the affected side completely comes in the xray.  Marker  Decubitus - useful for differentiating pleural effusions from consolidation (e.g. pneumonia) ; Loculated effusions from free fluid in the pleura. Abscess
  • 57.
     Radiographic positioningby clarks  Wikipedia  Radiographic positioning and procedures by Greathouse  Valuble inputs by Dr Kirti and Dr Gandhi
  • 58.
    Thank You forThe long and ?? BoringThank You for The long and ?? Boring presenTaTionpresenTaTion
  • 59.
     CT  Hrct MRI  Angiography But due to limitation of time and topic these modalities will be covered in subsequent presentations

Editor's Notes

  • #25 PA Standard investigation carried out in the x-ray dept Cassette anterior to chest, x-rays shot post-ant from 2 metres away, shoulders abducted to remove scapula Carried out in standing therefore better inspiration
  • #31 AP Cassette placed behind the patient, portable machine Patient could be sitting in a chair, semi erect in bed, supine in bed. NOTE the patient position will affect the CXR Marked AP on film Heart enlarged often poorer expansion