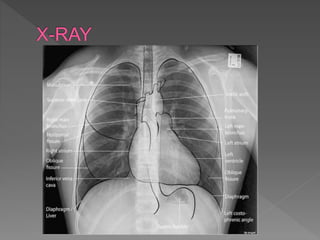
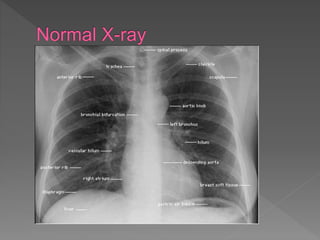
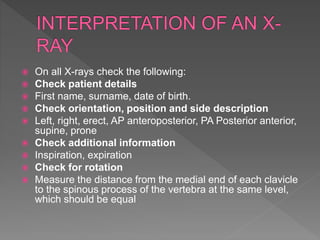
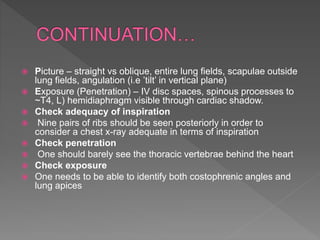
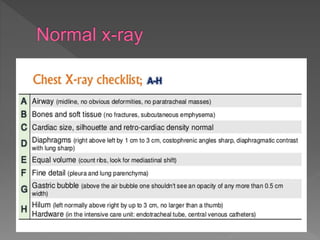
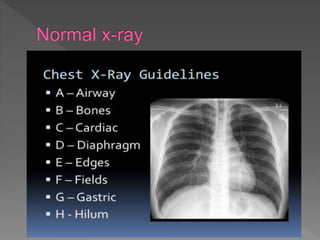
Low Rate Call Girls Pune Esha 9907093804 Short 1500 Night 6000 Best call girl...
R NKUNA X_RAY INTERPRETATION 2020.pptx Physiotherapy
1.
2. Chest X-rays is a painless, non-invasive test
and is the most commonly preferred
diagnostic examination to produce
An X-ray uses electromagnetic waves and
ionizing radiation to create pictures of the inside
of your body.
The procedures involves positioning the body
between the machine that produces the X-rays
and a plate that that creates the image digitally
or with X-ray film.
3. In order to examine an area where you’re
experiencing pain or discomfort
To monitor the progression of a diagnosed
disease, such as osteoporosis
To check how well a prescribed treatment is
working
4. Different tissues in our body absorb X-rays
at different extents:
Bone- high absorption (white)
Tissue- somewhere in the middle absorption
(grey)
Air- low absorption (black)
5. Does the thoracic spine align in the center of
the sternum and between the clavicles?
Are the clavicles level?
Verify Right and Left sides
Gastric bubble should be on the left
Margins should be sharp (the right hemi-
diaphgrams usually slightly higher than the
left)
6. Size -Diameter (>1/2 thoracic diameter is
enlarged heart) AP views make heart appear
larger than it actually is.
1/3 on the right and 2/3 on the left
Shape
•Silhouette-margins should be sharp
7. Tracheal deviation
Bifurcation of trachea
Continuation of all bones (any fractures?)
Costo-phrenic and cardio-phrenic angles
(which must be sharp and clear)
8. Was film taken under full inspiration?
10 posterior ribs should be visible OR 6 anterior ribs.
I - Inspiration. Check whether the 5 - 7 anterior/oblique ribs
intersect the diaphragm in the mid-clavicular line. If the
intersection happens in anterior/oblique ribs 8 or more, then
the lungs are hyper inflated.
R - Rotation. Check whether the patient's position is rotated.
The patient is NOT rotated if the spinous processes are
equidistant from the medial ends of the clavicles.
P - Penetration. Check whether the spine and the spaces
between the ribs can be seen through the heart; which
indicates that the X-ray exposure is adequate.
9.
10.
11. To obtain the front view:
1. Posterior - Anterior (PA)
Posterior - anterior refers to the direction of the
X-Ray beam travel.
X-Ray beams hit the posterior part of the chest
before the anterior part. To obtain the image,
the patient is asked to stand with their chest
against the film, to hold their arms up or to the
sides and roll their shoulders forward. The X-ray
technician may then ask the patient to take few
deep breaths and hold it for a couple of
seconds. This techniques of holding the breath
generally helps to get a clear picture of the
heart and lungs on the image.
12. Anterior - posterior (AP): This type of chest
X-Ray is generally less preferred because
the image of the heart and mediastinum is
less clear and focused in this projection.
To obtain AP image, the patient is asked to
stand with their back against the film. If the
patient is unable to stand, an AP image can
also be taken with the patient sitting or
supine on the bed.
13.
14. A CXR taken in the radiology department is taken with the
patient standing erect in front of
and facing the cassette containing the X-ray film.
• The X-ray tube is positioned behind the patient hence the
X-rays pass from posterior to anterior
(PA).
• For patients confined to bed or chair, the PA technique is
not possible, therefore the X-ray film
is placed behind the patient and the X-ray tube in front so
that the X-rays pass from anterior to
posterior (AP).
• In general, AP CXRs are taken with a shorter X-ray tube
to film distance compared to a PA film
due to practical limitations.
15. • There are marked differences in the CXR that can be attributed
entirely to the technique used.
• The heart is an anterior organ in the chest and its size is
magnified on an AP view due to both
the increase in divergence of the incident X-rays (the X-ray
source being closer to the film) and
the increase in distance between the heart and the film when
compared to the PA technique. This
magnification may make numerous mediastinal structures
appear abnormally enlarged.
• On AP films, the clavicles cast a broader shadow and typically
overlay the apices making interpretation
of these areas difficult (Fig 2.3).
• In general, the AP film should be interpreted with caution.
16.
17. A lateral view provides clearer visualization of the area
anterior to the mediastinum and posterior
to the diaphragms and may help interpretation of an
abnormality seen on a frontal view
If a low kV technique is used a lateral is necessary to image
the areas behind the heart and
hemi-diaphragms.
• Other pathology better appreciated on the lateral CXR is
right middle lobe or lingularr collapse
and/or consolidation, which may be missed on a frontal CXR
due to the orientation of the X-ray beam
18. On all X-rays check the following:
Check patient details
First name, surname, date of birth.
Check orientation, position and side description
Left, right, erect, AP anteroposterior, PA Posterior anterior,
supine, prone
Check additional information
Inspiration, expiration
Check for rotation
Measure the distance from the medial end of each clavicle
to the spinous process of the vertebra at the same level,
which should be equal
19. Picture – straight vs oblique, entire lung fields, scapulae outside
lung fields, angulation (i.e ’tilt’ in vertical plane)
Exposure (Penetration) – IV disc spaces, spinous processes to
~T4, L) hemidiaphragm visible through cardiac shadow.
Check adequacy of inspiration
Nine pairs of ribs should be seen posteriorly in order to
consider a chest x-ray adequate in terms of inspiration
Check penetration
One should barely see the thoracic vertebrae behind the heart
Check exposure
One needs to be able to identify both costophrenic angles and
lung apices
20.
21.
22. A - Airway
Trachea is visible and in midline
Trachea gets pushed away from abnormality,
e.g. pleural effusion or tension pneumothorax
Trachea gets pulled towards abnormality, e.g.
atelectasis
Trachea normally narrows at the vocal cords
View the carina, angle should be between 60 –
100 degrees
23. Visibility of the Trachea in the Midline
The trachea is normally narrower by the region of the vocal cords .
During certain abnormalities the trachea reacts by
Moving away as in thesec onditions :Pleural Effusion or Pneumothrox
Pulled towards , as in these conditions: Atlectasis
Carina Angle is normally between 60 – 100 degrees with the Right Bronchi
being steeper.
Abnormalities that may increase the angle such as Left Atrial Enlargement and
Lymph Node Enlargements.
The integrity of the Brochi stems and be worry of any any abnormalities such
as foreign bodies and obstructions of the airway
Endotracheal Tubes: should be placed 3 – 4cm above the Carina
Mediastinum
Must be measured and be equidistant from the left to the right side.
Observe for the presence of any mass lesions , inflammation
24. B – Bones
Check for fractures, dislocation, subluxation,
osteoblastic or osteolytic lesions in clavicles,
ribs, thoracic
Spine and humerus including osteoarthritic
changes
At this time also check the soft tissues for
subcutaneous air, foreign bodies and
surgical clips
25. Observe the Clavicle, Scapula,Ribs and Humarus that
they are equidistant from the midline
Observe the structures in the midline: Vertebrae and
Mediasternum
Observe Bone integrity for any Fractures, Dislocations,
Subluxations, Osteoblasts and Lesions.
Observe the Spine and Humarus for any Osteoathritic
change.
Observe for any subcutaneous air and foreign bodies or
surgical clips.
Observe Lateral Film for the positioning of the vertabr
26. C - Cardiac
Check heart size and heart borders
Heart position –⅔ to left, ⅓ to right
Heart size – measure cardiothoracic ratio on PA
film (normal <0.5)
Heart borders – R) border is R) atrium, L)
border is L) ventricle & atrium
Appropriate or blunted
Thin rim of air around the heart, think of
pneumomediastinum
Trace the aorta
27. The Heart size and borders need to observed
and measure the CarioThoracic Ratio on the film
taken in a PA direction (normally less than 0.5)
The position of the heart should be
-1/3 to the Left Side
-2/3 to the Right Side
Cardiac Borders should be appropriately sharp
Right Border is the Right Atrium
Laterally observe the Right Ventricle & Atrium for
the RetroSpinal and RetroCardiac Spaces
Left Border is the Left Ventricle and Atrium
There should normally be a Thin rim of air around
the heart being the PneamoMediaststinum
-CardioPhrenic – Close to the Cardiac Notch
-Costo Phrenic – Bottom and more costal.
Observe the Aorta Width, tortuosity and
calcification. Laterally trace the aorta.
Observe the Heart Valves calcification and valve
replacements.
Observe the SVC ,IVC And Azygous Vein
Widening
The picture shows Cardiacmegaly
28. D – Diaphragm
Right hemi-diaphragm o
Should be higher than the left o(~2.5cm / 1
intercostal space)
If much higher, think of effusion, lobar
collapse, diaphragmatic paralysis o
If you cannot see parts of the diaphragm,
consider infiltrate or effusion
29. Hemi-Diaphragms :
Right Hemi-Diaphragm
Should be higher than the Left Hemi Diaphragm by about
2.5 cm or 1 Intercostal space
Abnormalities
If the Right Hemi diaphragm is much higher think of an
effusion, lobar collapse or diaphragmatic paralysis If you
can not see parts of the diaphragm there may be infiltrate
or effusion.
Film taken in an Erect or Upright position may show Free
Air under the Diaphragm if Infra-abdominal perforation is
present.
Lateral film: may indicate fluid tracking up the Costo
Phrenic blunting & the associated Hemi-diaphragm.
30. E – Effusion
Effusions o Look for blunting of the
costophrenic angle
Identify the major fissures, if you can see
them more obvious than usual, then this
could mean that fluid is tracking along the
fissure
Check out the pleura
Thickening, loculations, calcifications and
pneumothorax
31. Observe the CostroPhrenic Angle for the
presence of any Blunting
Identify the major fissures if they are seen more
prominantely than usual as this is indicative of
Fluid Tracking along the fissure.
Observe the Pleura thickening, loculations,
calcification and pneumothorax.
Also observe the fissures on a lateral basis
32. Observe the Volume-anterior (oblique) ribs 5-7 and posterior ribs (horizontal) 6-8
and air entry-black colour on the lungs
Opacities-consolidation
Additional lines( ECG electrode, pig tail catheter)
Observe for the presence of infiltrates and Identify the location of infiltrates by use of
known radiological phenomena,
e.g. loss of heart borders or of the contour of the diaphragm
Remember that right middle lobe abuts the heart, but the right lower lobe does not
The lingula abuts the left side of the heart.
Identify the pattern of infiltration of Interstitial pattern (reticular) versus alveolar
(patchy or nodular) pattern
Lobar collapse.
Look for air bronchograms, tram tracking, nodules, Kerley B lines.
Pay attention to the apices.
Check for granulomas, tumour and pneumothorax.
Observe the translucency of the thoracic vertebrae in the lateral view, when there is
a sudden change in transparency, then this is likely to be caused by infiltrate.
Also try to find the infiltrate that you think you saw on the pa-film to verify existence
and anatomical location.
Pay special attention to the lower lung lobes.