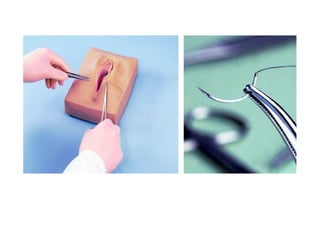
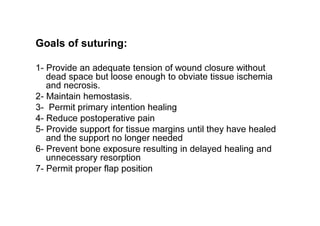
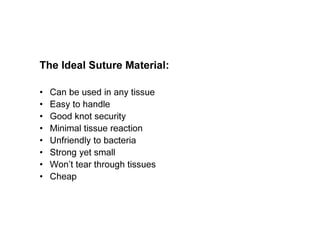
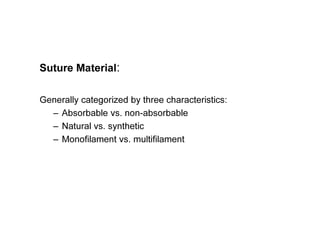
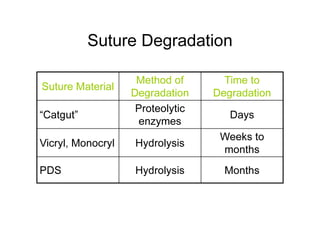
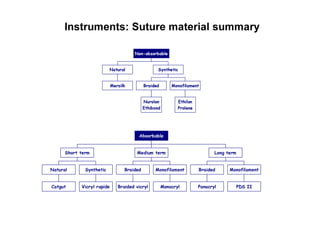
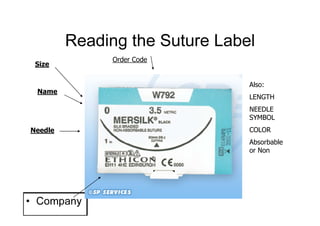
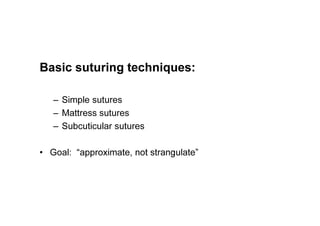
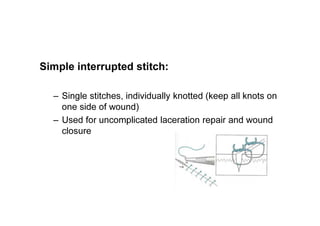
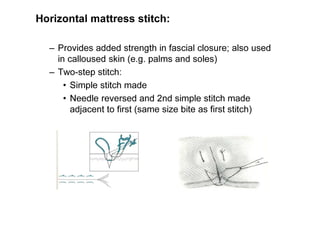
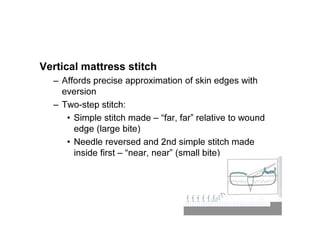
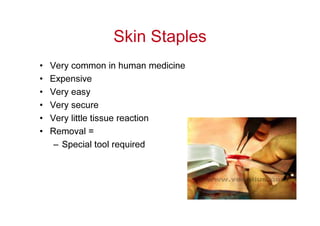
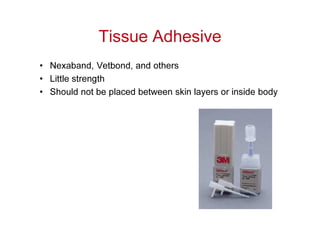
Sutures and Suturing
DR. EYAD ABOU ASALI
Goals of suturing:
1- Provide an adequate tension of wound closure without
dead space but loose enough to obviate tissue ischemia
and necrosis.
2- Maintain hemostasis.
3- Permit primary intention healing
4- Reduce postoperative pain
5- Provide support for tissue margins until they have healed
and the support no longer needed
6- Prevent bone exposure resulting in delayed healing and
unnecessary resorption
7- Permit proper flap position
The Ideal Suture Material:
• Can be used in any tissue
• Easy to handle
• Good knot security
• Minimal tissue reaction
• Unfriendly to bacteria
• Strong yet small
• Won’t tear through tissues
• Cheap
Suture Material:
Generally categorized by three characteristics:
– Absorbable vs. non-absorbable
– Natural vs. synthetic
– Monofilament vs. multifilament
Absorbable Suture:
• Degraded and eventually eliminated in one of two ways:
– Via inflammatory reaction utilizing tissue enzymes
– Via hydrolysis
• Examples:
– “Catgut”
– Chromic
– Vicryl
– Monocryl
– PDS
• Internal
• Intradermal/ subcuticular
• Rarely on skin
Non-absorbable Suture:
• Not degraded, permanent
• Examples:
– Prolene
– Nylon
– Stainless steel
– Silk*
(*not a truly permanent material; known to be broken
down over a prolonged period of time—years)
Primarily Skin
– Needs to be removed later
Stainless steel = exception
– Can be used internally
• Ligature
• Orthopedics
– Can be left in place for long periods
Choosing:
Absorbable Vs. Nonabsorbable
• How long you need it to work
• Do you want to see the patient again for suture removal
Natural Suture:
• Biological origin
• Cause intense inflammatory reaction
• Examples:
– “Catgut” – purified collagen fibers from intestine of
healthy sheep or cows
– Chromic – coated “catgut”
– Silk
Synthetic Suture:
• Synthetic polymers
• Do not cause intense inflammatory reaction
• Examples:
– Vicryl
– Monocryl
– PDS
– Prolene
– Nylon
Natural Vs. Synthetic
• Natural:
– Gut
– Chromic Gut
– Silk
– Collagen
• All are absorbable
Monofilament Suture:
• Grossly appears as single strand of suture material; all
fibers run parallel
• Minimal tissue trauma
• Resists harboring microorganisms
• Ties smoothly
• Requires more knots than multifilament suture
• Possesses memory
• Examples:
– Monocryl, PDS, Prolene, Nylon
Multifilament Suture:
• Fibers are twisted or braided together
• Greater resistance in tissue
• Provides good handling and ease of tying
• Fewer knots required
• Examples:
– Vicryl (braided)
– Chromic (twisted)
– Silk (braided)
Monofilament Vs. Multifilament
• memory easy to handle
• less tissue drag more tissue drag
• doesn’t wick wicks/ bacteria
• poor knot security good knot security
• - tissue reaction +tissue reaction
Suture Degradation
Suture Material
Method of
Degradation
Time to
Degradation
“Catgut”
Proteolytic
enzymes
Days
Vicryl, Monocryl Hydrolysis
Weeks to
months
PDS Hydrolysis Months
Suture Size:
• Sized according to diameter with “0” as reference size
• Numbers alone indicate progressively larger sutures (“1”,
“2”, etc)
• Numbers followed by a “0” indicate progressively smaller
sutures (“2-0”, “4-0”, etc)
Smaller -------------------------
------------ Larger
.....”3-0”...”2-0”...”1-0”...”0”...”1”...”2”...”3”.....
Instruments: Suture material summary
Mersilk
Natural
Nurolon
Ethibond
Braided
Ethilon
Prolene
Monofilament
Synthetic
Non-absorbable
Catgut
Natural
Vicryl rapide
Synthetic
Short term
Braided vicryl
Braided
Monocryl
Monofilament
Medium term
Panacryl
Braided
PDS II
Monofilament
Long term
Absorbable
Surgical Needles
• Most of surgical needles are fabricated from heat treated
steel
• The surgical needle has a basic design composed of
three parts
1- The eye which is swaged and permits the suture and
needle to act as a single unit to decrease trauma
2- The body which is the widest point of the needle and
is also referred to as the grasping area. The body
comes in number of shapes (round, oval, rectangular,
trapezoid, or side flattened)
3- The point which runs from the tip to the maximum
cross-sectional area of the body. The point also
comes in a number of different shapes (conventional
cutting, reverse cutting, side cutting, taper cut,taper,
blunt
Needle Holder Selection
1- Use an approximate size for the given needle. The
smaller the needle, the smaller the needle holder
required
2- Needle should be grasped one-quarter to one half the
distance from the swaged area
3- The tip of the jaws of the needle holder should meet
before remaining portion of the jaws
4- The needle should be placed securely in the tips of the
jaws and should not rock, twist, or turn
5- Do not over close the needle holder. It should close only
to the first or second ratchet. This will avoid damaging
the needle
6- Pass the needle holder so it is always directed by the
operator thumb
Placement of Needle in Tissue
1- Force should always be applied in the direction that
follows the curvature of the needle
2- Suturing should always be from movable to a
nonmovable tissue
3- Avoid excessive tissue bites with small needle as it will
be difficult to retrieve them
4- Use only sharp needles with minimal force. Replace dull
needles
5- Never force the needle through the tissue
6- Grasp the needle in the body one-quarter to one-half of
the length from the swaged area. Do not hold the
swaged area; this may bend or break the needle. Do not
grasp the point area as damage or notching may result
7- Avoid retrieving the needle from the tissue by the tip.
This will damage or dull the needle
8- Suture should be placed in keratinized tissue whenever
possible
9- An adequate tissue bite is required to prevent the flap
from tearing
Knots
A suture knot has three components
1- The loop created by the knot
2- The knot itself, which is composed of a number of
tight “throws”, each throw represents a weave of the two
stands
3- The ears, which are the cut ends of the suture
Principles of Suturing
1- The completed knot must be tight, firm, and tied so that
slippage will not occur
2- To ovoid wicking of bacteria, knot should not be placed
in incision lines
3- Knots should be small and the ends cut short (2-3mm)
4- Avoid excessive tension to finer gauge materials as
breakage may occur
5- Avoid using a jerking motion, which may break the
suture
6- Avoid crushing or crimping of suture materials by not
using hemostats or needle holders on them except on
the free end for tying
7- Do not tie suture too tightly as tissue necrosis may
occur. Knot tension should not produce tissue blanching
8- Maintain adequate traction on one end while tying to
ovoid loosing the first loop
Reading the Suture Label
• Company
Needle
Size
Order Code
Name
Also:
LENGTH
NEEDLE
SYMBOL
COLOR
Absorbable
or Non
Basic suturing techniques:
– Simple sutures
– Mattress sutures
– Subcuticular sutures
• Goal: “approximate, not strangulate”
Simple interrupted stitch:
– Single stitches, individually knotted (keep all knots on
one side of wound)
– Used for uncomplicated laceration repair and wound
closure
Arming the needle-holder
• Grasp the needle two-thirds the
distance from its pointed end
• Avoid grasping the needle at its
proximal or distal extremities
since this will prevent damage to
the suture
Open the suture packet with
one tear to reveal the needle
Simple interrupted stitch: Steps 1&2
• Grasp the skin edge with the
forceps and slightly evert the
skin edge
• Then pronate the needle-holder
so that the needle will pierce
the skin at 90o
• Ensure the trailing suture
material is out of the way to
avoid tangling
Drive the needle through the
full thickness of the skin by
supinating the needle-holder
Keeping the shaft of the
needle perpendicular to the
skin allows the curvature of
the needle to traverse the
skin as atraumatically as
possible
Images courtesy of BUMC
Simple interrupted stitch: Steps 3&4
• Release the needle and
pronate the needle-holder
• Regrasp the needle proximal
to its pointed end
• Maintain tension with the
forceps to prevent the
needle from retracting
Again, supinate the needle-
holder to rotate the
needle upwards and
through the tissue
Simple interrupted stitch: Steps 5&6
• Regrasp the needle in order to
rearm the needle-holder (due to
HIV risks it is better to use the
forceps to do this)
Grasp and slightly evert the
opposing skin edge with the
forceps
Pronate the needle-holder
Simple interrupted stitch: Steps 7&8
• Again, supinate the needle-
holder to rotate the needle
through the skin, keeping the
shaft 90° to the skin surface
After releasing the needle,
pronate the needle-holder
before regrasping the
needle…
Simple interrupted stitch: Steps 9&10
• …and again supinate the needle-
holder to rotate the needle through
the skin
Pull the suture material through
the skin until 2-3 cm is left
protruding
Discard the forceps and use your
free hand to grasp the long end
in preparation for an instrument
tie
Place the needle-holder between
the strands
Simple interrupted stitch: Steps 11&12
• Wrap the long strand around the
needle-holder to form the loop for
the first throw of a square knot
Rotate the needle-holder away
yourself and grasp the short end
of the suture
Simple interrupted stitch: Steps 13&14
• Now draw the short end back
through the loop towards yourself
Now tighten the first throw
Simple interrupted stitch: Steps 15&16
• The throw should be tightened just
enough to approximate the skin
edges but not enough to
strangulate the tissue
To begin the second throw of the
square knot, wrap the long strand
around the needle-holder by
bringing the long strand towards
yourself
Simple interrupted stitch: Steps 17&18
• Rotate the needle-holder towards
yourself to retrieve the short end
Grasp the short end and draw it
through the loop by pulling it
away from yourself
Simple interrupted stitch: Step 19&20
• Finally, tighten the second throw
securely against the first
• Ensure the knot is to one side of the
wound to avoid involvement in the
clot
In one hand hold the scissors as
shown
With the other hand maintain
tension on the suture material
Slide the tips of the scissors
down the strands to the point
where they will be cut
Cut the suture material leaving 4-
5mm tails (important for removal
of external non-absorbable
sutures)
Suture removal
• Sutures should be removed:
– Face: 3-4 days
– Scalp: 5 days
– Trunk: 7 days
– Limb: 7-10 days
– Foot: 10-14 days
• Steps involved in removal:
– Reassure patient that the procedure is not painful
– Cleanse the skin with hydrogen peroxide
– Grasp one of the suture ‘tails’ with forceps and elevate
– Slip the tip of the scissors under the suture and cut close to
the skin edge (to minimise the length of contaminated suture
that will be pulled through the wound)
– Gently pull the knot with the forceps and reinforce the wound
Proxi-Strips if required
Simple Continuous
Horizontal mattress stitch:
– Provides added strength in fascial closure; also used
in calloused skin (e.g. palms and soles)
– Two-step stitch:
• Simple stitch made
• Needle reversed and 2nd simple stitch made
adjacent to first (same size bite as first stitch)
Vertical mattress stitch
– Affords precise approximation of skin edges with
eversion
– Two-step stitch:
• Simple stitch made – “far, far” relative to wound
edge (large bite)
• Needle reversed and 2nd simple stitch made
inside first – “near, near” (small bite)
Subcuticular Sutures:
• Usually a running stitch, but can be interrupted
• Intradermal horizontal bites
• Allow suture to remain for a longer period of time without
development of crosshatch scarring
Skin Staples
• Very common in human medicine
• Expensive
• Very easy
• Very secure
• Very little tissue reaction
• Removal =
– Special tool required
Tissue Adhesive
• Nexaband, Vetbond, and others
• Little strength
• Should not be placed between skin layers or inside body
Principles for Suture Removal
1- The area should be swabbed with hydrogen peroxide for
removal of encrusted necrotic debris, blood, and serum
from about the sutures
2- A sharp suture scissors should be used to cut the loops
of individual or continuous sutures about the teeth
3- It is often helpful to use a No. 23 explorer to help lift the
sutures if they are within the sulcus or in close opposition
to the tissue
4- A cotton pliers is used to remove the suture. The
location of the knots should be noted so that they can be
removed first. This will prevent unnecessary entrapment
under the flap
Suture should be removed in 7 to 10 days
to prevent epithelialization or wicking
about the suture
Summary
• Wound classification
– Clean
– Clean, contaminated
– Contaminated
– Infected
• Types of wound healing
– Primary intention
– Secondary intention
– Delayed primary closure
• Suture material
– Properties
• Natural or synthetic
• Non-absorbable or absorbable
• Monofilament or multifilament
– Size
• Ranges from 3 – 12/0

Sutures and suturing

  • 1.
    Sutures and Suturing DR.EYAD ABOU ASALI
  • 3.
    Goals of suturing: 1-Provide an adequate tension of wound closure without dead space but loose enough to obviate tissue ischemia and necrosis. 2- Maintain hemostasis. 3- Permit primary intention healing 4- Reduce postoperative pain 5- Provide support for tissue margins until they have healed and the support no longer needed 6- Prevent bone exposure resulting in delayed healing and unnecessary resorption 7- Permit proper flap position
  • 4.
    The Ideal SutureMaterial: • Can be used in any tissue • Easy to handle • Good knot security • Minimal tissue reaction • Unfriendly to bacteria • Strong yet small • Won’t tear through tissues • Cheap
  • 5.
    Suture Material: Generally categorizedby three characteristics: – Absorbable vs. non-absorbable – Natural vs. synthetic – Monofilament vs. multifilament
  • 6.
    Absorbable Suture: • Degradedand eventually eliminated in one of two ways: – Via inflammatory reaction utilizing tissue enzymes – Via hydrolysis • Examples: – “Catgut” – Chromic – Vicryl – Monocryl – PDS • Internal • Intradermal/ subcuticular • Rarely on skin
  • 7.
    Non-absorbable Suture: • Notdegraded, permanent • Examples: – Prolene – Nylon – Stainless steel – Silk* (*not a truly permanent material; known to be broken down over a prolonged period of time—years)
  • 8.
    Primarily Skin – Needsto be removed later Stainless steel = exception – Can be used internally • Ligature • Orthopedics – Can be left in place for long periods
  • 9.
    Choosing: Absorbable Vs. Nonabsorbable •How long you need it to work • Do you want to see the patient again for suture removal
  • 10.
    Natural Suture: • Biologicalorigin • Cause intense inflammatory reaction • Examples: – “Catgut” – purified collagen fibers from intestine of healthy sheep or cows – Chromic – coated “catgut” – Silk
  • 11.
    Synthetic Suture: • Syntheticpolymers • Do not cause intense inflammatory reaction • Examples: – Vicryl – Monocryl – PDS – Prolene – Nylon
  • 12.
    Natural Vs. Synthetic •Natural: – Gut – Chromic Gut – Silk – Collagen • All are absorbable
  • 13.
    Monofilament Suture: • Grosslyappears as single strand of suture material; all fibers run parallel • Minimal tissue trauma • Resists harboring microorganisms • Ties smoothly • Requires more knots than multifilament suture • Possesses memory • Examples: – Monocryl, PDS, Prolene, Nylon
  • 14.
    Multifilament Suture: • Fibersare twisted or braided together • Greater resistance in tissue • Provides good handling and ease of tying • Fewer knots required • Examples: – Vicryl (braided) – Chromic (twisted) – Silk (braided)
  • 15.
    Monofilament Vs. Multifilament •memory easy to handle • less tissue drag more tissue drag • doesn’t wick wicks/ bacteria • poor knot security good knot security • - tissue reaction +tissue reaction
  • 16.
    Suture Degradation Suture Material Methodof Degradation Time to Degradation “Catgut” Proteolytic enzymes Days Vicryl, Monocryl Hydrolysis Weeks to months PDS Hydrolysis Months
  • 17.
    Suture Size: • Sizedaccording to diameter with “0” as reference size • Numbers alone indicate progressively larger sutures (“1”, “2”, etc) • Numbers followed by a “0” indicate progressively smaller sutures (“2-0”, “4-0”, etc) Smaller ------------------------- ------------ Larger .....”3-0”...”2-0”...”1-0”...”0”...”1”...”2”...”3”.....
  • 18.
    Instruments: Suture materialsummary Mersilk Natural Nurolon Ethibond Braided Ethilon Prolene Monofilament Synthetic Non-absorbable Catgut Natural Vicryl rapide Synthetic Short term Braided vicryl Braided Monocryl Monofilament Medium term Panacryl Braided PDS II Monofilament Long term Absorbable
  • 19.
    Surgical Needles • Mostof surgical needles are fabricated from heat treated steel • The surgical needle has a basic design composed of three parts 1- The eye which is swaged and permits the suture and needle to act as a single unit to decrease trauma
  • 20.
    2- The bodywhich is the widest point of the needle and is also referred to as the grasping area. The body comes in number of shapes (round, oval, rectangular, trapezoid, or side flattened) 3- The point which runs from the tip to the maximum cross-sectional area of the body. The point also comes in a number of different shapes (conventional cutting, reverse cutting, side cutting, taper cut,taper, blunt
  • 22.
    Needle Holder Selection 1-Use an approximate size for the given needle. The smaller the needle, the smaller the needle holder required 2- Needle should be grasped one-quarter to one half the distance from the swaged area 3- The tip of the jaws of the needle holder should meet before remaining portion of the jaws
  • 23.
    4- The needleshould be placed securely in the tips of the jaws and should not rock, twist, or turn 5- Do not over close the needle holder. It should close only to the first or second ratchet. This will avoid damaging the needle 6- Pass the needle holder so it is always directed by the operator thumb
  • 25.
    Placement of Needlein Tissue 1- Force should always be applied in the direction that follows the curvature of the needle 2- Suturing should always be from movable to a nonmovable tissue 3- Avoid excessive tissue bites with small needle as it will be difficult to retrieve them
  • 26.
    4- Use onlysharp needles with minimal force. Replace dull needles 5- Never force the needle through the tissue 6- Grasp the needle in the body one-quarter to one-half of the length from the swaged area. Do not hold the swaged area; this may bend or break the needle. Do not grasp the point area as damage or notching may result
  • 27.
    7- Avoid retrievingthe needle from the tissue by the tip. This will damage or dull the needle 8- Suture should be placed in keratinized tissue whenever possible 9- An adequate tissue bite is required to prevent the flap from tearing
  • 28.
    Knots A suture knothas three components 1- The loop created by the knot 2- The knot itself, which is composed of a number of tight “throws”, each throw represents a weave of the two stands 3- The ears, which are the cut ends of the suture
  • 30.
    Principles of Suturing 1-The completed knot must be tight, firm, and tied so that slippage will not occur 2- To ovoid wicking of bacteria, knot should not be placed in incision lines 3- Knots should be small and the ends cut short (2-3mm) 4- Avoid excessive tension to finer gauge materials as breakage may occur
  • 31.
    5- Avoid usinga jerking motion, which may break the suture 6- Avoid crushing or crimping of suture materials by not using hemostats or needle holders on them except on the free end for tying 7- Do not tie suture too tightly as tissue necrosis may occur. Knot tension should not produce tissue blanching 8- Maintain adequate traction on one end while tying to ovoid loosing the first loop
  • 32.
    Reading the SutureLabel • Company Needle Size Order Code Name Also: LENGTH NEEDLE SYMBOL COLOR Absorbable or Non
  • 33.
    Basic suturing techniques: –Simple sutures – Mattress sutures – Subcuticular sutures • Goal: “approximate, not strangulate”
  • 34.
    Simple interrupted stitch: –Single stitches, individually knotted (keep all knots on one side of wound) – Used for uncomplicated laceration repair and wound closure
  • 35.
    Arming the needle-holder •Grasp the needle two-thirds the distance from its pointed end • Avoid grasping the needle at its proximal or distal extremities since this will prevent damage to the suture Open the suture packet with one tear to reveal the needle
  • 36.
    Simple interrupted stitch:Steps 1&2 • Grasp the skin edge with the forceps and slightly evert the skin edge • Then pronate the needle-holder so that the needle will pierce the skin at 90o • Ensure the trailing suture material is out of the way to avoid tangling Drive the needle through the full thickness of the skin by supinating the needle-holder Keeping the shaft of the needle perpendicular to the skin allows the curvature of the needle to traverse the skin as atraumatically as possible Images courtesy of BUMC
  • 37.
    Simple interrupted stitch:Steps 3&4 • Release the needle and pronate the needle-holder • Regrasp the needle proximal to its pointed end • Maintain tension with the forceps to prevent the needle from retracting Again, supinate the needle- holder to rotate the needle upwards and through the tissue
  • 38.
    Simple interrupted stitch:Steps 5&6 • Regrasp the needle in order to rearm the needle-holder (due to HIV risks it is better to use the forceps to do this) Grasp and slightly evert the opposing skin edge with the forceps Pronate the needle-holder
  • 39.
    Simple interrupted stitch:Steps 7&8 • Again, supinate the needle- holder to rotate the needle through the skin, keeping the shaft 90° to the skin surface After releasing the needle, pronate the needle-holder before regrasping the needle…
  • 40.
    Simple interrupted stitch:Steps 9&10 • …and again supinate the needle- holder to rotate the needle through the skin Pull the suture material through the skin until 2-3 cm is left protruding Discard the forceps and use your free hand to grasp the long end in preparation for an instrument tie Place the needle-holder between the strands
  • 41.
    Simple interrupted stitch:Steps 11&12 • Wrap the long strand around the needle-holder to form the loop for the first throw of a square knot Rotate the needle-holder away yourself and grasp the short end of the suture
  • 42.
    Simple interrupted stitch:Steps 13&14 • Now draw the short end back through the loop towards yourself Now tighten the first throw
  • 43.
    Simple interrupted stitch:Steps 15&16 • The throw should be tightened just enough to approximate the skin edges but not enough to strangulate the tissue To begin the second throw of the square knot, wrap the long strand around the needle-holder by bringing the long strand towards yourself
  • 44.
    Simple interrupted stitch:Steps 17&18 • Rotate the needle-holder towards yourself to retrieve the short end Grasp the short end and draw it through the loop by pulling it away from yourself
  • 45.
    Simple interrupted stitch:Step 19&20 • Finally, tighten the second throw securely against the first • Ensure the knot is to one side of the wound to avoid involvement in the clot In one hand hold the scissors as shown With the other hand maintain tension on the suture material Slide the tips of the scissors down the strands to the point where they will be cut Cut the suture material leaving 4- 5mm tails (important for removal of external non-absorbable sutures)
  • 46.
    Suture removal • Suturesshould be removed: – Face: 3-4 days – Scalp: 5 days – Trunk: 7 days – Limb: 7-10 days – Foot: 10-14 days • Steps involved in removal: – Reassure patient that the procedure is not painful – Cleanse the skin with hydrogen peroxide – Grasp one of the suture ‘tails’ with forceps and elevate – Slip the tip of the scissors under the suture and cut close to the skin edge (to minimise the length of contaminated suture that will be pulled through the wound) – Gently pull the knot with the forceps and reinforce the wound Proxi-Strips if required
  • 47.
  • 48.
    Horizontal mattress stitch: –Provides added strength in fascial closure; also used in calloused skin (e.g. palms and soles) – Two-step stitch: • Simple stitch made • Needle reversed and 2nd simple stitch made adjacent to first (same size bite as first stitch)
  • 49.
    Vertical mattress stitch –Affords precise approximation of skin edges with eversion – Two-step stitch: • Simple stitch made – “far, far” relative to wound edge (large bite) • Needle reversed and 2nd simple stitch made inside first – “near, near” (small bite)
  • 50.
    Subcuticular Sutures: • Usuallya running stitch, but can be interrupted • Intradermal horizontal bites • Allow suture to remain for a longer period of time without development of crosshatch scarring
  • 51.
    Skin Staples • Verycommon in human medicine • Expensive • Very easy • Very secure • Very little tissue reaction • Removal = – Special tool required
  • 52.
    Tissue Adhesive • Nexaband,Vetbond, and others • Little strength • Should not be placed between skin layers or inside body
  • 53.
    Principles for SutureRemoval 1- The area should be swabbed with hydrogen peroxide for removal of encrusted necrotic debris, blood, and serum from about the sutures 2- A sharp suture scissors should be used to cut the loops of individual or continuous sutures about the teeth
  • 54.
    3- It isoften helpful to use a No. 23 explorer to help lift the sutures if they are within the sulcus or in close opposition to the tissue 4- A cotton pliers is used to remove the suture. The location of the knots should be noted so that they can be removed first. This will prevent unnecessary entrapment under the flap
  • 55.
    Suture should beremoved in 7 to 10 days to prevent epithelialization or wicking about the suture
  • 56.
    Summary • Wound classification –Clean – Clean, contaminated – Contaminated – Infected • Types of wound healing – Primary intention – Secondary intention – Delayed primary closure • Suture material – Properties • Natural or synthetic • Non-absorbable or absorbable • Monofilament or multifilament – Size • Ranges from 3 – 12/0