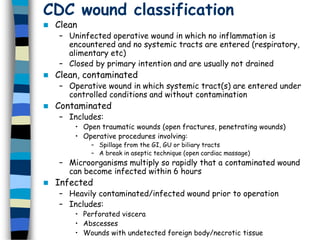
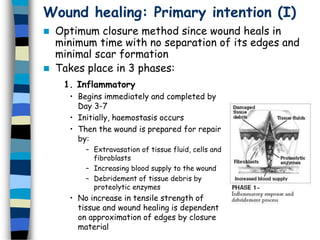
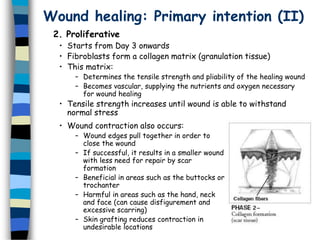
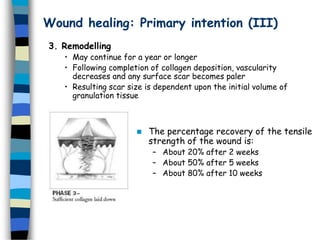
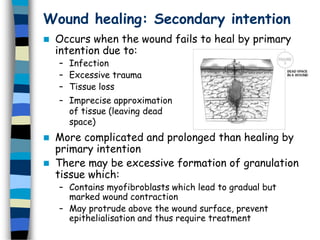
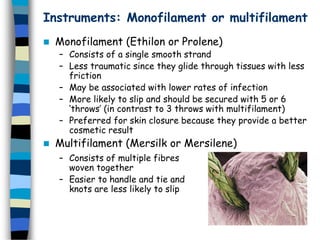
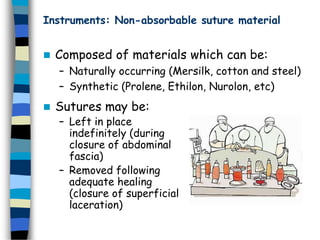
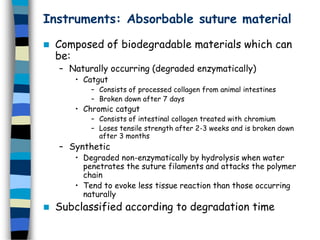
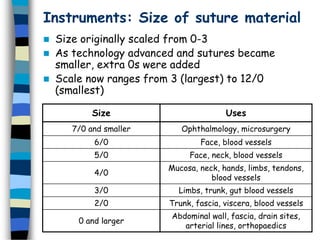
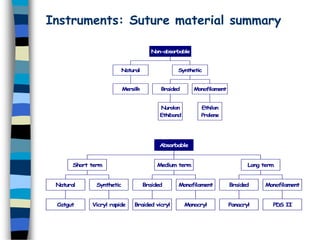
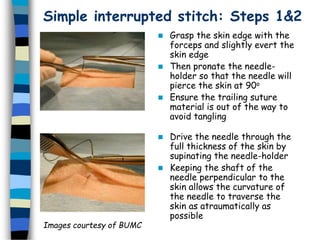
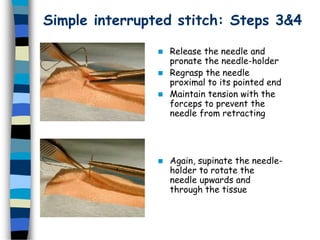
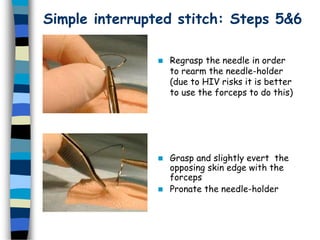
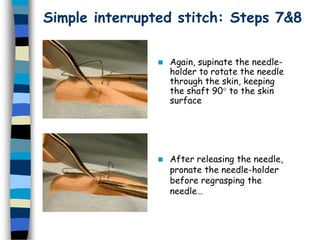
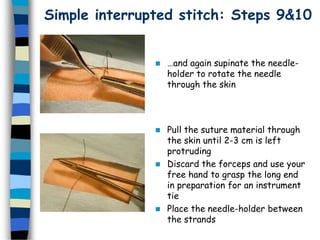
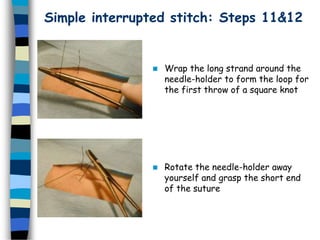
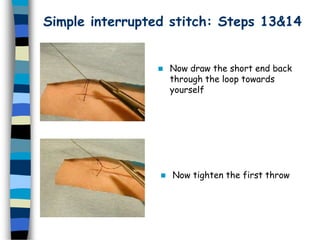
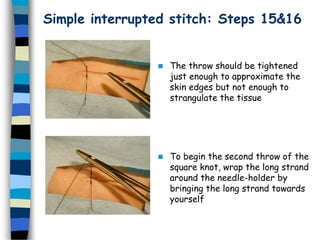
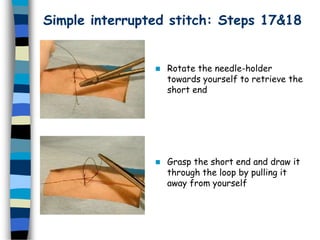
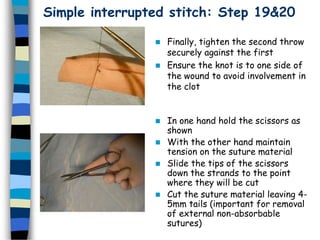
Basic surgical skills
SCRUBS
Overview
 CDC wound classification
 Types of wound healing
 Instruments
– Suture material
– Needle
 Basic suturing technique
– Simple interrupted suture
– Suture removal
CDC wound classification
 Clean
– Uninfected operative wound in which no inflammation is
encountered and no systemic tracts are entered (respiratory,
alimentary etc)
– Closed by primary intention and are usually not drained
 Clean, contaminated
– Operative wound in which systemic tract(s) are entered under
controlled conditions and without contamination
 Contaminated
– Includes:
• Open traumatic wounds (open fractures, penetrating wounds)
• Operative procedures involving:
– Spillage from the GI, GU or biliary tracts
– A break in aseptic technique (open cardiac massage)
– Microorganisms multiply so rapidly that a contaminated wound
can become infected within 6 hours
 Infected
– Heavily contaminated/infected wound prior to operation
– Includes:
• Perforated viscera
• Abscesses
• Wounds with undetected foreign body/necrotic tissue
Wound healing: Primary intention (I)
 Optimum closure method since wound heals in
minimum time with no separation of its edges and
minimal scar formation
 Takes place in 3 phases:
1. Inflammatory
• Begins immediately and completed by
Day 3-7
• Initially, haemostasis occurs
• Then the wound is prepared for repair
by:
– Extravasation of tissue fluid, cells and
fibroblasts
– Increasing blood supply to the wound
– Debridement of tissue debris by
proteolytic enzymes
• No increase in tensile strength of
tissue and wound healing is dependent
on approximation of edges by closure
material
Wound healing: Primary intention (II)
2. Proliferative
• Starts from Day 3 onwards
• Fibroblasts form a collagen matrix (granulation tissue)
• This matrix:
– Determines the tensile strength and pliability of the healing wound
– Becomes vascular, supplying the nutrients and oxygen necessary
for wound healing
• Tensile strength increases until wound is able to withstand
normal stress
• Wound contraction also occurs:
– Wound edges pull together in order to
close the wound
– If successful, it results in a smaller wound
with less need for repair by scar
formation
– Beneficial in areas such as the buttocks or
trochanter
– Harmful in areas such as the hand, neck
and face (can cause disfigurement and
excessive scarring)
– Skin grafting reduces contraction in
undesirable locations
Wound healing: Primary intention (III)
3. Remodelling
• May continue for a year or longer
• Following completion of collagen deposition, vascularity
decreases and any surface scar becomes paler
• Resulting scar size is dependent upon the initial volume of
granulation tissue
 The percentage recovery of the tensile
strength of the wound is:
– About 20% after 2 weeks
– About 50% after 5 weeks
– About 80% after 10 weeks
Wound healing: Secondary intention
 Occurs when the wound fails to heal by primary
intention due to:
– Infection
– Excessive trauma
– Tissue loss
 More complicated and prolonged than healing by
primary intention
 There may be excessive formation of granulation
tissue which:
– Contains myofibroblasts which lead to gradual but
marked wound contraction
– May protrude above the wound surface, prevent
epithelialisation and thus require treatment
– Imprecise approximation
of tissue (leaving dead
space)
Wound healing: Delayed primary closure
 Used in management of contaminated and
infected wounds with extensive tissue loss
and a high risk of infection (eg. trauma
following RTA, penetrating injury)
 Steps taken include:
– Debridement of nonviable tissues, usually under
sedation
– Leaving wound open with gauze packing inserted
– Wound approximation within 3-5 days if no
infection is evident
– If infection is present, the wound is allowed to
heal by secondary intention
Instruments: Forceps & needle-holder
 Small toothed forceps (Addison
forceps) grasp the skin edges
during suturing
 Hold in the first three fingers in a
similar way to a pen
 Grasp the needle-holder by
partially inserting the thumb and
ring finger into the loops of the
handle
 The free index finger provides
additional control and stability
Instruments: Needle (I)
 The main types of needle include:
– Tapered
• Gradually taper to the point and cross-section
reveals a round, smooth shaft
• Used for tissue that is easy to penetrate, such
as bowel or blood vessels
– Cutting
• Triangular tip with the apex forming a cutting
surface
• Used for tough tissue, such as skin (use of a
tapered needle with skin causes excess trauma
because of difficulty in penetration)
– Reverse cutting needle
• Similar to a conventional cutting needle except
the cutting edge faces down instead of up
• This may decrease the likelihood of sutures
pulling through soft tissue
Instruments: Needle (II)
 Most sutures with the suture material swaged
onto the base of the needle
 Shapes vary from a quarter circle to five-eighths
of a circle, depending on how confined the
operating field is
 Choice of needle should ‘alter the tissue to be
sutured as little as possible’ and is dependent on:
– The tissue being sutured
(when in doubt about
selection of a taper
point or cutting needle,
choose the taper for
everything except skin
sutures)
– Ease of access to the
tissue
– Individual preference
Instruments: Properties of suture material
 Handling of a suture
– Memory
• Tendency to stay in one position
• Leads to difficulty in tying sutures and knot unravelling
– Elasticity
• Ability to return to its original length after stretching
• High elasticity sutures should be used in oedematous tissue
– Knot strength
• Force required for a knot to slip
• Important to consider when ligating arteries
 Tensile strength
– Force necessary to break a suture
– Important to consider in areas of tension (linea alba)
 Tissue reaction
– Undesirable since inflammation worsens the scar
– Maximal between Day 3&7
 Non-absorbable or absorbable
 Monofilament or multifilament
Instruments: Monofilament or multifilament
 Monofilament (Ethilon or Prolene)
– Consists of a single smooth strand
– Less traumatic since they glide through tissues with less
friction
– May be associated with lower rates of infection
– More likely to slip and should be secured with 5 or 6
‘throws’ (in contrast to 3 throws with multifilament)
– Preferred for skin closure because they provide a better
cosmetic result
 Multifilament (Mersilk or Mersilene)
– Consists of multiple fibres
woven together
– Easier to handle and tie and
knots are less likely to slip
Instruments: Non-absorbable suture material
 Composed of materials which can be:
– Naturally occurring (Mersilk, cotton and steel)
– Synthetic (Prolene, Ethilon, Nurolon, etc)
 Sutures may be:
– Left in place
indefinitely (during
closure of abdominal
fascia)
– Removed following
adequate healing
(closure of superficial
laceration)
Instruments: Absorbable suture material
 Composed of biodegradable materials which can
be:
– Naturally occurring (degraded enzymatically)
• Catgut
– Consists of processed collagen from animal intestines
– Broken down after 7 days
• Chromic catgut
– Consists of intestinal collagen treated with chromium
– Loses tensile strength after 2-3 weeks and is broken down
after 3 months
– Synthetic
• Degraded non-enzymatically by hydrolysis when water
penetrates the suture filaments and attacks the polymer
chain
• Tend to evoke less tissue reaction than those occurring
naturally
 Subclassified according to degradation time
Instruments: Size of suture material
 Size originally scaled from 0-3
 As technology advanced and sutures became
smaller, extra 0s were added
 Scale now ranges from 3 (largest) to 12/0
(smallest)
Size Uses
7/0 and smaller Ophthalmology, microsurgery
6/0 Face, blood vessels
5/0 Face, neck, blood vessels
4/0
Mucosa, neck, hands, limbs, tendons,
blood vessels
3/0 Limbs, trunk, gut blood vessels
2/0 Trunk, fascia, viscera, blood vessels
0 and larger
Abdominal wall, fascia, drain sites,
arterial lines, orthopaedics
Instruments: Suture material summary
M
ersilk
Natural
Nurolon
Ethibond
Braided
Ethilon
Prolene
M
onofilament
Synthetic
Non-absorbable
Catgut
Natural
Vicryl rapide
Synthetic
Short term
Braided vicryl
Braided
Monocryl
Monofilament
Medium term
Panacryl
Braided
PDS II
Monofilament
Long term
Absorbable
Arming the needle-holder
 Grasp the needle two-thirds
the distance from its pointed
end
 Avoid grasping the needle at
its proximal or distal
extremities since this will
prevent damage to the suture
 Open the suture packet with
one tear to reveal the needle
Simple interrupted stitch: Steps 1&2
 Grasp the skin edge with the
forceps and slightly evert the
skin edge
 Then pronate the needle-
holder so that the needle will
pierce the skin at 90o
 Ensure the trailing suture
material is out of the way to
avoid tangling
 Drive the needle through the
full thickness of the skin by
supinating the needle-holder
 Keeping the shaft of the
needle perpendicular to the
skin allows the curvature of
the needle to traverse the
skin as atraumatically as
possible
Images courtesy of BUMC
Simple interrupted stitch: Steps 3&4
 Release the needle and
pronate the needle-holder
 Regrasp the needle
proximal to its pointed end
 Maintain tension with the
forceps to prevent the
needle from retracting
 Again, supinate the needle-
holder to rotate the
needle upwards and
through the tissue
Simple interrupted stitch: Steps 5&6
 Regrasp the needle in order
to rearm the needle-holder
(due to HIV risks it is better
to use the forceps to do this)
 Grasp and slightly evert the
opposing skin edge with the
forceps
 Pronate the needle-holder
Simple interrupted stitch: Steps 7&8
 Again, supinate the needle-
holder to rotate the needle
through the skin, keeping
the shaft 90° to the skin
surface
 After releasing the needle,
pronate the needle-holder
before regrasping the
needle…
Simple interrupted stitch: Steps 9&10
 …and again supinate the needle-
holder to rotate the needle
through the skin
 Pull the suture material through
the skin until 2-3 cm is left
protruding
 Discard the forceps and use your
free hand to grasp the long end
in preparation for an instrument
tie
 Place the needle-holder between
the strands
Simple interrupted stitch: Steps 11&12
 Wrap the long strand around the
needle-holder to form the loop for
the first throw of a square knot
 Rotate the needle-holder away
yourself and grasp the short end
of the suture
Simple interrupted stitch: Steps 13&14
 Now draw the short end back
through the loop towards
yourself
 Now tighten the first throw
Simple interrupted stitch: Steps 15&16
 The throw should be tightened
just enough to approximate the
skin edges but not enough to
strangulate the tissue
 To begin the second throw of the
square knot, wrap the long strand
around the needle-holder by
bringing the long strand towards
yourself
Simple interrupted stitch: Steps 17&18
 Rotate the needle-holder
towards yourself to retrieve the
short end
 Grasp the short end and draw it
through the loop by pulling it
away from yourself
Simple interrupted stitch: Step 19&20
 Finally, tighten the second throw
securely against the first
 Ensure the knot is to one side of
the wound to avoid involvement in
the clot
 In one hand hold the scissors as
shown
 With the other hand maintain
tension on the suture material
 Slide the tips of the scissors
down the strands to the point
where they will be cut
 Cut the suture material leaving 4-
5mm tails (important for removal
of external non-absorbable
sutures)
Suture removal
 Sutures should be removed:
– Face: 3-4 days
– Scalp: 5 days
– Trunk: 7 days
– Limb: 7-10 days
– Foot: 10-14 days
 Steps involved in removal:
– Reassure patient that the procedure is not painful
– Cleanse the skin with hydrogen peroxide
– Grasp one of the suture ‘tails’ with forceps and elevate
– Slip the tip of the scissors under the suture and cut
close to the skin edge (to minimise the length of
contaminated suture that will be pulled through the
wound)
– Gently pull the knot with the forceps and reinforce the
wound Proxi-Strips if required
Summary
 Wound classification
– Clean
– Clean, contaminated
– Contaminated
– Infected
 Types of wound healing
– Primary intention
– Secondary intention
– Delayed primary closure
 Suture material
– Properties
• Natural or synthetic
• Non-absorbable or absorbable
• Monofilament or multifilament
– Size
• Ranges from 3 – 12/0
References
 Ethicon
– Knot Manual
http://www.jnjgateway.com/public/useng/5256
ethicon_encyclopedia_of_knots.pdf
– Wound Closure Manual
http://www.jnjgateway.com/public/useng/ethic
on_wcm_feb2004.pdf
 Student BMJ
– Taylor B and Bayat A, (May 2003, June 2003 &
July 2003), Basic plastic surgery techniques
and principles.
 Boston University School of Medicine
– http://www.bumc.bu.edu/departments/pagemai
n.asp?page=5734&departmentid=69

suture basic_skils_in_ wound.pptx

  • 1.
  • 2.
    Overview  CDC woundclassification  Types of wound healing  Instruments – Suture material – Needle  Basic suturing technique – Simple interrupted suture – Suture removal
  • 3.
    CDC wound classification Clean – Uninfected operative wound in which no inflammation is encountered and no systemic tracts are entered (respiratory, alimentary etc) – Closed by primary intention and are usually not drained  Clean, contaminated – Operative wound in which systemic tract(s) are entered under controlled conditions and without contamination  Contaminated – Includes: • Open traumatic wounds (open fractures, penetrating wounds) • Operative procedures involving: – Spillage from the GI, GU or biliary tracts – A break in aseptic technique (open cardiac massage) – Microorganisms multiply so rapidly that a contaminated wound can become infected within 6 hours  Infected – Heavily contaminated/infected wound prior to operation – Includes: • Perforated viscera • Abscesses • Wounds with undetected foreign body/necrotic tissue
  • 4.
    Wound healing: Primaryintention (I)  Optimum closure method since wound heals in minimum time with no separation of its edges and minimal scar formation  Takes place in 3 phases: 1. Inflammatory • Begins immediately and completed by Day 3-7 • Initially, haemostasis occurs • Then the wound is prepared for repair by: – Extravasation of tissue fluid, cells and fibroblasts – Increasing blood supply to the wound – Debridement of tissue debris by proteolytic enzymes • No increase in tensile strength of tissue and wound healing is dependent on approximation of edges by closure material
  • 5.
    Wound healing: Primaryintention (II) 2. Proliferative • Starts from Day 3 onwards • Fibroblasts form a collagen matrix (granulation tissue) • This matrix: – Determines the tensile strength and pliability of the healing wound – Becomes vascular, supplying the nutrients and oxygen necessary for wound healing • Tensile strength increases until wound is able to withstand normal stress • Wound contraction also occurs: – Wound edges pull together in order to close the wound – If successful, it results in a smaller wound with less need for repair by scar formation – Beneficial in areas such as the buttocks or trochanter – Harmful in areas such as the hand, neck and face (can cause disfigurement and excessive scarring) – Skin grafting reduces contraction in undesirable locations
  • 6.
    Wound healing: Primaryintention (III) 3. Remodelling • May continue for a year or longer • Following completion of collagen deposition, vascularity decreases and any surface scar becomes paler • Resulting scar size is dependent upon the initial volume of granulation tissue  The percentage recovery of the tensile strength of the wound is: – About 20% after 2 weeks – About 50% after 5 weeks – About 80% after 10 weeks
  • 7.
    Wound healing: Secondaryintention  Occurs when the wound fails to heal by primary intention due to: – Infection – Excessive trauma – Tissue loss  More complicated and prolonged than healing by primary intention  There may be excessive formation of granulation tissue which: – Contains myofibroblasts which lead to gradual but marked wound contraction – May protrude above the wound surface, prevent epithelialisation and thus require treatment – Imprecise approximation of tissue (leaving dead space)
  • 8.
    Wound healing: Delayedprimary closure  Used in management of contaminated and infected wounds with extensive tissue loss and a high risk of infection (eg. trauma following RTA, penetrating injury)  Steps taken include: – Debridement of nonviable tissues, usually under sedation – Leaving wound open with gauze packing inserted – Wound approximation within 3-5 days if no infection is evident – If infection is present, the wound is allowed to heal by secondary intention
  • 9.
    Instruments: Forceps &needle-holder  Small toothed forceps (Addison forceps) grasp the skin edges during suturing  Hold in the first three fingers in a similar way to a pen  Grasp the needle-holder by partially inserting the thumb and ring finger into the loops of the handle  The free index finger provides additional control and stability
  • 10.
    Instruments: Needle (I) The main types of needle include: – Tapered • Gradually taper to the point and cross-section reveals a round, smooth shaft • Used for tissue that is easy to penetrate, such as bowel or blood vessels – Cutting • Triangular tip with the apex forming a cutting surface • Used for tough tissue, such as skin (use of a tapered needle with skin causes excess trauma because of difficulty in penetration) – Reverse cutting needle • Similar to a conventional cutting needle except the cutting edge faces down instead of up • This may decrease the likelihood of sutures pulling through soft tissue
  • 11.
    Instruments: Needle (II) Most sutures with the suture material swaged onto the base of the needle  Shapes vary from a quarter circle to five-eighths of a circle, depending on how confined the operating field is  Choice of needle should ‘alter the tissue to be sutured as little as possible’ and is dependent on: – The tissue being sutured (when in doubt about selection of a taper point or cutting needle, choose the taper for everything except skin sutures) – Ease of access to the tissue – Individual preference
  • 12.
    Instruments: Properties ofsuture material  Handling of a suture – Memory • Tendency to stay in one position • Leads to difficulty in tying sutures and knot unravelling – Elasticity • Ability to return to its original length after stretching • High elasticity sutures should be used in oedematous tissue – Knot strength • Force required for a knot to slip • Important to consider when ligating arteries  Tensile strength – Force necessary to break a suture – Important to consider in areas of tension (linea alba)  Tissue reaction – Undesirable since inflammation worsens the scar – Maximal between Day 3&7  Non-absorbable or absorbable  Monofilament or multifilament
  • 13.
    Instruments: Monofilament ormultifilament  Monofilament (Ethilon or Prolene) – Consists of a single smooth strand – Less traumatic since they glide through tissues with less friction – May be associated with lower rates of infection – More likely to slip and should be secured with 5 or 6 ‘throws’ (in contrast to 3 throws with multifilament) – Preferred for skin closure because they provide a better cosmetic result  Multifilament (Mersilk or Mersilene) – Consists of multiple fibres woven together – Easier to handle and tie and knots are less likely to slip
  • 14.
    Instruments: Non-absorbable suturematerial  Composed of materials which can be: – Naturally occurring (Mersilk, cotton and steel) – Synthetic (Prolene, Ethilon, Nurolon, etc)  Sutures may be: – Left in place indefinitely (during closure of abdominal fascia) – Removed following adequate healing (closure of superficial laceration)
  • 15.
    Instruments: Absorbable suturematerial  Composed of biodegradable materials which can be: – Naturally occurring (degraded enzymatically) • Catgut – Consists of processed collagen from animal intestines – Broken down after 7 days • Chromic catgut – Consists of intestinal collagen treated with chromium – Loses tensile strength after 2-3 weeks and is broken down after 3 months – Synthetic • Degraded non-enzymatically by hydrolysis when water penetrates the suture filaments and attacks the polymer chain • Tend to evoke less tissue reaction than those occurring naturally  Subclassified according to degradation time
  • 17.
    Instruments: Size ofsuture material  Size originally scaled from 0-3  As technology advanced and sutures became smaller, extra 0s were added  Scale now ranges from 3 (largest) to 12/0 (smallest) Size Uses 7/0 and smaller Ophthalmology, microsurgery 6/0 Face, blood vessels 5/0 Face, neck, blood vessels 4/0 Mucosa, neck, hands, limbs, tendons, blood vessels 3/0 Limbs, trunk, gut blood vessels 2/0 Trunk, fascia, viscera, blood vessels 0 and larger Abdominal wall, fascia, drain sites, arterial lines, orthopaedics
  • 18.
    Instruments: Suture materialsummary M ersilk Natural Nurolon Ethibond Braided Ethilon Prolene M onofilament Synthetic Non-absorbable Catgut Natural Vicryl rapide Synthetic Short term Braided vicryl Braided Monocryl Monofilament Medium term Panacryl Braided PDS II Monofilament Long term Absorbable
  • 19.
    Arming the needle-holder Grasp the needle two-thirds the distance from its pointed end  Avoid grasping the needle at its proximal or distal extremities since this will prevent damage to the suture  Open the suture packet with one tear to reveal the needle
  • 20.
    Simple interrupted stitch:Steps 1&2  Grasp the skin edge with the forceps and slightly evert the skin edge  Then pronate the needle- holder so that the needle will pierce the skin at 90o  Ensure the trailing suture material is out of the way to avoid tangling  Drive the needle through the full thickness of the skin by supinating the needle-holder  Keeping the shaft of the needle perpendicular to the skin allows the curvature of the needle to traverse the skin as atraumatically as possible Images courtesy of BUMC
  • 21.
    Simple interrupted stitch:Steps 3&4  Release the needle and pronate the needle-holder  Regrasp the needle proximal to its pointed end  Maintain tension with the forceps to prevent the needle from retracting  Again, supinate the needle- holder to rotate the needle upwards and through the tissue
  • 22.
    Simple interrupted stitch:Steps 5&6  Regrasp the needle in order to rearm the needle-holder (due to HIV risks it is better to use the forceps to do this)  Grasp and slightly evert the opposing skin edge with the forceps  Pronate the needle-holder
  • 23.
    Simple interrupted stitch:Steps 7&8  Again, supinate the needle- holder to rotate the needle through the skin, keeping the shaft 90° to the skin surface  After releasing the needle, pronate the needle-holder before regrasping the needle…
  • 24.
    Simple interrupted stitch:Steps 9&10  …and again supinate the needle- holder to rotate the needle through the skin  Pull the suture material through the skin until 2-3 cm is left protruding  Discard the forceps and use your free hand to grasp the long end in preparation for an instrument tie  Place the needle-holder between the strands
  • 25.
    Simple interrupted stitch:Steps 11&12  Wrap the long strand around the needle-holder to form the loop for the first throw of a square knot  Rotate the needle-holder away yourself and grasp the short end of the suture
  • 26.
    Simple interrupted stitch:Steps 13&14  Now draw the short end back through the loop towards yourself  Now tighten the first throw
  • 27.
    Simple interrupted stitch:Steps 15&16  The throw should be tightened just enough to approximate the skin edges but not enough to strangulate the tissue  To begin the second throw of the square knot, wrap the long strand around the needle-holder by bringing the long strand towards yourself
  • 28.
    Simple interrupted stitch:Steps 17&18  Rotate the needle-holder towards yourself to retrieve the short end  Grasp the short end and draw it through the loop by pulling it away from yourself
  • 29.
    Simple interrupted stitch:Step 19&20  Finally, tighten the second throw securely against the first  Ensure the knot is to one side of the wound to avoid involvement in the clot  In one hand hold the scissors as shown  With the other hand maintain tension on the suture material  Slide the tips of the scissors down the strands to the point where they will be cut  Cut the suture material leaving 4- 5mm tails (important for removal of external non-absorbable sutures)
  • 30.
    Suture removal  Suturesshould be removed: – Face: 3-4 days – Scalp: 5 days – Trunk: 7 days – Limb: 7-10 days – Foot: 10-14 days  Steps involved in removal: – Reassure patient that the procedure is not painful – Cleanse the skin with hydrogen peroxide – Grasp one of the suture ‘tails’ with forceps and elevate – Slip the tip of the scissors under the suture and cut close to the skin edge (to minimise the length of contaminated suture that will be pulled through the wound) – Gently pull the knot with the forceps and reinforce the wound Proxi-Strips if required
  • 31.
    Summary  Wound classification –Clean – Clean, contaminated – Contaminated – Infected  Types of wound healing – Primary intention – Secondary intention – Delayed primary closure  Suture material – Properties • Natural or synthetic • Non-absorbable or absorbable • Monofilament or multifilament – Size • Ranges from 3 – 12/0
  • 32.
    References  Ethicon – KnotManual http://www.jnjgateway.com/public/useng/5256 ethicon_encyclopedia_of_knots.pdf – Wound Closure Manual http://www.jnjgateway.com/public/useng/ethic on_wcm_feb2004.pdf  Student BMJ – Taylor B and Bayat A, (May 2003, June 2003 & July 2003), Basic plastic surgery techniques and principles.  Boston University School of Medicine – http://www.bumc.bu.edu/departments/pagemai n.asp?page=5734&departmentid=69