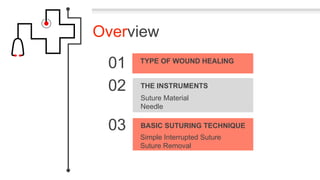
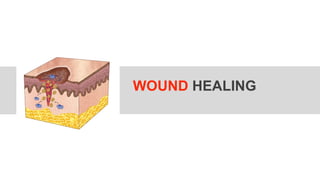
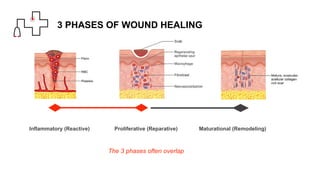
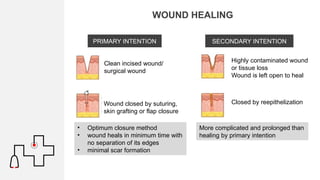
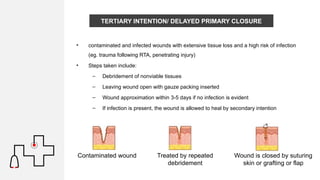
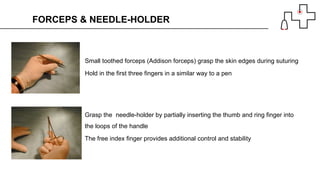
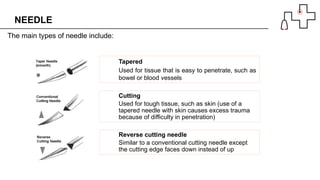
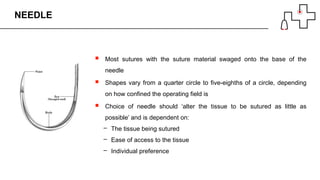
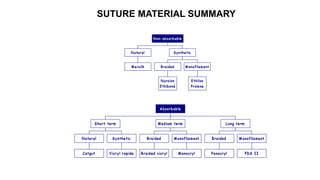
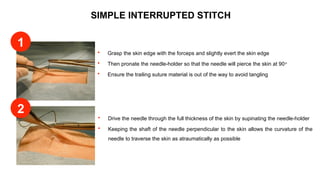
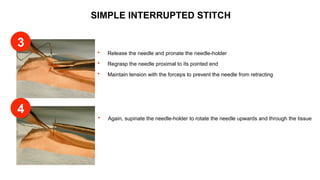
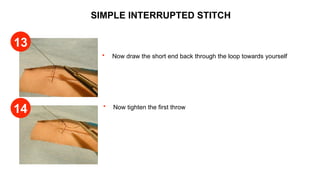
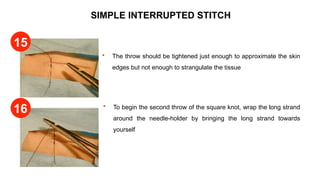
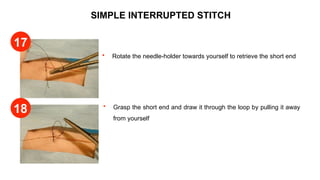
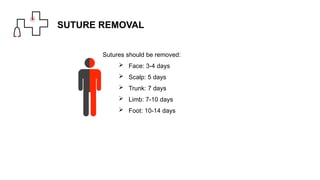
BASIC SURGICAL SKILL
dr. Jeffrey Ariesta Putra D.MAS, Sp.B, FICS, FMAS
Overview
01
02
03
TYPE OF WOUND HEALING
Suture Material
Needle
THE INSTRUMENTS
Simple Interrupted Suture
Suture Removal
BASIC SUTURING TECHNIQUE
WOUND HEALING
3 PHASES OF WOUND HEALING
Inflammatory (Reactive) Proliferative (Reparative) Maturational (Remodeling)
The 3 phases often overlap
WOUND HEALING
PRIMARY INTENTION SECONDARY INTENTION
Wound closed by suturing,
skin grafting or flap closure
Clean incised wound/
surgical wound
Highly contaminated wound
or tissue loss
Wound is left open to heal
Closed by reepithelization
• Optimum closure method
• wound heals in minimum time with
no separation of its edges
• minimal scar formation
More complicated and prolonged than
healing by primary intention
• contaminated and infected wounds with extensive tissue loss and a high risk of infection
(eg. trauma following RTA, penetrating injury)
• Steps taken include:
– Debridement of nonviable tissues
– Leaving wound open with gauze packing inserted
– Wound approximation within 3-5 days if no infection is evident
– If infection is present, the wound is allowed to heal by secondary intention
TERTIARY INTENTION/ DELAYED PRIMARY CLOSURE
Contaminated wound Treated by repeated
debridement
Wound is closed by suturing
skin or grafting or flap
THE INSTRUMENTS
Small toothed forceps (Addison forceps) grasp the skin edges during suturing
Hold in the first three fingers in a similar way to a pen
FORCEPS & NEEDLE-HOLDER
Grasp the needle-holder by partially inserting the thumb and ring finger into
the loops of the handle
The free index finger provides additional control and stability
The main types of needle include:
Reverse cutting needle
Similar to a conventional cutting needle except
the cutting edge faces down instead of up
Cutting
Used for tough tissue, such as skin (use of a
tapered needle with skin causes excess trauma
because of difficulty in penetration)
NEEDLE
Tapered
Used for tissue that is easy to penetrate, such as
bowel or blood vessels
NEEDLE
 Most sutures with the suture material swaged onto the base of the
needle
 Shapes vary from a quarter circle to five-eighths of a circle, depending
on how confined the operating field is
 Choice of needle should ‘alter the tissue to be sutured as little as
possible’ and is dependent on:
– The tissue being sutured
– Ease of access to the tissue
– Individual preference
PROPERTIES OF SUTURE MATERIAL
Handling of a suture
 Memory
Tendency to stay in one position
Leads to difficulty in tying sutures and knot unravelling
 Elasticity
Ability to return to its original length after stretching
High elasticity sutures should be used in oedematous tissue
 Knot strength
Force required for a knot to slip
Important to consider when ligating
 Tensile strength
Force necessary to break a suture
Important to consider in areas of tension (linea alba)
 Tissue reaction
Undesirable since inflammation worsens the scar
Maximal between Day 3&7
• Consists of a single smooth strand
• Less traumatic, less friction
• Associated with lower rates of
infection
• More likely to slip
• Preferred for skin closure because
they provide a better cosmetic result
SUTURE MATERIAL
• Consists of multiple fibres woven together
• Easier to handle and tie and knots are
less likely to slip
Monofilament Multifilament
SUTURE MATERIAL
Catgut
• Consists of processed collagen from animal intestines
• Broken down after 7 days
Chromic catgut
• Consists of intestinal collagen treated with chromium
• Loses tensile strength after 2-3 weeks and is broken
down after 3 months
 Degraded non-enzymatically by hydrolysis when water
penetrates the suture filaments and attacks the polymer
chain
 Tend to evoke less tissue reaction than those occurring
naturally
Subclassified according to degradation time
Natural Synthetic
Size originally scaled from 0-3
As technology advanced and sutures became smaller, extra 0s were added
Scale now ranges from 3 (largest) to 12/0 (smallest)
SIZE OF SUTURE MATERIAL
Size Uses
7/0 and smaller Ophthalmology, microsurgery
6/0 Face, blood vessels
5/0 Face, neck, blood vessels
4/0
Mucosa, neck, hands, limbs,
tendons, blood vessels
3/0 Limbs, trunk, gut blood vessels
2/0
Trunk, fascia, viscera, blood
vessels
0 and larger
Abdominal wall, fascia, drain
sites, arterial lines,
SUTURE MATERIAL SUMMARY
Mersilk
Natural
Nurolon
Ethibond
Braided
Ethilon
Prolene
Monofilament
Synthetic
Non-absorbable
Catgut
Natural
Vicryl rapide
Synthetic
Short term
Braided vicryl
Braided
Monocryl
Monofilament
Medium term
Panacryl
Braided
PDS II
Monofilament
Long term
Absorbable
BASIC SUTURING
TECHNIQUE
ARMING THE NEEDLE-HOLDER
 Open the suture packet with one tear to reveal the needle
 Grasp the needle two-thirds the distance from its
pointed end
SIMPLE INTERRUPTED STITCH
 Grasp the skin edge with the forceps and slightly evert the skin edge
 Then pronate the needle-holder so that the needle will pierce the skin at 90o
 Ensure the trailing suture material is out of the way to avoid tangling
 Drive the needle through the full thickness of the skin by supinating the needle-holder
 Keeping the shaft of the needle perpendicular to the skin allows the curvature of the
needle to traverse the skin as atraumatically as possible
1
2
SIMPLE INTERRUPTED STITCH
 Release the needle and pronate the needle-holder
 Regrasp the needle proximal to its pointed end
 Maintain tension with the forceps to prevent the needle from retracting
 Again, supinate the needle-holder to rotate the needle upwards and through the tissue
3
4
SIMPLE INTERRUPTED STITCH
 Regrasp the needle in order to rearm the needle-holder (due to HIV
risks it is better to use the forceps to do this)
 Grasp and slightly evert the opposing skin edge with the forceps
 Pronate the needle-holder
5
6
SIMPLE INTERRUPTED STITCH
 Again, supinate the needle-holder to rotate the needle through the skin,
keeping the shaft 90° to the skin surface
 After releasing the needle, pronate the needle-holder before regrasping the
needle
7
8
SIMPLE INTERRUPTED STITCH
 Supinate the needle-holder to rotate the needle through the skin until
2-3 cm is left protruding
 Discard the forceps and use your free hand to grasp the long end in
preparation for an instrument tie
 Place the needle-holder between the strands
9
10
SIMPLE INTERRUPTED STITCH
 Wrap the long strand around the needle-holder to form the loop for
the first throw of a square knot
 Rotate the needle-holder away yourself and grasp the short end
of the suture
11
12
SIMPLE INTERRUPTED STITCH
 Now draw the short end back through the loop towards yourself
 Now tighten the first throw
13
14
SIMPLE INTERRUPTED STITCH
 The throw should be tightened just enough to approximate the skin
edges but not enough to strangulate the tissue
 To begin the second throw of the square knot, wrap the long strand
around the needle-holder by bringing the long strand towards
yourself
15
16
SIMPLE INTERRUPTED STITCH
 Rotate the needle-holder towards yourself to retrieve the short end
 Grasp the short end and draw it through the loop by pulling it away
from yourself
17
18
SIMPLE INTERRUPTED STITCH
 Finally, tighten the second throw securely against the first
 Ensure the knot is to one side of the wound to avoid involvement in
the clot
 In one hand hold the scissors as shown
 With the other hand maintain tension on the suture material
 Slide the tips of the scissors down the strands to the point where they
will be cut
 Cut the suture material leaving 4-5mm tails (important for removal of
external non-absorbable sutures)
19
20
SUTURE REMOVAL
Sutures should be removed:
 Face: 3-4 days
 Scalp: 5 days
 Trunk: 7 days
 Limb: 7-10 days
 Foot: 10-14 days
SUTURE REMOVAL
Steps involved in removal:
 Reassure patient that the procedure is not painful
 Cleanse the skin with hydrogen peroxide
 Grasp one of the suture ‘tails’ with forceps and elevate Slip the tip of
the scissors under the suture and cut close to the skin edge (to
minimise the length of contaminated suture that will be pulled
through the wound)
 Gently pull the knot with the forceps and reinforce the wound Proxi-
Strips if required
SUMMARY
Types of wound healing
• Primary intention
• Secondary intention
• Delayed primary closure
Suture material
Properties
• Natural or synthetic
• Non-absorbable or absorbable
• Monofilament or multifilament
Size
• Ranges from 3 – 12/0
SURGERY IS AN ART
Ethicon
– Knot Manual http://www.jnjgateway.com/public/useng/5256ethicon_encyclopedia_of_knots.pdf
– Wound Closure Manual http://www.jnjgateway.com/public/useng/ethicon_wcm_feb2004.pdf
Student BMJ
– Taylor B and Bayat A, (May 2022, June 2022 & July 2022), Basic plastic surgery techniques and
principles.
Boston University School of Medicine
– http://www.bumc.bu.edu/departments/pagemain.asp?page=5734&departmentid=69
REFERENCES
THANK YOU
ANY QUESTION?

Basic surgical skill for medical student ppt.pptx

  • 1.
    BASIC SURGICAL SKILL dr.Jeffrey Ariesta Putra D.MAS, Sp.B, FICS, FMAS
  • 2.
    Overview 01 02 03 TYPE OF WOUNDHEALING Suture Material Needle THE INSTRUMENTS Simple Interrupted Suture Suture Removal BASIC SUTURING TECHNIQUE
  • 3.
  • 4.
    3 PHASES OFWOUND HEALING Inflammatory (Reactive) Proliferative (Reparative) Maturational (Remodeling) The 3 phases often overlap
  • 5.
    WOUND HEALING PRIMARY INTENTIONSECONDARY INTENTION Wound closed by suturing, skin grafting or flap closure Clean incised wound/ surgical wound Highly contaminated wound or tissue loss Wound is left open to heal Closed by reepithelization • Optimum closure method • wound heals in minimum time with no separation of its edges • minimal scar formation More complicated and prolonged than healing by primary intention
  • 6.
    • contaminated andinfected wounds with extensive tissue loss and a high risk of infection (eg. trauma following RTA, penetrating injury) • Steps taken include: – Debridement of nonviable tissues – Leaving wound open with gauze packing inserted – Wound approximation within 3-5 days if no infection is evident – If infection is present, the wound is allowed to heal by secondary intention TERTIARY INTENTION/ DELAYED PRIMARY CLOSURE Contaminated wound Treated by repeated debridement Wound is closed by suturing skin or grafting or flap
  • 7.
  • 8.
    Small toothed forceps(Addison forceps) grasp the skin edges during suturing Hold in the first three fingers in a similar way to a pen FORCEPS & NEEDLE-HOLDER Grasp the needle-holder by partially inserting the thumb and ring finger into the loops of the handle The free index finger provides additional control and stability
  • 9.
    The main typesof needle include: Reverse cutting needle Similar to a conventional cutting needle except the cutting edge faces down instead of up Cutting Used for tough tissue, such as skin (use of a tapered needle with skin causes excess trauma because of difficulty in penetration) NEEDLE Tapered Used for tissue that is easy to penetrate, such as bowel or blood vessels
  • 10.
    NEEDLE  Most sutureswith the suture material swaged onto the base of the needle  Shapes vary from a quarter circle to five-eighths of a circle, depending on how confined the operating field is  Choice of needle should ‘alter the tissue to be sutured as little as possible’ and is dependent on: – The tissue being sutured – Ease of access to the tissue – Individual preference
  • 11.
    PROPERTIES OF SUTUREMATERIAL Handling of a suture  Memory Tendency to stay in one position Leads to difficulty in tying sutures and knot unravelling  Elasticity Ability to return to its original length after stretching High elasticity sutures should be used in oedematous tissue  Knot strength Force required for a knot to slip Important to consider when ligating  Tensile strength Force necessary to break a suture Important to consider in areas of tension (linea alba)  Tissue reaction Undesirable since inflammation worsens the scar Maximal between Day 3&7
  • 12.
    • Consists ofa single smooth strand • Less traumatic, less friction • Associated with lower rates of infection • More likely to slip • Preferred for skin closure because they provide a better cosmetic result SUTURE MATERIAL • Consists of multiple fibres woven together • Easier to handle and tie and knots are less likely to slip Monofilament Multifilament
  • 13.
    SUTURE MATERIAL Catgut • Consistsof processed collagen from animal intestines • Broken down after 7 days Chromic catgut • Consists of intestinal collagen treated with chromium • Loses tensile strength after 2-3 weeks and is broken down after 3 months  Degraded non-enzymatically by hydrolysis when water penetrates the suture filaments and attacks the polymer chain  Tend to evoke less tissue reaction than those occurring naturally Subclassified according to degradation time Natural Synthetic
  • 14.
    Size originally scaledfrom 0-3 As technology advanced and sutures became smaller, extra 0s were added Scale now ranges from 3 (largest) to 12/0 (smallest) SIZE OF SUTURE MATERIAL Size Uses 7/0 and smaller Ophthalmology, microsurgery 6/0 Face, blood vessels 5/0 Face, neck, blood vessels 4/0 Mucosa, neck, hands, limbs, tendons, blood vessels 3/0 Limbs, trunk, gut blood vessels 2/0 Trunk, fascia, viscera, blood vessels 0 and larger Abdominal wall, fascia, drain sites, arterial lines,
  • 15.
    SUTURE MATERIAL SUMMARY Mersilk Natural Nurolon Ethibond Braided Ethilon Prolene Monofilament Synthetic Non-absorbable Catgut Natural Vicrylrapide Synthetic Short term Braided vicryl Braided Monocryl Monofilament Medium term Panacryl Braided PDS II Monofilament Long term Absorbable
  • 16.
  • 17.
    ARMING THE NEEDLE-HOLDER Open the suture packet with one tear to reveal the needle  Grasp the needle two-thirds the distance from its pointed end
  • 18.
    SIMPLE INTERRUPTED STITCH Grasp the skin edge with the forceps and slightly evert the skin edge  Then pronate the needle-holder so that the needle will pierce the skin at 90o  Ensure the trailing suture material is out of the way to avoid tangling  Drive the needle through the full thickness of the skin by supinating the needle-holder  Keeping the shaft of the needle perpendicular to the skin allows the curvature of the needle to traverse the skin as atraumatically as possible 1 2
  • 19.
    SIMPLE INTERRUPTED STITCH Release the needle and pronate the needle-holder  Regrasp the needle proximal to its pointed end  Maintain tension with the forceps to prevent the needle from retracting  Again, supinate the needle-holder to rotate the needle upwards and through the tissue 3 4
  • 20.
    SIMPLE INTERRUPTED STITCH Regrasp the needle in order to rearm the needle-holder (due to HIV risks it is better to use the forceps to do this)  Grasp and slightly evert the opposing skin edge with the forceps  Pronate the needle-holder 5 6
  • 21.
    SIMPLE INTERRUPTED STITCH Again, supinate the needle-holder to rotate the needle through the skin, keeping the shaft 90° to the skin surface  After releasing the needle, pronate the needle-holder before regrasping the needle 7 8
  • 22.
    SIMPLE INTERRUPTED STITCH Supinate the needle-holder to rotate the needle through the skin until 2-3 cm is left protruding  Discard the forceps and use your free hand to grasp the long end in preparation for an instrument tie  Place the needle-holder between the strands 9 10
  • 23.
    SIMPLE INTERRUPTED STITCH Wrap the long strand around the needle-holder to form the loop for the first throw of a square knot  Rotate the needle-holder away yourself and grasp the short end of the suture 11 12
  • 24.
    SIMPLE INTERRUPTED STITCH Now draw the short end back through the loop towards yourself  Now tighten the first throw 13 14
  • 25.
    SIMPLE INTERRUPTED STITCH The throw should be tightened just enough to approximate the skin edges but not enough to strangulate the tissue  To begin the second throw of the square knot, wrap the long strand around the needle-holder by bringing the long strand towards yourself 15 16
  • 26.
    SIMPLE INTERRUPTED STITCH Rotate the needle-holder towards yourself to retrieve the short end  Grasp the short end and draw it through the loop by pulling it away from yourself 17 18
  • 27.
    SIMPLE INTERRUPTED STITCH Finally, tighten the second throw securely against the first  Ensure the knot is to one side of the wound to avoid involvement in the clot  In one hand hold the scissors as shown  With the other hand maintain tension on the suture material  Slide the tips of the scissors down the strands to the point where they will be cut  Cut the suture material leaving 4-5mm tails (important for removal of external non-absorbable sutures) 19 20
  • 28.
    SUTURE REMOVAL Sutures shouldbe removed:  Face: 3-4 days  Scalp: 5 days  Trunk: 7 days  Limb: 7-10 days  Foot: 10-14 days
  • 29.
    SUTURE REMOVAL Steps involvedin removal:  Reassure patient that the procedure is not painful  Cleanse the skin with hydrogen peroxide  Grasp one of the suture ‘tails’ with forceps and elevate Slip the tip of the scissors under the suture and cut close to the skin edge (to minimise the length of contaminated suture that will be pulled through the wound)  Gently pull the knot with the forceps and reinforce the wound Proxi- Strips if required
  • 30.
    SUMMARY Types of woundhealing • Primary intention • Secondary intention • Delayed primary closure Suture material Properties • Natural or synthetic • Non-absorbable or absorbable • Monofilament or multifilament Size • Ranges from 3 – 12/0
  • 31.
  • 32.
    Ethicon – Knot Manualhttp://www.jnjgateway.com/public/useng/5256ethicon_encyclopedia_of_knots.pdf – Wound Closure Manual http://www.jnjgateway.com/public/useng/ethicon_wcm_feb2004.pdf Student BMJ – Taylor B and Bayat A, (May 2022, June 2022 & July 2022), Basic plastic surgery techniques and principles. Boston University School of Medicine – http://www.bumc.bu.edu/departments/pagemain.asp?page=5734&departmentid=69 REFERENCES
  • 33.

Editor's Notes

  • #8 Get people to follow along