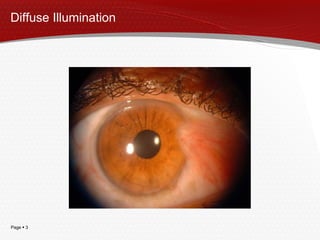
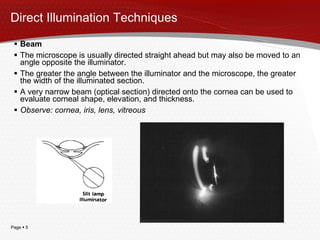
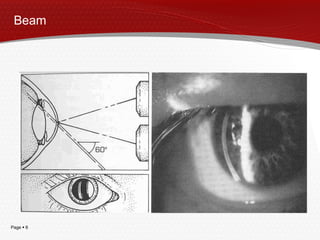
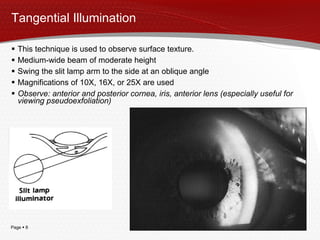
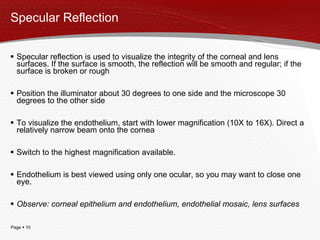
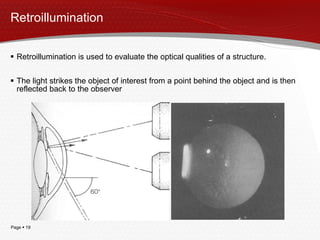
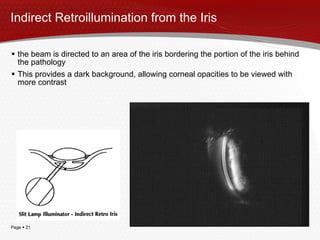
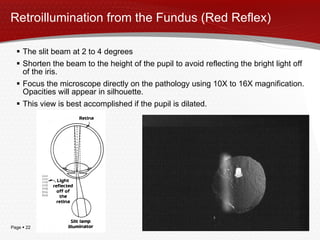
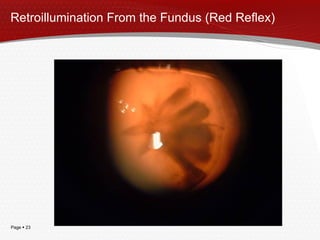
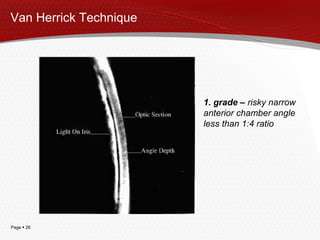
Slit Lamp Illumination Techniques Author:  Irina Jagiloviča e-mail:   [email_address] www:  www.optometristiem.lv
Diffuse Illumination Light is spread evenly over the entire observed surface The beam is opened all the way.  Direct the light onto the eye at a 45 degree angle The microscope is directed straight ahead. Observe: eyelids, lashes, conjunctiva, sclera, pattern of redness, iris, pupil, gross pathology, and media opacities
Diffuse Illumination
Direct Illumination Techniques Beam The microscope is usually directed straight ahead but may also be moved to an angle opposite the illuminator.  The greater the angle between the illuminator and the microscope, the greater the width of the illuminated section.  A very narrow beam (optical section) directed onto the cornea can be used to evaluate corneal shape, elevation, and thickness. Observe: cornea, iris, lens, vitreous
Beam
Beam
Tangential Illumination This technique is used to observe surface texture.  Medium-wide beam of moderate height  Swing the slit lamp arm to the side at an oblique angle  Magnifications of 10X, 16X, or 25X are used Observe: anterior and posterior cornea, iris, anterior lens (especially useful for viewing pseudoexfoliation)
Tangential Illumination
Specular Reflection Specular reflection is used to visualize the integrity of the corneal and lens surfaces. If the surface is smooth, the reflection will be smooth and regular; if the surface is broken or rough Position the illuminator about 30 degrees to one side and the microscope 30 degrees to the other side To visualize the endothelium, start with lower magnification (10X to 16X). Direct a relatively narrow beam onto the cornea  Switch to the highest magnification available.  Endothelium is best viewed using only one ocular, so you may want to close one eye. Observe: corneal epithelium and endothelium, endothelial mosaic, lens surfaces
Specular Reflection
Specular Reflection
Indirect Illumination Proximal Use a short, fairly narrow slit beam.  Place the beam at the border of the structure or pathology  Observe: corneal opacities (infiltrates, vessels, foreign bodies)
Proximal
Sclerotic Scatter A tall, wide beam is directed onto the limbal area.  When the light is properly aligned with regard to the eye, a ring of light will  appear around the cornea. The light is absorbed and scattered through the cornea highlighting pathology. Use 10X magnification, with the microscope directed straight ahead Observe: general pattern of corneal opacities
Sclerotic Scatter
Sclerotic Scatter
Sclerotic Scatter
Retroillumination Retroillumination is used to evaluate the optical qualities of a structure.  The light strikes the object of interest from a point behind the object and is then reflected back to the observer
Retroillumination
Indirect Retroillumination from the Iris the beam is directed to an area of the iris bordering the portion of the iris behind the pathology This provides a dark background, allowing corneal opacities to be viewed with more contrast
Retroillumination from the Fundus (Red Reflex) The slit beam at 2 to 4 degrees Shorten the beam to the height of the pupil to avoid reflecting the bright light off of the iris. Focus the microscope directly on the pathology using 10X to 16X magnification. Opacities will appear in silhouette. This view is best accomplished if the pupil is dilated.
Retroillumination From the Fundus (Red Reflex)
Van Herrick Technique Use to evaluate anterior chamber angle without gonioscopy Medium magnification Angle 60 degrees Narrow beam close to limbus Depth of anterior chamber is evaluated it to the thickness of cornea: 4. grade – open anterior chamber  angle 1:1 ratio 3. grade – open anterior chamber  angle 1:2 ratio 2. grade – narrow anterior chamber angle1:4  ratio 1. grade – risky narrow anterior chamber angle less than 1:4 ratio 0. grade – closed anterior chamber , cornea “sits” on iris
Van Herrick Technique
Van Herrick Technique 1. grade –  risky narrow anterior chamber angle less than 1:4 ratio
Thank you  !

Slit Lamp Illumination Techniques

  • 1.
    Slit Lamp IlluminationTechniques Author: Irina Jagiloviča e-mail: [email_address] www: www.optometristiem.lv
  • 2.
    Diffuse Illumination Lightis spread evenly over the entire observed surface The beam is opened all the way. Direct the light onto the eye at a 45 degree angle The microscope is directed straight ahead. Observe: eyelids, lashes, conjunctiva, sclera, pattern of redness, iris, pupil, gross pathology, and media opacities
  • 3.
  • 4.
  • 5.
    Direct Illumination TechniquesBeam The microscope is usually directed straight ahead but may also be moved to an angle opposite the illuminator. The greater the angle between the illuminator and the microscope, the greater the width of the illuminated section. A very narrow beam (optical section) directed onto the cornea can be used to evaluate corneal shape, elevation, and thickness. Observe: cornea, iris, lens, vitreous
  • 6.
  • 7.
  • 8.
    Tangential Illumination Thistechnique is used to observe surface texture. Medium-wide beam of moderate height Swing the slit lamp arm to the side at an oblique angle Magnifications of 10X, 16X, or 25X are used Observe: anterior and posterior cornea, iris, anterior lens (especially useful for viewing pseudoexfoliation)
  • 9.
  • 10.
    Specular Reflection Specularreflection is used to visualize the integrity of the corneal and lens surfaces. If the surface is smooth, the reflection will be smooth and regular; if the surface is broken or rough Position the illuminator about 30 degrees to one side and the microscope 30 degrees to the other side To visualize the endothelium, start with lower magnification (10X to 16X). Direct a relatively narrow beam onto the cornea Switch to the highest magnification available. Endothelium is best viewed using only one ocular, so you may want to close one eye. Observe: corneal epithelium and endothelium, endothelial mosaic, lens surfaces
  • 11.
  • 12.
  • 13.
    Indirect Illumination ProximalUse a short, fairly narrow slit beam. Place the beam at the border of the structure or pathology Observe: corneal opacities (infiltrates, vessels, foreign bodies)
  • 14.
  • 15.
    Sclerotic Scatter Atall, wide beam is directed onto the limbal area. When the light is properly aligned with regard to the eye, a ring of light will appear around the cornea. The light is absorbed and scattered through the cornea highlighting pathology. Use 10X magnification, with the microscope directed straight ahead Observe: general pattern of corneal opacities
  • 16.
  • 17.
  • 18.
  • 19.
    Retroillumination Retroillumination isused to evaluate the optical qualities of a structure. The light strikes the object of interest from a point behind the object and is then reflected back to the observer
  • 20.
  • 21.
    Indirect Retroillumination fromthe Iris the beam is directed to an area of the iris bordering the portion of the iris behind the pathology This provides a dark background, allowing corneal opacities to be viewed with more contrast
  • 22.
    Retroillumination from theFundus (Red Reflex) The slit beam at 2 to 4 degrees Shorten the beam to the height of the pupil to avoid reflecting the bright light off of the iris. Focus the microscope directly on the pathology using 10X to 16X magnification. Opacities will appear in silhouette. This view is best accomplished if the pupil is dilated.
  • 23.
    Retroillumination From theFundus (Red Reflex)
  • 24.
    Van Herrick TechniqueUse to evaluate anterior chamber angle without gonioscopy Medium magnification Angle 60 degrees Narrow beam close to limbus Depth of anterior chamber is evaluated it to the thickness of cornea: 4. grade – open anterior chamber angle 1:1 ratio 3. grade – open anterior chamber angle 1:2 ratio 2. grade – narrow anterior chamber angle1:4 ratio 1. grade – risky narrow anterior chamber angle less than 1:4 ratio 0. grade – closed anterior chamber , cornea “sits” on iris
  • 25.
  • 26.
    Van Herrick Technique1. grade – risky narrow anterior chamber angle less than 1:4 ratio
  • 27.

Editor's Notes

  • #3 Difūzo apgaismojumu izmanto vispārējai acs un tās palīgorgānu apskatei nelielā palielinājumā.
  • #9 Tangenciālais apgaismojums. Tiek uzstādīta vidēji plata sprauga . Spraugas lampa pagriezta gandrīz 90 leņķī pret varavīksneni. Mikroskops fokusēts varavīksnenes plaknē. Šajā apgaismojumā varavīksnenes nelīdzenumi met garu ēnu, metode ir ļoti informatīva varavīksnenes audzēju diagnosticēšanai.
  • #11 Spoguļatstarošanās. Spraugas lampa un mikroskops tiek novietoti pret apskatāmo struktūru ( radzenes priekšējo vai mugurējo virsmu) tā, ka mikroskopā redz spožu spraugas spoguļattēlu. Lai to panāktu spraugas lampa un mikroskops jānovieto vienādos leņķos pret apskatāmo laukumu. Ja apskatāmā virsma ir nelīdzena tad uz spožā refleksa fona būs redzami tumši laukumi . Šo metodi visbiežāk lieto radzenes endotēlija apskatei , lietojot palielinājumu 40 reizes radzenes endotēlija šūnas ir redzamas kā sīkgraudaina struktūra, ar mazāku palielinājumu endotēlija šūnas nav izšķiramas. Ar šo metodi var labi novērtēt kontaktlēcas priekšējās virsmas kvalitāti
  • #12 Spoguļatstarošanās. Spraugas lampa un mikroskops tiek novietoti pret apskatāmo struktūru ( radzenes priekšējo vai mugurējo virsmu) tā, ka mikroskopā redz spožu spraugas spoguļattēlu. Lai to panāktu spraugas lampa un mikroskops jānovieto vienādos leņķos pret apskatāmo laukumu. Ja apskatāmā virsma ir nelīdzena tad uz spožā refleksa fona būs redzami tumši laukumi . Šo metodi visbiežāk lieto radzenes endotēlija apskatei , lietojot palielinājumu 40 reizes radzenes endotēlija šūnas ir redzamas kā sīkgraudaina struktūra, ar mazāku palielinājumu endotēlija šūnas nav izšķiramas. Ar šo metodi var labi novērtēt kontaktlēcas priekšējās virsmas kvalitāti
  • #14 Netiešais apgaismojums. apskatīta tiek acs daļa, kas nav tieši apgaismota. Ja dzidrajā struktūrā ir lokalizēts apduļķojums to novēro kā gaišu objektu uz tumša fona.
  • #15 Netiešais apgaismojums. apskatīta tiek acs daļa, kas nav tieši apgaismota. Ja dzidrajā struktūrā ir lokalizēts apduļķojums to novēro kā gaišu objektu uz tumša fona.
  • #16 Pilnā iekšējā atstarošanās. Gaismas kūlis 1 – 1,5 mm plats. Tas tiek projicēts tuvu pie radzenes limba . Gaisma iekļūst radzenē un atstarojoties no radzenes virsmām pārvietojas pa to kā pa gaismas vadu . Ja radzenē ir apduļķojums tad pilnā iekšējā atstarošanās tiek izjaukta un gaisma izkļūst no radzenes audiem. Šajā tehnikā parasti radzeni apskata bez mikroskopa, ja izmanto mikroskopu, tad gaismas kūlis jāvirza tā, lai tas kristu ārpus mikroskopa redzes lauka , to panāk pagriežot spraugas lampas spoguli . Ne visos instrumentu modeļos ir paredzēta iespēja spoguli pagriezt.
  • #17 Pilnā iekšējā atstarošanās. Gaismas kūlis 1 – 1,5 mm plats. Tas tiek projicēts tuvu pie radzenes limba . Gaisma iekļūst radzenē un atstarojoties no radzenes virsmām pārvietojas pa to kā pa gaismas vadu . Ja radzenē ir apduļķojums tad pilnā iekšējā atstarošanās tiek izjaukta un gaisma izkļūst no radzenes audiem. Šajā tehnikā parasti radzeni apskata bez mikroskopa, ja izmanto mikroskopu, tad gaismas kūlis jāvirza tā, lai tas kristu ārpus mikroskopa redzes lauka , to panāk pagriežot spraugas lampas spoguli . Ne visos instrumentu modeļos ir paredzēta iespēja spoguli pagriezt.
  • #20 Retroiluminācija. Instruments uzstādīts kā platas spraugas gadījumā. Gaisma tiek virzīta uz necaurspīdīgu acs struktūru – varavīksneni, tīkleni un tiek apskatīta kāda dzidra acs struktūra uz apgaismotā fona, izkliedējoši vai necaurspīdīgi objekti redzami kā tumši plankumi uz gaiša fona.
  • #21 Retroiluminācija. Instruments uzstādīts kā platas spraugas gadījumā. Gaisma tiek virzīta uz necaurspīdīgu acs struktūru – varavīksneni, tīkleni un tiek apskatīta kāda dzidra acs struktūra uz apgaismotā fona, izkliedējoši vai necaurspīdīgi objekti redzami kā tumši plankumi uz gaiša fona.