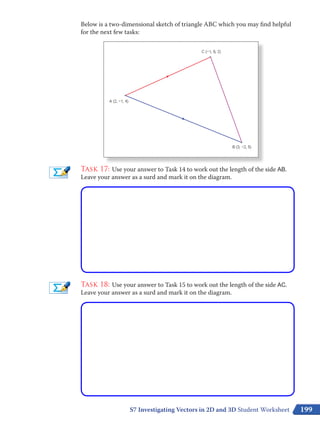
This document contains a student worksheet for investigating vectors in 2D and 3D using Autograph software. It includes tasks on expressing vectors in terms of other vectors, finding vector equations of lines given conditions, calculating lengths and angles of vectors, and using vectors to solve geometric problems in 2D and 3D. The worksheet guides students through using Autograph's vector tools to explore and check their work.
Worried about timely submission of your econometrics projects. Hire expert econometrics assignment help from Statisticshelpdesk; we offer class academic help by top quality tutors quickly with free moderation and clarification online. Contact today.
ENGR 102B Microsoft Excel Proficiency LevelsPlease have your in.docxYASHU40
ENGR 102B: Microsoft Excel Proficiency Levels
Please have your instructor or TA initial each level as you complete it. If you need additional help, ask the TAs or use the help guide within Excel.
Once you master Excel Levels I through IV, you can note Excel as a skill on your resume!
Please see D2L Content for this week for your Excel Homework assignment (individual), which is due via D2L Dropbox by the due date specified in the D2L News for your section.
If you use a Mac, please be sure to submit your homework in a format that the grader and instructor can open on a PC.
Level I: Basic Functions Initials _______
1. Calculating an Average: Calculate the arithmetic average of the 5 values listed below. Enter the values in cells A2 through A6. Place a descriptive label in cell A1.
3.6, 3.8, 3.5, 3.7, 3.6
First, calculate the average the long way, by summing the values and dividing by 5:
You will enter the following formula into a blank cell to accomplish this:
=(A2+A3+A4+A5+A6)/5
Second, calculate the average using Excel’s AVERAGE( ) function by entering the following formula in a cell:
=AVERAGE(cellrange)
Replace the “cellrange” with the actual addresses in your spreadsheet of the range of cells holding the five values (i.e., for this problem, the cell range is A2:A6).
2. Determining Velocities (in kph): Some friends at the University of Calgary are coming south for spring break. Help them avoid a speeding ticket by completing a velocity conversion worksheet that calculates the conversion from mph to kph in increments of 10 from 10 to 100. A conversion factor you will need is 0.62 miles/km; you will need this factor to convert from miles/hour to km/hour. Place the conversion factor in its own cell and then reference it in your conversion calculations using absolute cell referencing (e.g., $C$2). Refer to the CBT video on Absolute and Relative Cell Referencing from the “Preparation for the Excel Workshop” assignment if you don’t remember how to do this.
Level II: Advanced Functions Initials _______
1. Projectile Motion I: (See following page for Fig. 1 Excel chart) A projectile is launched at the angle 35o from the horizontal with a velocity equal to 30 m/s. Neglecting air resistance and assuming a horizontal surface, determine how far away from the launch site the projectile will land.
To answer this problem, you will need:
1. Excel’s trigonometry functions to handle the 35o angle, and
2. Equations relating distance to velocity and acceleration
When velocity is constant, as in the horizontal motion of our particle (since we’re neglecting air resistance), the distance traveled is simply the initial horizontal velocity times the time of flight:
(Equation 1)
What keeps the projectile from flying forever is gravity. Since the gravitational acceleration is constant, the vertical distance traveled becomes
(Equation 2)
Because the projectile ends up back on the ground, the final value of y is zero (a hor ...
Welcome to TechSoup New Member Orientation and Q&A (May 2024).pdfTechSoup
In this webinar you will learn how your organization can access TechSoup's wide variety of product discount and donation programs. From hardware to software, we'll give you a tour of the tools available to help your nonprofit with productivity, collaboration, financial management, donor tracking, security, and more.
How to Make a Field invisible in Odoo 17Celine George
It is possible to hide or invisible some fields in odoo. Commonly using “invisible” attribute in the field definition to invisible the fields. This slide will show how to make a field invisible in odoo 17.
2024.06.01 Introducing a competency framework for languag learning materials ...Sandy Millin
http://sandymillin.wordpress.com/iateflwebinar2024
Published classroom materials form the basis of syllabuses, drive teacher professional development, and have a potentially huge influence on learners, teachers and education systems. All teachers also create their own materials, whether a few sentences on a blackboard, a highly-structured fully-realised online course, or anything in between. Despite this, the knowledge and skills needed to create effective language learning materials are rarely part of teacher training, and are mostly learnt by trial and error.
Knowledge and skills frameworks, generally called competency frameworks, for ELT teachers, trainers and managers have existed for a few years now. However, until I created one for my MA dissertation, there wasn’t one drawing together what we need to know and do to be able to effectively produce language learning materials.
This webinar will introduce you to my framework, highlighting the key competencies I identified from my research. It will also show how anybody involved in language teaching (any language, not just English!), teacher training, managing schools or developing language learning materials can benefit from using the framework.
The Roman Empire A Historical Colossus.pdfkaushalkr1407
The Roman Empire, a vast and enduring power, stands as one of history's most remarkable civilizations, leaving an indelible imprint on the world. It emerged from the Roman Republic, transitioning into an imperial powerhouse under the leadership of Augustus Caesar in 27 BCE. This transformation marked the beginning of an era defined by unprecedented territorial expansion, architectural marvels, and profound cultural influence.
The empire's roots lie in the city of Rome, founded, according to legend, by Romulus in 753 BCE. Over centuries, Rome evolved from a small settlement to a formidable republic, characterized by a complex political system with elected officials and checks on power. However, internal strife, class conflicts, and military ambitions paved the way for the end of the Republic. Julius Caesar’s dictatorship and subsequent assassination in 44 BCE created a power vacuum, leading to a civil war. Octavian, later Augustus, emerged victorious, heralding the Roman Empire’s birth.
Under Augustus, the empire experienced the Pax Romana, a 200-year period of relative peace and stability. Augustus reformed the military, established efficient administrative systems, and initiated grand construction projects. The empire's borders expanded, encompassing territories from Britain to Egypt and from Spain to the Euphrates. Roman legions, renowned for their discipline and engineering prowess, secured and maintained these vast territories, building roads, fortifications, and cities that facilitated control and integration.
The Roman Empire’s society was hierarchical, with a rigid class system. At the top were the patricians, wealthy elites who held significant political power. Below them were the plebeians, free citizens with limited political influence, and the vast numbers of slaves who formed the backbone of the economy. The family unit was central, governed by the paterfamilias, the male head who held absolute authority.
Culturally, the Romans were eclectic, absorbing and adapting elements from the civilizations they encountered, particularly the Greeks. Roman art, literature, and philosophy reflected this synthesis, creating a rich cultural tapestry. Latin, the Roman language, became the lingua franca of the Western world, influencing numerous modern languages.
Roman architecture and engineering achievements were monumental. They perfected the arch, vault, and dome, constructing enduring structures like the Colosseum, Pantheon, and aqueducts. These engineering marvels not only showcased Roman ingenuity but also served practical purposes, from public entertainment to water supply.
1. 191
Student Investigation
Investigating Vectors
in 2D and 3D
S7
S t u d e n t W o r k s h e e t Name:
Activity 1: Position VectorsActivity 1: Position Vectors
Open up the Autograph file called “Vectors - Activity 1”.
Make sure you are not in Whiteboard Mode (there should not be a blue square
around the button).
Your screen should look something like this:
OPQR and OXYZ are parallelograms and:
___
›
OP= p
___
›
OR= r
___
›
OX= 2
__
3
p
___
›
OZ=
1
__
2
r
S7 Investigating Vectors in 2D and 3D Student Worksheet
2. 192
Task 1: Express the following vectors in terms of p and r (see below how
Autograph can help you):
1.
___
›
OQ 6.
___
›
PY
2.
___
›
PR 7.
___
›
YR
3.
___
›
OY 8.
___
›
XQ
4.
___
›
XZ 9.
___
›
XR
5.
___
›
RP 10.
___
›
RX
Using Autograph to help and check your answers:
(a) Adding Vectors
Say you thought that
___
›
OQ= p +
1
__
2
r.
Left-click on an unoccupied part of the graph area to deselect everything.
Hold down the Shift button to select more than one object:
Left-click on the vector p (it should turn black).
Left-click on the vector 1
__
2
r (it should also turn black).
Left-click on the point O (it should have a little square around it).
Right-click and select Add Vectors from the menu.
A vector should now appear from point O, and if it stops at point Q, then you
are correct, if not, just have another go.
Always click Undo after each attempt to clear the screen ready for another one!
(b) Subtracting Vectors
The method is very similar to adding vectors, but this time the order is crucial!
Say you thought that
___
›
ZX=
1
__
3
p −
1
__
2
r.
Left-click on an unoccupied part of the graph area to deselect everything.
Hold down the Shift button to select more than one object:
Left-click on the vector 1
__
3
p first (it should turn black).
Left-click on the vector 1
__
2
r second (it should also turn black).
Left-click on the point Z (it should have a little square around it).
Autograph Activities Student Investigations for 16-19
3. 193
Right-click and select Subtract Vectors from the menu.
A vector should now appear from point Z, and if it stops at point X, then you
are correct, if not, just have another go.
Task 2: What fraction of the area of parallelogram OPQR is not taken up by
parallelogram OXYZ?
Activity 2: The Vector Equation of a LineActivity 2: The Vector Equation of a Line
Open up a New 2D Graph Page.
Make sure you are not in Whiteboard Mode.
Edit the axes as follows:
x: Minimum: −17 Maximum: 17 Numbers: 2 Pips: 1
y: Minimum: −9 Maximum: 9 Numbers: 1 Pips: 1
Remove all of the green ticks underneath Auto.
Note: You must ensure all the ticks under Auto are removed or Autograph will
attempt to re-scale your axes for you.
Select Equal Aspect Mode from the toolbar.
This will automatically adjust the x-axis so that the x- and y-scales are equal.
Select Enter Vector Straight Line from the toolbar.
Enter in the following:
( x
y )= ( a
b )+ λ( p
q )
The value of each of the constants a, b, p and q is automatically set to 1.
What will this vector straight line look like? Where will it cross the axes?
Which direction will it slope? What is its gradient?
Predict
Click OK.
Left-click on the line (it should turn black).
Select Text Box from the toolbar.
S7 Investigating Vectors in 2D and 3D Student Worksheet
4. 194
Tick the box next to Show Detailed Object Text and click OK.
The Text Box should now display the equation of the vector straight line,
together with the current values of the constants a, b, p and q.
Try to think what effect adjusting the values of each of the four constants
will have on the vector straight line.
Predict
Click on the Constant Controller on the top toolbar.
The drop-down menu allows you to select different constants.
The up-down arrows alter the value of the selected constant.
The left-right arrows adjust the size of the step.
Task 3: Adjust the values of the constants a and b. What effect does this have
on the vector straight line?
Task 4: Adjust the values of the constants p and q. What effect does this have
on the vector straight line?
In this next set of tasks you will be given some information, and you should
use the Constant Controller to try to find the vector equation of a straight line
which fits that information. The following tools might also help you:
Enter Equation
Enters Co-ordinates
Undo
Autograph Activities Student Investigations for 16-19
5. 195
Task 5: Find the vector equation of a line which is parallel to the line
y = 3x + 1 and passes through the point (−3, 1).
Task 6: Find the vector equation of a line which represents the line
y = −0.5x − 3 after it has been translated 8 units in the positive y direction.
Task 7: Find the vector equation of a line which is perpendicular to the line
y = 2 – 4x and passes through the point (−4, −5).
Task 8: Find the vector equation of a line which represents the line
y = 0.2x – 1 after it has been reflected in the x-axis.
S7 Investigating Vectors in 2D and 3D Student Worksheet
6. 196
Task 9: Explain briefly why there are no unique answers to any of the four
tasks above.
Task 10: Find the vector equation of a line which completes an isosceles
triangle bounded by the lines: y = 2x + 2 and y = 7 – 0.5x.
Activity 3: Welcome to the world of 3D!Activity 3: Welcome to the world of 3D!
Open up the Autograph file called “Vectors - Activity 3”.
Make sure you not are in Whiteboard Mode.
Seeing a 3D set of axes like this might not be familiar to you, so take a few
moments to have a good look around using the Drag tool.
Note: The following functions may also prove useful when working with
Autograph in 3D:
+ Ctrl Zooms in and out
+ Shift Shifts the camera position
Click on x-y-z Orientation to return to your original view of the axes.
The triangle ABC has its vertices at the following points:
A (2, −1, 4) B (3, −2, 5) C (−1, 6, 2)
The origin O is also marked.
Autograph Activities Student Investigations for 16-19
7. 197
Click on View > Status Box.
Make sure you are in Select Mode.
Left-click on an unoccupied part of the graph area to deselect everything.
Left-click on each of the vertices of the triangle, and the origin, to make sure
you can identify which point is which. They are colour coded to make this
easier.
The co-ordinates of the vertices should appear in the Status Box.
Task 11: Express the vector
___
›
OAin the form ai + bj + ck.
Left-click on an unoccupied part of the graph area to deselect everything.
Hold down the Shift button to select more than one object, then left-click on
the origin, O (it should have a little cube around it).
Left-click on point A (it should also have a little cube around it).
Right-click and select Create Vector from the menu.
The vector
___
›
OAshould now be displayed, with the position vector displayed in
the Status Box.
Check that this matches your answer to Task 11 before carrying on.
Task 12: Express the vector
___
›
OBin the form ai + bj + ck.
Create vector
___
›
OBin the same way as described above and use it to check your
answer.
Task 13: How could you combine vectors
___
›
OAand
___
›
OBto give us the
vector
___
›
AB?
Hint: Looking at the directions of the arrows of the vectors displayed on
Autograph should help you.
S7 Investigating Vectors in 2D and 3D Student Worksheet
8. 198
Task 14: Use your answer to Task 13 to express the vector
___
›
ABin the form
ai + bj + ck. (Be very careful with your minus signs!)
Checking your answer:
Left-click on an unoccupied part of the graph area to deselect everything.
Hold down the Shift button to select more than one object, then left-click on
point A (it should have a little cube around it).
Right-click and select Vector from the menu.
Write your answer to Task 14 and click OK.
If your answer was correct, the vector
___
›
ABshould now be displayed.
If not, just hit Undo and try again!
Task 15: Use a similar technique (including drawing the relevant vectors in
Autograph) to express the vector
___
›
ACin the form ai + bj + ck.
Make sure you check and create your answer using the method described
above, as we will need this vector later!
Task 16: Calling vector
___
›
ABa, and vector
___
›
ACc, use your answers to Task 14
and Task 15 to find the scalar (or dot) product a.c.
Autograph Activities Student Investigations for 16-19
9. 199
Below is a two-dimensional sketch of triangle ABC which you may find helpful
for the next few tasks:
Task 17: Use your answer to Task 14 to work out the length of the side AB.
Leave your answer as a surd and mark it on the diagram.
Task 18: Use your answer to Task 15 to work out the length of the side AC.
Leave your answer as a surd and mark it on the diagram.
S7 Investigating Vectors in 2D and 3D Student Worksheet
10. 200
Task 19: Use your answers to Tasks 16, 17 and 18 to work out, in degrees,
the angle CAB. Round your answer to one decimal place and mark it on the
diagram.
Hint: Think about how to work out the angle between two vectors.
Checking your answer:
Left-click on an unoccupied part of the graph area to deselect everything.
Hold down the Shift button to select more than one object:
Left-click on vector
___
›
AB(it should turn black).
Left-click on vector
___
›
AC(it should turn black).
Right-click and select Angle between Vectors from the menu.
The angle should be displayed in the Results Box.
Task 20: Use the information contained on your diagram to work out the
area of triangle ABC. Round your answer to three significant figures.
Hint: How do you work out the area of a triangle when you are given two sides
and the included angle?
Autograph Activities Student Investigations for 16-19
11. 201
Task 21: Work out the co-ordinates of the mid-point of the line AC.
Task 22: Write the vector equation of a straight line which is parallel to AB,
and which passes through the mid-point of AC.
Checking your answer:
Left-click on an unoccupied part of the graph area to deselect everything.
Hold down the Shift button to select more than one object:
Left-click on point A and then point C (they should have cubes around them).
Right-click and select Mid-Point from the menu.
The mid-point of the line AC should now be displayed.
Select Enter Vector Straight Line from the toolbar.
Enter your answer to Task 22.
A vector straight line should now appear which is parallel to AB and which
passes through the mid-point of AC.
Task 23: What is the vector equation of the x-axis?
Select Enter Vector Straight Line and check your answer.
S7 Investigating Vectors in 2D and 3D Student Worksheet
12. 202
Task 24: Will the line from Task 22 ever cross the x-axis? If so, find the co-
ordinates of intersection. If not, explain how you know algebraically.
SummarySummary
Use the space below to summarise what you have learnt during this
investigation:
Autograph Activities Student Investigations for 16-19