Installation of Windows & Linux operating systemSathishnkl561998
This presentation tells some details on installing an operating system in the computer. I assure this things will help you to get some knowledge about the installation of the operating systems.
Installation of Windows & Linux operating systemSathishnkl561998
This presentation tells some details on installing an operating system in the computer. I assure this things will help you to get some knowledge about the installation of the operating systems.
CSS LO7 - PREPARING THE INSTALLER
LEARNING OUTCOME:
AT THE END OF THIS LESSON THE LEARNERS WILL BE ABLE TO . . .
1. Prepare their usb bootable drive installer according to the manufacturer procedure.
2. Prepare their usb drive containing drivers and application software.
3. Learn and experience to install Window 7 operating system.
4. Discover and prepare the basic applications needed to be installed.
Installation guide for Red Hat Enterprise Linux 6Varnnit Jain
Red Hat Enterprise Linux (RHEL) is a Linux distribution developed by Red Hat and targeted toward the commercial market. here is the installation guide for the same. Follow the steps.
This document will explain how to install Linux on Virtual Machine. The document is only for educational purpose for learning Linux Installation. The process includes following brief steps,
1) Creating a virtual machine
2) Use Linux CDs or .iso images for installation
3) Install Linux on the virtual machine created in step 1
Installation of DSpace, Koha and other software using LiblivecdRupesh Kumar
This is a guide demonstrating the installation of Lubuntu operating system on a Windows computer using Liblivecd - the live cd for librarians. DSpace, Koha, Joomla, Squirrelmail and other essential applications are pre-installed in Liblivecd. This means that installation of Lubuntu will come bundled with the above mentioned software. Thanks to Dr. A R D Prasad, Documentation Research and Training Centre, Bengaluru, India and Dr. Sunita Barve, National Chemical Laboratory, Pune, India for developing Liblivecd.
Becoming Linux Expert Series-Install Linux Operating Systemskbansal222
Go to: https://www.udemy.com/becoming-linux-expert-series-install-linux-operating-system/?couponCode=coupon2701
First course in the series to install Linux Operating System.88% discount.only at $1.
1. Very basic course
2. charges only token money of $1. 88% discount.
3. This is the first course in the series of many courses which I will be doing on Linux Operating system. There are many OS available but we will see that why we choose Linux.
4. Go to: https://www.udemy.com/becoming-linux-expert-series-install-linux-operating-system/?couponCode=coupon2701
5. Only 100 coupons are avalable.
Request you to leave a review.
Securing your Kubernetes cluster_ a step-by-step guide to success !KatiaHIMEUR1
Today, after several years of existence, an extremely active community and an ultra-dynamic ecosystem, Kubernetes has established itself as the de facto standard in container orchestration. Thanks to a wide range of managed services, it has never been so easy to set up a ready-to-use Kubernetes cluster.
However, this ease of use means that the subject of security in Kubernetes is often left for later, or even neglected. This exposes companies to significant risks.
In this talk, I'll show you step-by-step how to secure your Kubernetes cluster for greater peace of mind and reliability.
UiPath Test Automation using UiPath Test Suite series, part 3DianaGray10
Welcome to UiPath Test Automation using UiPath Test Suite series part 3. In this session, we will cover desktop automation along with UI automation.
Topics covered:
UI automation Introduction,
UI automation Sample
Desktop automation flow
Pradeep Chinnala, Senior Consultant Automation Developer @WonderBotz and UiPath MVP
Deepak Rai, Automation Practice Lead, Boundaryless Group and UiPath MVP
LF Energy Webinar: Electrical Grid Modelling and Simulation Through PowSyBl -...DanBrown980551
Do you want to learn how to model and simulate an electrical network from scratch in under an hour?
Then welcome to this PowSyBl workshop, hosted by Rte, the French Transmission System Operator (TSO)!
During the webinar, you will discover the PowSyBl ecosystem as well as handle and study an electrical network through an interactive Python notebook.
PowSyBl is an open source project hosted by LF Energy, which offers a comprehensive set of features for electrical grid modelling and simulation. Among other advanced features, PowSyBl provides:
- A fully editable and extendable library for grid component modelling;
- Visualization tools to display your network;
- Grid simulation tools, such as power flows, security analyses (with or without remedial actions) and sensitivity analyses;
The framework is mostly written in Java, with a Python binding so that Python developers can access PowSyBl functionalities as well.
What you will learn during the webinar:
- For beginners: discover PowSyBl's functionalities through a quick general presentation and the notebook, without needing any expert coding skills;
- For advanced developers: master the skills to efficiently apply PowSyBl functionalities to your real-world scenarios.
Essentials of Automations: Optimizing FME Workflows with ParametersSafe Software
Are you looking to streamline your workflows and boost your projects’ efficiency? Do you find yourself searching for ways to add flexibility and control over your FME workflows? If so, you’re in the right place.
Join us for an insightful dive into the world of FME parameters, a critical element in optimizing workflow efficiency. This webinar marks the beginning of our three-part “Essentials of Automation” series. This first webinar is designed to equip you with the knowledge and skills to utilize parameters effectively: enhancing the flexibility, maintainability, and user control of your FME projects.
Here’s what you’ll gain:
- Essentials of FME Parameters: Understand the pivotal role of parameters, including Reader/Writer, Transformer, User, and FME Flow categories. Discover how they are the key to unlocking automation and optimization within your workflows.
- Practical Applications in FME Form: Delve into key user parameter types including choice, connections, and file URLs. Allow users to control how a workflow runs, making your workflows more reusable. Learn to import values and deliver the best user experience for your workflows while enhancing accuracy.
- Optimization Strategies in FME Flow: Explore the creation and strategic deployment of parameters in FME Flow, including the use of deployment and geometry parameters, to maximize workflow efficiency.
- Pro Tips for Success: Gain insights on parameterizing connections and leveraging new features like Conditional Visibility for clarity and simplicity.
We’ll wrap up with a glimpse into future webinars, followed by a Q&A session to address your specific questions surrounding this topic.
Don’t miss this opportunity to elevate your FME expertise and drive your projects to new heights of efficiency.
Kubernetes & AI - Beauty and the Beast !?! @KCD Istanbul 2024Tobias Schneck
As AI technology is pushing into IT I was wondering myself, as an “infrastructure container kubernetes guy”, how get this fancy AI technology get managed from an infrastructure operational view? Is it possible to apply our lovely cloud native principals as well? What benefit’s both technologies could bring to each other?
Let me take this questions and provide you a short journey through existing deployment models and use cases for AI software. On practical examples, we discuss what cloud/on-premise strategy we may need for applying it to our own infrastructure to get it to work from an enterprise perspective. I want to give an overview about infrastructure requirements and technologies, what could be beneficial or limiting your AI use cases in an enterprise environment. An interactive Demo will give you some insides, what approaches I got already working for real.
Accelerate your Kubernetes clusters with Varnish CachingThijs Feryn
A presentation about the usage and availability of Varnish on Kubernetes. This talk explores the capabilities of Varnish caching and shows how to use the Varnish Helm chart to deploy it to Kubernetes.
This presentation was delivered at K8SUG Singapore. See https://feryn.eu/presentations/accelerate-your-kubernetes-clusters-with-varnish-caching-k8sug-singapore-28-2024 for more details.
Smart TV Buyer Insights Survey 2024 by 91mobiles.pdf91mobiles
91mobiles recently conducted a Smart TV Buyer Insights Survey in which we asked over 3,000 respondents about the TV they own, aspects they look at on a new TV, and their TV buying preferences.
GDG Cloud Southlake #33: Boule & Rebala: Effective AppSec in SDLC using Deplo...James Anderson
Effective Application Security in Software Delivery lifecycle using Deployment Firewall and DBOM
The modern software delivery process (or the CI/CD process) includes many tools, distributed teams, open-source code, and cloud platforms. Constant focus on speed to release software to market, along with the traditional slow and manual security checks has caused gaps in continuous security as an important piece in the software supply chain. Today organizations feel more susceptible to external and internal cyber threats due to the vast attack surface in their applications supply chain and the lack of end-to-end governance and risk management.
The software team must secure its software delivery process to avoid vulnerability and security breaches. This needs to be achieved with existing tool chains and without extensive rework of the delivery processes. This talk will present strategies and techniques for providing visibility into the true risk of the existing vulnerabilities, preventing the introduction of security issues in the software, resolving vulnerabilities in production environments quickly, and capturing the deployment bill of materials (DBOM).
Speakers:
Bob Boule
Robert Boule is a technology enthusiast with PASSION for technology and making things work along with a knack for helping others understand how things work. He comes with around 20 years of solution engineering experience in application security, software continuous delivery, and SaaS platforms. He is known for his dynamic presentations in CI/CD and application security integrated in software delivery lifecycle.
Gopinath Rebala
Gopinath Rebala is the CTO of OpsMx, where he has overall responsibility for the machine learning and data processing architectures for Secure Software Delivery. Gopi also has a strong connection with our customers, leading design and architecture for strategic implementations. Gopi is a frequent speaker and well-known leader in continuous delivery and integrating security into software delivery.
Elevating Tactical DDD Patterns Through Object CalisthenicsDorra BARTAGUIZ
After immersing yourself in the blue book and its red counterpart, attending DDD-focused conferences, and applying tactical patterns, you're left with a crucial question: How do I ensure my design is effective? Tactical patterns within Domain-Driven Design (DDD) serve as guiding principles for creating clear and manageable domain models. However, achieving success with these patterns requires additional guidance. Interestingly, we've observed that a set of constraints initially designed for training purposes remarkably aligns with effective pattern implementation, offering a more ‘mechanical’ approach. Let's explore together how Object Calisthenics can elevate the design of your tactical DDD patterns, offering concrete help for those venturing into DDD for the first time!
1. Write step by step procedure to install LINUX.
The easiest way to start the installation is to boot directly from the CD.
1.Welcome to Red Hat Linux
The Welcome screen does not prompt you for any input
Click on the Next button to continue
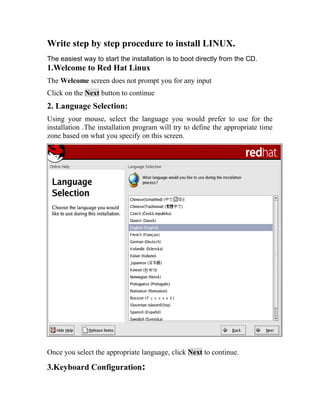
2. Language Selection:
Using your mouse, select the language you would prefer to use for the
installation .The installation program will try to define the appropriate time
zone based on what you specify on this screen.
Once you select the appropriate language, click Next to continue.
3.Keyboard Configuration:
2. Using your mouse, select the correct layout type (for example, U.S. English)
for the keyboard you would prefer to use for the installation and as the
system default
Once you have made your selection, click Next to continue.
4.Mouse Configuration:
Choose the correct mouse type for your system. If you cannot find an exact
match, choose a mouse type that you are sure is compatible with your
system .
3. 5.Choosing to Upgrade or Install:
The Upgrade Examine screen appears automatically if the installation
program detects a prior version of Red Hat Linux on your system.
If you would like to perform an upgrade, select Perform an upgrade of an
existing installation.
4. To perform a new installation of Red Hat Linux on your system, select
Perform a new Red Hat Linux installation and click Next.
6. Installation Type:
Choose the type of installation you would like to perform Red Hat Linux
allows you to choose the installation type that best fits your needs. Your
options are Personal Desktop, Workstation, Server, Custom, and
Upgrade.
5. 7.Disk Partitioning Setup
On this screen, you can choose to perform automatic partitioning, or manual
partitioning using Disk Druid.
Automatic partitioning allows you to perform an installation without having
to partition your drive(s) yourself. If you do not feel comfortable with
partitioning your system, it is recommended that you do not choose to
partition manually and instead let the installation program partition for you.
6. To partition manually, choose the Disk Druid partitioning tool.
If you chose to manually partition using Disk Druid
7(1) Automatic Partitioning:
1. Remove all Linux partitions on this system
2. Remove all partitions on this system
3. Keep all partitions and use existing free space
7. If you have two or more hard drives, you can choose which hard drive(s)
should contain this installation. Unselected hard drives, and any data on
them, will not be touched.
Click Next once you have made your selections to proceed.
7(2)Partitioning Your System:
If you chose automatic partitioning and selected Review, you can either
accept the current partition settings (click Next), or modify the setup using
Disk Druid, the manual partitioning tool.
8. Recommended Partitioning Scheme:
A swap partition (at least 32MB)
A /boot partition (100MB)
A root partition (1.7-5.0GB)
8. Boot Loader Configuration:
The installation program provides two boot loaders for you to choose from,
GRUB and LILO.
1.GRUB (GRand Unified Bootloader)
2. LILO (LInux LOader)
LILO (LInux LOader): LILO stores information about the location of the
kernel or other operating system on the Master Boot Record (MBR).
9. GNU GRUB (GRand Unified Boot loader) GRUB has a more powerful,
interactive command line interface GRUB will default to its command line
interface where the user can boot the system manually.
GRUB may have difficulties booting certain hardware.
LILO and GRUB do have a number of differences:
* LILO has no interactive command interface, whereas GRUB does.
* LILO does not support booting from a network, whereas GRUB does.
* LILO stores information regarding the location of the operating systems it
can to load physically on the MBR. If you change your LILO config file,
you have to rewrite the LILO stage one boot loader to the MBR. Compared
with GRUB, this is a much more risky option since a misconfigured MBR
could leave the system unbootable. With GRUB, if the configuration file is
configured incorrectly, it will simply default to the GRUB command-line
interface.
Boot Loader Configuration
10. If you do not want to install GRUB as your boot loader, click Change boot
loader. You can then choose to install LILO or choose not to install a boot
loader at all.
If you already have a boot loader that can boot Linux and do not want to
overwrite your current boot loader, or if you plan to boot the system using
boot diskettes, choose Do not install a boot loader by clicking on the
Change boot loader button.
If you choose to use a boot loader password to enhance your system
security, be sure to select the checkbox labeled Use a boot loader
password.
9. Set Root Password:
The root account is used to install packages, upgrade RPMs, and perform
most system maintenance. Logging in as root gives you complete control
over your system.
11. 10. Package Group Selection:
if you were to perform a Personal Desktop installation, you may see a screen
such as this:
Personal Desktop Default Installation
To select packages individually, check the Customize the set of packages
to be installed checkbox
You can select package groups, which group components together according
to function (for example, X Window System and Editors), individual
packages, or a combination of the two.
12. 11. Preparing to Install:
You should now see a screen preparing you for the installation of Red Hat
Linux.
For your reference, a complete log of your installation can be found in
/root/install.log once you reboot your system.
13. 12. Installing Packages:
At this point there is nothing left for you to do until all the packages have
been installed . How quickly this happens depends on the number of
packages you have selected and your computer's speed.
Installing Packages
13. Installation Complete:
Congratulations! Your Red Hat Linux 9 installation is now complete!
The installation program will prompt you to prepare your system for reboot.
Remember to remove any installation media (diskette in the diskette drive or
CD in the CD-ROM drive) if they are not ejected automatically upon reboot.