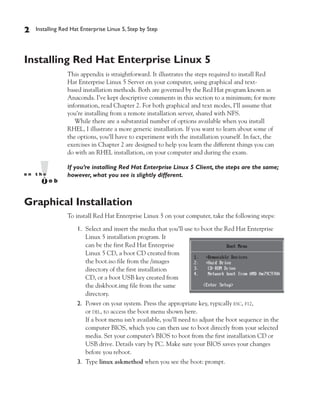
1. The document provides step-by-step instructions for installing Red Hat Enterprise Linux 5 using either a graphical or text-based installation method.
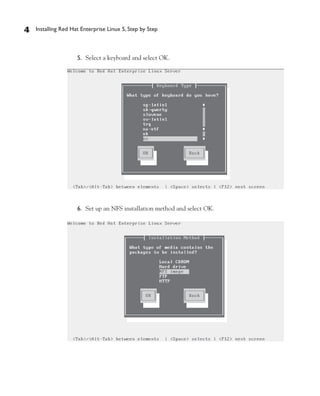
2. The graphical installation instructions include 27 steps to guide the user through options such as language and keyboard selection, partitioning disks, package selection, and network configuration.
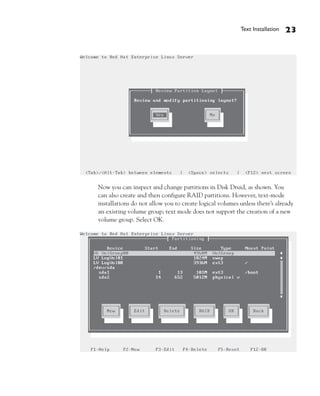
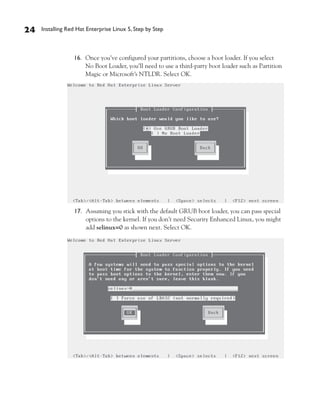
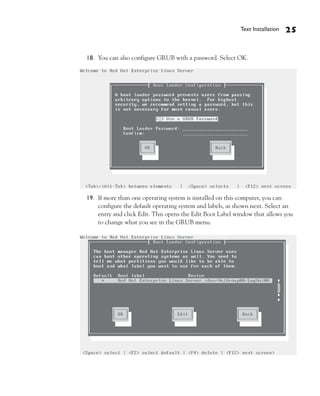
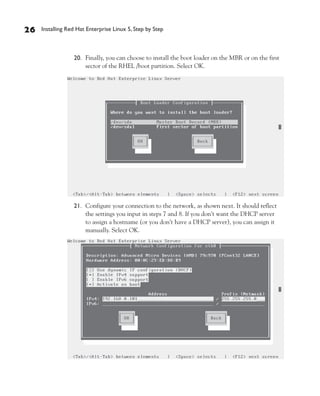
3. The text-based installation involves 29 steps that perform similar configuration tasks as the graphical method but without visual components like Disk Druid for partitioning.
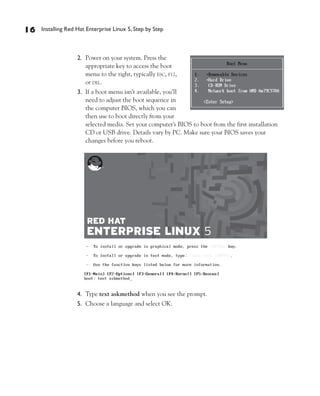
Do you know HP SimpleSave hard drive and its backup software? Do you know there are many other HP backup products? This article will introduce them to you.
Installation Guide XBRL Software [Zen Exbace] on Windows XPKDK Software
Get a complete Installation guide on XBRL Software.
http://www.exbace.com/default.aspx
Find flexible solution for financial information interchange of companies. eXBace is a streamline filing of financial statements as per MCA specifications.
Becoming Linux Expert Series-Install Linux Operating Systemskbansal222
Go to: https://www.udemy.com/becoming-linux-expert-series-install-linux-operating-system/?couponCode=coupon2701
First course in the series to install Linux Operating System.88% discount.only at $1.
1. Very basic course
2. charges only token money of $1. 88% discount.
3. This is the first course in the series of many courses which I will be doing on Linux Operating system. There are many OS available but we will see that why we choose Linux.
4. Go to: https://www.udemy.com/becoming-linux-expert-series-install-linux-operating-system/?couponCode=coupon2701
5. Only 100 coupons are avalable.
Request you to leave a review.
Installation guide for Red Hat Enterprise Linux 6Varnnit Jain
Red Hat Enterprise Linux (RHEL) is a Linux distribution developed by Red Hat and targeted toward the commercial market. here is the installation guide for the same. Follow the steps.
Software Delivery At the Speed of AI: Inflectra Invests In AI-Powered QualityInflectra
In this insightful webinar, Inflectra explores how artificial intelligence (AI) is transforming software development and testing. Discover how AI-powered tools are revolutionizing every stage of the software development lifecycle (SDLC), from design and prototyping to testing, deployment, and monitoring.
Learn about:
• The Future of Testing: How AI is shifting testing towards verification, analysis, and higher-level skills, while reducing repetitive tasks.
• Test Automation: How AI-powered test case generation, optimization, and self-healing tests are making testing more efficient and effective.
• Visual Testing: Explore the emerging capabilities of AI in visual testing and how it's set to revolutionize UI verification.
• Inflectra's AI Solutions: See demonstrations of Inflectra's cutting-edge AI tools like the ChatGPT plugin and Azure Open AI platform, designed to streamline your testing process.
Whether you're a developer, tester, or QA professional, this webinar will give you valuable insights into how AI is shaping the future of software delivery.
PHP Frameworks: I want to break free (IPC Berlin 2024)Ralf Eggert
In this presentation, we examine the challenges and limitations of relying too heavily on PHP frameworks in web development. We discuss the history of PHP and its frameworks to understand how this dependence has evolved. The focus will be on providing concrete tips and strategies to reduce reliance on these frameworks, based on real-world examples and practical considerations. The goal is to equip developers with the skills and knowledge to create more flexible and future-proof web applications. We'll explore the importance of maintaining autonomy in a rapidly changing tech landscape and how to make informed decisions in PHP development.
This talk is aimed at encouraging a more independent approach to using PHP frameworks, moving towards a more flexible and future-proof approach to PHP development.
Kubernetes & AI - Beauty and the Beast !?! @KCD Istanbul 2024Tobias Schneck
As AI technology is pushing into IT I was wondering myself, as an “infrastructure container kubernetes guy”, how get this fancy AI technology get managed from an infrastructure operational view? Is it possible to apply our lovely cloud native principals as well? What benefit’s both technologies could bring to each other?
Let me take this questions and provide you a short journey through existing deployment models and use cases for AI software. On practical examples, we discuss what cloud/on-premise strategy we may need for applying it to our own infrastructure to get it to work from an enterprise perspective. I want to give an overview about infrastructure requirements and technologies, what could be beneficial or limiting your AI use cases in an enterprise environment. An interactive Demo will give you some insides, what approaches I got already working for real.
Let's dive deeper into the world of ODC! Ricardo Alves (OutSystems) will join us to tell all about the new Data Fabric. After that, Sezen de Bruijn (OutSystems) will get into the details on how to best design a sturdy architecture within ODC.
Smart TV Buyer Insights Survey 2024 by 91mobiles.pdf91mobiles
91mobiles recently conducted a Smart TV Buyer Insights Survey in which we asked over 3,000 respondents about the TV they own, aspects they look at on a new TV, and their TV buying preferences.
GDG Cloud Southlake #33: Boule & Rebala: Effective AppSec in SDLC using Deplo...James Anderson
Effective Application Security in Software Delivery lifecycle using Deployment Firewall and DBOM
The modern software delivery process (or the CI/CD process) includes many tools, distributed teams, open-source code, and cloud platforms. Constant focus on speed to release software to market, along with the traditional slow and manual security checks has caused gaps in continuous security as an important piece in the software supply chain. Today organizations feel more susceptible to external and internal cyber threats due to the vast attack surface in their applications supply chain and the lack of end-to-end governance and risk management.
The software team must secure its software delivery process to avoid vulnerability and security breaches. This needs to be achieved with existing tool chains and without extensive rework of the delivery processes. This talk will present strategies and techniques for providing visibility into the true risk of the existing vulnerabilities, preventing the introduction of security issues in the software, resolving vulnerabilities in production environments quickly, and capturing the deployment bill of materials (DBOM).
Speakers:
Bob Boule
Robert Boule is a technology enthusiast with PASSION for technology and making things work along with a knack for helping others understand how things work. He comes with around 20 years of solution engineering experience in application security, software continuous delivery, and SaaS platforms. He is known for his dynamic presentations in CI/CD and application security integrated in software delivery lifecycle.
Gopinath Rebala
Gopinath Rebala is the CTO of OpsMx, where he has overall responsibility for the machine learning and data processing architectures for Secure Software Delivery. Gopi also has a strong connection with our customers, leading design and architecture for strategic implementations. Gopi is a frequent speaker and well-known leader in continuous delivery and integrating security into software delivery.
"Impact of front-end architecture on development cost", Viktor TurskyiFwdays
I have heard many times that architecture is not important for the front-end. Also, many times I have seen how developers implement features on the front-end just following the standard rules for a framework and think that this is enough to successfully launch the project, and then the project fails. How to prevent this and what approach to choose? I have launched dozens of complex projects and during the talk we will analyze which approaches have worked for me and which have not.
Connector Corner: Automate dynamic content and events by pushing a buttonDianaGray10
Here is something new! In our next Connector Corner webinar, we will demonstrate how you can use a single workflow to:
Create a campaign using Mailchimp with merge tags/fields
Send an interactive Slack channel message (using buttons)
Have the message received by managers and peers along with a test email for review
But there’s more:
In a second workflow supporting the same use case, you’ll see:
Your campaign sent to target colleagues for approval
If the “Approve” button is clicked, a Jira/Zendesk ticket is created for the marketing design team
But—if the “Reject” button is pushed, colleagues will be alerted via Slack message
Join us to learn more about this new, human-in-the-loop capability, brought to you by Integration Service connectors.
And...
Speakers:
Akshay Agnihotri, Product Manager
Charlie Greenberg, Host
Slack (or Teams) Automation for Bonterra Impact Management (fka Social Soluti...Jeffrey Haguewood
Sidekick Solutions uses Bonterra Impact Management (fka Social Solutions Apricot) and automation solutions to integrate data for business workflows.
We believe integration and automation are essential to user experience and the promise of efficient work through technology. Automation is the critical ingredient to realizing that full vision. We develop integration products and services for Bonterra Case Management software to support the deployment of automations for a variety of use cases.
This video focuses on the notifications, alerts, and approval requests using Slack for Bonterra Impact Management. The solutions covered in this webinar can also be deployed for Microsoft Teams.
Interested in deploying notification automations for Bonterra Impact Management? Contact us at sales@sidekicksolutionsllc.com to discuss next steps.
2. 2 Installing Red Hat Enterprise Linux 5, Step by Step
Installing Red Hat Enterprise Linux 5
This appendix is straightforward. It illustrates the steps required to install Red
Hat Enterprise Linux 5 Server on your computer, using graphical and text-
based installation methods. Both are governed by the Red Hat program known as
Anaconda. I’ve kept descriptive comments in this section to a minimum; for more
information, read Chapter 2. For both graphical and text modes, I’ll assume that
you’re installing from a remote installation server, shared with NFS.
While there are a substantial number of options available when you install
RHEL, I illustrate a more generic installation. If you want to learn about some of
the options, you’ll have to experiment with the installation yourself. In fact, the
exercises in Chapter 2 are designed to help you learn the different things you can
do with an RHEL installation, on your computer and during the exam.
If you’re installing Red Hat Enterprise Linux 5 Client, the steps are the same;
however, what you see is slightly different.
Graphical Installation
To install Red Hat Enterprise Linux 5 on your computer, take the following steps:
1. Select and insert the media that you’ll use to boot the Red Hat Enterprise
Linux 5 installation program. It
can be the first Red Hat Enterprise
Linux 5 CD, a boot CD created from
the boot.iso file from the /images
directory of the first installation
CD, or a boot USB key created from
the diskboot.img file from the same
directory.
2. Power on your system. Press the appropriate key, typically ESC, F12,
or DEL, to access the boot menu shown here.
If a boot menu isn’t available, you’ll need to adjust the boot sequence in the
computer BIOS, which you can then use to boot directly from your selected
media. Set your computer’s BIOS to boot from the first installation CD or
USB drive. Details vary by PC. Make sure your BIOS saves your changes
before you reboot.
3. Type linux askmethod when you see the boot: prompt.
4. 4 Installing Red Hat Enterprise Linux 5, Step by Step
5. Select a keyboard and select OK.
6. Set up an NFS installation method and select OK.
5. Graphical Installation 5
7. Start configuring your network, as shown. If you have a DHCP server on your
network, that is simplest—unless, of course, you’re told to enable static addressing
during your exam. For this installation, disable DHCP for both IPv4 and IPv6
addressing. If you don’t have an IPv6-capable DHCP server or router, disable
IPv6 addressing completely. Select OK. If you enable DHCP, skip the next step.
8. Add static address information for your network. Use the IP Address,
Gateway, and Name Server (DNS) addresses associated with your existing
network. Select OK.
6. 6 Installing Red Hat Enterprise Linux 5, Step by Step
9. Add connection information to the installation server. If you don’t have a
DNS server for the local network, you can substitute the IP address for the
NFS server name. Select OK.
10. Assuming your connection works, you’ll see the first installation screen.
Click Next.
7. Graphical Installation 7
11. You’ve already selected a language and keyboard, so the next step, if you’re
actually running Red Hat Enterprise Linux 5 (as opposed to one of the
rebuild distributions), is to enter an installation number associated with
your purchased or trial subscription, as shown next. The subscription
configures a custom set of package groups and repositories. If you don’t have
an installation number, select the Skip Entering Installation Number radio
button. Click OK, and If you did not enter an installation number, you’ll be
given a warning. Click Skip to continue.
12. The installation program searches for existing installations. If found, you’re
prompted to either upgrade or install over the existing installation. If not
found, you won’t see the screen shown here; if the drive is unformatted,
you’ll get a warning. Otherwise, skip to the next step. Select Install Red Hat
Enterprise Server and click Next to continue.
13. You can allow Anaconda to configure an optimized partition configuration
based on your memory and available hard disk space (based on free space
after removing partitions), or choose to customize the configuration, as
8. 8 Installing Red Hat Enterprise Linux 5, Step by Step
shown next. For the purpose of this installation, select Review And Modify
Partitioning Layout.
If you have network attached storage (NAS) that is configured to communicate
via iSCSI (a TCP/IP protocol), click Advanced Storage Configuration. You
can also configure communication with that storage here. If that’s what
you want to do, select Add iSCSI target, and click Add Drive. This opens a
Configure iSCSI Parameters window, where you’d enter the IP address and
iSCSI Initiator Name. But that’s beyond the scope of the current Red Hat
exams. Click Cancel to return to the previous screen, and then click Next.
14. If there are existing partitions on the installed hard drives, you’ll get the chance
to confirm that you want to remove said partitions (this step isn’t final). If
you’re configuring a dual-boot with another operating system, don’t delete the
partitions! Instead, click Back and select Create A Custom Layout. However,
the Red Hat exams are Linux exams, so I believe a dual-boot configuration,
especially with Microsoft Windows, is unlikely during the exam. These options
are shown next. Choose Yes or No, as appropriate.
9. Graphical Installation 9
15. Now inspect and change partitions in Disk Druid, as shown. You can also
create and then configure RAID and LVM partitions, as discussed in Chapter 2.
Make any desired changes, and then click Next.
10. 10 Installing Red Hat Enterprise Linux 5, Step by Step
16. Once you’ve configured your partitions, set up a boot loader. If you select
No Boot Loader Will Be Installed, you’ll need to use a third-party boot
loader such as Partition Magic or Microsoft’s NTLDR. Unless you want
to set up a Boot Loader Password or Configure Advanced Boot Loader
Options, click Next.
17. Configure your connection to the network. It should reflect the settings you
input in steps 8 and possibly 9. If you don’t want the DHCP server to assign a
hostname (or you don’t have a DHCP server), you can assign it manually, as
shown here. Click Next to move on.
11. Graphical Installation 11
18. Set the time zone for your system. If you don’t have another operating system
on this computer, keep the System Clock Uses UTC option active. Then
click Next.
12. 12 Installing Red Hat Enterprise Linux 5, Step by Step
19. Type in and confirm the root password for your system. Follow any instructions
on your exam carefully for this; you want to make it easy for the person grading
your exam to see what you’ve done. Yes, lost root passwords can be reset, but
what will your score be if the person grading your exam finds that you ignored
his or her instructions? Click Next.
20. There are two package customization screens available. Everyone sees the
screen shown next. (The choices are slightly different for Red Hat Enterprise
Linux 5 Client.) You can accept the defaults, select available options, and/or
select Customize Now. It’s usually best to customize modestly (I’ve selected
the Customize Now option), based on the requirements on your particular
Installation and Configuration exam. Click Next. (If you don’t select
Customize Now, skip the next step.)
13. Graphical Installation 13
21. Select the package groups of your choice. This should conform to the
requirements of the Installation and Configuration section of your
particular exam. Click Next.
14. 14 Installing Red Hat Enterprise Linux 5, Step by Step
22. Once you’ve selected the package groups of your choice, you get one last
chance to go back before starting the installation process. Click Next if
you’re happy with your choices, or click Back to make changes.
23. Some configuration options associated with previous versions of RHEL are no
longer part of the installation process. Some of these options are part of the
First Boot process described in Chapter 2. Normally, you’ll see the First Boot
screens only the first time you reboot a system.
Click Next when you’re ready to start the actual installation process. Depending
on hardware and network connections, it may take a few minutes, or more.
24. The next screen congratulates you for completing the installation. The next
step is to reboot your computer into RHEL. Click Reboot.
15. Text Installation 15
If you had to modify your computer’s BIOS menu, change it back so it boots
from the hard drive in the future. Make sure your BIOS saves your changes
before you reboot.
Text Installation
To install Red Hat Enterprise Linux 5 on your computer in text mode, take the
following steps:
1. Select and insert the media that you’ll use to boot the Red Hat Enterprise
Linux 5 installation program. It can be the first Red Hat Enterprise Linux 5
CD, a boot CD created from the boot.iso file from the /images directory of
the first installation CD, or a boot USB key created from the diskboot.img
file from the same directory.
16. 16 Installing Red Hat Enterprise Linux 5, Step by Step
2. Power on your system. Press the
appropriate key to access the boot
menu to the right, typically ESC, F12,
or DEL.
3. If a boot menu isn’t available, you’ll
need to adjust the boot sequence in
the computer BIOS, which you can
then use to boot directly from your
selected media. Set your computer’s BIOS to boot from the first installation
CD or USB drive. Details vary by PC. Make sure your BIOS saves your
changes before you reboot.
4. Type text askmethod when you see the prompt.
5. Choose a language and select OK.
18. 18 Installing Red Hat Enterprise Linux 5, Step by Step
7. Set up an NFS installation and select OK.
8. Start configuring your network. If you have a DHCP server on your network,
that is simplest—unless, of course, you’re told to enable static addressing
during your exam. For this installation, disable DHCP and IPv6 addressing.
Select OK. If you enable DHCP, skip step 8.
19. Text Installation 19
9. Add static address information for your network. Use IP, Gateway, and Name
Server (DNS) addresses associated with your existing network. Select OK.
10. Add connection information to the installation server, as shown. If you don’t
have a DNS server for your local network, you can substitute the IP address
for the NFS server name. Select OK.
20. 20 Installing Red Hat Enterprise Linux 5, Step by Step
11. Assuming your connection works, you’ll see the first text-mode installation
screen, welcoming you to Red Hat Enterprise Linux Server. Select OK.
12. Since you’ve already selected a language and keyboard, if you’re actually
running Red Hat Enterprise Linux 5 (as opposed to one of the rebuild
distributions), you can enter an Installation Number associated with your
purchased or trial subscription, as shown next. If you don’t have an installation
number, select the Skip Entering Installation Number option. The subscription
configures a custom set of package groups and repositories. Select OK.
21. Text Installation 21
If you did not enter an installation number, you’ll be given a warning. Select
Skip to continue.
13. The installation program now searches for existing installations. If found,
you’re prompted to either upgrade or install over the existing installation.
If you see this screen, select Reinstall System and select OK to continue.
Otherwise, you won’t even see these options and are taken to the next
step. You can allow Anaconda to configure an optimized installation based
on your system’s RAM and available hard disk space (based on free space
22. 22 Installing Red Hat Enterprise Linux 5, Step by Step
after removing partitions). This corresponds to the “default layout” options
described in Chapter 2. Alternatively, you can choose to customize the
configuration, as shown next. Select OK.
14. If one of the “default layout” options was selected, you’ll be asked to confirm
the changes to existing hard drive partitions. For the purpose of this section,
select Yes.
15. You’re prompted whether you want to Review And Modify Partitioning
Layout. Select Yes for the purpose of this appendix. If there are existing
partitions on the installed hard drives, you’ll be given the opportunity to
remove these partitions. If you’re configuring a dual-boot with another
operating system, don’t delete the partitions! However, on the exam, you’ll
be working with Linux, so I believe a dual-boot configuration, especially with
Microsoft Windows, is unlikely.
23. Text Installation 23
Now you can inspect and change partitions in Disk Druid, as shown. You
can also create and then configure RAID partitions. However, text-mode
installations do not allow you to create logical volumes unless there’s already
an existing volume group; text mode does not support the creation of a new
volume group. Select OK.
24. 24 Installing Red Hat Enterprise Linux 5, Step by Step
16. Once you’ve configured your partitions, choose a boot loader. If you select
No Boot Loader, you’ll need to use a third-party boot loader such as Partition
Magic or Microsoft’s NTLDR. Select OK.
17. Assuming you stick with the default GRUB boot loader, you can pass special
options to the kernel. If you don’t need Security Enhanced Linux, you might
add selinux=0 as shown next. Select OK.
25. Text Installation 25
18. You can also configure GRUB with a password. Select OK.
19. If more than one operating system is installed on this computer, you can
configure the default operating system and labels, as shown next. Select an
entry and click Edit. This opens the Edit Boot Label window that allows you
to change what you see in the GRUB menu.
26. 26 Installing Red Hat Enterprise Linux 5, Step by Step
20. Finally, you can choose to install the boot loader on the MBR or on the first
sector of the RHEL /boot partition. Select OK.
21. Configure your connection to the network, as shown next. It should reflect
the settings you input in steps 7 and 8. If you don’t want the DHCP server
to assign a hostname (or you don’t have a DHCP server), you can assign it
manually. Select OK.
27. Text Installation 27
22. Assuming you’ve set up a static configuration, you’ll see a screen where you
can set up Gateway and DNS (name server) IP address information. Fill in
this information and select OK.
23. You can also add the hostname of your choice, as shown. If you have more than
one network adapter, you’ll return to step 18 as often as needed. Select OK.
28. 28 Installing Red Hat Enterprise Linux 5, Step by Step
24. Next, set the time zone for your system. If you don’t have other operating
systems on this computer, keep the System Clock Uses UTC option active.
25. Now type in and confirm a root password for this system. Follow any instructions
on your exam carefully for this; you want to make it easy for the person grading
your exam to see what you’ve done. Select OK.
29. Text Installation 29
26. There are two package customization screens available. Everyone sees the screen
shown next. You can accept the defaults, select available options, and/or select
Customize Software Selection. It’s usually best to customize modestly (I’ve
selected the Customize Software Selection option), based on the requirements
on your particular Installation and Configuration exam. Select OK.
27. Select the package groups of your choice. Your selections should conform
to the requirements of the Installation and Configuration section of your
particular exam. Select OK.
30. 30 Installing Red Hat Enterprise Linux 5, Step by Step
28. Once you’ve selected the package groups of your choice, you get one last
chance to go back before starting the installation process. Select OK to start
the installation process.
29. Once your installation process starts, a screen will show the progress of the
installation.
31. Text Installation 31
Some configuration options associated with previous versions of RHEL are no
longer part of the installation process. Some of these options are part of the
First Boot process described in Chapter 2. Normally, you’ll see the First Boot
process only the first time you reboot a system.
30. When the Complete screen appears, you’ll know that installation is just
about complete. Select Reboot to reboot your computer into RHEL.
31. If you had to modify your computer’s BIOS menu, change it back so it boots
from the hard drive in the future. Make sure your BIOS saves your changes
before you reboot.