Ubuntu alternate ubuntu installation
•
0 likes•417 views

step by step alternate version of ubuntu and issues faced . some useful commands in ubuntu.Also steps on how to enable virutal box

Recommended
More Related Content
What's hot
What's hot (20)
Viewers also liked
Viewers also liked (20)
Similar to Ubuntu alternate ubuntu installation
Similar to Ubuntu alternate ubuntu installation (20)
More from arunkumar sadhasivam
Recently uploaded
Recently uploaded (20)
Ubuntu alternate ubuntu installation
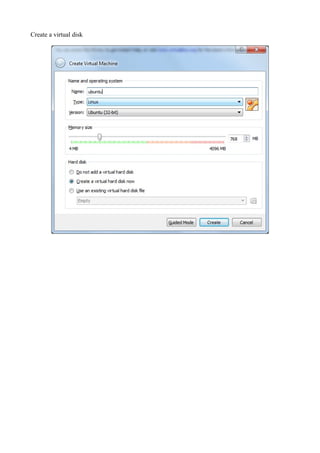
- 1. Create a virtual disk
- 2. set the hard disk size: size specified will be used in partition. Install ubuntu
- 13. byte space specified in first step 60 gb will be shown here. Select the free space
- 14. create a new partition. Split the partition to 15 gb for root ,15 gb for swap and remaining for the /hadoop
- 15. 15 gb for (/) root
- 20. Click the mount area use as
- 21. 3 partition for bigdata
- 24. change use as /home
- 28. Change mount point to /bigdata
- 32. install package manager Default Package Manager in DEBIAN / UBUNTU system is : 1) dpkg which is a backend tool for the more powerful apt system 2) apt as Frontend 3) aptitude (GUI of apt) For RED HAT LINUX distros like Fedora or CentOS: 1) rpm as Backend 2) yum as Frontend
- 35. GRUB, the Grand Unified Bootloader. This is the tiny piece of software responsible for starting up your computer and getting Linux — or Windows, if you dual-boot — loaded into memory. Because the PC architecture has undergone dramatic changes in the last 25 years, the boot process has become more complicated, and requires a small piece of software to handle getting your chosen operating system loaded into memory. With Windows XP, this piece of software is called NTLDR. On Linux, it’s called GRUB. (There was also another bootloader called LILO, but it’s been obsolete for years and is not recommended for new installations, even if your distribution gives you the option.) Both of them do the same thing: they get the operating system loaded into memory, and optionally, present you a menu with different choices on how you would like to boot your system. As I mentioned, there are two options for installing GRUB. First, you can install it to the Master Boot Record of your first hard drive. Second, you can install it to the boot sector of the active (bootable) hard drive partition. Which one is the right one? It depends. If you intend to dual-boot Windows, then you should avoid installing GRUB to the MBR. The reason for this is that Windows occasionally overwrites the MBR, for instance, when you reinstall it, and that could be quite often. When that happens, your Linux system will seem to disappear as your system starts booting directly into Windows, bypassing the boot menu altogether. To avoid this, install GRUB to the boot sector of the active partition instead. There’s an exception to that rule: If you are installing Linux to a secondary hard drive, and no part of it will be on your main hard drive, then you must install GRUB to the MBR, and take your chances with Windows overwriting the MBR with its own at some future date. If this happens, you’ll have to use a Linux rescue CD to get GRUB reinstalled. (I’ll cover this procedure in the future.) If, however, Linux will be the only operating system on your computer, it’s perfectly safe to — and you must — install GRUB to the MBR. Some special circumstance notes: If you run OS/2, you MUST NOT install GRUB to the MBR under any
- 36. circumstances, or you won’t be able to boot OS/2! You will have to install it to the boot sector of the Linux /boot partition on your primary (first) hard drive. If you don’t have any free unpartitioned space on your first hard drive, you will have to use a resizing tool such as Partition Magic to create some space and have your Linux installation create the Linux /boot partition in that space. The space must be within the first 1024 cylinders of the hard drive. And it will have to be a primary partition as well, not a logical partition. Many computers can’t boot from logical partitions, only primary ones. The root (/) partition can be elsewhere, even on a secondary hard drive. You’ll then need to add the /boot partition to OS/2’s Boot Manager menu once you’ve completed the Linux installation. If you have multiple Windows versions on your computer, and use a Windows boot menu to access them, you can add Linux to the Windows boot menu, but the process for this is somewhat complex, and I don’t intend to cover it here. Install GRUB to the boot sector instead, creating a /boot partition on the primary hard drive if necessary (see the OS/2 note above). As you’ve probably gathered, the simple everyday act of booting up your PC is much more complex than you thought it was. This has a lot to do with the way your computer’s BIOS accesses internal hard drives. The BIOS is the very first bit of software which starts when you turn on your computer, and it’s located on a physical ROM chip inside the machine. Twenty years ago, hard drives of 5 to 20 MB were common, and many PCs even shipped without a hard drive! Even as late as ten years ago, most computer BIOS software could not access more than the first 528 MB of a hard drive, creating booting problems. Eventually a solution called LBA (logical block addressing) raised this limit, first to 8 GB, and in more recent computers, to 137 GB. This is the range that the so-called first 1024 cylinders can access through the BIOS, before your operating system loads (using GRUB, NTLDR, or what have you). As hard drives exceed 137 GB now, and computers with 1TB of hard drive space are just now becoming available to consumers, the 20 year old BIOS design will again make trouble for the seemingly simple task of starting your computer.
- 38. CTRL=C (HOST KEY +C) to view in full mode: RIGHT CTRL+I to mouse and local windows 7 properly sync
- 39. as you can see can control mouse in windows command prompt and linux ubuntu screen Settings: to copy any content from windows to ubuntu and ubuntu to windows change the settings. Click settings and change it.
- 40. Change network to bridge adapter . Change video memory as as much as possible.
- 41. Click file > preference add extension to make display looking good. Terminal window look bad
- 43. Install guest Additions extensions: RIGHT-CTRL + F – fullscreen mode:press CTRL +F till you the below screen i.e top menu and footer
- 45. fails may if install ubuntu-alternate12.04 32 bit on windows 7. default value
- 46. folder structure of ubuntu as per partition:
- 47. bigdata created as mentioned in partition
- 48. bigdata as Root APTCommands: apt-get install apt-get remove purge: When removing software in some files such as configurations are not always removed. To completely remove a package use the purge switch apt-get remove –purge force install To fix broken packages use the force option with install apt-get -f install upgrade: apt-get upgrade dist-upgrade: use apt-get dist-upgrade apt-get dist-upgrade --To re-load your sources.list file use apt-get update
- 49. apt-get update To set environment variable in ubuntu: ===================================== 1. either edit /etc/bash.bashrc file but we dont have access to edit it >su root >password: root@ubuntu:/home/arun#nano /etc/bash.bashrc ^O to edit the file ^X to save the changes, it will ask whether to save the changes. if yes is given it will save. NOTE : this is bad practice as it causes login failure and affect all user . i created wrong environment variable which causes failure and looping login screen without login in to the screen.please can avoid other options: ============ add enviornment entry file with .sh under etc/profile.d/ files created with shell script will run when ubuntu starts. >su root >password: since we dont have permission to edit the files we can add a file by using sudo root root@ubuntu:/home/arun#mv arun /home/arun/environment.sh /etc/profile.d/ Adds a user sudo adduser Disable a user sudo passwd -l 'username' Delete a user sudo userdel -r 'username' change user password sudo pwd <> e.g sudo pwd arun Enter new password: Retype new password: passwd: passwd change successfully. Add user a to a usergroup sudo usermod -a -G GROUPNAME USERNAME
- 50. Remove user from a user group sudo deluser USER GROUPNAME NOTE: If you’re an experienced Linux user, it’s possible to configure Ubuntu so that the root account login is activated. Simply type the following at the command prompt to configure Ubuntu so that the root account login is activated sudo passwd root Then type a password. To switch to the root user in the future, type su -. To quit, type exit or hit Ctrl+D. deactivate the root account sudo passwd -l root If you ever want to slip into the root account for a short period, even if you haven’t followed the previous instructions to activate the root account login, you can do so by typing the following: sudo su You’ll be prompted to type your ordinary account login password; do so. When you’ve finished, type exit to return to your standard user account (or hit Ctrl+D). we can temporarily switch to this user by typing the following command, which stands for substitute user: su frank changing permissions: chmod a+rw myfile a-adding r-removing w-writing changing group: chmod g-rw. add(+) read/write permission for owner
- 51. if ubuntu login causes login loop with login in: ================================================ You might be having problems with LightDM, the login manager that comes in Ubuntu by default. In 12.04 it used to do the same problem you are describing. You can install GDM, an alternative login manager, to get around this: At the login screen, press and hold Ctrl+Alt+F2 (login in to ubuntu using command prompt way) to go to the terminal. Don't be afraid! Just log in here with your username and password. Then, type sudo apt-get install gdm. Let it install and type sudo dpkg-reconfigure gdm and follow the prompts to set it as your login manager. Press Ctrl+Alt+F7 to get back to the login screen which should now look different. Does logging in work? If it does, your problem is solved! If it doesn't, go back to the fullscreen terminal and type sudo dpkg-reconfigure lightdm to set LigthDM as you login manager again. Now you know that this is a problem with your graphics drivers for sure. to delte the folder use ======================= ctrl+Alt+F3 to go to command prompt login login as any user and try >arun@ubuntu: su root >password: >root@ubuntu:/home/arun# rm -rf <<foldername>> to delete the file >root@ubuntu:/home/arun#rm -f envrionment.sh login loop back issue solved : ============================== issue is files created under /etc/profile.d/ will be accessible for all user hence if any thing enter wrong causes login loop back failure all over. i deleted the file in command prompt mode using admin account steps: CTRL+ALT+F3 enter in command prompt mode enter as login arun >arun@ubuntu: su root >password: >root@ubuntu:/home/arun#cd /etc/profile.d >root@ubuntu:/etc/profile.d#rm -rf environment.sh << which i created unknowingly earlier> >sudo reboot reboot the ubuntu and try login worked!!!
- 52. This error occurs because of 64 bit os installed with 32 bit ubuntu. NOTE: virutal box by default wont support 64 , it is a problem need to fix by following steps: click installable virutal box in repair mode
- 53. now you can see it shows 64 bit ubuntu. Install above procedure of ubuntu installation in 64 bit .it create a new virtual box icon. Hence make sure delete the desktop icon and click virtual box as like re-installation. After this two virtualbox will be there C:Program FilesOracleVirtualBox make sure not select one in C:Program Files (x86)
- 54. still error persist change compatibility to windows 7 NOTE: while re-install / repair better kill all vbox tasks in taskmanager. Still not working may be need VT(virtual technology) need to be enabled. Reboot F2 bios setup In windows Bios settings > security tab > intel virtual technology>enabled check it is working fine !!!
- 55. common errors: Authenticator error: ==================== The root account is disabled by default in Ubuntu, so there is no root password, that's why su fails with an authentication error. Use sudo to become root: sudo -i only temporary only till open session of terminal worked!!! To permanently add a user to root login: sudo passwd root Then type a password. To switch to the root user in the future, type su -. To quit, type exit or hit Ctrl+D.
- 56. Use sudo to become root: sudo -i only temporary only till open session of terminal To permanently add a user to root login: sudo passwd root Then type a password. To switch to the root user in the future, type su -. To quit, type exit or hit Ctrl+D. Permanently make user to become a root sudo -i only allow to become root only till terminal session open. only till terminal session open. only one terminal session. once closed no more user is root. to permanently enable user as a root follow steps using sudo passwd root: The root account is disabled by default in Ubuntu, so there is no root password, that's why su fails with an authentication error. ERROR: if during installation /media partition isnot given it shows below error. Guest additions media files cannot be installed.
- 57. 1.Alternate: will be useful if does not have a cd to install. you can install from even windows 7 or any system without any bootable . i.e you can mount the iso file in virtual box in local disk locating the path of iso file and can install easily. experience ubuntu users prefer this. you can have more control the way partition and bootfile everything.only command prompt support not support gui based installation. can find information on how to install Ubuntu from the Alternate CD. The Alternate CD provides more advanced installation options than the standard Desktop CD, which is the recommended method of installing Ubuntu. For instructions on how to use the Desktop CD, see the Graphical Install page on the Ubuntu community documentation site. The alternate CD can be used to upgrade your Ubuntu version. This is useful for offline computers. The alternate CD installer is not a live CD. You can't use it to try out Ubuntu, test if Ubuntu works or fix a PC/edit partitions without reinstalling. 2.Desktop: if you have CD to install you can use. it is gui based easy over alternate. 3.server: Server edition comes with all the common applications that you would find in a server, php, mysql etc. Server edition doesn't have a GUI (neither gnome or kde). If you want to make your desktop work as a server, just install apache and any other tools that a server needs. Thats the point of the server edition. Is not to be a different version, but a specialized version. It saves you time because all the apps that a server needs come already in the installation cd. Certification as a guest on AWS, Microsoft Azure, Joyent, IBM and HP Cloud Updates to Tomcat (v7), Postgresql (v9.3), Docker v(0.9), Puppet (v3.0), Qemu (v2.0), Libvirt (v1.2), LXC (v1.0) and MySQL (v5.5)
- 58. between the Desktop and the Alternate installation: The Desktop install CD image contains a graphical installer as well as a live session of Ubuntu, that runs directly off your computer memory and the install media without installing anything to hard-disk. Using the live session installer you have the opportunity to begin using Ubuntu immediately, get an idea of system performance and install if and when ready. The Alternate CD has an old style, lightweight text-based installer with no Live session available. It also provides you with extra options and configurations not offered by the desktop versions. What do the DVD images contain? The Ubuntu DVD is a conjugation(link between alternate and desktop) of the Alternate and the Desktop CD. At the boot prompt, you can select to either go into the Live session with a graphical install, or do the old classical install. sources.list file Repositories are particular locations on the web which contain the thousands of packages (each containing programs, applications, etc) that you would need on your computer. The sources.list file contains the list of all the repositories that will be used to download packages in Synaptic and APT (see APTPage); it is located in /etc/apt/. Since /etc is the directory for system- wide configurations, you will require root privileges to edit it . Partition type during installation: Guided -resize SCSI3:
- 59. it creates 2 partition one for / and one for swap and allow you to change the size to have for root and swap.it ony shown if you partitioned already using manual method. Guided entire disk: it creates fixed partition by system , you cannot change the memory size allocated for root(/) and swap.
- 60. As you can see now resize SCSI3 is showing:
- 61. Guided Entire Disk and set up LVM: guided partition allows you to set up LVM(Logical volume manager) so with this further with this you can able to grow logical volumes later using later using the LVM Tools . So smaller part of partition towards LVM adds more flexibility.
- 63. Guided partition -use entire disk and set up encrypted LVM: if encryption is needed you can use this partiton type. NOTE: To create a desk version , you can download POWER ISO and ubuntu as iso and write to disk and can install ubuntu from CD. Guided -use entire disk and set up LVM is easy for beginner because if memory size
- 64. allocated is low not sure than we can change later by removing space from other drive and move to drive which needs space. With logical volume management, the whole disk would be allocated to a single volume group and logical volumes created to hold the / /usr and /home file systems. If, for example the /home logical volume later filled up but there was still space available on /usr then it would be possible to shrink /usr by a few megabytes and reallocate that space to /home. Another alternative would be to allocate minimal amounts of space for each logical volume and leave some of the disk unallocated. Then, when the partitions start to fill up, they can be expanded as necessary. As an example: Joe buys a PC with an 8.4 Gigabyte disk on it and installs Linux using the following partitioning system: /boot /dev/hda1 10 Megabytes swap /dev/hda2 256 Megabytes / /dev/hda3 2 Gigabytes /home /dev/hda4 6 Gigabytes This, he thinks, will maximize the amount of space available for all his MP3 files. Sometime later Joe decides that he want to install the latest office suite and desktop UI available but realizes that the root partition isn't large enough. But, having archived all his MP3s onto a new writable DVD drive there is plenty of space on /home. His options are not good: 1.Reformat the disk, change the partitioning scheme and reinstall. 2.Buy a new disk and figure out some new partitioning scheme that will require the minimum of data movement. 3.Set up a symlink farm on / pointing to /home and install the new software on /home With LVM this becomes much easier: NOTE: if guest additions icon in devices tab is clicked /media files is not able to understand show error " cannot able to mount media c:/vboxGuestAdditions.iso.hence .if already installed it shows the error message. As you can previously i given /bigdata folder hence the issue. Now i given only partition
- 65. root (/) hence now the guest additions is working.
- 66. Correctly working gui settings: Preference:
- 67. Settings:
- 72. command to check partition: arun@ubuntu:~$ sudo lsblk -o NAME,FSTYPE,SIZE,MOUNTPOINT,LABEL