Download to read offline

![16
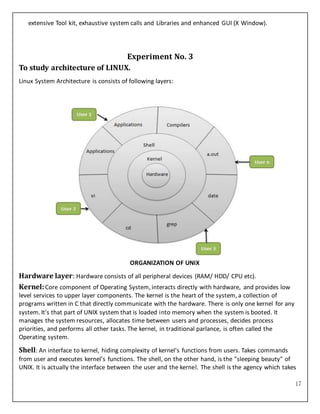
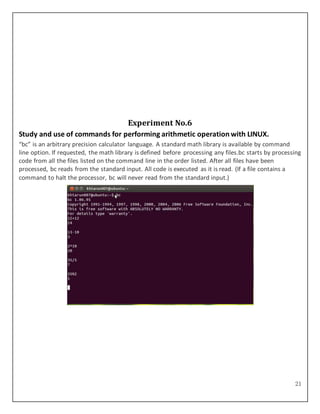
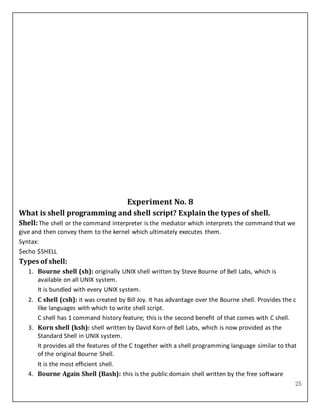
Experiment No. 2
To study UNIX operating system and explain its function.
OPERATING SYSTEM:An Operating System is a set of programs that Functions as an virtual
machine by presenting an interface that is easier to program than the underlying hardware acts as
resource management through orderly and controlled allocation of the processors, memories, and I/O
devices among the programs competing for it.
Types of Operating System:
1. Single User: The system will have its own hard disk, memory, CPU and other resources all
dedicated to a single user. Example: MS-DOS.
2. Multi User: The users having access to a multi-user system will have just a terminal and a
keyboard. The other resources such as hard disk, printers are centrally located. The user is
expected to simply hook onto his account, perform the work, disconnect and leave quietly.
Example: UNIX.
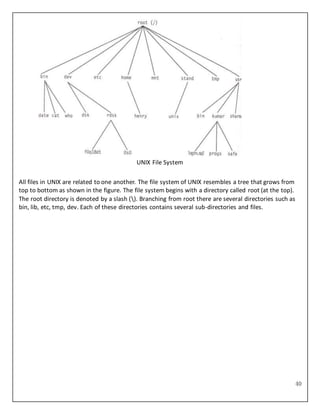
UNIX History:
The spade work for UNIX began at AT&T Bell Laboratories in 1969 by Ken Thompson and Dennis
Ritchie. The OS was initially known as UNICS (jokingly UNiplexed Information and Computing
System). In 1970 UNICS finally became UNIX. In 1973, UNIX was rewritten in 1973 in C principally
authored by Ritchie.
UNIX Function:
1. Multi-user system: Multi-user capability of UNIX allows several users to use the same
computer to perform their tasks. Several terminals [Keyboards and Monitors] are connected to a
single powerful computer [UNIX server] and each user can work with their terminals.
2. Multi-tasking system: Multitasking is the capability of the operating system to perform
various task simultaneously, i.e. a user can run multiple tasks concurrently.
3. Programming Facility: UNIX is highly programmable, the UNIX shell has all the necessary
ingredients like conditional and control structures, etc.
4. Security: UNIX allows sharing of data; every user must have a single login name and password.
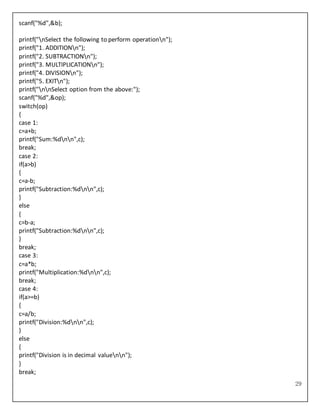
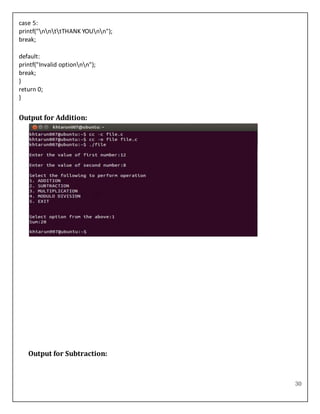
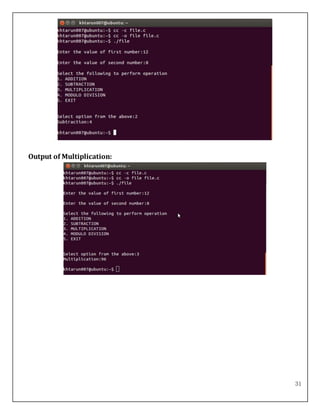
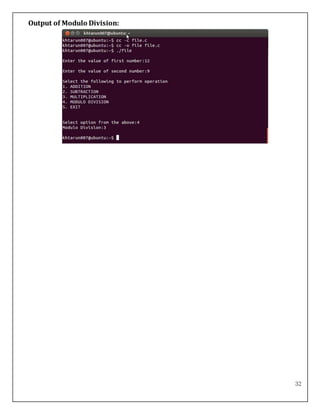
So, accessing another user’s data is impossible without his permission.
5. Portability: UNIX is portable because it is written in a high level language. So, UNIX can be run
on different computers.
6. Communication: UNIX supports communication between different terminals of the same
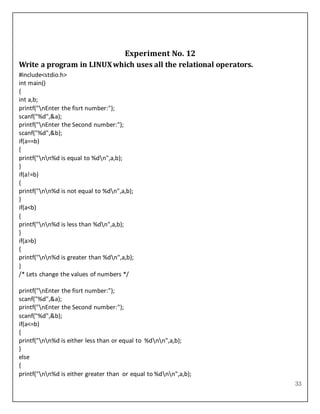
server as well as between terminals on different servers. Apart from these features, UNIX has an](https://image.slidesharecdn.com/srgoclinux-150928092218-lva1-app6891/85/Srgoc-linux-16-320.jpg)
![18
care of the features of redirection and has a programming capability of its own.
Utilities: The Tools and Applications consist of Application Software, Compilers, Database Package,
Internet tools, UNIX commands, etc.
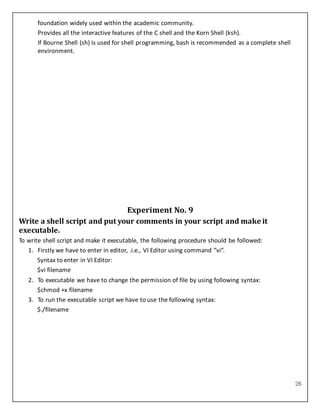
Experiment No. 4
To study basic & user status UNIX/LINUXcommands.
1. “touch” command: Create an empty file with 0 byte. It is also used to change the access and
modified time of currently exiting file.
Syntax:
$touch [option] [filename]
option:
“-a”: update the access time of a file.
“-m”: update the modification time of a file.
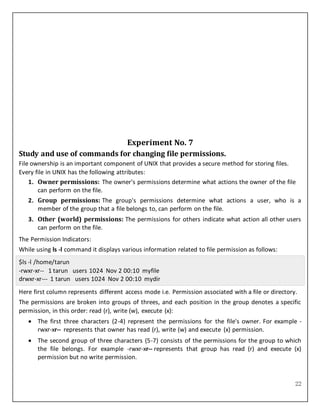
2. “chomd” command(Change Mode): Changes the file mode. The command is used to
change the permission of an ordinary file or directory.
Syntax:
$chmod <nnn> filename
Number Binary
Text
<nnn>
Octal Permission Representation
0 000 --- No permission (All types of access are denied
1 001 --x Execute permission (Execute access is allowed only)
2 010 -w- Write permission (Write access is allowed only)
3
011
-wx
Execute and write permission: 1 (execute) + 2 (write) = 3 (Write and
Execute are allowed)
4 100 r-- Read permission (Read access is allowed only)
5 101 r-x
Read and execute permission: 4 (read) +1 (execute) = 5 (Read and
Execute access are allowed)
6
110
rw-
Read and write permission: 4 (read) + 2 (write) = 6 (Read and Write
access are allowed)
7 111 rwx
All permissions: 4 (read) + 2 (write) + 1 (execute) = 7 (Read, Write and
Execute are allowed)
3. “rm” command(Remove File): The command is used to remove file from the system.](https://image.slidesharecdn.com/srgoclinux-150928092218-lva1-app6891/85/Srgoc-linux-18-320.jpg)
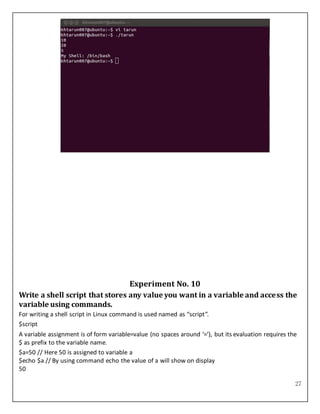
![19
Syntax:
$rm (f) filename
f: remove all the files regardless of their permission.
4. “mv” command(Move File): The command is used to move file from source to destination.
Syntax:
$mv (F) <source> <destination>
F: Do not ask whole approval or confirmation.
5. “cp” command(Copy File): The command copy the file from source to destination.
Syntax:
$cp <source> <destination>
6. “wc” command(WordCount): Counting the number of characters, words and lines.
Syntax:
$wc [option] [file]
option:
“-w”:words
“-l”:lines
“-c”:characters
7. “cat” command(Display File): This command is used to display file.
Syntax:
$cat <filename>](https://image.slidesharecdn.com/srgoclinux-150928092218-lva1-app6891/85/Srgoc-linux-19-320.jpg)
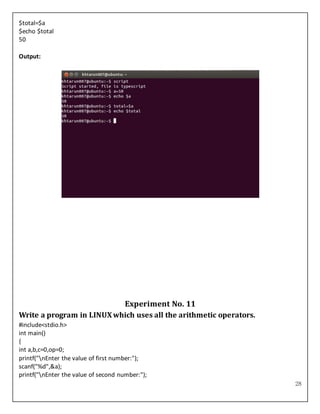
![20
Experiment No. 5
To study basic & user status UNIX/LINUXdirectory commands.
1. “ls” command: The “ls” command lists all files in the directory.
Syntax:
$ls [option] [filename]
option:
“-a”: list all the hidden files.
“-t”: list of the file name sorted by create time.
“-l”: long list of the directory purpose show the owner, group, permission and file size.
2. “pwd” command(Print Working Directory): It display the current path, pathname,
enables you to work out where you are in relation to all file system.
Syntax:
$pwd
3. “cd” command(Change Directory): The command cd directory means change the
working to directory.
Syntax:
$cd
4. “mkdir” command(Make Directory): This command is used to create a directory.
Syntax:
$mkdir <directoryname>
5. “rmdir” command(Remove Directory): This command is used to remove directory.
Syntax:
$rmdir <directory name>](https://image.slidesharecdn.com/srgoclinux-150928092218-lva1-app6891/85/Srgoc-linux-20-320.jpg)

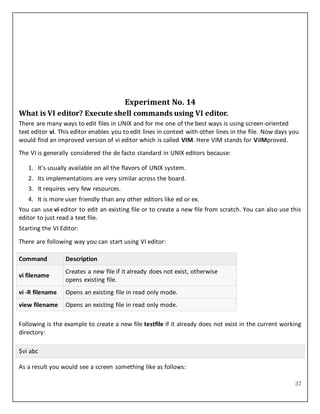
![38
|
~
~
~
~
~
~
~
~
~
~
~
~
"abc" [New File]
You will notice a tilde (~) on each line following the cursor. A tilde represents an unused line. If a line
does not begin with a tilde and appears to be blank, there is a space, tab, newline, or some other non-
viewable character present.
So now you have opened one file to start with. Before proceeding further let us understanding few
minor but important concepts explained below.
OperationModes:
While working with VI editor you would come across following two modes:
1. Command mode: This mode enables you to perform administrative tasks such as saving files,
executing commands, moving the cursor, cutting (yanking) and pasting lines or words, and
finding and replacing. In this mode, whatever you type is interpreted as a command.
2. Insert mode: This mode enables you to insert text into the file. Everything that's typed in this
mode is interpreted as input and finally it is put in the file.
The vi always starts in command mode. To enter text, you must be in insert mode. To come in insert
mode you simply type i. To get out of insert mode, press the Esc key, which will put you back into
command mode.
Hint: If you are not sure which mode you are in, press the Esc key twice, and then you'll be in
command mode. You open a file using VI editor and start type some characters and then come in
command mode to understand the difference.
Getting Out of VI:
The command to quit out of vi is: q. Once in command mode, type colon, and 'q', followed by return.
If your file has been modified in any way, the editor will warn you of this, and not let you quit. To
ignore this message, the command to quit out of vi without saving is: q! This lets you exit vi without
saving any of the changes.](https://image.slidesharecdn.com/srgoclinux-150928092218-lva1-app6891/85/Srgoc-linux-38-320.jpg)


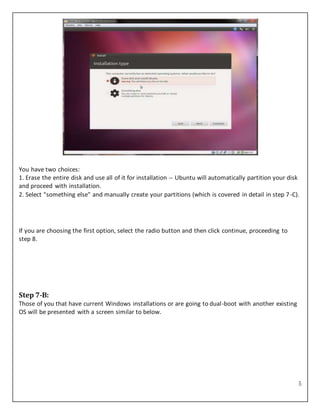
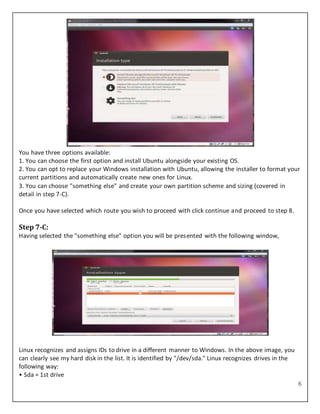
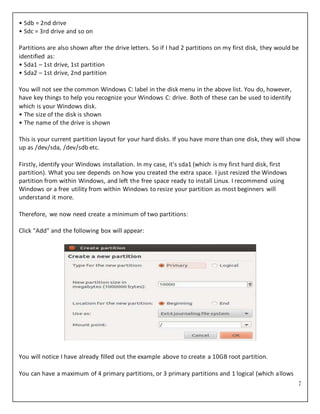
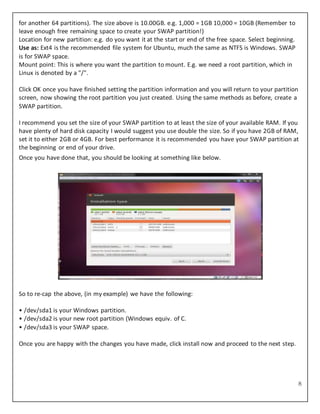
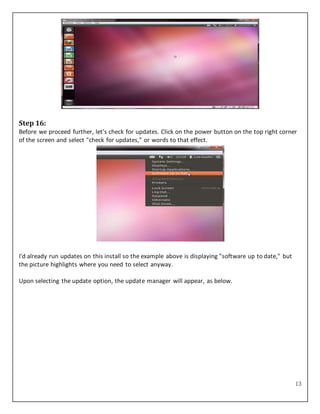
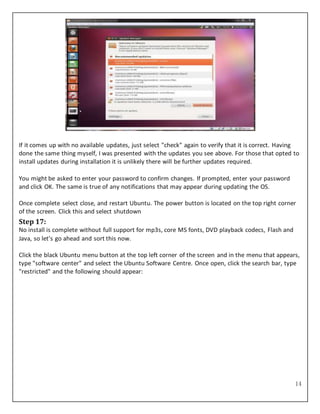
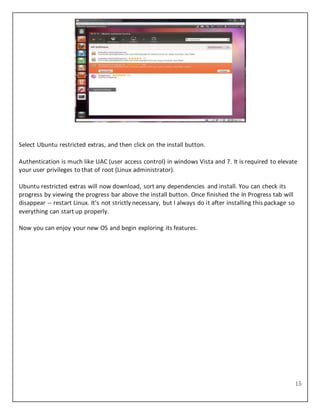
This document provides instructions for installing and configuring the Ubuntu Linux operating system on a computer. It includes 16 steps to guide the user through downloading Ubuntu, burning it to a disc, backing up data, booting from the live CD, installing Ubuntu alongside or replacing an existing Windows installation, setting up user accounts and preferences, and checking for software updates after installation is complete. Key steps involve partitioning the hard drive to allocate space for Ubuntu, selecting installation options, and rebooting to complete the process.


![[Deck] What's New in Spark-Iceberg Integration via DSV2.pptx](https://cdn.slidesharecdn.com/ss_thumbnails/deckwhatsnewinspark-icebergintegrationviadsv2-260210005337-25955b12-thumbnail.jpg?width=640&height=640&fit=bounds)


