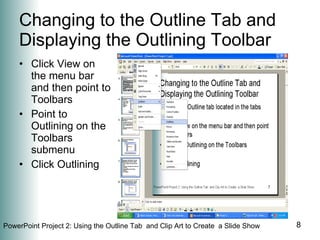
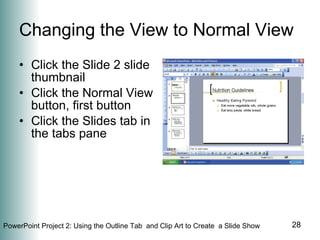
PowerPoint Project 2 Using the Outline Tab  and Clip Art to Create  a Slide Show
Objectives Start and customize a new slide show from an outline Add a slide and create a closing slide on the Outline tab Create text slides with multi-level bulleted lists on the Outline tab Save and review a presentation Insert and move clip art and change its size Add a header and footer to outline pages Animate clip art Add an animation scheme and run an animated slide show Print a presentation outline E-mail a slide show from within PowerPoint
Starting and Customizing PowerPoint Click the Start button on the Windows taskbar, point to All Programs on the Start menu, point to Microsoft Office on the All Programs submenu, and then click Microsoft Office PowerPoint 2003 on the Microsoft Office submenu If the PowerPoint window is not maximized, double-click its title bar to maximize it If the Language bar appears, right-click it and then click Close the Language bar on the shortcut menu If the Getting Started task pane appears in the PowerPoint window, click its Close button in the upper-right corner If the Standard and Formatting toolbars are positioned on the same row, click the Toolbar Options button and then click Show Buttons on Two Rows
Starting and Customizing PowerPoint Click the Slide Design button on the Formatting toolbar.
Starting and Customizing PowerPoint The Slide Design task pane is displayed Click the down scroll arrow  and then click the  Axis  template in the Available For Use area Click the Close button in the Slide Design task pane
Starting and Customizing PowerPoint
Changing to the Outline Tab and Displaying the Outlining Toolbar Click the Outline tab located in the tabs pane
Changing to the Outline Tab and Displaying the Outlining Toolbar Click View on the menu bar and then point to Toolbars Point to Outlining on the Toolbars submenu Click Outlining
Changing to the Outline Tab and Displaying the Outlining Toolbar
 
Creating a Title Slide  on the Outline Tab Click the Slide 1 slide icon on the Outline tab Type  Healthy Eating  and then press the SHIFT + ENTER keys Type  Healthy Living  and then press the ENTER key
Creating a Title Slide  on the Outline Tab Click on  the Demote button on the Outlining toolbar
Creating a Title Slide  on the Outline Tab Type  Nutrition and Fitness Basics  and then press the ENTER key Type  Clark College Fitness Center  and then press the ENTER key
Creating a Title Slide  on the Outline Tab
Adding a Slide on the Outline Tab Click the Promote button on the Outlining toolbar
Creating a Text Slide  with a Multi-Level Bulleted List on the Outline Tab Type  Nutrition Guidelines  and then press the ENTER key Click the Demote button on the Outlining toolbar to demote to the second level
Creating a Text Slide  with a Multi-Level Bulleted List on the Outline Tab Type  Healthy Eating Pyramid  and then press the ENTER key Click the Demote button on the Outlining toolbar to   demote to the third level
Creating a Text Slide  with a Multi-Level Bulleted List on the Outline Tab Type  Eat more vegetable oils, whole grains  and then press the ENTER key Type  Eat less pasta, white bread  and then press the ENTER key
Creating a Third Text Slide  with a Multi-Level Bulleted List Click the Promote button on the Outlining toolbar two times so that Slide 3 is added after Slide 2
Creating a Third Text Slide  with a Multi-Level Bulleted List Type  Recommended exercise  and then press the ENTER key Click the Demote button on the Outlining toolbar to demote to the second level
Creating a Third Text Slide  with a Multi-Level Bulleted List Type  30 minutes of daily moderate-intensity activity  and then press the ENTER key Click the Demote button to demote to the third level
Creating a Third Text Slide  with a Multi-Level Bulleted List Type  Brisk walking  and then press the ENTER key Type  Bicycling  and then press the ENTER key Type  Gardening  and then press the ENTER key
Creating a Third Text Slide  with a Multi-Level Bulleted List
Creating a Fourth Text Slide with a Multi-Level Bulleted List Your turn. Put in this slide. How many times do you hit Promote?
Creating a Closing Slide  on the Outline Tab Click the Promote button on the Outlining toolbar two times to add Slide 5 after Slide 4.
Saving a Presentation Insert a formatted floppy disk in drive A and then click the Save button on the Standard toolbar Type Project 2 Version 1 in the File name text box.  Do not press the ENTER key after typing the file name.  Click the Save in box arrow Click 3½ Floppy (A:) in the Save in list Click the Save button in the Save As dialog box
Changing the View  to Slide Sorter View Click the Slide Sorter View button at the lower left of the PowerPoint window. The middle button.
Changing the View to Normal View Click the Slide 2 slide thumbnail Click the Normal View button, first button Click the Slides tab in the tabs pane
PowerPoint Project 2  Continue reading Project 2 Start Project 2  PPT 131

Power Point Project 2

  • 1.
    PowerPoint Project 2Using the Outline Tab and Clip Art to Create a Slide Show
  • 2.
    Objectives Start andcustomize a new slide show from an outline Add a slide and create a closing slide on the Outline tab Create text slides with multi-level bulleted lists on the Outline tab Save and review a presentation Insert and move clip art and change its size Add a header and footer to outline pages Animate clip art Add an animation scheme and run an animated slide show Print a presentation outline E-mail a slide show from within PowerPoint
  • 3.
    Starting and CustomizingPowerPoint Click the Start button on the Windows taskbar, point to All Programs on the Start menu, point to Microsoft Office on the All Programs submenu, and then click Microsoft Office PowerPoint 2003 on the Microsoft Office submenu If the PowerPoint window is not maximized, double-click its title bar to maximize it If the Language bar appears, right-click it and then click Close the Language bar on the shortcut menu If the Getting Started task pane appears in the PowerPoint window, click its Close button in the upper-right corner If the Standard and Formatting toolbars are positioned on the same row, click the Toolbar Options button and then click Show Buttons on Two Rows
  • 4.
    Starting and CustomizingPowerPoint Click the Slide Design button on the Formatting toolbar.
  • 5.
    Starting and CustomizingPowerPoint The Slide Design task pane is displayed Click the down scroll arrow and then click the Axis template in the Available For Use area Click the Close button in the Slide Design task pane
  • 6.
  • 7.
    Changing to theOutline Tab and Displaying the Outlining Toolbar Click the Outline tab located in the tabs pane
  • 8.
    Changing to theOutline Tab and Displaying the Outlining Toolbar Click View on the menu bar and then point to Toolbars Point to Outlining on the Toolbars submenu Click Outlining
  • 9.
    Changing to theOutline Tab and Displaying the Outlining Toolbar
  • 10.
  • 11.
    Creating a TitleSlide on the Outline Tab Click the Slide 1 slide icon on the Outline tab Type Healthy Eating and then press the SHIFT + ENTER keys Type Healthy Living and then press the ENTER key
  • 12.
    Creating a TitleSlide on the Outline Tab Click on the Demote button on the Outlining toolbar
  • 13.
    Creating a TitleSlide on the Outline Tab Type Nutrition and Fitness Basics and then press the ENTER key Type Clark College Fitness Center and then press the ENTER key
  • 14.
    Creating a TitleSlide on the Outline Tab
  • 15.
    Adding a Slideon the Outline Tab Click the Promote button on the Outlining toolbar
  • 16.
    Creating a TextSlide with a Multi-Level Bulleted List on the Outline Tab Type Nutrition Guidelines and then press the ENTER key Click the Demote button on the Outlining toolbar to demote to the second level
  • 17.
    Creating a TextSlide with a Multi-Level Bulleted List on the Outline Tab Type Healthy Eating Pyramid and then press the ENTER key Click the Demote button on the Outlining toolbar to demote to the third level
  • 18.
    Creating a TextSlide with a Multi-Level Bulleted List on the Outline Tab Type Eat more vegetable oils, whole grains and then press the ENTER key Type Eat less pasta, white bread and then press the ENTER key
  • 19.
    Creating a ThirdText Slide with a Multi-Level Bulleted List Click the Promote button on the Outlining toolbar two times so that Slide 3 is added after Slide 2
  • 20.
    Creating a ThirdText Slide with a Multi-Level Bulleted List Type Recommended exercise and then press the ENTER key Click the Demote button on the Outlining toolbar to demote to the second level
  • 21.
    Creating a ThirdText Slide with a Multi-Level Bulleted List Type 30 minutes of daily moderate-intensity activity and then press the ENTER key Click the Demote button to demote to the third level
  • 22.
    Creating a ThirdText Slide with a Multi-Level Bulleted List Type Brisk walking and then press the ENTER key Type Bicycling and then press the ENTER key Type Gardening and then press the ENTER key
  • 23.
    Creating a ThirdText Slide with a Multi-Level Bulleted List
  • 24.
    Creating a FourthText Slide with a Multi-Level Bulleted List Your turn. Put in this slide. How many times do you hit Promote?
  • 25.
    Creating a ClosingSlide on the Outline Tab Click the Promote button on the Outlining toolbar two times to add Slide 5 after Slide 4.
  • 26.
    Saving a PresentationInsert a formatted floppy disk in drive A and then click the Save button on the Standard toolbar Type Project 2 Version 1 in the File name text box. Do not press the ENTER key after typing the file name. Click the Save in box arrow Click 3½ Floppy (A:) in the Save in list Click the Save button in the Save As dialog box
  • 27.
    Changing the View to Slide Sorter View Click the Slide Sorter View button at the lower left of the PowerPoint window. The middle button.
  • 28.
    Changing the Viewto Normal View Click the Slide 2 slide thumbnail Click the Normal View button, first button Click the Slides tab in the tabs pane
  • 29.
    PowerPoint Project 2 Continue reading Project 2 Start Project 2 PPT 131