MICROSOFT PowerPoint
Dr. AbdelhamidR. Khattab
Sinai University (SU)
Faculty of Information Technology and Computer Science
(FIT)
E-Mail: Abdelhamid.khattab@su.edu.eg
(INT 1001) Introduction to Informatics
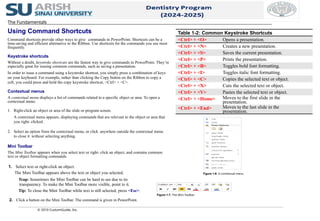
2.
4. Select MicrosoftPowerPoint 2010.
The PowerPoint 2010 program screen appears.
Other Ways to Launch a Program:
Click the Start button and type the program name in the
Search box. Click the program in the search results to
launch it.
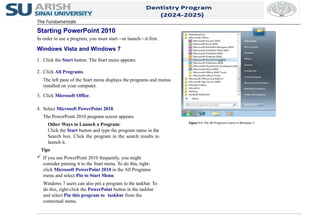
Tips
If you use PowerPoint 2010 frequently, you might
consider pinning it to the Start menu. To do this, right-
click Microsoft PowerPoint 2010 in the All Programs
menu and select Pin to Start Menu.
Windows 7 users can also pin a program to the taskbar. To
do this, right-click the PowerPoint button in the taskbar
and select Pin this program to taskbar from the
contextual menu.
Figure 1-1: The All Programs menu in Windows 7.
The Fundamentals
Starting PowerPoint 2010
In order to use a program, you must start—or launch—it first.
Windows Vista and Windows 7
1. Click the Start button. The Start menu appears.
2. Click All Programs.
The left pane of the Start menu displays the programs and menus
installed on your computer.
3. Click Microsoft Office.
3.
5
Main tasks forMS Power Point
Insert objects into slide (text , pictures, tables, charts, shapes )
Format slides ( background , layout, insert new slide, duplicate slide,
numbering slides).
Animation (objects , slide).
Costume slide show and setup slide show
4.
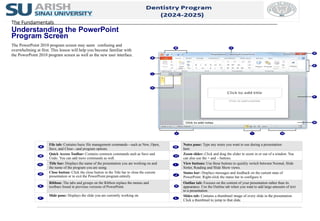
File tab: Containsbasic file management commands—such as New, Open,
Save, and Close—and program options.
Notes pane: Type any notes you want to use during a presentation
here.
Quick Access Toolbar: Contains common commands such as Save and
Undo. You can add more commands as well.
Zoom slider: Click and drag the slider to zoom in or out of a window. You
can also use the + and – buttons.
Title bar: Displays the name of the presentation you are working on and
the name of the program you are using.
View buttons: Use these buttons to quickly switch between Normal, Slide
Sorter, Reading and Slide Show views.
Close button: Click the close button in the Title bar to close the current
presentation or to exit the PowerPoint program entirely.
Status bar: Displays messages and feedback on the current state of
PowerPoint. Right-click the status bar to configure it.
Ribbon: The tabs and groups on the Ribbon replace the menus and
toolbars found in previous versions of PowerPoint.
Outline tab: Focuses on the content of your presentation rather than its
appearance. Use the Outline tab when you want to add large amounts of text
to a presentation.
Slide pane: Displays the slide you are currently working on. Slides tab: Contains a thumbnail image of every slide in the presentation.
Click a thumbnail to jump to that slide.
The Fundamentals
Understanding the PowerPoint
Program Screen
The PowerPoint 2010 program screen may seem confusing and
overwhelming at first. This lesson will help you become familiar with
the PowerPoint 2010 program screen as well as the new user interface.
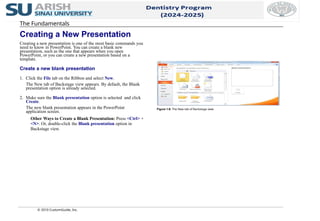
Getting Started withPresentations
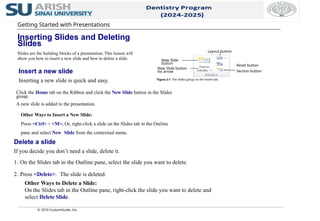
Selecting a Layout
The layout name tells you which types of text and/or object placeholders are included in the
layout; for example, the Title and Content layout contains a title placeholder and a body text
placeholder.
Select a layout
1. Click the Home tab on the Ribbon and click the Layout button in the Slides group.
The Layout gallery appears.
2. Select the layout you want to use. The new layout is applied to the slide.
Other Ways to Select a Layout:
On the Slides tab in the Outline pane, right-click the slide whose layout you want to change.
Select Layout from the contextual menu and select a layout from the list.
Tip: If you don’t find a layout that meets your needs perfectly, don’t fret; you can always
modify, move, or delete placeholders.
Insert a new slide using the Layout gallery
You can insert a new slide and select a layout at the same time using the Layout gallery.
3. Click the Home tab on the Ribbon and click the New Slide button list arrow in the Slides group.
The Layout gallery appears, listing the available layouts you have to choose from.
2. Select a layout from the list. A new slide with the selected layout is inserted into the
presentation.
Table 2-1: PowerPoint 2010 Slide Layouts
Title Slide
Title and Content
Section Header
Two Content
Comparison
Title Only
Blank
Content with Caption
Picture with Caption
9.
Inserting and EditingText
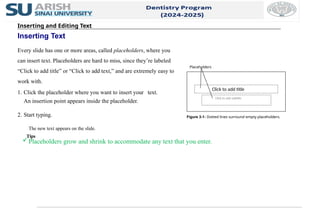
Inserting Text
Every slide has one or more areas, called placeholders, where you
can insert text. Placeholders are hard to miss, since they’re labeled
“Click to add title” or “Click to add text,” and are extremely easy to
work with.
1. Click the placeholder where you want to insert your text.
An insertion point appears inside the placeholder.
2. Start typing.
The new text appears on the slide.
Tips
Placeholders grow and shrink to accommodate any text that you enter.
Figure 3-1: Dotted lines surround empty placeholders.
Click to add title
Click to add subtitle
Placeholders
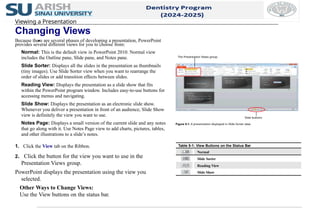
Changing Views
Because thereare several phases of developing a presentation, PowerPoint
provides several different views for you to choose from:
Normal: This is the default view in PowerPoint 2010. Normal view
includes the Outline pane, Slide pane, and Notes pane.
Slide Sorter: Displays all the slides in the presentation as thumbnails
(tiny images). Use Slide Sorter view when you want to rearrange the
order of slides or add transition effects between slides.
Reading View: Displays the presentation as a slide show that fits
within the PowerPoint program window. Includes easy-to-use buttons for
accessing menus and navigating.
Slide Show: Displays the presentation as an electronic slide show.
Whenever you deliver a presentation in front of an audience, Slide Show
view is definitely the view you want to use.
Notes Page: Displays a small version of the current slide and any notes
that go along with it. Use Notes Page view to add charts, pictures, tables,
and other illustrations to a slide’s notes.
1. Click the View tab on the Ribbon.
2. Click the button for the view you want to use in the
Presentation Views group.
PowerPoint displays the presentation using the view you
selected.
Other Ways to Change Views:
Use the View buttons on the status bar.
Figure 5-1: A presentation displayed in Slide Sorter view.
Table 5-1: View Buttons on the Status Bar
Normal
Slide Sorter
Reading View
Slide Show
Viewing a Presentation
The Presentation Views group
View buttons
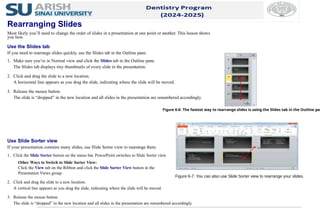
Use Slide Sorterview
If your presentation contains many slides, use Slide Sorter view to rearrange them.
1. Click the Slide Sorter button on the status bar. PowerPoint switches to Slide Sorter view.
Other Ways to Switch to Slide Sorter View:
Click the View tab on the Ribbon and click the Slide Sorter View button in the
Presentation Views group.
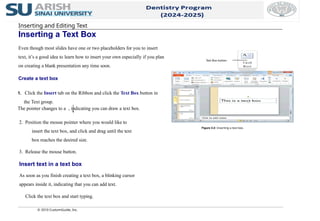
2. Click and drag the slide to a new location.
A vertical line appears as you drag the slide, indicating where the slide will be moved.
3. Release the mouse button.
The slide is “dropped” in the new location and all slides in the presentation are renumbered accordingly.
Figure 6-6: The fastest way to rearrange slides is using the Slides tab in the Outline pan
Rearranging Slides
Most likely you’ll need to change the order of slides in a presentation at one point or another. This lesson shows
you how.
Use the Slides tab
If you need to rearrange slides quickly, use the Slides tab in the Outline pane.
1. Make sure you’re in Normal view and click the Slides tab in the Outline pane.
The Slides tab displays tiny thumbnails of every slide in the presentation.
2. Click and drag the slide to a new location.
A horizontal line appears as you drag the slide, indicating where the slide will be moved.
3. Release the mouse button.
The slide is “dropped” in the new location and all slides in the presentation are renumbered accordingly.
Figure 6-7: You can also use Slide Sorter view to rearrange your slides.
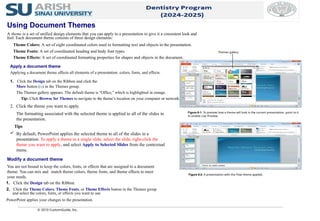
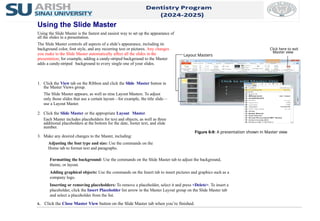
1. Click theView tab on the Ribbon and click the Slide Master button in
the Master Views group.
The Slide Master appears, as well as nine Layout Masters. To adjust
only those slides that use a certain layout—for example, the title slide—
use a Layout Master.
2. Click the Slide Master or the appropriate Layout Master.
Each Master includes placeholders for text and objects, as well as three
additional placeholders at the bottom for the date, footer text, and slide
number.
3. Make any desired changes to the Master, including:
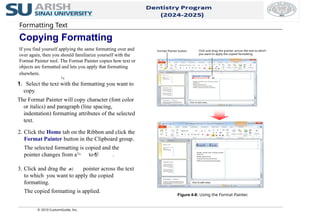
Adjusting the font type and size: Use the commands on the
Home tab to format text and paragraphs.
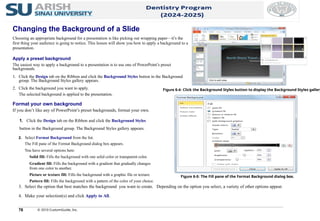
Using the Slide Master
Using the Slide Master is the fastest and easiest way to set up the appearance of
all the slides in a presentation.
The Slide Master controls all aspects of a slide’s appearance, including its
background color, font style, and any recurring text or pictures. Any changes
you make to the Slide Master automatically affect all the slides in the
presentation; for example, adding a candy-striped background to the Master
adds a candy-striped background to every single one of your slides.
Formatting the background: Use the commands on the Slide Master tab to adjust the background,
theme, or layout.
Adding graphical objects: Use the commands on the Insert tab to insert pictures and graphics such as a
company logo.
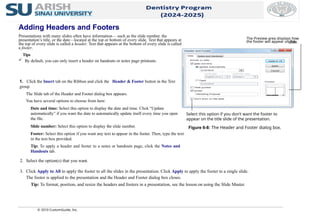
Inserting or removing placeholders: To remove a placeholder, select it and press <Delete>. To insert a
placeholder, click the Insert Placeholder list arrow in the Master Layout group on the Slide Master tab
and select a placeholder from the list.
4. Click the Close Master View button on the Slide Master tab when you’re finished.
Figure 6-9: A presentation shown in Master view.
Layout Masters
Click here to exit
Master view
18.
4. (Optional) Clickthe Effect Options button in the Transition to This Slide group and
select an option.
The transition effect is modified.
Trap: Try not to use too many different types of effects in the same presentation. Too
many transition effects can distract your viewers rather than intrigue them.
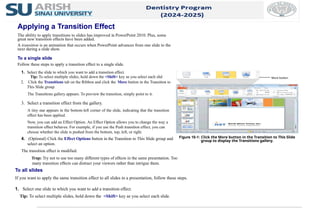
1. Select the slide to which you want to add a transition effect.
Tip: To select multiple slides, hold down the <Shift> key as you select each slid
2. Click the Transitions tab on the Ribbon and click the More button in the Transition to
This Slide group.
The Transitions gallery appears. To preview the transition, simply point to it.
3. Select a transition effect from the gallery.
A tiny star appears in the bottom-left corner of the slide, indicating that the transition
effect has been applied.
Now, you can add an Effect Option. An Effect Option allows you to change the way a
transition effect behaves. For example, if you use the Push transition effect, you can
choose whether the slide is pushed from the bottom, top, left, or right.
To all slides
If you want to apply the same transition effect to all slides in a presentation, follow these steps.
1. Select one slide to which you want to add a transition effect.
Tip: To select multiple slides, hold down the <Shift> key as you select each slide.
Figure 10-1: Click the More button in the Transition to This Slide
group to display the Transitions gallery.
Applying a Transition Effect
The ability to apply transitions to slides has improved in PowerPoint 2010. Plus, some
great new transition effects have been added.
A transition is an animation that occurs when PowerPoint advances from one slide to the
next during a slide show.
To a single slide
Follow these steps to apply a transition effect to a single slide.
More button
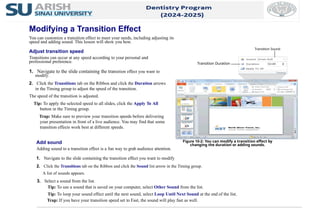
2. Click theTransitions tab on the Ribbon and click the Duration arrows
in the Timing group to adjust the speed of the transition.
The speed of the transition is adjusted.
Tip: To apply the selected speed to all slides, click the Apply To All
button in the Timing group.
Trap: Make sure to preview your transition speeds before delivering
your presentation in front of a live audience. You may find that some
transition effects work best at different speeds.
Add sound
Adding sound to a transition effect is a fun way to grab audience attention.
1. Navigate to the slide containing the transition effect you want to modify.
2. Click the Transitions tab on the Ribbon and click the Sound list arrow in the Timing group.
A list of sounds appears.
3. Select a sound from the list.
Tip: To use a sound that is saved on your computer, select Other Sound from the list.
Tip: To loop your sound effect until the next sound, select Loop Until Next Sound at the end of the list.
Trap: If you have your transition speed set to Fast, the sound will play fast as well.
Figure 10-2: You can modify a transition effect by
changing the duration or adding sounds.
Modifying a Transition Effect
You can customize a transition effect to meet your needs, including adjusting its
speed and adding sound. This lesson will show you how.
Adjust transition speed
Transitions can occur at any speed according to your personal and
professional preference.
1. Navigate to the slide containing the transition effect you want to
modify.
Transition Duration
Transition Sound
3. Select ananimation effect from the list.
The preset animation is applied to the text or object and a preview of the effect is displayed. A
number appears next to the object showing the order in which the animation will be displayed.
Tip: To see more animation effects, click More Entrance Effects, More Emphasis Effects, More
Exit Effects, or More Motion Paths in the Animation gallery.
Now, you can add an effect option. An effect option allows you to change the way an animation effect
behaves. For example, if you use the Fly In animation effect, you can choose the direction from which
the object or text flies in.
4. (Optional) Click the Effect Options button in the Animation group and select an option.
The selected effect option is applied and a preview is displayed.
Figure 10-3: The Animations gallery.
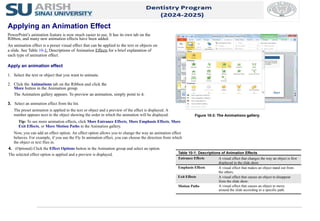
Table 10-1: Descriptions of Animation Effects
Entrance Effects A visual effect that changes the way an object is first
displayed in the slide show.
Emphasis Effects A visual effect that makes an object stand out from
the others.
Exit Effects A visual effect that causes an object to disappear
from the slide show.
Motion Paths A visual effect that causes an object to move
around the slide according to a specific path.
Applying an Animation Effect
PowerPoint’s animation feature is now much easier to use. It has its own tab on the
Ribbon, and many new animation effects have been added.
An animation effect is a preset visual effect that can be applied to the text or objects on
a slide. See Table 10-1: Descriptions of Animation Effects for a brief explanation of
each type of animation effect.
Apply an animation effect
1. Select the text or object that you want to animate.
2. Click the Animations tab on the Ribbon and click the
More button in the Animation group.
The Animation gallery appears. To preview an animation, simply point to it.
23.
2. Click theAnimations tab on the Ribbon and click the
Start list arrow in the Timing group.
A list of options appears:
On Click: Starts the animation effect when you click the slide.
With Previous: Starts the animation effect at the same time as the previous effect
in the list (i.e., one click executes two animation effects).
After Previous: Starts the effect immediately after the previous effect. Or, if this
is the first or only animation effect on the slide, selecting this option will start
the effect as soon as the slide appears.
3. Select an option from the list. The effect is applied.
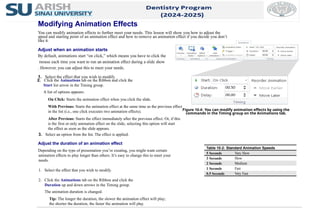
Adjust the duration of an animation effect
Depending on the type of presentation you’re creating, you might want certain
animation effects to play longer than others. It’s easy to change this to meet your
needs.
1. Select the effect that you wish to modify.
2. Click the Animations tab on the Ribbon and click the
Duration up and down arrows in the Timing group.
The animation duration is changed.
Tip: The longer the duration, the slower the animation effect will play;
the shorter the duration, the faster the animation will play.
Figure 10-4: You can modify animation effects by using the
commands in the Timing group on the Animations tab.
Table 10-2: Standard Animation Speeds
5 Seconds Very Slow
3 Seconds Slow
2 Seconds Medium
1 Seconds Fast
0.5 Seconds Very Fast
Modifying Animation Effects
You can modify animation effects to further meet your needs. This lesson will show you how to adjust the
speed and starting point of an animation effect and how to remove an animation effect if you decide you don’t
like it.
Adjust when an animation starts
By default, animations start “on click,” which means you have to click the
mouse each time you want to run an animation effect during a slide show
. However, you can adjust this to meet your needs.
1. Select the effect that you wish to modify.
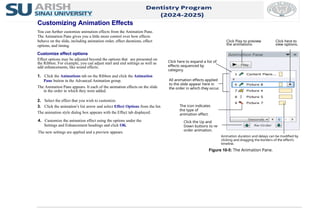
Customizing Animation Effects
Youcan further customize animation effects from the Animation Pane.
The Animation Pane gives you a little more control over how effects
behave on the slide, including animation order, effect durations, effect
options, and timing.
Customize effect options
Effect options may be adjusted beyond the options that are presented on
the Ribbon. For example, you can adjust start and end settings as well as
add enhancements, like sound effects.
1. Click the Animations tab on the Ribbon and click the Animation
Pane button in the Advanced Animation group.
The Animation Pane appears. It each of the animation effects on the slide
in the order in which they were added.
2. Select the effect that you wish to customize.
3. Click the animation’s list arrow and select Effect Options from the list.
The animation style dialog box appears with the Effect tab displayed.
4. Customize the animation effect using the options under the
Settings and Enhancement headings and click OK.
The new settings are applied and a preview appears.
Animation duration and delays can be modified by
clicking and dragging the borders of the effect’s
timeline.
Figure 10-5: The Animation Pane.
Click Play to preview
the animations.
All animation effects applied
to the slide appear here in
the order in which they occur.
Click the Up and
Down buttons to re-
order animation.
Click here to expand a list of
effects sequenced by
category.
Click here to
view options.
The icon indicates
the type of
animation effect.
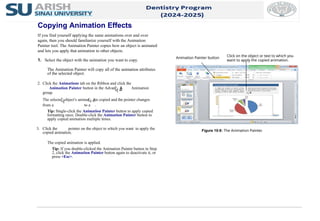
26.
2. Click theAnimations tab on the Ribbon and click the
Animation Painter button in the Advanced Animation
group.
The selected object’s animation is copied and the pointer changes
from a to a .
Tip: Single-click the Animation Painter button to apply copied
formatting once. Double-click the Animation Painter button to
apply copied animation multiple times.
3. Click the pointer on the object to which you want to apply the
copied animation.
The copied animation is applied.
Tip: If you double-clicked the Animation Painter button in Step
2, click the Animation Painter button again to deactivate it, or
press <Esc>.
The Animation Painter will copy all of the animation attributes
of the selected object.
Figure 10-8: The Animation Painter.
Copying Animation Effects
If you find yourself applying the same animations over and over
again, then you should familiarize yourself with the Animation
Painter tool. The Animation Painter copies how an object is animated
and lets you apply that animation to other objects.
1. Select the object with the animation you want to copy.
Animation Painter button Click on the object or text to which you
want to apply the copied animation.
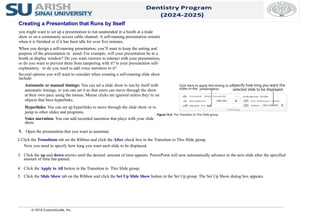
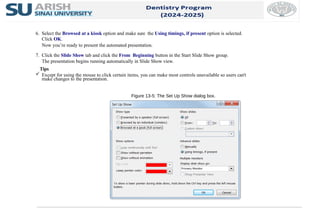
6. Select theBrowsed at a kiosk option and make sure the Using timings, if present option is selected.
Click OK.
Now you’re ready to present the automated presentation.
7. Click the Slide Show tab and click the From Beginning button in the Start Slide Show group.
The presentation begins running automatically in Slide Show view.
Tips
Except for using the mouse to click certain items, you can make most controls unavailable so users can't
make changes to the presentation.
Figure 13-5: The Set Up Show dialog box.


![© 2010 CustomGuide, Inc.
Applying Transition and Animation Effects
Remove a transition effect
It’s easy to remove a transition effect if you decide you don’t like it.
1. Navigate to the slide containing the transition effect you want to remove.
2. Click the Transitions tab on the Ribbon and click the
More button in the Transition to This Slide group.
The Transitions gallery appears.
3. Select None from the gallery. The transition effect is removed.
Remove a sound
You can easily remove a sound from a transition.
4. Navigate to the slide containing the transition sound you want to remove.
5. Click the Transitions tab on the Ribbon and click the
Sound list arrow in the Timing group.
3. Select [No Sound] from the list. The sound is removed.
Tips
It’s a good idea to preview any transition speeds or sounds before you deliver your presentation
in front of an audience.](https://image.slidesharecdn.com/dentistrypowerpoint2010v2-250827112523-a2a61cb5/85/dentistryPowerPoint-PowerPoint-2010-v2-ppsx-21-320.jpg)