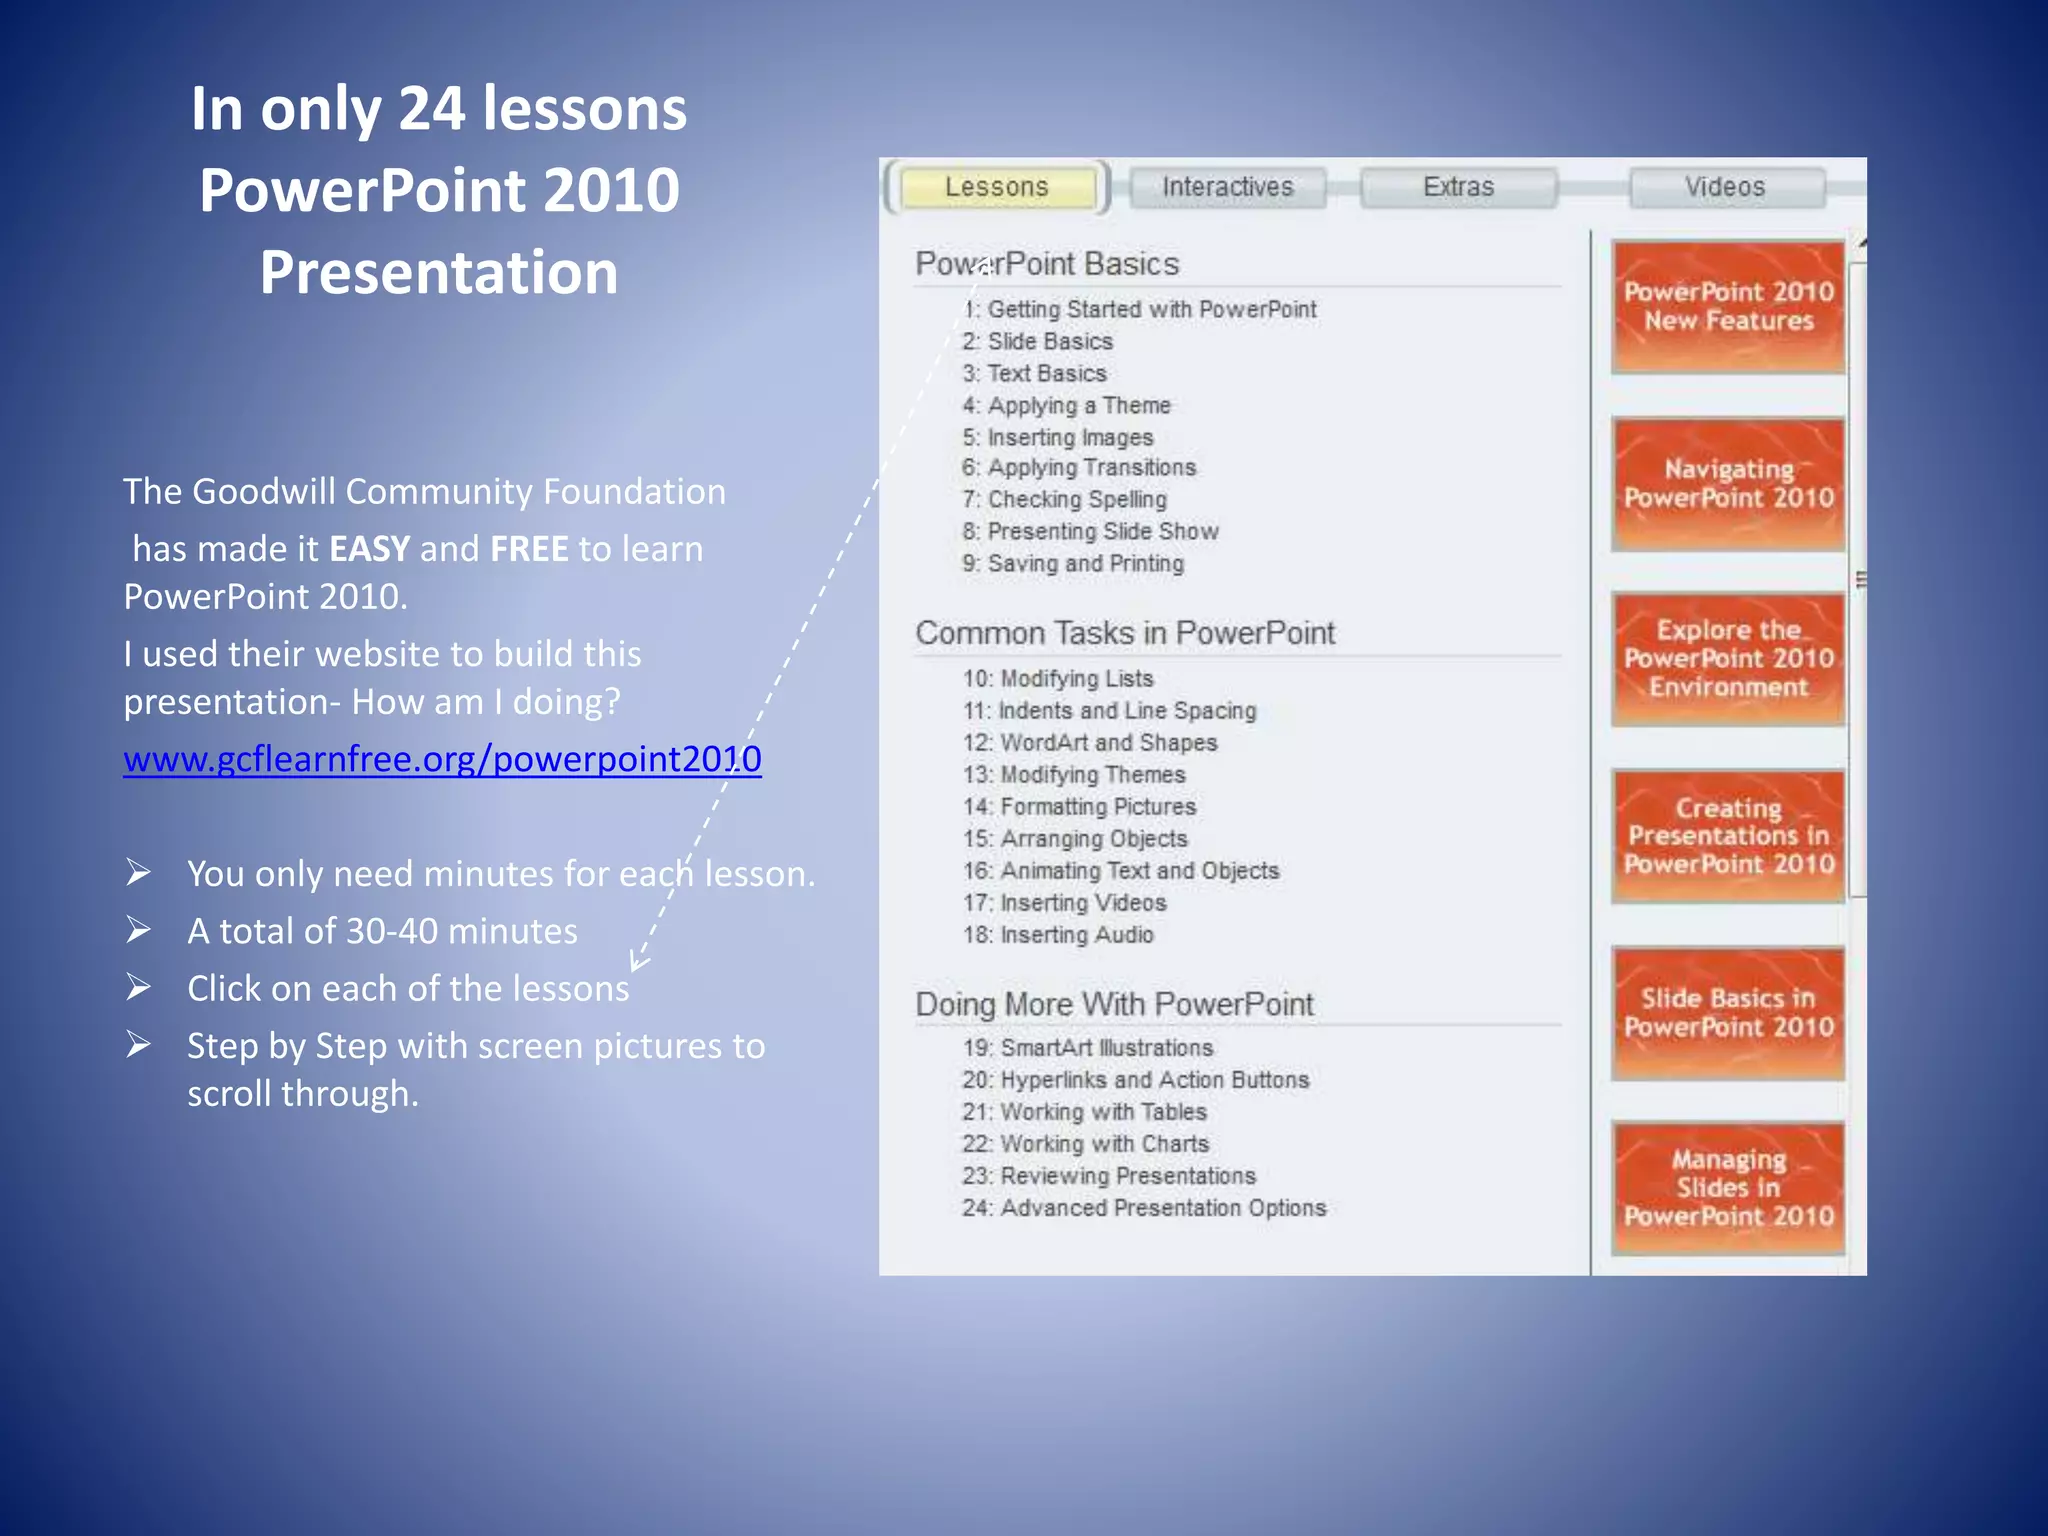
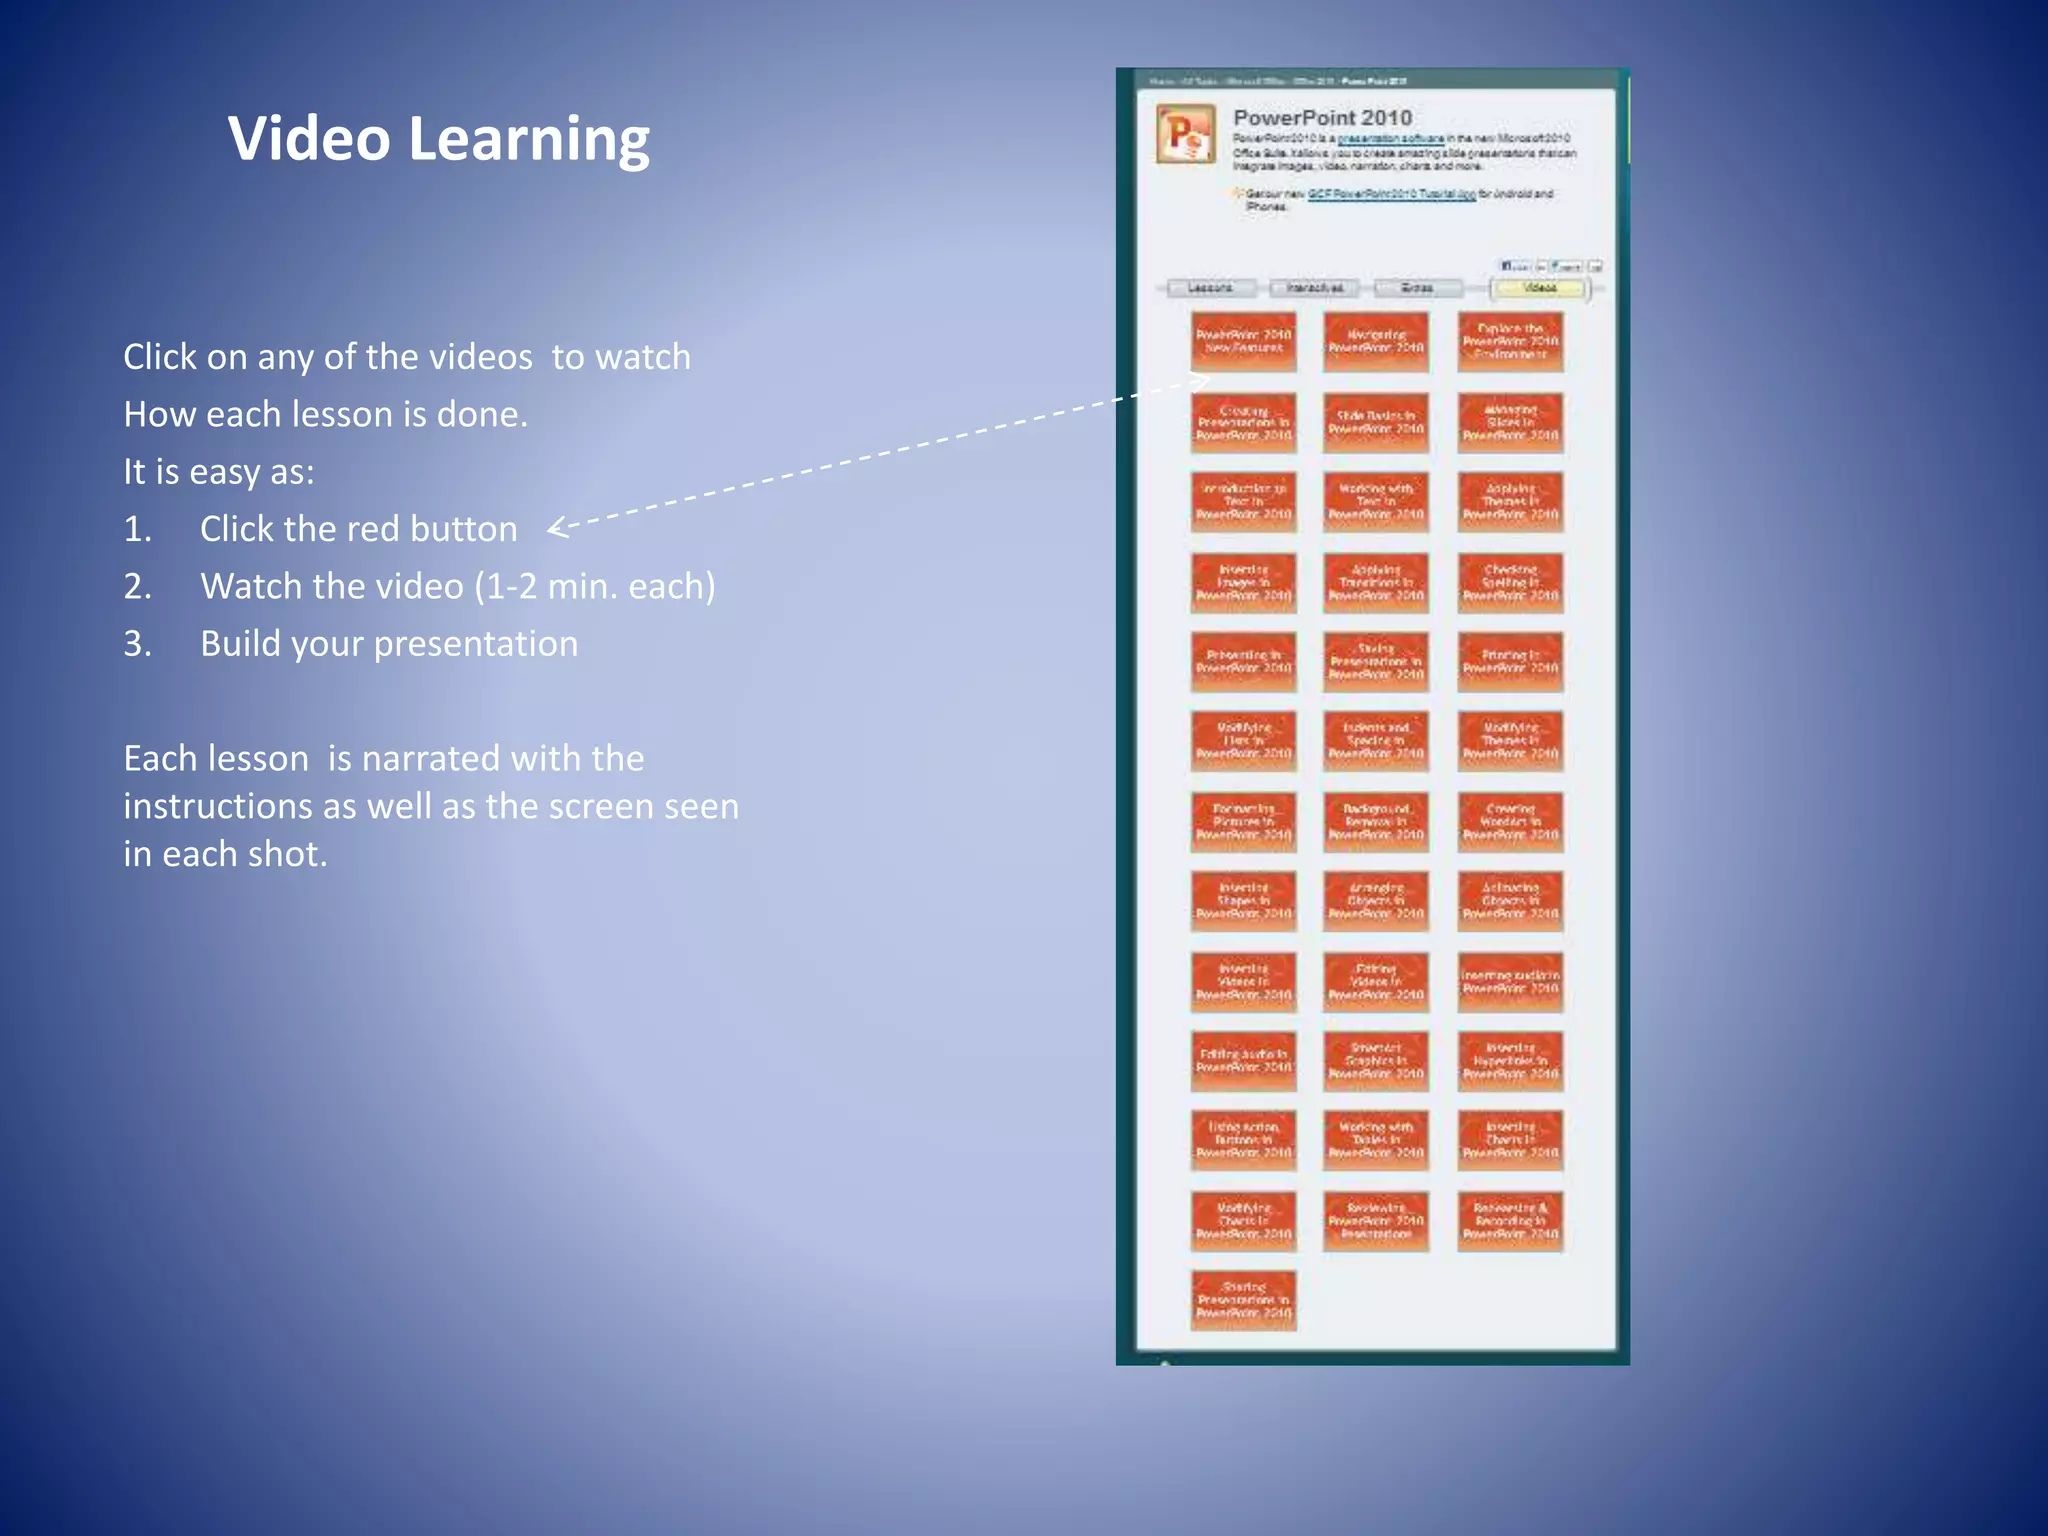
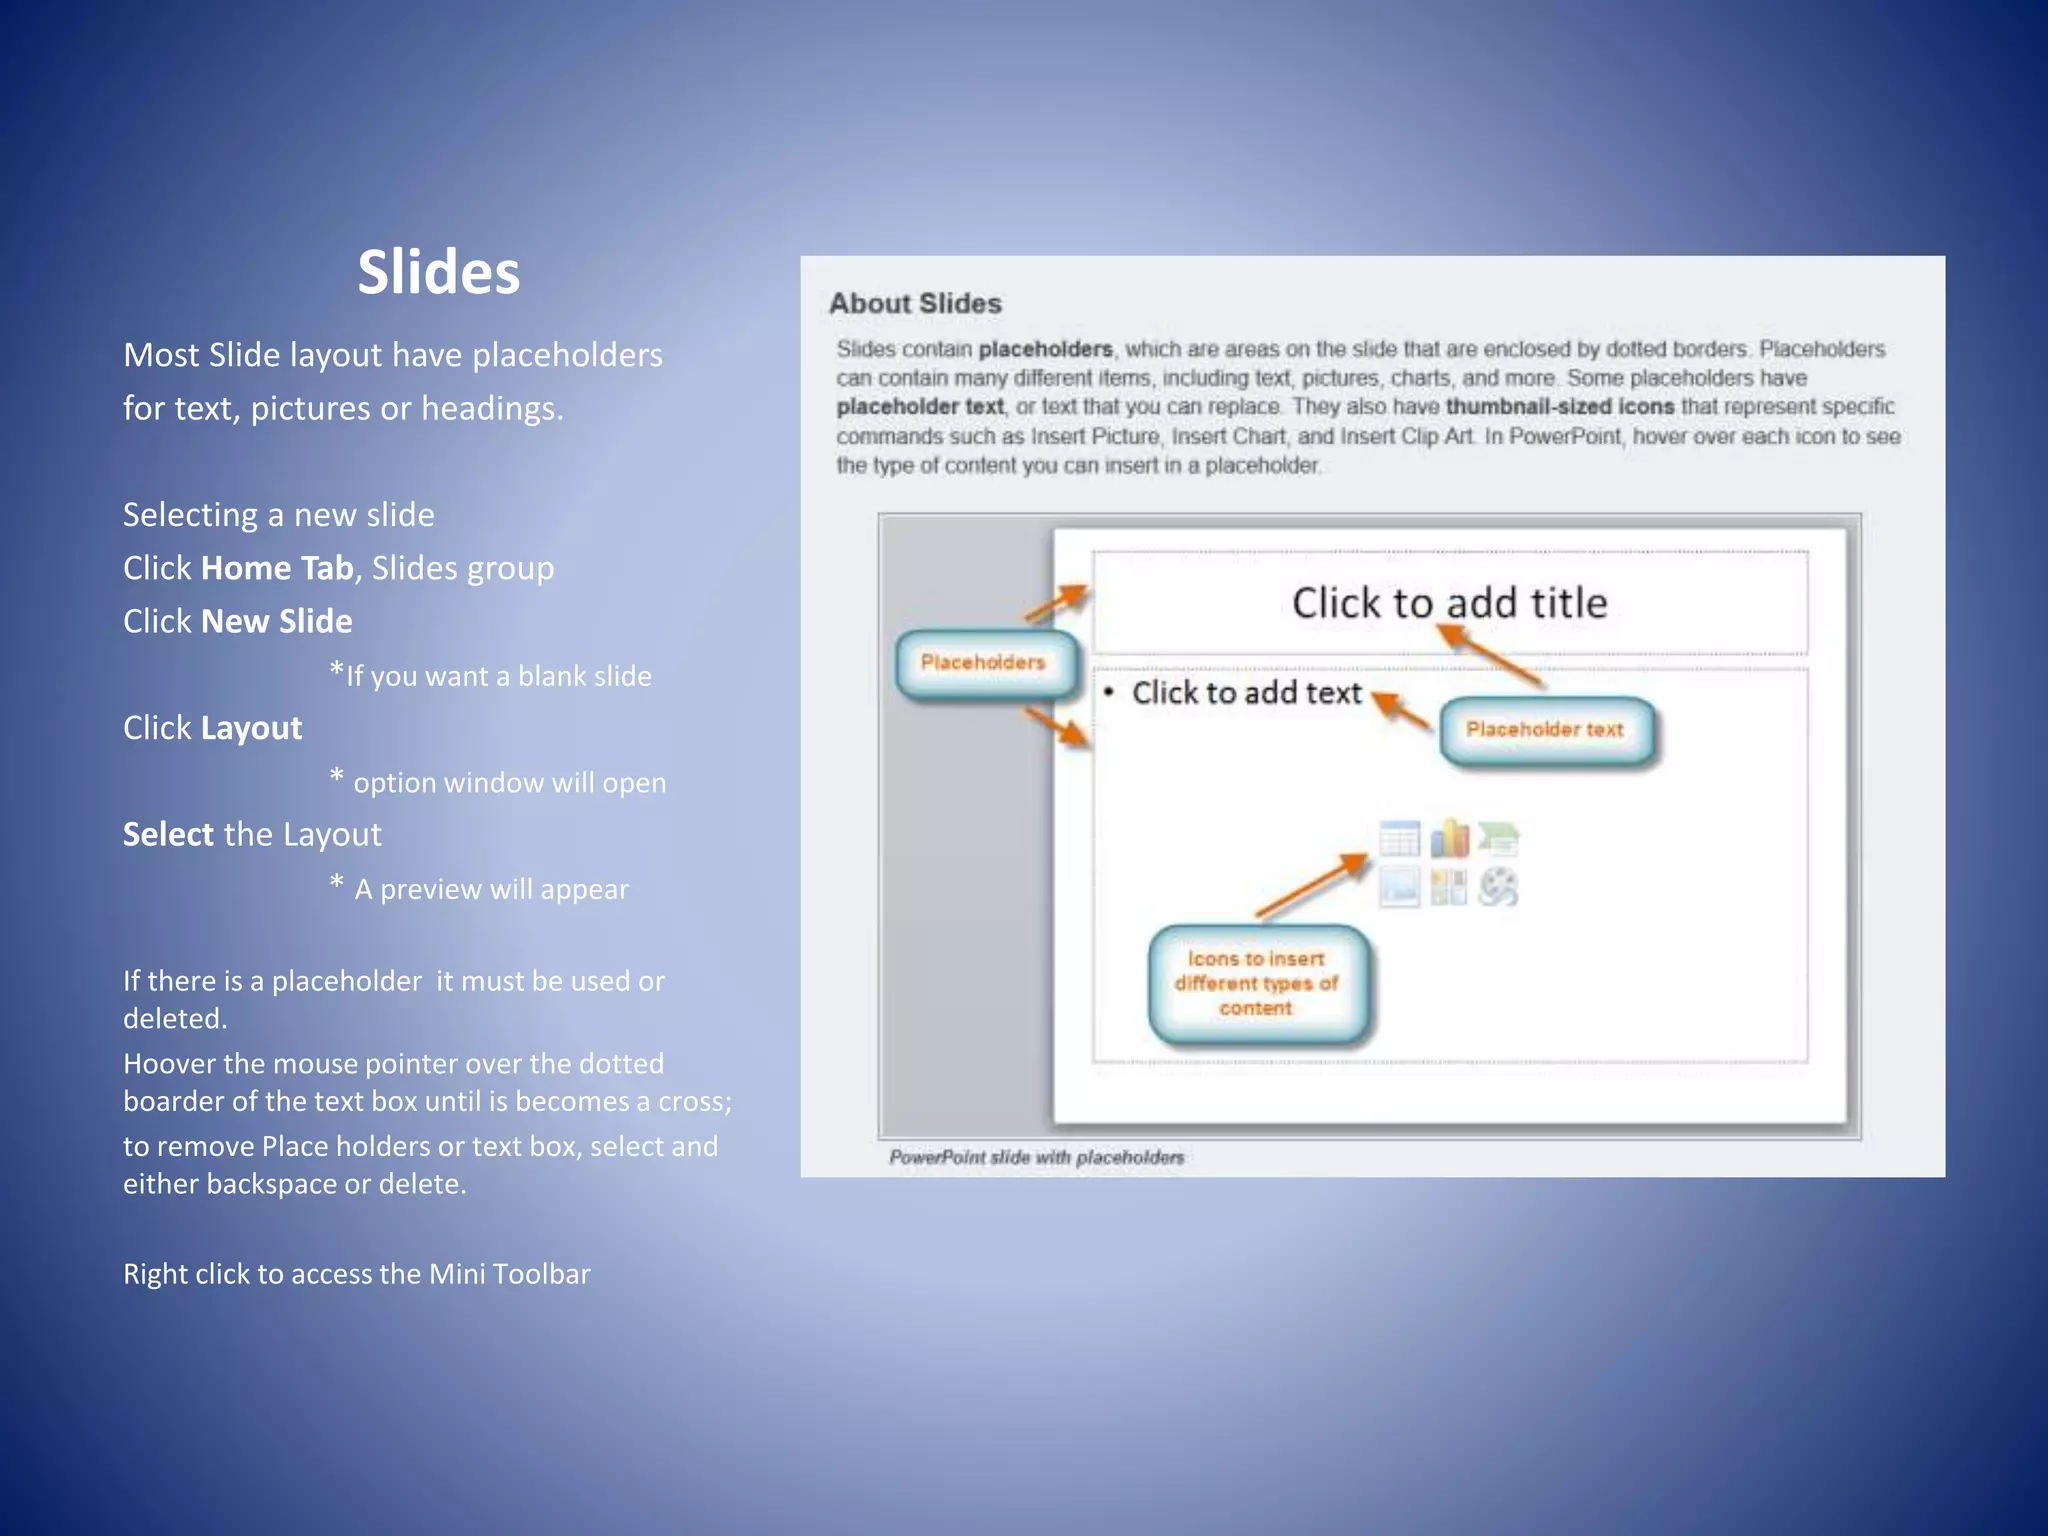
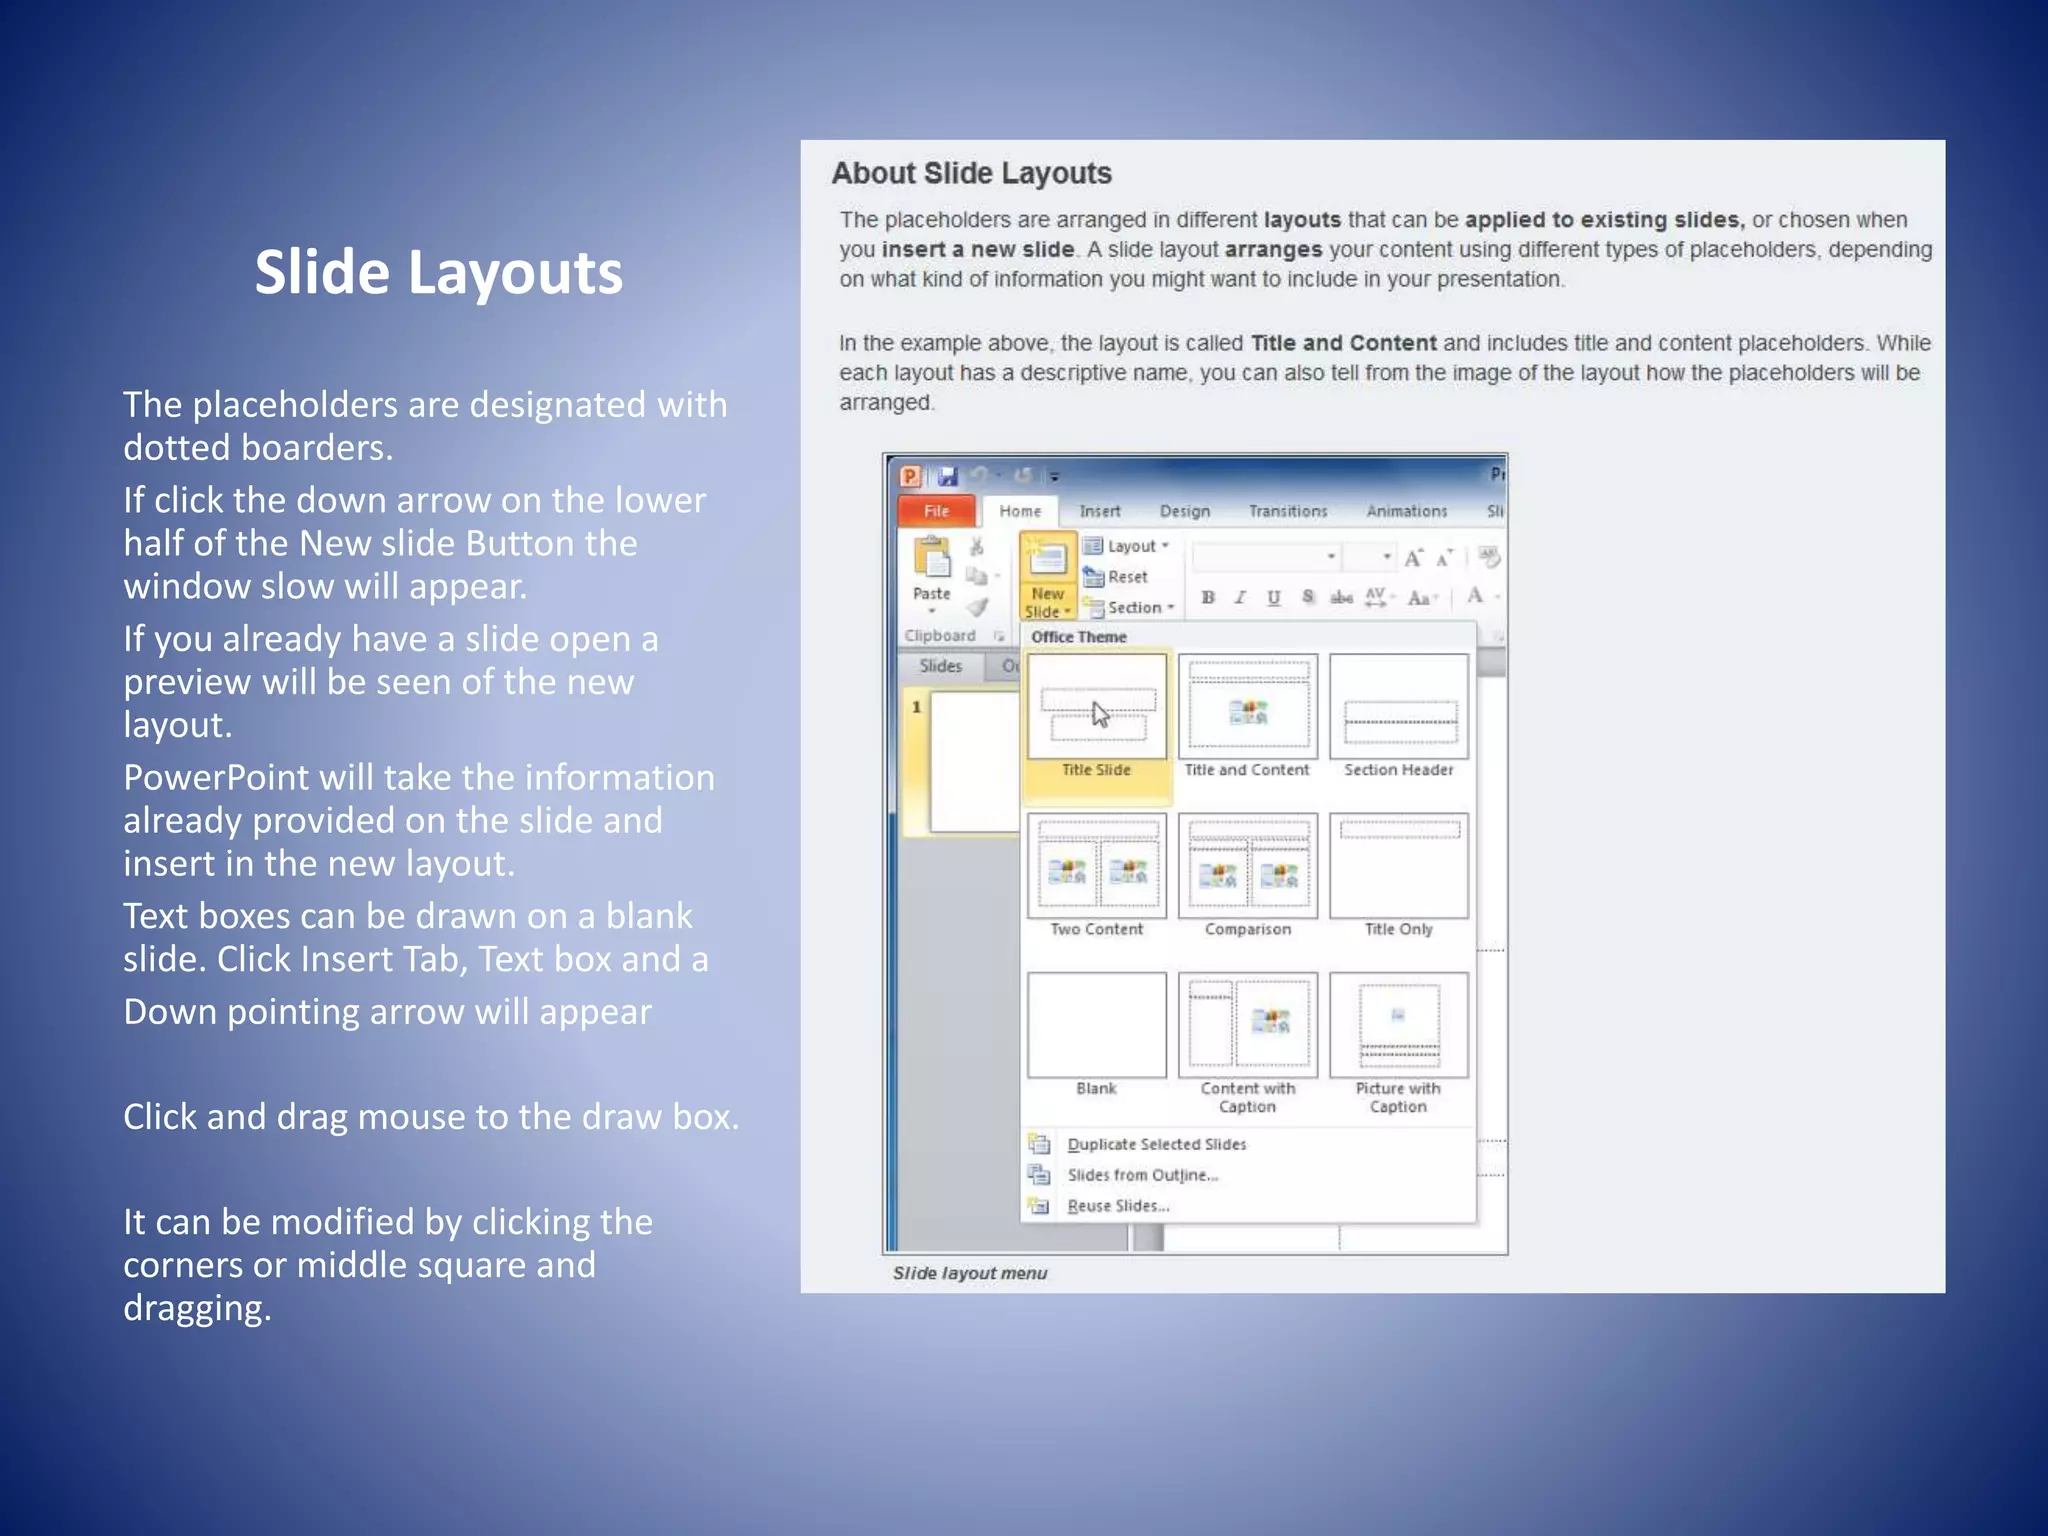
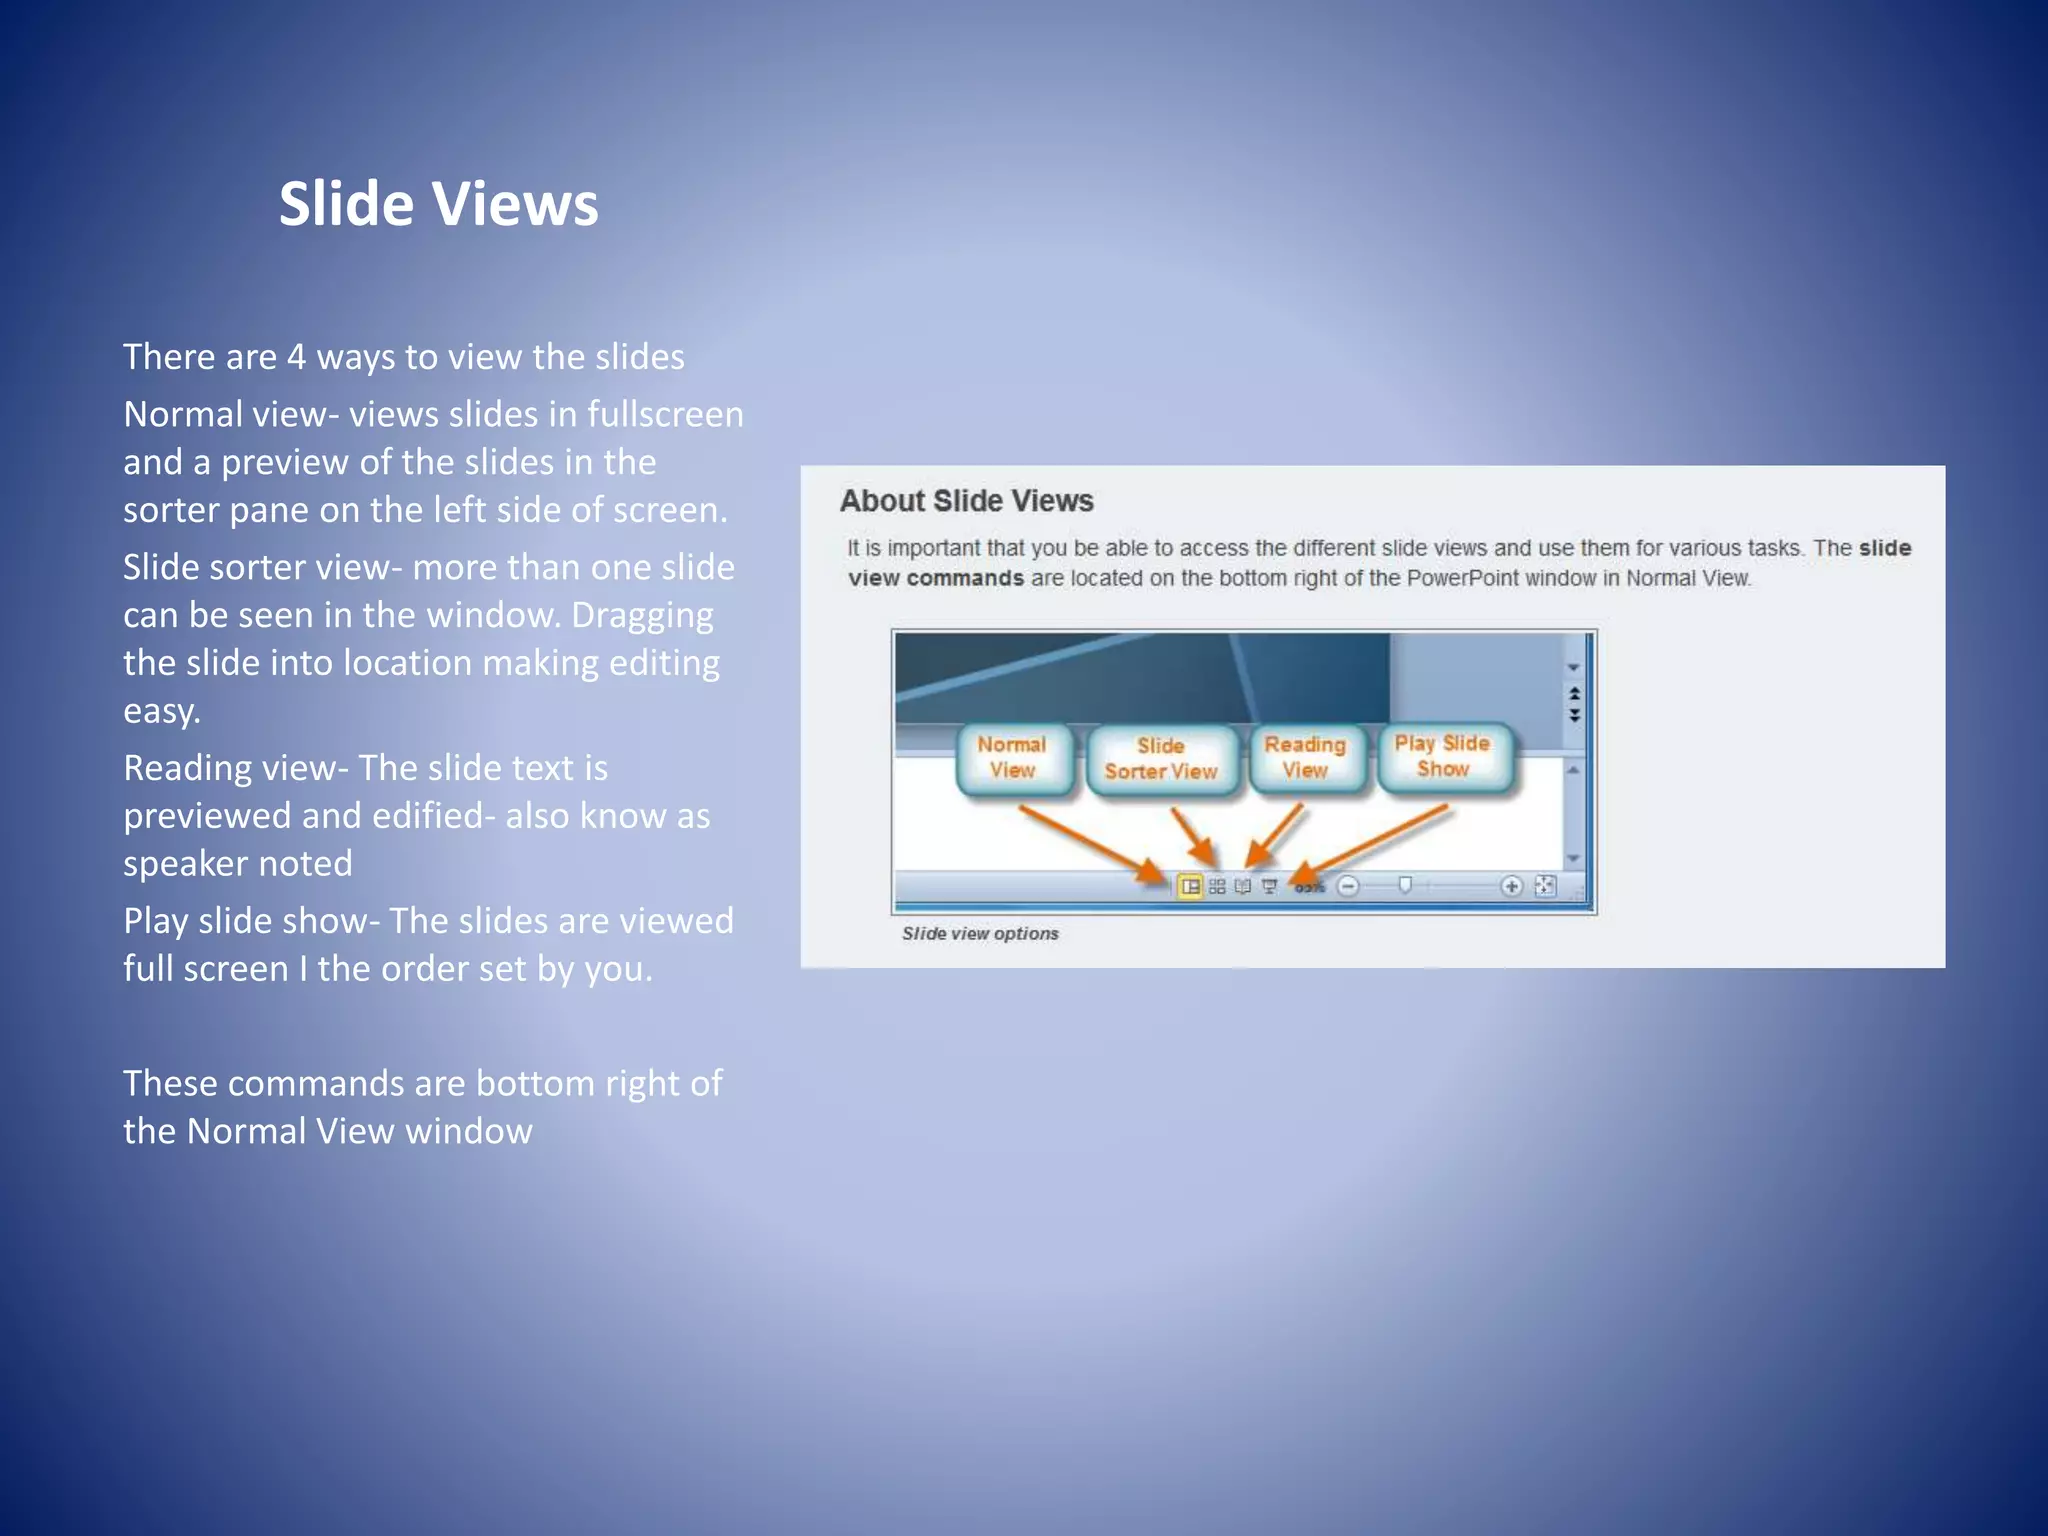
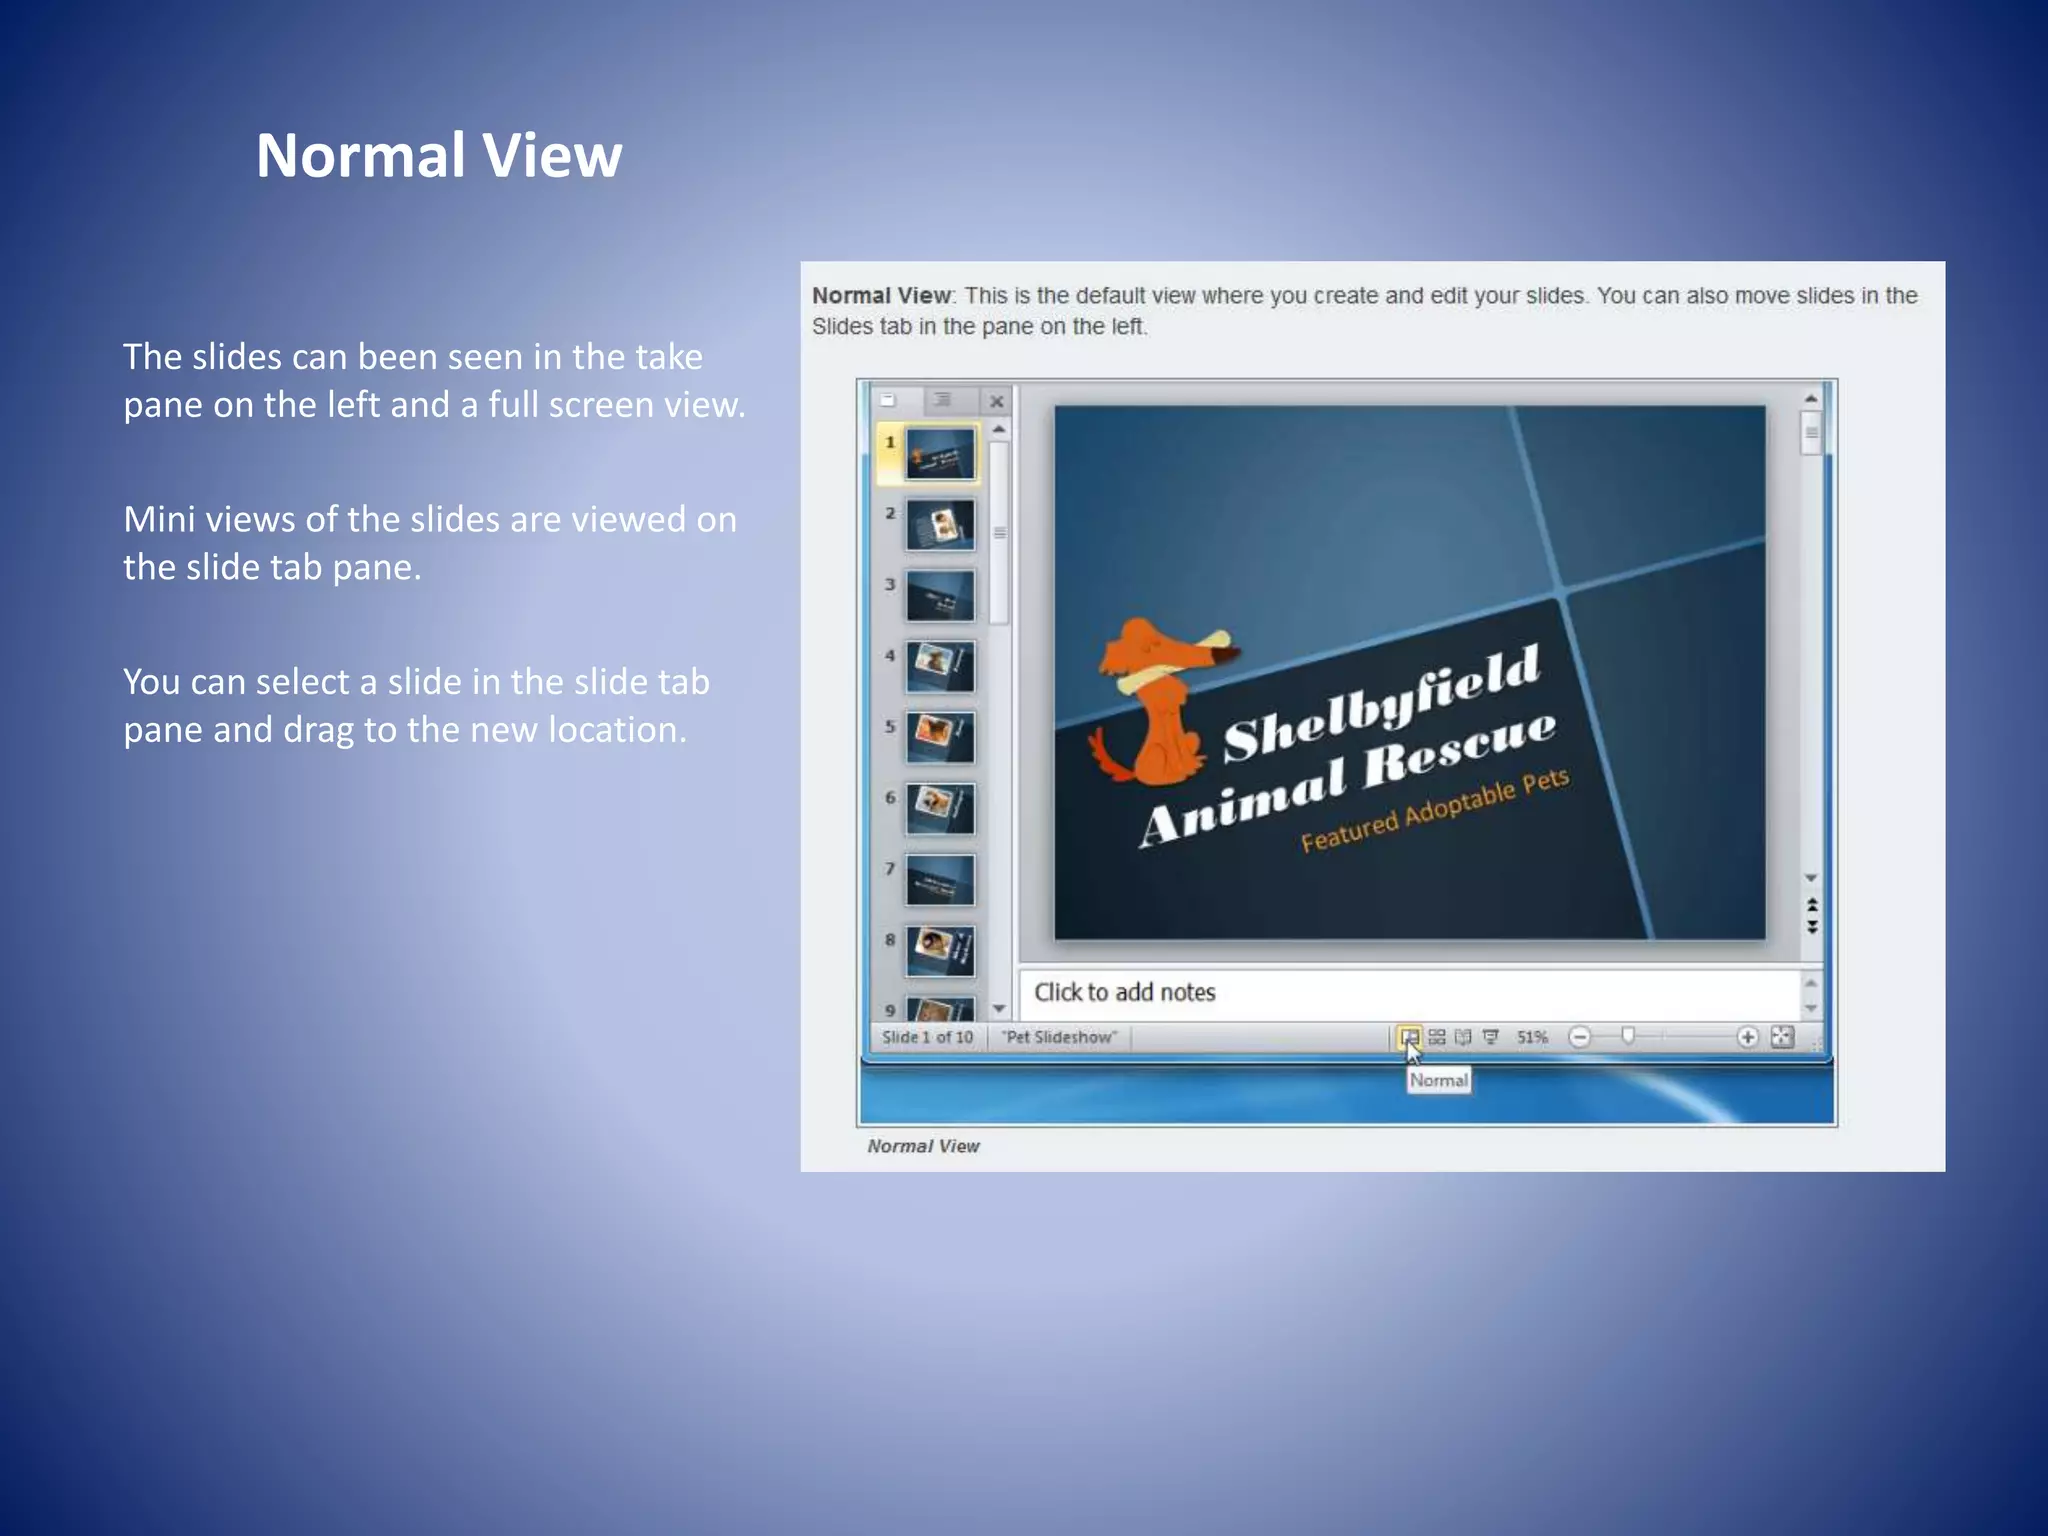
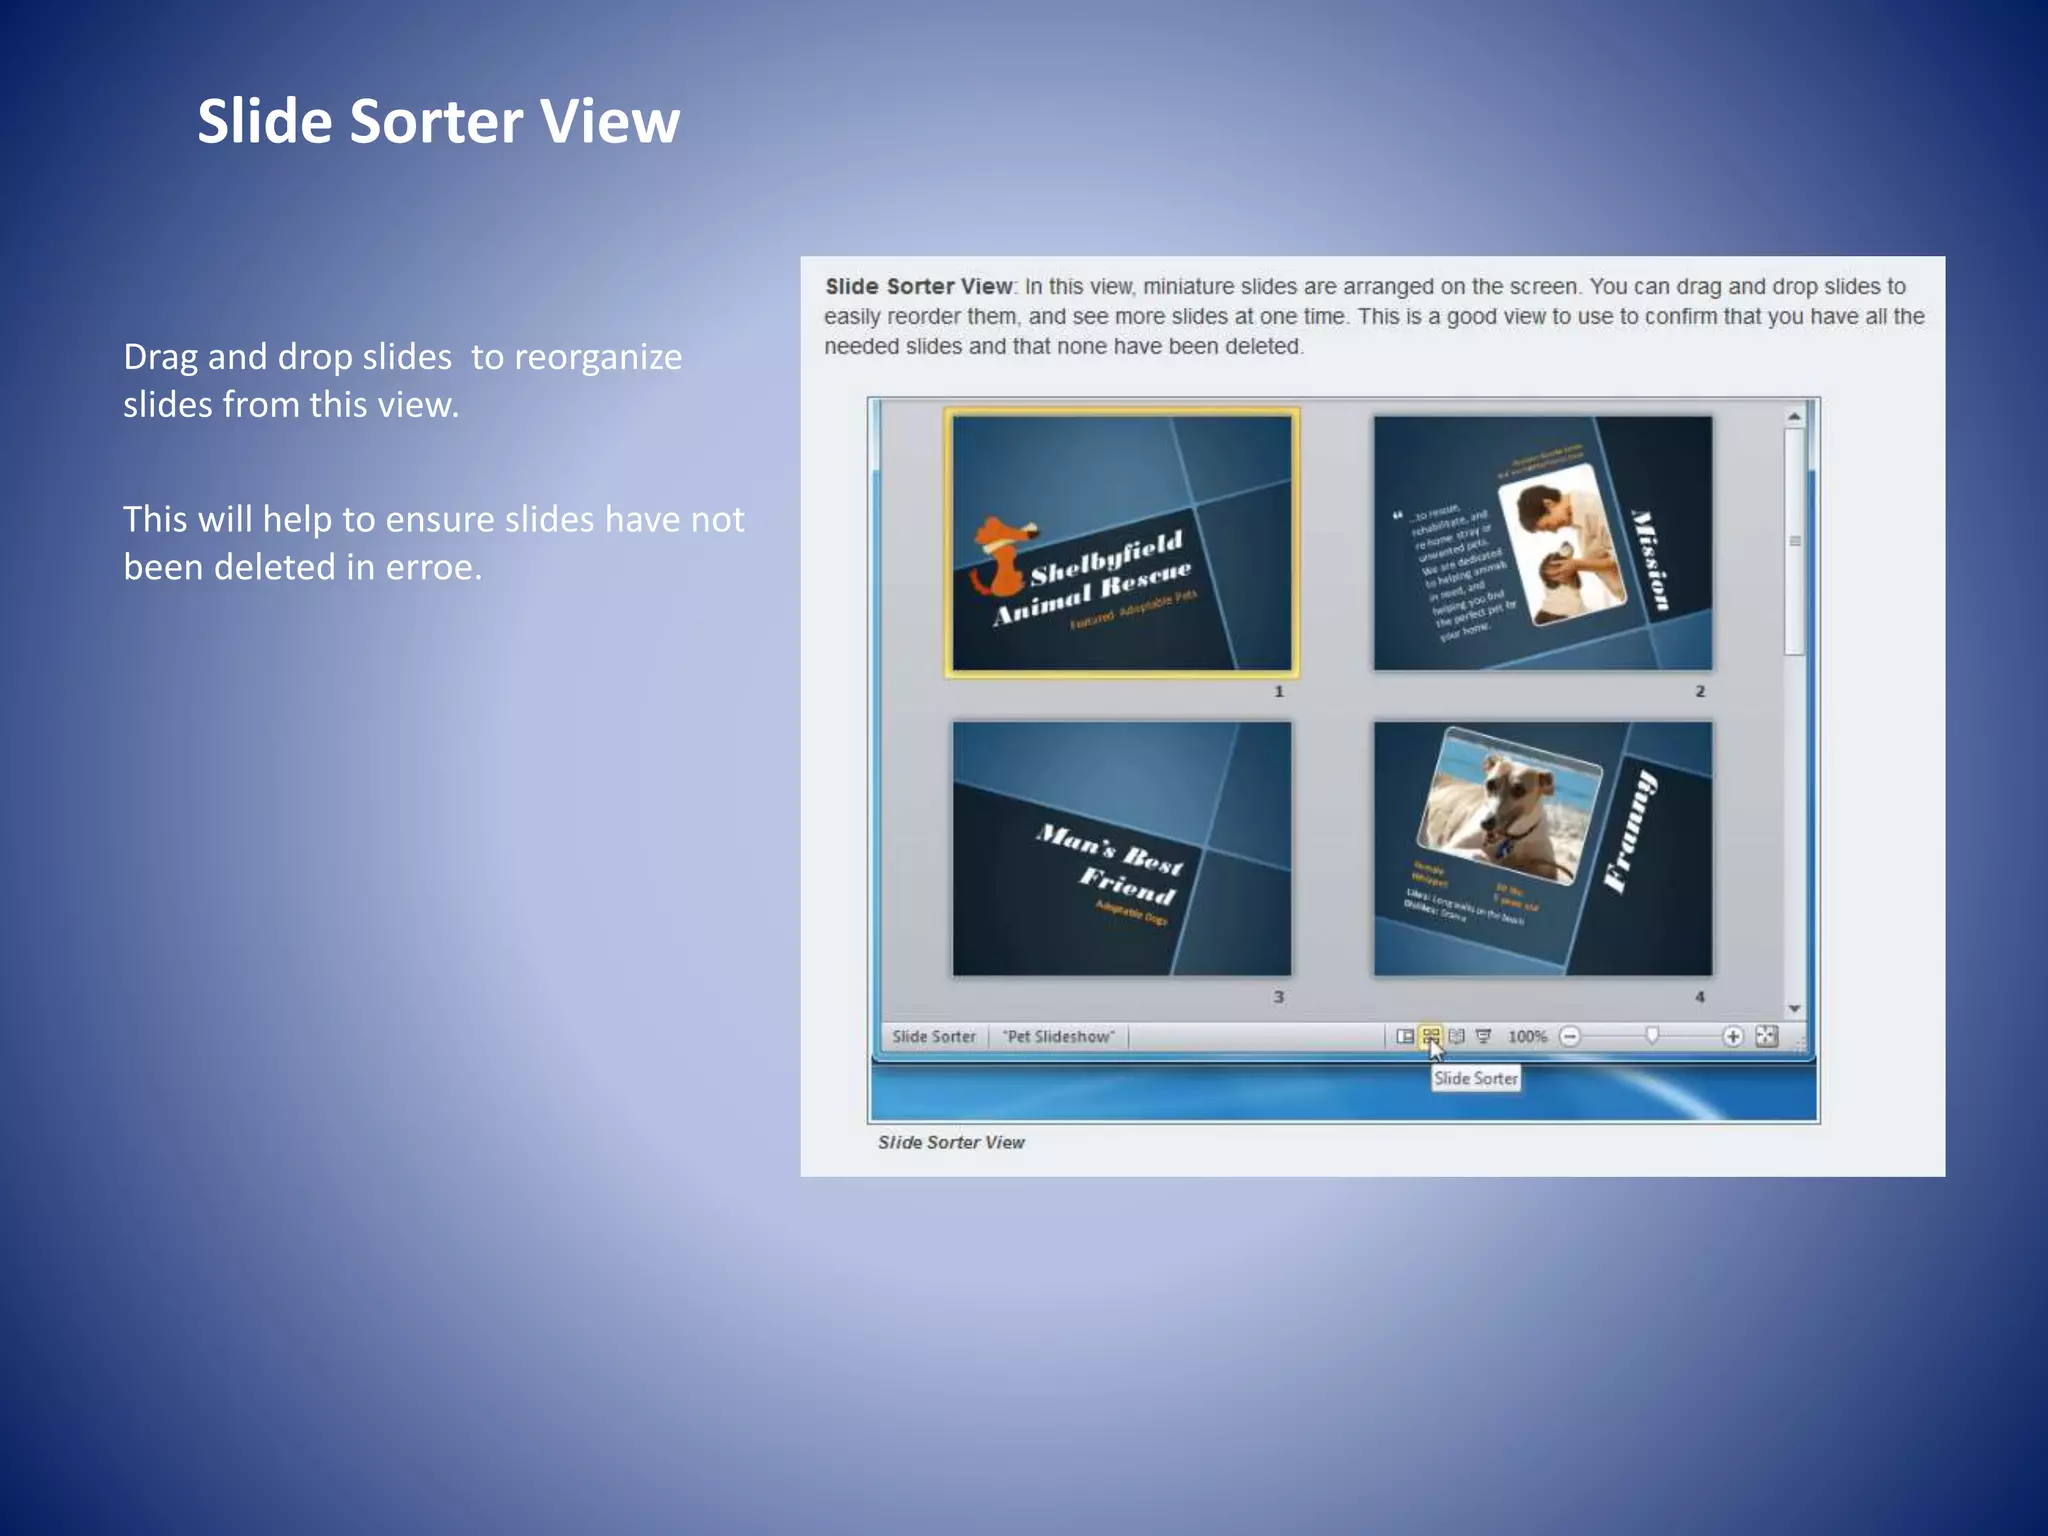
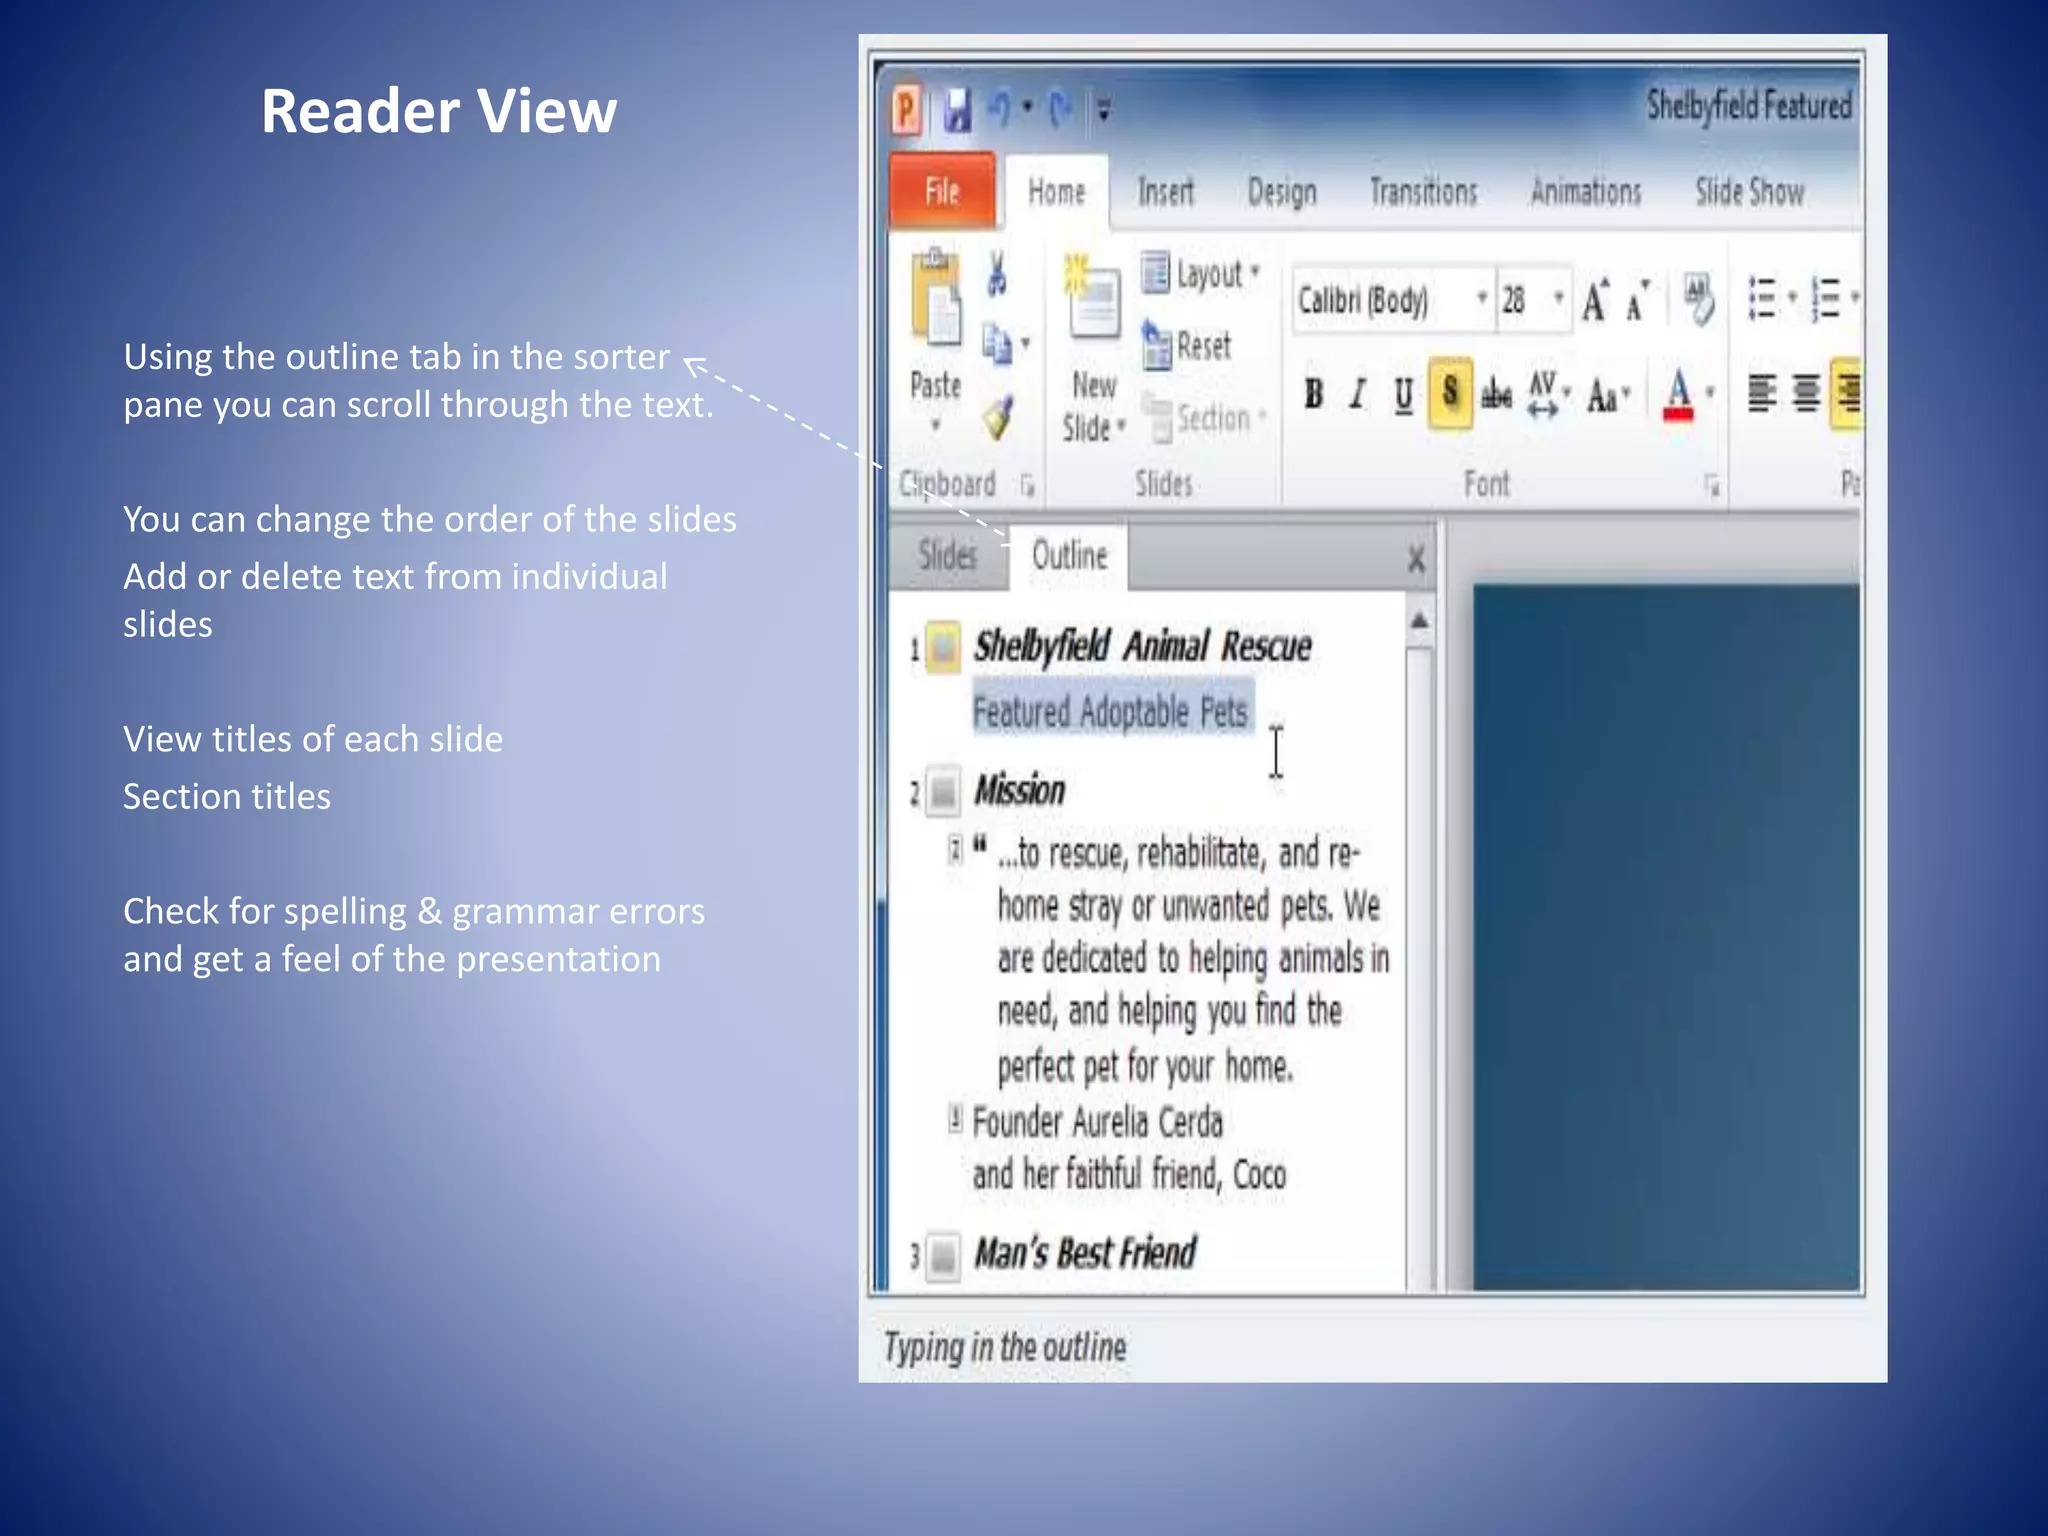
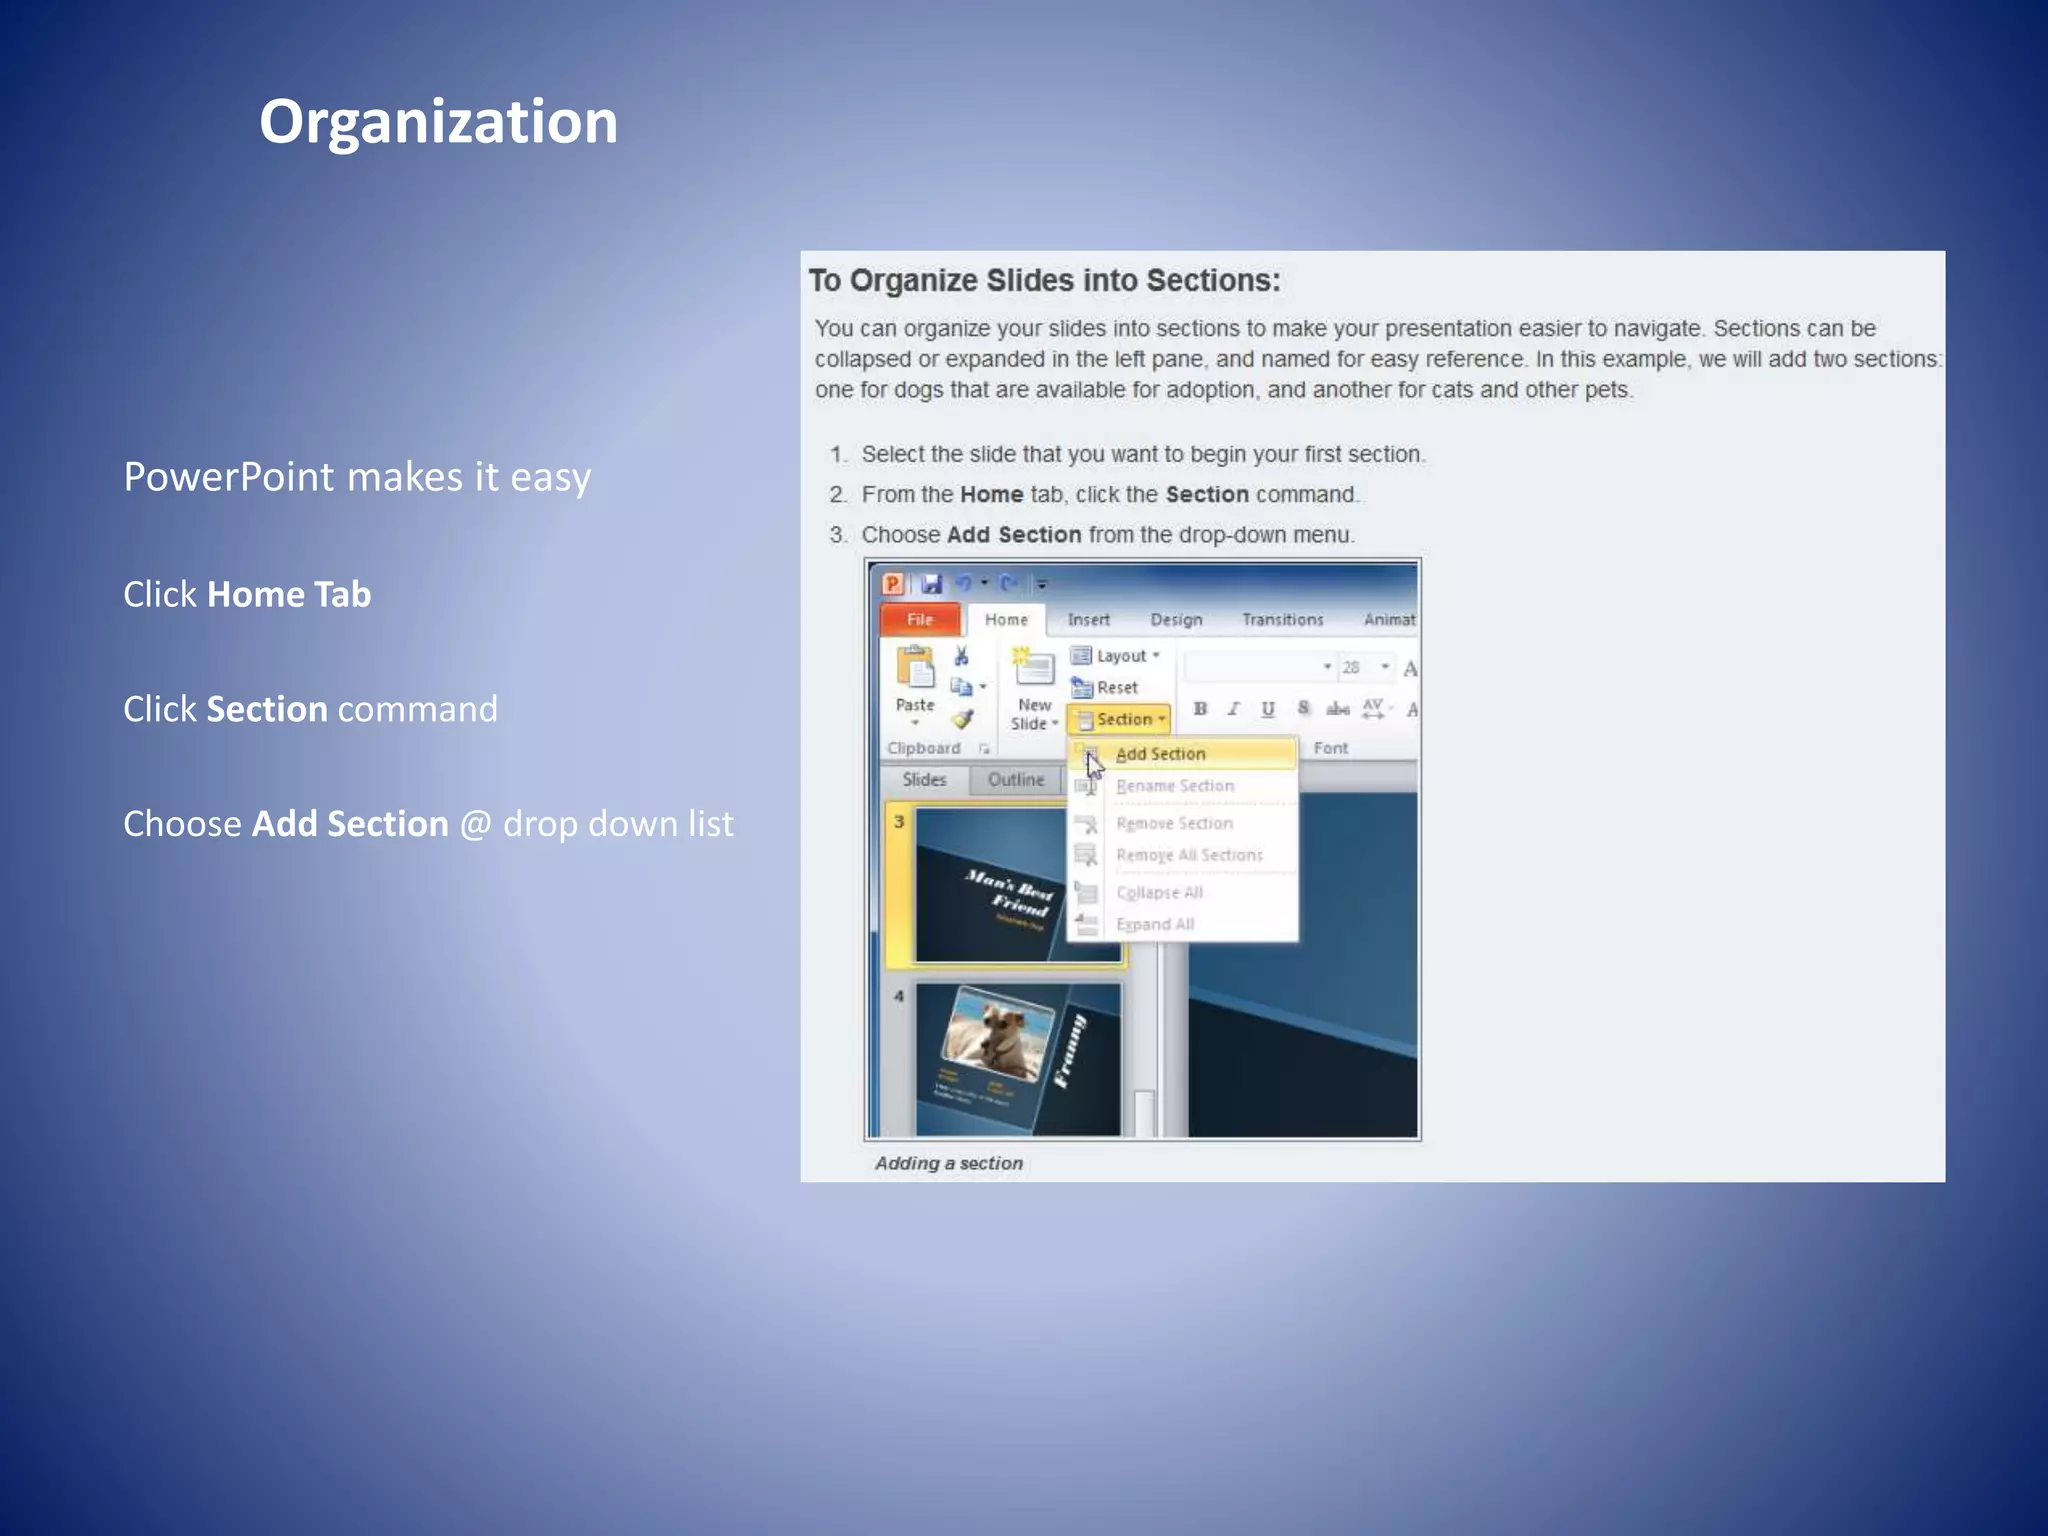
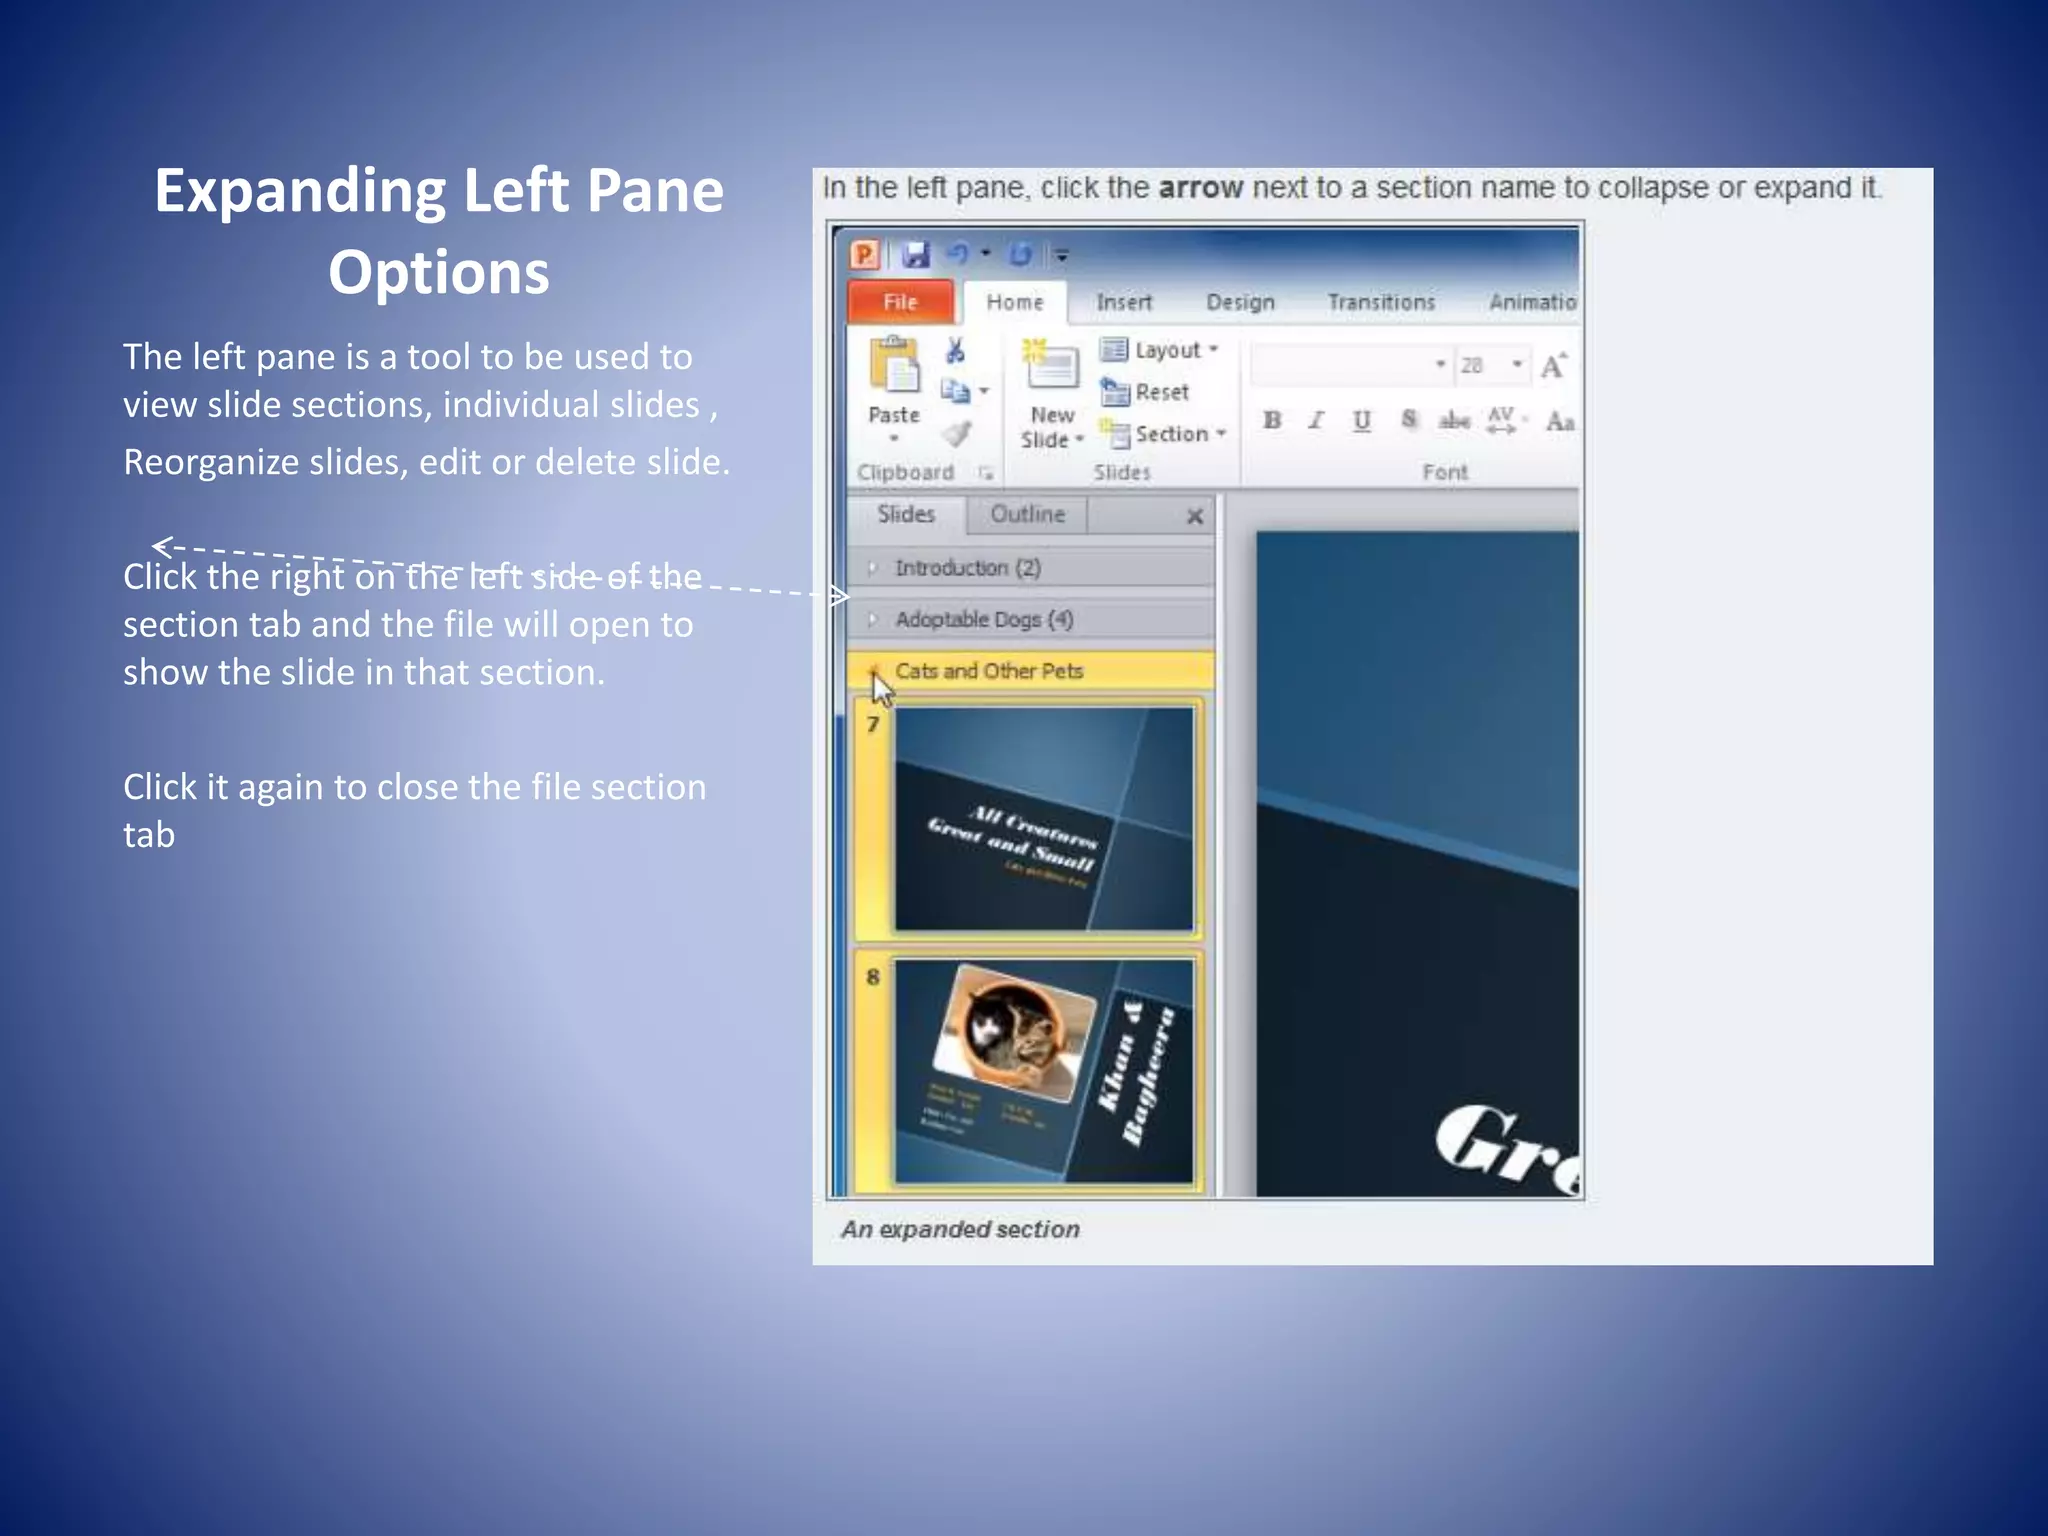
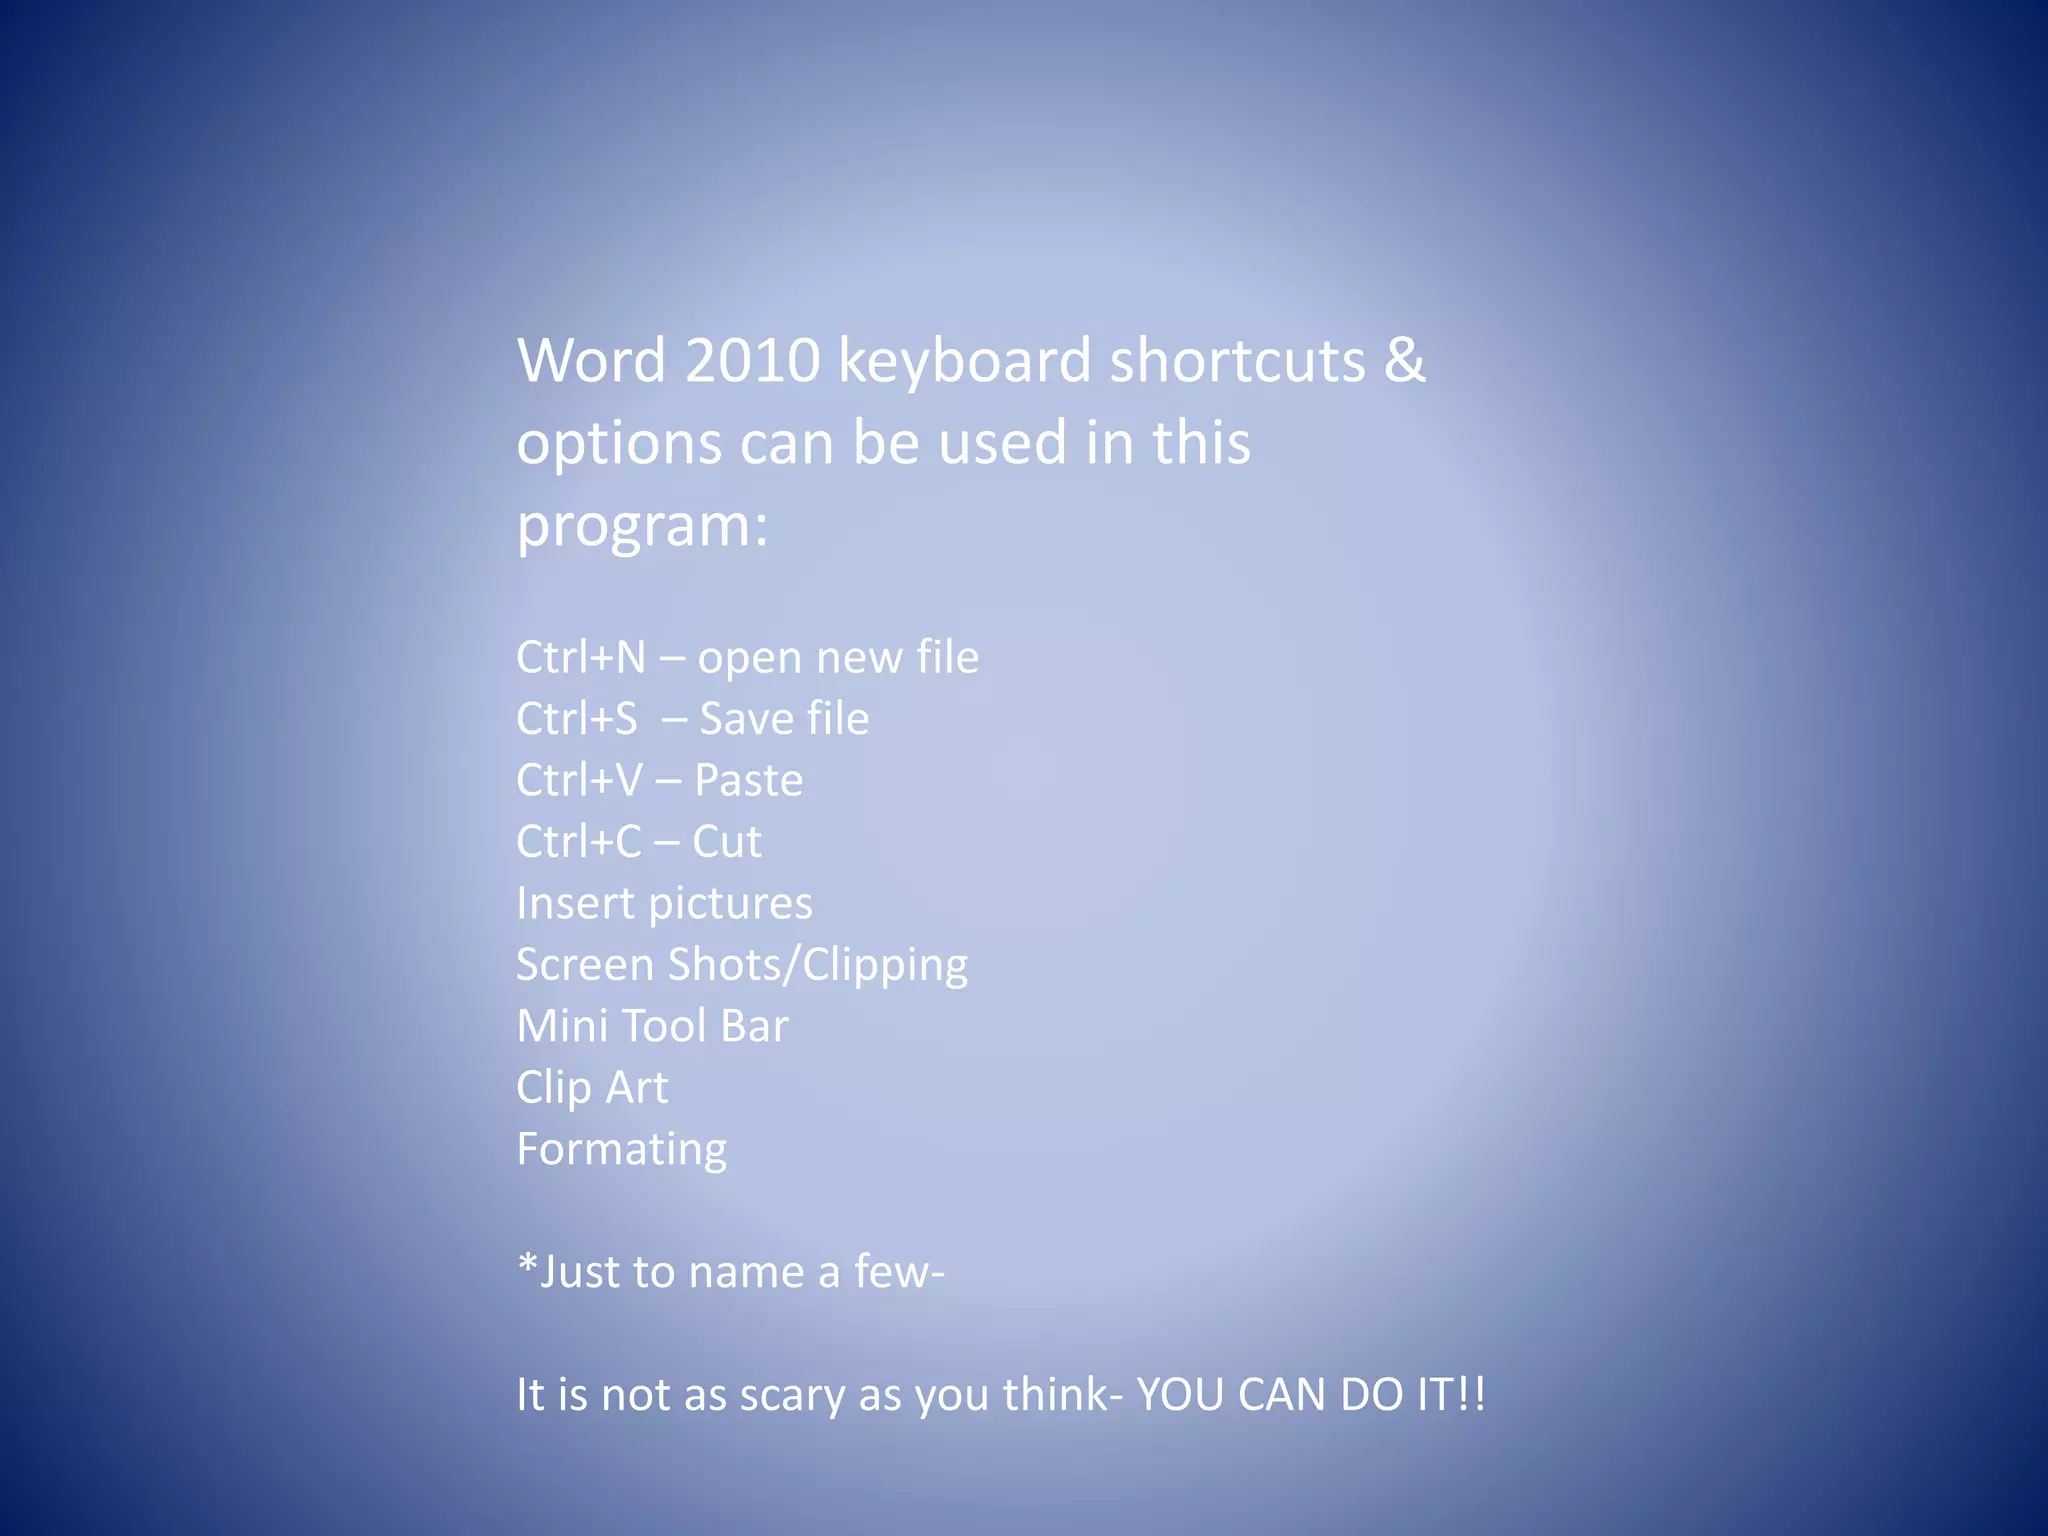
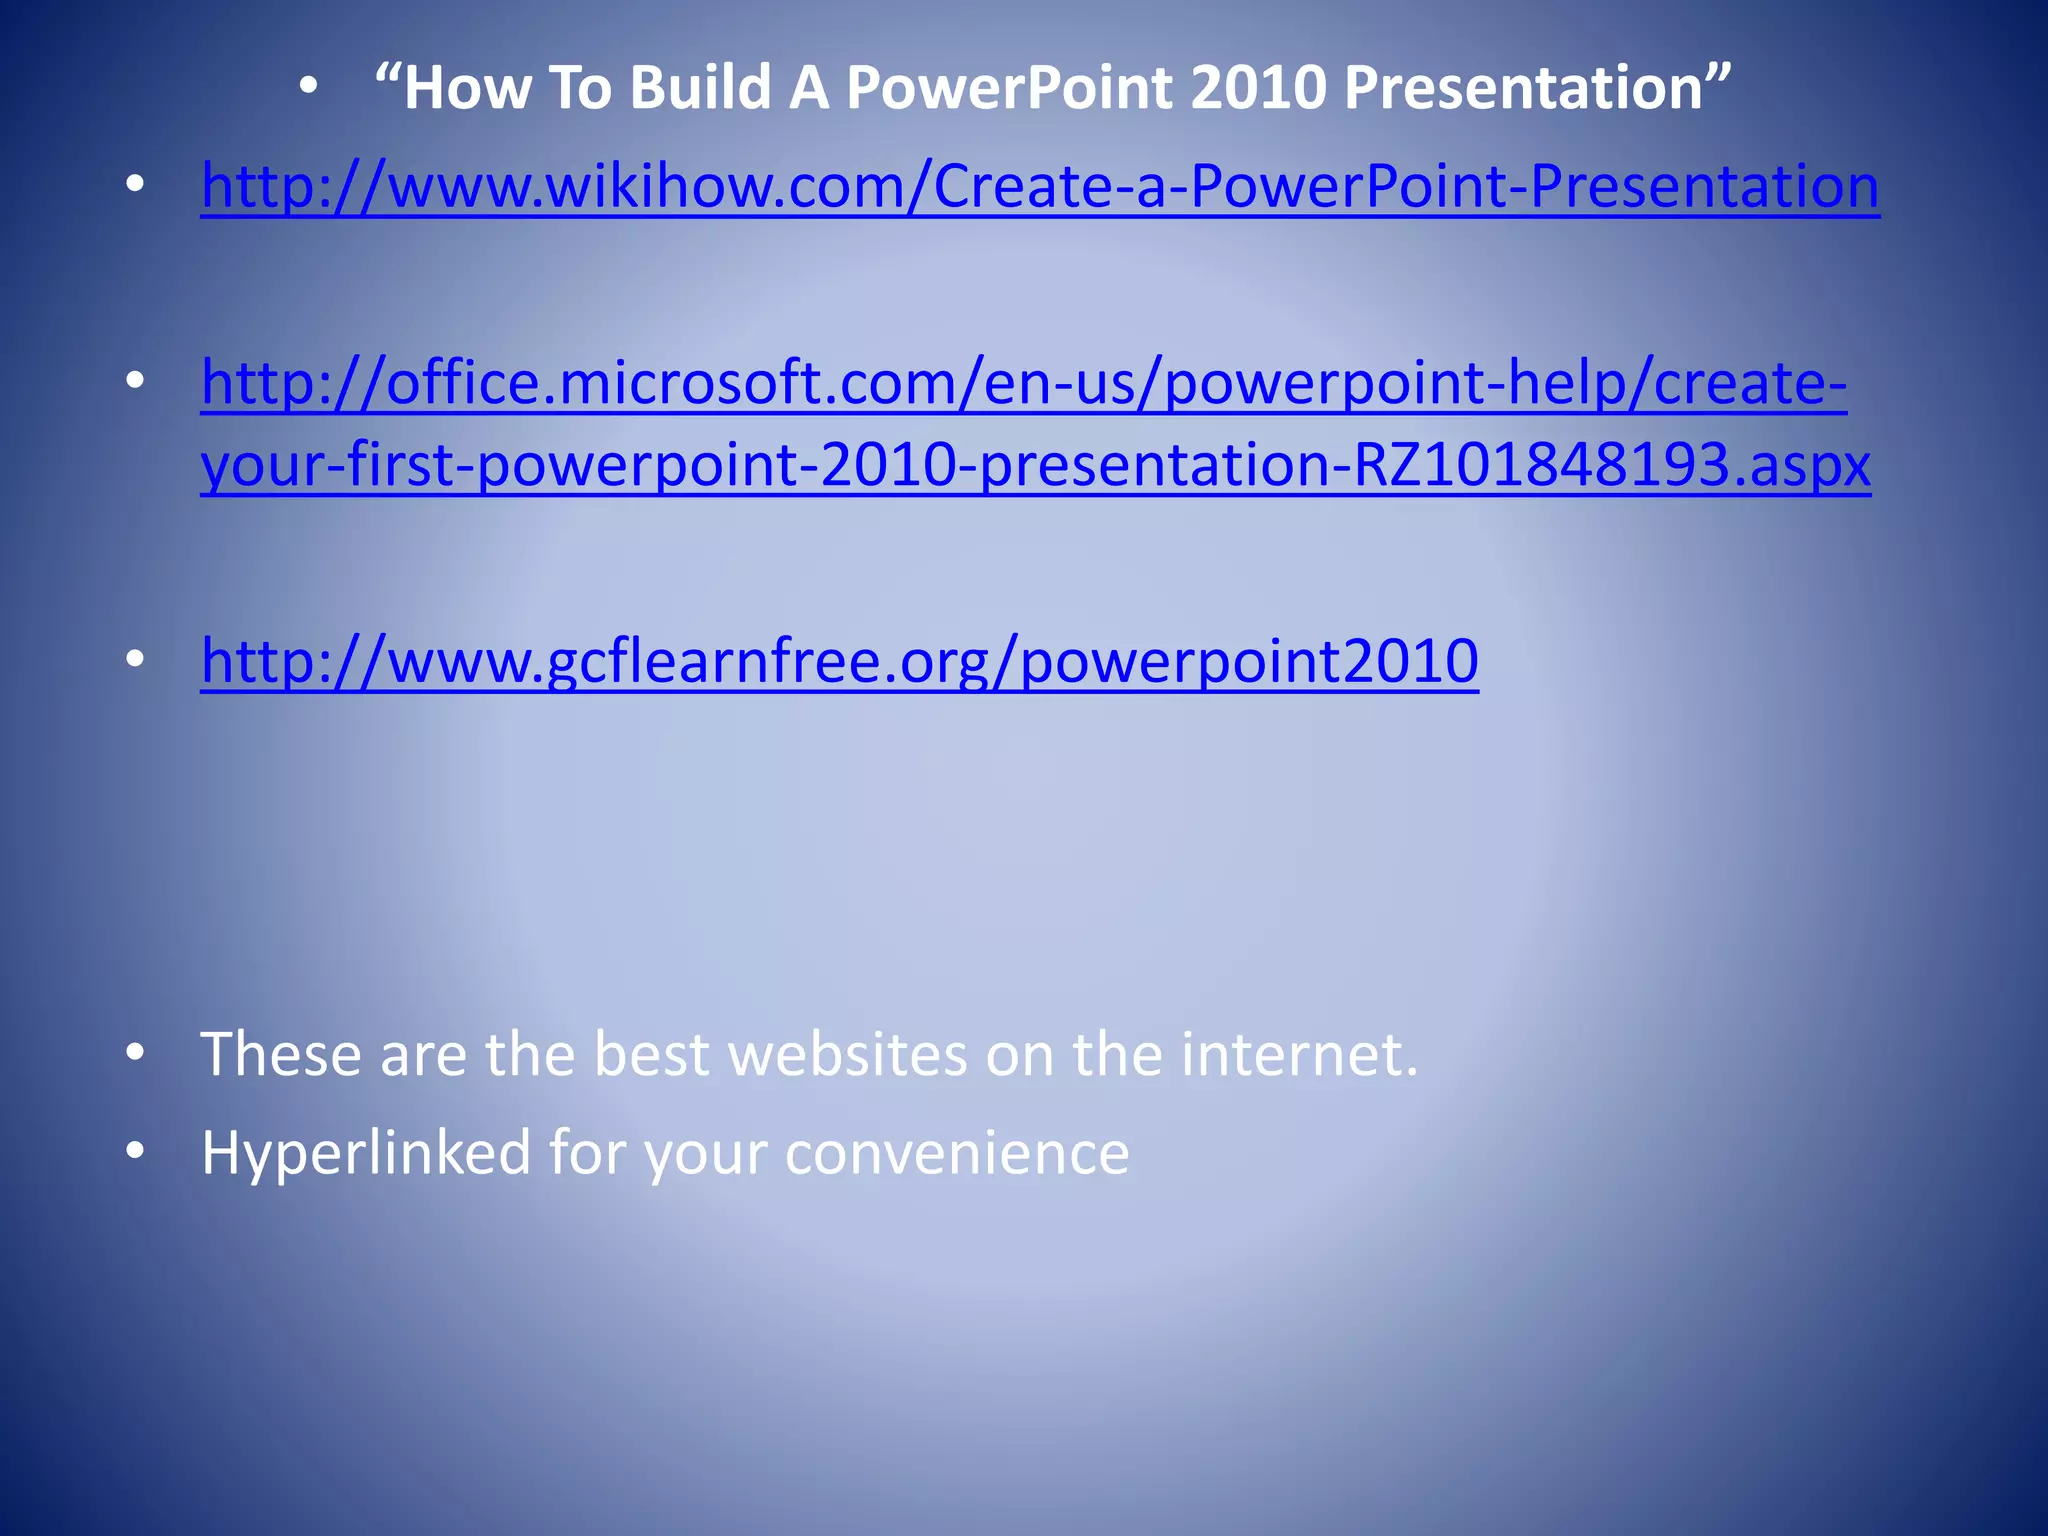
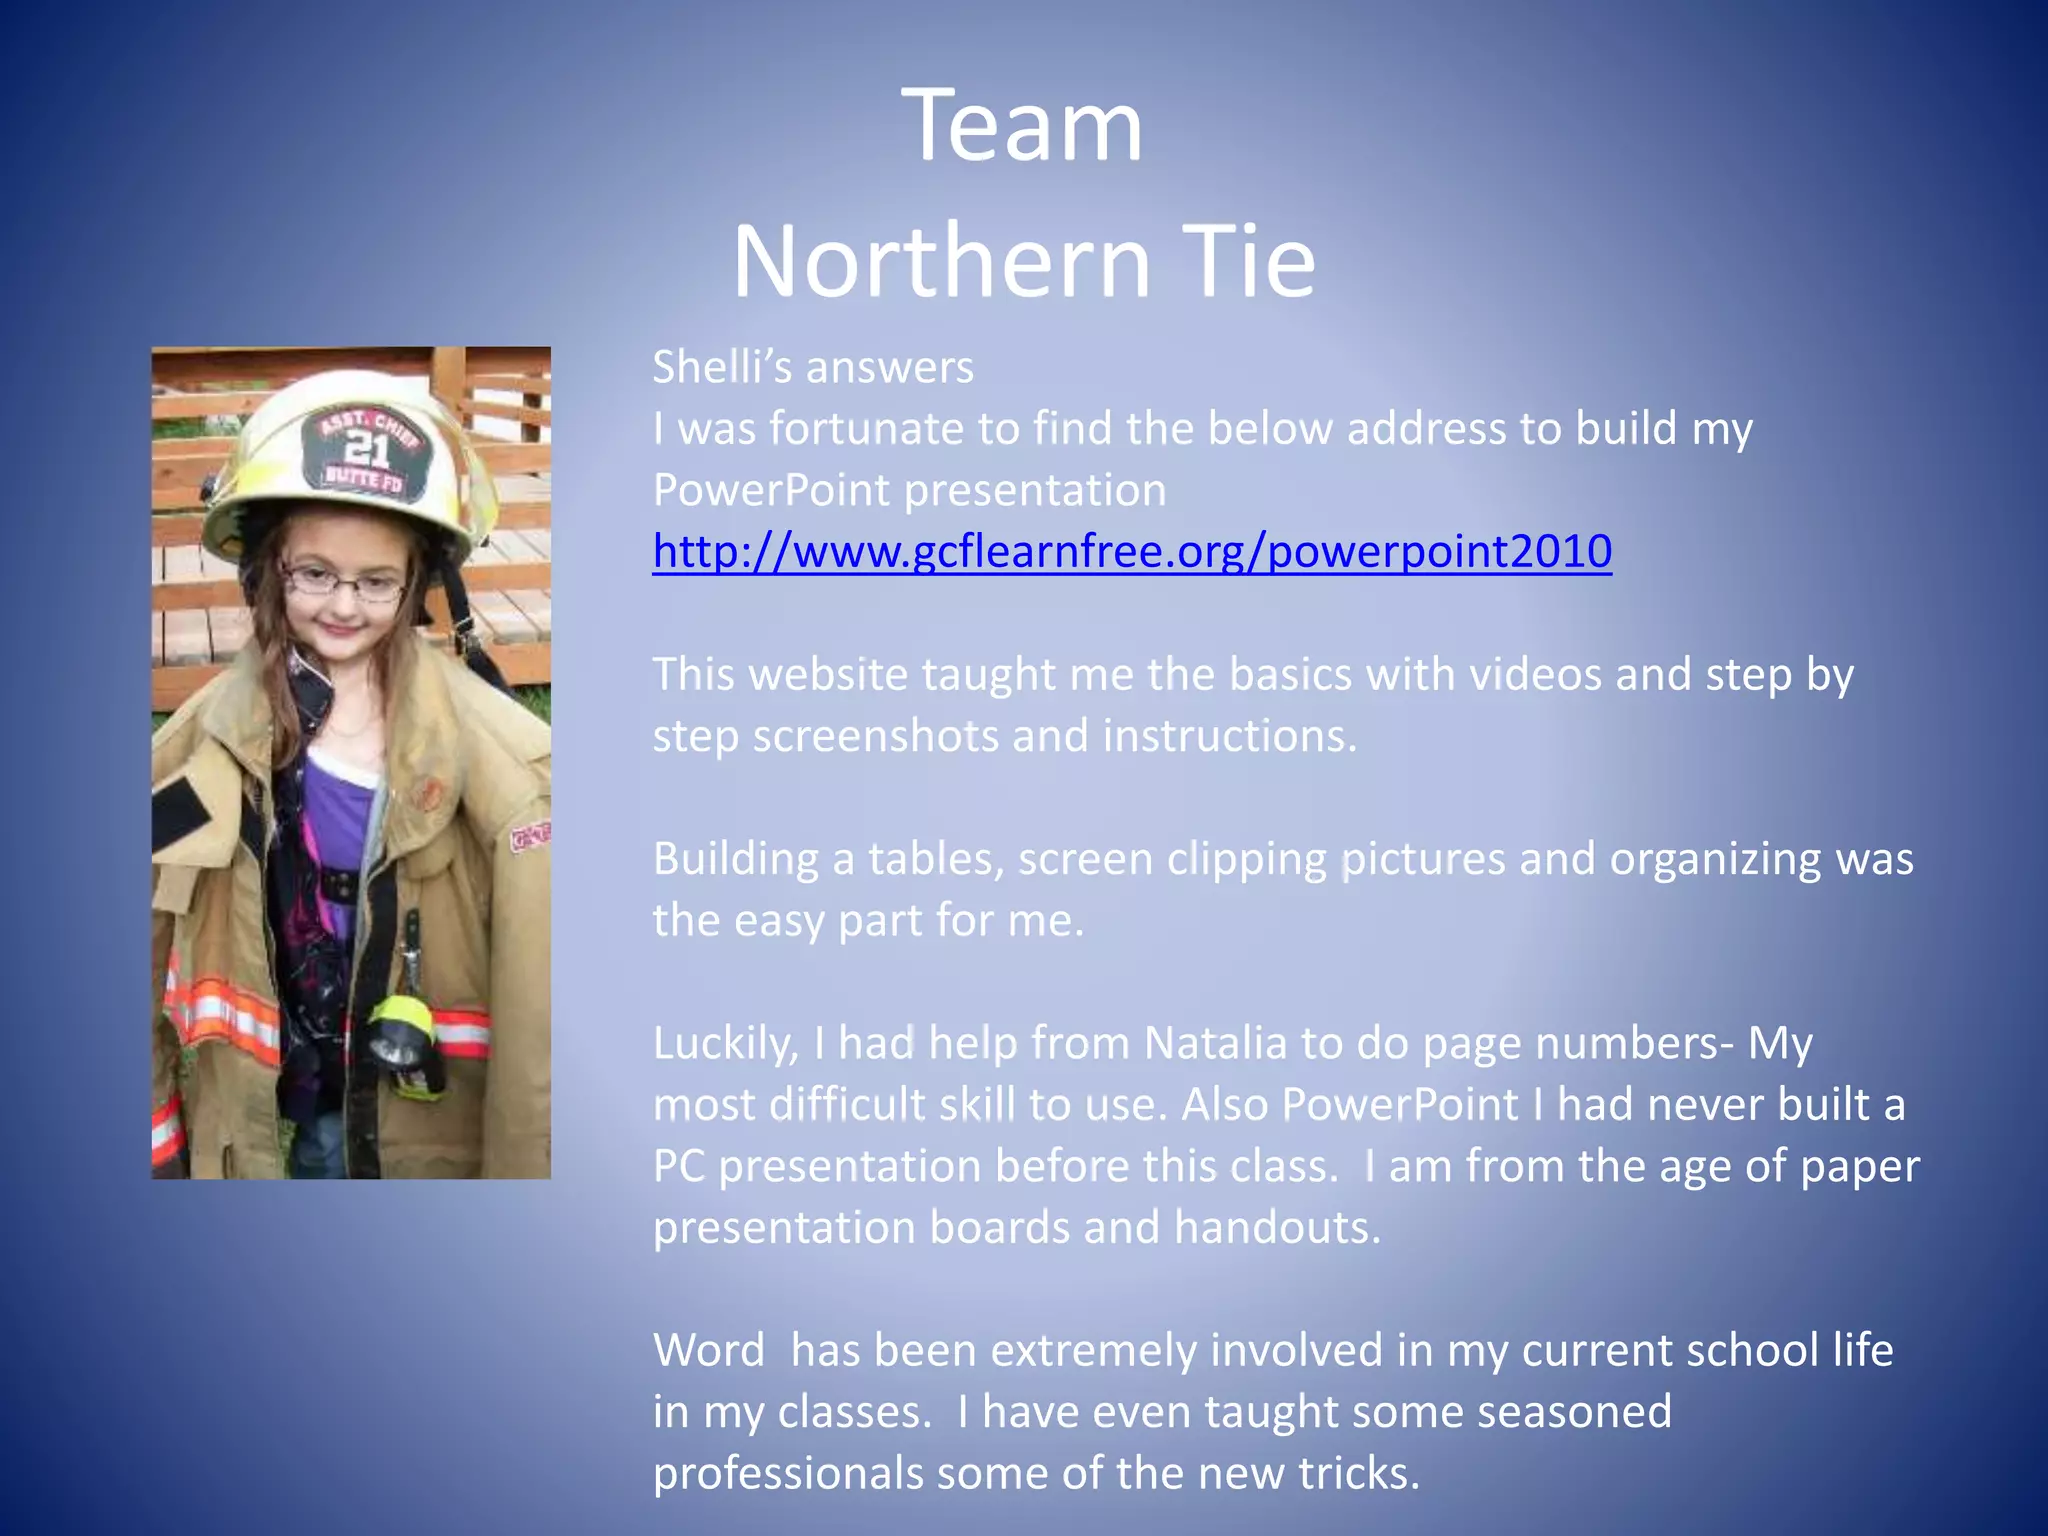
In only 24 lessons
PowerPoint 2010
Presentation
The Goodwill Community Foundation
has made it EASY and FREE to learn
PowerPoint 2010.
I used their website to build this
presentation- How am I doing?
www.gcflearnfree.org/powerpoint2010
 You only need minutes for each lesson.
 A total of 30-40 minutes
 Click on each of the lessons
 Step by Step with screen pictures to
scroll through.
Video Learning
Click on any of the videos to watch
How each lesson is done.
It is easy as:
1. Click the red button
2. Watch the video (1-2 min. each)
3. Build your presentation
Each lesson is narrated with the
instructions as well as the screen seen
in each shot.
How to Start
PowerPoint
Click the Start button
Click All Programs
Click Microsoft Office
Click PowerPoint 2010
*This is the logo.
Navigating
PowerPoint
1. Quick Toolbar
2. Ribbon
3. Slides Tab
4. Outline Tab
5. Slide Viewer
6. Zoom Control
7. Scroll Bar
Backstage
View Options
1. Save, Save As, Open,or Close
2. Info about PowerPoint File
3. Recent- List of documents opened
recently.
4. New- Opens a window with
Template & Theme
options
5. Print layout and selection options
6. Save & Send- options to share or
email presentation
7. Help- Search engine for questions
8. Options- Presentation Protection &
Document info
Create a New
Presentation
The is a screenshot of the PowerPoint
New Options-
Start here – There are Templates,
Themes, Sample or a Blank Document
Slides
Most Slide layout have placeholders
for text, pictures or headings.
Selecting a new slide
Click Home Tab, Slides group
Click New Slide
*If you want a blank slide
Click Layout
* option window will open
Select the Layout
* A preview will appear
If there is a placeholder it must be used or
deleted.
Hoover the mouse pointer over the dotted
boarder of the text box until is becomes a cross;
to remove Place holders or text box, select and
either backspace or delete.
Right click to access the Mini Toolbar
Slide Layouts
The placeholders are designated with
dotted boarders.
If click the down arrow on the lower
half of the New slide Button the
window slow will appear.
If you already have a slide open a
preview will be seen of the new
layout.
PowerPoint will take the information
already provided on the slide and
insert in the new layout.
Text boxes can be drawn on a blank
slide. Click Insert Tab, Text box and a
Down pointing arrow will appear
Click and drag mouse to the draw box.
It can be modified by clicking the
corners or middle square and
dragging.
Slide Views
There are 4 ways to view the slides
Normal view- views slides in fullscreen
and a preview of the slides in the
sorter pane on the left side of screen.
Slide sorter view- more than one slide
can be seen in the window. Dragging
the slide into location making editing
easy.
Reading view- The slide text is
previewed and edified- also know as
speaker noted
Play slide show- The slides are viewed
full screen I the order set by you.
These commands are bottom right of
the Normal View window
Normal View
The slides can been seen in the take
pane on the left and a full screen view.
Mini views of the slides are viewed on
the slide tab pane.
You can select a slide in the slide tab
pane and drag to the new location.
Slide Sorter View
Drag and drop slides to reorganize
slides from this view.
This will help to ensure slides have not
been deleted in erroe.
Slide Show
Hover the mouse over the Slide Show
button to view slides one at a time in
order of appearance.
Left arrow moves to the previous slide
Right arrow moves to the next slide
This will allow you view as a whole
product.
Reader View
Using the outline tab in the sorter
pane you can scroll through the text.
You can change the order of the slides
Add or delete text from individual
slides
View titles of each slide
Section titles
Check for spelling & grammar errors
and get a feel of the presentation
Organization
PowerPoint makes it easy
Click Home Tab
Click Section command
Choose Add Section @ drop down list
Expanding Left Pane
Options
The left pane is a tool to be used to
view slide sections, individual slides ,
Reorganize slides, edit or delete slide.
Click the right on the left side of the
section tab and the file will open to
show the slide in that section.
Click it again to close the file section
tab
Slide Notes
The pane at the bottom of the screen
is known as the speaker notes or the
slide notes.
It can be enlarged by positioning the
mouse on the border line until a top
and bottom arrow appears.
Drag it up or down to increase the size.
Click in the pane and type- these note
will appear below the slide.
View Tab
In this tab you can
Adjust color
Zoom Sizes
Presentation Views
Several of the Word
Anytime you are working on the
presentation always
Click SAVE-
This is a brief overview of some of the
unique functions and how easy it is to
make a presentation.
Word 2010 keyboard shortcuts &
options can be used in this
program:
Ctrl+N – open new file
Ctrl+S – Save file
Ctrl+V – Paste
Ctrl+C – Cut
Insert pictures
Screen Shots/Clipping
Mini Tool Bar
Clip Art
Formating
*Just to name a few-
It is not as scary as you think- YOU CAN DO IT!!
• “How To Build A PowerPoint 2010 Presentation”
• http://www.wikihow.com/Create-a-PowerPoint-Presentation
• http://office.microsoft.com/en-us/powerpoint-help/create-
your-first-powerpoint-2010-presentation-RZ101848193.aspx
• http://www.gcflearnfree.org/powerpoint2010
• These are the best websites on the internet.
• Hyperlinked for your convenience
Team
Northern Tie
Shelli’s answers
I was fortunate to find the below address to build my
PowerPoint presentation
http://www.gcflearnfree.org/powerpoint2010
This website taught me the basics with videos and step by
step screenshots and instructions.
Building a tables, screen clipping pictures and organizing was
the easy part for me.
Luckily, I had help from Natalia to do page numbers- My
most difficult skill to use. Also PowerPoint I had never built a
PC presentation before this class. I am from the age of paper
presentation boards and handouts.
Word has been extremely involved in my current school life
in my classes. I have even taught some seasoned
professionals some of the new tricks.

Sample power point presentation

  • 3.
    In only 24lessons PowerPoint 2010 Presentation The Goodwill Community Foundation has made it EASY and FREE to learn PowerPoint 2010. I used their website to build this presentation- How am I doing? www.gcflearnfree.org/powerpoint2010  You only need minutes for each lesson.  A total of 30-40 minutes  Click on each of the lessons  Step by Step with screen pictures to scroll through.
  • 4.
    Video Learning Click onany of the videos to watch How each lesson is done. It is easy as: 1. Click the red button 2. Watch the video (1-2 min. each) 3. Build your presentation Each lesson is narrated with the instructions as well as the screen seen in each shot.
  • 5.
    How to Start PowerPoint Clickthe Start button Click All Programs Click Microsoft Office Click PowerPoint 2010 *This is the logo.
  • 6.
    Navigating PowerPoint 1. Quick Toolbar 2.Ribbon 3. Slides Tab 4. Outline Tab 5. Slide Viewer 6. Zoom Control 7. Scroll Bar
  • 7.
    Backstage View Options 1. Save,Save As, Open,or Close 2. Info about PowerPoint File 3. Recent- List of documents opened recently. 4. New- Opens a window with Template & Theme options 5. Print layout and selection options 6. Save & Send- options to share or email presentation 7. Help- Search engine for questions 8. Options- Presentation Protection & Document info
  • 8.
    Create a New Presentation Theis a screenshot of the PowerPoint New Options- Start here – There are Templates, Themes, Sample or a Blank Document
  • 9.
    Slides Most Slide layouthave placeholders for text, pictures or headings. Selecting a new slide Click Home Tab, Slides group Click New Slide *If you want a blank slide Click Layout * option window will open Select the Layout * A preview will appear If there is a placeholder it must be used or deleted. Hoover the mouse pointer over the dotted boarder of the text box until is becomes a cross; to remove Place holders or text box, select and either backspace or delete. Right click to access the Mini Toolbar
  • 10.
    Slide Layouts The placeholdersare designated with dotted boarders. If click the down arrow on the lower half of the New slide Button the window slow will appear. If you already have a slide open a preview will be seen of the new layout. PowerPoint will take the information already provided on the slide and insert in the new layout. Text boxes can be drawn on a blank slide. Click Insert Tab, Text box and a Down pointing arrow will appear Click and drag mouse to the draw box. It can be modified by clicking the corners or middle square and dragging.
  • 11.
    Slide Views There are4 ways to view the slides Normal view- views slides in fullscreen and a preview of the slides in the sorter pane on the left side of screen. Slide sorter view- more than one slide can be seen in the window. Dragging the slide into location making editing easy. Reading view- The slide text is previewed and edified- also know as speaker noted Play slide show- The slides are viewed full screen I the order set by you. These commands are bottom right of the Normal View window
  • 12.
    Normal View The slidescan been seen in the take pane on the left and a full screen view. Mini views of the slides are viewed on the slide tab pane. You can select a slide in the slide tab pane and drag to the new location.
  • 13.
    Slide Sorter View Dragand drop slides to reorganize slides from this view. This will help to ensure slides have not been deleted in erroe.
  • 14.
    Slide Show Hover themouse over the Slide Show button to view slides one at a time in order of appearance. Left arrow moves to the previous slide Right arrow moves to the next slide This will allow you view as a whole product.
  • 15.
    Reader View Using theoutline tab in the sorter pane you can scroll through the text. You can change the order of the slides Add or delete text from individual slides View titles of each slide Section titles Check for spelling & grammar errors and get a feel of the presentation
  • 16.
    Organization PowerPoint makes iteasy Click Home Tab Click Section command Choose Add Section @ drop down list
  • 17.
    Expanding Left Pane Options Theleft pane is a tool to be used to view slide sections, individual slides , Reorganize slides, edit or delete slide. Click the right on the left side of the section tab and the file will open to show the slide in that section. Click it again to close the file section tab
  • 18.
    Slide Notes The paneat the bottom of the screen is known as the speaker notes or the slide notes. It can be enlarged by positioning the mouse on the border line until a top and bottom arrow appears. Drag it up or down to increase the size. Click in the pane and type- these note will appear below the slide.
  • 19.
    View Tab In thistab you can Adjust color Zoom Sizes Presentation Views Several of the Word Anytime you are working on the presentation always Click SAVE- This is a brief overview of some of the unique functions and how easy it is to make a presentation.
  • 20.
    Word 2010 keyboardshortcuts & options can be used in this program: Ctrl+N – open new file Ctrl+S – Save file Ctrl+V – Paste Ctrl+C – Cut Insert pictures Screen Shots/Clipping Mini Tool Bar Clip Art Formating *Just to name a few- It is not as scary as you think- YOU CAN DO IT!!
  • 21.
    • “How ToBuild A PowerPoint 2010 Presentation” • http://www.wikihow.com/Create-a-PowerPoint-Presentation • http://office.microsoft.com/en-us/powerpoint-help/create- your-first-powerpoint-2010-presentation-RZ101848193.aspx • http://www.gcflearnfree.org/powerpoint2010 • These are the best websites on the internet. • Hyperlinked for your convenience
  • 22.
    Team Northern Tie Shelli’s answers Iwas fortunate to find the below address to build my PowerPoint presentation http://www.gcflearnfree.org/powerpoint2010 This website taught me the basics with videos and step by step screenshots and instructions. Building a tables, screen clipping pictures and organizing was the easy part for me. Luckily, I had help from Natalia to do page numbers- My most difficult skill to use. Also PowerPoint I had never built a PC presentation before this class. I am from the age of paper presentation boards and handouts. Word has been extremely involved in my current school life in my classes. I have even taught some seasoned professionals some of the new tricks.