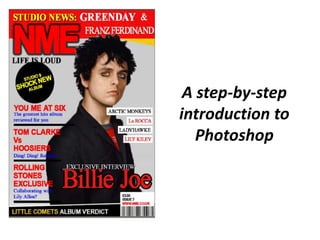
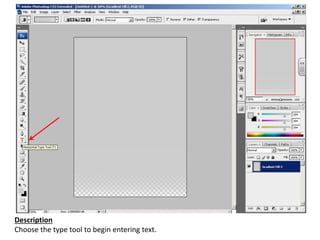
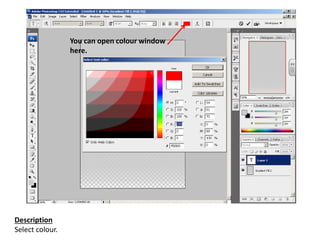
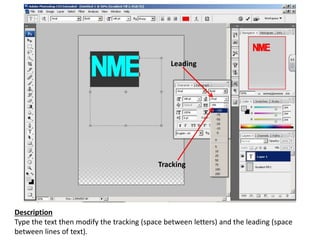
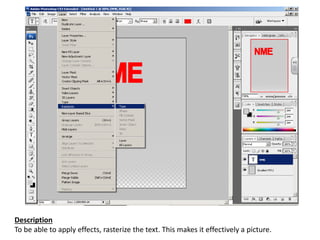
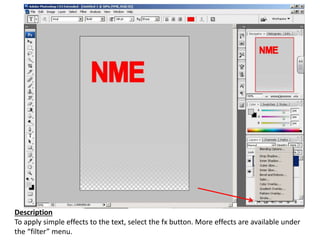
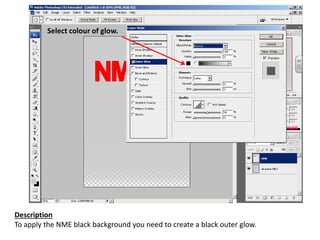
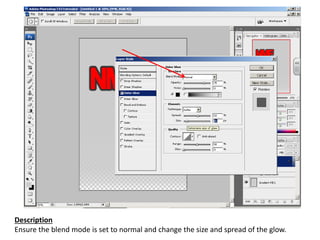
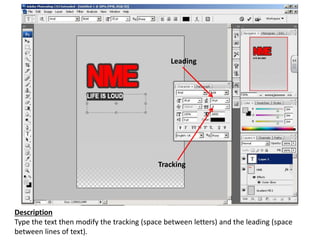
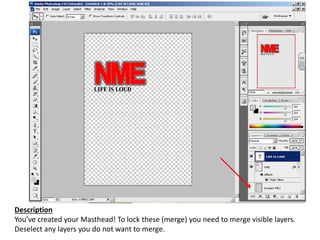
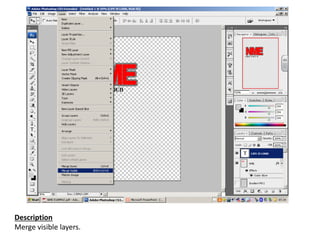
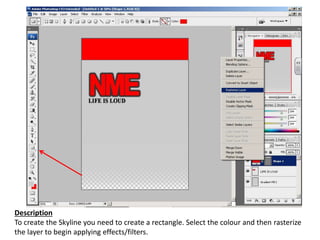
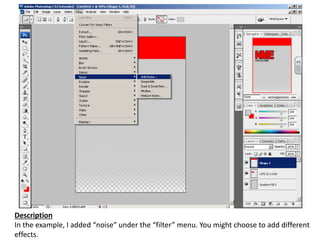
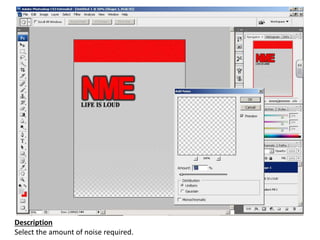
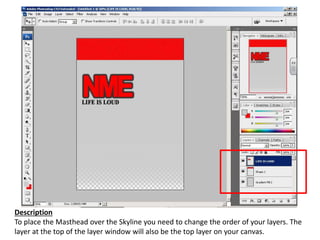
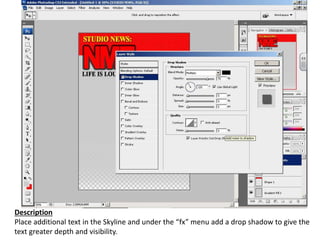
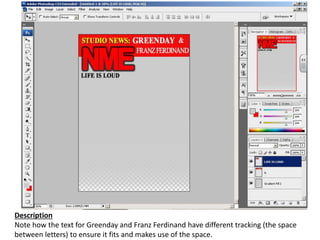
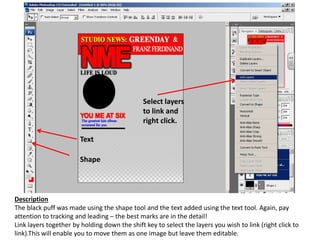
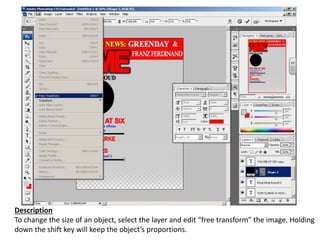
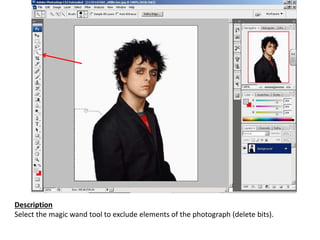
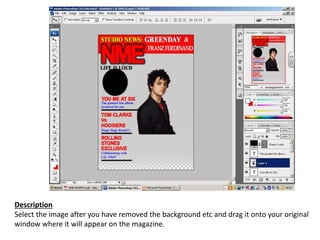
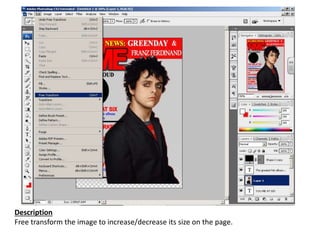
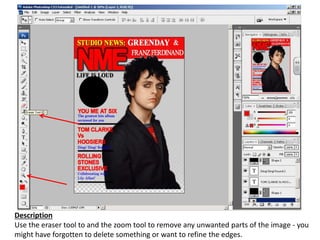
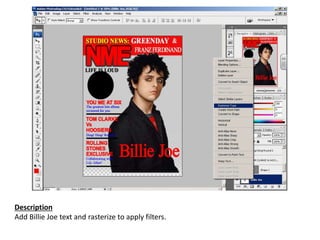
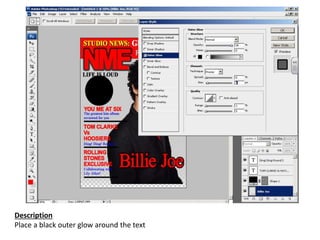
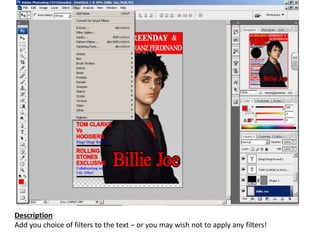
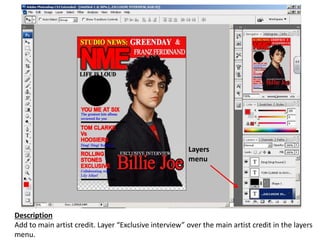
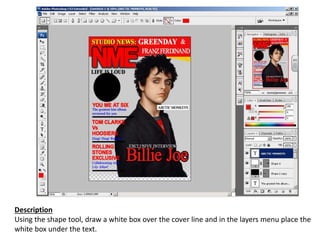
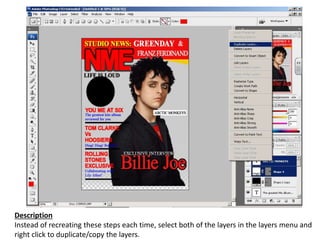
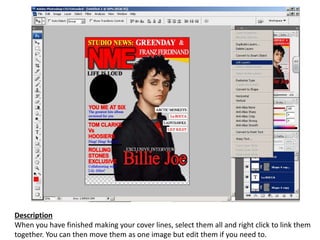
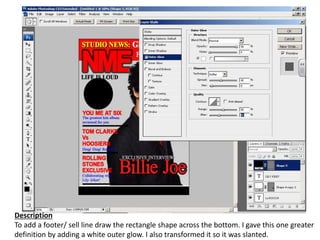
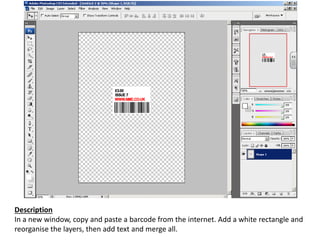
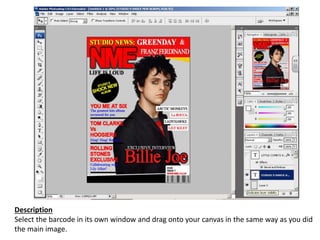
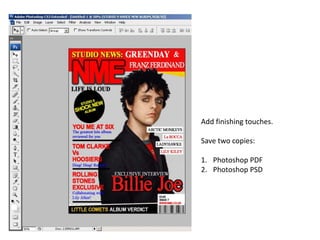
This document provides step-by-step instructions for creating a magazine cover in Photoshop. It describes how to add background colors and gradients, insert and style text, apply effects like outer glows and filters, import and edit images, and organize layers. The instructions guide the user through assembling cover lines, headlines, bylines, images and other design elements to build out the full magazine cover layout.
I worked on the Microsoft IE7 Tour graphics update for her. I created the reproduction docs: technical writing and screenshots of how to update the Photoshop files with the IE7 Tour graphics. I made the updated graphics in Photoshop CS2 and wrote a simple step by step tutorial on how to do this.
The photo with wild, flowing or flyway hair always makes a problem during removing background from that particular image. If you are quite worried about the process of doing hair masking then the following easy to learn tutorial can help you out.
A short study and presentation about the steps involved in Search Engine Optimization. The presentation also explores the role of Search Engine Optimization in search marketing.
TUTorial By chad neuman in InDesign,Tutorial AT Vishal Dawdy .docxwillcoxjanay
TUTorial By chad neuman in InDesign,Tutorial AT Vishal Dawdy
Download the support files first from Mod 3 Guidelines!
Begin…
INSTRUCTIONS:
Step 1
Open InDesign and go to File>New>Document or click the Create New File icon on the welcome screen. Set the settings shown here (these are all default settings except you’ll set it to 4 pages and click “facing pages”).
Step 2
Let’s set up the master pages. That way we can add a header and page numbers automatically. Make sure your “Pages” window is open from the Window Menu. DOUBLE-Click on the A-Master icon on the top of the Pages pull-out palette to work in the master pages shown here in yellow).
Step 3
In the lower-left hand corner of the left master page, click-and-drag with the Text tool to drag out a text box for the page number.
Step 4
Go to Type>Insert Special Character> Markers>Current Page Number.
Step 5
This will insert an automated page number so you don’t have to number each page. Change the size (and style if you want) of the font to an appropriate one for your publication.
[Note: Additionally, you could also place text (like the word 'page' or '#' symbol) in front of the page number and it would be continued throughout all pages using the master page template.]
Step 6
Select the Selection tool (black arrow). Hold down Option and click-and-drag the text box that has the automatic page number in it over to the right page to create another instance of the Auto Page Number. I placed the text box on the right side page on the lower right hand corner.
Step 7
If you put the text boxes for the page numbers in the same locations as I chose to, it should look something like this.
Step 8
Page numbers are not the only objects to put onto the master pages. And all the objects don’t have to be automatically updated objects, either. You can add photos, text, or shapes and they’ll be on every page. For this tutorial, add just a simple title at the top of each page by clicking-and-dragging out a text box along the top.
Step 9
Open the Paragraph palette under Window>Type & Tables>Paragraph and click the center or justify icon to center the text after highlighting it. Up in the Control options menu, change the tracking to 600 to increase the spacing of the text to spread out the title. The Tracking setting icon is an uppercase AV with directional arrows underneath it.
Step 10
Open Adobe Illustrator, create a New Document and go to File>Place to place the japanese_flag.gif file located in the downloadable support files for this tutorial (see Module 3 on our website).
Step 11
After clicking on the placed file with a Selection tool, open the Image Trace Control palette (under Window) to view the options for live tracing. Make sure the settings are set to the ones shown here; pretty much a basic black and white trace.
Step 12 Select Trace and then Go to the OBJECT menu and Expand (object+fill) to apply the trace to the selected artwork.
Step 13 Next, Deselect the image. Then, ...
How to Turn a Picture Into a Line Drawing in PhotoshopZenith Clipping
To transform a photograph into a line drawing in Photoshop, you don’t need it to appear as though you did it in Photoshop, you’ll need to focus on detail and set up your picture appropriately before you apply any channels.
The French Revolution, which began in 1789, was a period of radical social and political upheaval in France. It marked the decline of absolute monarchies, the rise of secular and democratic republics, and the eventual rise of Napoleon Bonaparte. This revolutionary period is crucial in understanding the transition from feudalism to modernity in Europe.
For more information, visit-www.vavaclasses.com
Introduction to AI for Nonprofits with Tapp NetworkTechSoup
Dive into the world of AI! Experts Jon Hill and Tareq Monaur will guide you through AI's role in enhancing nonprofit websites and basic marketing strategies, making it easy to understand and apply.
Synthetic Fiber Construction in lab .pptxPavel ( NSTU)
Synthetic fiber production is a fascinating and complex field that blends chemistry, engineering, and environmental science. By understanding these aspects, students can gain a comprehensive view of synthetic fiber production, its impact on society and the environment, and the potential for future innovations. Synthetic fibers play a crucial role in modern society, impacting various aspects of daily life, industry, and the environment. ynthetic fibers are integral to modern life, offering a range of benefits from cost-effectiveness and versatility to innovative applications and performance characteristics. While they pose environmental challenges, ongoing research and development aim to create more sustainable and eco-friendly alternatives. Understanding the importance of synthetic fibers helps in appreciating their role in the economy, industry, and daily life, while also emphasizing the need for sustainable practices and innovation.
Instructions for Submissions thorugh G- Classroom.pptxJheel Barad
This presentation provides a briefing on how to upload submissions and documents in Google Classroom. It was prepared as part of an orientation for new Sainik School in-service teacher trainees. As a training officer, my goal is to ensure that you are comfortable and proficient with this essential tool for managing assignments and fostering student engagement.
Model Attribute Check Company Auto PropertyCeline George
In Odoo, the multi-company feature allows you to manage multiple companies within a single Odoo database instance. Each company can have its own configurations while still sharing common resources such as products, customers, and suppliers.
Operation “Blue Star” is the only event in the history of Independent India where the state went into war with its own people. Even after about 40 years it is not clear if it was culmination of states anger over people of the region, a political game of power or start of dictatorial chapter in the democratic setup.
The people of Punjab felt alienated from main stream due to denial of their just demands during a long democratic struggle since independence. As it happen all over the word, it led to militant struggle with great loss of lives of military, police and civilian personnel. Killing of Indira Gandhi and massacre of innocent Sikhs in Delhi and other India cities was also associated with this movement.
2024.06.01 Introducing a competency framework for languag learning materials ...Sandy Millin
http://sandymillin.wordpress.com/iateflwebinar2024
Published classroom materials form the basis of syllabuses, drive teacher professional development, and have a potentially huge influence on learners, teachers and education systems. All teachers also create their own materials, whether a few sentences on a blackboard, a highly-structured fully-realised online course, or anything in between. Despite this, the knowledge and skills needed to create effective language learning materials are rarely part of teacher training, and are mostly learnt by trial and error.
Knowledge and skills frameworks, generally called competency frameworks, for ELT teachers, trainers and managers have existed for a few years now. However, until I created one for my MA dissertation, there wasn’t one drawing together what we need to know and do to be able to effectively produce language learning materials.
This webinar will introduce you to my framework, highlighting the key competencies I identified from my research. It will also show how anybody involved in language teaching (any language, not just English!), teacher training, managing schools or developing language learning materials can benefit from using the framework.
Biological screening of herbal drugs: Introduction and Need for
Phyto-Pharmacological Screening, New Strategies for evaluating
Natural Products, In vitro evaluation techniques for Antioxidants, Antimicrobial and Anticancer drugs. In vivo evaluation techniques
for Anti-inflammatory, Antiulcer, Anticancer, Wound healing, Antidiabetic, Hepatoprotective, Cardio protective, Diuretics and
Antifertility, Toxicity studies as per OECD guidelines
19. Description
To create the Skyline you need to create a rectangle. Select the colour and then rasterize
the layer to begin applying effects/filters.
20. Description
In the example, I added “noise” under the “filter” menu. You might choose to add different
effects.
22. Description
To place the Masthead over the Skyline you need to change the order of your layers. The
layer at the top of the layer window will also be the top layer on your canvas.
23. Description
Place additional text in the Skyline and under the “fx” menu add a drop shadow to give the
text greater depth and visibility.
24. Description
Note how the text for Greenday and Franz Ferdinand have different tracking (the space
between letters) to ensure it fits and makes use of the space.
25.
26. Description
The black puff was made using the shape tool and the text added using the text tool. Again, pay
attention to tracking and leading – the best marks are in the detail!
Link layers together by holding down the shift key to select the layers you wish to link (right click to
link).This will enable you to move them as one image but leave them editable.
Shape
Text
Select layers
to link and
right click.
27. Description
To change the size of an object, select the layer and edit “free transform” the image. Holding
down the shift key will keep the object’s proportions.
28.
29. Description
Open an image that you have taken (in this case, one I have copied from the internet).
Remember, your magazine images need to represent a range of genders, use a range of
angles and compositional elements, props and some live shots would be brilliant.
Your image will open in a new window which you should edit it in before transferring the
edited image over onto the canvas you are creating your magazine on.
33. Description
Use the eraser tool to and the zoom tool to remove any unwanted parts of the image - you
might have forgotten to delete something or want to refine the edges.
41. Description
Using the shape tool, draw a white box over the cover line and in the layers menu place the
white box under the text.
42. Description
Instead of recreating these steps each time, select both of the layers in the layers menu and
right click to duplicate/copy the layers.
43. Description
When you have finished making your cover lines, select them all and right click to link them
together. You can then move them as one image but edit them if you need to.
44.
45. Description
To add a footer/ sell line draw the rectangle shape across the bottom. I gave this one greater
definition by adding a white outer glow. I also transformed it so it was slanted.
46.
47. Description
In a new window, copy and paste a barcode from the internet. Add a white rectangle and
reorganise the layers, then add text and merge all.