SlideShare a Scribd company logo
1 of 8
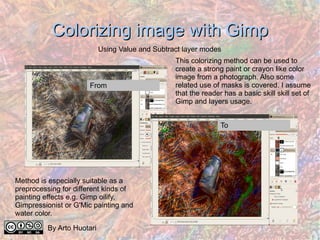
Colorizing image with Gimp From To This colorizing method can be used to create a strong paint or crayon like color image from a photograph. Also some related use of masks is covered. I assume that the reader has a basic skill skill set of Gimp and layers usage. Method is especially suitable as a preprocessing for different kinds of painting effects e.g. Gimp oilify, Gimpressionist or G'Mic painting and water color.  Using Value and Subtract layer modes By Arto Huotari
Step 1: Base image Select and prepare your base image any photo can be used. In the example base image has been a HDR image with some manipulations and filtering. A recommended minimum preprocessing is Selective Gaussian blur
Step 2: Add Value layer Add a white layer on top of the image layer and set the layer mode to Value. Copy visible pixels using Ctrl+Shit+C. Note that this step may show practically white before the colors are adjusted.
Step 3: Adjust colors . Paste clipboard as new layer and adjust levels either using curves or levels (Colors menu, Levels or Curves). Note that neither probably shows nothing by default. Only individual color channels are likely to show meaningful histogram after you change the mode of the histogram to logarithmic. This step can be skipped but is useful in most cases to asses that there is actually some colors other than pure white in the layer.  3
Step 4: Add Subtract layer . Duplicate the layer corresponding to 1 one (original image) move it on top of stack to position 2. Duplicate layer corresponding to 3 and move it on top of the stack to position 4. Invert colors of 4 and change the layer mode to Subtract. After that use Colors -> Curves to adjust color balance to desired. If you want to apply the effect only partially then apply a white mask to the layer and color regions with black correspondingly 1 2 4 3
Final image .
Other examples .
Thank You If you liked this visit my  Flickr page .

More Related Content

What's hot

1291 fa13 assign3_layered_drawings
1291 fa13 assign3_layered_drawings1291 fa13 assign3_layered_drawings
1291 fa13 assign3_layered_drawingsNYCCTfab
 
Paths, Masks And Blend Modes
Paths, Masks And Blend ModesPaths, Masks And Blend Modes
Paths, Masks And Blend ModesShan
 
Screenshot analysis
Screenshot analysisScreenshot analysis
Screenshot analysisJenniferEse
 
The 8 Basic Steps Elements 6
The 8 Basic Steps  Elements 6The 8 Basic Steps  Elements 6
The 8 Basic Steps Elements 6joelk
 
HDR Effect Presentation
HDR Effect PresentationHDR Effect Presentation
HDR Effect Presentationmathewcompton
 
Production process of film poster
Production process of film posterProduction process of film poster
Production process of film posterEmzzino
 
Fajardo, winfreya m. 11 caritas, abm
Fajardo, winfreya m. 11  caritas, abmFajardo, winfreya m. 11  caritas, abm
Fajardo, winfreya m. 11 caritas, abmshanneprincesspanamb
 
Cut out image with hard hair mask
Cut out image with hard hair maskCut out image with hard hair mask
Cut out image with hard hair masksujon hasan
 
Playing with timeline in photoshop cs6
Playing with timeline in photoshop cs6Playing with timeline in photoshop cs6
Playing with timeline in photoshop cs6baljaadsg
 
How to Create a Comic Style Photo Effect in Photoshop
How to Create a Comic Style Photo Effect in PhotoshopHow to Create a Comic Style Photo Effect in Photoshop
How to Create a Comic Style Photo Effect in PhotoshopMetrodesk
 
3 d polaroid effect
3 d polaroid effect3 d polaroid effect
3 d polaroid effectsyncmaster92
 
Photoshop for Art/Design
Photoshop for Art/DesignPhotoshop for Art/Design
Photoshop for Art/DesignHeather Cole
 
Annatation 3
Annatation 3Annatation 3
Annatation 3Leh98
 

What's hot (20)

Edgy Colors
Edgy ColorsEdgy Colors
Edgy Colors
 
1291 fa13 assign3_layered_drawings
1291 fa13 assign3_layered_drawings1291 fa13 assign3_layered_drawings
1291 fa13 assign3_layered_drawings
 
Paths, Masks And Blend Modes
Paths, Masks And Blend ModesPaths, Masks And Blend Modes
Paths, Masks And Blend Modes
 
Screenshot analysis
Screenshot analysisScreenshot analysis
Screenshot analysis
 
The 8 Basic Steps Elements 6
The 8 Basic Steps  Elements 6The 8 Basic Steps  Elements 6
The 8 Basic Steps Elements 6
 
HDR Effect Presentation
HDR Effect PresentationHDR Effect Presentation
HDR Effect Presentation
 
Production process of film poster
Production process of film posterProduction process of film poster
Production process of film poster
 
Fajardo, winfreya m. 11 caritas, abm
Fajardo, winfreya m. 11  caritas, abmFajardo, winfreya m. 11  caritas, abm
Fajardo, winfreya m. 11 caritas, abm
 
Cut out image with hard hair mask
Cut out image with hard hair maskCut out image with hard hair mask
Cut out image with hard hair mask
 
Playing with timeline in photoshop cs6
Playing with timeline in photoshop cs6Playing with timeline in photoshop cs6
Playing with timeline in photoshop cs6
 
How to Create a Comic Style Photo Effect in Photoshop
How to Create a Comic Style Photo Effect in PhotoshopHow to Create a Comic Style Photo Effect in Photoshop
How to Create a Comic Style Photo Effect in Photoshop
 
3 d effect
3 d effect3 d effect
3 d effect
 
3 d effect
3 d effect3 d effect
3 d effect
 
GIMP BASICS by Aedam Ampongan
GIMP BASICS by Aedam AmponganGIMP BASICS by Aedam Ampongan
GIMP BASICS by Aedam Ampongan
 
3 d polaroid effect
3 d polaroid effect3 d polaroid effect
3 d polaroid effect
 
Low mo tutorial
Low mo tutorialLow mo tutorial
Low mo tutorial
 
Photoshop for Art/Design
Photoshop for Art/DesignPhotoshop for Art/Design
Photoshop for Art/Design
 
Pop Art Technique
Pop Art TechniquePop Art Technique
Pop Art Technique
 
Chapter09
Chapter09Chapter09
Chapter09
 
Annatation 3
Annatation 3Annatation 3
Annatation 3
 

Similar to Colorizing image with Gimp

Photohsop movie 06
Photohsop movie 06Photohsop movie 06
Photohsop movie 06Ngoc Dep
 
G'MIG water color filter tutorial
G'MIG water color filter tutorial G'MIG water color filter tutorial
G'MIG water color filter tutorial Arto Huotari
 
The 8 Basic Steps Elements 6
The 8 Basic Steps  Elements 6The 8 Basic Steps  Elements 6
The 8 Basic Steps Elements 6joelk
 
How to copy a layer style in photoshop
How to copy a layer style in photoshopHow to copy a layer style in photoshop
How to copy a layer style in photoshopSibghatullah Khattak
 
Productive Meetings
Productive MeetingsProductive Meetings
Productive Meetings3rdpta
 
Photo Manipulation Tutorial (Step by Step Process)
Photo Manipulation Tutorial (Step by Step Process)Photo Manipulation Tutorial (Step by Step Process)
Photo Manipulation Tutorial (Step by Step Process)Overnight Graphics
 
Non Destructive Color Correction
Non Destructive Color CorrectionNon Destructive Color Correction
Non Destructive Color CorrectionAnn Elliott
 
Applying color effect in photoshop
Applying color effect in photoshopApplying color effect in photoshop
Applying color effect in photoshopsujon hasan
 
Steps to work_on_photoshop[1]
Steps to work_on_photoshop[1]Steps to work_on_photoshop[1]
Steps to work_on_photoshop[1]Fabio Lopez
 
Steps to work_on_photoshop[1]
Steps to work_on_photoshop[1]Steps to work_on_photoshop[1]
Steps to work_on_photoshop[1]Fabio Lopez
 
Abstract Halloween Tutorial
Abstract Halloween TutorialAbstract Halloween Tutorial
Abstract Halloween Tutorialstephonsimeon
 
Create a Photo Collage in Photoshop.pdf
Create a Photo Collage in Photoshop.pdfCreate a Photo Collage in Photoshop.pdf
Create a Photo Collage in Photoshop.pdfPinkverge
 
How to Sharpen an Image in Photoshop
How to Sharpen an Image in PhotoshopHow to Sharpen an Image in Photoshop
How to Sharpen an Image in PhotoshopZenith Clipping
 
DAY2_SUPERHERO.pptx
DAY2_SUPERHERO.pptxDAY2_SUPERHERO.pptx
DAY2_SUPERHERO.pptxPoddarWorks
 
Editing with PIXLR
Editing with PIXLREditing with PIXLR
Editing with PIXLRAnna Polud
 
Photoshop Workshop 1 - Fall 2012
Photoshop Workshop 1 - Fall 2012Photoshop Workshop 1 - Fall 2012
Photoshop Workshop 1 - Fall 2012Jeff Zhan
 
Photoshop tips online class version 2015
Photoshop tips online class version 2015Photoshop tips online class version 2015
Photoshop tips online class version 2015arteachertech
 

Similar to Colorizing image with Gimp (20)

Photohsop movie 06
Photohsop movie 06Photohsop movie 06
Photohsop movie 06
 
G'MIG water color filter tutorial
G'MIG water color filter tutorial G'MIG water color filter tutorial
G'MIG water color filter tutorial
 
The 8 Basic Steps Elements 6
The 8 Basic Steps  Elements 6The 8 Basic Steps  Elements 6
The 8 Basic Steps Elements 6
 
Concept
ConceptConcept
Concept
 
How to copy a layer style in photoshop
How to copy a layer style in photoshopHow to copy a layer style in photoshop
How to copy a layer style in photoshop
 
Productive Meetings
Productive MeetingsProductive Meetings
Productive Meetings
 
Writing de materials1
Writing de materials1Writing de materials1
Writing de materials1
 
Photo Manipulation Tutorial (Step by Step Process)
Photo Manipulation Tutorial (Step by Step Process)Photo Manipulation Tutorial (Step by Step Process)
Photo Manipulation Tutorial (Step by Step Process)
 
Non Destructive Color Correction
Non Destructive Color CorrectionNon Destructive Color Correction
Non Destructive Color Correction
 
Applying color effect in photoshop
Applying color effect in photoshopApplying color effect in photoshop
Applying color effect in photoshop
 
Steps to work_on_photoshop[1]
Steps to work_on_photoshop[1]Steps to work_on_photoshop[1]
Steps to work_on_photoshop[1]
 
Steps to work_on_photoshop[1]
Steps to work_on_photoshop[1]Steps to work_on_photoshop[1]
Steps to work_on_photoshop[1]
 
Abstract Halloween Tutorial
Abstract Halloween TutorialAbstract Halloween Tutorial
Abstract Halloween Tutorial
 
Create a Photo Collage in Photoshop.pdf
Create a Photo Collage in Photoshop.pdfCreate a Photo Collage in Photoshop.pdf
Create a Photo Collage in Photoshop.pdf
 
How to Sharpen an Image in Photoshop
How to Sharpen an Image in PhotoshopHow to Sharpen an Image in Photoshop
How to Sharpen an Image in Photoshop
 
DAY2_SUPERHERO.pptx
DAY2_SUPERHERO.pptxDAY2_SUPERHERO.pptx
DAY2_SUPERHERO.pptx
 
Coke can tutorial
Coke can tutorialCoke can tutorial
Coke can tutorial
 
Editing with PIXLR
Editing with PIXLREditing with PIXLR
Editing with PIXLR
 
Photoshop Workshop 1 - Fall 2012
Photoshop Workshop 1 - Fall 2012Photoshop Workshop 1 - Fall 2012
Photoshop Workshop 1 - Fall 2012
 
Photoshop tips online class version 2015
Photoshop tips online class version 2015Photoshop tips online class version 2015
Photoshop tips online class version 2015
 

Colorizing image with Gimp

  • 1. Colorizing image with Gimp From To This colorizing method can be used to create a strong paint or crayon like color image from a photograph. Also some related use of masks is covered. I assume that the reader has a basic skill skill set of Gimp and layers usage. Method is especially suitable as a preprocessing for different kinds of painting effects e.g. Gimp oilify, Gimpressionist or G'Mic painting and water color. Using Value and Subtract layer modes By Arto Huotari
  • 2. Step 1: Base image Select and prepare your base image any photo can be used. In the example base image has been a HDR image with some manipulations and filtering. A recommended minimum preprocessing is Selective Gaussian blur
  • 3. Step 2: Add Value layer Add a white layer on top of the image layer and set the layer mode to Value. Copy visible pixels using Ctrl+Shit+C. Note that this step may show practically white before the colors are adjusted.
  • 4. Step 3: Adjust colors . Paste clipboard as new layer and adjust levels either using curves or levels (Colors menu, Levels or Curves). Note that neither probably shows nothing by default. Only individual color channels are likely to show meaningful histogram after you change the mode of the histogram to logarithmic. This step can be skipped but is useful in most cases to asses that there is actually some colors other than pure white in the layer. 3
  • 5. Step 4: Add Subtract layer . Duplicate the layer corresponding to 1 one (original image) move it on top of stack to position 2. Duplicate layer corresponding to 3 and move it on top of the stack to position 4. Invert colors of 4 and change the layer mode to Subtract. After that use Colors -> Curves to adjust color balance to desired. If you want to apply the effect only partially then apply a white mask to the layer and color regions with black correspondingly 1 2 4 3
  • 8. Thank You If you liked this visit my Flickr page .